LG A7150: Messages
Messages: LG A7150

Messages
Create new massage
Menu 5.1
A7150 telephones allow you to write short text messages which can be
linked to create messages containing up to approx. 1530 characters (a
standard text message contains a maximum of 160 characters),
corresponding to 10 pages. EMS (Enhanced Messaging Service) can also
be used to attach icons, sounds and simple animation to the message. In
particular this telephone model supports EMS 5.0 which allows you to
send and receive colour graphics and to customise the text message layout
and font. If the message recipient’s phone does not support this version,
he/she will receive the compatible features only and receipt of the written
message is normally guaranteed.
The length of an enhanced or long message can be checked while writing
using the indicators found to the top left of the screen. The first number
refers to the number of characters left to complete the individual text
message while the second shows the number of messages written. The cost
of a long message depends on the number of short text messages linked
together. All the available options for writing short messages are shown
below.
Text (Menu 5.2.1)
You can write and edit text message, checking the number of message pages.
1. Enter the Messages menu by pressing the left soft key [Select].
2. If you want to write a new message, select Create new message.
3. To make text input easier, use T9.
4. Press [Insert] to attach the followings.
5. If you want to set option for your text, or to finish your writing, press the
left soft key [Options].
nn
Note
The phone which supports EMS release 5 is available to send colour pictures,
sounds, text styles, etc.. The other party may not receive pictures, sounds or
text styles you sent properly if the phone does not support such options.
57

Messages
Insert
] Symbol: You can add special characters.
] Graphic: You can insert the Default graphics or graphics in My pictures
that are available for short messages.
] Sound: You can insert sounds that are available for short messages.
] Text templates: You can use Text templates already set in the phone.
] Phonebook: You can add phone numbers or e-mail addresses in address
book.
] Business card: You can add your Business card to the message.
Options
] Send To: Sends text messages.
1. Enter numbers of recipient.
2. Press key to add more recipients.
3. You can add phone numbers in the address book.
4. Press the left soft key after entering numbers.
] Save to drafts: Stores messages in Drafts.
] Font: You can select Size and Style of fonts.
] Colour: You can select Colour of foreground and background.
] Alignment: You can make the message contents aligned Left, Center
or Right.
] Add T9 dictionary: You can add your own word. This menu can be
shown only when edit mode is Predictive (T9Abc/T9abc/T9ABC).
] T9 language: Select a T9 input mode.
] Exit:
If you press Exit while writing a message, you can end the writing
message and back to the Message menu. The message you have written
is not saved.
58

Messages
Multimedia (Menu 5.1.2)
A multimedia message may contain text, pictures and sounds. This feature can
only be used if supported by your network operator or service provider. Only
handsets offering features that are compatible with multimedia messaging or
emails can receive and send multimedia messages. Multimedia messages can
be formed of a maximum of 10 slides which do not exceed 100 KB.
1. Enter the Message menu by pressing the left soft key [Select].
2. If you want to write a new message, select Write multimedia message.
3. You can create a new message or choose one of the multimedia message
templates already made.
4. Press Insert to add Symbol, Graphic, Photo, Sound, Video, New Slide,
Text templates, address book or Business card.
] Symbol: You can add special characters. Note: the list of symbols can
be accessed while writing messages by pressing the ‘ * ’ key.
] Graphic: Attach predefined pictures and pictures downloaded from
WAP to your multimedia message.
] Photo: Attach a photo taken with the built-in camera to your multimedia
message.
] Take photo: Set the camera to take a photo to attach to your multimedia
message.
] Sound: Attach a predefined audio file or a file downloaded from WAP
to your multimedia message.
] New sound: Set record voice to save a new audio file to attach to your
multimedia message.
] Video: Attach a video recorded using the built-in video camera to your
multimedia message. Videos recorded in MMS Video mode (see [Menu
6-2]) can be attached.
] New video: Record a new video to attach to your multimedia message.
59

Messages
] New slide: A multimedia message can be formed of several pages which
are viewed according to preset time intervals just like the frames of a
film. This menu can be used to add a page – Next or Previous –to the
multimedia message you are composing. New sounds and pictures can
be entered into each page (one per page) in the standard manner.
] Text templates: Preset text templates may be used to speed up writing
of multimedia messages. Consult the Templates section [Menu 5-9] for
more information.
] Phonebook: Allows you to add telephone number or email addresses to
your multimedia message by taking them from the Address book.
] Business Card: Your own personal information can be added to
messages if entered and saved previously [Menu 5-9-3].
Options
] Send to: You can send multimedia messages to multiple recipients,
prioritise your message, and make it send later as well.
] Preview: You can preview multimedia messages you wrote.
] Save: You can save multimedia messages To drafts or As template.
] Edit Subject: Modifies multimedia messages you chose.
] Move to: You can move to previous or next slide.
] Delete slide: You can delete current slides.
] Set slide format: Sets the format of the current page by editing the
following options.
* Set timer: Set the timer for the frames forming the multimedia message
and for individual components such as text, sounds and pictures. The
start and finish time can be set for each of these components to allow you
to put together the message in the way you want.
nn
Note Try to put together your multimedia message and see the result by
selecting Preview!
60
Messages
* Swap text and photo: Inverts the order of the text and picture in the
current page. This option is only available if the message contains
photos.
] Add T9 dictionary: Use this option to add a word to the dictionary
when the word you want is not available. After entering a word, press
the left soft key [Save]. This menu is only shown when the input mode
is predictive (T9Abc / T9abc / T9ABC).
] T9 language: Allows you to select the T9 dictionary language or disable
the T9 input mode by selecting T9 off. For more information about the
T9 mode, see pages 32.
] Exit: You can back to the Message menu.
nn
Note If you select the photo (15K) on writing multimedia message, loading
duration will take around 5 seconds at least. Furthermore, you can’t
activate any key during loading time. After 5 seconds, it is available to
write multimedia message.
Inbox
Menu 5.2
You will be alerted when you have received messages. They will be stored
in Inbox.
In Inbox, you can identify each message by icons. For detail, see the icon
directive.
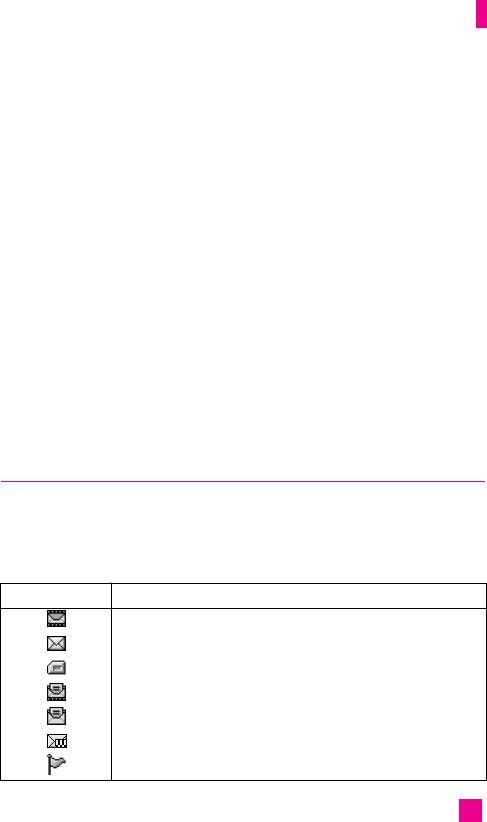
Icon Icon directive
Multimedia message
Short message
SIM message
Read multimedia message
Read text message
Push message
Notified multimedia message
61

Messages
If the phone shows ‘No space for SIM message’, you have to delete only
SIM messages from Inbox. If the phone displays ‘No space for message’,
you can make space of each repository as deleting messages, media and
applications.
Instead, when the telephone’s internal memory is full, the message
“Message memory full” is shown. In the same way you must delete some
messages in order to save others.
When notification of multimedia messages is received, these messages
must be downloaded from the server. See (Menu 5.0.2) for information
about telephone configuration.
To read a message, select the message and press [OK]. The following
menu can be accessed by pressing the key [Options]:
] View: You can view the received messages.
] Delete: You can delete the current message.
] Reply: You can reply to the sender.
] Forward: You can forward the selected message to another party.
] Return call: You can call back to the sender.
] View information: Lists information related to the message shown such
as sender’s address, subject, time and day of the message, message type
and size.
] Delete all read messages: Deletes all read messages.
] Delete all: Deletes all messages.
62

Messages
* Specific MMS options
] Repeat: Allows you to repeat reproduction of the selected multimedia
message.
] Receive: (for multimedia message notification only). Multimedia
messages, unlike text messages, must be downloaded from the server
automatically or manually (see (Menu 5.0.2.5)). The network initially
sends multimedia message notification: If the Auto Download option
(Menu 5.0.2.5) is off or an error has occurred, receipt must be confirmed
by selecting [Receive]. If the Auto Download option is on, the message
is automatically downloaded after receipt of notification.
] Cancel: Interrupts multimedia message download (only when
multimedia messages are being received).
* Specific download message options
] Information: Shows the content of download messages.
] Load: Launches the WAP connection to the URL contained in the
download message. The telephone must be configured for WAP services
(Menu 4.1.4) to use download messages
63
Messages
Outbox
Menu 5.3
You can see sent and unsent messages here. For sent message, you can see
the delivery status.
The browsing is same as that for the inbox message.
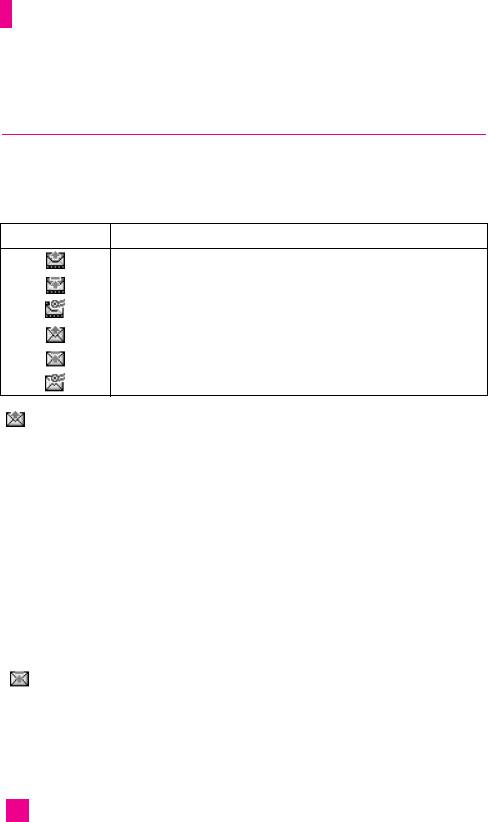
Icon Icon directive
MMS Sent
MMS Unsent
MMS delivery confirmed
SMS sent
SMS unsent
SMS Delivery confirmed
Messages sent correctly feature the following options.
] View: Shows the selected message.
] Delete: Deletes the selected message from the Sent folder.
] Edit: Modifies message you chose
] Send : Allows you to send the message again
] View information: Allows you to view information about the sent
message such as sender’s address, attachments (for multimedia
messages only), date and time of message transmission, message type
and size.
] Delete all: Deletes all messages in the Sent folder.
Messages being sent feature the following icons.
64

Messages
Drafts
Menu 5.4
You can view the messages saved as a draft. The draft messages are listed
with the date and time when they were saved.
The following options are available.
] View: Shows the selected message.
] Delete: Deletes the message you choose.
] Edit: Modifies the massage you choose.
] View information: To view the information of the message.
] Delete all: Deletes all of the messages in the folder.
Voice mail
Menu 5.5
This menu provides you with a quick way of accessing your voice mailbox
(if provided by your network).
Before using this feature, you must enter the voice server number obtained
from your network operator.
When new voice message is received, the symbol will be displayed on the
screen. Please check with your network provider for details of their service
in order to configure the handset correctly.
Listen to voice mail(Menu 5.7.1)
Once this option has been selected, simply press the left soft key [OK] to
listen to voice messages. You can also hold down the [1] key in standby
mode to listen to voice mail.
Voice mailbox number (Menu 5.7.2)
You can input and set the voice mailbox number.
The following submenus are available:
65

Messages
] Home: Enter the message answering number to be used when on the
national network.
] Roaming: Enter the message answering number to be used when in
international roaming mode.
Info. message
Menu 5.6
(Dependent to network and subscription).
Info service messages are text messages delivered by the network to GSM.
They provide general information such as weather reports, traffic news,
taxis, pharmacies, and stock prices. Each type of information has the
number; therefore, you can contact service provider as long as you have
input the certain number for the information. When you have received an
info service message, you can see the popup message to show you that you
have received a message or the info service message is directly displayed.
To view the message again or not in standby mode, follow the sequence
shown below;
nn
Note
Enablement of info messages may cause a reduction in the duration of
the battery in stand-by mode.
Read (Menu 5.6.1)
1. When you have received an info service message and select Read to
view the message, it will be displayed on the screen. You can read
another message by scrolling , or [Next].
2. The message will be shown until another message is reached.
Topics (Menu 5.6.2)
(Dependent to network and subscription).
] Add new: You can add Info service message numbers in the Phone
memory with its nickname.
66

Messages
] View list: You can see Info service message numbers which you added.
If you press [Options], you can edit and delete info message
category which you added.
] Active list: You can select info service message numbers in the active
list. if you activate an info service number, you can receive messages
sent from the number.
Templates
Menu 5.7
Templates are preset messages used to speed up the writing of common
messages. The available templates and options are listed below.
Text (Menu 5.7.1)
Some text templates are available for which the following options can be
accessed.
] View: Shows selected template.
] Delete: Deletes selected template.
] Add new: Allows you to create a new template.
] Send via: Allows you to send selected template via SMS or MMS.
] Edit: Edits selected template.
] Delete all: Deletes all text templates.
Multimedia (Menu 5.7.2)
You can use the following options.
] View: You can see multimedia templates.
] Delete: You can delete multimedia templates.
] Add new: Allows you to add new multimedia templates.
] Send via multimedia message: You can write and send multimedia
messages.
67

Messages
] Edit: You can edit multimedia templates.
] Delete all: Allows you to delete all multimedia messages.
Business card (Menu 5.7.3)
This option allows you to create your own business card featuring Name, 4
numbers and an email address. To create a new business card, press the left
soft key [Add] and enter the information into the fields. If a business card
is already available, the following menu can be accessed by pressing the
left soft key [Options]:
] Edit: Edits business card.
] Send via: Allows you to send business card via SMS or MMS.
] Delete: Deletes business card.
Settings
Menu 5.8
Text messages (Menu 5.8.1)
This menu allows you to configure preset information of text messages.
] Message centre number: If you want to send the text message, you can
receive the address of SMS centre through this menu.
] Message types:
Text, Voice, Fax, Natl. Paging, X.400, E-mail, ERMES
Usually, the type of message is set to Text. You can convert your text
into alternative formats. Contact your service provider for the
availability of this function.
] Validity period: This network service allows you to set how long your
text messages will be stored at the message centre.
] Delivery report: If you set to Yes, you can check whether your message
is sent successfully.
] Reply via same message centre: When a message is sent, it allows the
recipients to reply and charge the cost of the reply to your telephone bill.
68

Messages
Multimedia messages (Menu 5.8.2)
Use this menu to configure preset information of multimedia messages.
] Priority: You can set the priority of the message you choose.
] Message subject: You can enter multimedia messages subject when this
menu is on.
] Validity period: This network service allows you to set how long your
text messages will be stored at the message centre.
] Delivery report: If it is set to Yes in this menu, you can check whether
your message is sent successfully.
] Auto download
• Always on: Multimedia messages are automatically downloaded upon
receipt of notification if this option is selected.
• Manual: The telephone asks whether or not to go ahead with the download
when notification of a new multimedia message is received.
• Home network only: Messages are only downloaded automatically when
with your own operator if this option is selected. If in roaming mode,
confirmation will be requested if you wish to download the message.
• Off: Notification only will be received if this option is selected.
] Access point: A data connection via data call (CSD) using the GPRS or
the even faster EDGE service (see the Internet section for more
information about EDGE) is needed to download multimedia messages
from the server. Up to 5 connection profiles can be set for multimedia
messages.
The following menu can be accessed by pressing the left soft key
[Options] on the profile of your choice:
• Activate: Enable the selected profile and makes it ready for use.
• Settings: Enter the MMS server connection data provided by your operator
or service provider.
- Homepage
Set the multimedia message service centre (MMSC).
69

Messages
- Bearer
Data
GPRS
- Data settings
This is only shown if you select Data as the connection service.
IP address: Enter the multimedia service centre IP.
Dial number: Enter the telephone number to be used for the
connection.
User id: User id for own server connection (NOT WAP gateway
user ID).
Password: Password requested by own server connection (NOT by
WAP gateway) for identification purposes.
Call type: Select the type of data call – analogical or digital (ISDN).
Call speed: Set the connection speed for data - 9600 or 14400.
Linger time: Set the length of time after which the phone must
disconnect itself if no data have been transferred.
- GPRS setting
This menu is only shown if you select GPRS as the connection
service.
IP address: Enter the multimedia service centre IP.
APN: Enter the APN (Access Point Name) of the GPRS.
User id: Enter User id for server connection.
Password: Enter the password requested by the server.
- Connection type
Select whether the connection must be Permanent or Temporary.
- Secure settings
Decide whether or not the telephone must have a secure connection.
70

Messages
• Rename: Changes the name of the selected profile.
] Permitted message types
• Personal: Personal message.
•
Advertisements
: Commercial message.
• Information: Necessary information.
Download messages (Menu 5.8.3)
You can order push messages from WAP service providers. Push messages
are notifications of, for example, news headlines and they can contain a
text message or the address of a WAP service. For availability and
subscription, contact your WAP service provider.
nn
Note
Service providers can update an existing push message with a new
incoming push message. (Old one will be replaced with new one.)
When push messages expire, they are deleted automatically.
] Service: You can set on/off the reception of the push messages.
] Automatic download: If you set on, reception of a new push message
starts the connection to WAP atomatically.
Icon Description
Read Push Message
Unread Push Message
After selecting a push message, the following menus are available.
• Information: Shows the information of the current push message.
• Load: Connects to a specific site using the information in the current push
message.
• Delete: Deletes the current push message.
• Delete all read messages: Deletes all read messages.
• Delete All: Deletes all the messages in inbox (including SMS, MMS, etc.)
71

Messages
Info. message (Menu 5.8.4)
] Receive
Yes
If you select this menu, your phone will receive Info service messages.
No
If you select this menu, your phone will not receive Info service
messages any more.
] Alert
Yes
Your phone will beep when you have received Info service message
numbers.
No
Your phone will not beep even though you have received info service
messages.
] Languages
You can select the language you want by pressing [On/Off]. Then, the
info service message will be shown in the language that you selected.
Memory status
Menu 5.9
You can check free space and memory usage of each repository, SIM
memory. You can go to each repository menu.
72
Оглавление
- é„·‚ÎÂÌËÂ
- ǂ‰ÂÌËÂ
- LJ¯ ÚÂÎÂÙÓÌ
- éÒÌÓ‚Ì˚ ÙÛÌ͈ËË
- CxeÏa ÏeÌ˛
- ÜÛ̇ΠÁ‚ÓÌÍÓ‚
- åÓfl Ô‡Ô͇
- à„˚ Ë èËÎÓÊÂÌËfl
- ë‚ËÒ˚ Ë WAP
- ëÓÓ·˘ÂÌËfl
- ä‡Ï‡
- ÄÍÒÂÒÒÛ‡˚
- äÓÌÚ‡ÍÚ˚
- ç‡ÒÚÓÈÍË
- ÄÍÒÂÒÒÛ‡˚
- Memo
- Table of Contents
- Introduction
- Guidelines for safe and efficient use
- Your Phone
- Getting Started
- General Functions
- Selecting Functions and Options
- In-Call Menu
- Menu Tree
- Call history
- My folder
- Games & Apps
- Services & WAP
- Messages
- Camera/Video
- Tools
- Contact
- Settings
- Q&A
- Accessories
- Memo
