LG Optimus Me P350 Black: LG-P350LG-P350 Quick Reference Guide - English
LG-P350LG-P350 Quick Reference Guide - English: LG Optimus Me P350 Black
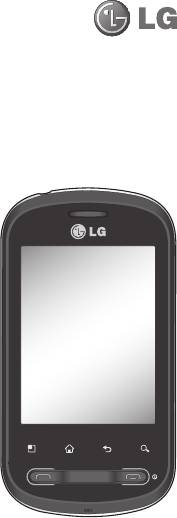
LG-P350LG-P350
Quick Reference Guide - English
This guide will help you understand your new mobile phone.
It will provide you with useful explanations of features on your phone.
• Some of the contents of this manual
may not apply to your phone
depending on your phone’s software or
your service provider.
• This handset is not recommended for
the visually impaired because of its
touch-screen keypad.
• Copyright ©2011 LG Electronics, Inc.
All rights reserved. LG and the LG
logo are registered trademarks of LG
Group and its related entities. All other
trademarks are the property of their
respective owners.
• Google™, Google Maps™, Google
Mail™, YouTube™, Google Talk™ and
Android Market™ are trademarks of
Google, Inc.
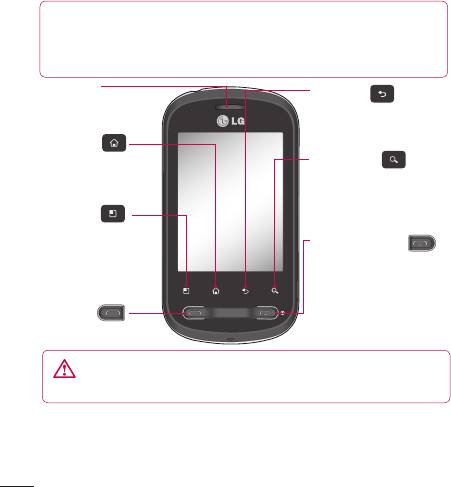
Getting to know your phone
To turn the phone on, press and hold the Power key for 3 seconds.
To turn the phone off, press the Power key for 3 seconds and touch Power Off.
TIP! When screen is locked
1. Drag your finger from left to right to unlock the screen.
2. To turn the phone off, press the Power key for 3 seconds and touch
Power Off.
Earpiece
Back key
- Returns to the previous
screen.
Home key
- Returns to the
Search key
home screen from
- Search the web and
any screen.
contents in your
Menu key
phone.
- Check what
Power/Lock key
options are
- Powers your phone
available.
on/off by pressing and
holding the key.
Send key
- Turns the screen off
and locks the phone.
WARNING:
Placing a heavy object on the phone or sitting on it
can damage its LCD and touch-screen functionalities.
Tip! Press Menu key whenever you tap an application to check what options
are available.
Tip! LG-P350 does not support video call.
Tip! If LG-P350 has errors when you use it or you cannot turn it on, remove
battery, install it again and turn it on after 5 seconds.
2
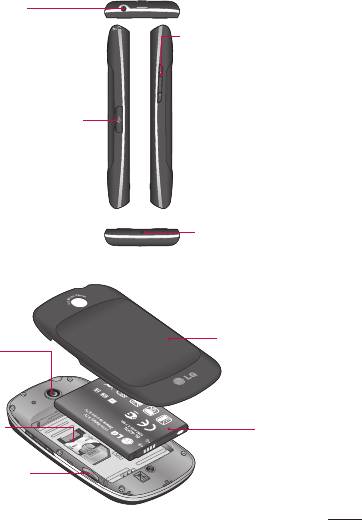
Stereo earphone
connector
Volume keys
- On the home screen:
controls ringer
volume.
Charger, micro USB cable
- During a call: controls
connector
your earpiece volume.
- When playing a track:
controls volume
continuously.
Microphone
Back cover
Camera lens
SIM card slot
Battery
micro SD memory
card slot
3
Getting to know your phone
Google Account Set-up
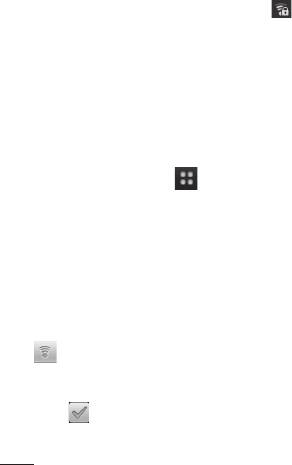
To connect to Wi-Fi
The first time you open the
Choose the Wi-Fi network you
Google application on your
want to connect with. If you
phone, you will be required to
see
, you need to enter a
sign in with your existing Google
password to connect.
account. If you do not have a
TIP!
Google account, you’re prompted
If you are out of the Wi-Fi area
to create one.
and choose 3G connection,
Creating your Google
additional charges may be
account
applied.
1
On the home screen, touch
USB tethering
the
Applications
tab to
You can share your phone's
open the applications menu.
internet connection with your
2
Tap
Gmail
and tap
Next >
computer.
Create
to start the Google
You can tether your phone to
Mail™ set up wizard.
your computer with a USB cable.
Turn on Wi-Fi
Settings
>
Wireless & network
From Home Screen , open
settings
>
Tethering & portable
Notification drawer and touch
hotspot
>
USB tethering
.
on.
For more information regarding
From Menu, choose Settings >
USB tethering, click Help.
Wireless & network settings >
TIP!
Wi-Fi
.
To use USB Tethering, you need
to install PC Suite onto your
PC first.
4

Wi-Fi Tethering
NOTE:
The LG-P350 supports
WEP, WPA/WPA2-PSK and
Use your LG-P350 as a portable
802.1x EAP security. If your
Wi-Fi hotspot.
Wi-Fi service provider or network
Settings
>
Wireless & network
administrator sets encryption for
settings
>
Tethering & portable
network security, fi ll in the key in
hotspot
>
Portable Wi-Fi
the pop-up window. If encryption
hotspot
.
is not set, this pop-up window
will not be shown. You can obtain
TIP!
the key from your Wi-Fi service
If your phone turns into sleep
provider or network administrator.
mode even when it is connected
to Wi-Fi, the Wi-Fi connection will
be disabled automatically. In this
case, if your phone has access
to 3G data, it may be connected
to the 3G network automatically,
and additional charges may be
applied.)
5
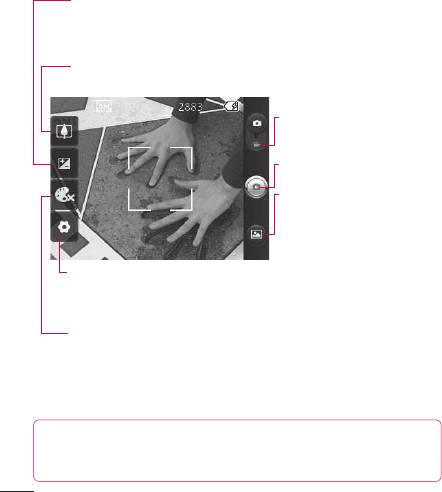
Camera
Getting to know the viewfinder
Brightness
– This defines and controls the amount of sunlight
entering the image. Slide the brightness indicator along the bar,
towards “-” for a lower brightness image, or towards “+” for a higher
brightness image.
Zoom
– Zoom in or zoom out. Alternatively, you can use the side
volume keys.
Video mode
– Slide down
this icon to switch to video
mode.
Taking a photo
Gallery
– This enables you
to access your saved photos
from within the camera
mode. Simply touch, and
your gallery will appear on
the screen.
Settings
– Touch this icon
to open
the settings menu. See
Using the
advanced settings
.
Colour effect
– Choose a colour tone for your new photo.
NOTE:
You need to insert a memory card fi rst to take a picture. Without
inserting a memory card, you will not be able to take a picture or save
the picture you have taken.
6
Video camera
Getting to know the viewfinder
Brightness
– This defines and controls the amount of sunlight
entering the Video. Slide the brightness indicator along the bar,
towards “-” for a lower brightness Video, or towards “+” for a
higher brightness Video.
Zoom
– Zoom in or zoom out. Alternatively, you can use the
side volume keys. Before starting to record a video, you can use
the zoom function. You cannot control the zoom function during
recording.
Camera mode
– Slide
up this icon to switch to
camera mode.
Start recording
Gallery
– This enables
you to access your saved
photos & videos from within
the video camera mode.
Simply touch, and your
Settings
– Touch this icon to
gallery will appear on the
open the settings menu. See
screen.
Using the advanced settings
.
Duration
– Set a duration limit for your video. Choose between
Normal
and
MMS
to limit the maximum size to send as an MMS
message. If you set as an MMS, you can record a 300kb video.
TIP!
When choosing an MMS duration, the Video
size will be set as QCIF and you can shoot longer videos.
7

Important notice
Please check to see if any
2. Optimising Battery Life
problems you have encountered
You can extend your battery's
with your phone are described
life by turning off features that
in this section, before taking the
you don't need to run constantly
phone in for service or calling a
in the background. You can also
service representative.
monitor how applications and
system resources consume
1. Phone memory
battery power.
When available space on your
To extend the life of your
phone memory is less than 10%,
battery
your phone cannot receive a new
message. You need to check your
- Turn off radio communications
phone memory and delete some
that you aren't using. If you
data such as applications or
aren't using Wi-Fi, Bluetooth, or
messages to make more memory
GPS, turn them off.
available.
- Turn down screen brightness
To manage the application
and set a shorter screen
timeout.
1
On the home screen, touch
Applications
tab and select
- Turn off automatic syncing
Settings
>
Applications
>
for Google Mail, Calendar,
Manage applications
.
Contacts, and other
2
When all applications
applications.
appear, scroll and select
- Some applications you’ve
the application you want to
downloaded may cause your
uninstall.
battery’s life to be reduced.
3
Tap
Uninstall
and touch OK to
uninstall the application you
desired.
8
To check the battery charge
3. Installing an Open
level
Source OS
1
On the home screen, touch
If you install an open source
Applications
tab and select
OS on your phone, and do not
Settings
>
About phone >
use the OS provided by the
Status
.
manufacturer, this may cause
2
The battery status (charging,
your phone to malfunction.
discharging) and level (as a
percentage of fully charged)
WARNING:
If you install and
are displayed at the top of the
use an OS other than the one
screen.
provided by the manufacturer,
To monitor and control what
your phone is no longer covered
uses the battery
by the warranty.
1
On the home screen, touch
Applications
tab and select
WARNING:
To protect your
Settings> About phone>
phone and personal data,
Battery use.
download applications only
from trusted sources, such
2
The top of the screen
as Android Market™. If some
displays battery usage time.
applications are not properly
Either how long since last
installed on your phone, your
connected to a power source
phone may not work correctly
or, if connected to a power
or a serious error could occur.
source, how long you were
You will need to uninstall those
last running on battery power.
applications and all of its data
The body of the screen lists
and settings from the phone.
applications or services using
battery power from greatest
amount to least.
9
Important notice
4. Using Unlock pattern
When you can’t recall your
unlock Pattern, PIN, or
Set unlock pattern to secure your
Password:
phone. Opens a set of screens
that guide you through drawing a
If you’ve created a Google
screen unlock pattern.
account on the phone, tap the
On the home screen, touch
Forgot pattern button. Then, you
Applications tab and select
are required to sign in with your
Settings
>
Location & security
Google account to unlock your
>
Set up screen lock
>
Pattern
.
phone If you haven’t created a
Google account on the phone or
Follow the screens to be guided
you forgot it, you need to perform
through drawing a screen unlock
a hard reset.
pattern. Select Next to continue
Caution:
If you perform a hard
to next screen.
reset, all user applications
and user data will be deleted.
WARNING:
Precautions
Please remember to backup any
to take when using the
important data before performing
Pattern Lock. It is very
a hard reset.
important that you remember
the unlock pattern you set.
You have 5 opportunities to
enter your unlock Pattern,
PIN or Password. If you have
used all 5 opportunities, you
may attempt again after 30
seconds.
10

5. Using Safe Mode and
3
When the power turns on,
Hard Reset
release these keys.
Using Safe mode
WARNING
* To recover the phone from any
If you perform a Hard Reset,
malfunction
all user applications and
Turn off your phone and reboot.
user data will be deleted.
While your phone is powering
Please remember to back up
back on, press and hold the
any important data before
Send key while the Android
performing a
Hard Reset
.
Logo is displayed. Your phone
will boot all the way to the
6. Connecting to Wi-Fi
main screen and display "safe
networks
mode" in the lower left-hand
To use Wi-Fi on your phone,
corner.
you access a wireless access
* Using Hard Reset (Factory
point, or “hotspot.” Some access
Reset)
points are open and you can
If it does not restore to its
simply connect to them. Others
original state, use
Hard Reset
to
are hidden or implement other
initialise your phone.
security features, so you must
configure your phone so it can
1
Remove and reinsert the
connect to them.
battery.
Turn off Wi-Fi when you're not
2
Press and hold for over 10
using it, to extend the life of your
seconds:
Power/Lock
key +
battery.
Send
key +
Down Volume
key.
11

Important notice
To turn Wi-Fi on and connect to
7. Using a micro SD card
a Wi-Fi network
Pictures, along with Music and
1
On the home screen, touch
Video files, can only be saved to
Applications
tab and select
external memory.
Settings > Wireless &
Before using the built-in camera,
networks > Wi-Fi settings
.
you need to insert a micro SD
2
Touch
Wi-Fi
to turn it on and
memory card to your phone first.
begin scan for available Wi-Fi
Without inserting a memory
networks.
card, you will not be able to save
- List of available Wi-Fi networks
pictures and video you have
is displayed. Secured networks
taken.
are indicated by a lock icon.
3
Touch a network to connect
WARNING:
to it.
Do not insert or remove
- If the network is open, you
the memory card when the
are prompted to confirm that
phone is on. Otherwise, it may
you want to connect to that
damage the memory card as
well as your phone, and the
network by touching
Connect
.
data stored on the memory
- If the network is secured,
card may be corrupted. To
you're prompted to enter
remove the memory card safely,
a password or other
please select
Home Screen
credentials. (Ask your network
> Applications > Settings >
administrator for details.)
SD card & phone storage >
4
The Status bar displays icons
Unmount SD card
.
that indicate Wi-Fi status.
12

8. Opening and Switching
TIP Getting back to recent
Applications
Apps
Multi-tasking is easy with
- Press and hold Home key,
Android because open
then a screen will display a
applications keep running
list of the applications you
even when you open another
used recently
application. There’s no need
to quit an application before
9.
Copy LG PC Suite from
opening another. Use and
SD Card
switch among several open
The LG PC Suite IV is a program
applications. Android manages
that helps you connect your
each application, stopping and
mobile phone to a PC using
starting them as needed, to
a USB data communication
ensure that idle applications
cable, so that you can use the
don’t consume resources
functions of the mobile phone on
unnecessarily.
your PC.
To stop the application you use
Major Functions of the LG PC
1
On the home screen, touch
Suite IV
Applications
tab and select
• Create, edit and delete phone
Settings
>
Applications
>
data conveniently.
Manage applications >
Running.
• Synchronise data between a
PC and a phone (Contacts,
2
Scroll to the desired
Calendar, Message(SMS),
application and touch
Force
Bookmark, Call log).
stop
to stop using it.
13

Important notice
• Transfer multimedia files
3
Connect your phone through
(photos, videos, music)
USB data cable to your PC.
conveniently with a simple
4
• In the status bar, drag the
drag & drop between a PC and
USB icon.
a phone.
• Choose USB Connected and
• Transfer the messages from a
Turn On USB storage.
phone to a PC.
• You can view the mass
• Use your phone as a Modem.
storage content on your PC
• S/W update without losing
and transfer the files.
your data.
5
• Copy the
‘LGPCSuiteIV’
Installing LG PC Suite from your
folder on your mass storage
micro SD memory card
to your PC.
1
Insert your micro SD memory
• Run ‘LGInstaller.exe’ file
card on your phone. (It may
on your PC and follow the
already be inserted on your
instructions.
phone.)
* When LG PC Suite IV installation
2
Before connecting the USB
is completed, disable
Mass
data cable, make sure that
storage only
mode to run LG PC
the
Mass storage only
mode
Suite IV.
is enabled on your phone.
NOTE:
Please do not remove
(On the applications menu,
or delete other program fi les
choose
Settings > SD card
installed on your memory card.
& phone storage
, then select
This may cause damage to your
Mass storage only
check
preinstalled applications on the
box.)
phone.
14

10.
Connecting your
1
Use the USB cable with
phone to a computer
your phone to connect the
via USB
phone to a USB port on your
computer. You receive a
NOTE:
To synchronise your phone
notification that the USB is
via USB cable with your PC, you
connected.
need to install the LG PC Suite
2
Open the Notification drawer
program on your PC. You can
and touch USB connected.
download this program from
the LG website (www.lg.com).
3
Touch
"Turn On USB storage"
Go to http://www.lg.com and
to confirm that you want to
select your region, country &
transfer files between your
language. Visit LG website for
phone’s micro SD card and
more information. As PC Suite is
the computer.
embedded at inboxed SD card,
When the phone is connected as
you can simply copy it to your PC.
USB storage, you will receive a
LG-P350 does not support:
notification. Your phone’s micro
- PC Connection via Bluetooth
SD card is mounted as a drive
- LG Air Sync (Web Sync, R-
on your computer. You can now
Click)
copy files to and from the micro
- OSP (On Screen Phone)
SD card.
- To-do in Calendar
- Memo
- Java Application
User’s guide for PC Suite IV is in
Help menu after the installation
PC Suite IV.
15

Important notice
11. Unlock screen when
information on the card.
using data connection
1
Safely disconnect the USB
device on your computer.
Your display will go dark if
untouched for a period of time
2
Open the Notification drawer
when using data connection. To
and touch
Turn off USB
turn on your LCD screen, just
storage
.
touch it.
3
Touch
Turn off USB storage
Note:
When uninstalling PC
in the dialog that opens.
Suite IV, USB and Bluetooth
Drivers are not automatically
12.
Hold phone up right
removed. Therefore, they must
Please hold the mobile phone up
be uninstalled manually.
right as a regular phone.
Tip!
To use a micro SD card on
While making/receiving calls or
your phone again, you need to
sending/receiving data, try to
open the Notifi cation drawer and
avoid holding the lower part of
touch "
Turn off USB storage
".
the phone where the antenna is
During this time, you can’t
located. It may affect call quality.
access the micro SD card from
13. When Screen freezes
your phone, so you can’t use
applications that rely on the
If the phone does not respond to
micro SD card, such as Camera,
user input or the screen freezes:
Gallery and Music.
Remove the battery, insert it
To disconnect your phone from
again and turn the phone on.
the computer, carefully follow
If it still does not work, please
your computer’s instructions
contact the service centre.
to disconnect USB devices
correctly, to avoid losing
16

14. Do not connect your
phone when turning
your PC on/off
Make sure to disconnect your
phone and PC via data cable as
your PC might have errors.
17

Before using the mobile phone, please read fi rst!
How to save music/video
- If there is a video file with a
files to the phone
subtitle file (.smi or .srt file with
the same name as the video
Connect your phone to the PC
file), place them in the same
using the USB cable.
folder to display the subtitle
Touch and drag down the status
automatically when playing the
bar on the home screen. Select
video file.
USB connected
>
Turn on USB
- When downloading music or
storage
>
Open folder to view
video files, copyright must
files
.
be secured. Please note that
If you didn't install LG Android
a corrupted file or file with a
Platform Driver on your PC, you
wrong extension may cause
need to set it manually. On the
damage to the phone.
home screen, touch
Applications
tab and select
Settings
>
SD
How to play music/video
card & phone storage
> activate
files to the phone
Mass storage only
.
Playing music files
Save music or video files from
From home screen touch
the PC to the phone's removable
Application
tab >
Music
. Locate
storage.
the file you want to play from
- You may copy or move files
Artist, Albums, Songs, Playlists
from the PC to the phone's
tabs.
removable storage using a card
Playing video files
reader.
From home screen touch
Application
tab >
Video player,
locate the file you want in the list
and select it to play.
18

How to move the
4
If the connection of LG-P350
contacts from the old
phone (using the USB cable)
phone to the current
is detected by LG PC Suite
IV, click "Sync" or "Sync
phone
Contacts" to synchronise the
Export your contacts as a CSV
contacts saved in the PC to
file from your old phone to the
your phone and save them.
PC using a PC sync program.
1
Download LG PC Suite IV at
How to send data from
www.lg.com and install it in
your phone via Bluetooth
the PC. Run the program and
Sending data via Bluetooth:
connect your phone to the PC
You can send data via Bluetooth
using the USB cable.
by running a corresponding
2
Select the
Contacts
icon. Go
application, not from Bluetooth
to
Menu
>
File
>
Import
and
menu, unlike regular mobile
select the CSV file saved in
phones.
the PC.
*
Sending pictures:
Run the
3
If the fields in the imported
Gallery application and select
CSV file are different from the
Picture
>
Menu
. Click
Share
ones in LG PC Suite IV, you
and select
Bluetooth
> Check
need to map the fields. After
If Bluetooth is turned on and
mapping the fields, click OK.
select
Scan for devices
>
Then, the contacts are added
Choose the device you want to
to the PC.
send data from the list.
19

Before using the mobile phone, please read fi rst!
*
Exporting contacts:
Run the
*
Connecting to FTP (Only
Contacts application. Touch
the FTP server is supported
the address you want to export
on this handset):
Select
to. Press
Menu
and Select
"
Settings
" > "
Wireless &
Share
>
Bluetooth
> Check
networks
" > "
Bluetooth
if Bluetooth is turned on and
settings
". Then, select the
select
Scan for devices
>
"
Discoverable
" checkbox
Choose the device you want to
and search for other devices.
send data from the list.
Find the service you want and
*
Sending multi-selected
connect to the FTP server.
contacts:
Run the "Contacts"
TIP:
The version is Bluetooth 2.1
application. To Select more
EDR and certified by Bluetooth
than one contact press
Menu
SIG. It is compatible with other
key and touch
Multiselect
.
Bluetooth SIG certified devices.
Select the contacts you want
- If you want to search for this
to send or press
Menu
key
phone from other devices,
and touch
Select all
. Select
go to "
Settings
" > "
Wireless
Share
>
Bluetooth
> Check
& networks
" > "
Bluetooth
if Bluetooth is turned on and
settings
".
select
Scan for devices
>
Then, select the "
Discoverable
"
Choose the device you want to
checkbox.
send data from the list.
The checkbox is cleared after
120 seconds.
- Supported profiles are HFP,
HSP, OPP, PBAP (server), FTP
(server), A2DP, AVRCP, and
DUN.
20
Ukraine Restriction of Hazardous Substances
The equipment complies with requirements of the Technical
Regulation, in terms of restrictions for the use of certain
dangerous substances in electrical and electronic equipment.


Оглавление
- LG-P350LG-P350 Руководство пользователя
- Посібник користувача LG-P350LG-P350
- LG-P350LG-P350
- LG-P350LG-P350 Quick Reference Guide - English

