LG L60 Black: User Guide
User Guide: LG L60 Black
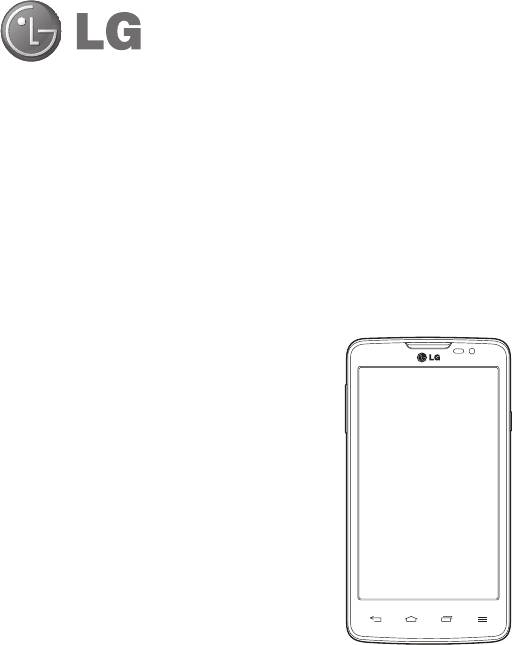
ENGLISH
User Guide
• Screen displays and illustrations may differ from those you see on
actual phone.
• Some of the contents of this guide may not apply to your
phone, depending on the software and your service provider. All
information in this document is subject to change without notice.
• This handset is not suitable for people who have a visual
impairment due to the tap screen keyboard.
• Copyright ©2014 LG Electronics, Inc. All rights reserved. LG and
the LG logo are registered trademarks of LG Group and its related
entities. All other trademarks are the property of their respective
owners.
• Google™, Google Maps™, Gmail™, YouTube™, Hangouts™ and
Play Store™ are trademarks of Google, Inc.

Table of contents
Guidelines for safe and effi cient use .................4
Calls ..................................................................35
Making a call ..................................................35
Important notice ...............................................11
Calling your contacts .......................................35
Answering and rejecting a call.........................35
Getting to know your phone .............................15
Adjusting the in-call volume ............................35
Phone overview ...............................................15
Making a second call ......................................35
Installing the SIM card and battery ..................17
Viewing your call logs ......................................36
Charging your phone .......................................19
Call settings ....................................................36
Using the memory card ...................................20
Locking and unlocking the screen ...................21
People................................................................37
Searching for a contact ...................................37
Your Home screen .............................................22
Adding a new contact ......................................37
Touch screen tips ............................................22
Favorites contacts ...........................................37
Home screen ...................................................22
Creating a group .............................................38
Extended home screen ..................................23
Customizing the Home screen
.......................24
Messaging .........................................................39
Returning to recently-used applications...........24
Sending a message .........................................39
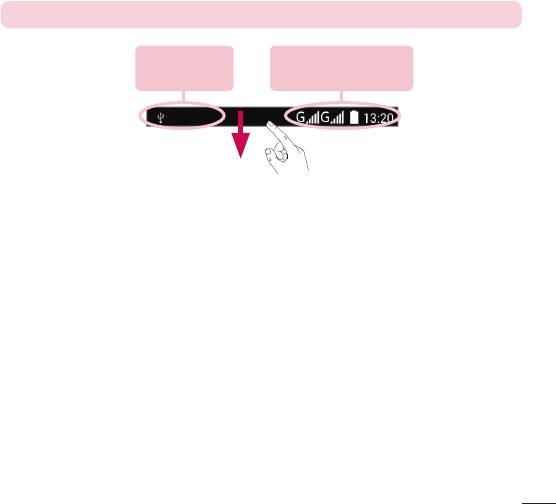
Notifi cations panel...........................................25
Threaded box .................................................40
Opening the notifi cations panel ......................26
Changing your message settings .....................40
Indicator icons on the Status Bar....................26
Email .................................................................41
On-screen keyboard ........................................28
Entering accented letters ...............................28
Managing an email account ............................41
Working with account folders ..........................41
Google account setup .......................................29
Composing and sending email .........................41
Connecting to Networks and Devices ..............30
Camera ..............................................................42
Wi-Fi ...............................................................30
Getting to know the viewfi nder ........................42
Connecting to Wi-Fi networks ........................30
Using the advanced settings ............................43
T
urning Wi-Fi on and connecting to a Wi-Fi
Taking a quick photo ......................................43
network ........................................................30
Once you've taken a photo ..............................43
Bluetooth ........................................................31
From your Gallery ............................................44
Sharing your phone's data connection .............32
Video camera ....................................................45
Wi-Fi Direct .....................................................33
PC connections with a USB cable ....................33
Getting to know the viewfi nder ........................45
Using the advanced settings ............................46
Recording a quick video ..................................46
2

After recording a video ....................................46
Bookmarks ...................................................57
From your Gallery ............................................47
Chrome ...........................................................58
Viewing webpages ........................................58
Function ............................................................48
Opening a page
............................................58
Guest mode .....................................................48
Syncing with other devices ............................58
KNOCKON .......................................................48
Settings .............................................................59
Multimedia ........................................................49
WRELESS & NETWORKS
..................................59
Gallery ............................................................49
Sound .............................................................60
View photos in Gallery ...................................49
Display ............................................................60
Playing videos...............................................
49
Connect to a Computer via USB .......................64
Editing photos ...............................................49
Deleting photos/videos ..................................49
Transfer user contents via a computer using a
Setting as wallpaper ......................................50
USB cable. ......................................................64
Videos .............................................................50
Phone software update ....................................65
Playing a video .............................................50
Music ..............................................................51
Phone software update....................................65
Playing a song ..............................................51
About this user guide .......................................66
Add music fi les to your phone ........................52
About this user guide ......................................66
Transfer music using Media sync (MTP)..........52
Trademarks ..................................................... 66
FM Radio ........................................................53
Accessories .......................................................67
Utilities ..............................................................54
Setting your alarm ...........................................54
Troubleshooting ................................................68
Using your calculator .......................................54
Adding an event to your calendar ....................54
FAQ ....................................................................71
Sound Recorder ..............................................55
Recording a sound or voice ...........................55
Google+ ..........................................................55
V
oice Search ...................................................55
Downloads ......................................................56
The Web ............................................................57
Browser ..........................................................57
Using the Web toolbar ...................................57
Viewing webpages
........................................57
Opening a page ............................................57
3

Guidelines for safe and effi cient use
Please read these simple guidelines. Not following these guidelines may be dangerous or illegal.
Should a fault occur, a software tool is built into your device that will gather a fault log.
This tool gathers only data specific to the fault, such as signal strength, cell ID position in sudden call drop and
applications loaded. The log is used only to help determine the cause of the fault. These logs are encrypted and
can only be accessed by an authorized LG Repair centre should you need to return your device for repair.
Exposure to radio frequency energy
Radio wave exposure and Specific Absorption Rate (SAR) information.
This mobile phone model LG-X145 has been designed to comply with applicable safety requirements for
exposure to radio waves. These requirements are based on scientific guidelines that include safety margins
designed to assure the safety of all persons, regardless of age and health.
• The radio wave exposure guidelines employ a unit of measurement known as the Specific Absorption Rate
(SAR). Tests for SAR are conducted using standardised methods with the phone transmitting at its highest
certified power level in all used frequency bands.
• While there may be differences between the SAR levels of various LG phone models, they are all designed to
meet the relevant guidelines for exposure to radio waves.
• The SAR limit recommended by the International Commission on Non-Ionizing Radiation Protection (ICNIRP) is
2 W/kg averaged over 10g of tissue.
• The highest SAR value for this model phone tested for use at the ear is 0.347 W/kg (10g) and when worn on
the body is 0.678 W/Kg (10g).
• This device meets RF exposure guidelines when used either in the normal use position against the ear or
when positioned at least 1.5 cm away from the body. When a carry case, belt clip or holder is used for body-
worn operation, it should not contain metal and should position the product at least 1.5 cm away from your
body. In order to transmit data files or messages, this device requires a quality connection to the network.
In some cases, transmission of data files or messages may be delayed until such a connection is available.
Ensure the above separation distance instructions are followed until the transmission is completed.
4
Product care and maintenance
WARNING
Only use batteries, chargers and accessories approved for use with this particular phone
model. The use of any other types may invalidate any approval or warranty applying to
the phone and may be dangerous.
• Do not disassemble this unit. Take it to a qualified service technician when repair work is required.
• Repairs under warranty, at LG's discretion, may include replacement parts or boards that are either new or
reconditioned, provided that they have functionality equal to that of the parts being replaced.
• Keep away from electrical appliances such as TVs, radios and personal computers.
• The unit should be kept away from heat sources such as radiators or cookers.
• Do not drop.
• Do not subject this unit to mechanical vibration or shock.
• Switch off the phone in any area where you are required to by special regulations. For example, do not use
your phone in hospitals as it may affect sensitive medical equipment.
• Do not handle the phone with wet hands while it is being charged. It may cause an electric shock and can
seriously damage your phone.
• Do not charge a handset near flammable material as the handset can become hot and create a fire hazard.
• Use a dry cloth to clean the exterior of the unit (do not use solvents such as benzene, thinner or alcohol).
• Do not charge the phone when it is on soft furnishings.
• The phone should be charged in a well ventilated area.
• Do not subject this unit to excessive smoke or dust.
• Do not keep the phone next to credit cards or transport tickets; it can affect the information on the magnetic
strips.
• Do not tap the screen with a sharp object as it may damage the phone.
• Do not expose the phone to liquid or moisture.
• Use accessories like earphones cautiously. Do not touch the antenna unnecessarily.
• Do not use, touch or attempt to remove or fix broken, chipped or cracked glass. Damage to the glass display
due to abuse or misuse is not covered under the warranty.
• Your phone is an electronic device that generates heat during normal operation. Extremely prolonged, direct
skin contact in the absence of adequate ventilation may result in discomfort or minor burns. Therefore, use
care when handling your phone during or immediately after operation.
5

Guidelines for safe and effi cient use
• If your phone gets wet, immediately unplug it to dry off completely. Do not attempt to accelerate the drying
process with an external heating source, such as an oven, microwave or hair dryer.
• The liquid in your wet phone, changes the color of the product label inside your phone. Damage to your device
as a result of exposure to liquid is not covered under your warranty.
Efficient phone operation
Electronics devices
All mobile phones may receive interference, which could affect performance.
• Do not use your mobile phone near medical equipment without requesting permission. Avoid placing the
phone over pacemakers, for example, in your breast pocket.
• Some hearing aids might be disturbed by mobile phones.
• Minor interference may affect TVs, radios, PCs etc.
• Use your phone in temperatures between 0ºC and 40ºC, if possible. Exposing your phone to extremely low or
high temperatures may result in damage, malfunction, or even explosion.
Road safety
Check the laws and regulations on the use of mobile phones in the area when you drive.
• Do not use a hand-held phone while driving.
• Give full attention to driving.
• Pull off the road and park before making or answering a call if driving conditions so require.
• RF energy may affect some electronic systems in your vehicle such as car stereos and safety equipment.
• When your vehicle is equipped with an air bag, do not obstruct with installed or portable wireless equipment. It
can cause the air bag to fail or cause serious injury due to improper performance.
• If you are listening to music whilst out and about, please ensure that the volume is at a reasonable level so
that you are aware of your surroundings. This is of particular importance when near roads.
6
Avoid damage to your hearing
To prevent possible hearing damage, do not listen at high volume levels for
long periods.
Damage to your hearing can occur if you are exposed to loud sound for long periods of time. We therefore
recommend that you do not turn on or off the handset close to your ear. We also recommend that music and call
volumes are set to a reasonable level.
• When using headphones, turn the volume down if you cannot hear the people speaking near you, or if the
person sitting next to you can hear what you are listening to.
NOTE: Excessive sound pressure from earphones and headphones can cause hearing
loss
Glass Parts
Some parts of your mobile device are made of glass. This glass could break if your mobile device is dropped on
a hard surface or receives a substantial impact. If the glass breaks, do not touch or attempt to remove it. Stop
using your mobile device until the glass is replaced by an authorised service provider.
Blasting area
Do not use the phone where blasting is in progress. Observe restrictions and follow any regulations or rules.
Potentially explosive atmospheres
• Do not use your phone at a refueling point.
• Do not use near fuel or chemicals.
• Do not transport or store flammable gas, liquid or explosives in the same compartment of your vehicle as your
mobile phone or accessories.
7

Guidelines for safe and effi cient use
In aircraft
Wireless devices can cause interference in aircraft.
• Turn your mobile phone off before boarding any aircraft.
• Do not use it on the ground without permission from the crew.
Children
Keep the phone in a safe place out of the reach of small children. It includes small parts which may cause a
choking hazard if detached.
Emergency calls
Emergency calls may not be available on all mobile networks. Therefore you should never depend solely on your
phone for emergency calls. Check with your local service provider.
Battery information and care
• You do not need to completely discharge the battery before recharging. Unlike other battery systems, there is
no memory effect that could compromise the battery's performance.
• Use only LG batteries and chargers. LG chargers are designed to maximise the battery life.
• Do not disassemble or short-circuit the battery.
• Replace the battery when it no longer provides acceptable performance. The battery pack may be recharged
hundreds of times before it needs replacing.
• Recharge the battery if it has not been used for a long time to maximise usability.
• Do not expose the battery charger to direct sunlight or use it in high humidity, such as in the bathroom.
• Do not leave the battery in hot or cold places, as this may deteriorate battery performance.
• There is risk of explosion if the battery is replaced with an incorrect type.
• Dispose of used batteries according to the manufacturer's instructions. Please recycle when possible. Do not
dispose as household waste.
• If you need to replace the battery, take it to the nearest authorised LG Electronics service point or dealer for
assistance.
8

• Always unplug the charger from the wall socket after the phone is fully charged to save unnecessary power
consumption of the charger.
• Actual battery life will depend on network configuration, product settings, usage patterns, battery and
environmental conditions.
• Make sure that no sharp-edged items such as animal’s teeth or nails, come into contact with the battery. This
could cause a fire.
DECLARATION OF CONFORMITY
Hereby, LG Electronics declares that this LG-X145 product is in compliance with the
essential requirements and other relevant provisions of Directive 1999/5/EC. A copy of the
Declaration of Conformity can be found at http://www.lg.com/global/declaration
Contact office for compliance of this product :
LG Electronics Inc.
EU Representative, Krijgsman 1,
1186 DM Amstelveen, The Netherlands
9

Disposal of your old appliance
1
All electrical and electronic products should be disposed of separately from the
municipal waste stream via designated collection facilities appointed by the
government or the local authorities.
2 The correct disposal of your old appliance will help prevent potential negative
consequences for the environment and human health.
3 For more detailed information about disposal of your old appliance, please contact
your city offi
ce, waste disposal service or the shop where you purchased the
product.
Disposal of waste batteries/accumulators
1
This symbol may be combined with chemical symbols for mercury (Hg), cadmium
(Cd) or lead (Pb) if the batter
y contains more than 0.0005% of mercury, 0.002% of
cadmium or 0.004% of lead.
2 All batteries/accumulators should be disposed separately from the municipal waste
stream via designated collection facilities appointed by the government or the local
authorities.
3 The correct disposal of your old batteries/accumulators will help to prevent potential
negative consequences for the environment,
animal and human health.
4 For more detailed information about disposal of your old batteries/ accumulators,
please contact your city offi
ce, waste disposal service or the shop where you
purchased the product.
10
Important notice
Please check to see whether any problems you encountered with your phone are described in this section before
taking the phone in for service or calling a service representative.
1. Phone memory
When there is less than 10% of space available in your phone memory, your phone cannot receive new
messages. You need to check your phone memory and delete some data, such as applications or messages, to
make more memory available.
To uninstall applications:
1 Tap
11
Please read this before you start using your phone!
> > Settings > Apps.
2 Once all applications appear, scroll to and select the application you want to uninstall.
3 Tap Uninstall.
2. Optimizing battery life
Extend your battery's power by turning off features that you don't have to run constantly in the background. You
can monitor how applications and system resources consume battery power.
Extending your phone's battery life:
• Turn off radio communications when you are not using. If you are not using Wi-Fi, Bluetooth or GPS, turn them
off.
• Reduce screen brightness and set a shorter screen timeout.
• Turn off automatic syncing for Gmail, Calendar, Contacts and other applications.
• Some applications you have downloaded may reduce battery power.
• While using downloaded applications, check the battery charge level.
To check the battery power level:
• Tap > > Settings > Battery.
The battery status (charging or discharging) and battery level (percentage charged) is displayed at the top of the
screen.
To monitor and control how battery power is being used:
• Tap
12
Important notice
> > Settings > Battery.
Battery usage time is displayed on the screen. It tells you how long it has been since you last connected your
phone to a power source or, if currently connected, how long the phone was last running on battery power.
The screen shows the applications or services using battery power, listed in order from the greatest to smallest
amount used.
3. Before installing an open source application and OS
WARNING
If you install and use an OS other than the one provided by the manufacturer it may
cause your phone to malfunction. In addition, your phone will no longer be covered by the
warranty.
WARNING
To protect your phone and personal data, only download applications from trusted
sources, such as Play Store™. If there are improperly installed applications on your
phone, the phone may not work normally or a serious error may occur. You must uninstall
those applications and all associated data and settings from the phone.
4. Using an unlock pattern
Set an unlock pattern to secure your phone. Tap > > Settings > Security > Screen lock > Pattern.
This opens a screen that will guide you through how to draw a screen unlock pattern. You have to create a
Backup PIN as a safety measure in case you forget your unlock pattern.
Caution: Create a Google account before setting an unlock pattern and remember the
Backup PIN you created when creating your pattern lock.
WARNING
Precautions to take when using pattern lock.
It is very important to remember the unlock pattern you set. You will not be able to
access your phone if you use an incorrect pattern 5 times. You have 5 opportunities to
enter your unlock pattern, PIN or password. If you have used all 5 opportunities, you can
try again after 30 seconds.
< If you have forgotten your PIN or Password >
If you forget your PIN or Password, you will need to perform a hard reset.
Caution: If you perform a hard reset, all user applications and user data will be deleted.
NOTE: If you have not logged into your Google Account and have forgotten your Unlock
Pattern, you will need to enter your Backup PIN.
5. Using the Hard Reset (Factory Reset)
If your phone does not restore to its original condition, use a Hard Reset (Factory Reset) to initialize it.
1 Turn the power off.
2 Press and hold the Po
wer/Lock Key + Volume Down Key on the phone.
3 Release the Po
wer/Lock Key only when the LG logo is displayed, then immediately press and hold the
Power/Lock Key again.
4 Release all keys when the Factory data reset screen is displayed.
5 Press the V
olume Key to scroll to the desired option, then press the Power/Lock Key to confi rm.
WARNING
If you perform a Hard Reset, all user applications, user data and DRM licenses will be
deleted. Please remember to backup any important data before performing a Hard Reset.
13
6. Opening and switching applications
Multi-tasking is easy with Android, you can keep more than one application running at the same time. There is
no need to quit an application before opening another one. Use and switch between several open applications.
Android manages each application, stopping and starting them as needed to ensure that idle applications don't
consume resources unnecessarily.
1 Touch and hold the Recent Key
14
Important notice
. A list of recently used applications will be displayed.
2 Tap the application you want to access. This does not stop the previous app running in the background on
the phone.
Make sure to tap Back Key
to exit an app after using it.
7. Transferring music, photos and videos using Media
sync (MTP)
1 Tap > > Settings > Storage to check out the storage media.
2 Connect the phone to your PC using the USB cable.
3 Tap
> USB computer connection will appear on your phone screen, select the Media device (MTP)
option.
4 Open the memory folder on your PC. You can view the mass storage content on your PC and transfer the
fi
les from PC to Device memory folder or vice versa.
8. Hold your phone upright
Hold your cell phone vertically, as you would a regular phone. Your phone has an internal antenna. Be careful not
to scratch or damage the back of the phone, as this may affect performance.
When making/receiving calls or sending/receiving data, avoid holding the lower part of the phone where the
antenna is located. Doing so may affect call quality.
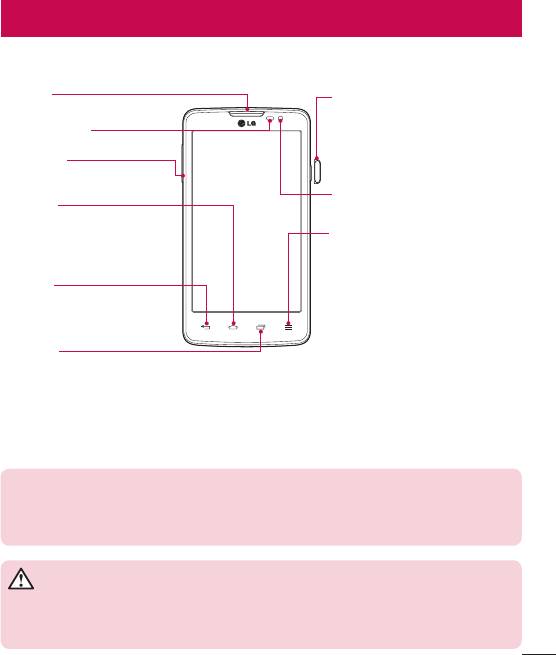
Getting to know your phone
Phone overview
Earpiece
Power/Lock Key
•
Switch your phone on/off by pressing
Proximity Sensor
and holding this key.
•
Short press to lock/unlock the screen.
Volume keys
Front-Facing Camera lens
Home Key
Return to the Home screen from any
Menu Key
screen.
Display the available options.
Back Key
•
Return to the previous screen.
•
Exit an app after using it.
Recent Key
Display recently used applications.
NOTE: Proximity sensor
When receiving and making calls, the proximity sensor automatically turns the backlight off
and locks the touch screen by sensing when the phone is near your ear. This extends battery
life and prevents you from unintentionally activating the touch screen during calls.
WARNING
Placing a heavy object on the phone or sitting on it can damage the LCD and touch screen
functions. Do not cover the LCD proximity sensor with protective film. This could cause the
sensor to malfunction.
15
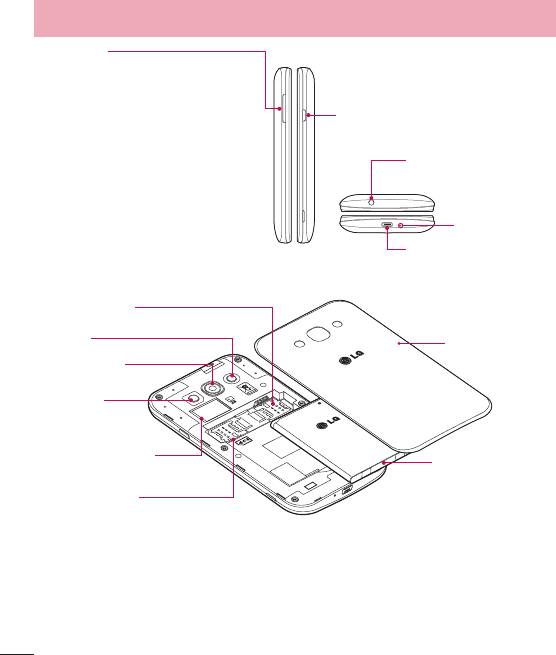
Getting to know your phone
Volume keys
•
In the Home screen: Control ringer volume.
•
During a call: Control your earpiece volume.
•
When playing a song: Control volume
Power/Lock Key
continuously.
Earphone Jack
Microphone
Charger/USB Port
SIM1 card slot
Flash
Battery cover
Camera lens
Speaker
microSD Card slot
Battery
SIM2 card slot
16
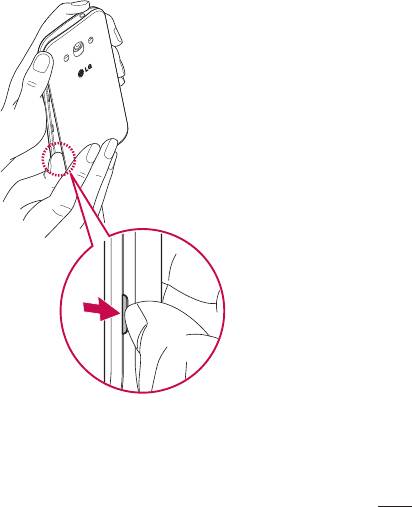
Installing the SIM card and battery
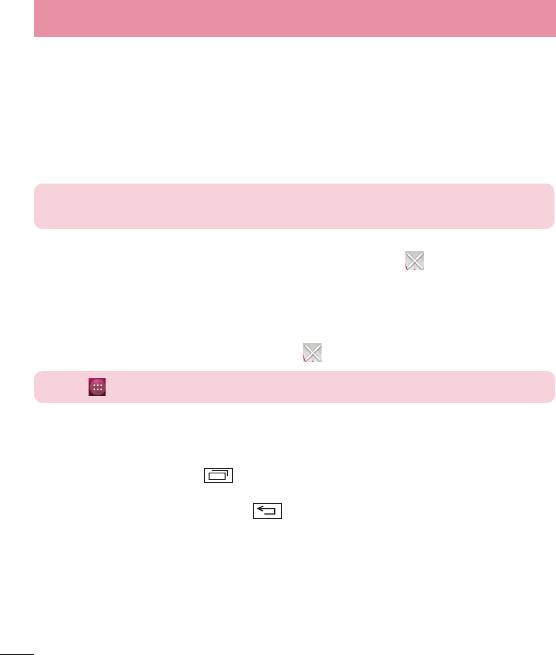
Before you can start exploring your new phone, you'll need to set it up. To insert the SIM card and battery.
1 To remove the battery cover, hold the phone fi rmly in one hand. With your other hand, lift off the battery
cover with your Thumb nail as shown in fi gure.
17
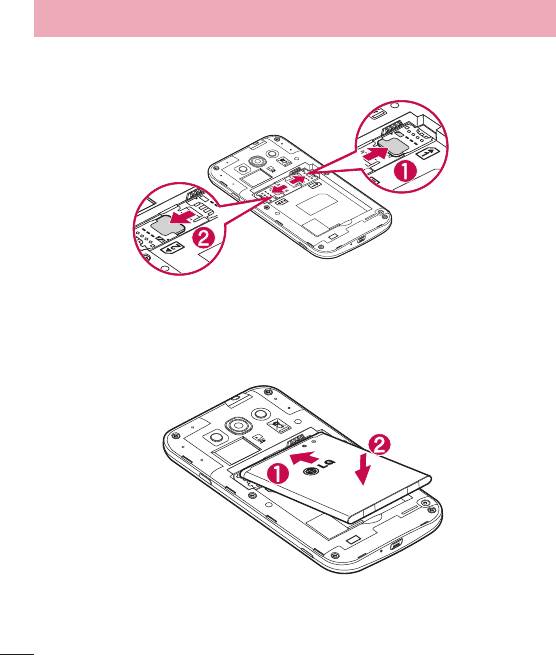
Getting to know your phone
2 Slide the SIM card into its slots as shown in the fi gure. Make sure the gold contact area on the card is
facing downwards.
3 Insert the battery into place by aligning the gold contacts on the phone and the battery (1) and pressing it
down until it clicks into place (2).
18
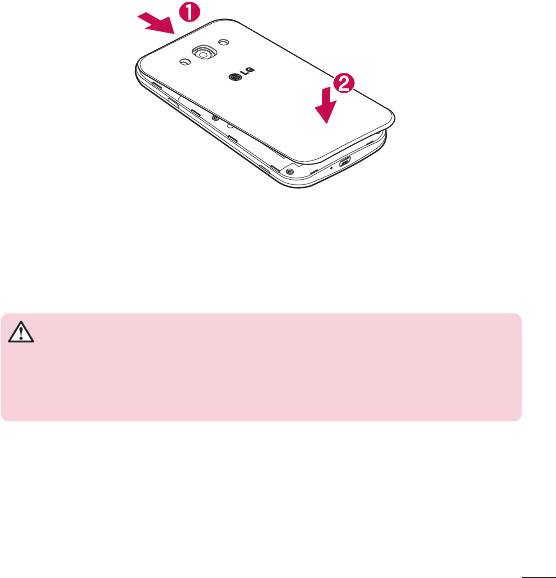
4 Align the battery cover over the battery compartment (1) and press it down until it clicks into place (2).
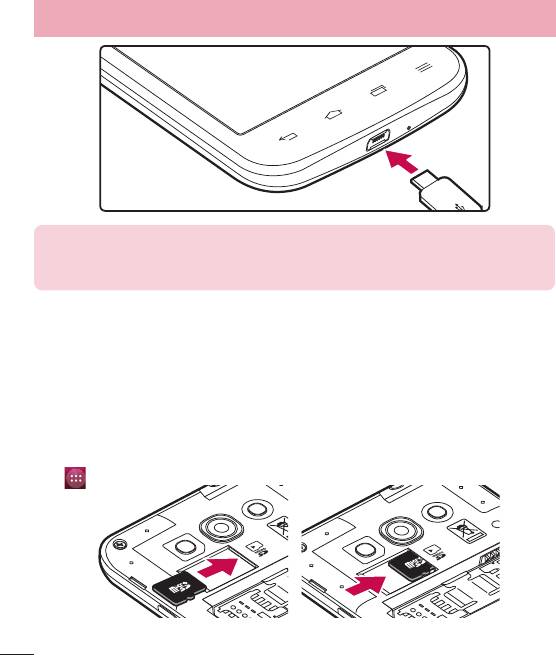
Charging your phone
Charge the battery before using it for the first time. Use the charger to charge the battery. A computer can be
also used to charge the device by connecting them via the USB cable.
WARNING
Use only LG-approved chargers, batteries, and cables. When using unapproved
chargers or cables, it may cause battery charging delay or pop-up message regarding
slow charging. Or, unapproved chargers or cables can cause the battery to explode or
damage the device, which are not covered by the warranty.
The charger connector is at the bottom of the phone. Insert the charger and plug it into an electrical outlet.
19
Getting to know your phone
NOTE:
• The battery must be fully charged initially to improve battery lifetime.
• Do not open the back cover while your phone is charging.
Using the memory card
TM
TM
Your phone supports the use of microSD
or microSDHC
memory cards of up to 32 GB capacity. These
memory cards are specifically designed for mobile phones and other ultra-small devices, and are ideal for storing
media-rich files such as music, programs, videos, and photographs for use with your phone.
To insert a memory card:
Insert the memory card into the slot. Make sure the gold contact area is facing downwards.
To safely remove the memory card:
Touch
> Settings > Storage > Unmount SD card > OK.
20
NOTE:
• Use only compatible memory cards with your phone. Using incompatible memory cards
may damage the card and data stored on the card, as well as the phone.
• As the device uses FAT32, the maximum size for any given file is 4 GB.
WARNING
Do not insert or remove the memory card when the phone is ON. Doing so may damage
the memory card as well as your phone, and the data stored on the memory card may
become corrupt.
To format the memory card:
Your memory card may already be formatted. If it isn't, you must format it before you can use it.
NOTE: All files on your memory card are deleted when it is formatted.
1 Touch
to open the application list.
2 Scroll and touch Settings > Stor
age.
3 Touch Er
ase SD card > Erase SD card > Erase everything.
If you have set a pattern lock, input the pattern lock then select Erase everything.
NOTE: If there is content on your memory card, the folder structure may be different after
formatting, as all the files will have been deleted.
Locking and unlocking the screen
If you do not use the phone for a while, the screen will be automatically turned off and locked. This helps to
prevent accidental taps and saves battery power.
When you are not using the phone, press the Power/Lock key
to lock your phone.
If there are any programs running when you lock your screen, they may be still running in Lock mode. It is
recommended that you exit all programs before entering Lock mode to avoid unnecessary charges (e.g. phone
calls, web access and data communications).
To wake up your phone, press the Power/Lock key
. The Lock screen will appear. Touch and slide the Lock
screen in any direction to unlock your Home screen. The last screen you viewed will open.
21

Your Home screen
Touch screen tips
Here are some tips on how to navigate on your phone.
Tap or touch – A single finger tap selects items, links, shortcuts and letters on the on-screen keyboard.
Touch and hold – Touch and hold an item on the screen by tapping it and not lifting your finger until an action
occurs. For example, to open a contact's available options, touch and hold the contact in the Contacts list until
the context menu opens.
Drag – Touch and hold an item for a moment and then, without lifting your finger, move your finger on the
screen until you reach the target position. You can drag items on the Home screen to reposition them.
Swipe or slide – To swipe or slide, quickly move your finger across the surface of the screen, without pausing
when you first tap it (so you don’t drag an item instead). For example, you can slide the screen up or down to
scroll through a list, or browse through the different Home screens by swiping from left to right (and vice versa).
Double-tap – Double-tap to zoom on a webpage or a map. For example, quickly double-tap a section of a
webpage to adjust that section to fit the width of the screen. You can also double-tap to zoom in and out while
viewing the picture.
Pinch-to-Zoom – Use your index finger and thumb in a pinching or spreading motion to zoom in or out when
using the browser or Maps, or when browsing pictures.
Rotate the screen – From many applications and menus, the orientation of the screen adjusts to the device's
physical orientation.
NOTE:
• To select an item, tap the center of the icon.
• Do not press too hard; the tap screen is sensitive enough to pick up a light, yet firm tap.
• Use the tip of your finger to tap the option you want. Be careful not to tap any other
keys.
Home screen
The Home screen is the starting point for many applications and functions, and it allows you to add items like
application shortcuts, or Google widgets to give you instant access to information and applications. This is the
default canvas and accessible from any menu by tapping
.
22
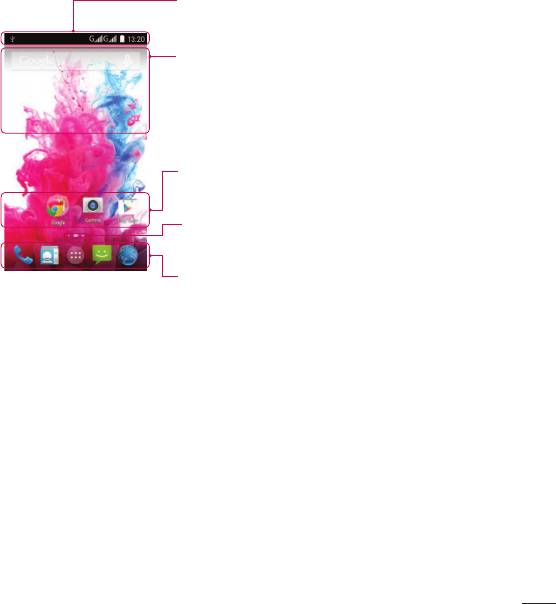
Status Bar
Shows phone's status information including the time, signal strength,
battery status, and notification icons.
Widget
Widgets are self-contained applications that can be accessed through
the Apps screen or on the Home screen or an extended home screen.
Unlike a shortcut, the Widget appears as an on-screen application.
Application Icons
Tap an icon (application, folder, etc.) to open and use it.
Location Indicator
Indicates which Home screen canvas you are viewing.
Quick Key Area
Provides one-touch access to the function in any home screen canvas.
Extended home screen
The operating system provides multiple Home screen canvases to provide more space for adding icons, widgets,
and more.
Slide your finger left or right across the Home screen.
23
Your Home screen
Customizing the Home screen
You can customize your Home screen by adding widgets or changing wallpapers.
To add items on your Home screen
1 Touch and hold the empty part of the Home screen.
2 In the Add Mode menu, select the item you wish to add. You will then see this added item on the Home
screen.
3 Drag it to the desired location and lift your fi nger.
TIP! To add an application icon to the Home screen from the Apps menu, touch and hold
the application you want to add.
To remove an item from the Home screen
Home screen > touch and hold the icon you want to remove > drag it to .
To add an app as a Quick key
From the Apps menu or on the Home screen, touch and hold an application icon and drag it to the Quick
key area.
To remove an app from the Quick key area
Touch and hold the desired quick key and drag it to .
NOTE: Apps key cannot be removed.
Returning to recently-used applications
1 Touch and hold the Recent Key . The screen displays a pop-up containing the icons of applications
you used recently.
2 Tap an icon to open the application. Or tap
to return to your previous screen.
24
Notifications panel
Notifications alert you the arrival of new messages, calendar events, and alarms, as well as to ongoing events,
such as when you are on a call.
When a notification arrives, its icon appears at the top of the screen. Icons for pending notifications appear on
the left, and system icons such as Wi-Fi or battery strength shown on the right.
NOTE: The available options may vary depending on the region or service provider.
Pending
Bluetooth, Wi-Fi &
notifications
battery status
25

Your Home screen
Opening the notifications panel
Swipe down from the status bar to open the notifications panel.
Notifications
The current notifications are listed, each with a brief description. Tap a
notification to view it.
To close the notifications panel, touch and drag the tab toward the top
of the screen.
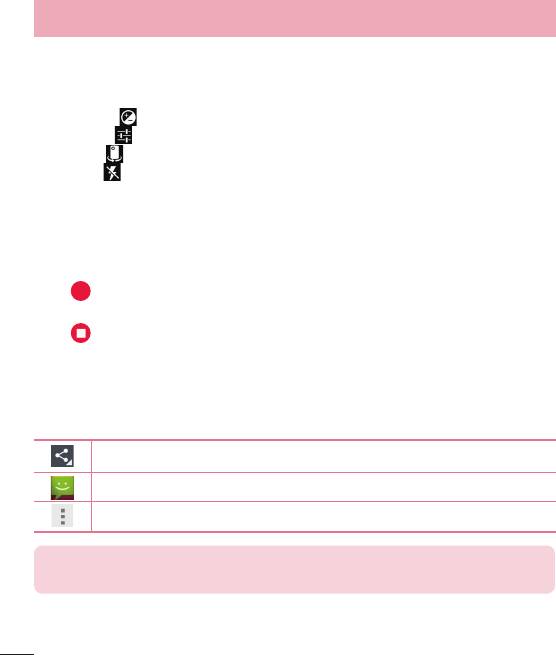
Indicator icons on the Status Bar
Indicator icons appear on the status bar at the top of the screen to report missed calls, new messages, calendar
events, device status and more.
26

The icons displayed at the top of the screen provide information about the status of the device. The icons listed
in the table below are some of the most common ones.
Icon Description Icon Description
No SIM card inserted Ringer is silenced
No network signal available Vibrate mode is on
Airplane mode is on Battery fully charged
Connected to a Wi-Fi network Battery is charging
Phone is connected to PC via USB
Wired headset connected
cable
Call in progress Downloading data
Missed call Uploading data
Bluetooth is on GPS is on
System warning Data is synchronizing
An alarm is set New Gmail message available
New voicemail available New Hangouts message available
New text or multimedia message Choose input method
A song is currently playing Mobile hotspot is active
27
Your Home screen
NOTE: The icons location in the status bar may differ according to the function or
service.
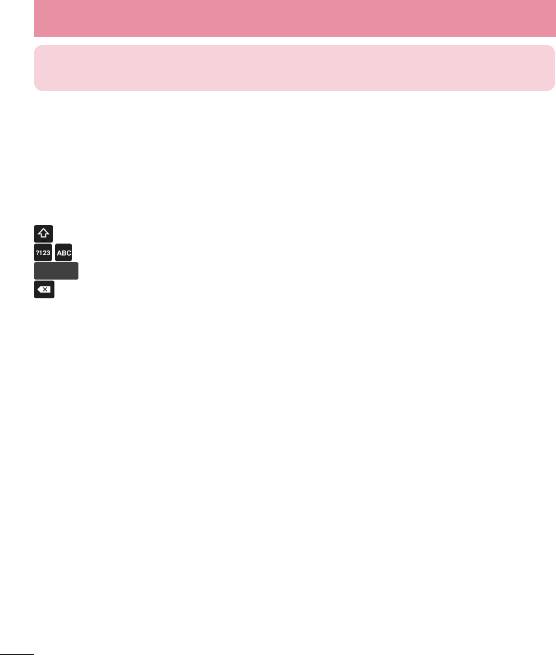
On-screen keyboard
You can enter text using the on-screen keyboard. The on-screen keyboard appears automatically on the screen
when you need to enter text. To manually display the keyboard, simply tap a text field where you want to enter
text.
Using the keypad & entering text
Tap once to capitalize the next letter you type. Double-tap for all caps.
Tap to switch to the numbers and symbols keyboard.
Tap to enter a space.
Tap to delete the previous character.
Entering accented letters
When you select French or Spanish as the text entry language, you can enter special French or Spanish
characters (e.g. "á").
For example, to input "á", touch and hold the "a" key until the zoom-in key grows bigger and displays characters
from different languages.
Then select the special character you want.
28
Google account setup
When you first turn on your phone, you have the opportunity to activate the network, to sign into your Google
Account and select how you want to use certain Google services.
To set up your Google account:
• Sign into a Google Account from the prompted set-up screen.
OR
• Tap > > select a Google application, such as Gmail > select New to create a new account.
If you have a Google account, tap Existing, enter your email address and password, then tap
.
Once you have set up your Google account on your phone, your phone automatically synchronizes with your
Google account on the Web.
Your contacts, Gmail messages, Calendar events and other information from these applications and services on
the Web are synchronized with your phone. (This will depend on your synchronization settings.)
After signing in, you can use Gmail™ and take advantage of Google services on your phone.
29
Connecting to Networks and Devices
Wi-Fi
With Wi-Fi, you can use high-speed Internet access within the coverage of the wireless access point (AP). Enjoy
wireless Internet using Wi-Fi, without extra charges.
Connecting to Wi-Fi networks
To use Wi-Fi on your phone, you need to access a wireless access point or ‘hotspot’. Some access points are
open and you can simply connect to them. Others are hidden or use security features; you must configure your
phone to be able to connect to them.
Turn off Wi-Fi when you're not using it to extend the life of your battery.
NOTE: If you are out of the Wi-Fi zone or have set Wi-Fi to OFF, additional charges may
be applied by your mobile operator for mobile data use.
Turning Wi-Fi on and connecting to a Wi-Fi network
1 Tap > > Settings > Wi-Fi.
2 Set Wi-Fi to ON to turn it on and start scanning for available
Wi-Fi networks.
3 Tap the Wi-Fi menu again to see a list of active and in-range Wi-Fi networks.
• Secured networks are indicated by a lock icon.
4 Tap a network to connect to it.
• If the network is secured, you are prompted to enter a password or other credentials. (Ask your network
administrator for details)
5 The status bar displays icons that indicate Wi-Fi status.
30
Bluetooth
You can use Bluetooth to send data by running a corresponding application, but not from the Bluetooth menu as
on most other mobile phones.
NOTE:
• LG is not responsible for the loss, interception or misuse of data sent or received via the
Bluetooth wireless feature.
• Always ensure that you share and receive data with devices that are trusted and
properly secured. If there are obstacles between the devices, the operating distance
may be reduced.
• Some devices, especially those that are not tested or approved by Bluetooth SIG, may
be incompatible with your device.
Turning on Bluetooth and pairing up your phone with a Bluetooth device
You must pair your device with another device before you connect to it.
1 Tap
> > Settings > set Bluetooth to ON.
2 Tap the Bluetooth menu again.
You will see the option to make your phone visible and option to search
devices. Now tap SEARCH FOR DEVICES to view the devices in the Bluetooth Range.
3 Choose the device you want to pair with from the list.
Once the paring is successful,
your device will connect to the other device.
NOTE: Some devices, especially headsets or hands-free car kits, may have a fixed
Bluetooth PIN, such as 0000. If the other device has a PIN, you will be asked to enter it.
Send data using the Bluetooth wireless feature
1 Select a fi le or item, such as a contact, calendar event or media fi le, from an appropriate application or
from Do
wnloads.
2 Select the option for sending data via Bluetooth.
NOTE: The method for selecting an option may vary by data type.
3 Search for and pair with a Bluetooth-enabled device.
Receive data using the Bluetooth wir
eless feature
1 Tap
> > Settings > set Bluetooth to ON.
31

Connecting to Networks and Devices
2 Tap the Bluetooth menu again and mark the checkbox at the top of the screen to make your phone visible
to other devices.
NOTE: To select the length of time that your device will be visible, tap > Visibility
timeout.
3 Select Accept to confi
rm that you are willing to receive data from the device.
Sharing your phone's data connection
USB tethering and portable Wi-Fi hotspot are great features when there are no wireless connections available.
You can share your phone's mobile data connection with a single computer via a USB cable (USB tethering). You
can also share your phone's data connection with more than one device at a time by turning your phone into a
portable Wi-Fi hotspot.
When your phone is sharing its data connection, an icon appears in the status bar and as an ongoing notification
in the notifications drawer.
For the latest information about tethering and portable hotspots, including supported operating systems and
other details, visit http://www.android.com/tether.
To share your phone's data connection as a portable Wi-Fi hotspot
1 Tap
> > Settings > More... > Tethering & portable hotspot > Wi-Fi hotspot switch to
activate.
2 Enter a password and tap Sa
ve.
TIP! If your computer is running Windows 7 or a recent distribution of some flavours of
Linux (such as Ubuntu), you will not usually need to prepare your computer for tethering.
But, if you are running an earlier version of Windows or another operating system, you
may need to prepare your computer to establish a network connection via USB. For the
most current information about which operating systems support USB tethering and how
to configure them, visit http://www.android.com/tether.
To rename or secure your portable hotspot
You can change the name of your phone's Wi-Fi network name (SSID) and secure its Wi-Fi network.
1 Tap
> > Settings > More... > Tethering & portable hotspot > Wi-Fi hotspot.
2 Tap Set up
Wi-Fi hotspot.
• The Set up Wi-Fi hotspot dialogue box will open.
32
• You can change the Network SSID (name) that other devices see when scanning for Wi-Fi networks.
• You can also tap the Security menu to configure the network with Wi-Fi Protected Access 2 (WPA2)
security using a pre-shared key (PSK).
• If you touch the WPA2 PSK security option, a password field is added to the Set up Wi-Fi hotspot
dialogue box. If you enter a password, you will need to enter that password when you connect to the
phone's hotspot with a computer or other device. You can set None in the Security menu to remove
security from your Wi-Fi network.
3 Tap Save.
ATTENTION! If you set the security option as Open, you cannot prevent unauthorised
usage of online services by other people and additional charges may be incurred. To
avoid unauthorized usage, you are advised to keep the security option active.
Wi-Fi Direct
Wi-Fi Direct supports a direct connection between Wi-Fi enabled devices without an access point. Due to the
high battery usage of Wi-Fi direct, it is recommended that you plug your phone into a power outlet while using
the Wi-Fi Direct feature. Check your Wi-Fi & Wi-Fi Directed network in advance and make sure the users are
connected to the same network.
PC connections with a USB cable
Learn to connect your device to a PC with a USB cable in USB connection modes.
Transferring music, photos and videos using the USB mass storage mode
1 Connect your phone to a PC using a USB cable.
2 If you haven't installed the LG Android Platform Driver on your PC, you will need to manually change the
settings.T
ouch
> Settings > Storage > Choose > USB computer connection, then select
Media device (MTP).
3 You can now view the mass storage content on your PC and transfer the fi les.
Sync
hronize with Windows Media Player
Ensure that Windows Media Player is installed on your PC.
1 Use the USB cable to connect the phone to a PC on which Windows Media Player has been installed.
2 Select the Media device (MTP) option.
When connected, a pop-up window will appear on the PC.
33

Connecting to Networks and Devices
3 Open Windows Media Player to synchronize music fi les.
4 Edit or enter your device’s name in the pop-up window (if necessary).
5 Select and drag the music fi les you want to the sync list.
6 Start synchronization.
• The following requirements must be satisfied to synchronize with Windows Media Player.
Items Requirement
OS Microsoft Windows XP SP2, Vista or higher
Window Media Player version Windows Media Player 10 or higher
34
Calls
Making a call
1 Tap > to open the keypad.
2 Enter the number using the keypad. To delete a digit, tap the
.
3 Tap
to make a call.
4 To end a call, tap the End icon
.
TIP! To enter "+" to make international calls, touch and hold .
Calling your contacts
1 Tap to open your contacts.
2 Scroll through the contact list or enter the fi rst few letters of the contact you want to call by tapping
.
3 Select the contact you want to call, tap on the Number.
Answering and rejecting a call
When you receive a call in Lock state, swipe the to right direction to Answer the incoming call. Swipe the
to left direction to Decline an incoming call.
Swipe the Decline with message icon in any direction if you want to send a message.
Adjusting the in-call volume
To adjust the in-call volume during a call, use the Volume up and down keys on the left side of the phone.
Making a second call
1 During your fi rst call, tap and dial the number. You can also go to the recently dialled numbers list by
tapping or can search contacts by tapping and selecting the contact you want to call.
2 Tap
to make a call.
35
Calls
3 Both calls are displayed on the call screen. Your initial call is locked and put on hold.
4 Tap the displayed number to toggle between calls. Or tap
Merge calls to start a conference call.
5 To end active calls, tap End call icon
or tap and slide the notifi cation bar down and select the
End call icon .
NOTE: You are charged for each call you make.
Viewing your call logs
On the Home screen, tap and choose the History tab .
View a complete list of all dialled, received and missed calls.
TIP!
• Tap any call log entry to view the date, time and duration of the call.
• Tap , then tap Delete to delete all the recorded items.
Call settings
You can configure phone call settings such as call forwarding, as well as other special features offered by your
carrier.
1 On the Home screen, tap .
2 Tap
.
3 Tap Settings and choose the options that you wish to adjust.
36
People
Add contacts to your phone and synchronize them with the contacts in your Google account or other accounts
that support contact syncing.
Searching for a contact
1 Tap to open your contacts.
2 Tap
Find contacts and enter the contact name using the keyboard.
Adding a new contact
1 Tap , enter the new contact's number, then tap . Tap Add to contacts, then tap CREATE NEW
CONTACT.
2 If you want to add a picture to the new contact, tap the image area. Choose from T
ake photo, Choose
photo from Gallery.
3 Tap a category of contact information and enter the details about your contact.
4 Tap DONE.
Favorites contacts
You can classify frequently called contacts as favourites.
Adding a contact to your favourites
1 Tap
to open your contacts.
2 Tap a contact to view its details.
3 Tap the star to the right corner of the contact's name. The star will turn grey color.
Remo
ving a contact from your favourites list
1 Tap
to open your contacts.
2 Tap the
tab, and choose a contact to view its details.
3 Tap the grey color star to the right corner of the contact's name. The star turns white color and the contact
is removed from your favourites.
37
People
Creating a group
1 Tap to open your contacts.
2 Tap
and tap .
3 Enter a name for the new group.
4 Tap DONE to save the group.
NOTE: If you delete a group, the contacts assigned to that group will not be lost. They
will remain in your contacts.
38
Messaging
Your phone combines SMS and MMS into one intuitive, easy-to-use menu.
WARNING: LG message should be set up to default SMS app. If not, some message
functions will be limited.
Sending a message
1 Tap on the Home screen and tap to open a blank message.
2 Enter a contact name or contact number in the T
ype name or number fi eld. As you enter the contact
name, matching contacts will appear. You can tap a suggested recipient. You can add more than one
contact.
NOTE: You will be charged for a text message for every person to whom you send the
message.
3 Tap the Type text message fi eld and begin composing your message.
4 Tap
to open the Options menu. Choose from Insert quick text, insert contact, Add subject and
Discard.
TIP! You can tap the icon to attach the file, that you want to share with message.
5 Tap
to send your message.
6 Responses will appear on the screen. As you view and send additional messages, a message thread is
created.
WARNING:
• The 160-character limit may vary from country to country, depending on the language
and how the SMS is coded.
• If an image, video or audio file is added to an SMS message, it is automatically
converted into an MMS message and you are charged accordingly.
39

Messaging
Threaded box
Messages (SMS, MMS) exchanged with another party can be displayed in chronological order so that you can
conveniently see an overview of your conversation.
Changing your message settings
Your phone message settings are pre-defined, so you can send messages immediately. You can change the
settings according to your preferences.
• Tap the Messaging icon on the Home screen, tap and then tap Settings.
40
You can use the Email application to read emails from services like Gmail. The Email application supports the
following account types: POP3, IMAP and Exchange.
Your service provider or system administrator can provide you with the account settings you need.
Managing an email account
The first time you open the Email application, a set-up wizard opens to help you to set up an email account.
After the initial set-up, Email displays the contents of your inbox.
To add another email account:
• Tap > > Email >tap > Settings > ADD ACCOUNT.
To change an email account's settings:
• Tap > > Email > tap > Settings > General settings.
Working with account folders
Tap > > Email > tap and select Folders.
Each account has an Inbox, Outbox, Sent and Drafts folder. Depending on the features supported by your
account's service provider, you may have additional folders.
Composing and sending email
To compose and send a message
1 While in the Email application,
tap the
> Compose.
2 Enter an address for the message's intended recipient. As you enter text, matching addresses will be
proposed from your Contacts.
Separate multiple addresses using semicolons.
3 Tap the
to add a Cc/Bcc and tap Attach fi le to attach fi les, if required.
4 Enter the text of the message.
5 Tap
.
TIP! When a new email arrives in your Inbox, you will be notified by a sound or vibration.
41
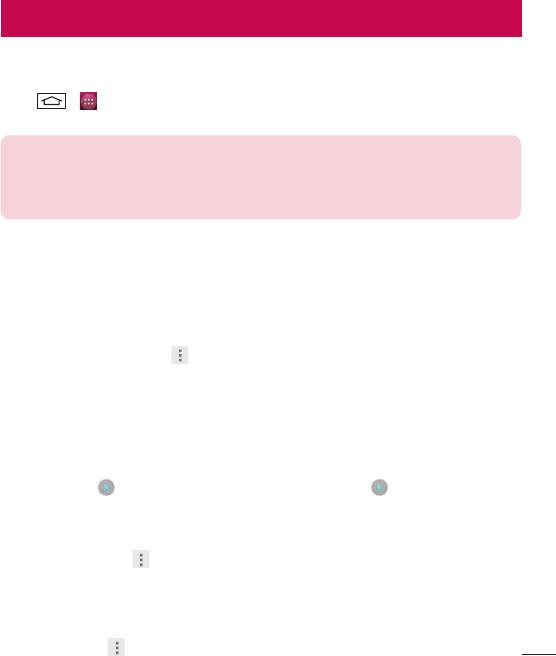
Camera
To open Camera:
From the lock screen, swipe from right to left.
From the Home screen, touch the Camera icon
.
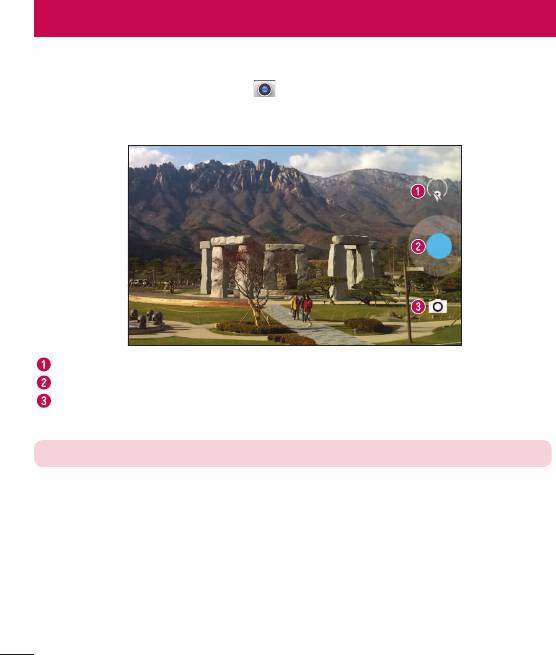
Getting to know the viewfinder
Setting icon: Tap this icon to change camera/video settings such as flash, exposure and so on.
Capture button
Mode icon: Tap this icon switch to the desired mode; Camera, Video and Panorama mode.
NOTE: Please ensure the camera lens is clean before taking pictures.
42
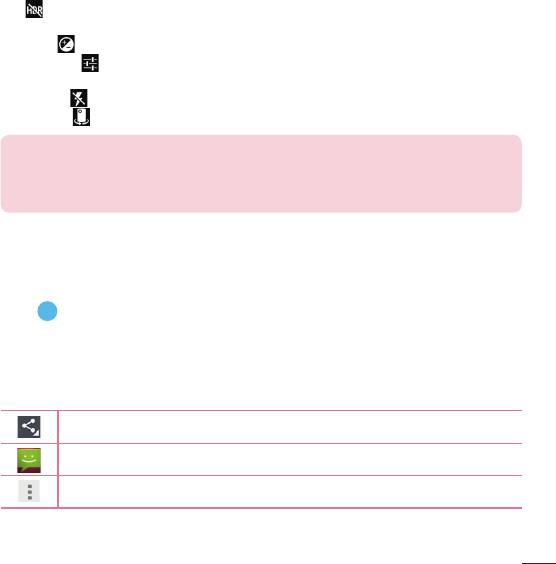
Using the advanced settings
To change camera settings such as flash, exposure and so on, touch the circle to the next to the Capture button.
HDR
: HDR+ automatically snaps a rapid burst of photos and combines them to give you the best possible
single shot. Daytime shots are vivid with clean shadows and night time shots are sharp with less noise.
EXPOSURE
: Defines and controls the amount of sunlight entering the photo.
MORE OPTIONS
: Tap to select the advanced options like LOCATION, COUNTDOWN TIMER, PICTURE SIZE,
WHITE BALANCE and SCENE MODE.
FLASH MODE
: Tap to select the flash mode.
Swap camera
: Switch between the rear–facing camera lens and the front–facing camera lens.
TIP!
• When you exit the camera, some settings return to their defaults, such as white
balance, color effect, timer and shot mode. Check these before you take your next
photo.
Taking a quick photo
1 Open the Camera application and point the lens toward the subject your want to photograph.
2 Tap
to capture the photo.
Once you've taken a photo
To see the image you just took, swipe from right to left. Keep swiping to see other images in your Gallery
Tap to send your photo to others or share it via social network services.
Tap to send an image via MMS.
Tap to open all advanced options.
43
Camera
TIP! If you have an SNS account set up on your phone, you can share your photo with
your SNS community.
NOTE: Additional charges may apply when MMS messages are downloaded while
roaming.
From your Gallery
Tap Gallery.
• To view more photos, scroll left or right.
• To zoom in or out, double-tap the screen or place two fingers and spread them apart (move your fingers closer
together to zoom out).
44
Video camera
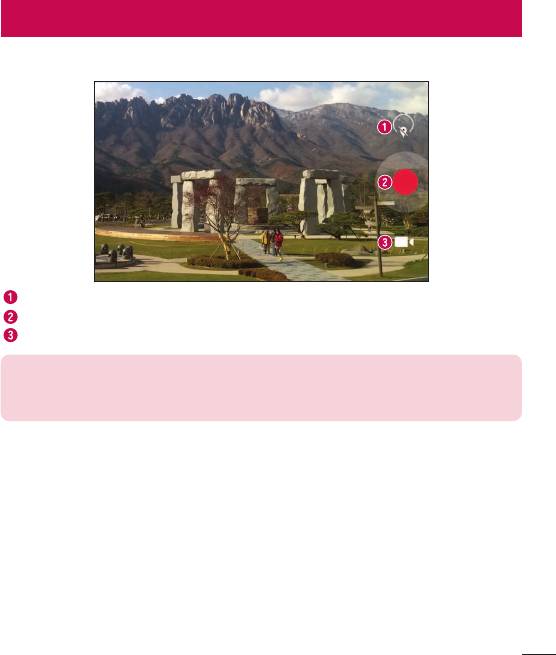
Getting to know the viewfinder
Setting icon: Tap this icon to change camera/video settings such as flash, exposure and so on.
Record button
Mode icon: Tap this icon switch to the desired mode; Camera, Video and Panorama mode.
TIP!
When recording a video, place two fingers on the screen and pinch to use the Zoom
function.
45
Video camera
Using the advanced settings
To change video settings such as flash, White balance and so on, touch the circle to the next to the Record
button.
WHITE BALANCE
: Improves color quality in various lighting conditions.
MORE OPTIONS
: Tap to select the advanced options like Time Lapse or Store location.
Swap camera
: Switch between the rear-facing camera lens and the front-facing camera lens.
FLASH MODE
: Tap to select the flash mode.
Recording a quick video
1 Open the Camera application and choose the Video mode button.
2 The video camera viewfi nder appears on the screen.
3 Holding the phone, point the lens towards the subject you wish to capture in your video.
4 Tap
once to start recording.
5 A red light will appear at the top left corner of the viewfi nder with a timer showing the length of the video.
6 Tap on the screen to stop recording.
After recording a video
To see the video you just took, swipe from right to left.
Keep swiping to see other video images in your Gallery
Tap to send your video to others or share it via social network services.
Tap to send the video via MMS.
Tap to open all advanced options.
NOTE: Additional charges may apply when MMS messages are downloaded while
roaming.
46

From your Gallery
Tap Gallery. Tap on video play icon to play the video.
47
Function
Guest mode
To protect your privacy or limit some applications to your children, you can use the Guest mode.
When you lend your phone to others, you can limit the applications to be displayed.
In advance, set the Guest mode and customize the options.
NOTE: To use the Guest mode, the pattern lock should be set in advance.
1 Tap
> > Settings > Guest mode.
2 Tap the Guest Mode switch
to enable this mode.
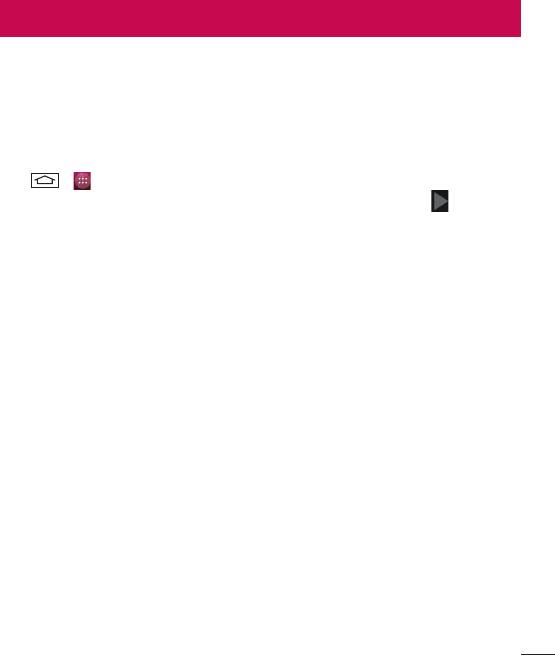
KNOCKON
You can turn on/off the screen by just double-tap.
To activate KnockON feature
1 Tap
> > Settings > Display > KNOCKON.
2 Place a checkmark on KNOCKON.
Double-tap the center screen quickly to unlock the screen.
To lock the screen, double-tap the status bar in any
screen (except on the camera viewfinder) or empty area on the Home screen.
NOTE: When turning the screen on, make sure you do not cover the proximity sensor.
Doing so will turn the screen off immediately after turning it on in order to prevent
abnormal turning on in your pocket or bag.
48
Multimedia
Gallery
Open the Gallery application to view albums of your pictures and videos.
1 Tap
> > Gallery.
You can manage and share all your image and video fi les with Gallery.
NOTE:
• Some file formats are not supported, depending on the software installed on the
device.
• Some files may not play properly, depending on how they are encoded.
View photos in Gallery
To view your photos, open the Gallery app.
• By default, your photos are automatically organized into Albums. You can also view photos by Location, Time,
People, or Tags. Touch Albums at the top of the screen to see these options.
• Once you touch a group of photos, you’ll see photos in the Grid view. Touch the Album title at the top of the
screen to switch between Grid view and Filmstrip view.
• To see other options, touch Menu .
Zooming in and out
Use one of the following methods to zoom in on an image:
• Double-tap anywhere to zoom in.
• Spread two fingers apart on any place to zoom in. Pinch to zoom out, or double-tap to return.
Playing videos
Video files show the icon in the preview. Select a video to watch it and tap . The Videos application will
launch.
Editing photos
When viewing an photo, tap > Edit.
Deleting photos/videos
Use one of the following methods:
• In a folder, touch and hold an image, once image is highlighted then select photos/videos which you wanted to
delete, and then tap
> Delete.
49
Multimedia
• When viewing a photo, tap > Delete.
Setting as wallpaper
When viewing a photo, tap > Set picture as to set the image as wallpaper or assign to a contact.
NOTE:
• Some file formats are not supported, depending on the device software.
• If the file size exceeds the available memory, an error can occur when you open files.
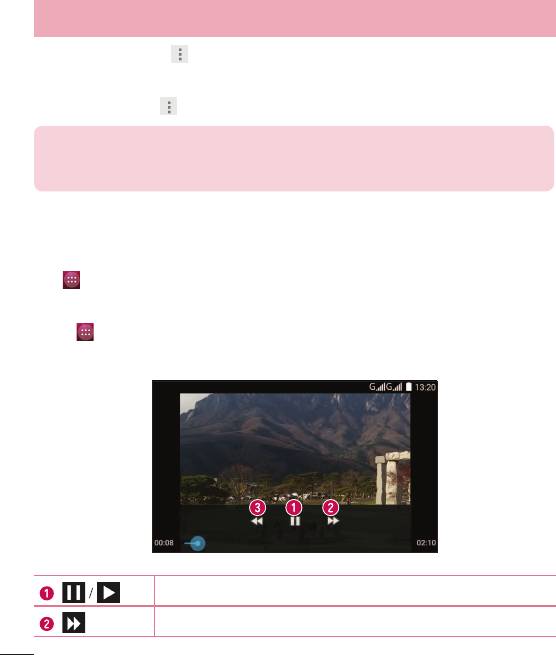
Videos
Your phone has a built-in video player that lets you play all of your favorite videos. To access the video player,
touch
> Gallery.
Playing a video
1 Touch > Gallery.
2 Select the video you want to play.
Touch to pause/resume video playback.
Touch to go 5 seconds forward.
50
Touch to go 15 seconds backward.
To change the volume while watching a video, press the up and down volume keys on the left-hand side of the
phone.
Music
Your phone has a built-in music player that lets you play all your favorite tracks. To access the music player, tap
> > Play Music.
Playing a song
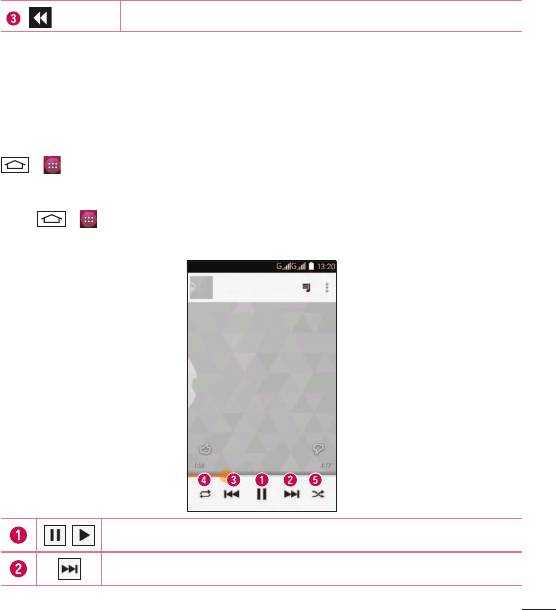
1 Tap > > Play Music.
2 Select the song you want to play.
Tap to pause/ resume playback.
/
Tap to skip to the next track in the album, playlist, or shuffle.
51
Multimedia
Tap to restart the current track or skip to the previous track in the album, playlist, or
shuffle.
Tap to toggle through the repeat modes to repeat all songs, repeat current song, or repeat
off.
Tap to play the current playlist in shuffle mode (tracks are played in random order).
Add music files to your phone
Start by transferring music files to your phone:
• Transfer music using Media sync (MTP).
• Download from the wireless Web.
• Synchronize your phone to a computer.
• Receive files via Bluetooth.
Transfer music using Media sync (MTP)
1 Connect the phone to your PC using the USB cable.
2 Select the Media sync (MTP) option.
Your phone will appear as another hard drive on your computer. Click
on the drive to view it. Copy the fi les from your PC to the drive folder.
NOTE:
• Some file formats are not supported, depending on the device software.
• If the file size exceeds the available memory, an error can occur when you open files.
• Music file copyrights may be protected by international treaties and national copyright
laws. Therefore, it may be necessary to obtain permission or a licence to reproduce or
copy music. In some countries, national laws prohibit private copying of copyrighted
material. Before downloading or copying the file, check the national laws of the relevant
country concerning the use of such material.
52

FM Radio
Your phone has a built-in FM radio so you can tune in to your favorite stations and listen on the go.
NOTE: You need to use your headphones to listen to the radio. Insert it into the
headphone jack.
53
Utilities
Setting your alarm
1 Tap > > Clock > > .
2 Tap Done.
3 After you set the alarm, your phone lets you know how much time is left before the alarm will go off.
4 Set the Repeat, Alar
m sound, and Vibration options.
NOTE: To change alarm settings in the alarm list screen, tap the and select Settings.
Using your calculator
1 Tap > > Calculator.
2 Tap the number keys to enter numbers.
3 For simple calculations, tap the function you want to perform (+, –, x or ÷) followed by =.
4 For more complex calculations, touch
and select the Advanced panel, then choose sin, cos, tan,
log etc.
5 To clear the history, touch
and select the Clear history.
Adding an event to your calendar
1 Tap > > Calendar.
2 On the screen, you can fi nd the different view types for the Calendar (Day, Week, Month, Agenda).
3 Tap on the date for which you wish to add an event and tap
.
4 Tap Event name and enter the event name.
5 Tap Location and enter the location.
Check the date and enter the time you wish your event to start and
fi nish.
6 If you wish to repeat the alarm, set REPETITION and set REMINDERS,
if necessary.
7 Tap DONE to save the event in the calendar
.
54
Sound Recorder
Use the voice recorder to record voice memos or other audio files.
Recording a sound or voice
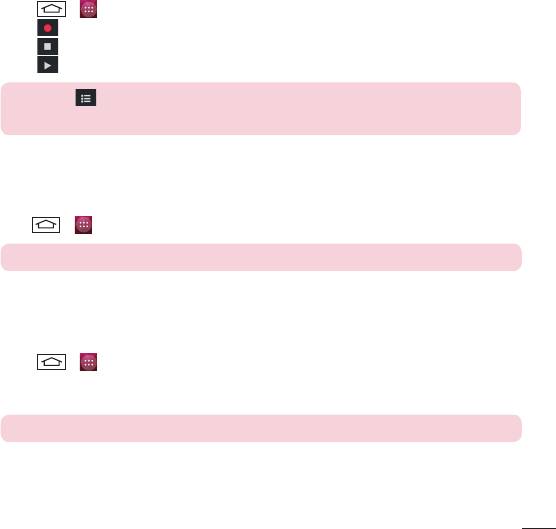
1 Tap > > Sound Recorder.
2 Tap
to begin recording.
3 Tap
to end the recording.
4 Tap
to listen to the recording.
NOTE: Tap to access your album. You can listen to the saved recording. The
available recording time may differ from actual recording time.
Google+
Use this application to stay connected with people via Google’s social network service.
• Tap > > Google+.
NOTE: This application may not be available depending on the region or service provider.
Voice Search
Use this application to search webpages using voice.
1 Tap
> > Voice Search.
2 Say a keyword or phrase when Speak no
w appears on the screen. Select one of the suggested keywords
that appear.
NOTE: This application may not be available depending on the region or service provider.
55
Utilities
Downloads
Use this application to see what files have been downloaded through the applications.
• Tap > > Downloads.
NOTE: This application may not be available depending on the region or service provider.
56
The Web
Browser
Use this application to browse the Internet. Browser gives you a fast, full-color world of games, music, news,
sports, entertainment and much more, right on your mobile phone wherever you are and whatever you enjoy.
NOTE: Additional charges apply when connecting to these services and downloading
content. Check data charges with your network provider.
1 Tap
> > Browser.
Using the Web toolbar
Tap slide it upwards with your finger to open.
Tap to go back one page.
Tap to go forward one page, to the page you connected to after the current one. This is the
opposite of what happens when you tap , which takes you to the previous page.
Tap to add a new window.
Tap to access bookmarks.
Viewing webpages
Tap the address field, enter the web address and tap Go.
Opening a page
To go to new page, tap
> .
To go to another webpage, tap
, scroll up or down, and tap the page to select it.
Bookmarks
To bookmark the current webpage, tap > Save to bookmarks > OK.
To open a bookmarked webpage, tap
and select one.
57
The Web
Chrome
Use Chrome to search for information and browse webpages.
1 Tap
> > Chrome.
NOTE: This application may not be available, depending on your region and service
provider.
Viewing webpages
Tap the Address field, and then enter a web address or search criteria.
Opening a page
To go to a new page, tab > New tab.
To go to another webpage, tap
, scroll up or down and tap the page to select it.
Syncing with other devices
Sync open tabs and bookmarks to use with Chrome on another device when you are logged in with the same
Google account.
To view open tabs on other devices, tap
> Other devices.
Select a webpage to open.
To add bookmarks, tap the Menu Key
> > Save.
58

Settings
This section provides an overview of items you can change using your phone's System settings menus.
To access the Settings menu:
Tap
> > SETTINGS.
- or -
Tap
> > Settings.
WRELESS & NETWORKS
< Wi-Fi >
Wi-Fi – Turns on Wi-Fi to connect to available Wi-Fi networks.
TIP! How to obtain the MAC address
To set up a connection in some wireless networks with MAC filters, you may need to
enter the MAC address of your phone in the router.
You can find the MAC address in the following user interface: tap
> > Settings
> Wi-Fi >
> Advanced > MAC address.
< Bluetooth >
Turn the Bluetooth wireless feature on or off to use Bluetooth.
< Data usage >
Displays the data usage and set mobile data usage limit.
< More… >
Airplane mode – After switching to Airplane mode, all wireless connections are disabled.
Tethering & portable hotspot
Wi-Fi hotspot – You can also use your phone to provide a mobile broadband connection. Create a hotspot
and share your connection. Please read "Sharing your phone's data connection" for more information.
USB tethering – Connect the USB cable to share the internet connection with the computer.
Bluetooth tethering – Allows you to set your phone whether you are sharing the Internet connection or not.
Hotspot & tethering settings – Select the correct protocol to share the internet connection with the
computer.
59

Settings
NOTE: You must set a lock screen PIN or password before you can use credential
storage.
Default SMS app – Allows you to set the default SMS app.
VPN – Displays the list of Virtual Private Networks (VPNs) that you've previously configured. Allows you to add
different types of VPNs.
Mobile networks – Set options for data roaming, network mode & operators, access point names (APNs) etc.
USB Internet – Sharing Windows PC internet via USB cable.
Sound
Volumes – Adjust the phone's volume settings to suit your needs and your environment.
Phone ringtone – Set the ringtone for calls.
Vibrate when ringing – Checkmark to set the phone to vibrate in addition to the ringtone when you receive
calls.
Default notification sound – Set the notification sound.
Dial pad touch tones – Checkmark to play tones while using dial pad.
Touch sounds – Checkmark to play sound when making screen selection.
Screen lock sound – Checkmark to play sound when locking and unlocking the screen.
Vibrate on touch – Checkmark to vibrate when tapping the Home touch buttons and during other UI
interactions.
Display
Lock screen notifications – Checkmark to show notifications on lock screen.
Wallpaper – Sets your Lock screen wallpaper. Select it from Gallery, Live Wallpapers, Photos or Wallpapers.
Brightness – Adjusts the brightness of the screen. For best battery performance, use the dimmest comfortable
brightness.
Auto-rotate screen – Checkmark to set the phone to automatically rotate the screen based on the phone
orientation (portrait or landscape).
KNOCK ON – Double-tap the center of the screen quickly to turn screen on and off.
Sleep – Sets the amount of time before the screen times out
Daydream – Tap the Daydream switch to toggle it On or Off. On allows the set screensaver to be displayed
60

when the phone is sleeping while docked and/or charging. Choose from Clock, Colors, Google Photos.
Font size – Sets the size of the font displayed in the phone and menus.
< Storage >
Phone storage – View the internal storage usage.
SD card – Check total available SD card space. Touch Unmount SD card for safe removal. Erase SD card if you
want to delete all data from the SD card.
< Battery >
Battery Percentage – Checkmark to display the battery level percentage on the Status Bar next to the battery
icon.
< Apps >
View and manage your applications.
< Location >
Turn on location service, your phone determines your approximate location using GPS, Wi-Fi and mobile
networks.
Mode – Set the location mode from High accuracy, Battery saving and Device only.
< Security >
Screen lock – Set a screen lock type to secure your phone. Opens a set of screens that guide you through
drawing a screen unlock pattern. Set None, Slide, Face Unlock, Pattern, PIN or Password.
Enable widgets – Checkmark to show the wigets on Lock screen.
Lost phhone contact – Select whether to display the owner information on the lock screen and customize the
owner information.
Automatically lock – Choose the amount of time before the screen automatically locks after the screen has
timed-out.
Power button instantly locks – Allows you to instantly lock the screen when you press the Power/Lock key.
Encrypt phone – Allows you to encrypt data on the phone for security. You will be required to enter a PIN or
password to decrypt your phone each time you power it on.
Set up SIM card lock – Set up SIM card lock or change the SIM card PIN.
Make password visible – Show the last character of the hidden password as you type.
Device administrators – View or deactivate phone administrators.
Unknown sources – Default setting to install non-Play store applications.
Verify apps – Disallow or warn before installation of apps that may cause harm.
Storage type - Display the storage type.
61

Settings
Trusted credentials – Display trusted CA certificates.
Install from phone storage – Choose to install encrypted certificates.
Clear credentials – Remove all certificates.
< Guest mode >
To protect your privacy or limit some applications to your children, you can use the Guest mode.
When you lend your phone to others, you can limit the applications to be displayed.
In advance, set the Guest mode and customize the options.< Language & input >
Use the Language & input settings to select the language for the text on your phone and to configure the
on-screen keyboard, including words you've added to its dictionary.
< Backup & reset >
Change the settings for managing your settings and data.
Back up my data – Set to backup your settings and application data to the Google server.
Backup account – Set to backup your account.
Automatic restore – Set to restore your settings and application data when the applications are reinstalled on
your device.
DRM reset – Backs up all information on the device and restores it in the event of data loss or replacement.
Factory data reset – Reset your settings to the factory default values and delete all your data. If you reset the
phone this way, you are prompted to re-enter the same information as when you first started Android.
< Date & time >
Use Date & time settings to set how dates will be displayed. You can also use these settings to set your own
time and time zone rather than obtaining the current time from the mobile network.
< Scheduled power on & off >
Enables your phone to turn on or off automatically on the day and time which you schedule.
< Accessibility >
Use the Accessibility settings to configure any accessibility plug-ins you have installed on your phone.
NOTE: Requires additional plug-ins to become selectable.
TalkBack
Allows you to set up the TalkBack function which assists people with impaired vision by providing verbal
feedback.
Captions – Allows the customizing of caption settings for those with hearing impairments.
62

Magnification gestures – When this feature is turend on, you can zoom in and out by triple-tapping the screen.
Large text – Checkmark to increase the size of the text.
Power button ends call – Checkmark so that you can end voice calls by pressing the Power/Lock key. When
this option is enabled, pressing the Power/Lock key during a call does not lock the screen.
Auto-rotate screen – Checkmark to allow the device to rotate the screen depending on the device orientation
(portrait or landscape).
Speak passwords – Checkmark to allow voice confirmations of characters when entering passwords.
Accessibility shortcut – Allows you to quickly enable accessibility features.
Text-to-speech output – Sets the preferred speech engine and speech rate.
Touch feedback time – Allows you to set the touch and hold delay (Short, Medium, or Long).
< Printing >
Allows you to print the content of certain screens (such as web pages displayed in Chrome) to a printer
connected to the same Wi-Fi network as your Android device.
< About phone >
View legal information and check your phone status and software version.
63

Connect to a Computer via USB
You can use a USB cable to connect your phone to a PC or Laptop and transfer music, pictures, and other files
in both directions.
Transfer user contents via a computer using a USB cable.
Related settings
Settings > Device > Storage > Menu > USB computer connection
1 Connect your phone to a computer using a USB cable. Then open the Android phone's Notifi cations Panel.
2 Tap the USB computer connection bar , then (depending on the connected device and transferred fi les)
tap USB storage, Media device(MTP) or Camera (PTP).
3 On the computer, open My computer (or Windo
ws Explorer), click the removable drive associated with
your phone, then transfer all of the fi les you want to the computer and vice versa.
®
4 On the computer, safely stop/remove the USB Phone. For example, for Windows
XP, use the Safely
Remove Hardware option.
5 On your phone, open the Notifi cations Panel, tap Tap the USB computer connection bar (
> Charge
phone (or Turn off USB storage) then disconnect the the phone from the computer.
64

Phone software update
Phone software update
LG Mobile Phone software update via Over-the-Air (OTA)
This feature allows you to conveniently update your phone's software to a newer version via OTA, without
connecting using a USB data cable. This feature will only be available if and when LG makes a newer firmware
version available for your device.
You should first check the software version on your mobile phone: Settings > About phone > System updates
> Check now.
NOTE: Your personal data from internal phone storage—including information about your
Google account and any other accounts, your system/application data and settings, any
downloaded applications and your DRM licence—might be lost in the process of updating
your phone's software. Therefore, LG recommends that you backup your personal data
before updating your phone's software. LG does not take responsibility for any loss of
personal data.
NOTE: This feature depends on your network service provider, region and country.
65

About this user guide
About this user guide
• Before using your device, please carefully read this manual. This will ensure that you use your phone safely
and correctly.
• Some of the images and screenshots provided in this guide may appear differently on your phone.
• Your content may differ from the final product, or from software supplied by service providers or carriers, This
content may be subject to change without prior notice. For the latest version of this manual, please visit the LG
website at www.lg.com.
• Your phone's applications and their functions may vary by country, region, or hardware specifications. LG
cannot be held liable for any performance issues resulting from the use of applications developed by providers
other than LG.
• LG cannot be held liable for performance or incompatibility issues resulting from registry settings being edited
or operating system software being modified. Any attempt to customize your operating system may cause the
device or its applications to not work as they should.
• Software, audio, wallpaper, images, and other media supplied with your device are licensed for limited use. If
you extract and use these materials for commercial or other purposes, you may be infringing copyright laws.
As a user, you are fully and entirely responsible for the illegal use of media.
• Additional charges may be applied for data services, such as messaging, uploading and downloading, auto-
syncing, or using location services. To avoid additional charges, select a data plan that is suitable for your
needs. Contact your service provider to obtain additional details.
Trademarks
• LG and the LG logo are registered trademarks of LG Electronics.
• All other trademarks and copyrights are the property of their respective owners.
Notice: Open Source Software
To obtain the corresponding source code under GPL, LGPL, MPL and other open source
licences, please visit http://opensource.lge.com/
All referred licence terms, disclaimers and notices are available for download with the
source code.
66
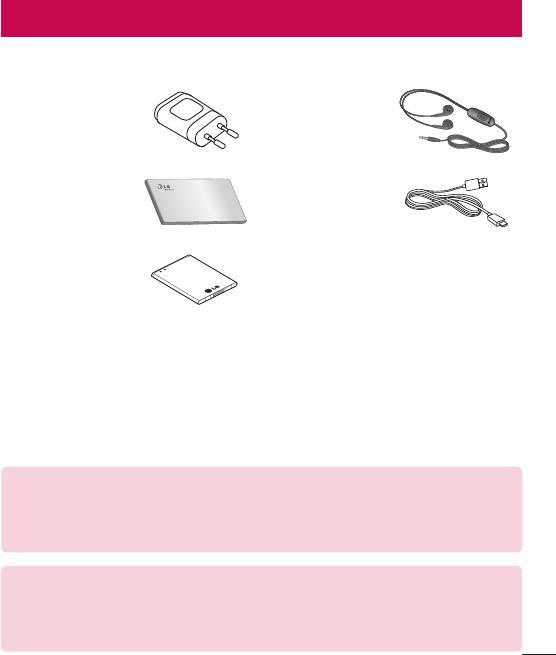
Accessories
These accessories are available for use with the your phone. (Items described below may be optional.)
Travel adaptor
Stereo headset
Quick Start Guide Data cable
Battery
NOTE:
• Always use genuine LG accessories.
• Failure to do this may void your warranty.
• Accessories may vary in different regions.
Ukraine Restriction of Hazardous Substances
The equipment complies with requirements of the Technical Regulation, in terms of
r
estrictions for the use of certain dangerous substances in electrical and electronic
equipment.
67
Troubleshooting
This chapter lists some problems you might encounter when using your phone. Some problems require you to
call your service provider, but most are easy to fix yourself.
Message Possible causes Possible corrective measures
There is no SIM card
SIM card
Make sure that the SIM card is correctly
in the phone or it is
error
inserted.
inserted incorrectly.
Signal is weak or you
Move toward a window or into an open
are outside the carrier
area. Check the network operator coverage
No network
network.
map.
connection/
Dropped
Check whether the SIM card is more than
network
Operator applied
6~12 months old. If so, change your SIM
new services.
card at your network provider's nearest
branch. Contact your service provider.
To change a security
code, you will need
to confirm the new
code by re-entering
Codes do not
If you forget the code, contact your service
it.
match
provider.
The two codes you
have entered do not
match.
No
Not supported by
applications
service provider or
Contact your service provider.
can be set
registration required.
68

Message Possible causes Possible corrective measures
Dialling error New network not authorized.
New SIM card
Calls not
Check for new restrictions.
inserted.
available
Pre-paid charge limit
Contact service provider or reset limit with
reached.
PIN2.
On/Off key pressed
Press the On/Off key for at least two
Phone cannot
too briefly.
seconds.
be switched
on
Battery is not
Charge battery. Check the charging indicator
charged.
on the display.
Battery is not
Charge battery.
charged.
Outside temperature
Make sure phone is charging at a normal
is too hot or cold.
temperature.
Check the charger and its connection to
Charging
Contact problem
the phone.
error
No voltage Plug the charger into a different socket.
Charger defective Replace the charger.
Wrong charger Use only original LG accessories.
69
Troubleshooting
Message Possible causes Possible corrective measures
The Fixed dialling
Number not
Check the Settings menu and turn the
number function
allowed
function off.
is on.
Impossible
to receive /
Memory full Delete some messages from your phone.
send SMS &
photos
Files do not
Unsupported file
Check the supported file formats.
open
format
The screen
If you use a protection tape or case, make
does not turn
Proximity sensor
sure it has not covered the area around the
on when I
problem
proximity sensor. Make sure that the area
receive a call.
around the proximity sensor is clean.
Check the settings status in the sound menu
No sound Vibration mode
to make sure you are not in vibration or
silent mode.
Hangs up or
Intermittent software
Try to perform a software update via the
freezes
problem
website.
70
FAQ
Category
Question Answer
Sub-Category
You can connect a Bluetooth audio device
BT
such as a Stereo/Mono headset or Car Kit.
What are the functions
Bluetooth
Also, when the FTP server is connected to
available via Bluetooth
Devices
a compatible device, you can share content
stored on the storage media.
Data
How can I backup
The Contacts data can be synchronized
Contacts
Contacts?
between your phone and Gmail™.
Backup
Data
Is it possible to set up
Only two-way synchronization is available.
Synchronization
one-way sync with Gmail?
Is it possible to
The Inbox is automatically synchronized. You
Data
synchronize all email
can view other folders by tapping the
and
Synchronization
folders?
select Folders to choose a folder.
Google™
Do I have to log into
Once you have logged into Gmail, no need
Service
Gmail whenever I want to
to log into Gmail again.
Gmail Log-In
access Gmail?
Google™
Service
Is it possible to filter
No, email filtering is not supported via the
emails?
phone.
Account
What happens when
Phone
I execute another
Your email will automatically be saved as
Function
application while writing
a draft.
an email?
71
FAQ
Category
Question Answer
Sub-Category
Is there a file size
Phone
limitation for when I
Function
There is no file size limitation.
want to use MP3 file
Ringtone
as ring tone?
My phone does not
Phone
display the time of receipt
You will only be able to see the times for
Function
for messages older than
messages received the same day.
Message Time
24 hrs. How can I change
this?
Phone
Is it possible to install
Any application that is available at Play
Function
another navigation
Store™ and is compatible with the hardware
Navigation
application on my phone?
can be installed and used.
Is it possible to
Phone
Only Gmail and MS Exchange server
synchronize my contacts
Function
(company email server) contacts can be
from all my email
Synchronisation
synchronized.
accounts?
If you transferred a contact with the W & P
functions saved into the number, you will not
be able to use those features. You will need
Phone
to re-save each number.
Is it possible to save a
Function
contact with Wait and
How to save with Wait and Pause:
Wait and
Pause in the numbers?
1. From the Home screen, tap the Phone
Pause
icon
.
2. Dial the number, then tap the
.
3. Tap Add 2-sec pause or Add wait.
Phone
You are able to set the phone to require that
What are the phone’s
Function
an Unlock Pattern be entered before the
security functions?
Security
phone can be accessed or used.
72
Category
Question Answer
Sub-Category
1. From the Home screen, tap the
.
2. Tap SETTINGS > Security > Screen
lock.
3. Tap Screen lock > Pattern. The first time
you do this, a short tutorial about creating
an Unlock Pattern will appear.
4. Set up by drawing your pattern once, and
once again for confirmation.
Phone
Function
Precautions to take when using the
How do I create the
pattern lock.
Unlock
Unlock Pattern?
It is very important to remember the unlock
Pattern
pattern you set. You will not be able to
access your phone if you use an incorrect
pattern five times. You have five chances to
enter your unlock pattern, PIN or password.
If you have used all 5 opportunities, you can
try again after 30 seconds. (Or, if you preset
the backup PIN, you can use the backup
PIN code to unlock the pattern.)
73
FAQ
Category
Question Answer
Sub-Category
If you have forgotten your pattern:
If you logged into your Google account on
the phone but failed to enter the correct
pattern 5 times, tap the forgot pattern
button. You are then required to log in with
Phone
What should I do if I forget
your Google account to unlock your phone.
Function
the unlock pattern and I
If you have not created a Google account on
Unlock
didn’t create my Google
the phone or you have forgotten it, you will
Pattern
account on the phone?
have to perform a hard reset.
Caution: If you perform a factory reset,
all user applications and user data will
be deleted. Please remember to backup
any important data before performing a
factory reset.
Phone
Will I know when my
Function
Yes, you will receive a notification.
memory is full?
Memory
VPN access configuration is different for
Phone
each company. To configure VPN access
Function
How do I set up a VPN?
from your phone, you must obtain the details
VPN
from your company’s network administrator.
My screen turns off after
1. From the Home screen, tap the
.
Phone
only 15 seconds. How
2. Tap SETTINGS.
Function
can I change the amount
3. Tap Display > Sleep.
Screen time
of time for the backlight to
4. Tap the preferred screen backlight timeout
out
turn off?
time.
74
Category
Question Answer
Sub-Category
When using data, your phone may default to
the Wi-Fi connection (if Wi-Fi connectivity on
Phone
When Wi-Fi and mobile
your phone is set to On). However, there will
Function
network are both
be no notification when your phone switches
Wi-Fi &
available, which service
from one to the other.
mobile
will my phone use?
To know which data connection is being
network
used, view the mobile network or Wi-Fi icon
at the top of your screen.
Yes. Just touch and hold the icon until the
Phone
Is it possible to remove an
Remove icon appears at the top of the
Function
application from the Home
screen. Then, without lifting your finger, drag
Home screen
screen?
the icon to the Remove icon.
I downloaded an
Phone
1. From the Home screen, tap the
.
application and it causes
Function
2. Tap SETTINGS > Apps > Downloaded.
a lot of errors. How do I
Application
3. Tap the application, then tap Uninstall.
remove it?
Is it possible to charge my
Phone
Yes, the phone will be charged by the USB
phone using a USB data
Function
cable regardless of whether the necessary
cable without installing the
Charger
drivers are installed or not.
necessary USB driver?
Phone
Will my alarm be audible if
Function
No, this is not supported.
the phone is turned off?
Alarm
Phone
If my ringer volume is set
Your alarm is programmed to be audible
Function
to Off or Vibrate, will I hear
even in these scenarios.
Alarm
my alarm?
Recovery
How can I perform a
If your phone does not restore to its original
Solution
factory reset if I can’t
condition, use a hard reset (factory reset) to
Hard Reset
access the phone’s
initialize it.
(Factory Reset)
setting menu?
75

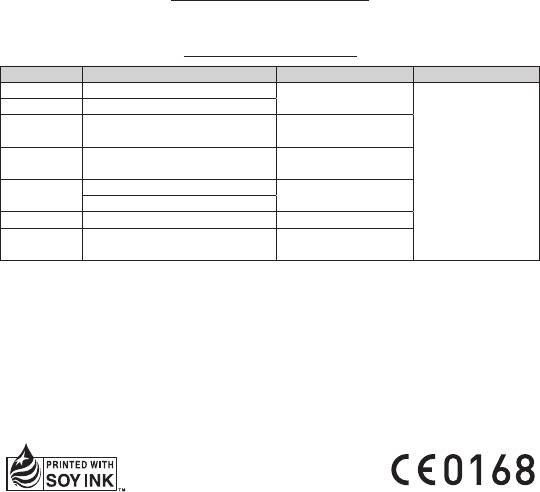
Cлyжбa поддepж
ки к
л
иeнтoв
Уважaeмый пoтpeбитeль! Ecли Bac интepecyeт инфopмaция, cвязаннaя c пpиoбpeтeниeм пpoдyкции,
xapaктepиcтикaми и эксплуатацией тexники, a тaкжe cepвиcным oбcлyживaниeм, пpocим Bac oбpaщaтьcя в
Cлyжбy поддepж
ки к
л
иeнтoв.
Телефон Режим работы Интернет
Россия 8-800-200-7676
Круглосуточно
Беларусь 8-820-0071-1111
8:00 - 21:00 (Пн.-Пт.)
Украина 0-800-303-000
8:30 - 18:30 (Сб., Вс.)
00-800-0081-0005
Moldova
Permanent
Doar de pe telefoane ixe
http://www.lg.com
8-8000-805-805
9:00 - 20:00 (Пн.-Пт.)
Казахстан
2255 (для мобильных телефонов)
9:00 - 18:00 (Сб., Вс.)
Кыргызстан 8-0000-710-005 Круглосуточно
9:00 - 18:30 (Пн.-Пт.)
Узбекистан 8-800-120-2222
9:00 - 15:00 (Сб.)
Bce звонки бecплaтныe
Всі дзвінки зі стаціонарних телефонів безкоштовні

