LG C2500: Multimedia [Menu 6]
Multimedia [Menu 6]: LG C2500

Multimedia [Menu 6]
Camera [Menu 6-1]
! Note
Please obey all local laws governing the taking of picture.
User can take photo with the built-in camera. The camera
lens is on the back of the handset and the display of the
handset works as viewfinder. The camera produces
When user enter the “Camera” screen, user can press
pictures in JPG format.
Navi-right/left key L and R to change camera options
Please pay attention; if handset is not enough memory to
and Navi-up/down D and U to change camera options
take a new photo, you need to free some pictures by
status
deleting old photos or other files in the gallery.
! Note
In an environment of over 40°C “Night mode” can not activate
properly.
Camera options
Capture mode Image size Cont shot Frame Image qty Effect EV WB Night Zoom
Camera mode 128x128 Off Off High Normal +4 Auto Off 1.0x
160x120 3 shot Frame 1 Normal B & W +3 Daylight On 1.5x
320x240 5 shot Frame 2 Low Sepia +2 Tungsten 2.0x
640x480 9 shot Frame 3 Negative +1 Fluorescent 2.5x
Frame 4 B&W negat. 0 3.0x
Frame 5 Oil paint -1
Frame 6 Emboss -2
Frame 7 Bluish -3
Frame 8 Black board -4
Frame 9 White Board
Frame 10 Crayon
C2500
47
[Night mode]
On
Option
Back
Camera
options bar
Camera
display area
Selection keys
Multimedia [Menu 6]
Taking a Photo
• Cont shot: you can take a photo in various shot.
• In Multimedia menu, select Camera.
• Delay timer: to set a time delay before the camera takes
• The live image appears on the display, and you can use
a photo. Select the length of delay you want.
the display as a view finder.
• Restore default: to reset all camera settings back to
• To take a photo press side key to capture.
default.
When taking a photo a shutter sound is heard. The
phone saves the photo in the
Photo gallery of the
MP3 player [Menu 6-2]
Multimedia menu.
Your phone includes an MP3 player for listening to MP3
To setup Camera option
files.
Press Option to enter options screen. User can select:
MP3 files stored in the MP3 folder (Default setting) will
automatically be detected and added to the default play
• To photo gallery: the folder save images taken, for detail
list.
please see Photo gallery.
You can listen to the sound files via a compatible headset,
• Camera setting: the setting option for further camera
or the phone’s loudspeaker. You can make or answer a
functions
call while using the MP3 player. During a call, the
• Image setting: the settings about image
playback is paused.
• Image size: the options of image size have: 128x128,
160x120, 320x240, 640x480
• Effect setting: to set effects of photo.
• Add frame: to select the frame style from the list when
take pictures.
– Stick frame only support when image size set for 128x128.
– When image size set for 128x128, user can press Navi-up
U or down D key to change frame style directly.
48
C2500
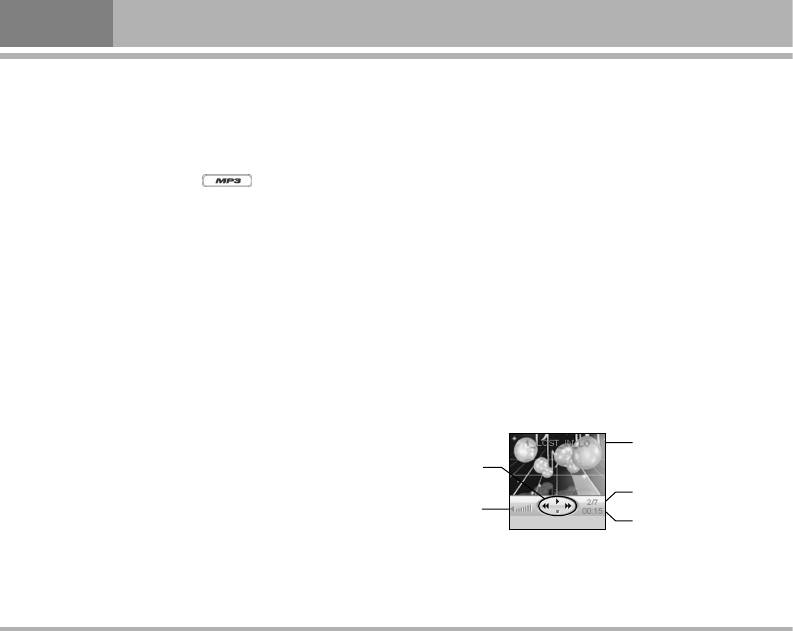
1_LOST_IN_LO
1_LOST_IN_LO
Option
Back
Name of MP3
Function key
The play number of
Volume
MP3
The time of play
MP3
! Note
• Skin: to select background picture of MP3 player.
Because of the small dimension of the speaker, in some cases the
There are three skin pictures for users choose.
audio could be distorted, especially at maximum volume and when
• Select Repeat to play the current track or the enter
there are lots of bass sounds. Therefore, we recommend you to use
the stereo headset in order to appreciate the high quality of your
track list repeatedly.
music.
• Turn on/off Random function.
• Turn on/off Background play function.
The MP3 player supports: [Menu 6-2-1]
– On: allow music continuing playing when left audio
• MPEG-1 Layer III: Sampling frequency up to 48 KHz.
player.
Bit rate up to 320 Kbps stereo.
– Off: when user left audio player, music will stop.
• MPEG-2 Layer III: Sampling frequency up to 48 KHz.
• Please turn off the handset before Add/Delete music or
Bit rate up to 320 Kbps stereo.
handsets will automatic turn off when cable plug in.
MP3 player settings [Menu 6-2-2]
! Note
Settings: MP3 player setting options.
All music tracks must be storage in MP3 folder (Default setting, user
may not be change path.)
• Turn On/Off for List auto generate.
• When List auto generate function
• Plug in cable (USB) to handset and
turns on, the handset will refresh
PC, screen show two options:
the track list automatically
– Mass storage mode: for add / remove
everytime when the handset
music or image.
switch on.
- In the Mass storage mode, user can
• When List auto generate functions
add / remove music to handset via
turns off, the handset will not refresh the track list
PC.
automatically everytime when the handset switch on.
- COM Port mode:
set the USB as COM Port.
C2500
49
LG-ONLINE
[
03 Chopin03 Chopin
]
2929 Julul17:0917:09
Menu Contacts
USB Config :
Mass Storage
COM Port
OK Back
Multimedia [Menu 6]
Playing the file [Menu 6-2-3]
▪ Delete: to delete the selecting music.
• User can listen to music on the loudspeaker or with
▪ Rename: to modify the name of the selecting music.
headphone. The handset default setting for MP3 playing
▪ Add to rings: to add selected music for ring tone.
is loudspeaker; user also can plug in headphone to
▪ Detail: to show music information
listen MP3.
▪ Delete all: to delete all the music in the play list.
• Use the functions of the four ways Navigation key as
describe in the bellow table:
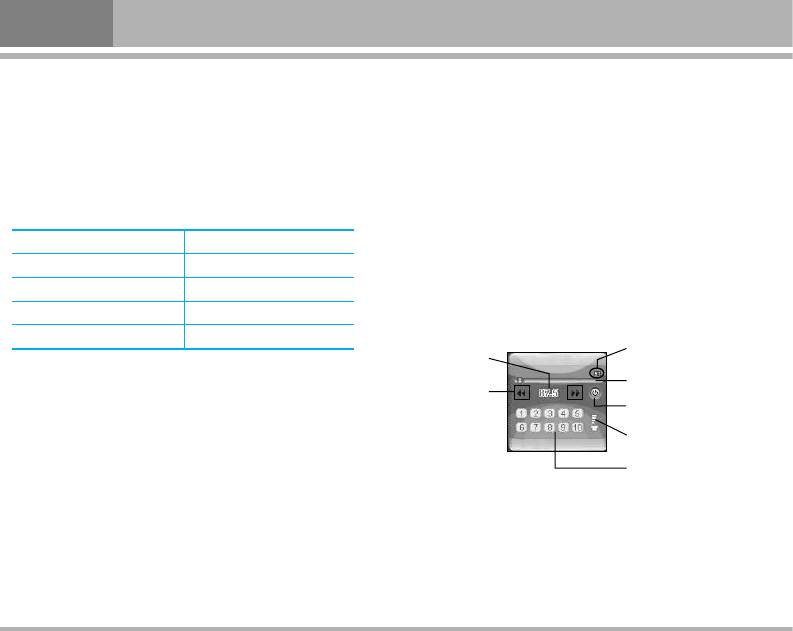
FM radio [Menu 6-3]
Four ways Navigation Key Audio Play Function
To listen to the FM radio on your phone connect the
U Up 4Play /;Pause music
compatible headset connector on the left top of the
D Down < Stop
phone. Note that the quality of the radio broadcast
L Left 9 Skip to previous tracks
depends on the radio station’s coverage in that particular
area.
R Right : Skip to next tracks
• In the MP3 player menu, press Option allows access to
the following settings.
– List: you can view all the tracks available on the track list
and play the desired track
– If you press Option in the play list, you can:
▪ Play: to play selected music.
▪ Add: to add music which not store in the MP3 folder.
50
C2500
FM Radio
Option
Back
Channel frequency
*Stereo indicate
Radio frequency
Search channel
indicate bar
icons
Radio power on/
off indicate
Volume
Channel list
* If the radio channel supports stereo effect, the stereo
Four ways Navigation key FM Radio Function
indicate will show on screen. If the radio channel not
D Down Turn On/Off radio
supports stereo effect, and the stereo indicate will hide
from screen.
L Left Short press to skip -0.1 MHZ
Long press enable channel auto
To turn on the radio
search
• Press
Menu and select Multimedia and FM radio.
R Right Short press to skip +0.1 MHZ
• Press down key Dto turn on/off radio.
Long press enable channel auto
search
! Note
Key 1~10 To change radio channel, by
Before you turn on the FM radio, please make sure the headset is
pressing the corresponding
plugged well. Otherwise, the FM radio cannot be turn on.
number key
– On the display is frequency of the radio channel.
– If you have already saved radio channels in channel list,
Using the radio
you can select a radio channel location 1 to 10 by
When the radio is on, press Option and select
pressing the corresponding number key.
• Channel list: To save the channel you have found, press
• Turning a radio channel
Option and select Edit. Key in the name of the channel and
! Note
Frequency press Done. You can save 10 radio channels in
the handset.
Using FM radio, user must plug in headphone, FM radio does not
support loudspeaker function.
• Manual input: if you know the frequency of the radio
channel you would like to listen to (between 87.5 MHz
• When the radio is on, long press Navigation left/rightkey
and 108.0 MHz), key it in and press OK.
to search left/right next channel automatically. When
you short press Navigation left/right key [L or R] key
• Auto search: if you want to search radio channel, press
to search channel skip +/-0.1 MHZ.
Yes when Preset list confirm message show up. Radio
channels will be selected automatically and saved in
Channel list. [MAX: 10 Channels)
C2500
51
Multimedia [Menu 6]
• Settings: FM radio setting options:
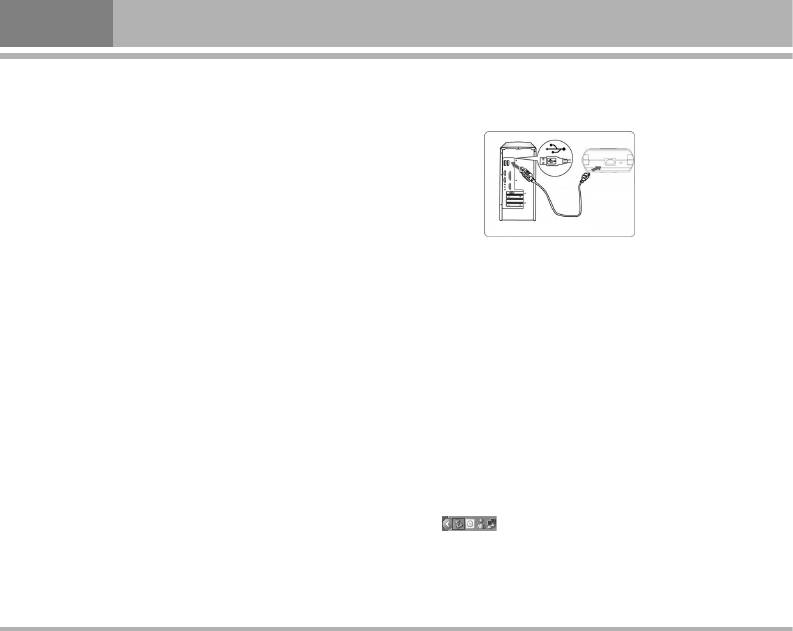
If you want to add/remove music and images to the
Handset, connect it to a PC with USB cable
! Note
You can normally make a call or answer an incoming call while
listening to the radio. The volume of the radio is muted. When you
end the call, the radio volume will automatically be turned up again.
Also, when an application using GPRS or HSCSD connection is
sending or receiving data, it may interfere with the radio.
Photo gallery [Menu 6-4]
Connecting the handset to PC
Photo gallery is a folder under File manager folder. It is a
folder to save the photo images. You can view image in
• After connected the handset and PC, choice “Mass
this folder.
Storage” handsets will automatic turn off
• Press Option and choose one of the following functions
• The OS will automatically generate a “Removable Disk”
that may be available for the selected file: View,
in My Computer. You can enter the disk to access the
Forward, Rename, Delete, Delete all files and Sort.
data in the handset.
• To use Mass storage (USB cable)
• You can access to the handset from the Window
Explorer (Windows 2000/XP) / File Manager or My
! Note
Computer and add / erase audio, image or other files to
System default requirement: PC hardware and software for Windows
the handset.
2000/XP. For more information, please see below “Install USB
Software for Window 2000”.
• If you want to remove the USB cable from the handset
after adding or erasing files,
! Note
– Double click the Remove Hardware icon in the taskbar
Please use USB according to the standard steps as below; otherwise
tray.
the data may lose or cause damage.
– Click Stop when the message “You can remove
hardware now” appears on the screen, remove the
handset.
52
C2500
Type
A
Type B
USB port (Type B)
on the player
USB port (Type A) on PC
USB Cable

Copy files into the handset
Delete: to delete the selected sound file.
• After connecting the handset to a PC successfully, there
Rename: to modify the name of the selecting sound.
will be a new disk “Removable Disk” in My computer.
Append: to append the now sound with the already
• Enter the directory stored your music, image, or other
existing sound. This function only supports the AMR
files, and select them thru your mouse. After selection,
file.
you’re your mouse on the selected files and click right
Forward: to forward the sound file to “Set as ring
button of your mouse to select “Copy”, enter the
tone” or “To MMS”.
Removable Disk from My Computer, and click right
Delete all: to delete the entire available sound files.
button of your mouse to select “Paste” then the music
– Settings: there are two types format setting: AMR or
files will be copied into the handset.
WAV
Voice recorder [Menu 6-5]
Install USB Software for Window 2000
Voice recorder settings
! Note
• Voice recorder is a simple voice recording application,
Please upgrade Windows 2000 to Service Pack 4 for supporting the
which provides functionalities for the user to manage
USB disk function.
voice files. User can play recorder voice use
For more information about Windows 2000 Service Pack 4,
loudspeaker or headphone. The loudspeaker is default
please visit
setting for playing recorder voice.
http://www.microsoft.com/windows2000/downloads/servicep
acks/default.asp
• Within Voice recorder submenu, you can select Record,
List and Settings
You can also download the Service Pack 4 from Microsoft web site.
– Record: Once recording is started, the remaining time
Copyright © 2004 Microsoft Corporation, One Microsoft Way,
is displayed.
Redmond, Washington 98052-6399 U.S.A. All rights reserved.
– List: you can play back or delete the recorded voice.
Press Option you can select from
Play: play the selected sound.
C2500
53
Multimedia [Menu 6]
Install USB Software for Window 98
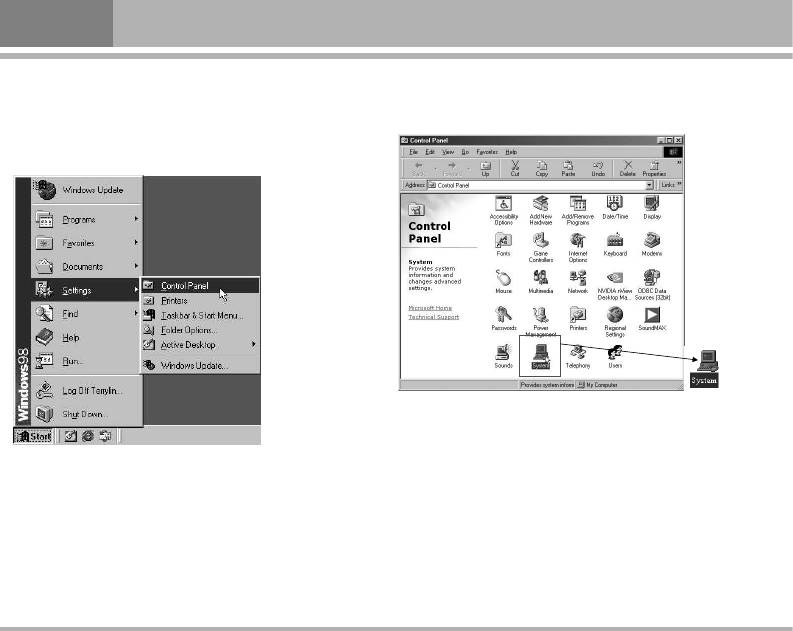
• Step 2 Open System
! Note
From Control panels ➝ System
Please use USB according to the standard steps as below; otherwise
the data may lose or cause damage.
• Step 1 Open Control Panels
Press Start ➝ Setting ➝ Control panels
54
C2500
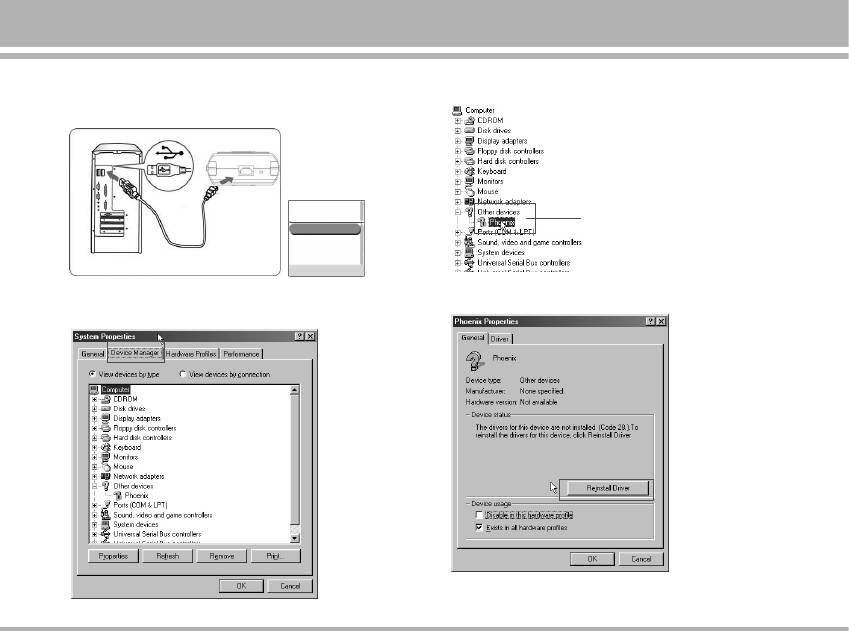
Connect it to a PC with USB cable, choice “Mass Storage”
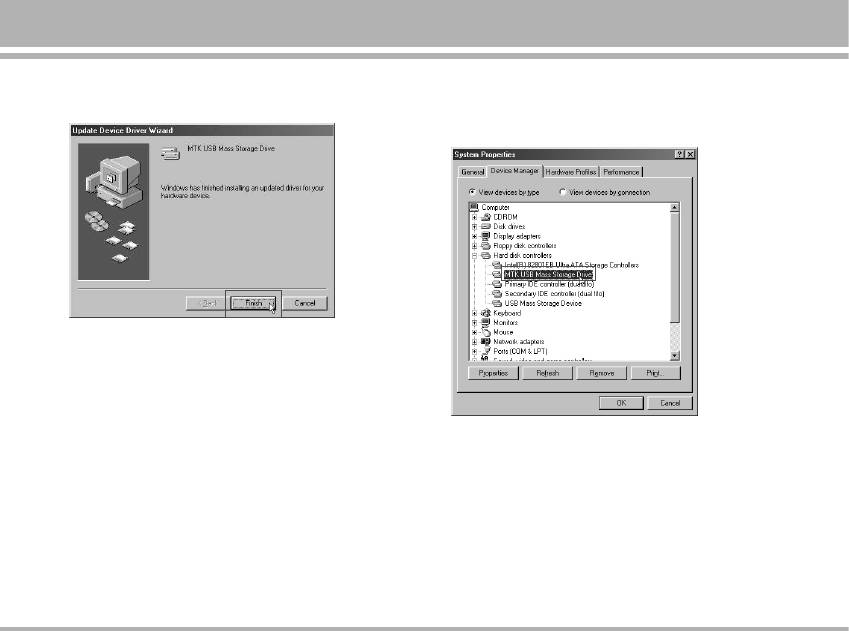
• Step 4 Double Click the Unknown USB Device
handsets will automatic turn off.
• Step 5 Click the
Reinstall Driver button
• Step 3 Open Device Manager
C2500
55
Type
A
Type B
USB port (Type B)
USB Config :
on the player
Mass Storage
COM Port
USB Cable
USB port (Type A) on PC
OK Back
Unknown USB device
Multimedia [Menu 6]
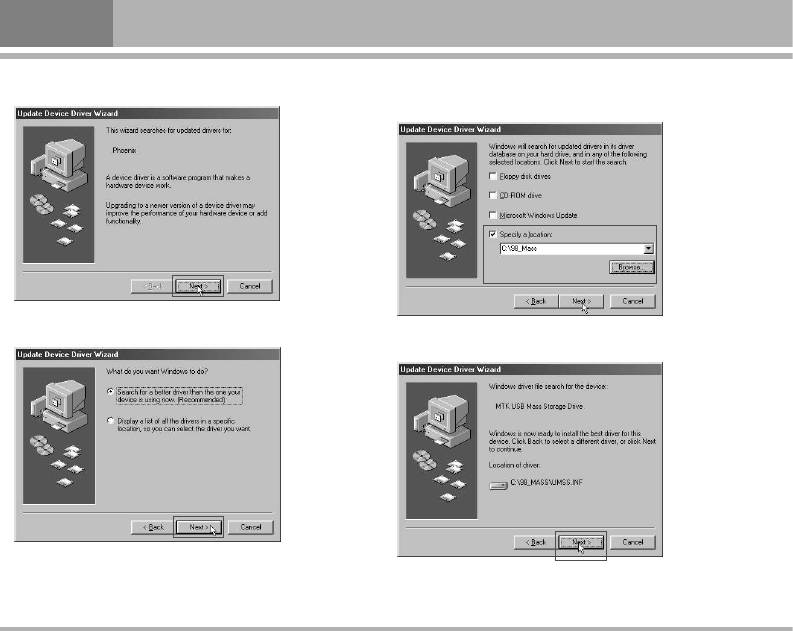
• Step 6 Press Next button
• Step 8 Assign the location where the device driver
locate. [The driver location is depending on user.]
• Step 7 Press Next button
• Step 9 Press Next button
56
C2500
• Step 10 Windows will search and install the USB driver
• Step 11 You can see the device in the Device Manager
and Install complete
In the Device Manager, you can see USB Mass Storage
Device show up.
! Note
You can download USB driver for Window 98 from LG WOW site.
C2500
57
Оглавление
- ÑÓ·Ó ÔÓʇÎÓ‚‡Ú¸
- é„·‚ÎÂÌËÂ
- 낉ÂÌËfl ÔÓ ·ÂÁÓÔ‡ÒÌÓÒÚË
- ÅÂÁÓÔ‡ÒÌÓ ËÒÔÓθÁÓ‚‡ÌËÂ
- êÂÍÓÏẨ‡ˆËË ‰Îfl ·ÂÁÓÔ‡ÒÌÓ„Ó Ë ˝ÙÙÂÍÚË‚ÌÓ„Ó ËÒÔÓθÁÓ‚‡ÌËfl
- ä‡ÚÍÓ ÛÍÓ‚Ó‰ÒÚ‚Ó
- ä‡ÚÍÓ Á̇ÍÓÏÒÚ‚Ó Ò ÚÂÎÂÙÓÌÓÏ
- èËÒÚÛÔ‡fl Í ‡·ÓÚÂ
- èËÒÚÛÔ‡fl Í ‡·ÓÚÂ
- àÒÔÓθÁÓ‚‡ÌË ÏÂÌ˛
- ëÔËÒÓÍ ÏÂÌ˛
- èÓÙËÎË [ÏÂÌ˛ 1]
- Ç˚ÁÓ‚˚ [ÏÂÌ˛ 2]
- àÌÒÚÛÏÂÌÚ˚ [ÏÂÌ˛ 3]
- 鄇̇ÈÁ [ÏÂÌ˛ 4]
- ëÓÓ·˘ÂÌËfl [ÏÂÌ˛ 5]
- åÛθÚËωˇ [ÏÂÌ˛ 6]
- åÓ [ÏÂÌ˛ 7]
- é·ÓÁ‚‡ÚÂθ [ÏÂÌ˛ 8]
- ç‡ÒÚÓÈÍË [ÏÂÌ˛ 9]
- è‡ÏflÚ͇
- Welcome
- Contents
- Safety Information
- Safety Warnings
- Guidelines for safe and efficient use
- Quick Start Guide
- Understanding Your Phone
- Getting Started
- Getting Started
- Using the Menu
- Listing of Functions
- Profiles [Menu 1]
- Call register [Menu 2]
- Tools [Menu 2]
- Organizer [Menu 4]
- Messages [Menu 5]
- Multimedia [Menu 6]
- My stuff [Menu 7]
- Browser [Menu 8]
- Settings [Menu 9]
- Accessories
- Technical data
- Memo


