LG 60LA620S – страница 2
Инструкция к Телевизору LG 60LA620S
12
INSTALLATION PROCEDURE / ASSEMBLING AND PREPARING
ENGLISH
ENG
NOTE
y
Image shown may differ from your TV.
y
Your TV’s OSD (On Screen Display) may differ slightly from that shown in this manual.
y
The available menus and options may differ from the input source or product model that you are
using.
y
New features may be added to this TV in the future.
y
The TV can be placed in standby mode in order to reduce the power consumption. And the TV should
be turned off if it will not be watched for some time, as this will reduce energy consumption.
y
The energy consumed during use can be significantly reduced if the level of brightness of the picture
is reduced, and this will reduce the overall running cost.
INSTALLATION PROCEDURE
1 Open the package and make sure all the accessories are included.
2 Attach the stand to the TV set.
3 Connect an external device to the TV set.
4 Make sure the network connection is available.
You can use the TV network functions only when the network connection is made.
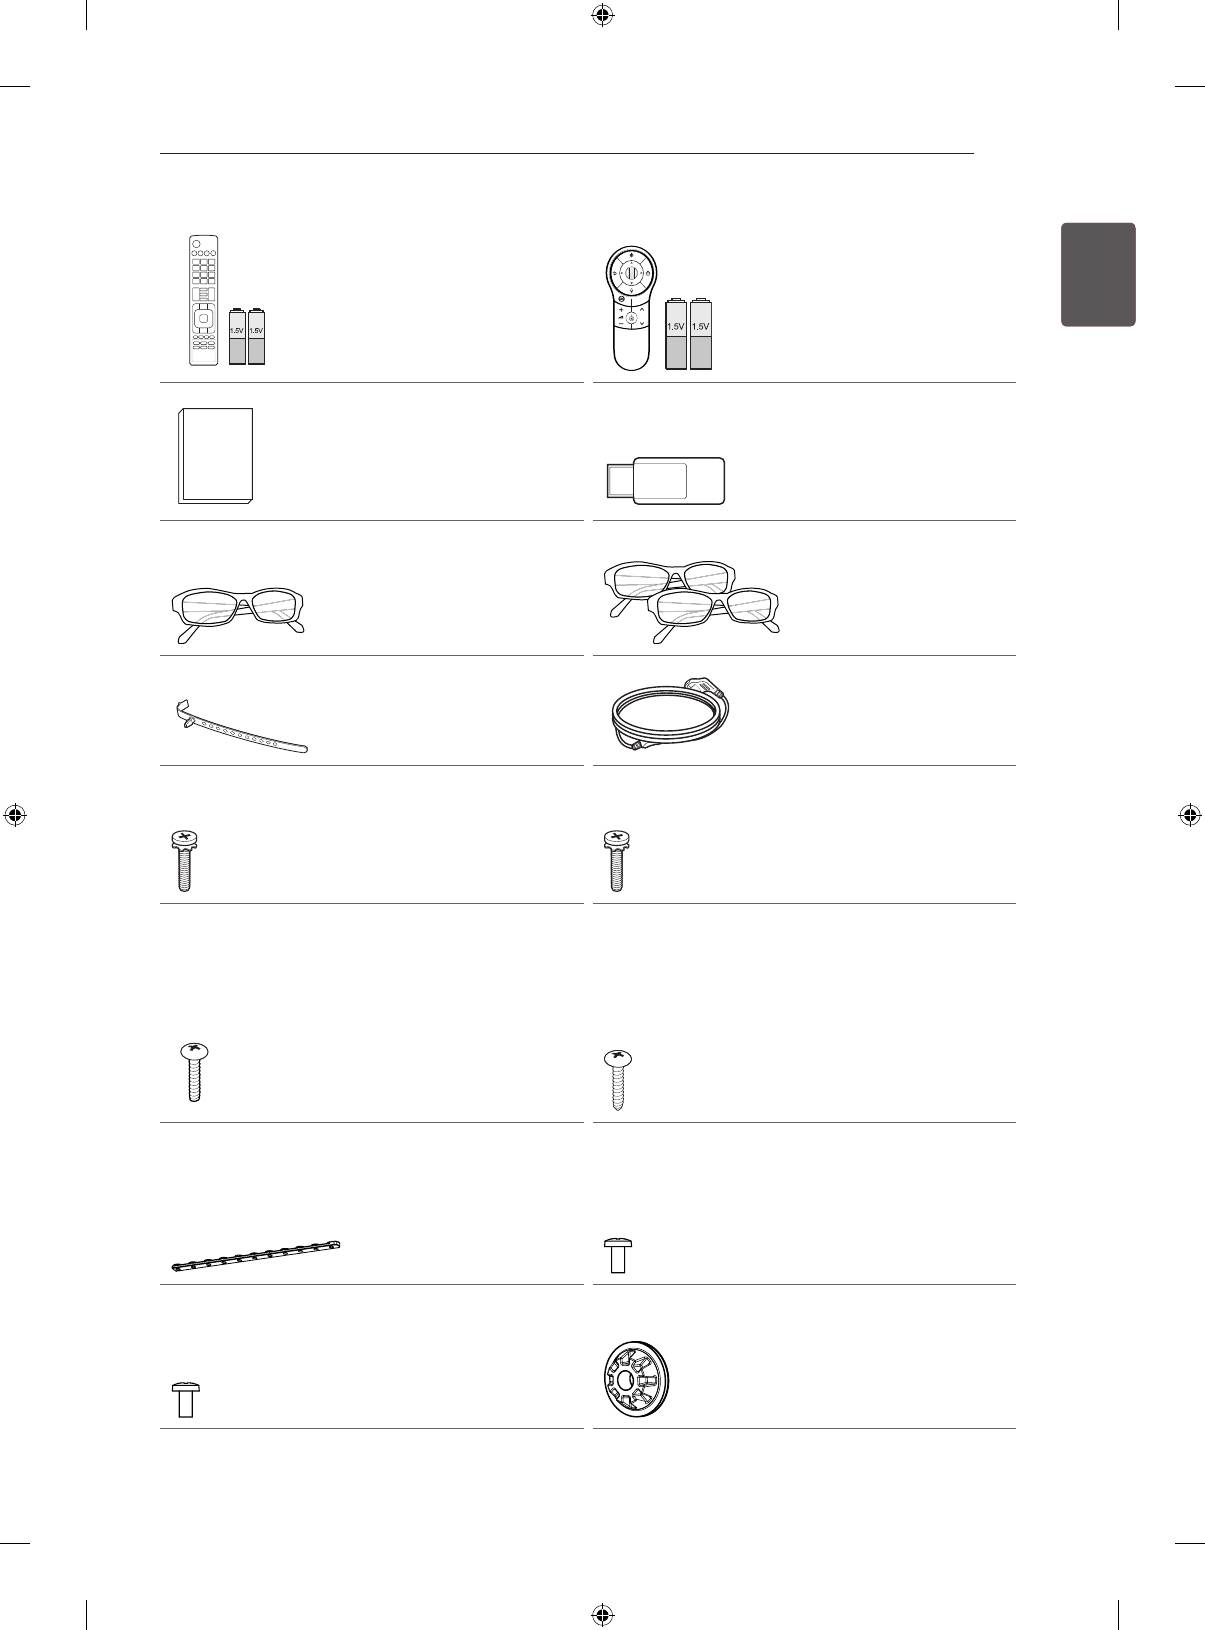
ASSEMBLING AND PREPARING
Unpacking
Check your product box for the following items. If there are any missing accessories, contact the local
dealer where you purchased your product. The illustrations in this manual may differ from the actual
product and item.
CAUTION
y
Do not use any unapproved items to ensure the safety and product life span.
y
Any damage or injuries caused by using unapproved items are not covered by the warranty.
y
Some models have a thin film attached on to the screen and this must not be removed.
NOTE
y
The items supplied with your product may vary depending on the model.
y
Product specifications or contents of this manual may be changed without prior notice due to upgrade
of product functions.
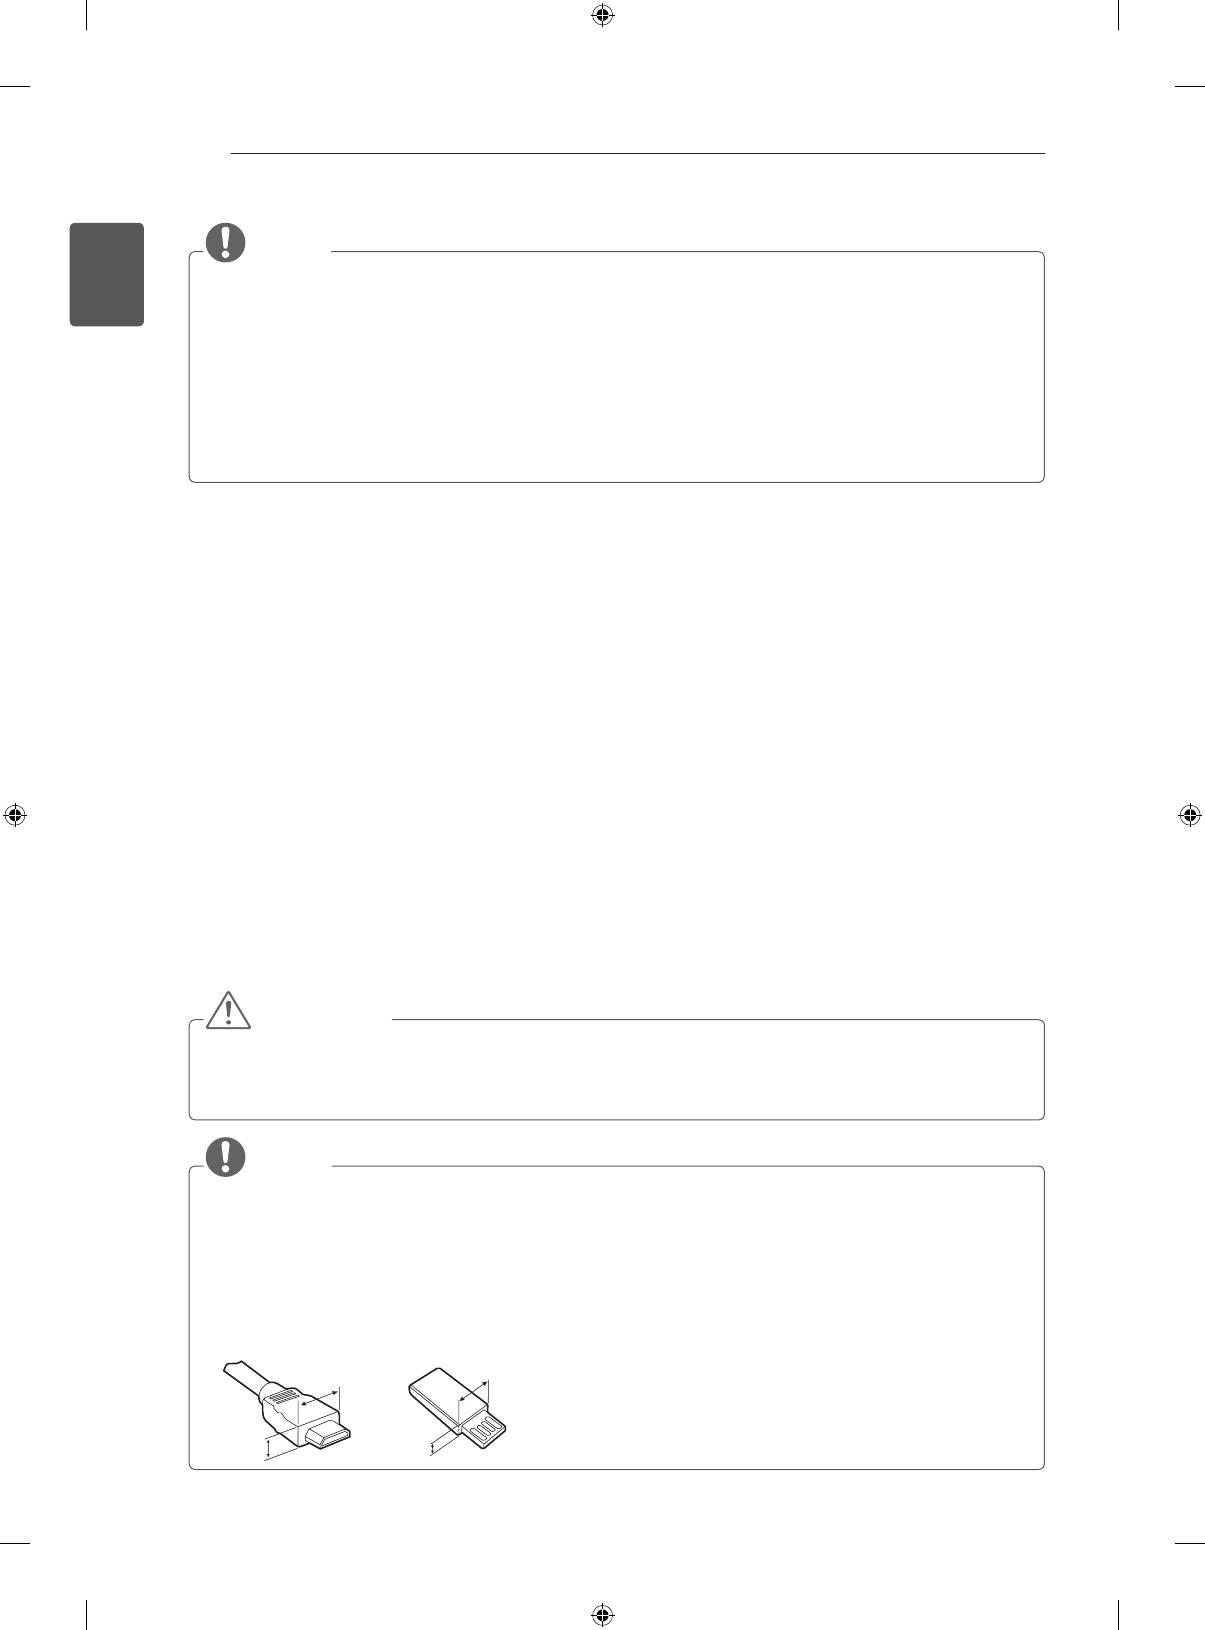
y
For an optimal connection, HDMI cables and USB devices should have bezels less than 10 mm thick
and 18 mm width. Use an extension cable that supports USB 2.0 if the USB cable or USB memory
stick does not fit into your TV’s USB port.
B
B
*A
A
A
<
=
10 mm
*B
<
=
18 mm
ASSEMBLING AND PREPARING
13
ENERGY
AV MODE
INPUT
SAVING
TV
ENGENGLISH
1 2 3
4 5 6
7 8
9
LIST
FLASHBK
MARK
0
FAV
P
A
MUTE
3D
CHVOL
E
G
Remote control and
MENU
INFO
Q.MENU
ENTER
batteries (AAA)
BACK
L/R SELECT
EXIT
(Only LA62**, LA64**,
FREEZE
RATIO
LN570*, LN575*, LN577*)
(See p. 22, 23)
123
P
INPUT
AV MODE
TV
ENERGY
SAVING
1 2 3
4 5 6
9
7 8
FLASHBK
LIST
0
FAV
MARK
3D
MUTE
E
G
A
P
CHVOL
MENU
INFO
Q.MENU
ENTER
EXIT
BACK
L/R SELECT
FREEZE
RATIO
Magic Remote Control,
Batteries (AA)
(Only LA66**, LA69**,
LA74**, LN578*)
(See p. 24)
Wi-Fi Dongle
Owner’s manual
(Depending on model)
Cinema 3D Glasses
The number of 3D glasses
may differ depending on
the model or country.
Dual play glasses
(Depending on model)
(Depending on model)
Cable Holder
(Depending on model)
Power Cord
(See p. A-6)
(Depending on model)
Stand Screws
M4 x 14
Stand Screws
(8 EA: Only LN57**-ZE/ZK,
M4 x 20
LA62**, LA64**, LA66**)
(4 EA: Only LA69**,
(4 EA: Only LN57**-ZA)
LA74**)
(See p. A-3,A-5)
(See p. A-4)
Desk-mount Screw
(1 EA : Only
32/39/42/47/50/60LN57**-
ZA)
(2 EA :Only
32/39/42/47/50LN57**-ZE/
Stand Screws
ZK, 32/39/42/47/50LA62**,
3 EA, P5 x 25
32/42/47/50LA64**,
(Only LN57**-ZA)
32/42/47/50LA66**)
(See p.A-5)
(See p. 18)
Desk-mount Cable
2 EA (Only
Bracket Screw
32/39/42/47/50LN57**-ZE/
2 EA, P4 x 8
ZK, 32/39/42/47/50LA62**,
(Only 47/50LN57**-
32/42/47/50LA64**,
ZE/ZK,47/50LA62**,
32/42/47/50LA66**)
47/50LA64**,47/50LA66**)
(See p. 18)
(See p. 18)
Bracket Screw
2 EA, M4 x 8
(Only 32/39/42LN57**-
Wall mount inner spacers
ZE/ZK, 32/39/42LA62**,
4 EA
32/42LA64**,32/42LA66**)
(Only LA64**)
(See p. 18)
(See p. 21)
14
ASSEMBLING AND PREPARING
ENGLISH
ENG
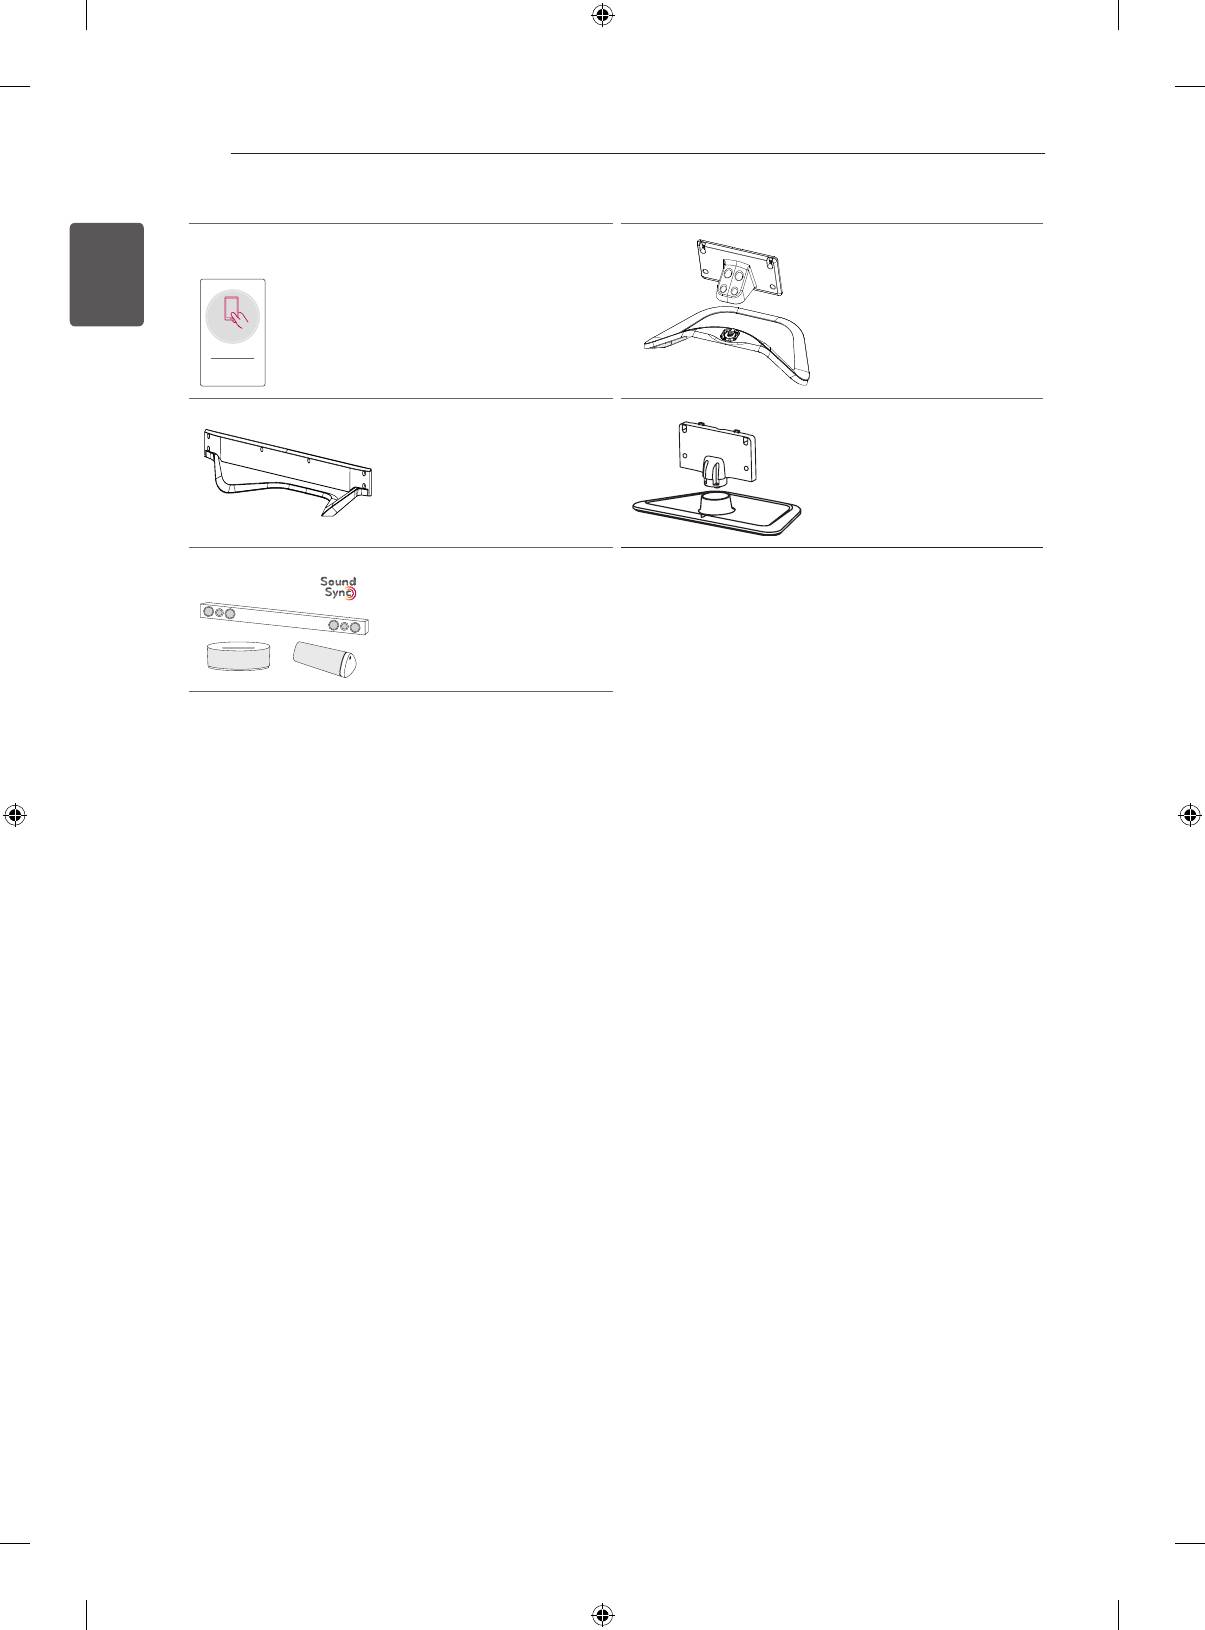
Stand Body / Stand Base
Tag On
(Only LN57**-ZE/ZK,
LA62**, LA64** , LA66**)
Tag On
(Depending on model)
(See p.A-3)
Stand Base
Stand Body / Stand Base
(Only LA69**, LA74** )
(Only LN57**-ZA)
(See p.A-4)
(See p.A-5)
LG Audio device
(Depending on model)
ASSEMBLING AND PREPARING
15
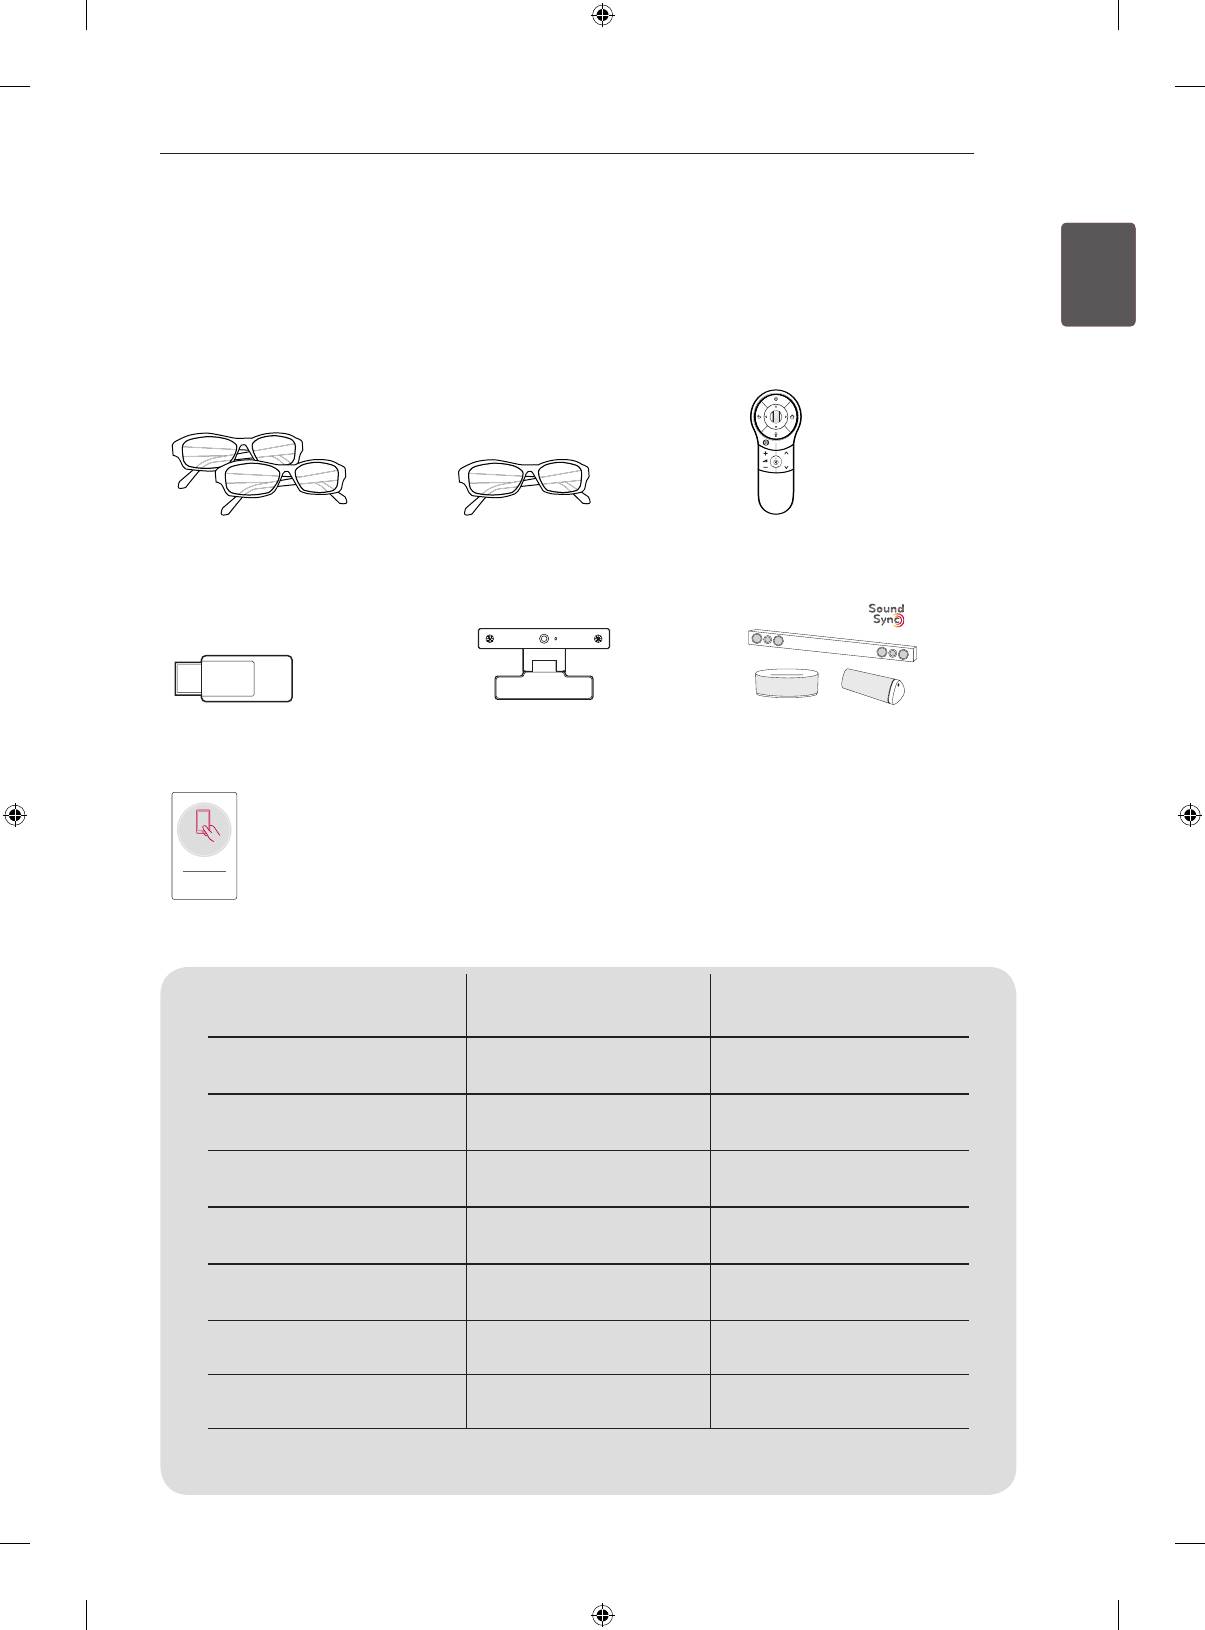
Separate purchase
ENGENGLISH
(Depending on model)
Separate purchase items can be changed or modied for quality improvement without any notication.
Contact your dealer to buy these items.
These devices only work with certain models.
123
P
AG-F***DP
AG-F***
AN-MR400
Dual play glasses
Cinema 3D Glasses
Magic Remote
AN-WF100
AN-VC4**
LG Audio device
Wi-Fi Dongle
Video call camera
Tag On
Tag on
LA62**, LA64**,
LN57**
LA66**, LA69**, LA74**
Compatibility
AG-F***DP
•
Dual play glasses
(Depending on model)
AG-F***
•
Cinema 3D Glasses
AN-MR400
• •
Magic Remote
AN-WF100
•
Wi-Fi Dongle
(Depending on model)
AN-VC4**
• •
Video call camera
•
LG Audio device
•
(Depending on model)
•
Tag On
•
(Depending on model)
The model name or design may be changed depending on the upgrade of product functions,
manufacturer’s circumstances or policies.
16
ASSEMBLING AND PREPARING
ENGLISH
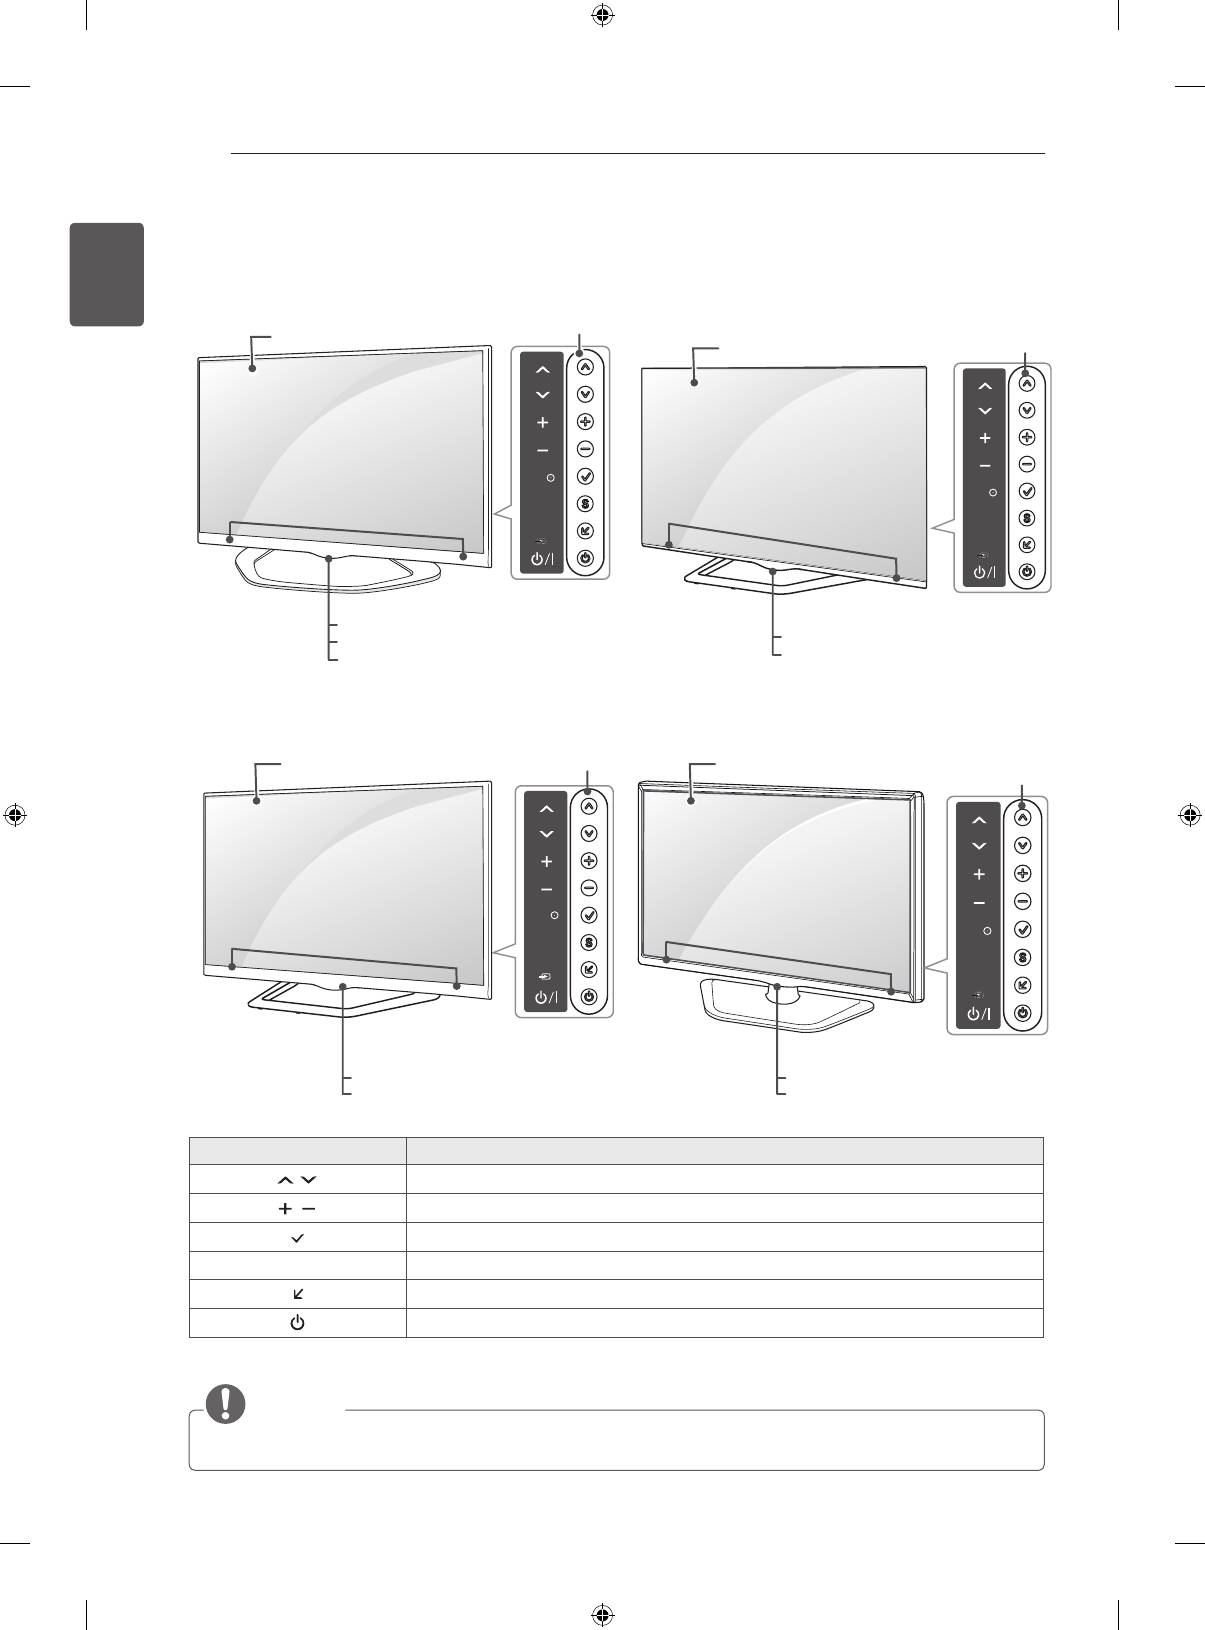
Parts and buttons
ENG
Button Description
H
Scrolls through the saved programmes.
H
Adjusts the volume level.
H
Selects the highlighted menu option or confirms an input.
S
Accesses the main menu, or saves your input and exits the menus.
H
Changes the input source.
Turns the power on or off.
NOTE
y
You can set the
LG Logo Light
to on or off by selecting OPTION in the main menus.(Depending on model)
LAN
RGB IN
(PC)
IN IN OUT
(RGB/HDMI-PC)
AUDIO
SETTINGS
INPUT
OK
IN/OUT
AV1
(RGB)
VIDEO
AV
AUDIO
IN
PR
COMPONENT
P
B
Satellite
700mA MAx
13/18V
LNB IN
Y
ANTENNA
/CABLE
OPTICAL
DIGITAL
AUDIO
H/P
USB IN
USB IN
IN
USB Appps
HDD IN USB Hub
11(ARC) 2 3 4(PC) 2
3
Buttons
Screen
OK
SETTINGS
INPUT
Speakers
OK
SETTINGS
INPUT
A type : LA62**, LA64**, LA66**,
LN57**-ZE/ZK
Buttons
Screen
Speakers
Remote control sensor
Remote control sensor
LG Logo Light (Only LA64**, LA66**)
LG Logo Light
Power Indicator (Only LA62**, LN57**-ZE/ZK)
OK
SETTINGS
INPUT
D type : LN57**-ZA
Screen
Buttons
Speakers
Remote control sensor
Power Indicator
OK
SETTINGS
INPUT
B type : LA69**, 42/47/55LA74**
C type : 60LA74**
Screen
Buttons
Speakers
Remote control sensor
LG Logo Light
ASSEMBLING AND PREPARING
17
y
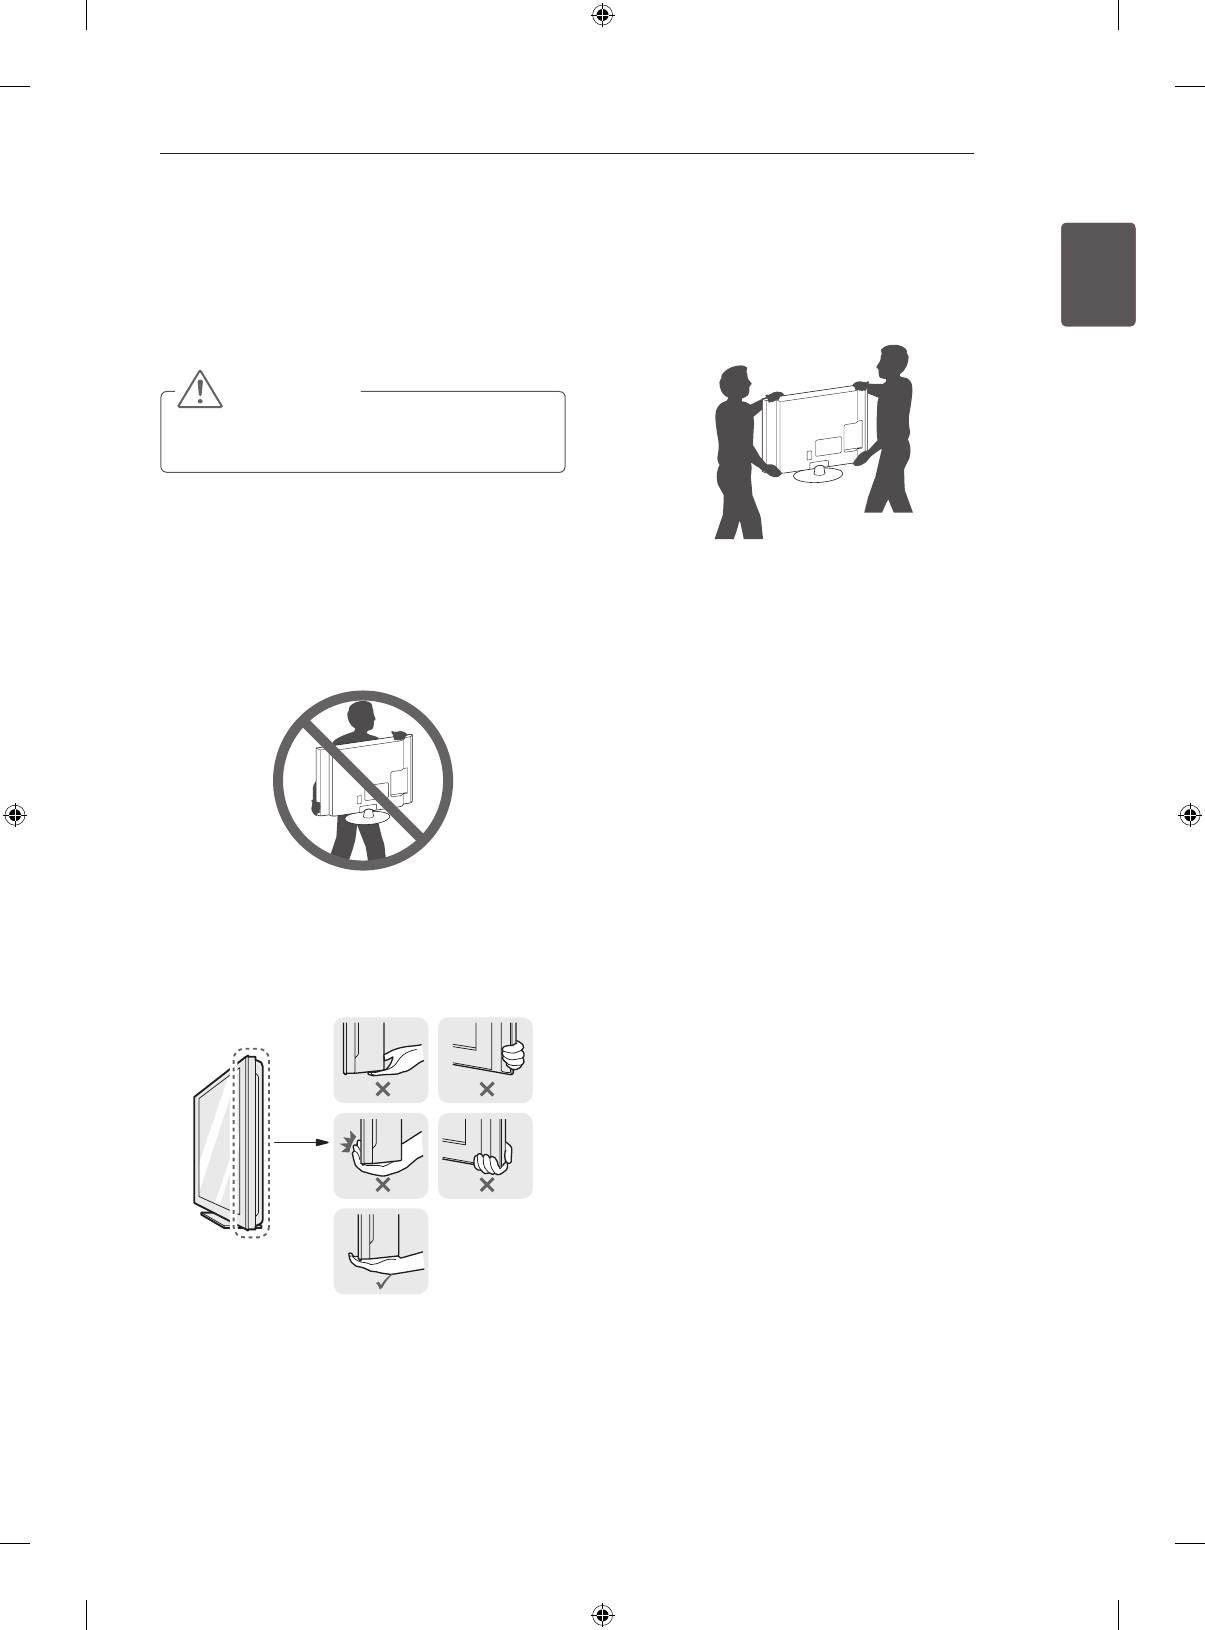
When transporting a large TV, there should be
Lifting and moving the TV
at least 2 people.
ENGENGLISH
y
When transporting the TV by hand, hold the TV
Please note the following advice to prevent the
as shown in the following illustration.
TV from being scratched or damaged and for safe
transportation regardless of its type and size.
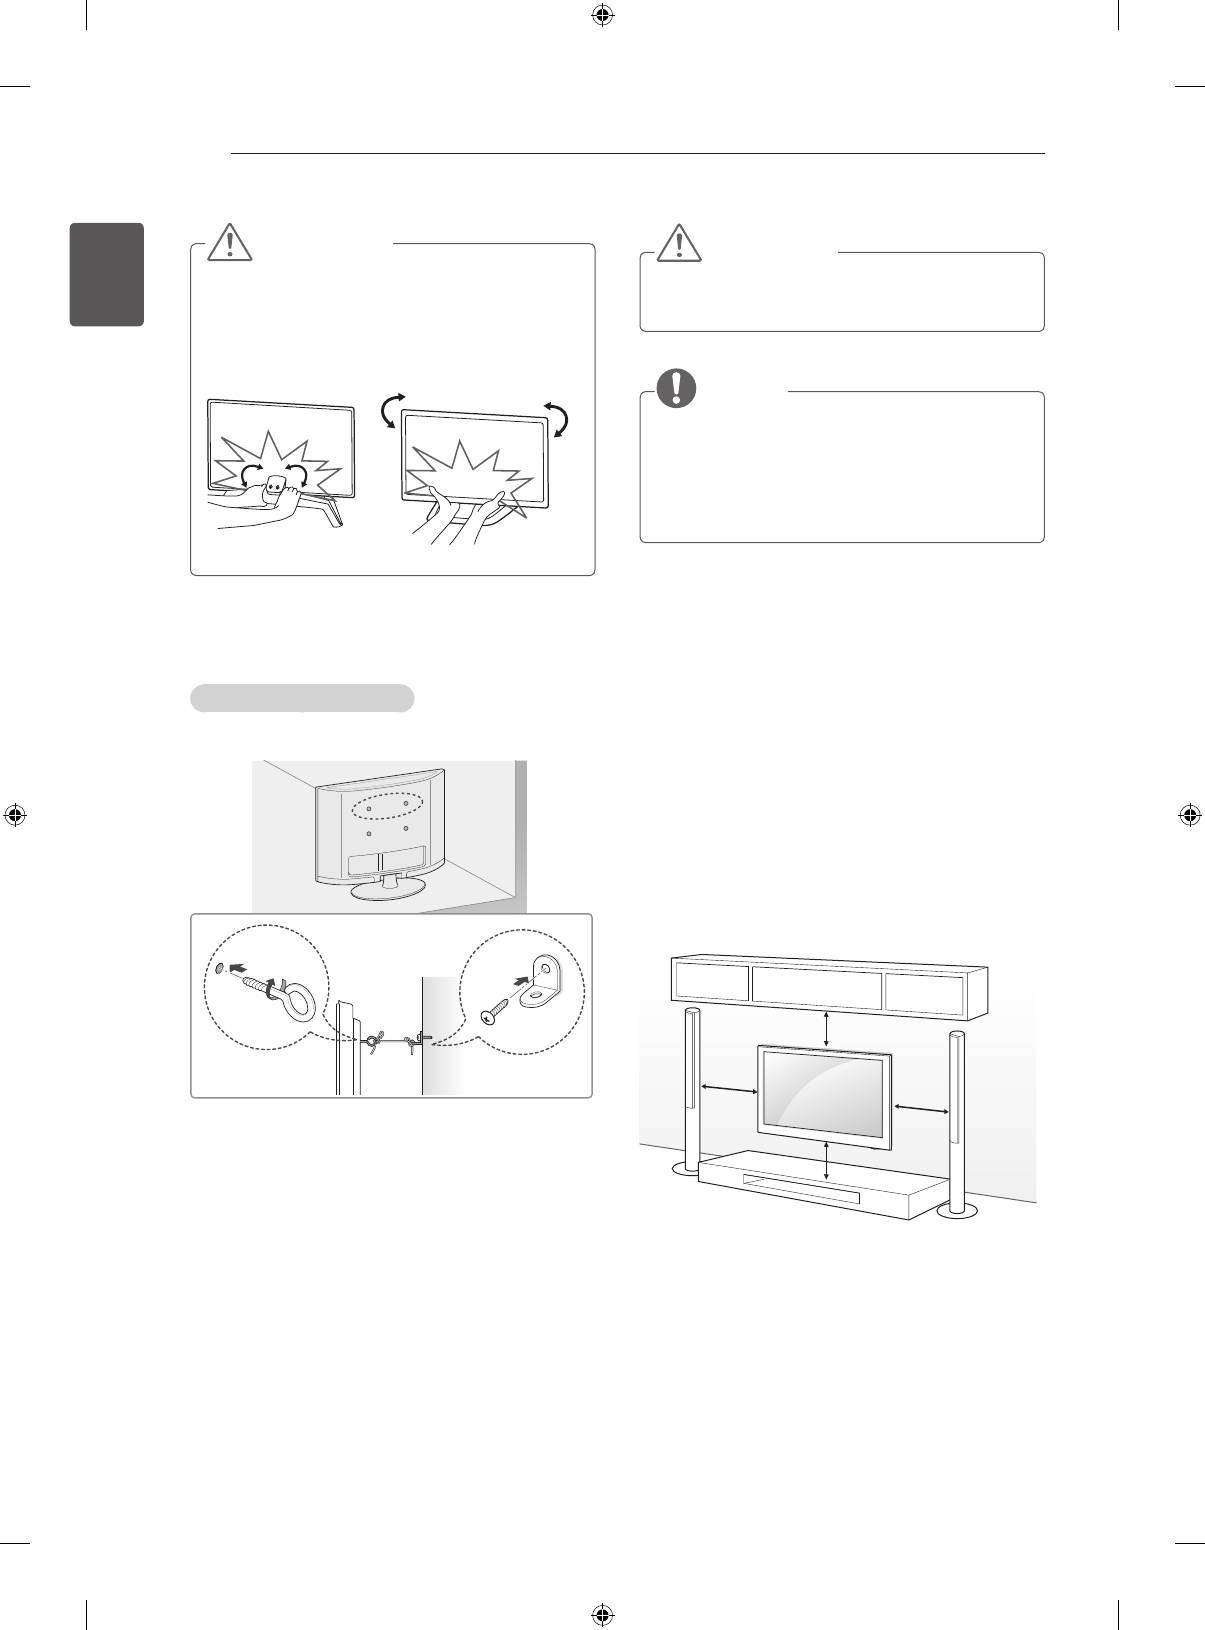
CAUTION
y
Avoid touching the screen at all times, as
this may result in damage to the screen.
y
It is recommended to move the TV in the box
or packing material that the TV originally came
in.
y
When transporting the TV, do not expose the
y
Before moving or lifting the TV, disconnect the
TV to jolts or excessive vibration.
power cord and all cables.
y
When transporting the TV, keep the TV upright,
y
When holding the TV, the screen should face
never turn the TV on its side or tilt towards the
away from you to avoid damage.
left or right.
y
Do not apply excessive pressure to cause
exing /bending of frame chassis as it may
damage screen.
y
Hold the top and bottom of the TV frame rmly.
Make sure not to hold the transparent part,
speaker, or speaker grill area.
Remote control sensor
LG Logo Light
Remote control sensor
Power Indicator
18
ASSEMBLING AND PREPARING
ENGLISH
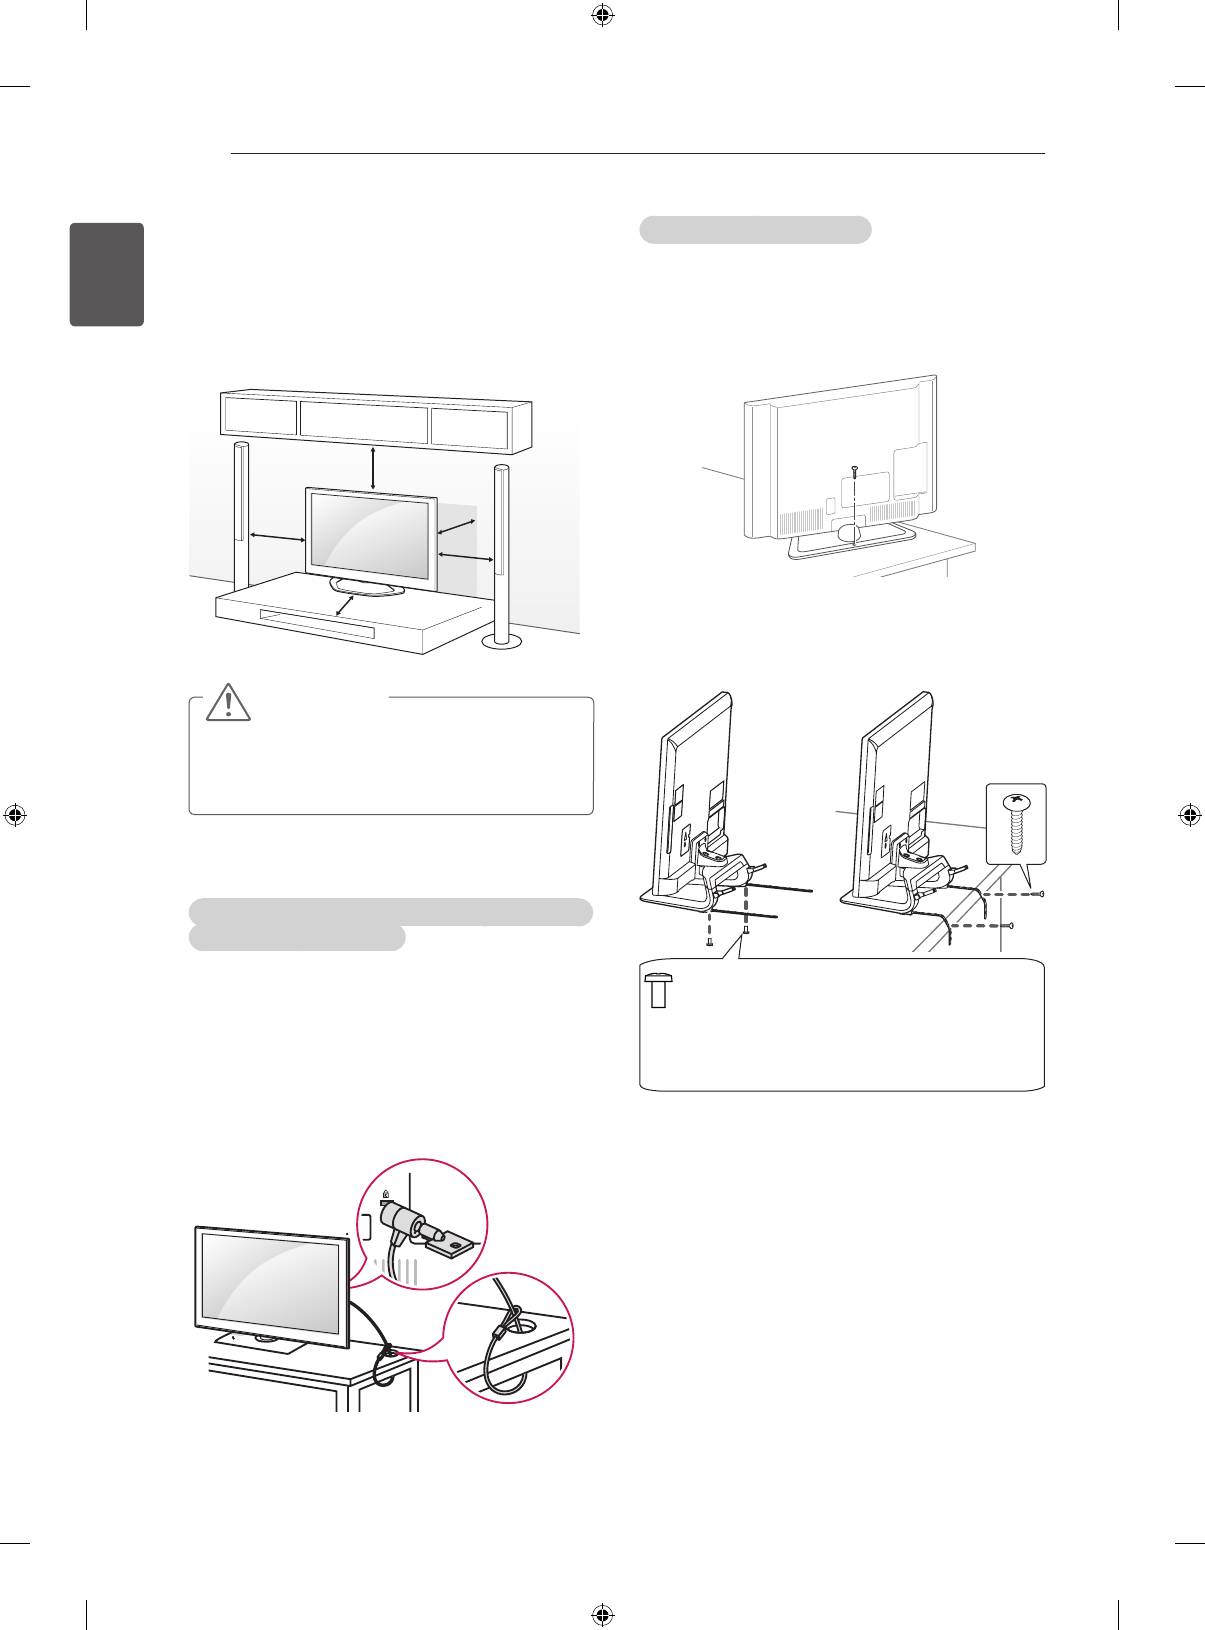
Securing the TV to a table
Mounting on a table
ENG
Fix the TV to a table to prevent from tilting forward,
1 Lift and tilt the TV into its upright position on a
damage, and potential injury.
table.
To secure the TV to a table, insert and tighten the
- Leave a 10 cm (minimum) space from the
supplied screw on the rear of the stand.
wall for proper ventilation.
(Only 32/39/42/47/50/60LN57**-ZA)
10 cm
10 cm
10 cm
10 cm
10 cm
(Only 32/39/42/47/50LN57**-ZE/ZK,
32/39/42/47/50LA62**, 32/42/47/50LA64**,
2 Connect the power cord to a wall outlet.
32/42/47/50LA66**)
CAUTION
y
Do not place the TV near or on sources
of heat, as this may result in fire or other
damage.
Using the Kensington security system (This feature is
not available for all models.)
y
Image shown may differ from your TV.
2 EA, P4 x 8
The Kensington security system connector is
(Only 47/50LN57**-ZE/ZK, 47/50LA62**,
47/50LA64**,47/50LA66**)
located at the rear of the TV. For more information
2 EA, M4 x 8
of installation and using, refer to the manual
(Only 32/39/42LN57**-ZE/ZK, 32/39/42LA62**,
provided with the Kensington security system or
32/42LA64**, 32/42LA66**)
visit
http://www.kensington.com.
Connect the Kensington security system cable
between the TV and a table.
ASSEMBLING AND PREPARING
19
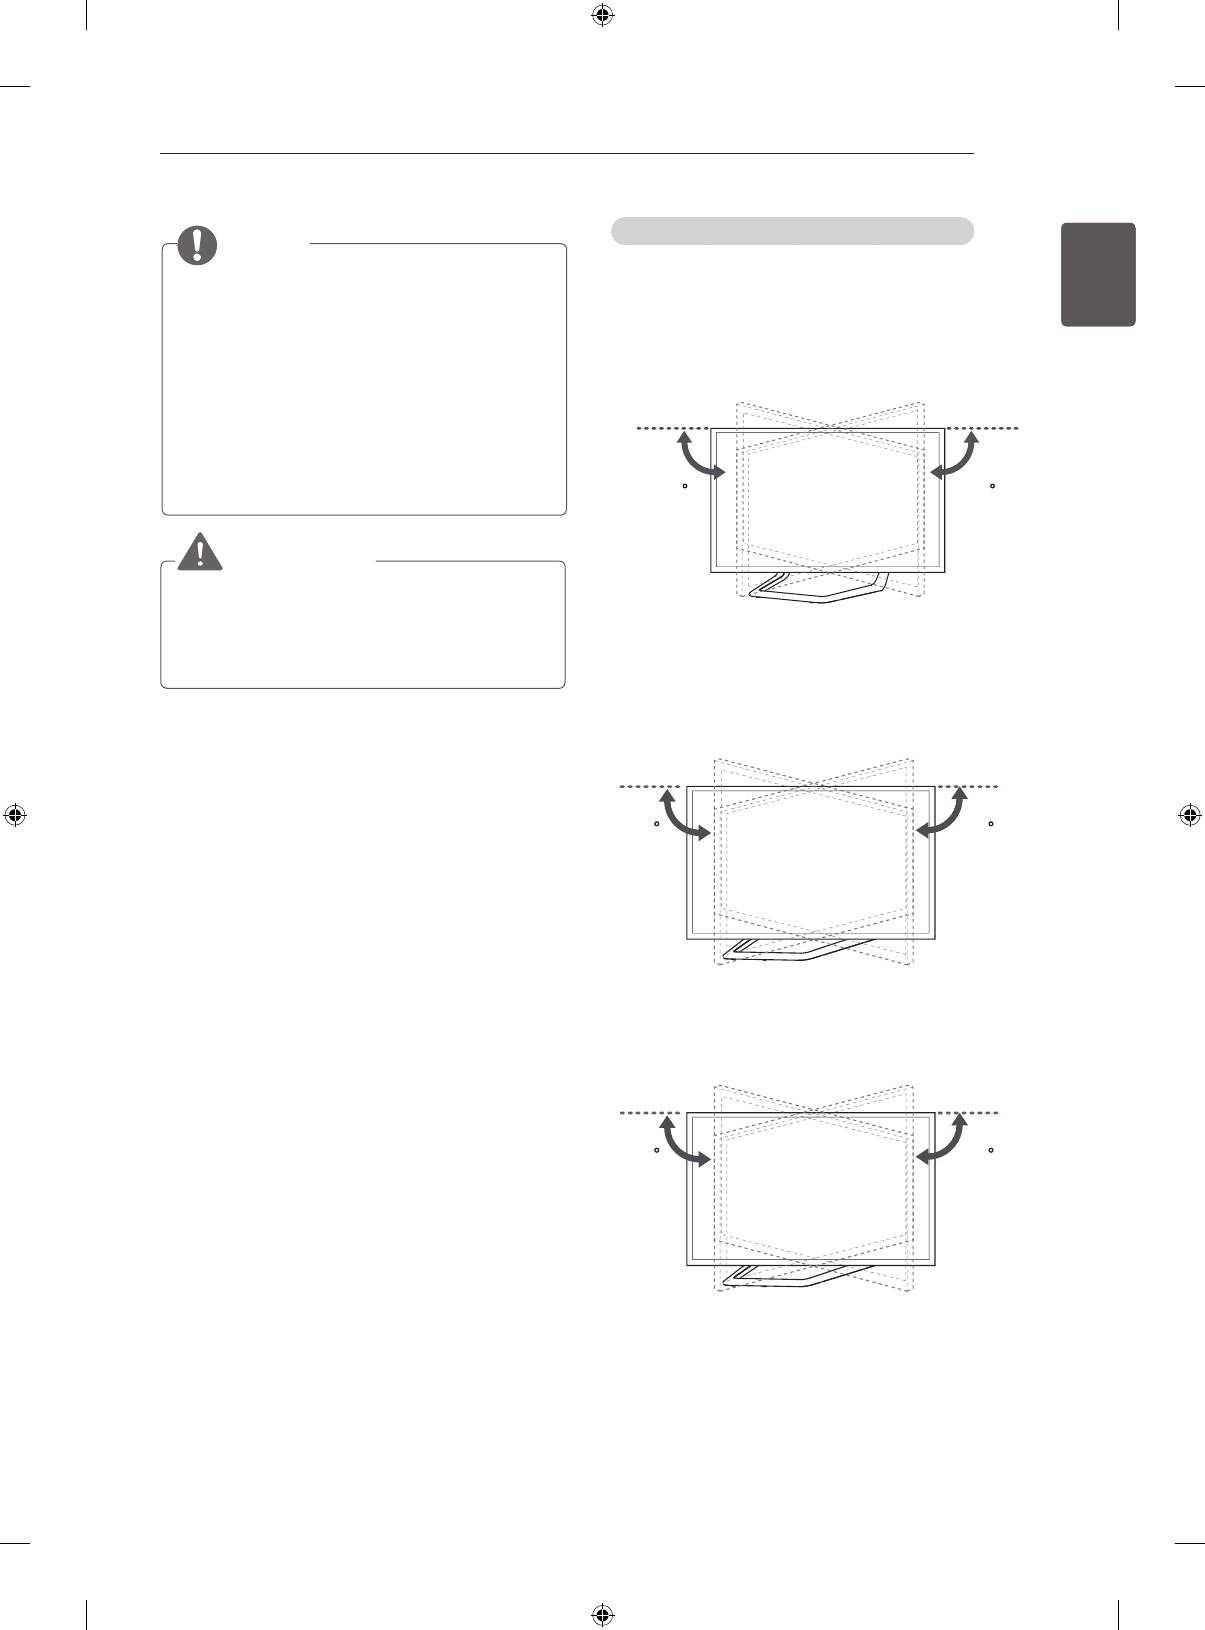
Adjusting the angle of the TV to suit view
NOTE
ENGENGLISH
(Only 32/39/42/47/50LN57**-ZE/ZK,
(This feature is not available for all models.)
32/39/42/47/50LA62**, 32/42/47/50LA64**,
Swivel 15 degrees to the left or right and adjust the
32/42/47/50LA66**)
angle of the TV to suit your view.
How to fix the TV to a table
(Only LA62**, LA64**, LA66**, LN57**-ZE/ZK)
1. Connect the Desk-mount Cables to the
Stand Base using the Bracket Screws.
2. Fix the Desk-mount Cables to a table using
the Desk-mount Screws.
3. Once the TV is fixed, move the table close to
the wall. Children may go in, causing injuries.
1515
WARNING
y
To prevent TV from falling over, the TV
should be securely attached to the floor/
wall per installation instructions. Tipping,
shaking, or rocking the TV may cause injury.
Swivel 10 degrees to the left or right and adjust the
angle of the TV to suit your view.
(Only 42/47LA69**, 42/47LA74**)
1010
Swivel 8 degrees to the left or right and adjust the
angle of the TV to suit your view.
(Only 55LA69**, 55/60LA74**)
88
20
ASSEMBLING AND PREPARING
ENGLISH
ENG
CAUTION
CAUTION
y
When adjusting the angle adof the product,
y
Make sure that children do not climb on or
watch out for your fingers.
hang on the TV.
»
Personal injury may occur if hands or fingers
are pinched. If the product is tilted too much, it
may fall, causing damage or injury.
NOTE
y
Use a platform or cabinet that is strong and
large enough to support the TV securely.
y
Brackets, bolts and ropes are not provided.
You can obtain additional accessories from
your local dealer.
<Rear> <Front>
Securing the TV to a wall
Mounting on a wall
(This feature is not available for all models.)
Attach an optional wall mount bracket at the rear of
the TV carefully and install the wall mount bracket
on a solid wall perpendicular to the floor. When you
attach the TV to other building materials, please
contact qualified personnel.
LG recommends that wall mounting be performed
by a qualified professional installer.
10 cm
10 cm
10 cm
1 Insert and tighten the eye-bolts, or TV brackets
and bolts on the back of the TV.
10 cm
- If there are bolts inserted at the eye-bolts
position, remove the bolts first.
2 Mount the wall brackets with the bolts to the
wall.
Match the location of the wall bracket and the
eye-bolts on the rear of the TV.
3 Connect the eye-bolts and wall brackets tightly
with a sturdy rope.
Make sure to keep the rope horizontal with the
at surface.
ASSEMBLING AND PREPARING
21
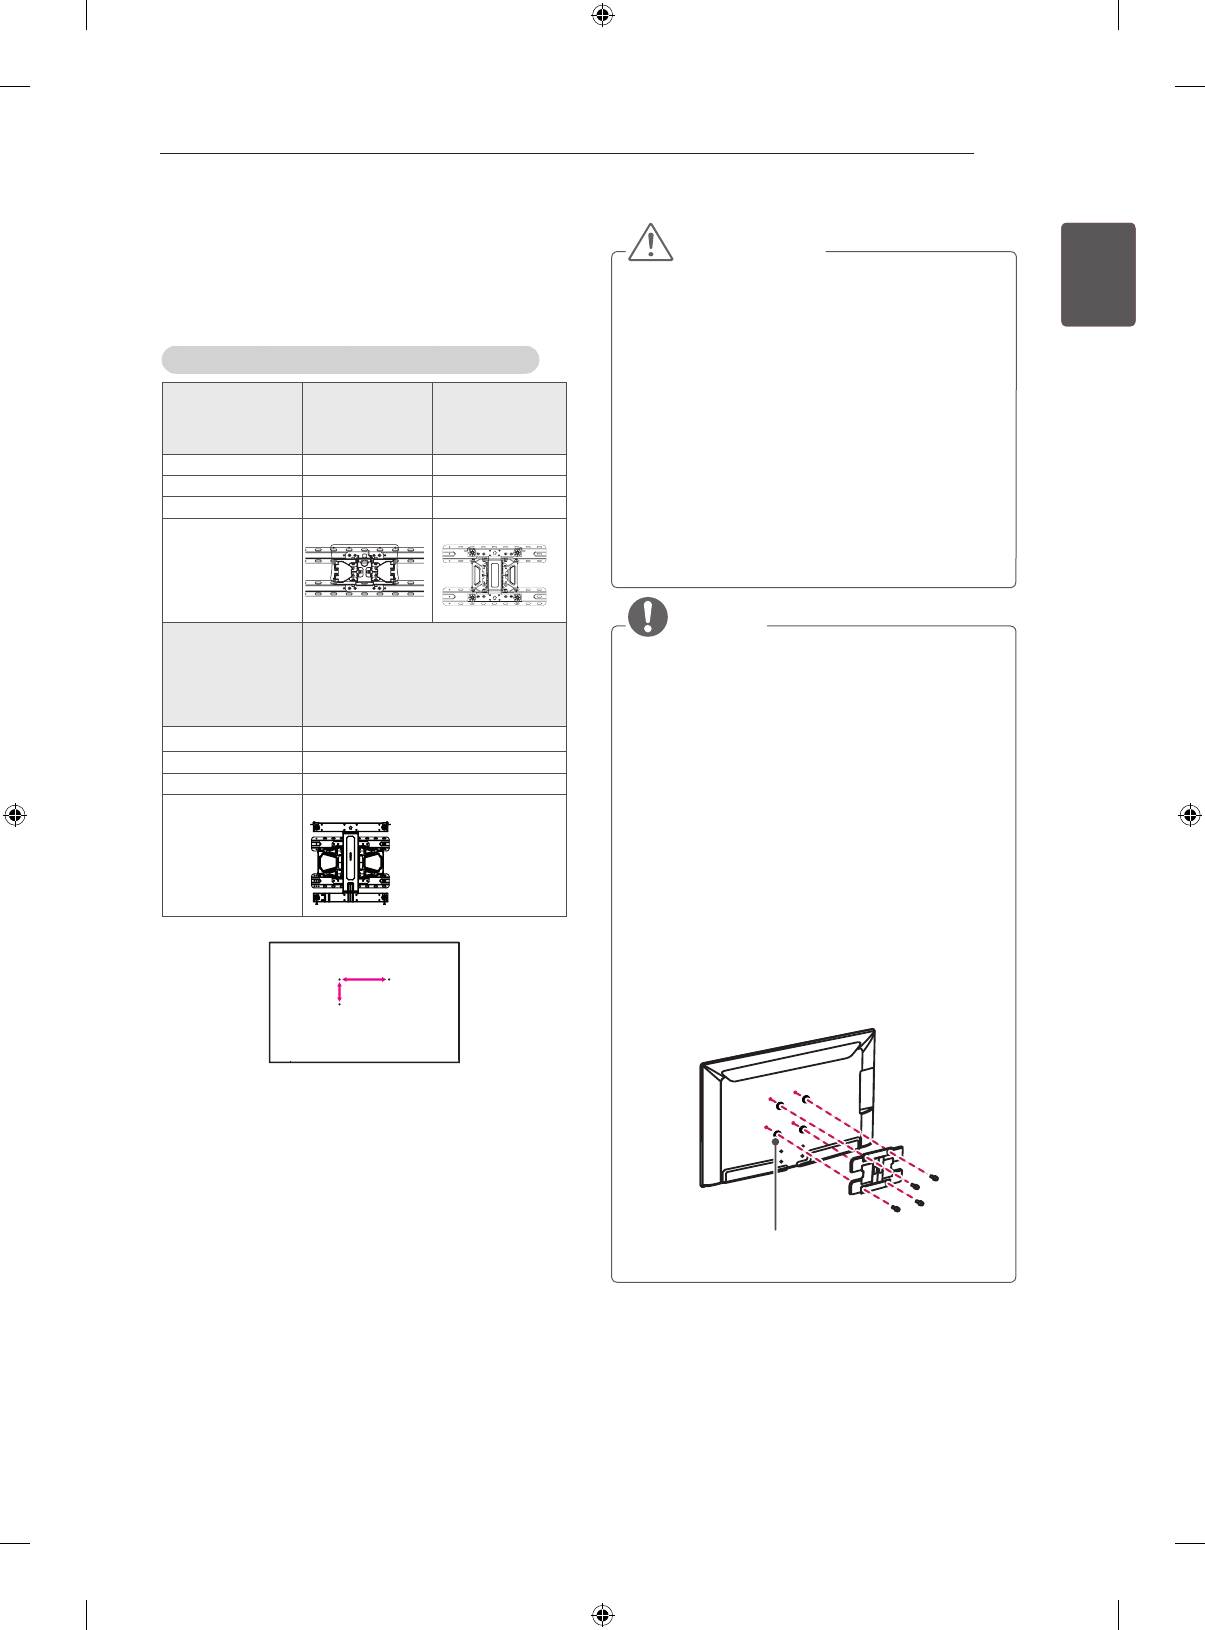
Make sure to use screws and wall mount
bracket that meet the VESA standard. Standard
ENGENGLISH
CAUTION
dimensions for the wall mount kits are described in
y
Disconnect the power first, and then move
the following table.
or install the TV. Otherwise electric shock
may occur.
y
If you install the TV on a ceiling or slanted
Separate purchase(Wall Mounting Bracket)
wall, it may fall and result in severe injury.
Model 32LA62**
39/42LA62**
Use an authorised LG wall mount and
32LN57**
32LA64**
contact the local dealer or qualified
32LA66**
personnel.
39/42LN57**
y
Do not over tighten the screws as this may
VESA (A x B) 200 x 100 200 x 200
cause damage to the TV and void your
Standard screw M4 M6
warranty.
Number of screws 4 4
y
Use the screws and wall mounts that meet
Wall mount
LSW130B
LSW230B
the VESA standard. Any damages or injuries
bracket
by misuse or using an improper accessory
are not covered by the warranty.
Model 47/50/55/60LA62**
NOTE
42/47/50/55/60LA64**
42/47/50/55LA66**
y
Use the screws that are listed on the VESA
42/47/55LA69**
standard screw specifications.
42/47/55/60LA74**
y
The wall mount kit includes an installation
47/50/55/60LN57**
manual and necessary parts.
VESA (A x B) 400 x 400
y
The wall mount bracket is not provided. You
Standard screw M6
can obtain additional accessories from your
Number of screws 4
local dealer.
Wall mount
LSW430B
y
The length of screws may differ depending
bracket
on the wall mount. Make sure to use the
proper length.
y
For more information, refer to the manual
supplied with the wall mount.
y
When attaching a third-party wall mounting
bracket to the TV, insert the wall mount
inner spacers into the TV wall mount holes
to move your TV in vertical angle. Please
A
make sure not to use the spacers for LG
B
wall mounting bracket. (Only LA64**)
Wall Mount Inner Spacer
22
REMOTE CONTROL
ENGLISH
REMOTE CONTROL
ENG
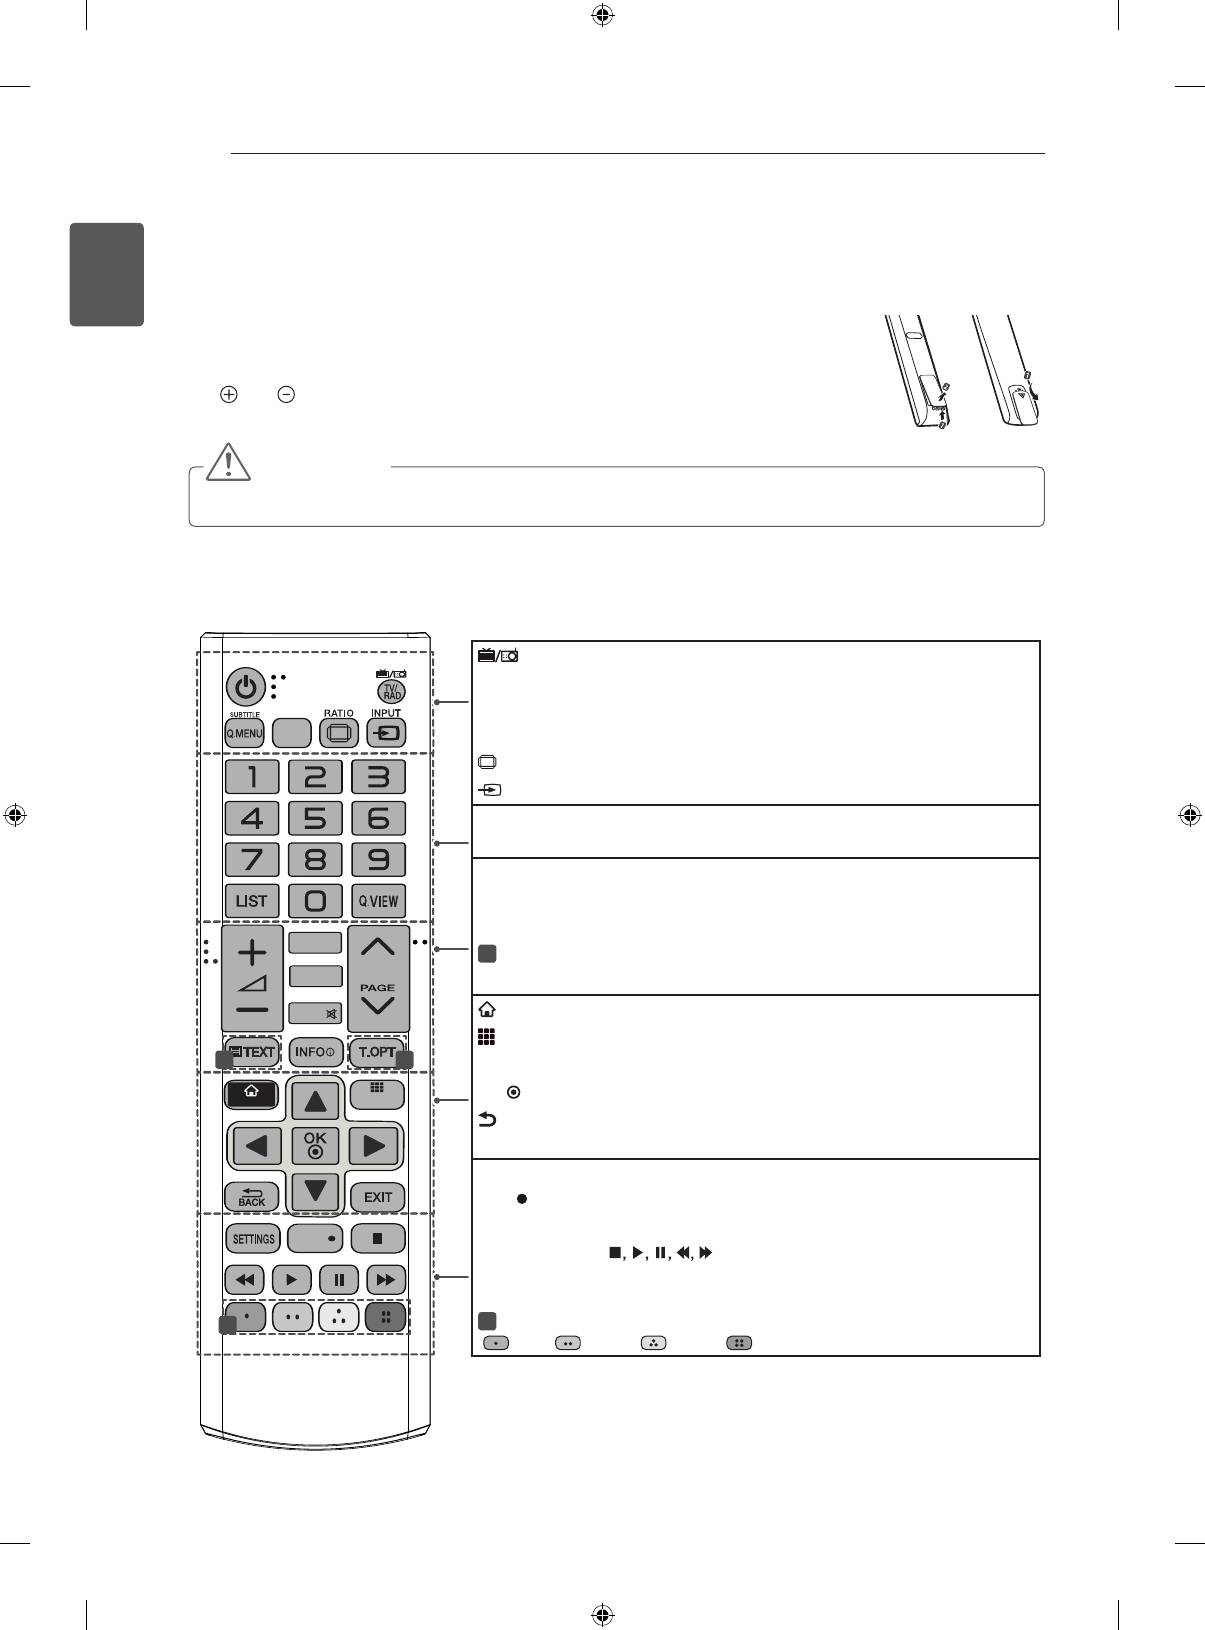
The descriptions in this manual are based on the buttons on the remote control.
Please read this manual carefully and use the TV correctly.
or
To replace batteries, open the battery cover, replace batteries (1.5 V AAA) matching
the
and ends to the label inside the compartment, and close the battery cover.
To remove the batteries, perform the installation actions in reverse.
CAUTION
y
Do not mix old and new batteries, as this may damage the remote control.
Make sure to point the remote control toward the remote control sensor on the TV.
(Only , LN570*, LN575*, LN577*)
GUIDE
FAV
APP/*
P
MUTE
SMART
MY APPS
LIVE TV
REC
TV/RAD Selects Radio, TV and DTV programme.
SUBTITLE Recalls your preferred subtitle in digital mode.
Q. MENU Accesses the quick menus.
GUIDE Shows programme guide.
RATIO Resizes an image.
INPUT Changes the input source.
LIST Accesses the saved programme list.
Q.VIEW Returns to the previously viewed programme.
FAV Accesses your favourite programme list.
APP/* Select the MHP TV menu source. (Only Italy.) (Depending on model)
PAGE Moves to the previous or next screen.
1
TELETEXT BUTTONS These buttons are used for teletext.
INFO
Views the information of the current programme and screen.
SMART Accesses the Smart Home menus.
MY APPS Shows the list of Apps.
1
1
Navigation buttons (up/down/left/right) Scrolls through menus or options.
OK
Selects menus or options and confirms your input.
BACK Returns to the previous level.
EXIT Clears on-screen displays and return to TV viewing.
SETTINGS Accesses the main menus.
REC Start to record and display record menu.
LIVE TV Return to LIVE TV.
Control buttons (
) Controls the Premium contents, Time
Machine or Smart Share menus or the SIMPLINK compatible devices (USB
or SIMPLINK or Time Machine).
2
2
Colour buttons These access special functions in some menus.
( : Red, : Green, : Yellow, : Blue)
REMOTE CONTROL
23
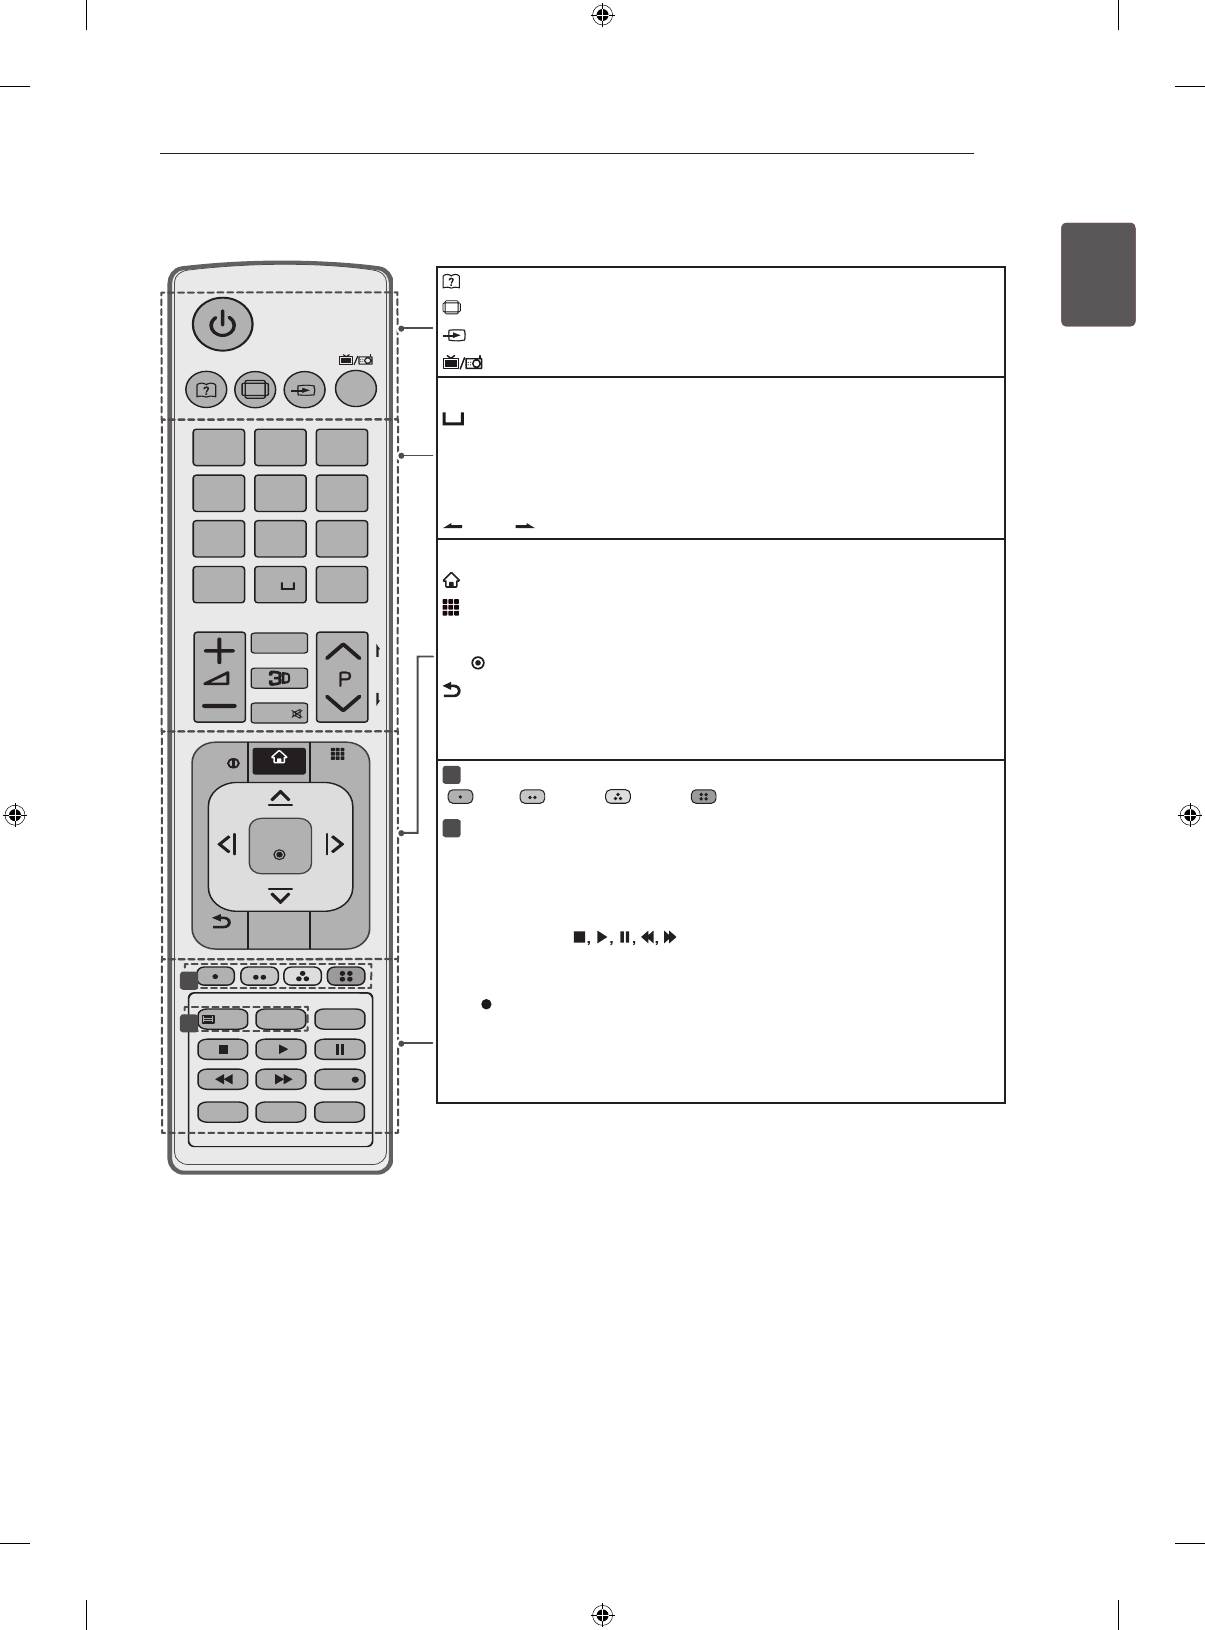
(Only LA62**, LA64**)
ENGENGLISH
(User Guide) Sees user-guide.
RATIO Resizes an image.
INPUT Changes the input source.
TV/RAD Selects Radio, TV and DTV programme.
LIST Accesses the saved programme list.
(Space) Opens an empty space on the screen keyboard.
Q.VIEW Returns to the previously viewed programme.
FAV Accesses your favourite programme list.
3D Used for viewing 3D video.
PAGE Moves to the previous or next screen.
INFO Views the information of the current programme and screen.
SMART Accesses the Smart Home menus.
MY APPS Shows the list of Apps.
Navigation buttons (up/down/left/right) Scrolls through menus or options.
OK
Selects menus or options and confirms your input.
BACK Returns to the previous level.
GUIDE Shows programme guide.
EXIT Clears on-screen displays and return to TV viewing.
1
Colour buttons These access special functions in some menus.
( : Red, : Green, : Yellow, : Blue)
2
TELETEXT BUTTONS These buttons are used for teletext.
SUBTITLE Recalls your preferred subtitle in digital mode.
Q. MENU Accesses the quick menus.
LIVE TV Return to LIVE TV.
Control buttons (
) Controls the Premium contents, Time
Machine or Smart Share menus or the SIMPLINK compatible devices (USB
or SIMPLINK or Time Machine).
REC
Start to record and display record menu.
SETTINGS Accesses the main menus.
AD Switches the Audio Description On or Off.
APP/
*
Select the MHP TV menu source. (Only Italy.) (Depending on model)
RATIO INPUT
TV/
RAD
1
.,;@
2
abc
3
def
4
ghi
5
jkl
6
mno
7
pqrs
8
tuv
9
wxyz
LIST
Q.VIEW
0
FAV
P
A
G
E
MUTE
INFO
SMART
MY APPS
OK
BACK
GUIDE
EXIT
SUBTITLE
TEXT
T.OPT
Q.MENU
LIVE TV
REC
SETTINGS
AD
APP/*
1
2

24
MAGIC REMOTE CONTROL FUNCTIONS
ENGLISH
ENG
MAGIC REMOTE CONTROL FUNCTIONS
This item is not included for all models.
When the message “Magic Remote Control battery is low. Change the battery.” is
displayed, replace the battery.
To replace batteries, open the battery cover, replace batteries (1.5 V AA) matching
and ends to the label inside the compartment, and close the battery cover. Be
sure to point the remote control toward the remote control sensor on the TV.
To remove the batteries, perform the installation actions in reverse.
CAUTION
y
Do not mix old and new batteries, as this may damage the remote control.
(Only LA66**, LA69**, LA74**, LN578*)
Pointer (RF transmitter)
(POWER)
Turns the TV on or off.
Navigation buttons (up/down/
left/right)
BACK
Scrolls through menus or op-
Returns to the previous level.
BACK SMART
tions.
SMART
Wheel(OK)
Accesses the Smart Home
Selects menus or options and
menus.
confirms your input.
Scrolls through the saved
/Q.MENU
Voice recognition
programmes.
(Depending on model)
If you press the navigation
button while moving the pointer
/Q.MENU
P
on the screen, the pointer
Accesses the quick menus.
disappears, and the Magic
Accesses the Universal Control.
Remote Control works as a
regular remote control.
+ -
To display the pointer again,
Adjusts the volume level.
shake the Magic Remote
ꕌPꕍ
Control from side to side.
Scrolls through the saved
3D
programmes or channels.
Used for viewing 3D video.
MUTE
(Depending on model)
Mutes all sounds.
Voice recognition(Depending on model)
Network connection is required to use the voice recognition function.
The recognition rate may vary depending on the user’s characteristics (voice, pronunciation, intonation
and speed) and the environment (noise and TV volume).
1. Press the Voice recognition button.
2. Speak when the voice display window appears on the left of the TV screen.
• The voice recognition may fail when you speak too fast or too slow.
• Use the Magic remote control no further than 10 cm from your face.
MAGIC REMOTE CONTROL FUNCTIONS
25
Registering Magic Remote
ENGENGLISH
Control
It is necessary to ‘pair’ (register) the magic remote
control to your TV before it will work.
How to register the Magic Remote Control
BACK
HOME
MY APPS
P
11-1 Brief Info Title Test...
Info.
1 To register automatically,
More
turn the TV on and press the
Wheel(OK) button. When
registration is completed, the
completion message appears
on the screen.
If you press Wheel(OK) on the Magic
2 If registration fails, turn the TV
Remote Control, the following screen
off and back on, then press
1
appears.
the Wheel(OK) button to
Shows information about the current
complete registration.
programme and screen.
2
You can select More Menu.
How to re-register the Magic Remote Control
1 Press and hold the BACK
BACK
and SMART
buttons
together for 5 seconds to
Precautions to Take when
reset, then register it by
SMART
following “How to register the
Using the Magic Remote
Magic Remote Control” above.
Control
2 To re-register the Magic
Remote Control, press and
hold the BACK
button for 5
y
Use the Magic Remote Control within the
seconds toward the TV. When
maximum communication distance (10 m).
registration is completed, the
Using the Magic Remote Control beyond this
completion message appears
distance, or with an object obstructing it, may
on the screen.
cause a communication failure.
y
A communication failure may occur due to
How to use Magic Remote
nearby devices. Electrical devices such as
a microwave oven or wireless LAN product
Control
may cause interference, as these use the
1 If the pointer disappears, move
same bandwidth (2.4 GHz) as the Magic
the Magic Remote Control
Remote Control.
slightly to left or right. Then, it
y
The Magic Remote Control may be damaged
will automatically appear on
the screen.
or may malfunction if it is dropped or receives
»
If the pointer has not been
a heavy impact.
used for a certain period of
y
Take care not to bump into nearby furniture
time, it will disappear.
or other people when using the Magic
2 You can move the pointer by
Remote Control.
aiming the Pointer Receiver of
the Magic Remote Control at
y
Manufacturer and installer cannot provide
your TV then move it left, right,
service related to human safety as the
up or down.
applicable wireless device has possibility of
»
If the pointer does not work
electric wave interference.
properly, leave the Magic
y
It is recommended that an Access Point (AP)
Remote Control for 10
seconds then use it again.
be located more than 1 m away from the
TV. If the AP is installed closer than 1 m, the
Magic Remote Control may not perform as
expected due to frequency interference.

26
USING THE USER GUIDE
ENGLISH
USING THE USER GUIDE
ENG
User Guide allows you to more easily access the detailed TV information.
1 Press the SMART
button to access the
Smart Home menu.
OPTION > To set language
1
2 Select User Guide and press Wheel(OK).
SMART Settings OPTION Language
Selects Menu Language and Audio Language displayed on the screen.
Menu Language
Selects a language for the display text.
[In Digital Mode Only]
Audio Language
When watching a digital broadcast containing several audio
languages, you can select the language you want.
more
[In Digital mode Only]
Subtitle
Use the Subtitle function when two or more subtitle
Language
languages are broadcast.
✎ If subtitle data in a selected language is not broadcast,
2
the default language subtitle will be displayed.
Try Now
Close
More
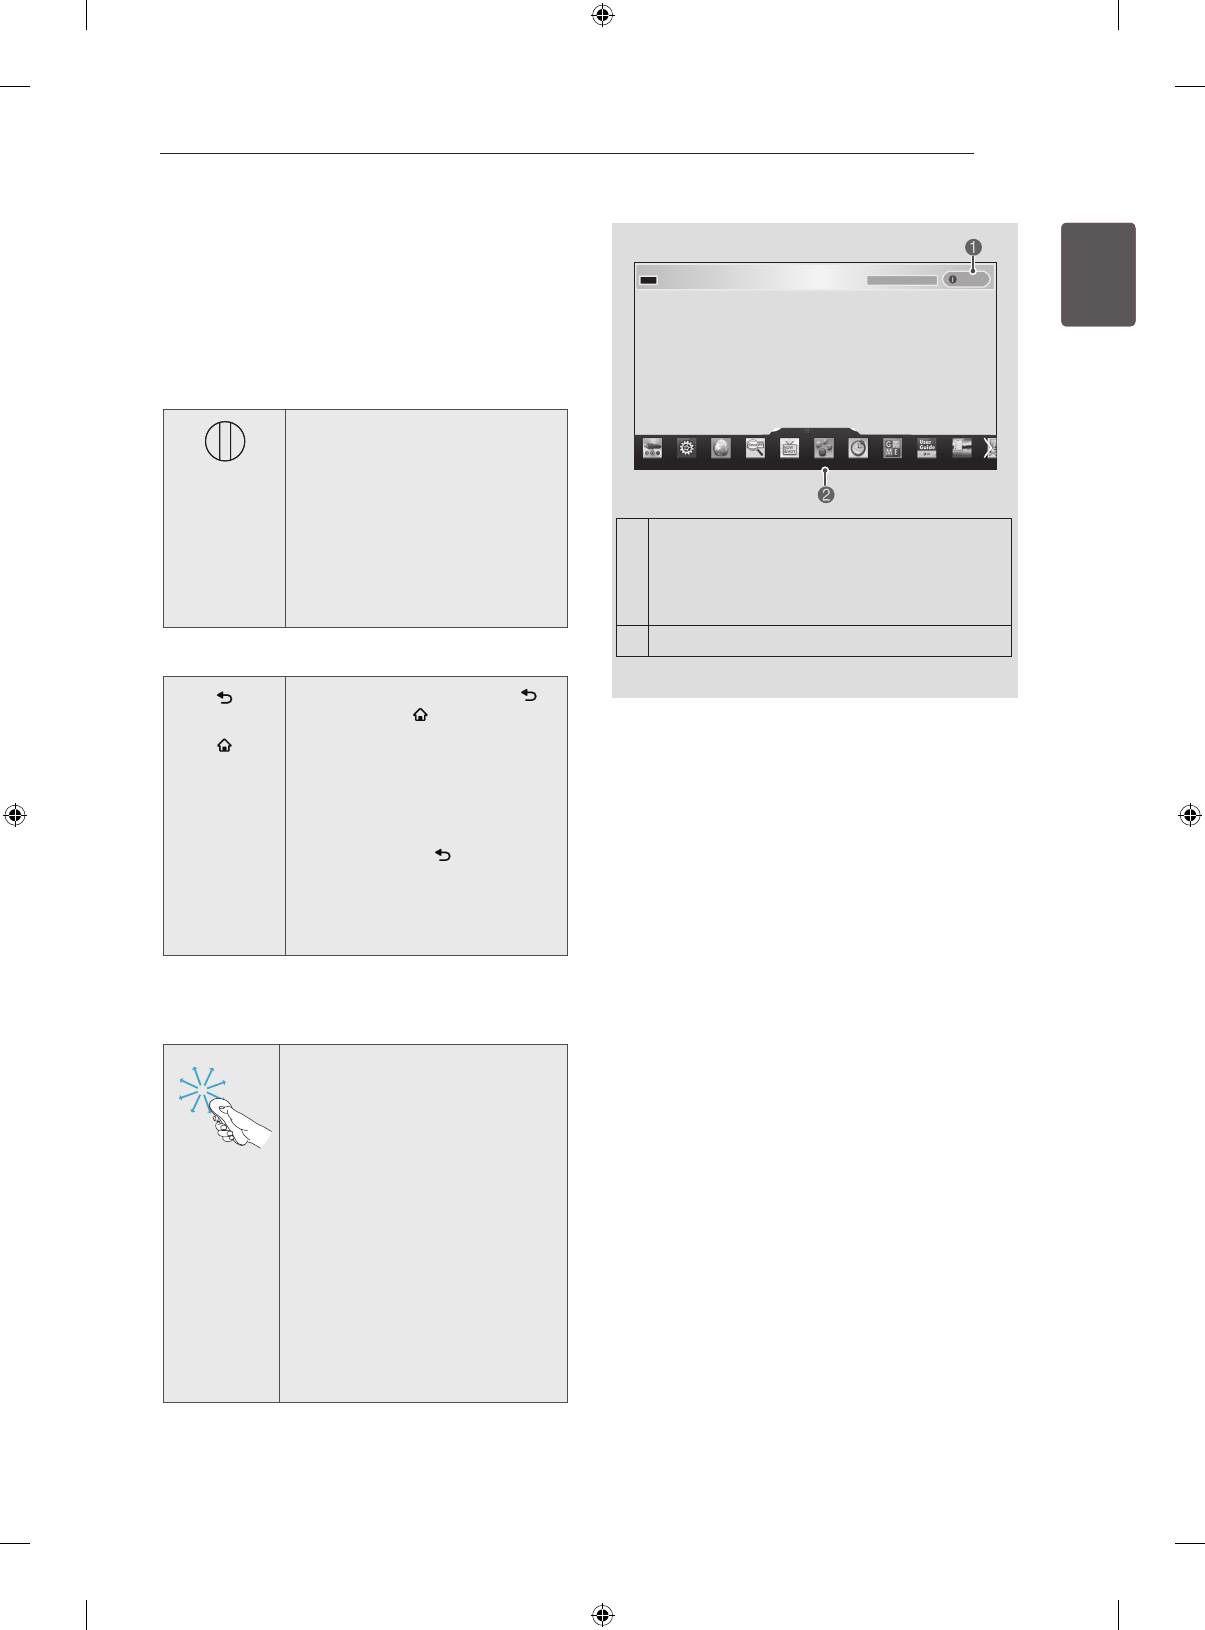
User Guide
Index Online User Guide
1
Shows the description of the selected menu.
You can use
ꕌ
/
ꕍ
to move between pages.
2
Moves to the selected menu directly from the
User Guide.
User Guide
NOTE
y
You can also access the User Guide by
pressing
(User Guide) in the remote
control.(Only LA62**, LA64**)
User Guide
1
3
To use input device
To set time options
PROGRAMME Setting
To set TV lock options
PICTURE, SOUND Setting
To set language
OPTION
To set country
LG SMART Function
Advanced Function
Disabled Assisstance
Information
2
To set Magic remote control
Index
Online User Guide
4 5
1
Shows the current watching programme or
input source screen.
2
Allows to select the category you want.
3
Allows to select the item you want.
You can use
ꕌ
/
ꕍ
to move between pages.
4
Allows to browse the description of the
function you want from the index.
5
Provides the detailed information on the
functions of LG Smart TV when the Internet
is connected.
(It may not be available depending on the
country/language.)
MAINTENANCE / TROUBLESHOOTING
27
MAINTENANCE
ENGENGLISH
Cleaning your TV
Clean your TV regularly to keep the best performance and to extend the product lifespan.
CAUTION
y
Make sure to turn the power off and disconnect the power cord and all other cables first.
y
When the TV is left unattended and unused for a long time, disconnect the power cord from the wall
outlet to prevent possible damage from lightning or power surges.
Screen, frame, cabinet and stand
y
To remove dust or light dirt, wipe the surface with a dry, clean, and soft cloth.
y
To remove major dirt, wipe the surface with a soft cloth dampened in clean water or a diluted mild
detergent. Then wipe immediately with a dry cloth.
CAUTION
y
Avoid touching the screen at all times, as this may result in damage to the screen.
y
Do not push, rub, or hit the screen surface with your fingernail or a sharp object, as this may result in
scratches and image distortions.
y
Do not use any chemicals as this may damage the product.
y
Do not spray liquid onto the surface. If water enters the TV, it may result in fire, electric shock, or
malfunction.
Power cord
Remove the accumulated dust or dirt on the power cord regularly.
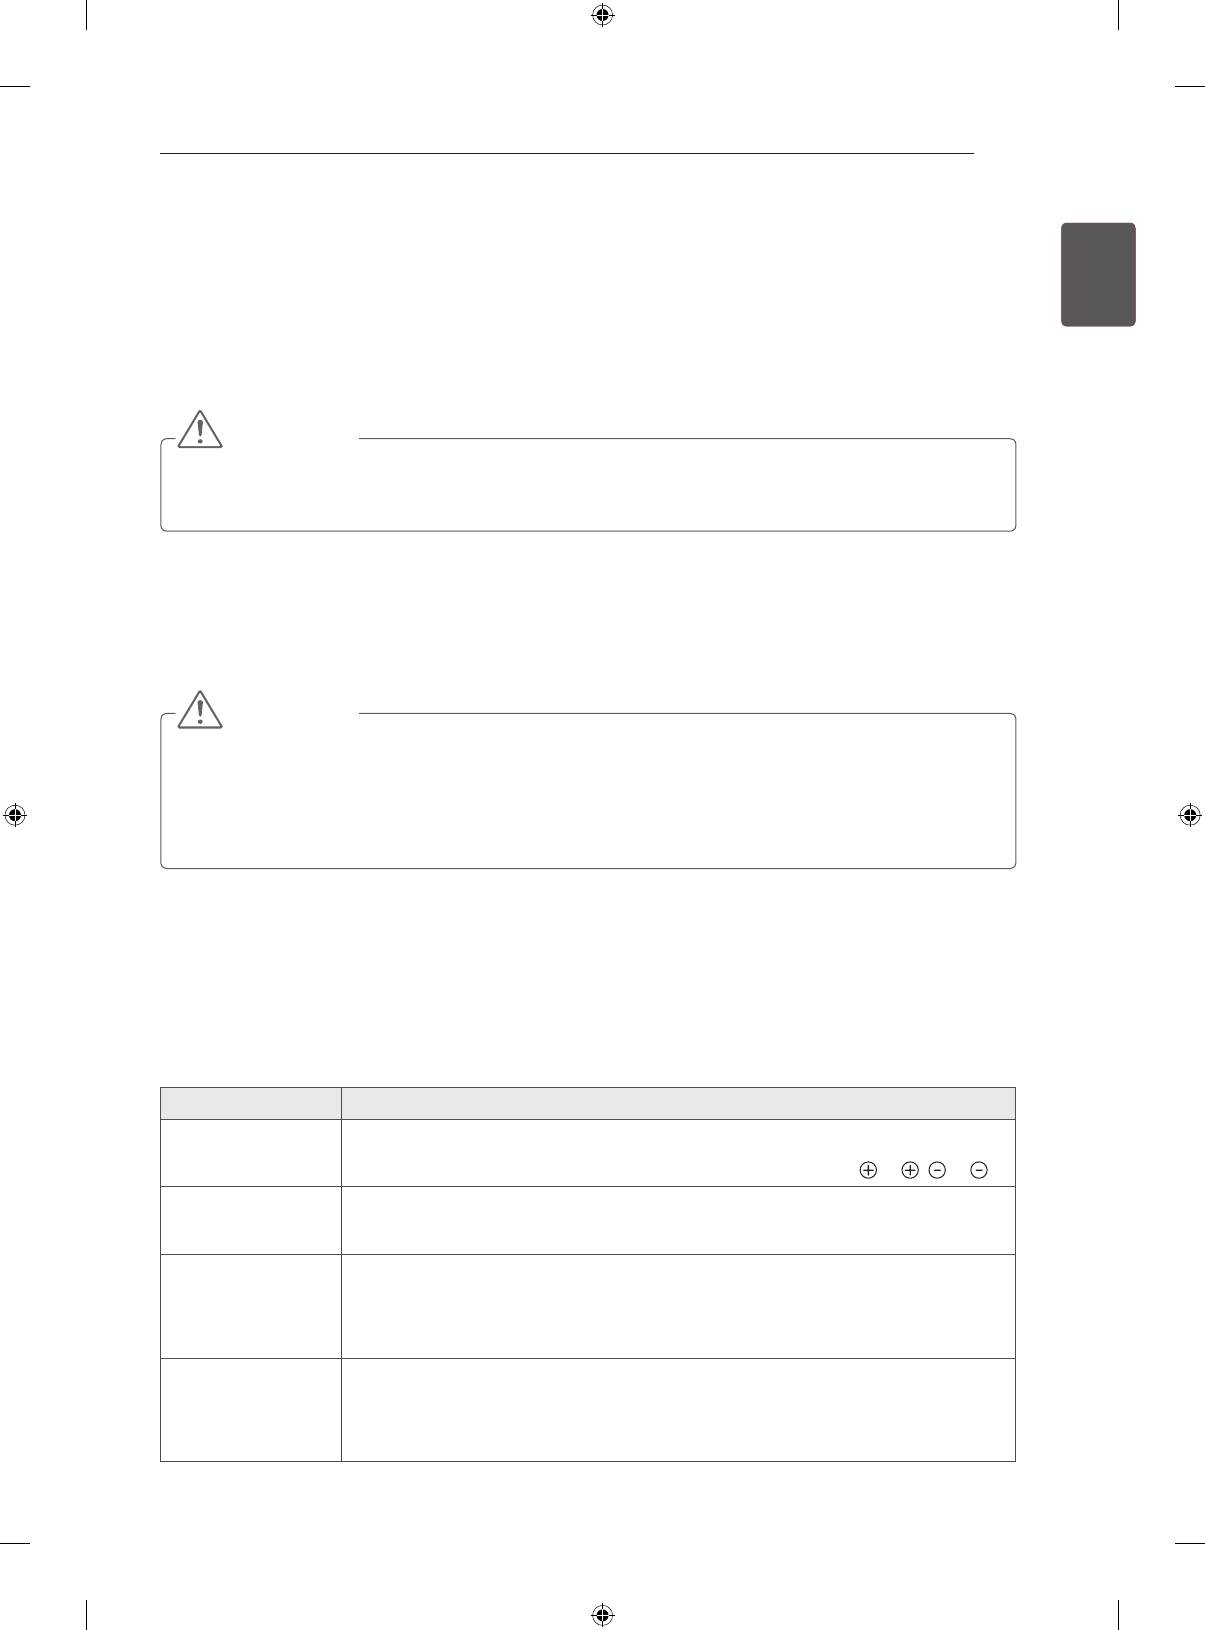
TROUBLESHOOTING
Problem Solution
Cannot control
y
Check the remote control sensor on the product and try again.
the TV with the
y
Check if there is any obstacle between the product and the remote control.
remote control.
y
Check if the batteries are still working and properly installed (
to , to ).
No image display
y
Check if the product is turned on.
and no sound is
y
Check if the power cord is connected to a wall outlet.
produced.
y
Check if there is a problem in the wall outlet by connecting other products.
The TV turns off
y
Check the power control settings. The power supply may be interrupted.
suddenly.
y
Check if the Auto sleep feature is activated in the Time settings.
y
If there is no signal while the TV is on, the TV will turn off automatically after
15 minutes of inactivity.
When connecting
y
Turn the TV off/on using the remote control.
to the PC (HDMI
y
Reconnect the HDMI cable.
DVI), ‘No signal’
y
Restart the PC with the TV on.
or ‘Invalid Format’
is displayed.
28
EXTERNAL CONTROL DEVICE SETUP / SPECIFICATIONS
ENGLISH
EXTERNAL CONTROL DEVICE SETUP
ENG
To obtain the external control device setup information, please visit www.lg.com
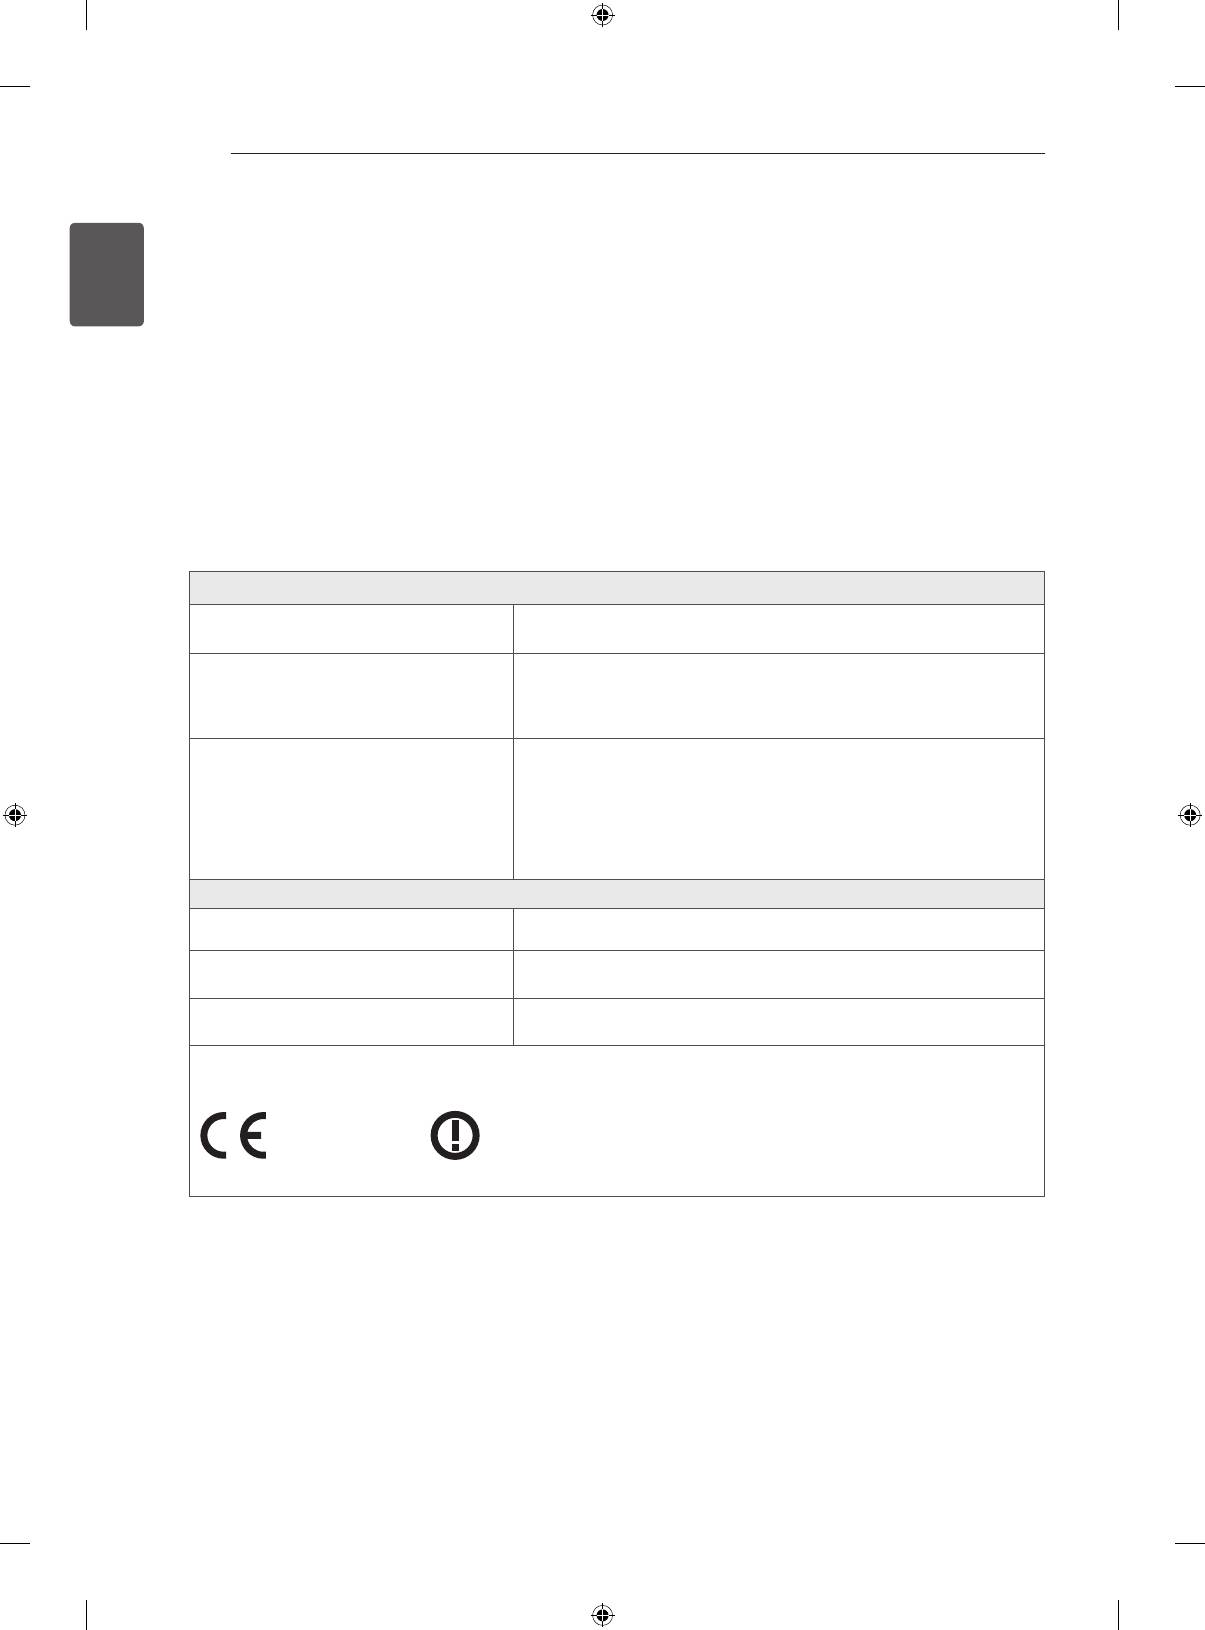
SPECIFICATIONS
(Only LA66**, LA69**, LA74**, LN578*)
Wireless LAN module (TWFM-B006D) specification
Standard IEEE802.11a/b/g/n
2400 to 2483.5 MHz
Frequency Range
5150 to 5250 MHz
5725 to 5850 MHz (for Non EU)
802.11a: 11 dBm
802.11b: 14 dBm
Output Power
802.11g: 10.5 dBm
(Max.)
802.11n - 2.4GHz: 11 dBm
802.11n - 5GHz: 12.5 dBm
Bluetooth module (BM-LDS401) specification
Standard Bluetooth Version 3.0
Frequency Range 2400 ~ 2483.5 MHz
Output Power (Max.) 10 dBm or lower
y
Because band channel used by the country could be different, the user can not change or adjust the
operating frequency and this product is set for the regional frequency table.
0197
0197
SPECIFICATIONS
29
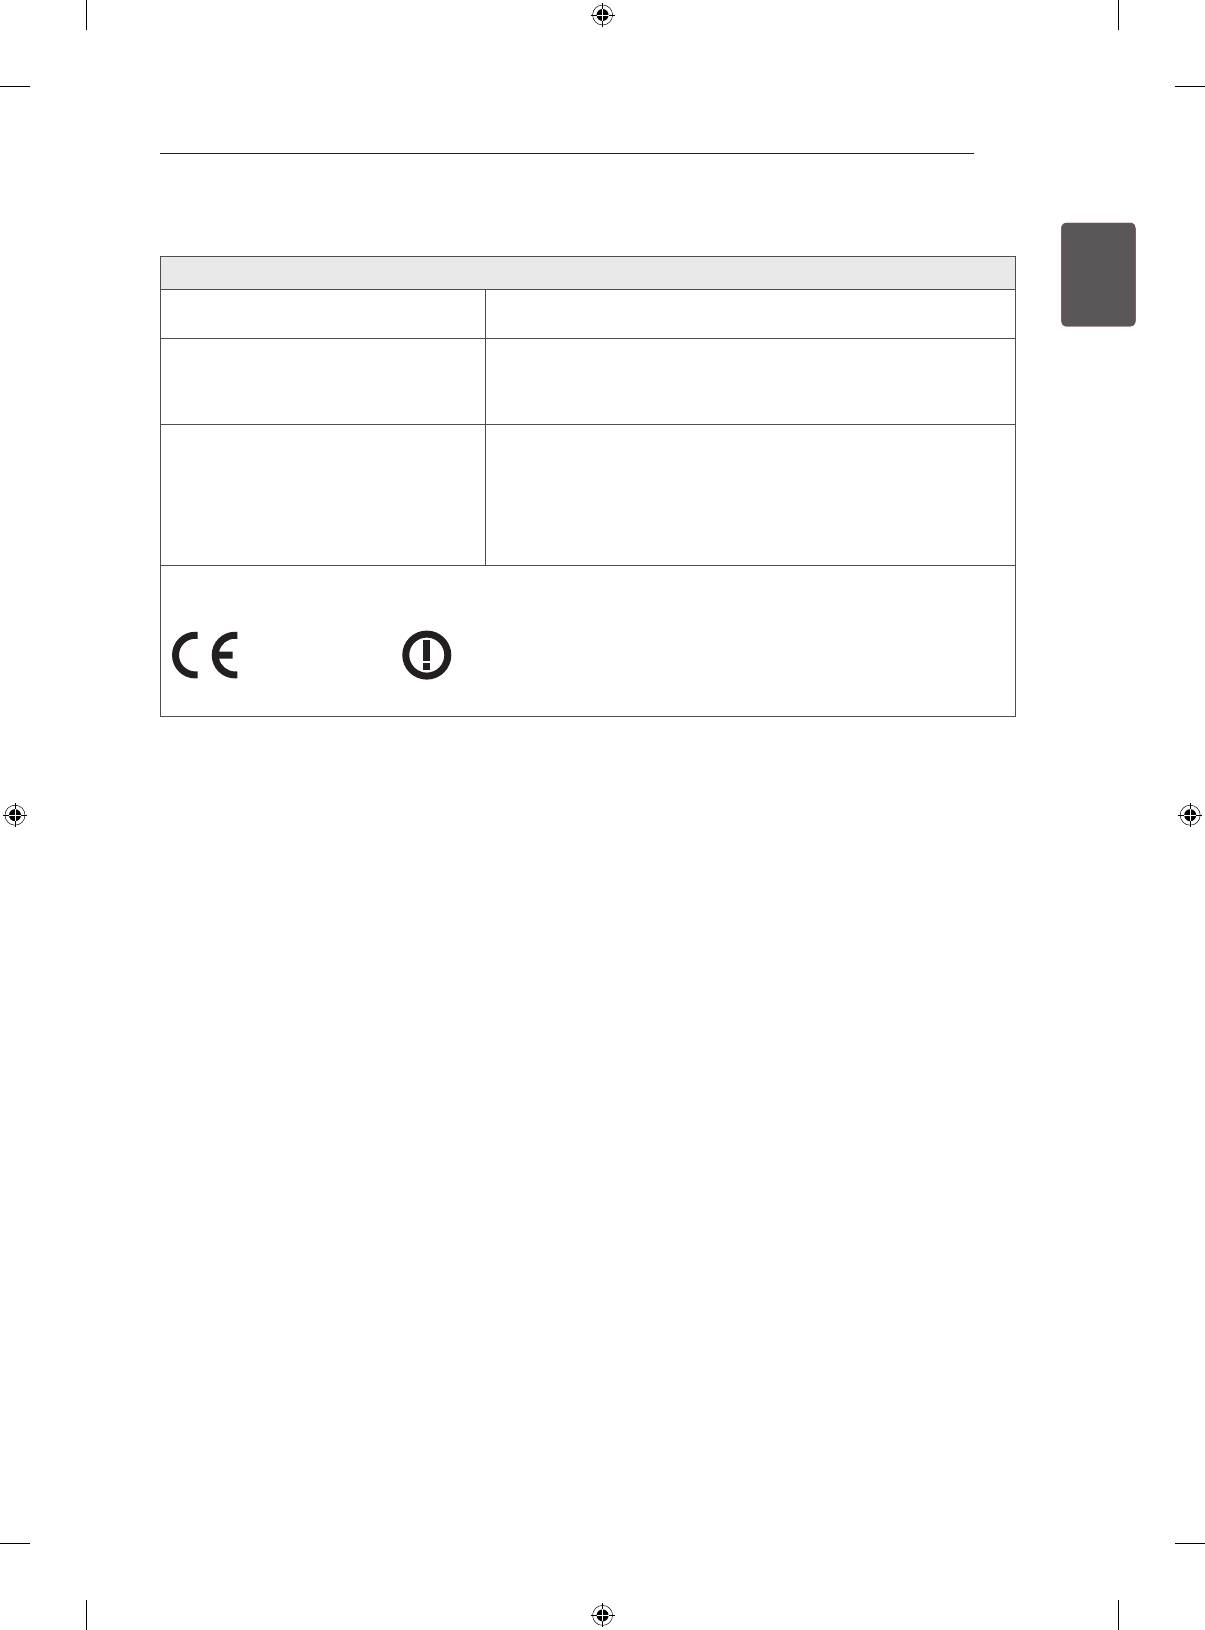
(Only LN575*, LN577*, LA62**, LA64**)
ENGENGLISH
Wireless LAN module(TWFM-B006D) specification
Standard IEEE802.11a/b/g/n
2400 to 2483.5 MHz
Frequency Range
5150 to 5250 MHz
5725 to 5850 MHz (for Non EU)
802.11a: 11 dBm
802.11b: 14 dBm
Output Power
802.11g: 10.5 dBm
(Max.)
802.11n - 2.4GHz: 11 dBm
802.11n - 5GHz: 12.5 dBm
y
Because band channel used by the country could be different, the user can not change or adjust the
operating frequency and this product is set for the regional frequency table.
0197
0197


HASZNÁLATI ÚTMUTATÓ
LED TV
* Az LG LED TV megnevezés a LED háttérfénnyel ellátott LCD képernyőkre vonatkozik.
A készülék használatbavétele előtt figyelmesen
olvassa el az útmutatót, és őrizze meg, mert
később szüksége lehet rá.
www.lg.com
