LG 47LA660S – страница 2
Инструкция к LG 47LA660S
15
ENG
ENGLISH
ASSEMBLING AND PREPARING
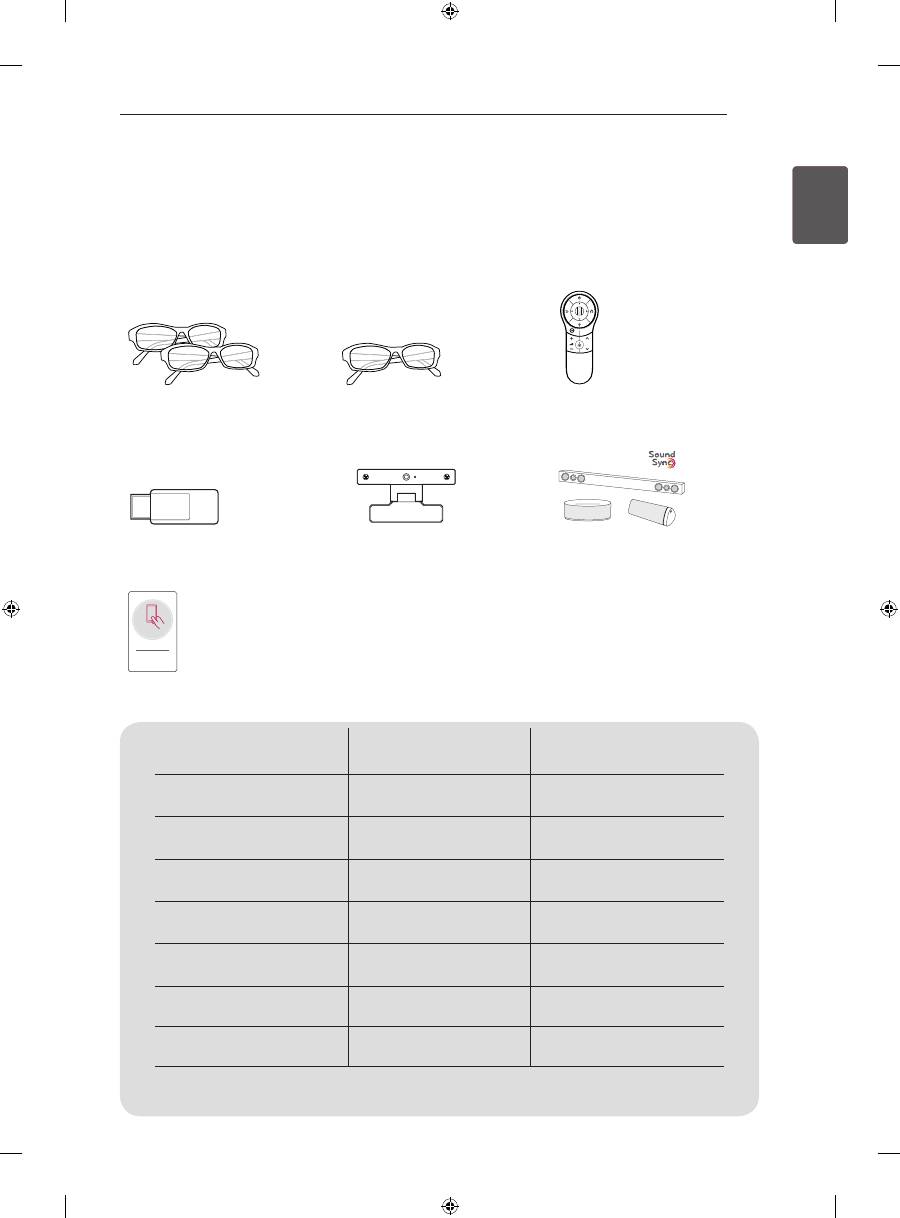
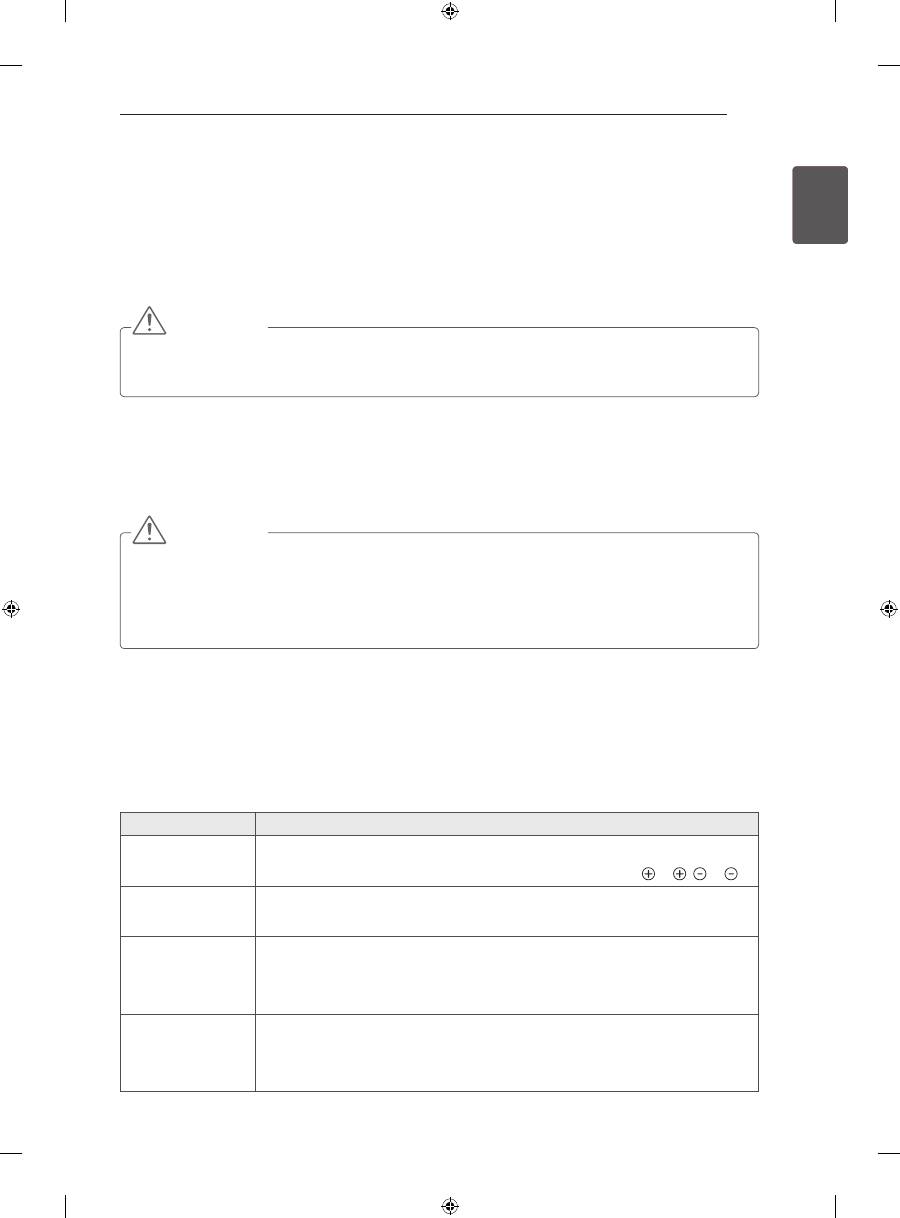
Separate purchase
(Depending on model)
Separate purchase items can be changed or modified for quality improvement without any notification.
Contact your dealer to buy these items.
These devices only work with certain models.
P
123
AG-F***dP
Dual play glasses
AG-F***
Cinema 3D Glasses
AN-MR400
Magic Remote
AN-WF100
Wi-Fi Dongle
AN-VC4**
Video call camera
LG Audio device
Tag On
Tag on
Compatibility
LN57**
LA62**, LA64**,
LA66**, LA69**, LA74**
AG-F***dP
Dual play glasses
•
(Depending on model)
AG-F***
Cinema 3D Glasses
•
AN-MR400
Magic Remote
•
•
AN-WF100
Wi-Fi Dongle
•
(Depending on model)
AN-VC4**
Video call camera
•
•
LG Audio device
•
(Depending on model)
•
Tag On
•
(Depending on model)
•
The model name or design may be changed depending on the upgrade of product functions,
manufacturer’s circumstances or policies.
16
ENG
ENGLISH
ASSEMBLING AND PREPARING
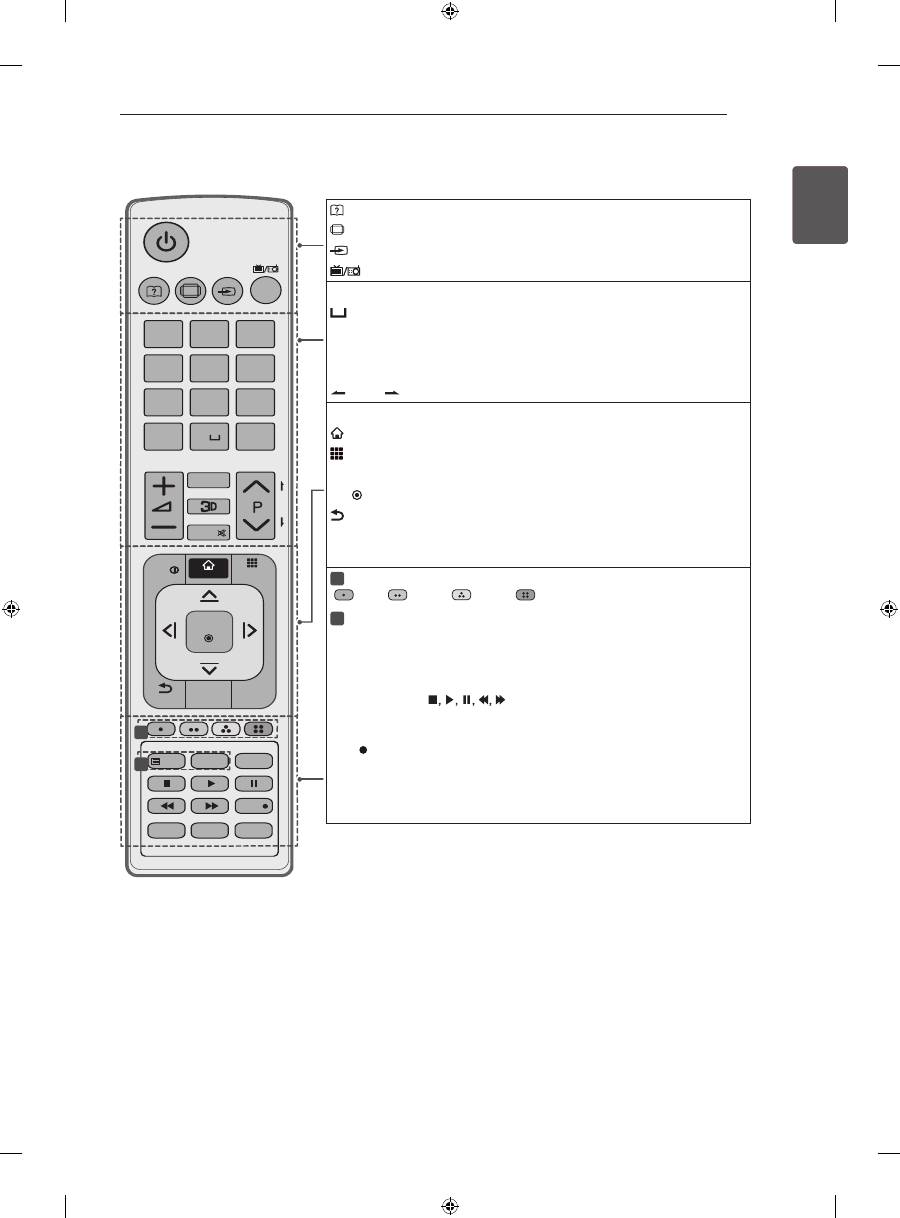
Parts and buttons
Button
description
H
Scrolls through the saved programmes.
H
Adjusts the volume level.
H
Selects the highlighted menu option or confirms an input.
S
Accesses the main menu, or saves your input and exits the menus.
H
Changes the input source.
Turns the power on or off.
NOTE
y
You can set the
LG Logo Light
to on or off by selecting
OPTION
in the main menus.(Depending on model)
LAN
(PC)
RGB IN
(RGB/HDMI-PC)
AUDIO
IN
IN
OUT
OPTICAL
DIGITAL
AUDIO
H/P
IN/OUT
(RGB)
AV1
IN
HDD IN
USB Hub
USB Appps
USB IN
1
1
(ARC)
2
3
4
(PC)
2
USB IN
3
ANTENNA
/CABLE
13/18V
700mA MAx
LNB IN
Satellite
IN
COMPONENT
AV
P
R
P
B
Y
VIDEO
AUDIO
SETTINGS
INPUT
OK
SETTINGS
INPUT
OK
Buttons
Screen
Speakers
SETTINGS
INPUT
OK
Screen
Buttons
Speakers
Remote control sensor
LG Logo Light (Only LA64**, LA66**)
Power Indicator (Only LA62**, LN57**-ZE/ZK)
Remote control sensor
LG Logo Light
A type : LA62**, LA64**, LA66**,
LN57**-ZE/ZK
SETTINGS
INPUT
OK
Screen
Buttons
Speakers
Remote control sensor
Power Indicator
D type : LN57**-ZA
SETTINGS
INPUT
OK
Screen
Buttons
Speakers
Remote control sensor
LG Logo Light
C type : 60LA74**
B type : LA69**, 42/47/55LA74**
17
ENG
ENGLISH
ASSEMBLING AND PREPARING
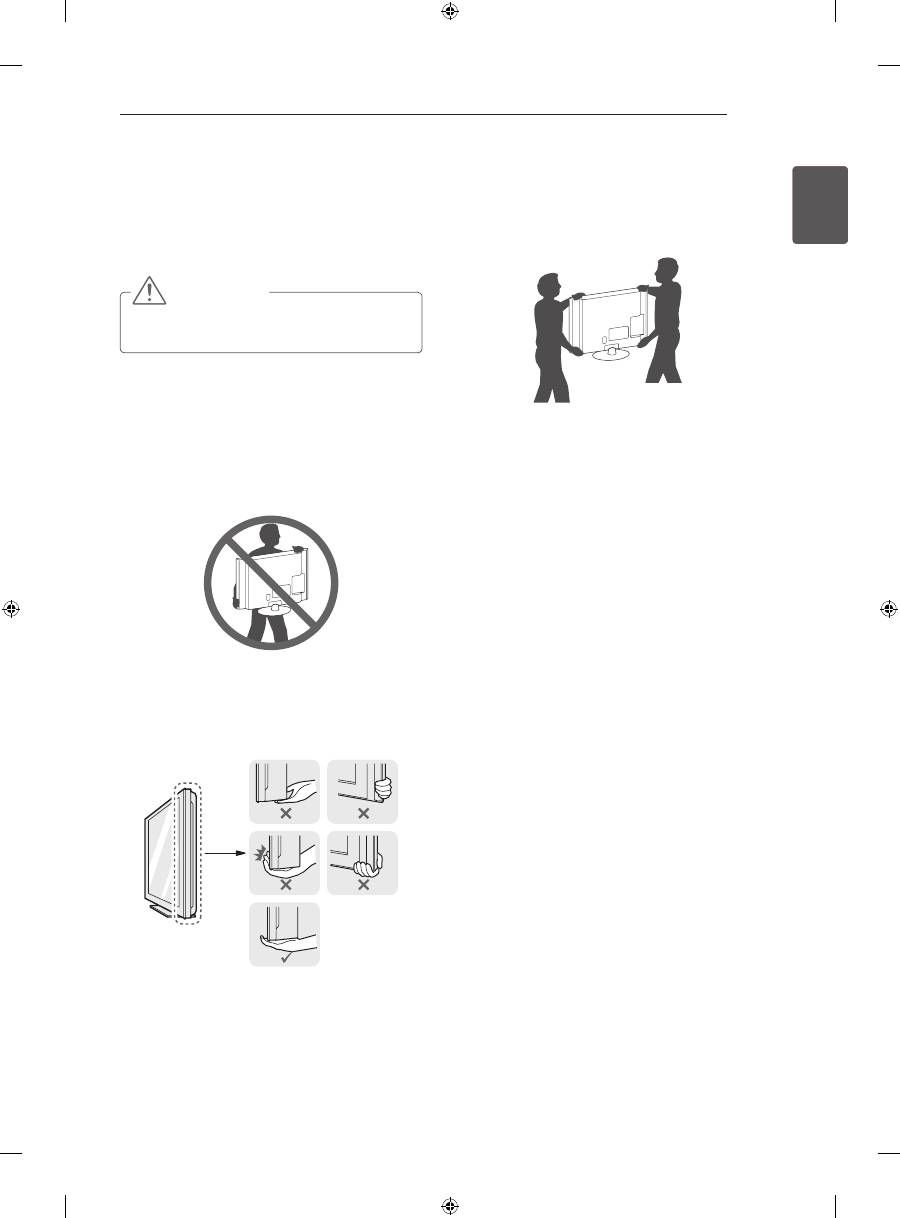
Lifting and moving the TV
Please note the following advice to prevent the
TV from being scratched or damaged and for safe
transportation regardless of its type and size.
CAUTION
y
Avoid touching the screen at all times, as
this may result in damage to the screen.
y
It is recommended to move the TV in the box
or packing material that the TV originally came
in.
y
Before moving or lifting the TV, disconnect the
power cord and all cables.
y
When holding the TV, the screen should face
away from you to avoid damage.
y
Hold the top and bottom of the TV frame firmly.
Make sure not to hold the transparent part,
speaker, or speaker grill area.
y
When transporting a large TV, there should be
at least 2 people.
y
When transporting the TV by hand, hold the TV
as shown in the following illustration.
y
When transporting the TV, do not expose the
TV to jolts or excessive vibration.
y
When transporting the TV, keep the TV upright,
never turn the TV on its side or tilt towards the
left or right.
y
Do not apply excessive pressure to cause
flexing /bending of frame chassis as it may
damage screen.
Remote control sensor
LG Logo Light
Remote control sensor
Power Indicator
18
ENG
ENGLISH
ASSEMBLING AND PREPARING
Mounting on a table
1 Lift and tilt the TV into its upright position on a
table.
- Leave a 10 cm (minimum) space from the
wall for proper ventilation.
10 cm
10 cm
10 cm
10 cm
10 cm
2 Connect the power cord to a wall outlet.
Using the Kensington security system (This feature is
not available for all models.)
y
Image shown may differ from your TV.
The Kensington security system connector is
located at the rear of the TV. For more information
of installation and using, refer to the manual
provided with the Kensington security system or
visit
http://www.kensington.com.
Connect the Kensington security system cable
between the TV and a table.
CAUTION
y
Do not place the TV near or on sources
of heat, as this may result in fire or other
damage.
Securing the TV to a table
Fix the TV to a table to prevent from tilting forward,
damage, and potential injury.
To secure the TV to a table, insert and tighten the
supplied screw on the rear of the stand.
(Only 32/39/42/47/50/60LN57**-ZA)
(Only 32/39/42/47/50LN57**-ZE/ZK,
32/39/42/47/50LA62**, 32/42/47/50LA64**,
32/42/47/50LA66**)
2 EA, P4 x 8
(Only 47/50LN57**-ZE/ZK, 47/50LA62**,
47/50LA64**,47/50LA66**)
2 EA, M4 x 8
(Only 32/39/42LN57**-ZE/ZK, 32/39/42LA62**,
32/42LA64**, 32/42LA66**)
19
ENG
ENGLISH
ASSEMBLING AND PREPARING
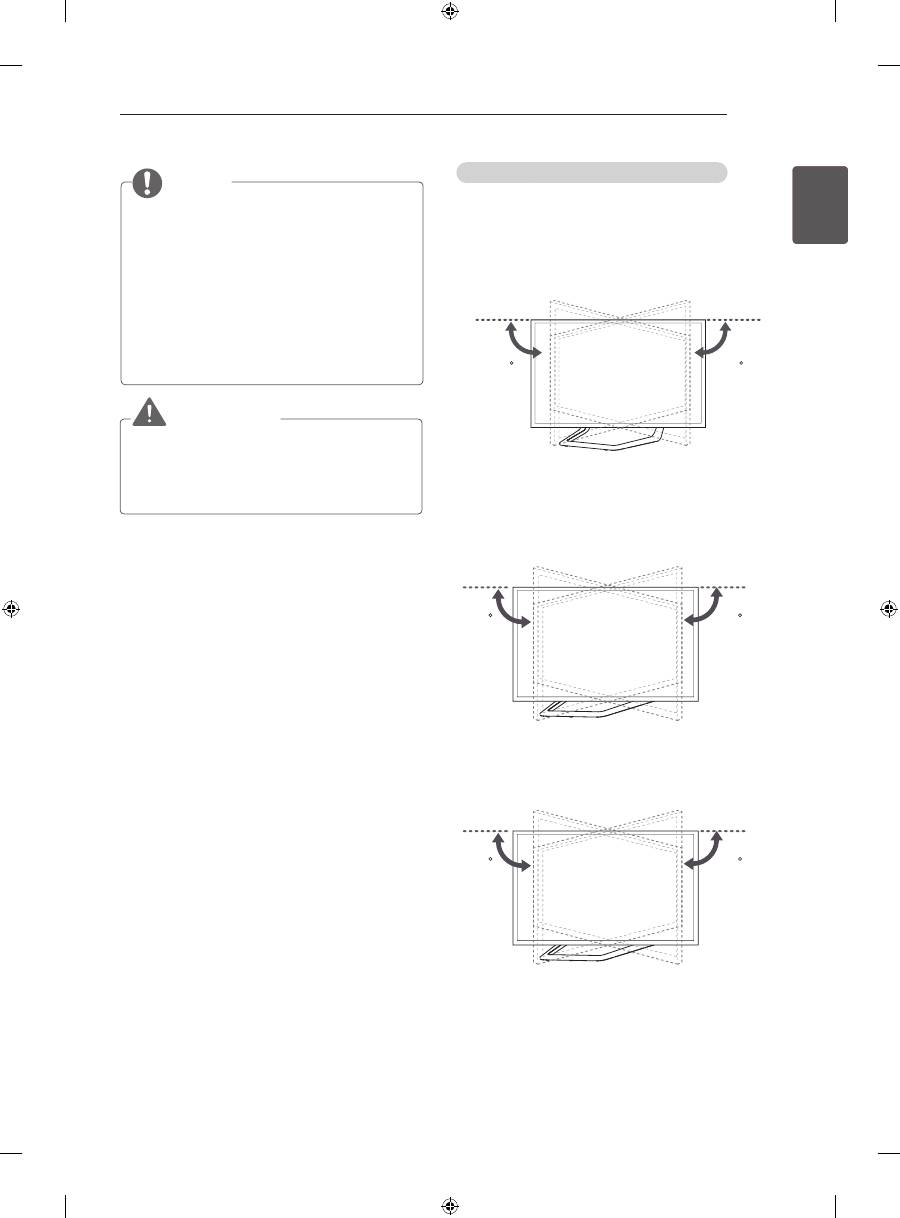
Adjusting the angle of the TV to suit view
(This feature is not available for all models.)
Swivel 15 degrees to the left or right and adjust the
angle of the TV to suit your view.
(Only LA62**, LA64**, LA66**, LN57**-ZE/ZK)
15
15
Swivel 10 degrees to the left or right and adjust the
angle of the TV to suit your view.
(Only 42/47LA69**, 42/47LA74**)
10
10
Swivel 8 degrees to the left or right and adjust the
angle of the TV to suit your view.
(Only 55LA69**, 55/60LA74**)
8
8
NOTE
(Only 32/39/42/47/50LN57**-ZE/ZK,
32/39/42/47/50LA62**, 32/42/47/50LA64**,
32/42/47/50LA66**)
How to fix the TV to a table
1. Connect the Desk-mount Cables to the
Stand Base using the Bracket Screws.
2. Fix the Desk-mount Cables to a table using
the Desk-mount Screws.
3. Once the TV is fixed, move the table close to
the wall. Children may go in, causing injuries.
WARNING
y
To prevent TV from falling over, the TV
should be securely attached to the floor/
wall per installation instructions. Tipping,
shaking, or rocking the TV may cause injury.
20
ENG
ENGLISH
ASSEMBLING AND PREPARING
Mounting on a wall
Attach an optional wall mount bracket at the rear of
the TV carefully and install the wall mount bracket
on a solid wall perpendicular to the floor. When you
attach the TV to other building materials, please
contact qualified personnel.
LG recommends that wall mounting be performed
by a qualified professional installer.
10 cm
10 cm
10 cm
10 cm
CAUTION
y
Make sure that children do not climb on or
hang on the TV.
NOTE
y
Use a platform or cabinet that is strong and
large enough to support the TV securely.
y
Brackets, bolts and ropes are not provided.
You can obtain additional accessories from
your local dealer.
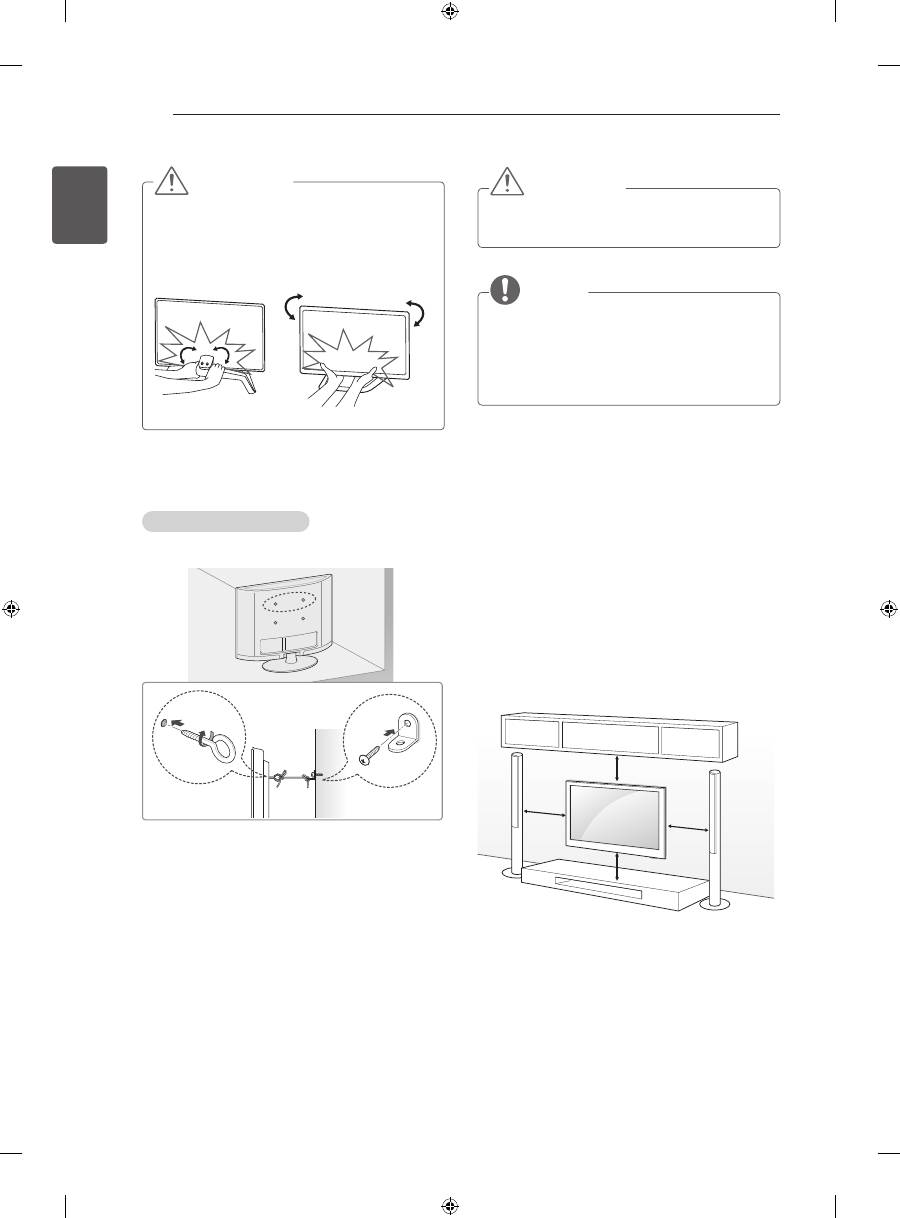
Securing the TV to a wall
(This feature is not available for all models.)
1 Insert and tighten the eye-bolts, or TV brackets
and bolts on the back of the TV.
- If there are bolts inserted at the eye-bolts
position, remove the bolts first.
2 Mount the wall brackets with the bolts to the
wall.
Match the location of the wall bracket and the
eye-bolts on the rear of the TV.
3 Connect the eye-bolts and wall brackets tightly
with a sturdy rope.
Make sure to keep the rope horizontal with the
flat surface.
CAUTION
y
When adjusting the angle adof the product,
watch out for your fingers.
»
Personal injury may occur if hands or fingers
are pinched. If the product is tilted too much, it
may fall, causing damage or injury.
<Rear>
<Front>
21
ENG
ENGLISH
ASSEMBLING AND PREPARING
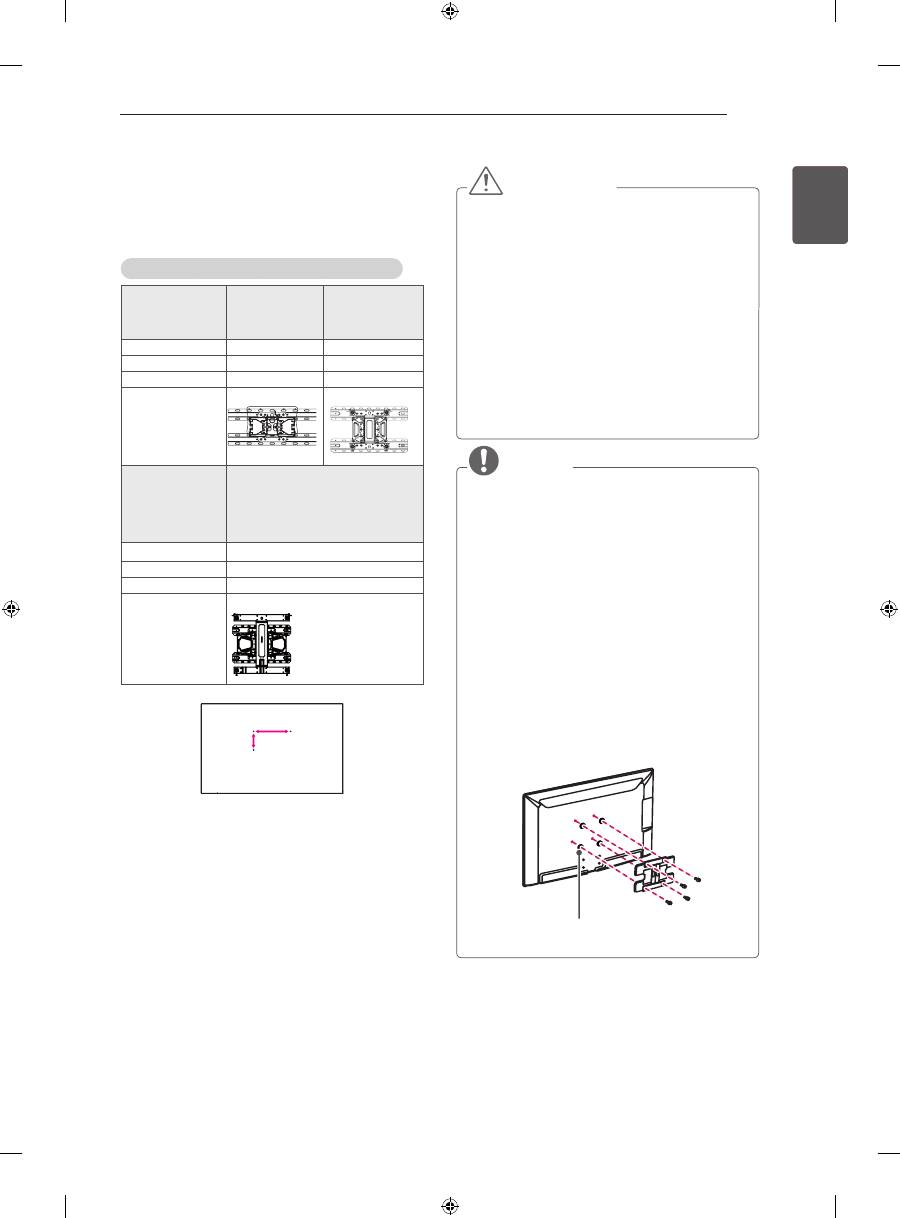
Make sure to use screws and wall mount
bracket that meet the VESA standard. Standard
dimensions for the wall mount kits are described in
the following table.
Separate purchase(Wall Mounting Bracket)
Model
32LA62**
32LN57**
39/42LA62**
32LA64**
32LA66**
39/42LN57**
VESA (A x B)
200 x 100
200 x 200
Standard screw
M4
M6
Number of screws 4
4
Wall mount
bracket
LSW130B
LSW230B
Model
47/50/55/60LA62**
42/47/50/55/60LA64**
42/47/50/55LA66**
42/47/55LA69**
42/47/55/60LA74**
47/50/55/60LN57**
VESA (A x B)
400 x 400
Standard screw
M6
Number of screws 4
Wall mount
bracket
LSW430B
A
B
CAUTION
y
Disconnect the power first, and then move
or install the TV. Otherwise electric shock
may occur.
y
If you install the TV on a ceiling or slanted
wall, it may fall and result in severe injury.
Use an authorised LG wall mount and
contact the local dealer or qualified
personnel.
y
Do not over tighten the screws as this may
cause damage to the TV and void your
warranty.
y
Use the screws and wall mounts that meet
the VESA standard. Any damages or injuries
by misuse or using an improper accessory
are not covered by the warranty.
NOTE
y
Use the screws that are listed on the VESA
standard screw specifications.
y
The wall mount kit includes an installation
manual and necessary parts.
y
The wall mount bracket is not provided. You
can obtain additional accessories from your
local dealer.
y
The length of screws may differ depending
on the wall mount. Make sure to use the
proper length.
y
For more information, refer to the manual
supplied with the wall mount.
y
When attaching a third-party wall mounting
bracket to the TV, insert the wall mount
inner spacers into the TV wall mount holes
to move your TV in vertical angle. Please
make sure not to use the spacers for LG
wall mounting bracket. (Only LA64**)
Wall Mount Inner Spacer
22
ENG
ENGLISH
REMOTE CONTROL
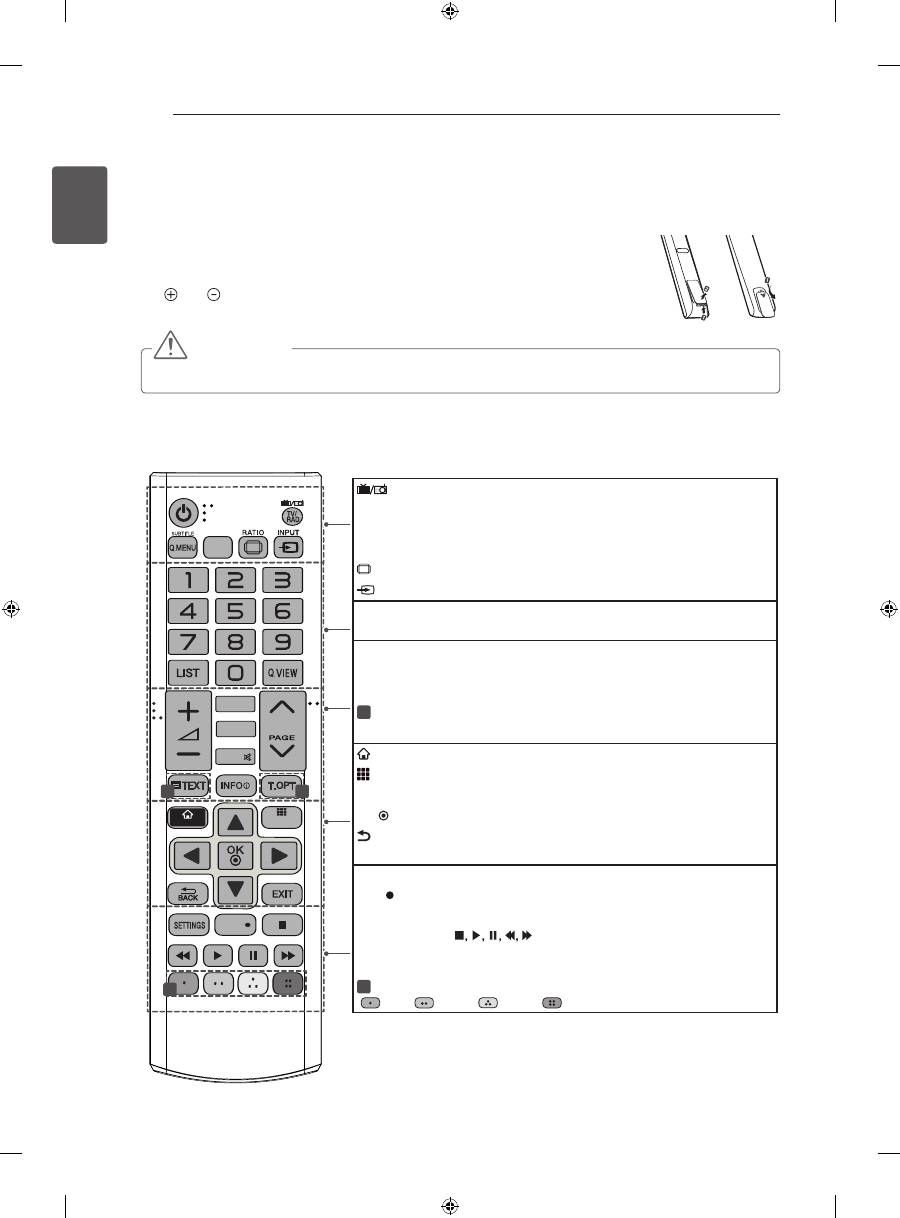
REMOTE CONTROL
The descriptions in this manual are based on the buttons on the remote control.
Please read this manual carefully and use the TV correctly.
To replace batteries, open the battery cover, replace batteries (1.5 V AAA) matching
the and ends to the label inside the compartment, and close the battery cover.
To remove the batteries, perform the installation actions in reverse.
or
CAUTION
y
Do not mix old and new batteries, as this may damage the remote control.
Make sure to point the remote control toward the remote control sensor on the TV.
(Only , LN570*, LN575*, LN577*)
APP/*
MUTE
FAV
P
GUIDE
SMART
MY APPS
REC
LIVE TV
1
2
1
TV/RAd
Selects Radio, TV and DTV programme.
SUBTITLE
Recalls your preferred subtitle in digital mode.
Q. MENU
Accesses the quick menus.
GUIdE
Shows programme guide.
RATIO
Resizes an image.
INPUT
Changes the input source.
LIST
Accesses the saved programme list.
Q.VIEW
Returns to the previously viewed programme.
FAV
Accesses your favourite programme list.
APP/*
Select the MHP TV menu source. (Only Italy.) (Depending on model)
PAGE
Moves to the previous or next screen.
1
TELETEXT BUTTONS
These buttons are used for teletext.
INFO
Views the information of the current programme and screen.
SMART
Accesses the Smart Home menus.
My APPS
Shows the list of Apps.
Navigation buttons
(up/down/left/right) Scrolls through menus or options.
OK
Selects menus or options and confirms your input.
BACK
Returns to the previous level.
EXIT
Clears on-screen displays and return to TV viewing.
SETTINGS
Accesses the main menus.
REC
Start to record and display record menu.
LIVE TV
Return to LIVE TV.
Control buttons
(
) Controls the Premium contents, Time
Machine or Smart Share menus or the SIMPLINK compatible devices (USB
or SIMPLINK or Time Machine).
2
Colour buttons
These access special functions in some menus.
(
: Red,
: Green,
: Yellow,
: Blue)
23
ENG
ENGLISH
REMOTE CONTROL
(Only LA62**, LA64**)
(User Guide)
Sees user-guide.
RATIO
Resizes an image.
INPUT
Changes the input source.
TV/RAd
Selects Radio, TV and DTV programme.
LIST
Accesses the saved programme list.
(Space)
Opens an empty space on the screen keyboard.
Q.VIEW
Returns to the previously viewed programme.
FAV
Accesses your favourite programme list.
3d
Used for viewing 3D video.
PAGE
Moves to the previous or next screen.
INFO
Views the information of the current programme and screen.
SMART
Accesses the Smart Home menus.
My APPS
Shows the list of Apps.
Navigation buttons
(up/down/left/right) Scrolls through menus or options.
OK
Selects menus or options and confirms your input.
BACK
Returns to the previous level.
GUIdE
Shows programme guide.
EXIT
Clears on-screen displays and return to TV viewing.
1
Colour buttons
These access special functions in some menus.
(
: Red,
: Green,
: Yellow,
: Blue)
2
TELETEXT BUTTONS
These buttons are used for teletext.
SUBTITLE
Recalls your preferred subtitle in digital mode.
Q. MENU
Accesses the quick menus.
LIVE TV
Return to LIVE TV.
Control buttons
(
) Controls the Premium contents, Time
Machine or Smart Share menus or the SIMPLINK compatible devices (USB
or SIMPLINK or Time Machine).
REC
Start to record and display record menu.
SETTINGS
Accesses the main menus.
Ad
Switches the Audio Description On or Off.
APP/*
Select the MHP TV menu source. (Only Italy.) (Depending on model)
P
A
G
E
TV/
RAD
RATIO
INPUT
FAV
MUTE
EXIT
OK
GUIDE
MY APPS
LIVE TV
REC
TEXT
T.OPT
SUBTITLE
Q.MENU
AD
BACK
SETTINGS
INFO
1
.,;@
2
abc
3
def
4
ghi
5
jkl
6
mno
7
pqrs
8
tuv
0
9
wxyz
LIST
Q.VIEW
SMART
APP/*
1
2
24
ENG
ENGLISH
MAGIC REMOTE CONTROL FUNCTIONS
MAGIC REMOTE CONTROL FUNCTIONS
This item is not included for all models.
When the message “Magic Remote Control battery is low. Change the battery.” is
displayed, replace the battery.
To replace batteries, open the battery cover, replace batteries (1.5 V AA) matching
and ends to the label inside the compartment, and close the battery cover. Be
sure to point the remote control toward the remote control sensor on the TV.
To remove the batteries, perform the installation actions in reverse.
CAUTION
y
Do not mix old and new batteries, as this may damage the remote control.
(Only LA66**, LA69**, LA74**, LN578*)
P
BACK
SMART
/Q.MENU
Voice recognition
(Depending on model)
/Q.MENU
Accesses the quick menus.
Accesses the Universal Control.
SMART
Accesses the Smart Home
menus.
Wheel(OK)
Selects menus or options and
confirms your input.
Scrolls through the saved
programmes.
If you press the navigation
button while moving the pointer
on the screen, the pointer
disappears, and the Magic
Remote Control works as a
regular remote control.
To display the pointer again,
shake the Magic Remote
Control from side to side.
(POWER)
Turns the TV on or off.
3d
Used for viewing 3D video.
(Depending on model)
BACK
Returns to the previous level.
+ -
Adjusts the volume level.
ꕌ
P
ꕍ
Scrolls through the saved
programmes or channels.
MUTE
Mutes all sounds.
Navigation buttons
(up/down/
left/right)
Scrolls through menus or op-
tions.
Pointer (RF transmitter)
Voice recognition
(Depending on model)
Network connection is required to use the voice recognition function.
The recognition rate may vary depending on the user’s characteristics (voice, pronunciation, intonation
and speed) and the environment (noise and TV volume).
1. Press the Voice recognition button.
2. Speak when the voice display window appears on the left of the TV screen.
•
The voice recognition may fail when you speak too fast or too slow.
•
Use the Magic remote control no further than 10 cm from your face.
25
ENG
ENGLISH
MAGIC REMOTE CONTROL FUNCTIONS
Registering Magic Remote
Control
It is necessary to ‘pair’ (register) the magic remote
control to your TV before it will work.
How to register the Magic Remote Control
BACK
HOME
P
MY APPS
1 To register automatically,
turn the TV on and press the
Wheel(OK)
button. When
registration is completed, the
completion message appears
on the screen.
2 If registration fails, turn the TV
off and back on, then press
the
Wheel(OK)
button to
complete registration.
How to re-register the Magic Remote Control
BACK
SMART
1 Press and hold the
BACK
and
SMART
buttons
together for 5 seconds to
reset, then register it by
following “How to register the
Magic Remote Control” above.
2 To re-register the Magic
Remote Control, press and
hold the
BACK
button for 5
seconds toward the TV. When
registration is completed, the
completion message appears
on the screen.
How to use Magic Remote
Control
1 If the pointer disappears, move
the Magic Remote Control
slightly to left or right. Then, it
will automatically appear on
the screen.
»
If the pointer has not been
used for a certain period of
time, it will disappear.
2 You can move the pointer by
aiming the Pointer Receiver of
the Magic Remote Control at
your TV then move it left, right,
up or down.
»
If the pointer does not work
properly, leave the Magic
Remote Control for 10
seconds then use it again.
Precautions to Take when
Using the Magic Remote
Control
y
Use the Magic Remote Control within the
maximum communication distance (10 m).
Using the Magic Remote Control beyond this
distance, or with an object obstructing it, may
cause a communication failure.
y
A communication failure may occur due to
nearby devices. Electrical devices such as
a microwave oven or wireless LAN product
may cause interference, as these use the
same bandwidth (2.4 GHz) as the Magic
Remote Control.
y
The Magic Remote Control may be damaged
or may malfunction if it is dropped or receives
a heavy impact.
y
Take care not to bump into nearby furniture
or other people when using the Magic
Remote Control.
y
Manufacturer and installer cannot provide
service related to human safety as the
applicable wireless device has possibility of
electric wave interference.
y
It is recommended that an Access Point (AP)
be located more than 1 m away from the
TV. If the AP is installed closer than 1 m, the
Magic Remote Control may not perform as
expected due to frequency interference.
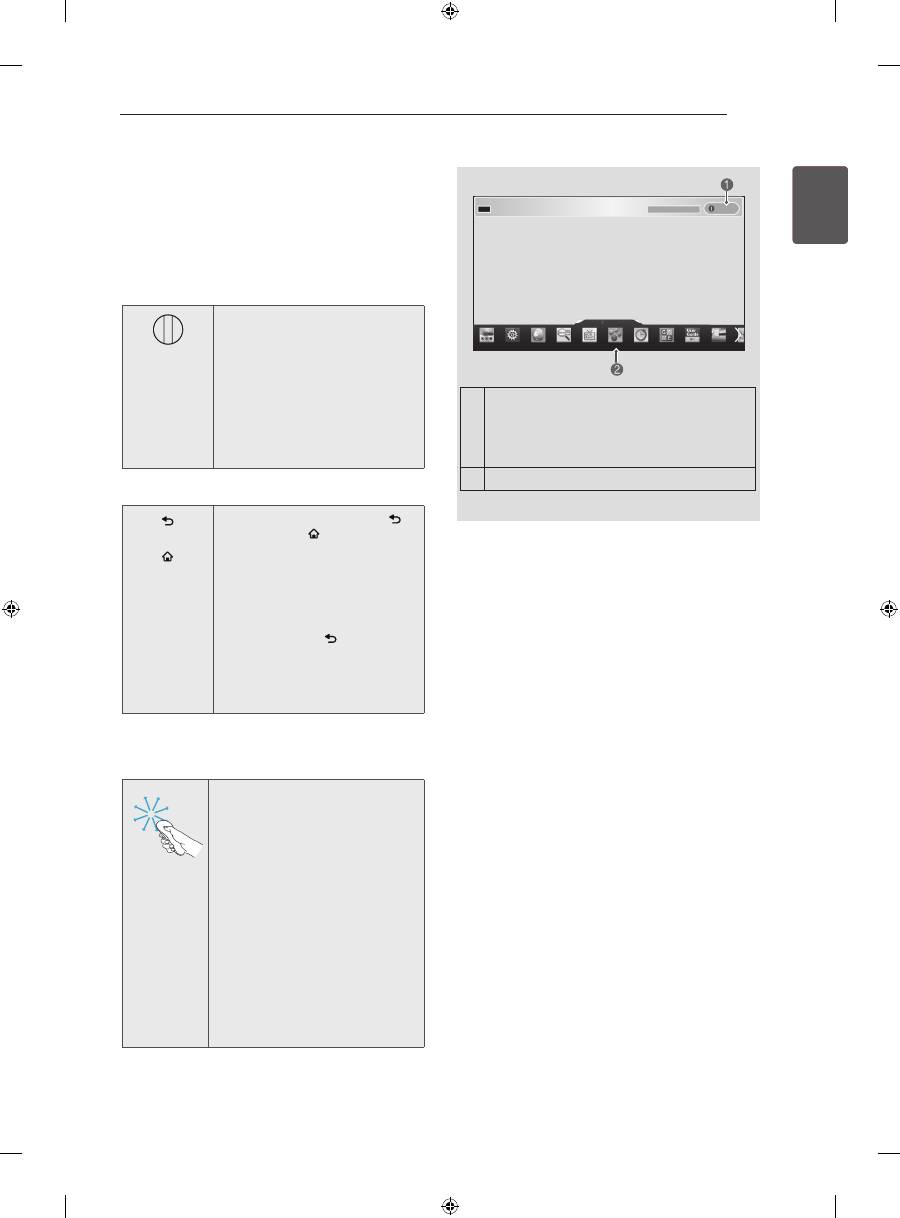
1
If you press
Wheel(OK)
on the Magic
Remote Control, the following screen
appears.
Shows information about the current
programme and screen.
2
You can select More Menu.
More
11
-1 Brief Info Title Test...
Info.
26
ENG
ENGLISH
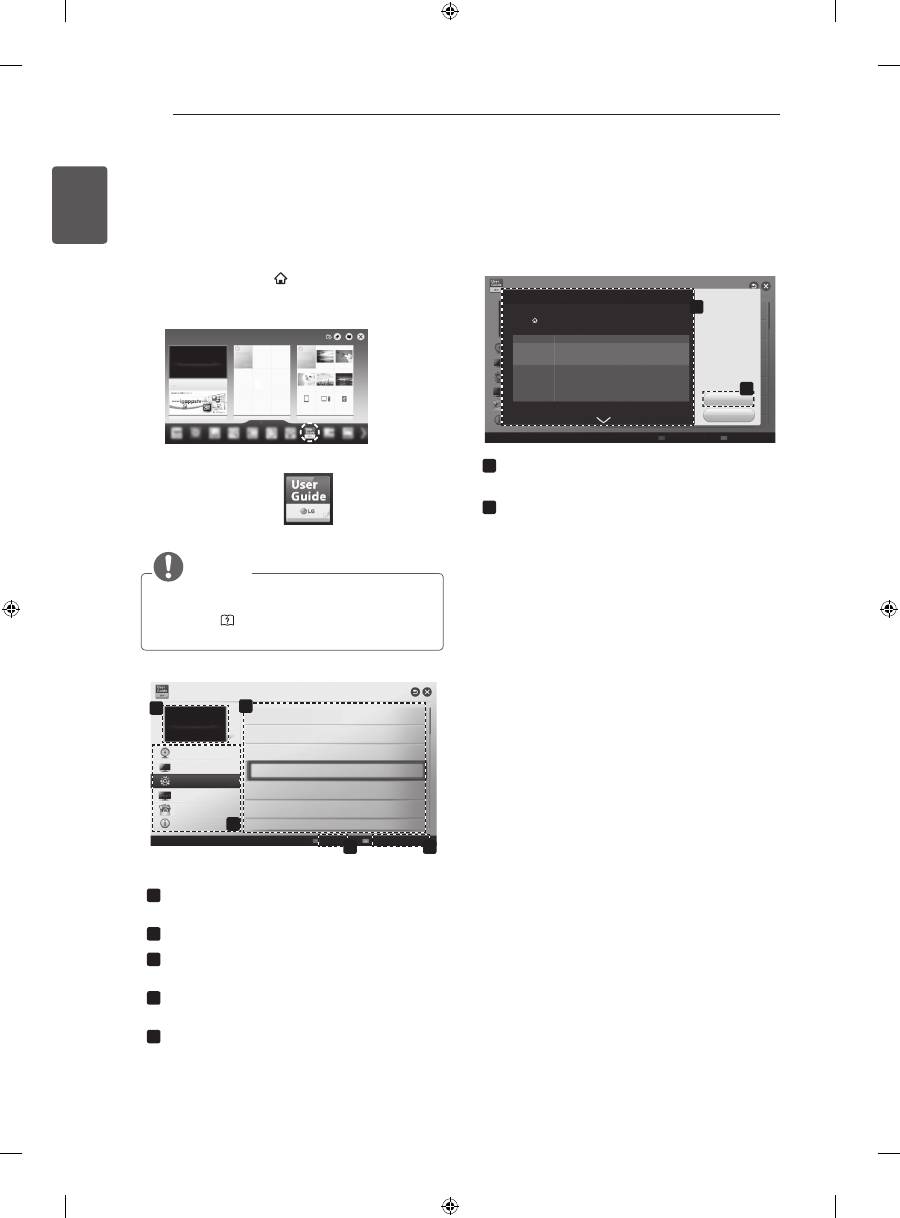
USING THE USER GUIDE
USING THE USER GUIdE
User Guide allows you to more easily access the detailed TV information.
1 Press the
SMART
button to access the
Smart Home menu.
2 Select
User Guide
and press
Wheel(OK)
.
User Guide
User Guide
NOTE
y
You can also access the User Guide by
pressing (
User Guide
) in the remote
control.(Only LA62**, LA64**)
To use input device
To set TV lock options
To set country
Disabled Assisstance
To set Magic remote control
To set language
To set time options
User Guide
3
1
OPTION
PROGRAMME Setting
PICTURE, SOUND Setting
LG SMART Function
Advanced Function
Information
2
4
5
Index
Online User Guide
1
Shows the current watching programme or
input source screen.
2
Allows to select the category you want.
3
Allows to select the item you want.
You can use
ꕌ
/
ꕍ
to move between pages.
4
Allows to browse the description of the
function you want from the index.
5
Provides the detailed information on the
functions of LG Smart TV when the Internet
is connected.
(It may not be available depending on the
country/language.)
1
2
OPTION > To set language
SMART
Settings
OPTION
Language
Selects Menu Language and Audio Language displayed on the screen.
Menu Language
Audio Language
Selects a language for the display text.
[In Digital Mode Only]
When watching a digital broadcast containing several audio
languages, you can select the language you want.
Subtitle
Language
[In Digital mode Only]
Use the Subtitle function when two or more subtitle
languages are broadcast.
✎
If subtitle data in a selected language is not broadcast,
the default language subtitle will be displayed.
Try Now
Close
1
Shows the description of the selected menu.
You can use
ꕌ
/
ꕍ
to move between pages.
2
Moves to the selected menu directly from the
User Guide.
More
more
Index
Online User Guide
27
ENG
ENGLISH
MAINTENANCE / TROUBLESHOOTING
MAINTENANCE
Cleaning your TV
Clean your TV regularly to keep the best performance and to extend the product lifespan.
CAUTION
y
Make sure to turn the power off and disconnect the power cord and all other cables first.
y
When the TV is left unattended and unused for a long time, disconnect the power cord from the wall
outlet to prevent possible damage from lightning or power surges.
Screen, frame, cabinet and stand
y
To remove dust or light dirt, wipe the surface with a dry, clean, and soft cloth.
y
To remove major dirt, wipe the surface with a soft cloth dampened in clean water or a diluted mild
detergent. Then wipe immediately with a dry cloth.
CAUTION
y
Avoid touching the screen at all times, as this may result in damage to the screen.
y
Do not push, rub, or hit the screen surface with your fingernail or a sharp object, as this may result in
scratches and image distortions.
y
Do not use any chemicals as this may damage the product.
y
Do not spray liquid onto the surface. If water enters the TV, it may result in fire, electric shock, or
malfunction.
Power cord
Remove the accumulated dust or dirt on the power cord regularly.
TROUBLESHOOTING
Problem
Solution
Cannot control
the TV with the
remote control.
y
Check the remote control sensor on the product and try again.
y
Check if there is any obstacle between the product and the remote control.
y
Check if the batteries are still working and properly installed ( to , to ).
No image display
and no sound is
produced.
y
Check if the product is turned on.
y
Check if the power cord is connected to a wall outlet.
y
Check if there is a problem in the wall outlet by connecting other products.
The TV turns off
suddenly.
y
Check the power control settings. The power supply may be interrupted.
y
Check if the Auto sleep feature is activated in the Time settings.
y
If there is no signal while the TV is on, the TV will turn off automatically after
15 minutes of inactivity.
When connecting
to the PC (HDMI
DVI), ‘No signal’
or ‘Invalid Format’
is displayed.
y
Turn the TV off/on using the remote control.
y
Reconnect the HDMI cable.
y
Restart the PC with the TV on.
28
ENG
ENGLISH
EXTERNAL CONTROL DEVICE SETUP / SPECIFICATIONS
EXTERNAL CONTROL dEVICE SETUP
To obtain the external control device setup information, please visit
www.lg.com
SPECIFICATIONS
(Only LA66**, LA69**, LA74**, LN578*)
Wireless LAN module (TWFM-B006D) specification
Standard
IEEE802.11a/b/g/n
Frequency Range
2400 to 2483.5 MHz
5150 to 5250 MHz
5725 to 5850 MHz (for Non EU)
Output Power
(Max.)
802.11a: 11 dBm
802.11b: 14 dBm
802.11g: 10.5 dBm
802.11n - 2.4GHz: 11 dBm
802.11n - 5GHz: 12.5 dBm
Bluetooth module (BM-LDS401) specification
Standard
Bluetooth Version 3.0
Frequency Range
2400 ~ 2483.5 MHz
Output Power (Max.)
10 dBm or lower
y
Because band channel used by the country could be different, the user can not change or adjust the
operating frequency and this product is set for the regional frequency table.
0197 0197
29
ENG
ENGLISH
SPECIFICATIONS
(Only LN575*, LN577*, LA62**, LA64**)
Wireless LAN module(TWFM-B006D) specification
Standard
IEEE802.11a/b/g/n
Frequency Range
2400 to 2483.5 MHz
5150 to 5250 MHz
5725 to 5850 MHz (for Non EU)
Output Power
(Max.)
802.11a: 11 dBm
802.11b: 14 dBm
802.11g: 10.5 dBm
802.11n - 2.4GHz: 11 dBm
802.11n - 5GHz: 12.5 dBm
y
Because band channel used by the country could be different, the user can not change or adjust the
operating frequency and this product is set for the regional frequency table.
0197 0197


HASZNÁLATI ÚTMUTATÓ
LED TV
A készülék használatbavétele előtt figyelmesen
olvassa el az útmutatót, és őrizze meg, mert
később szüksége lehet rá.
www.lg.com
* Az LG LED TV megnevezés a LED háttérfénnyel ellátott LCD képernyőkre vonatkozik.
2
HUN
MAGY
AR
TARTALOMJEGYZÉK
TARTALOMJEGYZÉK
3
LicEncEK
3
nYÍLT FORRÁSKÓDÚ
SZOFTVEREKRE VOnATKOZÓ
MEGJEGYZÉSEK
4
BiZTOnSÁGi TuDniVALÓK
10
- 3D képek megtekintése (Csak 3D
típusoknál)
12 ÖSSZESZERELÉSi FOLYAMAT
12 ÖSSZESZERELÉS ÉS ELŐKÉSZÍTÉS
12
Kicsomagolás
15
Külön megvásárolható tartozékok
16
A készülék részei és gombjai
17
A TV felemelése és szállítása
18
Felszerelés asztalra
20
Felszerelés falra
22 TÁViRÁnYÍTÓ
24 A MAGic TÁViRÁnYÍTÓ
vEZÉRLŐfunKciói
25
A Magic távirányító regisztrálása
25
A Magic távirányító használata
25
A Magic távirányító használatával
kapcsolatos óvintézkedések
26 A hASZnÁLATi ÚTMuTATÓ
hASZnÁLATA
27 KARBAnTARTÁS
27
A TV-készülék tisztítása
27
- Képernyő, keret, készülékház és állvány
27
- Tápkábel tisztítása
27 hiBAELhÁRÍTÁS
28 KÜLSŐ vEZÉRLŐESZKÖZ
BEÁLLÍTÁSA
28 MŰSZAKi ADATOK
ViGYÁZAT
y
A jelzés olyan figyelmeztetésekre utal,
amelyek be nem tartása komoly sérülést,
illetve súlyos vagy akár halálos balesetet is
okozhat.
FiGYELEM
y
A jelzés olyan figyelmeztetésekre utal,
amelyek be nem tartása könnyebb személyi
sérülést, illetve a készülék károsodását
okozhatja.
MEGJEGYZÉS
y
A megjegyzés segít a készülék
megértésében és biztonságos
használatában. A termék használata
előtt kérjük, figyelmesen olvassa el a
megjegyzést.
3
HUN
MAGY
AR
LICENCEK / NYÍLT FORRÁSKÓDÚ SZOFTVEREKRE VONATKOZÓ MEGJEGYZÉSEK
LicEncEK
A támogatott licencek típustól függően eltérőek lehetnek. A licencekkel kapcsolatos további tudnivalókért
látogasson el a
www.lg.com
webhelyre.
Készült a Dolby Laboratories licence alapján. A „Dolby” és a két D betű alkotta jel a
Dolby Laboratories védjegye.
The terms HDMI and HDMI High-Definition Multimedia interface, and the HDMI logo
are trademarks or registered trademarks of HDMI Licensing LLC in the United States
and other countries.
A DIVX VIDEO: A DivX® a DivX, LLC, a Rovi Corporation leányvállalata által
létrehozott digitális videoformátum. A készülék hivatalos DivX Certified®
tanúsítvánnyal rendelkező eszköz, amely alkalmas DivX-videók lejátszására. A
divx.
com
honlapon további tájékoztatást kaphat, és a fájlokat DivX videóvá konvertáló
szoftvereszközöket tölthet le.
A DIVX VIDEO-ON-DEMAND: A DivX Certified® tanúsítvánnyal rendelkező
készüléket regisztrálni kell a megvásárolt DivX Video-on-Demand (VOD) filmek
lejátszásához. A regisztrációs kód lekéréséhez nyissa meg a DivX VOD menüpontot
a készülékbeállítás menüben. A regisztrációs folyamattal kapcsolatos további
információkért látogasson el a vod.divx.com honlapra.
„DivX Certified® tanúsítvánnyal rendelkező eszköz maximum HD 1080p felbontású
DivX® videók, köztük prémium tartalmak lejátszására.”
„A DivX®, DivX Certified® és ezekhez tartozó logók a Rovi Corporation vagy annak
leányvállalatai védjegyei, használatuk licenchez kötött.”
„A következő USA-szabadalmak védelme alatt áll :
7,295,673; 7,460,668; 7,515,710; 7,519,274”
A következő USA-beli szabadalmak alá tartozó licencek keretében: 5,956,674;
5,974,380; 6,487,535 és egyéb USA-beli és nemzetközi, kiadott vagy függőben lévő
szabadalmak alapján gyártva. A DTS, a & DTS embléma, az embléma együttesen,
valamint a & DTS 2.0+Digital Out a DTS, Inc. védjegyei. A készülék szoftvert
tartalmaz. © DTS, Inc. Minden jog fenntartva.
nYÍLT FORRÁSKÓDÚ SZOFTVEREKRE
VOnATKOZÓ MEGJEGYZÉSEK
Ha hozzá kíván jutni a forráskódhoz GPL, LGPL, MPL és a készülék által tartalmazott más nyílt forráskódú
licencek alapján, látogasson el a következő webhelyre:
http://opensource.lge.com.
A forráskód mellett minden hivatkozott licencfeltétel, jótállási nyilatkozat és szerzői jogi közlemény
letölthető.
Az LG Electronics - térítés ellenében -, CD-ROM-on hozzáférhetővé teszi a forráskódot. A lemez ára a
forgalmazás költségeit (pl. az adathordozó ára, szállítási és kezelési költség) tartalmazza. A CD-ROM-
ot a következő címen lehet megrendelni e-mailben: opensource@lge.com. Ez az ajánlat a készülék
megvásárolásától számított három (3) évig érvényes.
4
HUN
MAGY
AR
BIZTONSÁGI TUDNIVALÓK
BiZTOnSÁGi TuDniVALÓK
A készülék használata előtt kérjük, fi gyelmesen olvassa el a következő biztonsági
óvintézkedéseket.
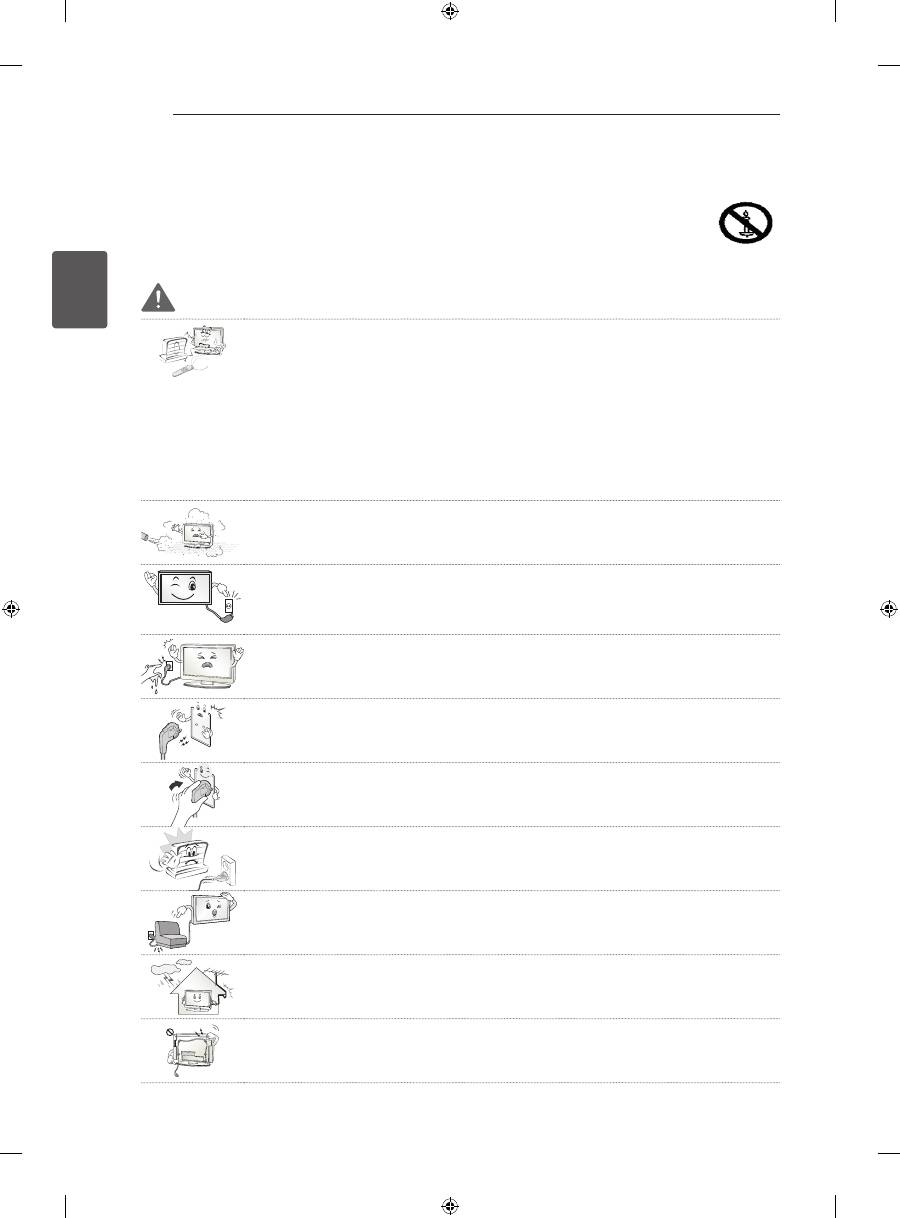
ViGYÁZAT
y
Ne helyezze a TV-készüléket és a távirányítót a következő környezetekbe:
- Közvetlen napsugárzásnak kitett helyek
-
Nedves területek, például fürdőszoba
-
Hőforrás közelébe, például kályhák és egyéb hőt kibocsátó eszközök
-
Konyhai berendezések vagy párologtató készülékek közelébe, ahol könnyen ki
vannak téve gőznek vagy olajnak
-
Esőnek vagy szélnek kitett helyek
-
Vizet tartalmazó tárgyak, például vázák közelébe
Ellenkező esetben tűz, áramütés, hibás működés vagy deformálódás következhet
be.
y
Ne helyezze a készüléket olyan helyre, ahol por érheti.
Ez tűzveszélyes lehet.
y
A hálózati csatlakozódugó a készülék áramtalanítására szolgál. A dugónak köny-
nyen hozzáférhetőnek kell lennie.
y
Ne érintse meg a tápkábelt nedves kézzel. Ha a csatlakozódugó tűi nedvesek vagy
porosak, törölje teljesen szárazra, illetve portalanítsa.
Ellenkező esetben a nedvesség halálos áramütést okozhat.
y
A tápkábelt minden esetben földelt konnektorhoz csatlakoztassa. (Kivéve a földe-
lés nélküli eszközöket.)
Halálos áramütést vagy sérülést szenvedhet.
y
A tápkábelt szorosan csatlakoztassa az aljzathoz.
A nem megfelelően csatlakoztatott tápkábel tüzet okozhat.
y
Győződjön meg róla, hogy a tápkábel nem ér forró tárgyakhoz, például fűtőtesthez.
Ez tűzveszélyes és áramütést okozhat.
y
A kábelre se nehéz tárgyat, se készüléket ne helyezzen.
Ellenkező esetben tüzet vagy áramütést okozhat.
y
Hajlítsa el az antenna kábelét az épület belső és külső tere között úgy, hogy ne jut-
hasson bele esővíz.
Az eső tönkreteheti a készülék belsejét, és áramütést is okozhat.
y
Ha TV-készüléket szerel a falra, gondoskodjon arról, hogy azt ne a TV hátulján
lévő táp- és jelkábelnél fogva akassza fel.
Ez tüzet vagy áramütést okozhat.
