Karcher B 250 R I Bp: Troubleshooting
Troubleshooting: Karcher B 250 R I Bp
-
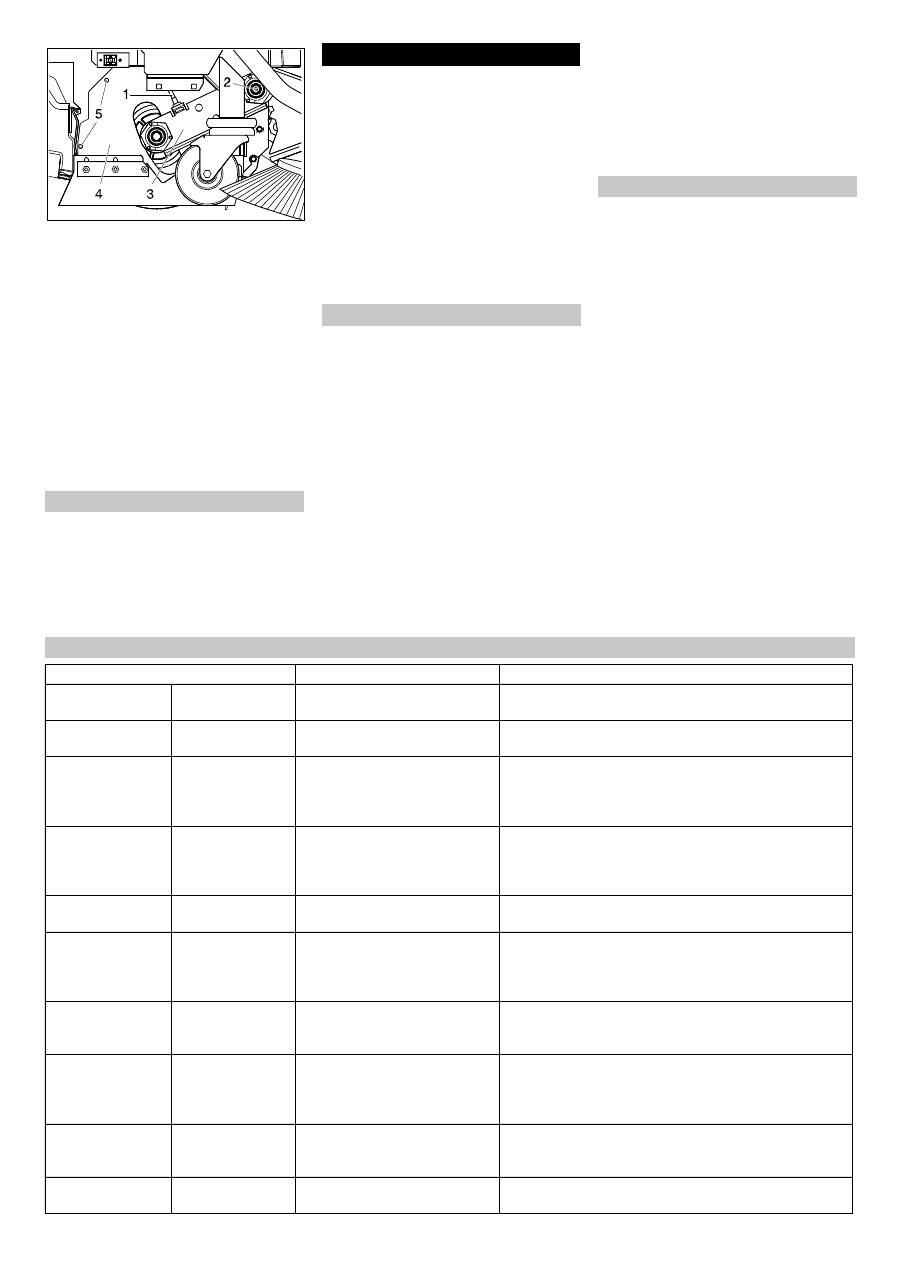
10
1 Bowden cable
2 Screw of the link bracket
3 Link
4 Cover
5 Lid screws
Hang out the Bowden cable.
Loosen and remove screws of the link
bracket.
Remove the crank.
Loosen and remove both screws of the
lid and open the cover.
Pull out roller brush.
Insert new roller brush and reassemble
the sweeper in the reverse sequence.
Readjust the Bowden cable.
In case of danger of frost:
Empty the fresh and dirt water reser-
voirs.
Store the appliance in a frost-protected
room.
DANGER
Risk of injury. Before carrying out any tasks
on the machine, set the main key to "0" and
remove it. Press emergency-stop button.
Suction turbine, side brushes and filter
cleaner continue to run for a while after
switching off. Carry out maintenance tasks
only after these components have come to
a halt.
Drain and dispose of the dirt water and
the residual fresh water.
In case of faults that cannot be remedied
using the table below please contact the
customer service.
The operator may only replace the follow-
ing vehicle flat fuses having the following
values:
– 7.5A (F1) – Control and emergency
power supply.
– 30A (F3) – Lift/accessories module sup-
ply.
– 80A (F6) – Lift/Clean module 2 (sweeper).
ATTENTION
Defective pole fuses should only be re-
placed by the service center. If these fuses
are defective, then customer service center
has to check the usage conditions and the
entire control system.
The control unit is located below the oper-
ating panel. To access the fuses the cover
on the left side of the foot compartment
must be removed in advance.
Turn out the fastening screws at the up-
per end of the cover.
Remove cover.
Replace fuse.
Replace cover.
Note:
The population of fuses is displayed on the
inner side of the cover.
The display shows the existing faults at in-
tervals of 4 seconds (example:
Fault scrubbing
funktion H1/022
If the faults continue to be displayed on the
console even after 4 seconds, then pro-
ceed as follows:
Bring the key switch to "0" (switch off
the machine).
Wait till the text on the display has dis-
appeared.
Bring the key switch back to "1" (switch
on the machine). Carry out the trouble-
shooting measures in the given se-
quence only if the fault occurs again. At
such times, always bring the main
switch to the "0" position and ensure
that the emergency-stop button is de-
pressed.
If the fault cannot be repaired, call cus-
tomer service and mention the fault
code(s) (H1/022 in the example).
Frost protection
Troubleshooting
Replace fuses
Fault indication
Faults with display
Display
Cause
Remedy
Seat switch broken seat switch open
Seat contact switch has not been
activated.
The machine only operates if the operator is seated on the
seat. Plug in the plug of the seat contact switch.
Release accelera-
tor!
release throttle?
The gas pedal is depressed when
the main switch is on.
Take your foot off the accelerator before switching on the
main switch. If the fault recurs, call customer service.
battery empty ->
charge!
battery empty ->
charge!
The discharge level of the battery
has been reached. Cleaning units
can no longer be operated. Drives
and lighting can be activated.
Drive the machine to the charging station and charge the
battery.
battery totally dis-
charged!
battery totally dis-
charged!
More than the permissible battery
capacity has been utilised. All
units will be switched off. Machine
is no longer ready for operations.
Manually unlock the front wheel brake. (Caution! The appli-
ance does not have any braking effect now!) If unlocking is
not possible, then call customer service. Move the machine
slowly to the charging station. Charge battery.
Dirt reservoir full,
cleaning stopped
sewage tank full
cleaning stops
Dirt water reservoir is full.
Empty the dirt water reservoir.
Operating hours set
to 0!
operating hours set
to 0!
Internal machine error while sav-
ing the number of operating
hours. During restart, the operat-
ing hours are always reset to 0.
None, for information.
Module tempera-
ture high! Let cool
down!
moduletemp. high
let cool down!
Controls are too hot.
Set the key switch to "0". Wait at least 15 minutes. Set the
key switch to "1".
Drive motor hot! Let
it cool down!
drive motor hot! let
cool down!
Drive motor has got overheated
due to a steep climb or locked
brake.
Set the key switch to "0". Wait at least 15 minutes. Set the
key switch to "1". If possible, drive the appliance on level
grounds only. If required, check the parking brake and the
accelerator pedal.
Contactor open!!
Emergency-stop
button??
contactor open!!
emergcy. button?
Press emergency-stop button.
Release emergency-stop button by turning. Set the key
switch to "0". Wait at least 10 minutes. Set the key switch
to "1".
Shut down, missing
bus supply
Shutdown, missing
bus supply
Inform Customer Service
26 EN
-
11
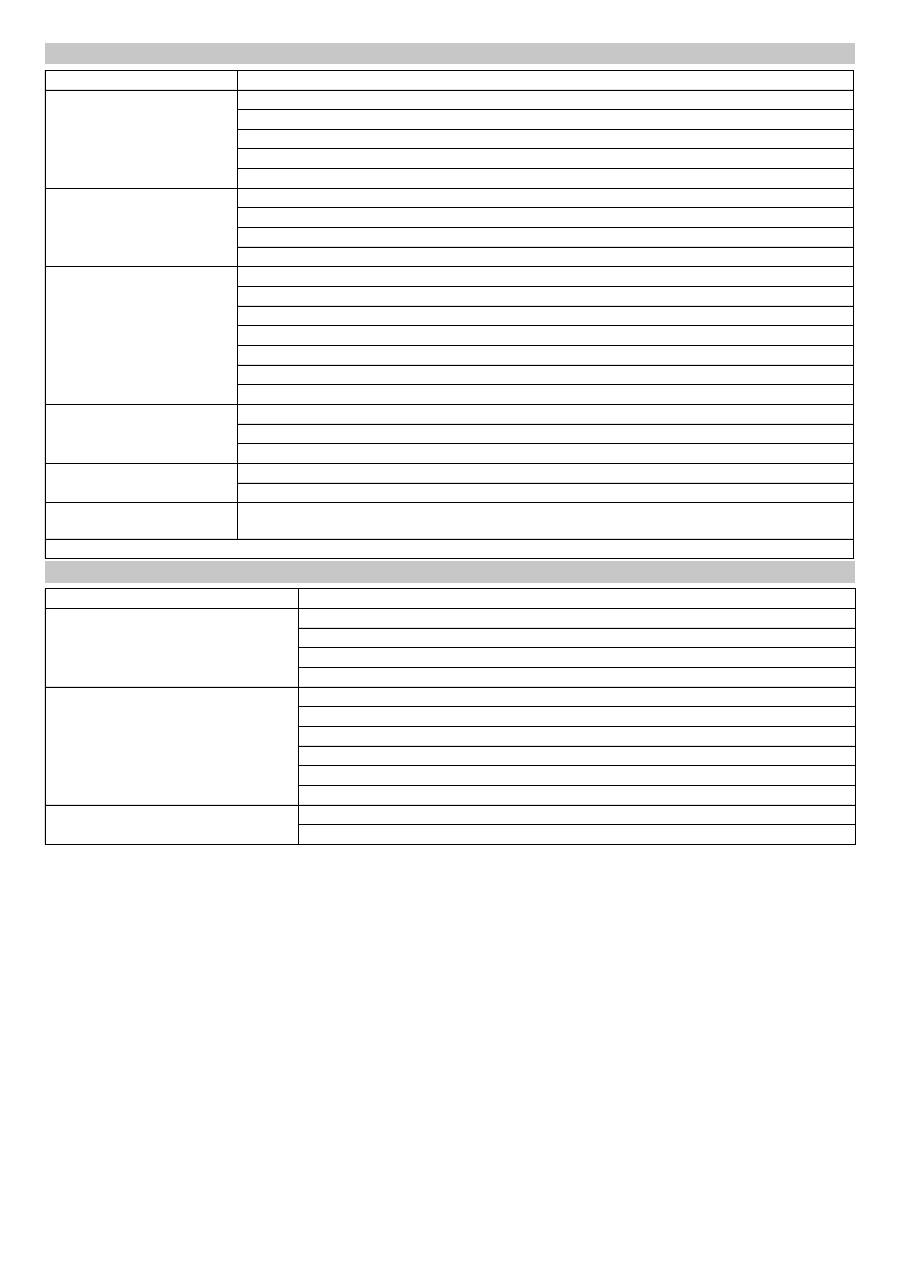
Faults without display on the console
Fault
Remedy
Appliance cannot be started
Insert battery plug.
Set main switch to “1”.
Unlock the emergency stop switch.
Check fuse F1, replace if required. *
Check battery; charge it, if needed
Insufficient water quantity
Check fresh water level, refill tank if necessary.
Check hoses for blockages; clean if required.
Clean the fresh water filter.
Open the fresh water ball valve.
Insufficient vacuum perfor-
mance
Clean the seals between dirt water reservoir and cover and check for tightness, replace if required.
Clean the flat-fold filters at the suction support of the suction turbine.
Clean the vacuum lips on the vacuum bar, replace if required
Check suction hose for blockages; clean if required.
Check the suction hose for tightness; replace if required.
Check if the cover on the dirt water discharge hose is closed
Check the setting of the vacuum bar.
Insufficient cleaning result
Set/ adjust contact pressure.
Select a more intensive cleaning program.
Check the brushes for wear, replace if required.
Brushes do not turn
Reduce contact pressure.
Check if foreign matters block the brushes; remove foreign matter if required.
Optional overall lamp and/or
working lamp is not functioning
Check fuse F3, replace if required. *
* The fuses are located in the flat insertion sockets on the wiring plate and can be accessed by opening the front panel.
Additional faults for the B 250 RI
Fault
Remedy
Machine is not sweeping properly
Check roller brushes and/or side brushes for wear, replace if necessary.
Roller brush does not rotate; check drive belt; remove dirt, if required.
Check function of bulk waste flap
Check sealing strip for wear, adjust or replace as required.
Sweeper generates a cloud of dust
Empty waste container
Check drive belts for suction turbine of sweeper.
Check sealing cover on suction fan
Check dust filter, clean or replace.
Check filter case seal
Check sealing strips for wear, adjust or replace as required
Poor cleaning performance at edges
Set the inclination of the side-brushes; adjust, if required.
Replace the side brushes
27 EN
Оглавление
- Inhaltsverzeichnis
- Bedien- und Funktionselemente
- Vor Inbetriebnahme
- Betrieb
- Pflege und Wartung
- Hilfe bei Störungen
- Technische Daten
- EG-Konformitätserklärung
- Contents
- Operating and Functional Elements
- Before Startup
- Operation
- Maintenance and care
- Troubleshooting
- Technical specifications
- EC Declaration of Conformity
- Table des matières
- Eléments de commande et de fonction
- Avant la mise en service
- Fonctionnement
- Entretien et maintenance
- Assistance en cas de panne
- Caractéristiques techniques
- Déclaration de conformité CE
- Indice
- Elementi di comando e di funzione
- Prima della messa in funzione
- Funzionamento
- Cura e manutenzione
- Guida alla risoluzione dei guasti
- Dati tecnici
- Dichiarazione di conformità CE
- Inhoud
- Elementen voor de bediening en de functies
- Voor de inbedrijfstelling
- Werking
- Onderhoud
- Hulp bij storingen
- Technische gegevens
- EG-conformiteitsverklaring
- Índice de contenidos
- Elementos de operación y funcionamiento
- Antes de la puesta en marcha
- Funcionamiento
- Cuidados y mantenimiento
- Ayuda en caso de avería
- Datos técnicos
- Declaración de conformidad CE
- Índice
- Elementos de comando e de funcionamento
- Antes de colocar em funcionamento
- Funcionamento
- Conservação e manutenção
- Ajuda em caso de avarias
- Dados técnicos
- Declaração de conformidade CE
- Indholdsfortegnelse
- Betjenings- og funktionselementer
- Inden ibrugtagning
- Drift
- Pleje og vedligeholdelse
- Hjælp ved fejl
- Tekniske data
- EU-overensstemmelses- erklæring
- Innholdsfortegnelse
- Betjenings- og funksjonelementer
- Før den tas i bruk
- Drift
- Pleie og vedlikehold
- Feilretting
- Tekniske data
- EU-samsvarserklæring
- Innehållsförteckning
- Manövrerings- och funktionselement
- Före ibruktagande
- Drift
- Skötsel och underhåll
- Åtgärder vid störningar
- Tekniska data
- Försäkran om EU- överensstämmelse
- Sisällysluettelo
- Ohjaus- ja käyttölaitteet
- Ennen käyttöönottoa
- Käyttö
- Hoito ja huolto
- Häiriöapu
- Tekniset tiedot
- EU- standardinmukaisuustodistus
- Πίνακας περιεχομένων
- Στοιχεία χειρισμού και λειτουργίας
- Πριν τη θέση σε λειτουργία
- Λειτουργία
- Φροντίδα και συντήρηση
- Αντιμετώπιση βλαβών
- Τεχνικά χαρακτηριστικά
- Δήλωση Συμμόρφωσης των Ε . Κ .
- İ çindekiler
- Kullan ı m ve çal ı ş ma elemanlar ı
- Cihaz ı çal ı ş t ı rmaya ba ş lamadan önce
- Çal ı ş t ı rma
- Koruma ve Bak ı m
- Ar ı zalarda yard ı m
- Teknik Bilgiler
- AB uygunluk bildirisi
- Оглавление
- Защита окружающей среды Гарантия
- Описание элементов управления и рабочих узлов
- Перед началом работы
- Эксплуатация
- Уход и техническое обслуживание
- Помощь в случае неполадок
- Технические данные
- Заявление о соответствии ЕС
- Tartalomjegyzék
- Kezelési- és funkciós elemek
- Üzembevétel el ő tt
- Üzem
- Ápolás és karbantartás
- Segítség üzemzavar esetén
- M ű szaki adatok
- EK konformitási nyiltakozat
- Obsah
- Ovládací a funk č ní prvky
- P ř ed uvedením do provozu
- Provoz
- Ošet ř ování a údržba
- Pomoc p ř i poruchách
- Technické údaje
- Prohlášení o shod ě pro ES
- Vsebinsko kazalo
- Upravljalni in funkcijski elementi
- Pred zagonom
- Obratovanje
- Nega in vzdrževanje
- Pomo č pri motnjah
- Tehni č ni podatki
- ES-izjava o skladnosti
- Spis tre ś ci
- Elementy urz ą dzenia
- Przed pierwszym uruchomieniem
- Dzia ł anie
- Czyszczenie i konserwacja
- Usuwanie usterek
- Dane techniczne
- Deklaracja zgodno ś ci UE
- Cuprins
- Elemente de utilizare ş i func ţ ionale
- Înainte de punerea în func ţ iune
- Func ţ ionarea
- Îngrijirea ş i între ţ inerea
- Remedierea defec ţ iunilor
- Date tehnice
- Declara ţ ie de conformitate CE
- Obsah
- Ovládacie a funk č né prvky
- Pred uvedením do prevádzky
- Prevádzka
- Starostlivos ť a údržba
- Pomoc pri poruchách
- Technické údaje
- Vyhlásenie o zhode s normami EÚ
- Pregled sadržaja
- Komandni i funkcijski elementi
- Prije prve uporabe
- U radu
- Njega i održavanje
- Otklanjanje smetnji
- Tehni č ki podaci
- EZ izjava o uskla đ enosti
- Pregled sadržaja
- Komandni i funkcioni elementi
- Pre upotrebe
- Rad
- Nega i održavanje
- Otklanjanje smetnji
- Tehni č ki podaci
- Izjava o uskla đ enosti sa propisima EZ
- Съдържание
- Обслужващи и функционални елементи
- Преди пускане в експлоатация
- Експлоатация
- Грижи и поддръжка
- Помощ при неизправности
- Технически данни
- Декларация за съответствие на ЕО
- Sisukord
- Teenindus- ja funktsioonielemendid
- Enne seadme kasutuselevõttu
- Käitamine
- Korrashoid ja tehnohooldus
- Abi häirete korral
- Tehnilised andmed
- EÜ vastavusdeklaratsioon
- Satura r ā d ī t ā js
- Vad ī bas un funkcijas elementi
- Pirms ekspluat ā cijas uzs ā kšanas
- Darb ī ba
- Kopšana un tehnisk ā apkope
- Pal ī dz ī ba darb ī bas trauc ē jumu gad ī jum ā
- Tehniskie dati
- EK Atbilst ī bas deklar ā cija
- Turinys
- Valdymo ir funkciniai elementai
- Prieš pradedant naudoti
- Naudojimas
- Prieži ū ra ir aptarnavimas
- Pagalba gedim ų atveju
- Techniniai duomenys
- EB atitikties deklaracija
- Зміст
- Елементи управління і функціональні вузли
- Перед початком роботи
- Експлуатація
- Догляд та технічне обслуговування
- Допомога у випадку неполадок
- Технічні характеристики
- Заява при відповідність Європейського співтовариства
