Karcher KMR 1250 D: Before Startup
Before Startup: Karcher KMR 1250 D

Before Startup
Moving sweeper by engaging
Operation
self-propulsion
Unloading
Adjusting driver's seat
Î Lock parking brake.
몇
Warning
Î Open the device hood.
Do not use a forklift truck to unload the ma-
Î Set the freewheel lever to ON.
chine as this may damage it.
The travel drive is now ready for operation.
To unload the machine, proceed as follows:
Î Close cover.
Î Loosen the wooden plank from the pal-
Î Release parking brake.
let and fit it with nails at the ends of the
The appliance can now be driven.
palette (front side of the device).
Start up
Î Remove the elastic tape fasteners at
the stop points.
General notes
Î Park the sweeper on an even surface.
Î Hang-out the rod for the leveling equip-
Î Remove ignition key.
ment.
Î Lock parking brake.
Î Loosen the 4 fastening screws.
Î Bring the seat to the desired position.
Refuelling
Î Tighten the fastening screws and hang
Danger
in the frame again.
Risk of explosion!
Starting the machine
– Only use the fuels specified in the Op-
erations Manual.
Note
Î Knock off the locking blocks and use
– Do not refuel the machine in enclosed
The machine is equipped with a seat con-
them to support the wooden planks on
spaces.
tact switch If the driver's seat is vacated,
the left and right.
– Smoking and naked flames are strictly
the machine is switched off.
Î Slide the machine over the prepared
prohibited.
Open fuel cock
ramp from the pallet.
– Ensure that no fuel reaches the hot
Î Open the device hood.
Î Loosen the rope fastened at the side-
open surfaces.
brush frame for transportation.
Î Switch off engine.
The machine can be moved in 2 ways:
Î Open the device hood.
(1) By pushing it (see Moving sweeper
without engaging self-propulsion).
(2) By driving it (see Moving sweeper by
engaging self-propulsion).
Moving sweeper without engaging
self-propulsion
Danger
Î Turn the lever downward to position O
Risk of injury! Before engaging the free-
(OPEN).
wheel operation, the machine must be se-
Î Close cover.
cured to prevent it rolling away.
Î Open fuel filler cap.
Î Lock parking brake.
Turning on the Appliance
Î Fill in diesel.
Î Open the device hood.
Î Sit on the driver's seat.
Î Fill tank to max. 1 cm below the lower
Î Accelerator pedal in zero position.
edge of the filler nozzle.
Î Lock parking brake.
Î Wipe off any spilt fuel and close fuel fill-
Î Bring the engine speed setting to central
er cap.
position (operating speed).
Î Close cover.
Î Insert the ignition key into the ignition lock.
Note
Î Turn ignition key past position 1.
The machine can be operated for a maxi-
Î If the machine starts, release the igni-
mum of 3 hours on a full tank.
tion key.
Inspection and maintenance work
Note
Î Check engine oil level.
Never operate the starter motor for longer
Î Set the freewheel lever to OFF.
Î Check the hydraulic oil level.
than 10 seconds. Wait at least 10 seconds
This blocks the travel drive function.
before operating the starter motor again.
Î Empty waste container.
Î Close cover.
Î Check roller brush.
Î Release parking brake.
Î Check tyre pressure.
The machine can now be pushed.
Î Shake off dust filter.
Note
Note
Do not move the machine for long distanc-
For description, see section on Care and
es without engaging self-propulsion, a
maintenance.
speed of 10 km/h should not be exceeded.
20 EN
- 5
Note
Note
Drive the machine
When cleaning surfaces, only lower the
The container can only be tilted and emp-
Î Raise roller brush.
roller brush.
tied once a set minimum level has been
Î The side-brushes lift up.
reached.
Î Release parking brake.
Note
Note
Drive forward
Also lower side brush when cleaning along
A two-handed operation is required to carry
Î Press right accelerator pedal down
edges.
out the following steps.
slowly.
Sweeping even surfaces
Reverse drive
Lock the sweep roller to "Fine tuning" mode
Danger
Î Lower the roller brush; for that bring the
Î Raise waste container.
Risk of injury! While reversing, ensure that
lever in central position (lower roller
Once the required height has been
there is nobody in the way, ask them to
brush wear and tear).
reached:
move if somebody is around.
Sweeping uneven surfaces
Î Press left accelerator pedal down slowly.
Lock the roller brush to "store in floating
Note
mode" mode
Driving method
Î Lower the roller brush; for that bring the
Î Tip waste container out.
– The accelerator pedal can be used to
lever in lower position (higher roller
vary the driving speed infinitely.
brush wear and tear).
– Avoid pressing the pedal suddenly as
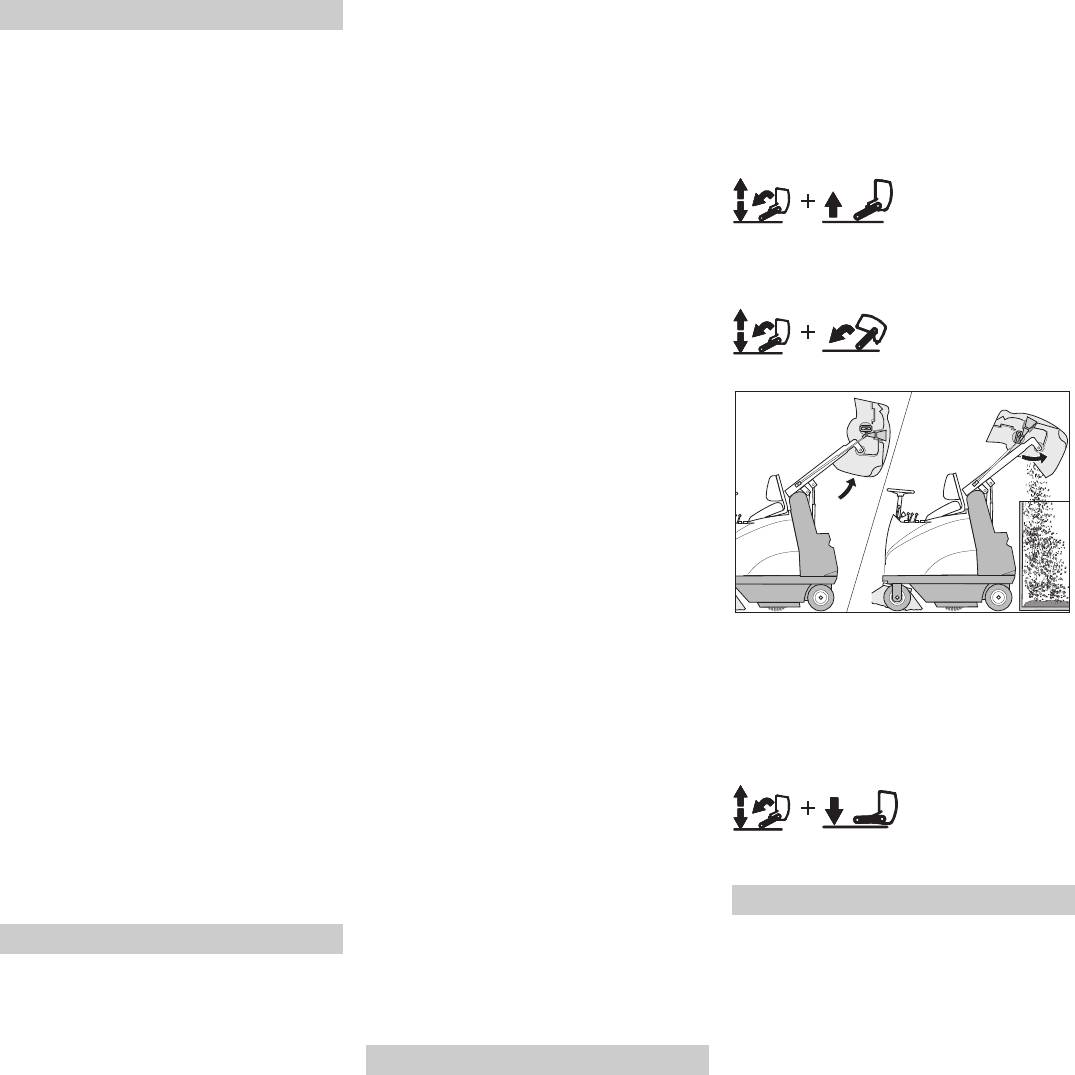
Sweeping in larger objects
this may damage the hydraulic system.
Note
– In the event of power loss on inclined
To sweep in larger objects such as bever-
surfaces, slightly reduce the pressure
age cans or larger quantities of leaves, it is
on the accelerator pedal.
necessary to briefly raise the bulk waste
Brakes
flap.
Î Release the accelerator pedal, the ma-
Raising bulk waste flap:
chine brakes automatically and stops.
Î Open the bulk waste flap manually.
– The waste container can be emptied in
Note
Î Drive over large parts at low speed with
opened bulk waste flap.
the easiest way in the fully drawn-out
If the automatic braking effect is not ade-
position.
quate to bring the device to a standstill,
Note
– If the switch for the tilting mechanism of
then either use the parking brakes or the re-
An optimum cleaning result can only be
the waste container is released, then
verse pedal.
achieved if the bulk waste flap has been
the waste container automatically goes
lowered completely.
Driving over obstacles
back to the starting position.
Driving over fixed obstacles which are 50
Sweeping dry floors
mm high or less:
Î Lower the roller brush while cleaning sur-
Î Drive forwards slowly and carefully.
faces.
Driving over fixed obstacles which are
Î Lower side brush when cleaning along edg-
Î Tilt the waste container up to the end-
more than 50 mm high:
es.
position.
Î Only drive over these obstacles using a
Switch on dust suction while cleaning dusty sur-
Turn off the appliance.
suitable ramp.
faces.
Î Set the lever to "dry" sweeping operations.
Î Release the accelerator pedal, the ma-
Sweeping mode
Sweeping damp or wet floors
chine brakes automatically and stops.
Danger
Switch off the dust suction to protect the dust fil-
Î Set the engine speed to minimum
Risk of injury! If the bulk waste flap is open,
ter against moisture.
speed.
stones or gravel may be flung forwards by
Î Set the lever to "wet" sweeping operations.
Î Lock parking brake.
the roller brush. Make sure that this does
Î Raise roller brush.
Emptying waste container
not endanger persons, animals or objects.
Î The side-brushes lift up.
몇 Warning
Note
Î Turn ignition key to "0" and remove it.
Do not sweep up packing strips, wire or
Wait until the automatic filter shaking proc-
Note
similar objects as this may damage the
ess is finished and the dust has settled be-
Once the machine has been switched off,
sweeping mechanism.
fore you open or empty the waste
the dust filter is shaked automatically for
몇 Warning
container.
approx. 10 seconds.
To avoid damaging the floor, do not contin-
Danger
ue to operate the sweeping machine in the
Risk of injury! When emptying the waste
same position.
container, care should be taken to ensure
Note
that no persons or animals are within its
To achieve an optimum cleaning result, the
swivelling range.
driving speed should be adjusted to take
Danger
specific situations into account.
Danger of crushing. Never reach into the
Note
rod assembly for the drainage mechanism.
During operation, the waste container
Stay away from the area under the raised
should be emptied at regular intervals.
container.
Note
Danger
During operations, the dust filter should be
Danger of tipping. Place the machine on an
shaken and cleaned every 15-30 minutes
even surface during emptying.
depending on the amount of collected dust.
Î Stop the machine.
Î Raise roller brush.
- 6
21EN
Оглавление
- Symbole auf dem Gerät
- Bestimmungsgemäße Verwendung
- Geräteelemente
- Vor Inbetriebnahme
- Transport
- Lagerung des Gerätes
- Hilfe bei Störungen
- Technische Daten
- Garantie CE-Erklärung
- Symbols on the machine
- Proper use
- Device elements
- Before Startup
- Transport Maintenance and care
- Troubleshooting
- Technical specifications
- Warranty CE declaration
- Symboles sur l'appareil
- Utilisation conforme
- Éléments de l'appareil
- Avant la mise en service
- Transport
- Assistance en cas de panne
- Caractéristiques techniques
- Garantie Déclaration CE
- Simboli riportati
- Uso conforme a destinazione
- Parti dell'apparecchio
- Prima della messa in funzione
- Fermo dell'impianto
- Guida alla risoluzione dei guasti
- Dati tecnici
- Garanzia Dichiarazione CE
- Symbolen op het toestel
- Reglementair gebruik
- Apparaat-elementen
- Voor de inbedrijfstelling
- Vervoer
- Hulp bij storingen
- Technische gegevens
- Garantie CE-verklaring
- Símbolos del manual de
- Función
- Elementos del aparato
- Antes de la puesta en marcha
- Transporte Cuidados y mantenimiento
- Ayuda en caso de avería
- Datos técnicos
- Garantía Declaración CE
- Symboler på aggregatet
- Ändamålsenlig användning
- Aggregatelement
- Före ibruktagande
- Transport
- Skötsel och underhåll
- Åtgärder vid störningar
- Tekniska data
- Garanti CE-försäkran
- Σύμβολα στο εγχειρίδιο
- Λειτουργία Χρήση σύμφωνα με τους κανονισμούς
- Στοιχεία συσκευής
- Πριν τη θέση σε λειτουργία
- Χειρισμός
- Αποθήκευση της συσκευής
- Αντιμετώπιση βλαβών
- Τεχνικά χαρακτηριστικά
- Εγγύηση Δήλωση συμμόρφωσης CE
- Символы в руководстве по
- Использование по
- Элементы прибора
- Перед началом работы
- Уход и техническое
- Помощь в случае неполадок
- Технические данные
- Гарантия Заявление о соответствии требованиям СЕ


