LG G5310: Organizer [Menu 5]
Organizer [Menu 5]: LG G5310

Organizer [Menu 5]
Accessing the Menu
Scheduler [Menu 5-1]
On top of the screen there are sections for date and icons.
Whenever you change the date, the calendar will be updated
according to the date. And square cursor will be used to locate the
certain day. If you see under bar on the calendar, it means that there
is a schedule that day. This function helps to remind you of your
schedule and memo. The phone will sound an alarm tone if you set
this for the note.
For changing the day, month, and year.
Key Description
Key Description
1 3
If you press these keys shortly,
Yearly
U
you can set the alarm daily.
D
In case of pressing for a long
* #
Monthly
time, you can set it weekly.
Add new
You can edit maximum 30 characters. You can take a note. You can
choose the following types of note. You can make up to maximum 20
notes.
• Schedule
Input the subject, the schedule time, the repeat time, alarm time by
pressing [Select].
ENGLISH
• Memo
1. Select Add New by pressing [Select].
2. Scroll to highlight Memo.
3. Press [Select].
4. Input the memo and then press [Select].
62

Accessing the Menu
View day
Shows the note for the chosen day. Use U , D to browse
through the note lists. If you set alarm for the note, Alarm watch is
displayed. Press [Options] to delete, edit the note you selected.
View all
Shows the notes that are set for all days. Use U , D to browse
through the note lists. You can use the same menu as “View date”
by pressing [Options].
Delete past
You can delete for the last schedule already is notified you.
Delete all
You can delete for the all note(s).
Phone book [Menu 5-2]
Search
(Calling from phonebook)
1. Open the phonebook first by pressing [Names] in a standby
mode.
2. Search by Pressing [Select] to enter.
ENGLISH
63

Organizer [Menu 5]
Accessing the Menu
3. Depending on setting Search by, the below menu may not
appear.
• Name
• Number
4. You can find an entry by name and number.
5. Select [Search].
6. You can check the names and numbers by pressing [List].
7. If you want to edit, delete, copy an entry, or to add the voice to
one, select [Options]. The below menu will be displayed.
• Edit : You can edit the name, number, E-mail, and fax
by pressing [OK].
• Delete : You can delete an entry.
• View other : You can see other phone numbers in names
number you searched.
•
Write message
: You can write message.
• Copy : You can copy an entry from SIM to phone or
from phone to SIM.
• Call : You can call thru the chosen entry.
• Voice : You can add the voice to the entry or change
the voice tag.
• Main number : You can select the one out of mobile, home,
office that you often use. The main number will
ENGLISH
be displayed first, if you set this.
64

Accessing the Menu
Add new
You can add phonebook entry by using this function.
Phone memory capacity is 200 entries. SIM card memory capacity
depends on the service provider.
You can also save 20 characters of name in the Phone memory, and
you can save characters in the SIM card. The number of character is
SIM dependent feature.
1. Open the phonebook first by pressing [Names] in standby mode.
2. Scroll to highlight Add new, and press [Select] to enter.
3. Select the memory you want to save: SIM or Phone.
• SIM : You can add name and number for entry.
a. Write a name to add.
b. Press [OK], then you can input a number.
c. Press [OK].
d. If you want to add the voice, press [Yes].
• Phone : You can add name, mobile, home, office, fax no. and
E-mail address.
a. You can select among mobile, home and office by
pressing [select].
b. Write a name to add.
c. Enter the numbers following as mobile, home, office
by pressing [Next] for next step [Clear] for cancel
and C for saving or exit.
d. If you want to add the voice, press [Yes].
ENGLISH
You should speak a word within 2 seconds, and the phone asks you
to speak it again to ensure the accuracy of voice recognition. After
voice recognition has finished, Voice is attached automatically.
65

Organizer [Menu 5]
Accessing the Menu
Note
• The voice can only be attached to main number which you
set. For example, if you change main number voice will be
automatically attached changed number.
•
You can add voice tag to phone number in SIM card.
The voice tag can be erased removing or changing SIM card.
And voice tag attached to phone number in SIM card may be
attached to another phone number when you changed SIM
card. Why? The answer is that SIM card doesn’t contain
information about voice tag.
Speed dials
You can associate any of the keys 2 to 9 with a Name list entry.
You can call directly by pressing this key for 2-3 seconds.
1. Open the phonebook first by pressing [Names] in a standby
mode.
2. Scroll to Speed dials, then press [Select] to enter this menu.
3. Every Speed dials will be displayed.
4. If you want to add Speed dials, select <Empty>. Then, you can
search the name in phonebook.
5. If you select allocated name by Speed dials, you can view
following the submenus.
• Change : You can change the allocation of Speed dials
ENGLISH
number.
• Cancel : You can cancel the allocated Speed dials number.
66

Accessing the Menu
Voice list
You can see all phone numbers which contain voice. You can also
call directly by pressing [Send]. After selecting phone number by
using U and D press [Options], you can see following the
submenus.
• Play
You can play voice which is attached to phone number.
• Change
You can change voice which is attached to phone number.
• Delete
You can delete voice which is attached to phone number.
• Call
You can call by selecting this menu.
Caller groups
You can list up to 20 members per one group. There are 7 groups
you can make lists to.
1. Press [Names] to enter into the phonebook in standby mode.
2. Scroll to Caller groups item then press [Select] to enter this
menu.
3. Every Group list will be displayed.: Family, Friend, Colleague,
VIP, Group1, Group2 and Others.
ENGLISH
4. Select Group name that you want to manage by pressing [Select].
67

Organizer [Menu 5]
Accessing the Menu
5. Then submenus below will be displayed.
• View member
- You can view the number list in Caller groups.
- You can select the member you want by pressing [Options]
then you can enable the submenu such as Edit, Delete, View
other number, Write message, Copy, Voice and Main
number.
• Group ring tone
You can set the ring tone depending on Group.
• Group animation
You can set the animation for each group.
• Add member
You can add the member in Caller groups.
1. Scroll to highlight Add member, and then press [Select] to
enter.
2. The group member souldn’t be exceeded 20. Otherwise, the
error message will be displayed.
3. Press [OK] to add member.
• Delete member
You can delete the member already saved in phonebook.
• Rename
ENGLISH
You can change group name.
68

Accessing the Menu
Copy all
You can copy/move entries from SIM card memory to Phone
memory or from Phone memory to SIM card memory.
1. Open the phonebook first by pressing [Names] in standby mode.
2. Scroll to Copy all, then press [Select] to enter this menu.
3. Then submenus below will be displayed.
• SIM to Phone : You can copy the entry from SIM Card to Phone
memory.
• Phone to SIM : You can copy the entry from Phone memory to
SIM Card.
Delete all
You can delete all entries in SIM, Phone, and Voice. This function
requires Security code.
1.
Press [Names] to enter into the phonebook in standby mode.
2. Scroll to Delete all, then press [Select].
3. Then select a memory to erase: SIM, Phone, Voice.
4. And then you will be requested to enter Security code.
5. Press [OK] or, press [Back] to cancel.
Settings
You can set preferred memory which includes Variable, SIM or
Phone and preferred search which includes Variable, Name and
ENGLISH
Number.
69

Organizer [Menu 5]
Accessing the Menu
1. Open the phonebook first by pressing [Names] in a standby
mode.
2. Scroll to Settings, then Press [Select] to enter.
3. Then submenus below will be displayed.
• Set memory
1. Scroll to highlight Set memory, then press [Select] to enter.
2. The three submenus are displayed.
- Variable : If you select Variable, the phone asks you
where to store whenever you add entries in
Phonebook.
- SIM : If you select SIM, the phone stores entries to
SIM directly without asking you where to store.
- Phone : If you select Phone, the phone stores entries to
Phone directly without asking you where to
store.
• Search by
1. Scroll to highlight Search by, then press [Select] to enter.
2. The three submenus are displayed.
- Variable : If you select Variable, the phone asks you how
to search the entries.
- Name : If you select Name, the phone searches entries
by name.
- Number : If you select Number, the phone searches
ENGLISH
entries by number.
70
Accessing the Menu
Information
• Service dial number
Use this function to access a particular list of services provided by
your network operator (if supported by the SIM card).
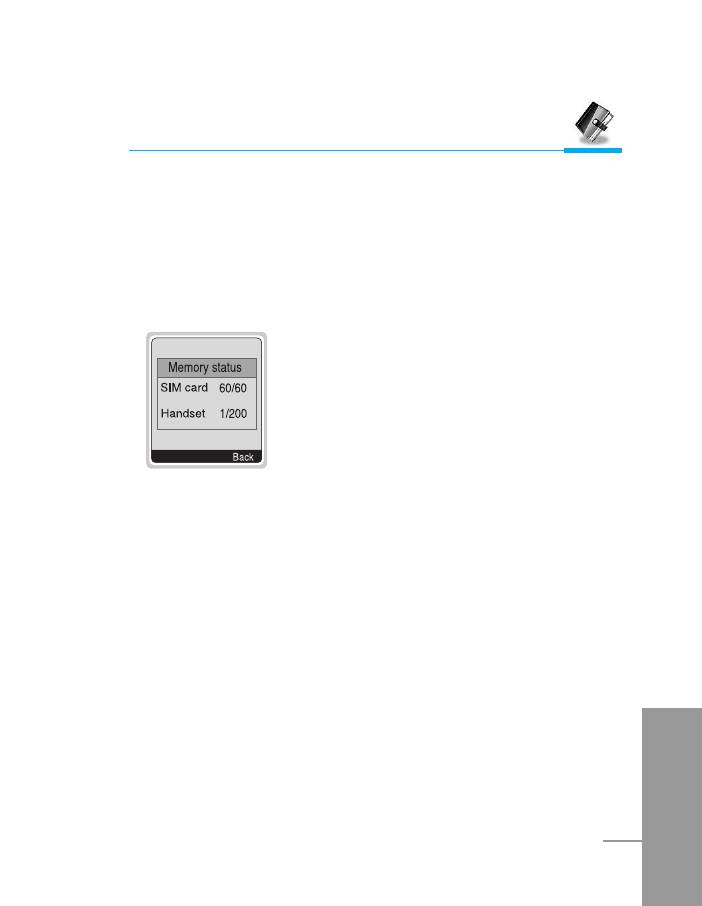
• Memory status
This feature allows you to see how many free
and in-use are in your phonebook.
• Own number (SIM dependent)
You can check your own number in SIM card.
ENGLISH
71
Оглавление
- ÑÎfl LJ¯ÂÈ ·ÂÁÓÔ‡ÒÌÓÒÚË
- ëÓ‰ÂʇÌËÂ
- ó‡ÒÚË ÚÂÎÂÙÓ̇
- éÔËÒ‡ÌË Í·‚˯
- éÔËÒ‡ÌË Í·‚˯
- àÌÙÓχˆËfl ̇ ‰ËÒÔÎÂÂ
- ìÒÚ‡ÌÓ‚ÍË
- ➌
- ìÒÚ‡ÌÓ‚ÍË
- èÓfl‰ÓÍ ‚Íβ˜ÂÌËfl ÚÂÎÂÙÓ̇
- äÓ‰˚ ‰ÓÒÚÛÔ‡
- íÂÎÂÙÓÌ̇fl ÍÌË„‡
- ëÚÛÍÚÛ‡ ÏÂÌ˛
- ëÓÓ·˘ÂÌËfl [åÂÌ˛ 1]
- Ç˚ÁÓ‚˚ [åÂÌ˛ 2]
- ÄÛ‰ËÓÔÓÙ. [åÂÌ˛ 3]
- ìÒÚ‡ÌÓ‚ÍË [åÂÌ˛ 4]
- 鄇̇ÈÁ [åÂÌ˛ 5]
- ÄÍÒÂÒÒÛ‡˚ [åÂÌ˛ 6]
- ÄÍÒÂÒÒÛ‡˚ [åÂÌ˛ 6] ÄÍÒÂÒÒÛ‡˚ [åÂÌ˛ 6]
- ÄÍÒÂÒÒÛ‡˚ [åÂÌ˛ 6]
- àÌÚÂÌÂÚ [åÂÌ˛ 7]
- Java [åÂÌ˛ 8]
- åÂÌ˛ àÌÚÂÌÂÚ éÌ-·ÈÌ
- åÂÌ˛ ‚Ó ‚ÂÏfl ‚˚ÁÓ‚‡
- ÄÍÒÂÒÒÛ‡˚
- ìıÓ‰ Ë ÚÂıÌ˘ÂÒÍÓ ӷÒÎÛÊË‚‡ÌËÂ
- íÂıÌ˘ÂÒÍË ‰‡ÌÌ˚Â
- è‡ÏflÚ͇
- For Your Safety
- Contents
- Part of the Phone
- Key Description
- E
- Key Description
- Display Information
- Installation
- ➌
- Installation
- Powering On Sequence
- Access Codes
- Phonebook
- Menu Tree
- Messages [Menu 1]
- Call Register [Menu 2]
- Profiles [Menu 3]
- Settings [Menu 4]
- Organizer [Menu 5]
- Fun & Tools [Menu 6]
- WAP services [Menu 7]
- Java [Menu 8]
- Internet On-line menu
- How to Use Data and Fax call
- In call Menu
- Accessories
- Care and Maintenance
- Technical Data
- Memo


