Karcher B 250 R + D 100: Operation
Operation: Karcher B 250 R + D 100

-
5
Release the park brake (see "Pushing
the appliance").
One person must sit on the seat and ac-
tivate the brake pedal during the push-
ing if necessary.
Push down the appliance through the
ramp from the pallet.
Re-tighten the screws of the park brake.
The sweep brushes must be installed be-
fore the initial operation (see "Maintenance
work").
The brushes are mounted.
Insert the vacuum bar into the vacuum
bar suspension in such a manner that
the profiled sheet is positioned above
the suspension.
Tighten the wing nuts.
Insert the suction hose.
Note:
Press emergency-stop switch to immedi-
ately switch off all functions of the machine.
DANGER
Risk of accident. Prior to every operation,
the parking brake must be checked for
proper function on a level ground.
Take the seating position.
Release emergency-stop button by
turning.
Set main switch to “1”.
Select direction of travel.
Gently depress drive pedal.
The brake must get released and you must
be able to hear it (the control lamp for im-
mobilizing brake on the console switches
off). The machine must roll slightly on a
plane surface. When the pedal is released,
the brake falls in an audible manner.
Switch off the machine and call the after-
sales service if the above-mentioned
events do not occur.
DANGER
Risk of accident! If the machine does not
brake, then proceed as follows:
If the machine does not come to a halt
on a ramp with a gradient of 2% when
you release the drive pedal, then the
emergency-stop button may be
pressed for safety reasons only if the
mechanical functioning of the immobi-
lizing brake has been checked properly
before commissioning the machine.
Press the brake pedal if the machine
does not brake properly.
Switch off the machine only after it
comes to a complete halt (on an even
surface) and call up the aftersales ser-
vice!
Further, follow all warning instructions
for braking.
DANGER
Danger of tipping if gradient is too high.
The gradient in the direction of travel
should not exceed 15%.
Danger of tipping when driving round
bends at high speed.
Danger of slipping on wet floors.
Drive slowly when cornering.
Danger of tipping on unstable ground.
Only use the machine on sound surfac-
es.
Danger of tipping with excessive sideways
tilt.
The gradient perpendicular to the direc-
tion of travel should not exceed 15%.
DANGER
Increased risk of accident on account of tilt-
ing sweeper for B 250 RI models. Be extra
careful while driving reverse and pay atten-
tion to the swiveling movement while steer-
ing the sweeper.
Move the seat adjustment lever away
from the seat and hold it.
Then push the seat forwards or back-
wards.
Release the seat adjustment lever and
lock the seat in place.
Loosen the wing nut to adjust the steer-
ing wheel.
Position the steering wheel.
Tighten the wing nuts.
Release emergency-stop button by
turning.
Sit on the seat and set main switch to
“1”.
Set the drive direction using the drive
direction button at the operator console.
Determine the driving speed by press-
ing the drive pedal.
Stop the machine: Release driving ped-
al; press brake, if necessary.
Note:
The direction of travel can also be changed
while driving. This way, even heavily soiled
spots can be cleaned by driving back and
forth several times.
In case of overloading, the drive motor au-
tomatically switches off after a certain peri-
od. A fault message is displayed on the
console. The concerned unit gets switched
off if the controls get overheated.
Allow machine to cool down at least for
15 minutes.
Turn the key switch to "0", wait for a few
seconds and then turn it to "1".
Loosen the three hexagonal screws by
key width 7 mm (arrow) by three revolu-
tions each to unlock the emergency
brake.
Push the appliance.
Retighten the screw.
DANGER
Danger of accident by failing brakes.
Retighten the screws immediately after the
sliding process.
ATTENTION
Risk of damage to the suction turbine if op-
erated without flat folded filter.
Prior to operating the appliance, check
the flat folded filter inside the lid of the
waste water tank for its presence, cor-
rect installation and condition.
Replace damaged flat folded filter.
ATTENTION
Risk of damage. Only use the recommend-
ed detergents. With other detergents, the
operator bears the increased risk regarding
the operational safety and danger of acci-
dent.
Only use detergents that are free from sol-
vents, hydrochloric acid and hydrofluoric
acid.
몇
CAUTION
Follow the safety instructions for using de-
tergents.
Note:
Do not use highly foaming detergents.
Recommended detergents:
Without battery
Installing the Brushes
BD model
BR model
Installing the Vacuum Bar
Operation
Check immobilizing brake
Driving
Ajdust the seat
Adjusting the steering wheel
Drive the machine
Overload
Pushing the device
Check flat folded filter
Filling in detergents
Detergent
21 EN
-
6
Open the cover of the fresh water reser-
voir.
Fill fresh water (max. 60 °C) until 15 cm
below the upper edge of the tank.
Pour in detergent.
Close the cover of the fresh water res-
ervoir.
Note:
Fill up the fresh water tank completely prior
to the initial start-up to bleed the water pipe
system.
With automatic fill of fresh water reser-
voir (option)
Note:
It is recommended to use a hose that is
equipped with an Aquastop coupling on the
appliance side. This minimises the spout-
ing of water when the hose is disconnected
after the filling process.
Connect the hose to the automatic fill-
ing system and open the water supply
(max. 60 °C, max. 5 bars).
Wait briefly - the automatic filling sys-
tem will interrupt the water supply when
the tank is full.
Shut off the water supply and discon-
nect the hose from the appliance.
Detergent is added to the fresh water on
the way to the cleaning head with the help
of a dosaging device.
Note:
The dosing unit can be used to add 3% de-
tergent at maximum. With higher dosage
the detergent must be put into the fresh wa-
ter tank.
Place the canister with the detergent in
the trough behind the seat.
Unscrew the canister lid.
Insert the suction hose of the dosing
equipment into the canister.
Note:
– The appliance is equipped with a fresh
water indicator in the display. If the
fresh water tank is empty, the function
of adding detergent gets deactivated.
The cleaning head continues to work
without liquid supply.
– Detergent addition is also stopped
when the detergent can is empty. Indi-
cator lamp: "detergent tank empty"
glows red. Only fresh water is supplied
to the cleaning head.
The sweeper picks up loose dirt before
cleaning the floor.
ATTENTION
Risk of damage to the sweeper.
–
Do not sweep in packing tapes, wires or
similar objects.
–
Only drive over steps with a maximum
height of 2 cm with the B 250 RI mod-
els.
–
The dust filter can get blocked or germs
can form in it. Use the sweeper only to
sweep dry surfaces.
몇
WARNING
Risk of injury!
Suction turbine, side brushes and filter
cleaner continue to run for a while after
switching off.
Switch on "sweeping" button.
The sweeper is activated. The indicator
lamp "sweeping" is on during the opera-
tions.
The bulk waste flap can be raised to sweep
in larger objects (up to max. 6 cm height).
몇
DANGER
Risk of injury on account of electric shock.
Raise the bulk waste flap only when there
is no person standing close by.
Press the pedal for raising the bulk
waste flap.
Note:
The vacuuming and sweeping performance
is lower when the bulk waste flap is raised.
Hence, raise the bulk waste flap only when
needed.
Set "sweeping" button to "0".
The sweeper is deactivated. Once you
have stopped sweeping, the dust filter is
cleaned for approx. 15 seconds. The indi-
cator lamp "dust filter shaking" glows.
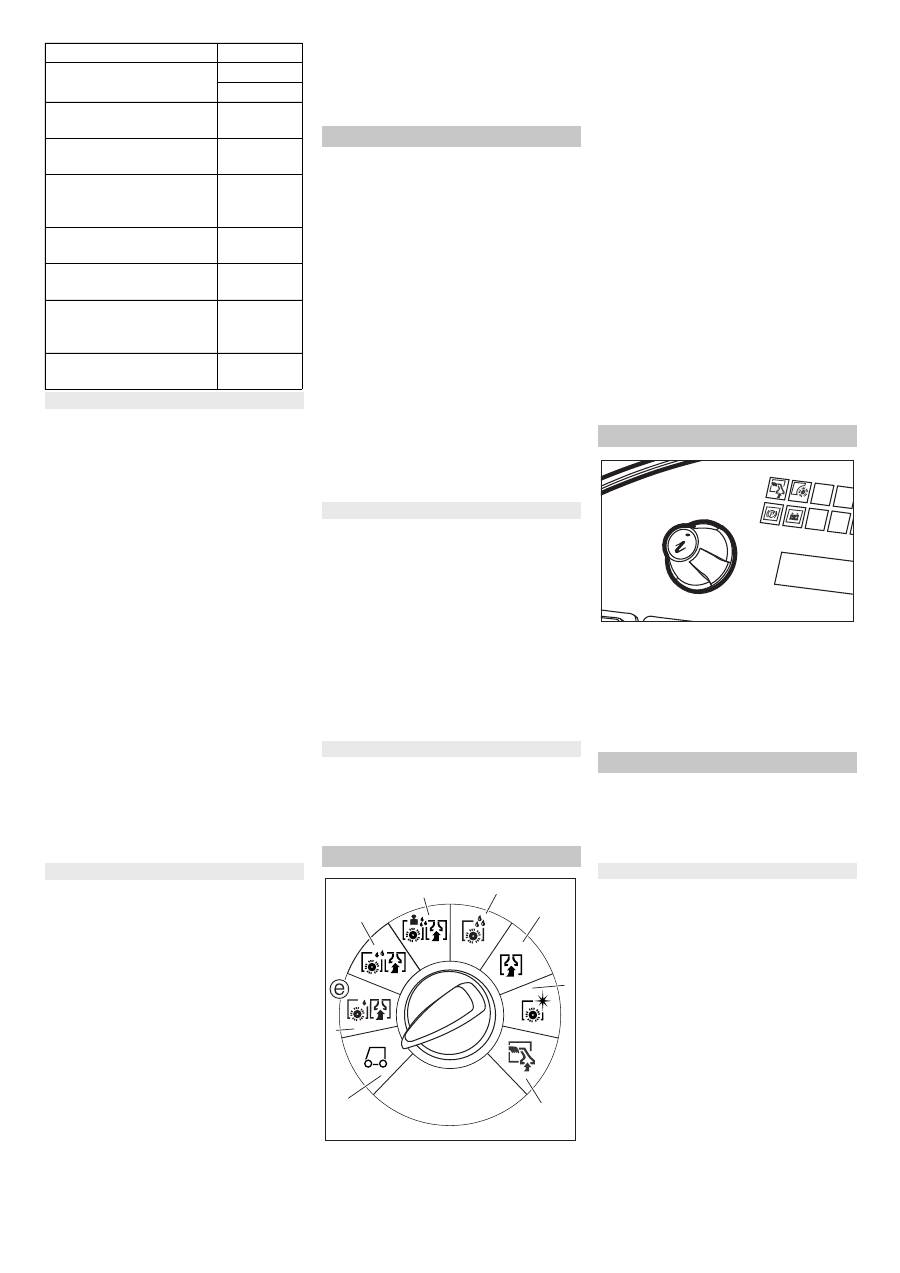
1
Transport mode
Driving to the Place of Use.
2
Eco mode
Wet clean the floor (with reduced brush
speed) and vacuum up wastewater
(with reduced suction).
3
Normal mode
Wet clean the floor and vacuum up dirt
water.
4 Increased brush contact pressure
Wet clean the floor (with increased
brush contact pressure) and vacuum up
dirt water.
5
Intense mode
Wet clean the floor and allow the deter-
gent to react.
6
Vacuum mode
Suck in the dirt fleet.
7
Polishing mode
Polishing the floor without the applica-
tion of liquid.
8 Manual cleaning
Apply liquid detergent using the wall-
ceiling-floor nozzle (optional) and vacu-
um it again.
Use the Info button to select the menu
items and do the settings.
– Turning the button to the right/left
scrolls through the menus forward/
backward.
– The selected setting gets accepted by
pressing the button.
You can make the settings for the different
cleaning programs in the operator menu.
Different parameters can be set based on
the cleaning program. The settings are
done using the Info button.
Release emergency-stop button by
turning.
Sit on the seat and set main switch to
“1”.
The display shows the battery charging
status and the fresh water level.
Select cleaning program.
Call the operator menu by turning the
info button.
Select the desired parameter by turning
the Info button. The currently set value
is displayed as a bar.
Press Info button, the bar display blinks.
Reset the parameter by turning the Info
button between "min" and "max".
Accept modified setting by pressing the
Info button or wait till the set value is ac-
cepted automatically.
Application
Detergent
Routine cleaning of all water
resistant floors
RM 745
RM 746
Routine cleaning of glossy
surfaces (e.g. granite)
RM 755 ES
Routine cleaning and basic
cleaning of industrial floors
RM 69 ASF
Routine cleaning and basic
cleaning of fine stoneware
tiles
RM 753
Routine cleaning of tiles in
sanitary areas
RM 751
Cleaning and disinfection in
sanitary areas
RM 732
Removal of coating from all
alkali-resistant floors (e.g.
PVC)
RM 752
Removal of coating from li-
noleum floors
RM 754
Fresh water
Metering device (option)
Sweeping (B 250 RI only)
Bulk waste flap
Stopping sweeping
Program selection switch
1
2
3
4
5
6
7
8
Info button
Settings
Operations menu
22 EN
-
7
Note:
– If the selected parameter does not
change within 10 seconds, then the dis-
play goes back to displaying the battery
charging status and the fresh water lev-
el.
– The same cleaning parameter can have
individual settings for each cleaning
program.
– The brush pressure can be set only
when the machine is on in the programs
brush suction, wet brushing, polishing
and polishing suction.
– All settings are saved in the powerless
state of the machine.
Select the menu item "Accept default
values?" in the operator menu by turn-
ing the Info button
Press Info button. The factory settings
of all parameters are restored for each
cleaning program.
The table given below gives details of the
factory settings of the parameters for the
cleaning programs. If no values are en-
tered, then the respective parameter can-
not be set in the given cleaning program.
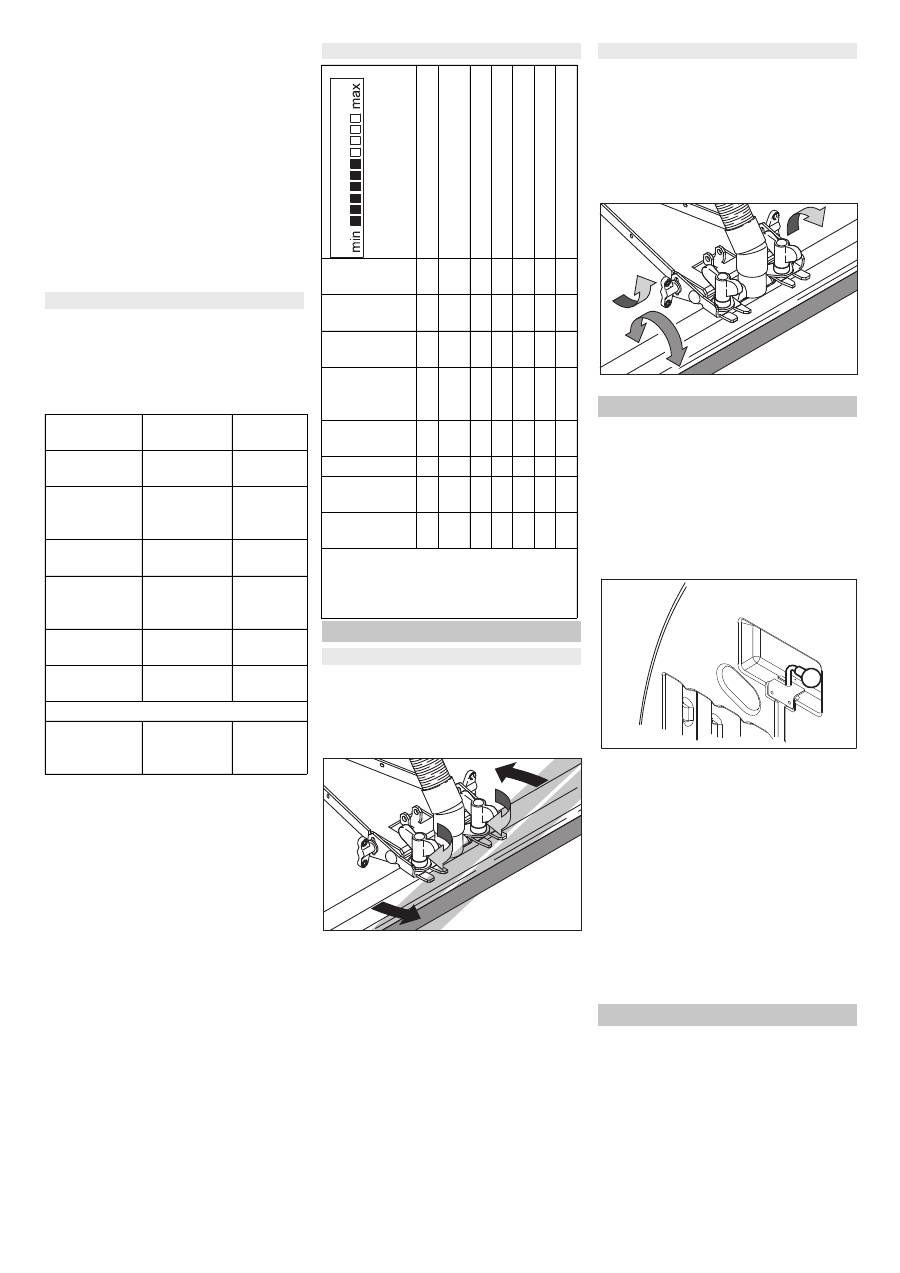
To improve the vacuuming result on tiled
floors the vacuum bar can be turned to an
oblique position of up to 5°.
Release the wing nuts.
Turn the vacuum bar.
Tighten the wing nuts.
If the vacuum result is unsatisfactory the in-
clination of the straight vacuum bar can be
modified.
Note:
The bent vacuum bar must be adjusted
horizontally.
Release the wing nuts.
Tilt the vacuum bar.
Tighten the wing nuts.
– During normal operations (fresh water
mode), water is taken from the fresh
water tank and collected in dirt water
tank after use.
– Water can be circulated for floors with
dirt levels of slight to normal.
First clean in the fresh water mode till
the water in the fresh water tank has
been consumed.
The set the switching of recyling/ fresh
water mode to Recycling.
Note:
– The dirt water is cleaned by a filter be-
fore being reused.
– For recycling operations, the entire re-
cycling filter must lie below the dirt wa-
ter level.
ATTENTION
Risk of damage due to overdose of deter-
gent. Very often, the detergent contained
in the dirt water has only been partially
used. Hence, in the recycling mode, the
detergent quantity to be added is to be set
to 0.
Note:
Overflow waste water tank. If the dirt water
tank is full, the suction turbine switches off
and the indicator lamp "dirt water tank full"
begins to blink. All cleaning programs with
suction are blocked for one minute. Empty
the waste water tank.
Reset parameters
Adjustable pa-
rameters
min:step:ma
x
Remark
Water quantity 1:1:8
1=min.,
8=max.
Detergent dos-
ing unit
0:1:3
0=Off,
1=min.,
3=max.
Brush pressure 0:1:8
0=min.,
8=max.
FACT (brush
speed)
–
Power,
Whisper,
Fine Clean
Brush rotation
time after stop
0s:1s:3s
From idling
to lifting
Working speed 1:1:6
1=1km/h,
6=6km/h
For B 250 RI only:
Trailing time for
sweeper after
stopping
0s:1s:5s
From idling
to lifting
Factory setting BR...:
Water quantity
Detergent dosage (%)
Brush pressure
FACT (brush speed)
Brush trailing time (s)
Working speed
Suction blower value
Transport
mode
– –
– – – – –
Eco mode
2 0,5 2 W
P
2 8 W
Normal mode
3 1
4 P
C
2 6 P
Increased
brush contact
pressure
4 3
7 P
C
2 6 P
Intense mode
5 3
4 P
C
2 6 –
Vacuum mode
– –
– – – 6 P
Polishing
mode
– –
2 – – 6 –
Manual clean-
ing
– –
– – – – P
P=Power
PC=Power Clean
W=Whisper
WP=Whisper Clean
Setting the Vacuum Bar
Oblique position
Inclination
Recycling operations (option)
Empty tanks
23 EN
Оглавление
- Inhaltsverzeichnis
- Bedien- und Funktionselemente
- Vor Inbetriebnahme
- Betrieb
- Pflege und Wartung
- Hilfe bei Störungen
- Technische Daten
- EG-Konformitätserklärung
- Contents
- Operating and Functional Elements
- Before Startup
- Operation
- Maintenance and care
- Troubleshooting
- Technical specifications
- EC Declaration of Conformity
- Table des matières
- Eléments de commande et de fonction
- Avant la mise en service
- Fonctionnement
- Entretien et maintenance
- Assistance en cas de panne
- Caractéristiques techniques
- Déclaration de conformité CE
- Indice
- Elementi di comando e di funzione
- Prima della messa in funzione
- Funzionamento
- Cura e manutenzione
- Guida alla risoluzione dei guasti
- Dati tecnici
- Dichiarazione di conformità CE
- Inhoud
- Elementen voor de bediening en de functies
- Voor de inbedrijfstelling
- Werking
- Onderhoud
- Hulp bij storingen
- Technische gegevens
- EG-conformiteitsverklaring
- Índice de contenidos
- Elementos de operación y funcionamiento
- Antes de la puesta en marcha
- Funcionamiento
- Cuidados y mantenimiento
- Ayuda en caso de avería
- Datos técnicos
- Declaración de conformidad CE
- Índice
- Elementos de comando e de funcionamento
- Antes de colocar em funcionamento
- Funcionamento
- Conservação e manutenção
- Ajuda em caso de avarias
- Dados técnicos
- Declaração de conformidade CE
- Indholdsfortegnelse
- Betjenings- og funktionselementer
- Inden ibrugtagning
- Drift
- Pleje og vedligeholdelse
- Hjælp ved fejl
- Tekniske data
- EU-overensstemmelses- erklæring
- Innholdsfortegnelse
- Betjenings- og funksjonelementer
- Før den tas i bruk
- Drift
- Pleie og vedlikehold
- Feilretting
- Tekniske data
- EU-samsvarserklæring
- Innehållsförteckning
- Manövrerings- och funktionselement
- Före ibruktagande
- Drift
- Skötsel och underhåll
- Åtgärder vid störningar
- Tekniska data
- Försäkran om EU- överensstämmelse
- Sisällysluettelo
- Ohjaus- ja käyttölaitteet
- Ennen käyttöönottoa
- Käyttö
- Hoito ja huolto
- Häiriöapu
- Tekniset tiedot
- EU- standardinmukaisuustodistus
- Πίνακας περιεχομένων
- Στοιχεία χειρισμού και λειτουργίας
- Πριν τη θέση σε λειτουργία
- Λειτουργία
- Φροντίδα και συντήρηση
- Αντιμετώπιση βλαβών
- Τεχνικά χαρακτηριστικά
- Δήλωση Συμμόρφωσης των Ε . Κ .
- İ çindekiler
- Kullan ı m ve çal ı ş ma elemanlar ı
- Cihaz ı çal ı ş t ı rmaya ba ş lamadan önce
- Çal ı ş t ı rma
- Koruma ve Bak ı m
- Ar ı zalarda yard ı m
- Teknik Bilgiler
- AB uygunluk bildirisi
- Оглавление
- Защита окружающей среды Гарантия
- Описание элементов управления и рабочих узлов
- Перед началом работы
- Эксплуатация
- Уход и техническое обслуживание
- Помощь в случае неполадок
- Технические данные
- Заявление о соответствии ЕС
- Tartalomjegyzék
- Kezelési- és funkciós elemek
- Üzembevétel el ő tt
- Üzem
- Ápolás és karbantartás
- Segítség üzemzavar esetén
- M ű szaki adatok
- EK konformitási nyiltakozat
- Obsah
- Ovládací a funk č ní prvky
- P ř ed uvedením do provozu
- Provoz
- Ošet ř ování a údržba
- Pomoc p ř i poruchách
- Technické údaje
- Prohlášení o shod ě pro ES
- Vsebinsko kazalo
- Upravljalni in funkcijski elementi
- Pred zagonom
- Obratovanje
- Nega in vzdrževanje
- Pomo č pri motnjah
- Tehni č ni podatki
- ES-izjava o skladnosti
- Spis tre ś ci
- Elementy urz ą dzenia
- Przed pierwszym uruchomieniem
- Dzia ł anie
- Czyszczenie i konserwacja
- Usuwanie usterek
- Dane techniczne
- Deklaracja zgodno ś ci UE
- Cuprins
- Elemente de utilizare ş i func ţ ionale
- Înainte de punerea în func ţ iune
- Func ţ ionarea
- Îngrijirea ş i între ţ inerea
- Remedierea defec ţ iunilor
- Date tehnice
- Declara ţ ie de conformitate CE
- Obsah
- Ovládacie a funk č né prvky
- Pred uvedením do prevádzky
- Prevádzka
- Starostlivos ť a údržba
- Pomoc pri poruchách
- Technické údaje
- Vyhlásenie o zhode s normami EÚ
- Pregled sadržaja
- Komandni i funkcijski elementi
- Prije prve uporabe
- U radu
- Njega i održavanje
- Otklanjanje smetnji
- Tehni č ki podaci
- EZ izjava o uskla đ enosti
- Pregled sadržaja
- Komandni i funkcioni elementi
- Pre upotrebe
- Rad
- Nega i održavanje
- Otklanjanje smetnji
- Tehni č ki podaci
- Izjava o uskla đ enosti sa propisima EZ
- Съдържание
- Обслужващи и функционални елементи
- Преди пускане в експлоатация
- Експлоатация
- Грижи и поддръжка
- Помощ при неизправности
- Технически данни
- Декларация за съответствие на ЕО
- Sisukord
- Teenindus- ja funktsioonielemendid
- Enne seadme kasutuselevõttu
- Käitamine
- Korrashoid ja tehnohooldus
- Abi häirete korral
- Tehnilised andmed
- EÜ vastavusdeklaratsioon
- Satura r ā d ī t ā js
- Vad ī bas un funkcijas elementi
- Pirms ekspluat ā cijas uzs ā kšanas
- Darb ī ba
- Kopšana un tehnisk ā apkope
- Pal ī dz ī ba darb ī bas trauc ē jumu gad ī jum ā
- Tehniskie dati
- EK Atbilst ī bas deklar ā cija
- Turinys
- Valdymo ir funkciniai elementai
- Prieš pradedant naudoti
- Naudojimas
- Prieži ū ra ir aptarnavimas
- Pagalba gedim ų atveju
- Techniniai duomenys
- EB atitikties deklaracija
- Зміст
- Елементи управління і функціональні вузли
- Перед початком роботи
- Експлуатація
- Догляд та технічне обслуговування
- Допомога у випадку неполадок
- Технічні характеристики
- Заява при відповідність Європейського співтовариства
