Karcher WPC 10000 BW-AM: Proper use Environmental protection
Proper use Environmental protection: Karcher WPC 10000 BW-AM
14
Deutsch
– The electrical connections must be
done by an electrician according to
IEC 60364-1.
– Never touch damaged or ripped mains
cables. If required, pull out the plug
from the socket immediately.
– Never operate the unit with damaged
cable.
The following symbols are used in this op-
erating manual:
Danger
Indicates an immediate threat of danger.
Failure to observe the instruction may re-
sult in death or serious injuries.
몇
Warning
Indicates a possibly dangerous situation.
Failure to observe the instruction may re-
sult in light injuries or damage to property.
Note
Indicates useful tips and important infor-
mation about the product.
The plant is used for treating surface wa-
ter, water from natural springs and river
water.
Due to the modular structure, turbid sub-
stances, hardeners, salts, bacteria and
water can be separated depending on the
quality of raw water.
Danger
Risk of injury if the plant is not installed
properly. Risk to health on account of
poorly treated drinking water. The plant
may be put into operation only when set-
up, installed and prepared for operation by
skilled and authorized personnel.
Î
Check the connection of the plant to
the raw water source.
Î
Ensure uninterrupted flow of the gen-
erated drinking water into a tank or a
suitable user-side facility.
Note
The driking water must be able to flow out
without any counter-pressure. The height
difference must not be more than 3 m.
Note
If the plant is fitted with one or more dos-
ing stations, then it needs to be ensured
that this has been connected properly and
filled up.
Î
Fill up dosing station (refer chapter
"Maintenance and Care/ Maintenance
jobs")
Î
Check whether the mains plug of the
dosing pumps of the dosing stations is
connected to the sockets of the plant.
Î
Check the position of the operating
swtich:
"Automatic“ position:
the plant is
controlled by an external floater switch
in the drinking water tank.
"Manual" position: the plant is man-
ually switched on and off using the
main switch.
Î
Turn the main switch to position "1";
drinking water production will start.
– Display time
Alternating display of:
– Plant/ version number and operating
status.
– Drinking water temperature and con-
ductance.
– Operating hours (_ _ _ _ _h_ _min).
몇
Warning
Risk of damage. If the plant is to be shut
down for more than 14 days, then Kärcher
Customer Service must carry out some
preservative tasks.
Î
Turn main switch to "0"; the plant will
stop production of drinking water.
Note
Do not switch off the plant overnight! The
media filter is automatically cleaned dur-
ing the night. There is a risk of damage to
the plant if you do not do this cleaning.
Danger
Health hazard on account of poor quality
of drinking water. . The control tasks out-
lined in this maintenance plan are to be
carried out according to the schedule in
order to ensure the quality of drinking wa-
ter. If the deviations in the target values
cannot be corrected by taking the pre-
scribed measures, then stop production of
drinking water and inform Kärcher Cus-
tomer Service immediately.
Electrical system
Symbols
Proper use Environmental protection
The packaging material can be
recycled. Please do not throw
the packaging material into
household waste; please send
it for recycling.
Old appliances contain valuable
materials that can be recycled;
these should be sent for recy-
cling.. Batteries, oil, and similar
substances must not enter the
environment. Please dispose of
your old appliances using ap-
propriate collection systems.
Start up
Before Commissioning
Filling up the dosing station
Operation
Switching on the plant
Monitoring elements
Display media and active carbon filters
Display of the operating panel
Switching off the plant
Maintenance and care
English
15
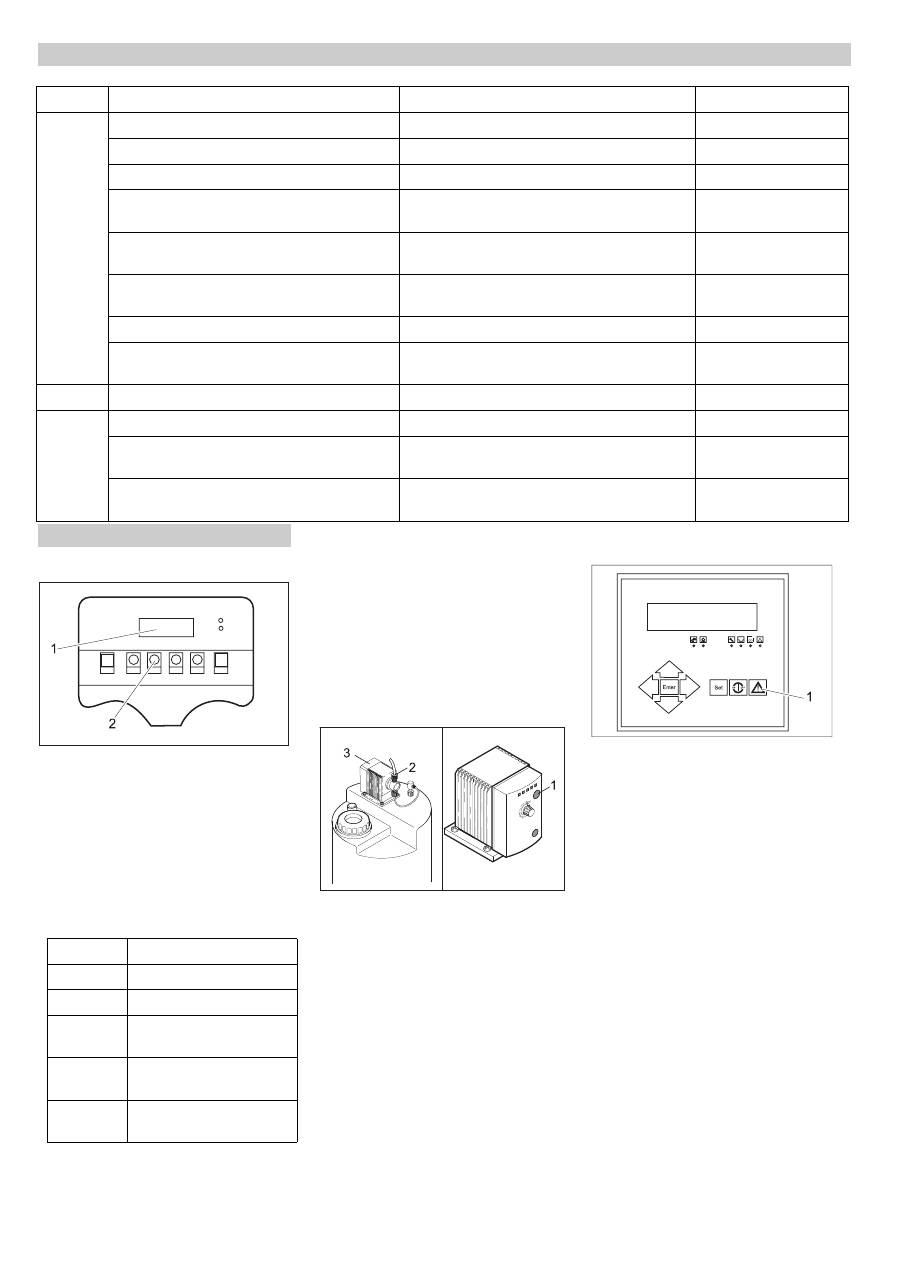
1 Display
2 ADVANCE key
During operations, the current time is
shown in the display.
Î
Press ADVANCE key for 5 to 6 sec-
onds. The display will show the first sta-
tus display from the list shown beloe.
Î
To go to the next display, press once
again the ADVANCE key briefly.
If you do not press the ADVACE key for
some time, the display goes back to show-
ing the time.
The dosing pump must be dearated if the
pump has sucked in air (for e.g. if the dos-
ing container has been completely emp-
tied).
– The unit will stop; the display shows the
interruption "Motor protection".
Note
This errror message is displayed independ-
ent of which dosing container has been
used.
1 Dosing frequency button
2 Screw connections
3 Dosing pump
Î
Refill dosing station (refer chapter on
Startup)
Î
Loosen screws on the dosing pump.
Î
Read and note the dosing frequency
that has been set at the LEDs of the
dosing pump.
Î
Set the dosing frequency to 100% by re-
peatedly pressing the dosing frequency
button and waiting until there are no
more bubbles in the suction pipe (ap-
prox. 1 minute). Absorb the oozing dos-
ing liquid with a piece of cloth.
Î
Tighten the screws.
Î
Set the dosing pump to the original dos-
ing frequency.
1 Return key
Î
Accept the interruption message on the
operating panel by pressing the Return
key; the unit will start.
Î
Check the pressure difference between
the two manometers. Change filter inlay
if value is more that 0.08 MPa (0.8 bar):
Î
Turn the main switch to position "0"
Î
Interrupt raw water inflow.
Î
Open the raw water testing tap to de-
pressurise the filter.
Maintenance schedule
Time
Check / Activity
Target value
In case of deviation
daily
Filling level of dosing container
adequate filling
refill
Air bubbles in the dosing pipes
no air bubbles
Bleed dosing pump.
Drinking water flow based on the startup value Lowered by less than 10%
Fine regulation
Drinking water guide value based on the start-
up value
Increase within 10%
Fine regulation
Pressure difference between pump and con-
centrate pressure
maximum 15% above startup difference
Kärcher Customer
Service
Counter/meter for media and active carbon fil-
ters
Reflushing has taken place in the last 24 hours Kärcher Customer
Service
Pressure difference fine filter
maximum 0.08 MPa (0.8 bar)
Replace fine filter
Visual inspection of the plant
no leaks
Kärcher Customer
Service
weekly
Fill up operations log
monthly
Clean and rinse dosing container
Visual inspection of raw water pump
No damage/ leaks can be detected
Kärcher Customer
Service
Float switch in drinking water tank
no functional disruption can be detected
Kärcher Customer
Service
Maintenance Works
Check media and active carbon filters
Display
Significance
2000
Not important
0000
Not important
D–07
Number of days until the
next reflushing
–001
Number of reflushing that
have been conducted
0–01
days - hours since the last
reflushing
Bleed dosing pump.
Replace fine filter
16
English
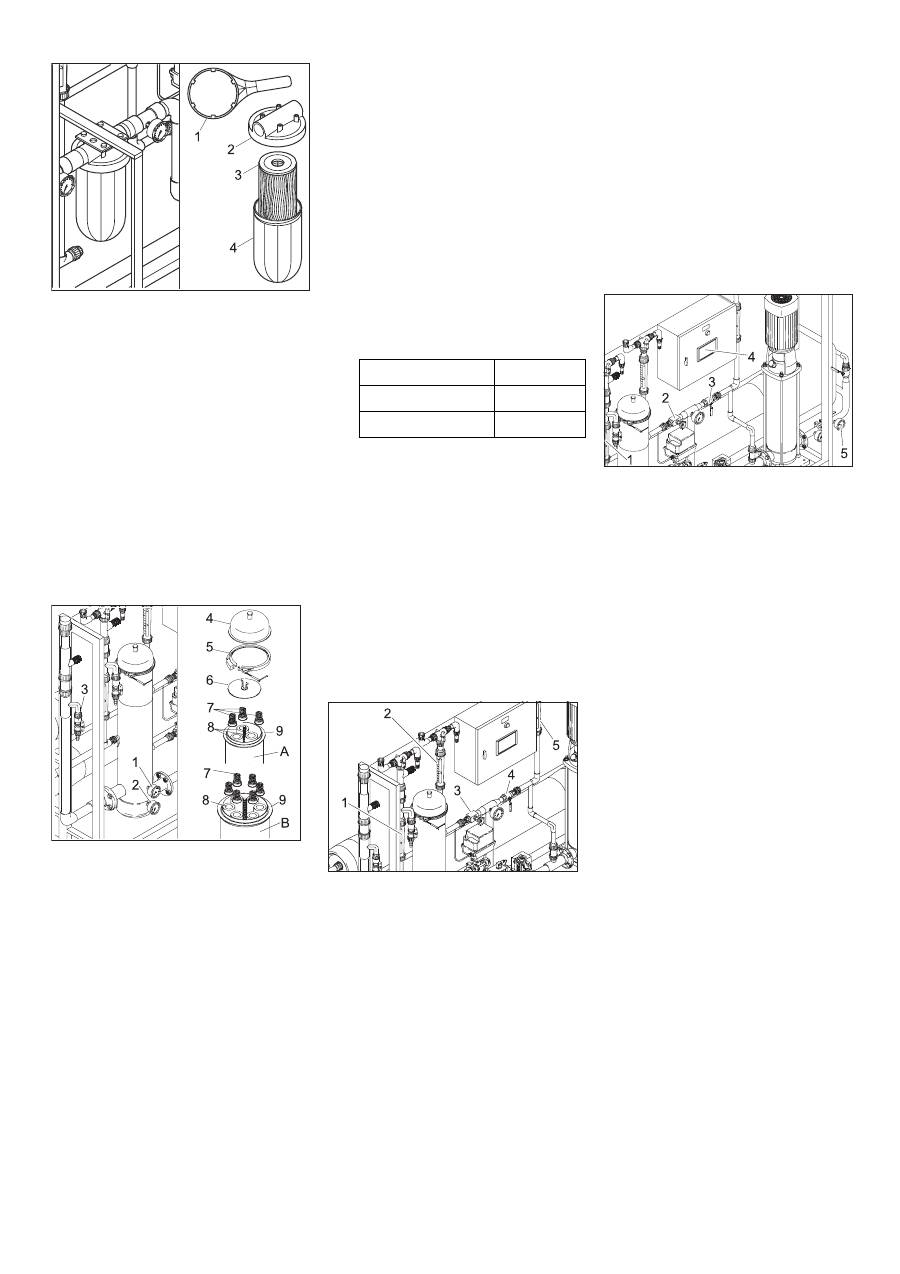
WPC 2500 BW-AM:
1 Filter key
2 Filter casing
3 Filter pot
4 Filter inlay
Î
Unscrew the filter pot using the filter
key.
Î
Take out the filter inlay.
Î
Clean filter casing and filter pot if re-
quired.
Î
Insert new filter inlay into filter pot.
Î
Install and tighten filter pot.
Î
Close raw water testing tap.
Î
Restart the raw water flow.
Î
Set main switch to “1”.
WPC 5000/10000 BW-AM:
1 Manometer
2 Manometer
3 Raw water testing tap
4 Cover
5 Clamp ring
6 Screw plate
7 Spring cap
8 Filter candle
9 Filter casing
A WPC 5000 BW-AM
B WPC 10000 BW-AM
Î
Loosen the clamp ring.
Î
Remove the lid.
Î
Unscrew the screw plate.
Î
Remove spring cap.
Î
Take out the filter candle.
Î
Clean the filter casing.
Î
Insert new filter candle.
Î
Place the spring caps on the filter can-
dles.
Î
Replace the screw plate and fix the
screws.
Î
Replace the lid and fasten the clamping
ring.
Î
Close raw water testing tap.
Î
Restart the raw water flow.
Î
Set main switch to “1”.
몇
Warning
Danger of damage to the plant. The follow-
ing values should not be exceeded when
you make changes to the plant settings:
–
Max. pump pressure 2.1 MPa
(21 bar)
–
Maximum drinking water volume:
– The concentrate quantity should not fall
below the value at the time of startup.
–
Do not change the setting of the pump
regulation valve.
Note
There is a time delay before the plant reacts
to the changes done to the regulating
valves. Hence do the settings at the pres-
sure regulation valve and the concentrate
regulation valve in small steps and wait for
the respective effect.
(1) Drinking water flow has fallen from
_______ l/h to _______ l/h
1 Flow meter for drinking water
2 Flow meter for concentrate
3 Concentrate regulation valve
4 Pressure regulation valve
5 Flow meter for concentrate backflow
Î
Read the quantity of drinking water at
the flow meter for drinking water and
compare it to the value when the plant
was started (see start-up report). If the
drinking water flow ahs fallen to ______
l/h, then do the following fine regulation:
Î
Close the pressure regulation valve in a
clock-wise direction until the flow meter
for the concentrate backflow has almost
achieved the target value.
Î
Close the concentrate regulation valve
slowly in the clock-wise direction until
the required target value is reached for
the two flow meters of the concentrate
and the drinking water.
Î
Readjust both the valves if required.
Note
Inform Kärcher Customer Service if this fine
regulation does not lead to any changes to
the drinking water flow.
(2) Conductivity of drinking water has in-
creased from _____µS/cm to _____µS/cm
Note
Small increases in the conductivity of drink-
ing water does not affect the quality of the
drinking water.
1 Flow meter for drinking water
2 Concentrate regulation valve
3 Pressure regulation valve
4
Display
5 Manometer for membrane input pres-
sure
Î
Read the current conductivity value on
the display of the operating panel and
compare it to the value at the time of
start-up (see start-up report). If the
drinking water conductivity has in-
creased to _____µS/cm, then you need
to rinse the membrane of the RO filter
unit:
Î
Open the concentrate regulation valve
in small step by turning it in the anti-
clockwise direction until the conductivity
has reached the target value.
Î
Close the pressure regulation valve in
small steps in the clock-wise direction
until the flow meter of the drinking water
has reached the target value.
몇
Warning
Danger of damage to the RO membrane.
While closing the pressure regulation valve,
ensure that the membrane input pressure
does not exceed 2.1 MPa (21 bar).
Note
The purpose of this setting procedure is to
increase the concentrate quantity.
Î
Repeat these setting steps if required.
Eventually, the original drinking water
quantity will no longer be reached.
Fine regulation of the operating pres-
sures
WPC 2500 BW-AM
2,500 l/h
WPC 5000 BW-AM
5,000 l/h
WPC 10000 BW-AM 10,000 l/h
Оглавление
- Inhaltsverzeichnis Bedienelemente Sicherheitshinweise
- Bestimmungsgemäße Ver- wendung Umweltschutz
- Verbrauchsmaterial
- Störungen
- Technische Daten
- Rückseite. Bleibt leer, damit das Blatt herausgetrennt werden kann
- Contents Control elements Safety instructions
- Proper use Environmental protection
- Consumables
- Faults
- Technical specifications
- Rear side. Is kept blank so that the sheet can be separated
- Table des matières Eléments de commande
- Consignes de sécurité
- Matériel de consommation
- Caractéristiques techniques
- Déclaration CE Garantie Pièces de rechange
- Verso. Reste vide, afin que la feuille peut être retirer.
- Indice Dispositivi di comando Norme di sicurezza
- Uso conforme a destinazione Protezione dell’ambiente
- Materiale di consumo
- Dati tecnici
- Dichiarazione CE Garanzia Ricambi
- Tergo. Resta vuoto in modo da poter separare il foglio
- Inhoudsopgave Bedieningselementen Veiligheidsinstructies
- Reglementair gebruik Zorg voor het milieu
- Verbruiksmateriaal
- Storingen
- Technische gegevens
- Achterkant. Blijft leeg zodat de pagina eruit gehaald kan worden
- Índice de contenidos Elementos de mando Indicaciones de seguridad
- Uso previsto Protección del medio am- biente
- Material de uso
- Averías
- Datos técnicos
- Parte posterior. En blanco para separar la hoja
- Πίνακας περιεχομένων Στοιχεία χειρισμού Υποδείξεις ασφαλείας
- Χρήση σύμφωνα με τους κανονισμούς Προστασία περιβάλλοντος
- Αναλώσιμα υλικά
- Βλάβες
- Τεχνικά χαρακτηριστικά
- Δήλωση συμμόρφωσης CE Εγγύηση Ανταλλακτικά
- Οπισθόφυλλο Παραμένει κενό για να αποκοπεί το φύλλο
- İ çindekiler Kumanda elemanlar ı Güvenlik uyar ı lar ı
- Kurallara uygun kullan ı m Çevre koruma
- Tüketim malzemesi
- Ar ı zalar
- Teknik Bilgiler
- Arka sayfa. Sayfan ı n ayr ı labilmesi için bo ş kal ı r
- Оглавление Элементы управления Указания по технике безопасности
- Использование по назначению Защита окружающей среды
- Расходный материал
- Неполадки
- Технические данные
- Заявление о соответствии требованиям СЕ Гарантия Запасные части
- Оборотная сторона . ь Остается пустой , чтобы можно было отделить лист
