Karcher K 5 Car: Start up Operation
Start up Operation: Karcher K 5 Car
Start up Operation
Notice
몇 Danger
Dry running of more than 2 minutes leads to
The water jet that is emitted from the high-
damage of the high-pressure pump. If the
pressure nozzle results in a repulsion pow-
appliance does not build up pressure within
er acting on the hand spray gun. Make sure
2 minutes, switch the appliance off and pro-
that you have a firm footing and are also
ceed in accordance with the instructions in
holding the hand spray gun and spray lance
Chapter "Troubleshooting".
firmly.
Illustration
몇 Danger
Push the high pressure hose into the
High-pressure jets can be dangerous if im-
quick coupling until it locks audibly.
properly used. The jet may not be directed
Note: Make sure the connection nipple
at persons, animals, live electrical equip-
is aligned correctly.
ment or at the appliance itself.
Check the secure connection by pulling
Notice
on the high pressure hose.
Car tyres, paint or sensitive surfaces such
Attach the water supply hose to the
as wood should not be cleaned with the dirt
coupling on the water connection.
blaster, as there is a risk of damage.
Note: The supply hose is not included.
Notice
Connect the water supply hose to the
Risk of damage to the paintwork
water supply.
When working with the washing brush, it
Completely open the water tap.
must be free of dirt or other particles.
Insert the mains plug into the socket.
Illustration
Turn on the appliance “I/ON”.
Push the spray lance into the trigger
Illustration
gun and fasten it by turning it through
Unlock the lever on the trigger gun.
90°.
Pull on the lever of the trigger gun; the
Unlock the lever on the trigger gun.
device will switch on.
Pull on the lever of the trigger gun; the
Switch the appliance on for a (max. of 2
device will switch on.
minutes) and wait until the water exits at
Working with detergent
the hand spray gun without bubbles.
Release the lever on the trigger gun.
Danger
Note: Release the lever of the trigger
The use of wrong detergents or chemicals
gun; the device will switch off again.
can compromise the safety of the appli-
High pressure remains in the system.
ance.
Illustration
Please use exclusively KÄRCHER deter-
Lock the lever on the trigger gun.
gents and care products to carry out the re-
spective cleaning task, as these were spe-
cifically developed for your appliance. The
use of other detergents and care products
may lead to premature wear and can inval-
idate your warranty claims. Please obtain
information at your local dealer or request
information directly from KÄRCHER.
Danger
The improper use of detergents can cause
severe injuries or toxication.
When using detergents, the material data
safety sheet issued by the detergent manu-
20 EN
– 10
facturer must be adhered to, especially the
Optional
instructions regarding personal protective
Foam nozzle
equipment.
Fill the detergent solution in the deter-
Notice
gent tank of the foam nozzle (observe
Risk of damage to the appliance
dosage instructions on the packaging of
Apply the "Ultra Foam Cleaner TM 615"
the detergent).
cleaner via the foam nozzle only.
Connect the detergent tank to the foam
nozzle.
Connect the foam nozzle to the trigger
gun.
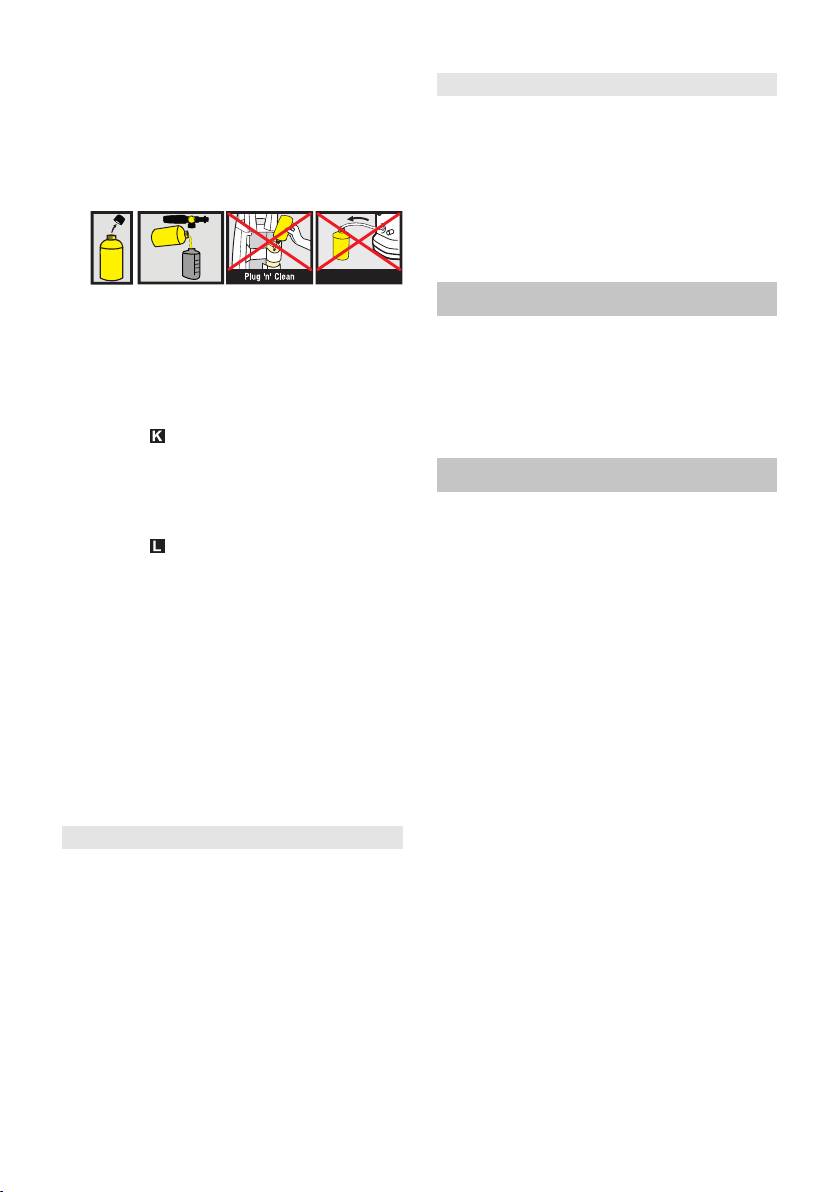
Suck 'n' Clean
Interrupting operation
Notes regarding the detergent: The most
commonly used KÄRCHER detergents can
Release the lever on the trigger gun.
be purchased ready to use in their Plug 'n'
Lock the lever on the trigger gun.
Clean detergent bottles with locking lids.
Insert the trigger gun in its holder.
This will make the pesky refilling and filling
During longer breaks (more than 5 min-
processes redundant.
utes), also turn the appliance off using
Illustration
the "0/OFF" switch.
Remove the lid from the Plug 'n' Clean
Finish operation
detergent bottle and press the deter-
gent bottle into the detergent connec-
몇 Caution
tion with the opening facing down.
Only separate the high-pressure hose from
Illustration
the hand spray gun or the appliance when
Adjust the suction volume of the deter-
there is no pressure in the system.
gent solution by means of the dosage
Remove the Plug 'n' Clean detergent
regulator for detergents.
bottle from the intake and close it with
Use spray lance with pressure regula-
the lid. To store, place into the intake ro-
tion (Vario Power).
tated by 180°.
Turn the spray lance to "Mix" position.
Release the lever on the trigger gun.
Note: This will mix the detergent with
Turn off the appliance "0/OFF".
the water stream.
Turn off tap.
Fill the detergent solution in the deter-
Press the lever on the trigger gun to re-
gent tank of the foam nozzle (observe
lease any remaining pressure in the
dosage instructions on the packaging of
system.
the detergent).
Lock the lever on the trigger gun.
Recommended cleaning method
Disconnect the mains plug from the
socket.
Spray the detergent sparingly on the
Detach the appliance from the water
dry surface and allow it to react, but not
supply.
to dry.
Spray off loosened dirt with the high
pressure jet.
– 11
21EN
Оглавление
- Bestimmungsgemäße
- Sicherheit
- Gerätebeschreibung
- Vor Inbetriebnahme
- Inbetriebnahme
- Transport
- Lagerung Pflege und Wartung
- Zubehör und Ersatzteile
- Technische Daten EG-Konformitätserklärung
- Proper use
- Safety
- Description of the Appliance
- Before Startup
- Start up Operation
- Transport
- Troubleshooting
- Technical specifications EC Declaration of Conformity
- Оглавление Защита окружающей среды
- Безопасность
- Описание прибора
- Перед началом работы
- Начало работы
- Эксплуатация
- Транспортировка
- Хранение
- Помощь в случае
- Технические данные
- Заявление о
- Захист навколишнього Зміст середовища
- Опис пристрою
- Перед початком роботи
- Експлуатація
- Транспортування
- Допомога у випадку неполадок
- Приладдя й запасні деталі
- Технічні характеристики Заява при відповідність Європейського співтовариства
