Karcher HDS-C 8-15 E Steel: Maintenance and care
Maintenance and care: Karcher HDS-C 8-15 E Steel
-
7
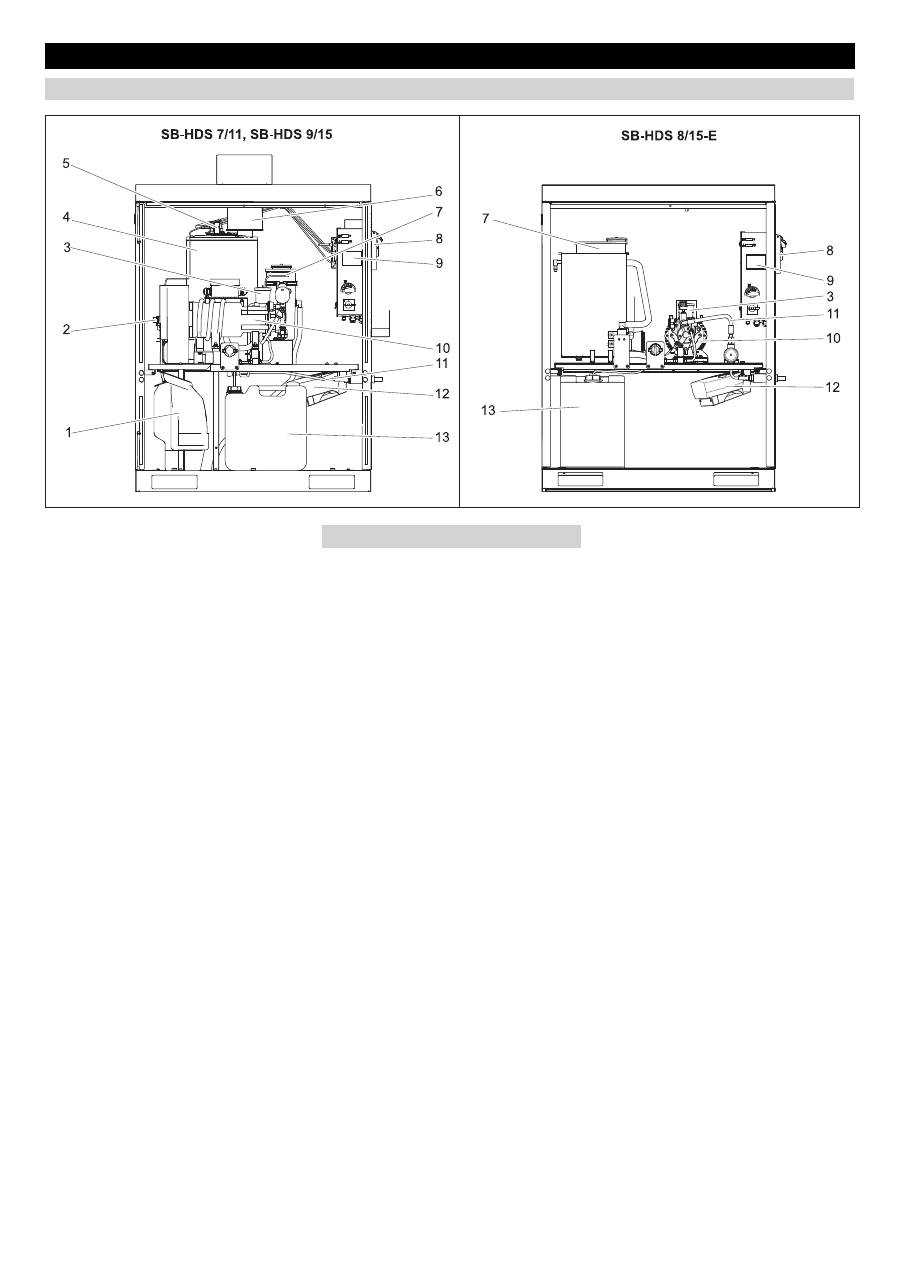
1 Fuel tank*
2 Fuel filter and fuel pump*
3 Oil tank
4 Burner with continuous heater*
5 Photovoltaic cell for flame monitoring*
6 Exhaust pipe*
7 Container for softener (RM 110)
8 Coin verification unit (optional)
9 Coin container (optional)
10 High pressure pump
11 high pressure hose
12 Fan heater
13 Cleaning agent container
* only HDS-C 7/11, HDS-C 9/15
The bases of a safe operating of the equip-
ment is thr regularly maintenance accord-
ing to the following maintenance plan.
Use only original parts of the manufacturer
or part suggessted by him, such as
–
parts and wearing parts,
–
accessories parts,
–
operating materials,
–
cleaning agents.
Danger
Risk of accident while working on the unit.
During all tasks
Turn off the water supply; close the
fresh water tap,
First switch-on in voltage-less state,
switch off the emergency stop switch in
the building and secure it against being
switched on again.
Caution
Risk of damage. Never use a high-pressure
jet to clean the inside of the system.
–
operator
Performances containing the notice
"operator" may only be performed by in-
structed individualls, who are able to
operate and service high pressure
equipment.
–
Maintenance
Performances with the notice "mainte-
nance" may only be performed by the
Kärcher- Maintenance-Mechanics.
In order to guarantee a reliable operation
og the equipment, we success, you signed
a maintenance agreement. Please refer to
you local Kärcher service department.
Danger!
danger of injury because of possible dam-
aged parts of the high pressure jet, danger
of burns because of hot equipment parts..
When working, while the equipment is open
take special care, and obey all safty notic-
es!.
The following parts are possible to be hot-
ter than 50 °C:
–
Exhaust pipe and exhaust opening (on-
ly HDS-C 7/11, HDS-C 9/15)
–
Burner with continuous heater (only
HDS-C 7/11, HDS-C 9/15)
–
cylinder head of the high pressure
pump
–
high pressure hose
Maintenance and care
System overview
Maintenance instructions
Who may perform maintenance?
Maintenance contract
23 EN
-
8
Maintenance schedule
Time
Activity
Performance
By whom
daily
Visible inspection of the high
pressure hoses
Check high pressure hoses for mechanical damages such as scraping, vis-
ible hose duck, bends, porous and cracked rubber. Replace damaged high
pressure hoses.
Operator
Check warning boards at the
washing place
Check whether the warning boards for the users are available and legible. Operator
Check the unit for leaks
Check pumps and pipes for leaks. Inform Customer Service if there is oil
under the high pressure pump, if more than 3 drops of water drop out of the
high pressure pump when the pump is running.
Operator
Check fill level of detergent
tank
Check filling level, refill if necessary.
Operator
Empty the coin container
Open the plant door and empty the coin container.
Operator
Only HDS-C 7/11, HDS-C 9/
15: Check fill level of fuel tank
Check filling level, refill if necessary.
Operator
Everyday
under frost
conditions
Check frost protection devices Is the hot air blower working?
Operator
After 40
operating
hours or
once a
week
Check oil level of the high
pressure pump
The oil level must lie between the MIN and MAX markings; else refill.
Operator
Check oil level
Milky oil indicates that it contains water. Inform Customer Service.
Operator
Check filling level of softener
liquid
Check filling level; refill the softener RM 110, if required.
Operator
After 80
operating
hours or
once every
two weeks
Clean and maintain housing
Clean the housing thoroughly from inside and outside.
Take care of the stainless steel casing using steel cleaner (order no.: 6.290-
911.0).
Operator
After 160
operating
hours or
once a
month
Clean detergent filter in the
detergent container
Remove filter and rinse it thoroughly with hot water.
Operator
Clean sieve in the water short-
age safe guard.
See Maintenance tasks
Operator
Lubricate the door hinges
Lubricate the hinges with grease (order no.: 6.288-072).
Operator
Door locks
Spray care liquid (order no. 6.288-116) into the locks.
Operator
After 250
operating
hours or
once every
six months
Check pump head
Customer
Service
Only HDS-C 7/11, HDS-C 9/
15: Adjust ignition electrodes,
replace if required
Customer
Service
After 500
operating
hours or
once a
year
Check the high pressure
pump thoroughly
Customer
Service
Oil change in high pressure
pump
See Maintenance tasks
Operator
Only HDS-C 7/11, HDS-C 9/
15: Desoot the heating coil,
adjust burner
Customer
Service
Only HDS-C 7/11, HDS-C 9/
15: Decalcify the heating coil
See Maintenance tasks
Trained op-
erator
Only HDS-C 7/11, HDS-C 9/
15: Clean the fuel container
See Maintenance tasks
Operator
24 EN
-
9
Danger
Risk of burns due to hot oil or hot parts of
the plant. Allow pump to cool down for 15
minutes before oil change.
Note
Please dispose off used oil only in the col-
lection points provided for them. Please
hand over old oil, if any, only at such plac-
es. Polluting the environment with used oil
is a punishable offence.
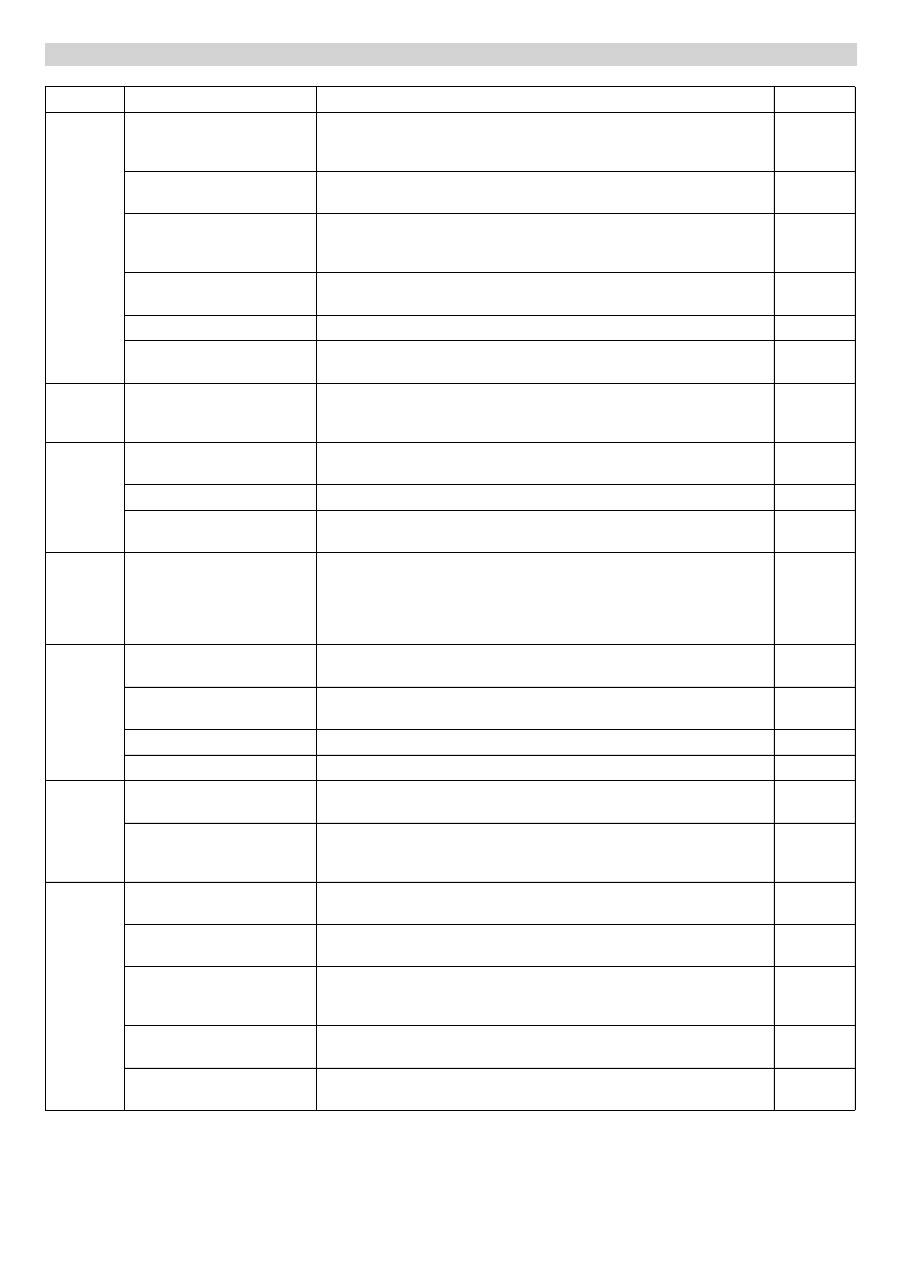
1 Oil container lid
2 Oil drain screw
Keep a collection basin for old oil ready.
Remove the lid of the oil container.
Unscrew the oil drain screw and collect
used oil.
HDS-C 7/11, HDS-C 9/15: Replace O
Ring 11x2 (order no: 6.362-458.0) and
turn in the oild drain screw.
HDS-C 8/15-E: Replace copper washer
14x18 (order no. 7.362-005.0) and turn
in the oil drain screw.
Slowly fill in new oil until the "MAX"
marking on the oil container.
Close the oil container with the lid.
Deliver the old oil to the respective col-
lection centres.
Loosen covering nut and take off hose.
Take out sieve.
Note
If necessary turn in screw M8 appr. 5 mm
inwards and therewith pull out sieve.
Clean sieve in water.
Push sieve inwards.
Put on hose.
Tighten covering nut firmly.
There will be calcium deposits in the plant if
the softening plant (optional) is accidentally
out of operation for a long time. Calcium de-
posits in the plant can lead to following dis-
ruptions:
–
higher pipe resistances,
–
reduced heat transfer at the heat ex-
changers,
–
failure of components spoilt on account
of calcium deposits.
In the interest of environmental safety, use
only tested and approved decalcifying
agents (calcium dissolution acids with test
marking) to decalcify. The high pressure
unit should be decalcified using the Kärch-
er calcium solvent.
Danger
Only persons trained by Kärcher are au-
thorised to decalcify the plant. Risk of ex-
plosion due to combustible gases! Do not
smoke during decalcification; ensure prop-
er ventilation. Risk of burns injury on ac-
count of acid. Wear protective glasses and
protective gloves.
Unscrew the hand-spray gund and in-
sert the hose in the drainage duct so
that the water can flow freely.
Set the hot water temperature to 40 °C.
Shut off water supply.
Start the washing programme with hot
water until the swimmer container for
fresh water is almost empty.
Add 0.5 litre calcium solvent to the
swimmer tank for fresh water.
Leave the water inlet open until the
swimmer tank for fresh water is full
again.
Switch on the plant briefly and then let
the calcium solvent react. Repeat this
process every 4 to 5 minutes until the
swimmer tank for fresh water is almost
empty.
Open the water inlet and let the wash-
ing programme with hot water run for 5
minutes until the tank is rinsed.
Connect the hand-spray gun to the high
pressure hose.
Caution
Danger of damage to the fuel pump. Do not
interchange the forward and backward flow
pipes for fuel. This can cause the fuel
pump to dry run and get damaged.
Pull out the fuel hoses on the fuel pump.
Remove the fuel tank from the plant.
Rinse the fuel tank thoroughly (allow
the fuel tank rinsed with water to dry
properly).
Dispose off fuel residues according to
environment safety laws.
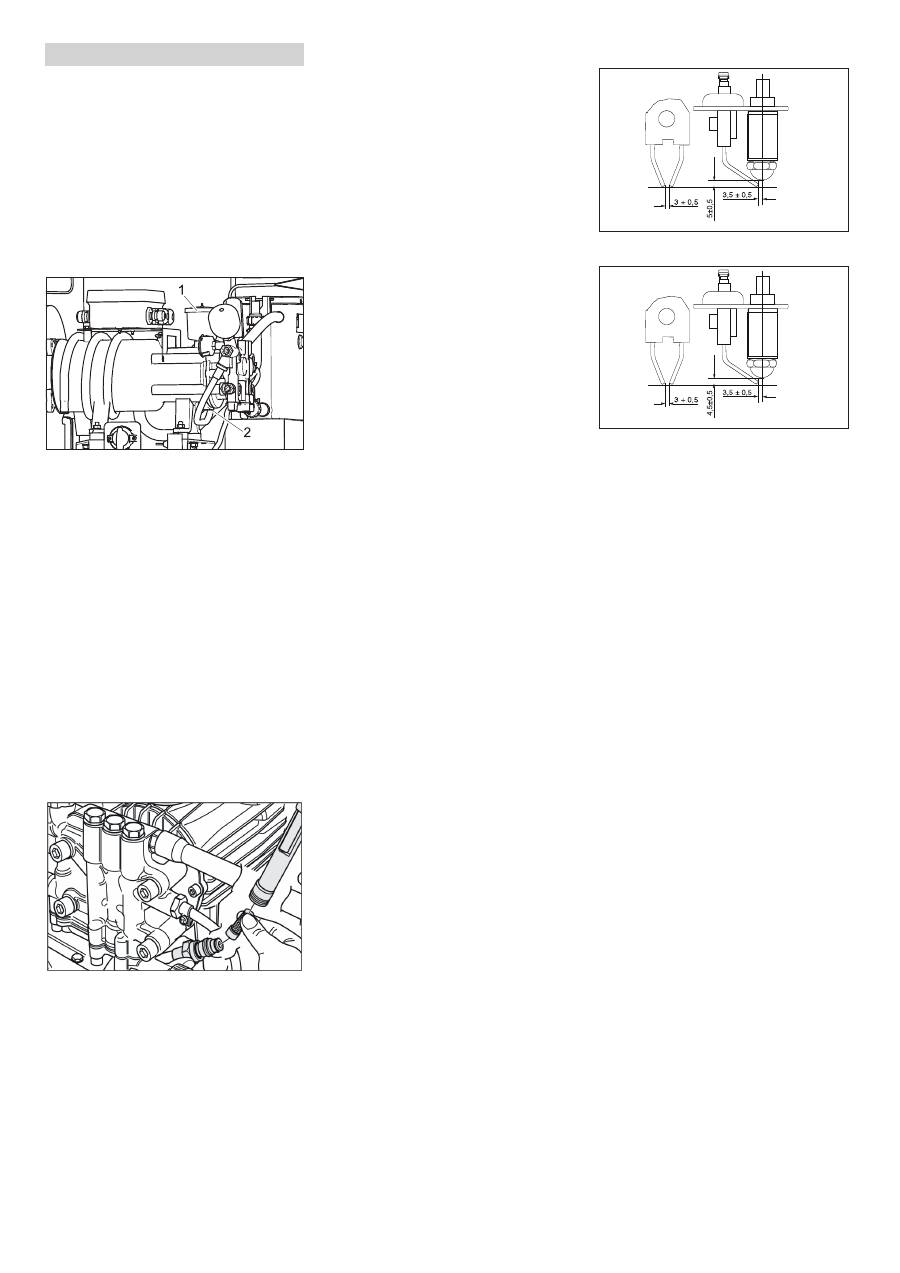
The correct setting of the ignition elec-
trodes is very important for the burner to
function properly. The settings have been
indicated in the above drawing.
Maintenance Works
Oil change
Clean sieve in the water shortage safe-
guard (only HDS-C 7/11, HDS-C 9/15)
Decalcify the heating spiral (only HDS-C
7/11, HDS-C 9/15)
Clean fuel tank (only HDS-C 7/11, HDS-C
9/15)
Electrode setting SB-HDS 7/11
Electrode setting SB-HDS 9/15
25 EN
Оглавление
- Deutsch
- Bedienung
- Betriebsstoffe einfüllen
- Stilllegung
- Funktion
- Technische Daten
- Wartung und Pflege
- Hilfe bei Störungen
- Zubehör
- TransportLagerung Anlage installieren (Nur für Fachkräfte)
- EG-Konformitätserklärung
- Protokoll für Hochdruckprüfung
- English
- Operations
- Filling in detergents
- Shutdown
- Function
- Specifications
- Maintenance and care
- Troubleshooting
- Accessories
- Transport Storage Installing the unit (only for ex- perts)
- EC Declaration of Conformity
- Log of high pressure testing
- Français
- Utilisation
- Réglages
- Protection antigel
- Remisage
- Fonction
- Caractéristiques techniques
- Entretien et maintenance
- Assistance en cas de panne
- Accessoires
- Garantie Transport Entreposage Installation de l'appareil (Uni- quement pour les spécia- listes)
- Déclaration de conformité CE
- Rapport de contrôle de la haute pression
- Italiano
- Uso
- Impostazioni
- Antigelo
- Funzione
- Dati tecnici
- Cura e manutenzione
- Guida alla risoluzione dei guasti
- Accessori
- GaranziaTrasporto Supporto Installazione dell'impianto (solo personale specializzato)
- Dichiarazione di conformità CE
- Protocollo per controllo alta pressione
- Español
- Manejo
- Configuraciones
- Protección antiheladas
- Puesta fuera de servicio
- Datos técnicos
- Mantenimiento y cuidado
- Ayuda en caso de avería
- Accesorios
- Declaración de conformidad CE
- Protocolo para la inspección de alta presión
- Português
- Manuseamento
- Ajustes
- Protecção contra o congela- mento
- Desactivação da máquina
- Dados técnicos
- Manutenção e conservação
- Ajuda em caso de avarias
- Acessórios
- Garantia Transporte Armazenamento Instalar instalação (Apenas para técnicos autorizados)
- Declaração de conformidade CE
- Protocolo para o controlo de alta pressão
- Nederlands
- Bediening
- Bedrijfsstoffen vullen
- Stilllegging
- Functie
- Technische gegevens
- Onderhoud en instandhouding
- Hulp bij storingen
- Toebehoren
- Garantie Vervoer Opslag Installatie installeren (alleen voor vaklui)
- EG-conformiteitsverklaring
- Protocol voor hogedrukcontrole
- Περιεχόμενα
- Χειρισμός
- Ρυθμίσεις
- Αντιπαγετική προστασία
- Ακινητοποίηση
- Τεχνικά χαρακτηριστικά
- Φροντίδα και συντήρηση
- Αντιμετώπιση βλαβών
- Εξαρτήματα
- Δήλωση Συμμόρφωσης των Ε . Κ .
- Πρωτόκολλο ελέγχου υψηλής πίεσης
- Polski
- Obs ł uga
- Ustawienia
- Ochrona przeciwmrozowa
- Przeznaczenie
- Dane techniczne
- Dogl ą d i piel ę gnacja
- Usuwanie usterek
- Akcesoria
- Gwarancja Transport Przechowywanie Instalacja urz ą dzenia (Tylko dla wykwalifikowanych pra- cowników)
- Deklaracja zgodno ś ci UE
- Protokó ł badania wysokiego ci ś nienia
- Оглавление
- Эксплуатация
- Настройки
- Защита от замерзания
- Вывод из эксплуатации
- Назначение
- Технические данные
- Техническое обслуживание и уход
- Помощь в случае непола - док
- Принадлежности
- Гарантия Транспортировка Хранение Монтаж установки - Только для специалистов
- Заявление о соответствии ЕС
- Протокол проверки системы высокого давления
