Karcher B 40 W Bp R 55: Before Startup
Before Startup: Karcher B 40 W Bp R 55
-
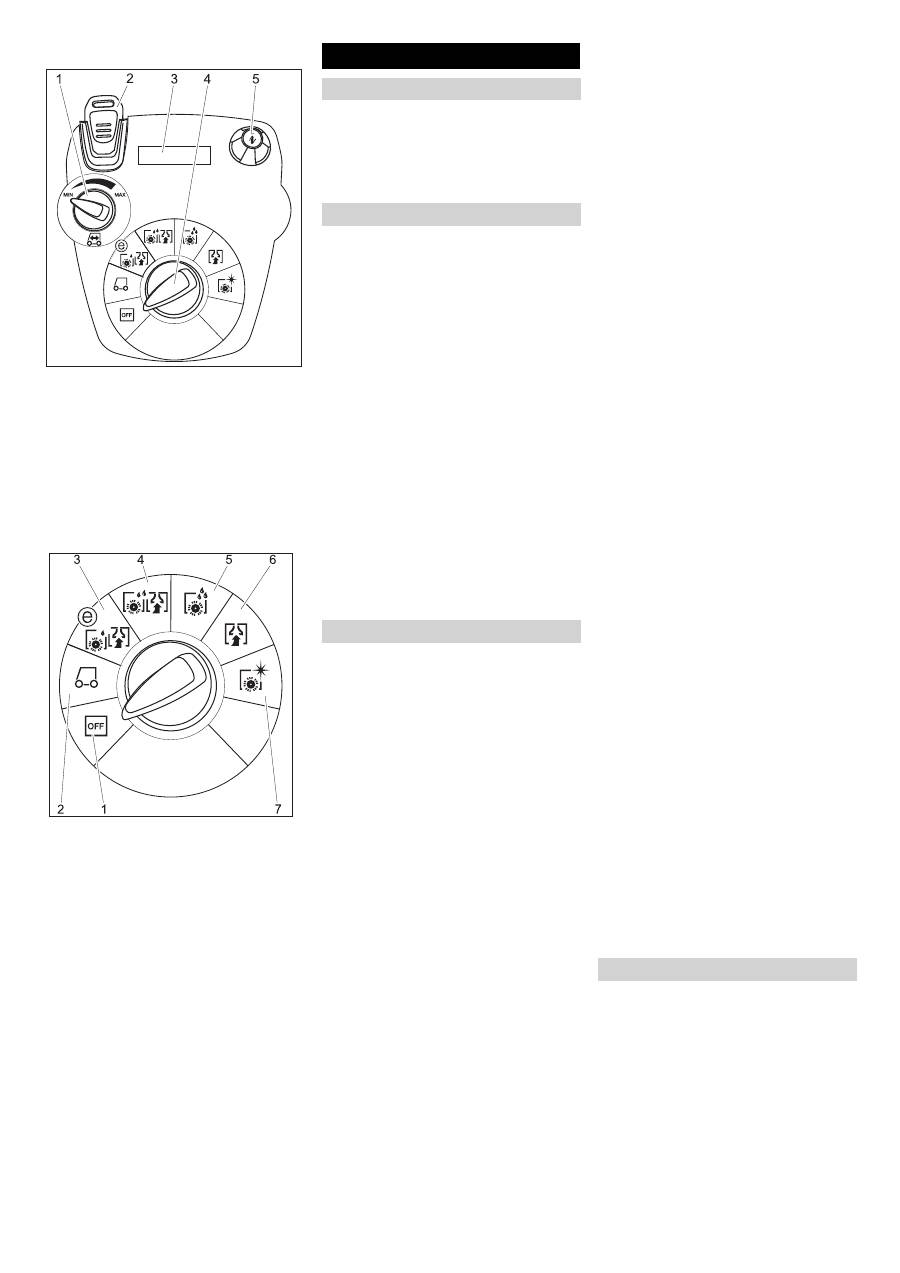
3
1 Rotating button for drive speed
(B 40 W only)
2 Intelligent Key
yellow - operator
grey - supervisor
3 Display
4 Program selection switch
5 Info button
1
OFF
Device is switched off
2
Transport mode
(B 40 W only)
Driving to the Place of Use.
3
Eco mode
Wet clean the floor (with reduced brush
speed) and vacuum up wastewater
(with reduced suction).
4
Normal mode
Wet clean the floor and vacuum up dirt
water.
5
Intense mode
Wet clean the floor and allow the deter-
gent to react.
6
Vacuum mode
Suck in the dirt fleet.
7
Polishing mode
Polishing the floor without the applica-
tion of liquid.
The disc brush must be installed before the
initial operation (see "Maintenance work").
The brushes are mounted.
Install the batteries (see "Care and Mainte-
nance/Install and connect batteries").
Prior to the initial startup, following a ser-
vice reset or when switching to another bat-
tery type, you must adjust the charging
marker line.
Use the Grey Intelligent Key.
Setting the charging marker line (see
Chapter "Grey Intelligent Key/Setting
the charging marker line“.
We recommend using our batteries as de-
scribed in chapter "Care and Maintenance/
Recommended batteries".
Note
While using other batteries (for e.g. batter-
ies from other manufacturers) the total dis-
charge protection level must be reset by
the Kärcher after sales service according to
the respective battery.
Note
The appliance is equipped with a safety
mechanism to prevent total discharge, i.e.
when the permissible minimum capacity is
reached, the brush motor and the turbine
are switched off.
Drive the machine directly to the charg-
ing station; avoid any steep gradients in
the process.
Danger
Risk of injury on account of electric shock.
The mains voltage must correspond with
the type plate on the appliance.
Use the charger only in dry rooms with suf-
ficient ventilation!
Average charging time is approx. 10 -15
hours.
The built-in charger has electronic controls
and is suitable for all recommended batter-
ies; it automatically switches off the charg-
ing process.
The built-in battery is shown on the display dur-
ing the charging process. If this is not the case,
the charging marker line must be selected (see
"Setting the charging marker line").
The appliance must not be used during the
charging process.
Initial charge tips
With the initial charge, the control will not
yet be able to detect which battery type has
been installed. Keep charging the batteries
until the display shows a full charge (batter-
ies may still not be completely charged).
The next charging process will have an ac-
curate display and charge power and the
batteries will be fully charged.
Use the appliance until the deep discharge
protection switches off the brush motor and
the turbine after the initial charge of the bat-
tery. This procedure is necessary to adjust
the battery indicator. Only then the correct
battery status is displayed.
몇
Danger
Risk of explosion!
Prior to
Charging low-maintenance bat-
teries
, the tank must be swivelled upwards
(see chapter "Installing and connecting bat-
teries"). This will prevent the generation of
dangerous gases during the charging pro-
cess under the tank.
While the water tank is folded up, you must
not clean with any water.
When
charging maintenance-free batter-
ies
, the water tank does not need to be
folded up.
Insert the plug of the connecting cable
into the socket. The charging process
will start.
Note
: The selected battery will be dis-
played during charging.
Charge until the display shows a full
charge.
몇
Warning
Danger of causticization!
–
Adding water to the battery in its discharged
state can cause the acid to leak.
–
Use safety glasses while handling bat-
tery acid and follow the safety instruc-
tions to avoid personal injury or damage
to clothes.
–
Should the acid spray on to the skin or
clothes, rinse immediately with lots of
water.
Caution
Risk of damage!
–
Use only distilled or desalinated water
(EN 50272-T3) for filling the battery.
–
Do not add any substances (so-called
performance improving agents), else
warranty claims will not be entertained.
–
Replace batteries only with batteries of
the same type. Otherwise, the charging
guideline must be readjusted by cus-
tomer service.
Insert the vacuum bar into the vacuum
bar suspension in such a manner that
the profiled sheet is positioned above
the suspension.
Tighten the wing nuts.
Operator console
Program selection switch
Before Startup
Installing the Brushes
BD model
BR model
Install batteries
Setting the charging marker line
Using batteries made by other manufac-
turers
Charging battery
Charging process
Low maintenance batteries (wet batteries)
Installing the Vacuum Bar
16 EN
Оглавление
- Inhaltsverzeichnis
- Bedien- und Funktionselemente
- Vor Inbetriebnahme
- Betrieb
- Anhalten und abstellen
- TransportLagerung Pflege und Wartung
- Frostschutz
- Störungen
- Zubehör B 40
- Technische Daten
- Contents
- Operating and Functional Elements
- Before Startup
- Operation
- Shutting Down the Appliance
- Transport Storage Maintenance and care
- Frost protection
- Faults
- Accessory B 40
- Technical specifications
- Table des matières
- Eléments de commande et de fonction
- Avant la mise en service
- Fonctionnement
- Arrêt et mise hors marche de l'appareil
- Transport Entreposage Entretien et maintenance
- Protection antigel
- Pannes
- Accessoires B 40
- Caractéristiques techniques
- Indice
- Elementi di comando e di funzione
- Prima della messa in funzione
- Funzionamento
- Arresto e spegnimento
- Trasporto Supporto Cura e manutenzione
- Antigelo
- Guasti
- Accessori B 40
- Dati tecnici
- Inhoudsopgave
- Elementen voor de bediening en de functies
- Voor de inbedrijfstelling
- Werking
- Stoppen en stilleggen
- Vervoer Opslag Onderhoud
- Vorstbescherming
- Storingen
- Toebehoren B 40
- Technische gegevens
- Índice de contenidos
- Elementos de operación y funcionamiento
- Antes de la puesta en marcha
- Funcionamiento
- Detención y apagado
- Transporte Almacenamiento Cuidados y mantenimiento
- Protección antiheladas
- Averías
- Accesorio B 40
- Datos técnicos
- Índice
- Elementos de comando e de funcionamento
- Antes de colocar em funcionamento
- Funcionamento
- Parar e desligar
- Intelligent Key cinzento
- Protecção contra o congelamento
- Avarias
- Acessórios B 40
- Dados técnicos
- Indholdsfortegnelse
- Betjenings- og funktionselementer
- Inden ibrugtagning
- Drift
- Standse og stille til siden
- Transport Opbevaring Pleje og vedligeholdelse
- Frostbeskyttelse
- Fejl
- Tilbehør B 40
- Tekniske data
- Innholdsfortegnelse
- Betjenings- og funksjonelementer
- Før den tas i bruk
- Drift
- Stansing og parkering
- Transport Lagring Pleie og vedlikehold
- Frostbeskyttelse
- Feil
- Tilbehør B 40
- Tekniske data
- Innehållsförteckning
- Manövrerings- och funktionselement
- Före ibruktagande
- Drift
- Stoppa och parkera
- TransportFörvaring Skötsel och underhåll
- Frostskydd
- Störningar
- Tillbehör B 40
- Tekniska data
- Sisällysluettelo
- Ohjaus- ja käyttölaitteet
- Ennen käyttöönottoa
- Käyttö
- Pysähdys ja pysäköinti
- KuljetusSäilytys Hoito ja huolto
- Suojaaminen pakkaselta
- Häiriöt
- Varusteet B 40
- Tekniset tiedot
- Πίνακας περιεχομένων
- Στοιχεία χειρισμού και λειτουργίας
- Πριν τη θέση σε λειτουργία
- Λειτουργία
- Στάση και θέση εκτός λειτουργίας
- Γκρίζο Intelligent Key
- Αντιπαγετική προστασία
- Βλάβες
- Πρόσθετος εξοπλισμός B 40
- Τεχνικά χαρακτηριστικά
- İ çindekiler
- Kullan ı m ve çal ı ş ma elemanlar ı
- Cihaz ı çal ı ş t ı rmaya ba ş lamadan önce
- Çal ı ş t ı rma
- Durma ve durdurma
- Ta ş ı ma Depolama Koruma ve Bak ı m
- Antifriz koruma
- Ar ı zalar
- Aksesuarlar B 40
- Teknik Bilgiler
- Оглавление
- Описание элементов управления и рабочих узлов
- Перед началом работы
- Эксплуатация
- Остановка и парковка
- Серый чип - ключ
- Уход и техническое обслуживание
- Защита от замерзания
- Неполадки
- Принадлежности B 40
- Технические данные
- Tartalomjegyzék
- Kezelési- és funkciós elemek
- Üzembevétel el ő tt
- Üzem
- Megállás és leállítás
- Szállítás Tárolás Ápolás és karbantartás
- Fagyás elleni védelem
- Üzemzavarok
- Tartozék B 40
- M ű szaki adatok
- Obsah
- Ovládací a funk č ní prvky
- P ř ed uvedením do provozu
- Provoz
- Zastavení a vypnutí p ř ístroje
- P ř eprava Ukládání Ošet ř ování a údržba
- Ochrana proti zamrznutí
- Poruchy
- P ř íslušenství B 40
- Technické údaje
- Vsebinsko kazalo
- Upravljalni in funkcijski elementi
- Pred zagonom
- Obratovanje
- Zaustavljanje in odlaganje
- Transport Skladiš č enje Nega in vzdrževanje
- Zaš č ita pred zamrznitvijo
- Motnje
- Pribor B 40
- Tehni č ni podatki
- Spis tre ś ci
- Elementy urz ą dzenia
- Przed pierwszym uruchomieniem
- Dzia ł anie
- Zatrzymywanie i odstawianie
- Transport Przechowywanie Czyszczenie i konserwacja
- Ochrona przeciwmrozowa
- Usterki
- Akcesoria B 40
- Dane techniczne
- Cuprins
- Elemente de utilizare ş i func ţ ionale
- Înainte de punerea în func ţ iune
- Func ţ ionarea
- Oprirea ş i depozitarea
- Transport Depozitarea Îngrijirea ş i între ţ inerea
- Protec ţ ia împotriva înghe ţ ului
- Defec ţ iuni
- Accesorii B 40
- Date tehnice
- Obsah
- Ovládacie a funk č né prvky
- Pred uvedením do prevádzky
- Prevádzka
- Zastavenie a odstavenie
- Transport Uskladnenie Starostlivos ť a údržba
- Ochrana proti zamrznutiu
- Poruchy
- Príslušenstvo B 40
- Technické údaje
- Pregled sadržaja
- Komandni i funkcijski elementi
- Prije prve uporabe
- U radu
- Zaustavljanje i odlaganje
- Transport Skladištenje Njega i održavanje
- Zaštita od smrzavanja
- Smetnje
- Pribor B 40
- Tehni č ki podaci
- Pregled sadržaja
- Komandni i funkcioni elementi
- Pre upotrebe
- Rad
- Zaustavljanje i odlaganje
- Transport Skladištenje Nega i održavanje
- Zaštita od smrzavanja
- Smetnje
- Pribor B 40
- Tehni č ki podaci
- Съдържание
- Обслужващи и функционални елементи
- Преди пускане в експлоатация
- Експлоатация
- Спиране и изключване
- Сив интелигентен ключ
- Защита от замръзване
- Повреди
- Принадлежности B 40
- Технически данни
- Sisukord
- Teenindus- ja funktsioonielemendid
- Enne seadme kasutuselevõttu
- Käitamine
- Peatumine ja seiskamine
- Transport Hoiulepanek Korrashoid ja tehnohooldus
- Jäätumiskaitse
- Rikked
- Tarvikud B 40
- Tehnilised andmed
- Satura r ā d ī t ā js
- Vad ī bas un funkcijas elementi
- Pirms ekspluat ā cijas uzs ā kšanas
- Darb ī ba
- Aptur ē šana un izsl ē gšana
- Transport ē šana Glab ā šana Kopšana un tehnisk ā apkope
- Aizsardz ī ba pret aizsalšanu
- Trauc ē jumi
- B 40 piederumi
- Tehniskie dati
- Turinys
- Valdymo ir funkciniai elementai
- Prieš pradedant naudoti
- Naudojimas
- Sustojimas ir palikimas stov ė ti
- Transportavimas Laikymas Prieži ū ra ir aptarnavimas
- Apsauga nuo šal č io
- Gedimai
- B 40 priedai
- Techniniai duomenys
- Перелік
- Елементи управління і функціональні вузли
- Перед початком роботи
- Експлуатація
- Зупинка та паркування
- Сірий чіп - ключ
- Зберігання Догляд та технічне обслуговування
- Захист від морозів
- Неполадки
- Додаткове обладнання B 40
- Технічні характеристики
