Electrolux EFG50300X: инструкция
Раздел: Бытовая, кухонная техника, электроника и оборудование
Тип: Вытяжка
Инструкция к Вытяжке Electrolux EFG50300X

EN USER MANUAL
RU РУКОВОДСТВО ПО
HR KNJIŽICA S UPUTAMA
DE GEBRAUCHSANLEITUNG
ЭКСПЛУАТАЦИИ
SL NAVODILO ZA UPORABO
FR MANUEL D’UTILISATION
ET KASUTUSJUHEND
EL ΟΔΗΓΊΕΣ ΧΡΉΣΗΣ
NL GEBRUIKSAANWIJZING
LV LIETOŠANAS PAMĀCĪBA
TR KULLANIM KITAPÇIĞI
ES MANUAL DE USO
LT NAUDOTOJO VADOVAS
BG РЪКОВОДСТВО НА
PT LIVRO DE INSTRUÇÕES
UK ІНСТРУКЦІЯ З
ПОТРЕБИТЕЛЯ
PARA UTILIZAÇÃO
ЕКСПЛУАТАЦІЇ
KK ПАЙДАЛАНУШЫ НҰСҚАУЛЫҒЫ
IT LIBRETTO DI USO
HU HASZNÁLATI ÚTMUTATÓ
MK УПАТСТВО ЗА КОРИСНИК
SV ANVÄNDNINGSHANDBOK
CS NÁVOD K POUŽITÍ
SQ UDHËZUES PËR PËRDORIMIN
NO BRUKSVEILEDNING
SK NÁVOD NA POUŽÍVANIE
SR КОРИСНИЧКО УПУТСТВО
EFG 50300
FI KÄYTTÖOHJEET
RO MANUAL DE FOLOSIRE
ﻡﺩﺥﺕﺱﻡﻝﺍ ﻝﻱﻝﺩ AR
EFGR 70300
DA BRUGSVEJLEDNING
PL INSTRUKCJA UŻYTKOWANIA

EN USER MANUAL .................................................................................. 3
DE GEBRAUCHSANLEITUNG ................................................................ 7
FR MANUEL D’UTILISATION ................................................................. 12
NL GEBRUIKSAANWIJZING ................................................................. 16
ES MANUAL DE USO ............................................................................ 21
PT LIVRO DE INSTRUÇÕES PARA UTILIZAÇÃO. ............................... 25
IT LIBRETTO DI USO ........................................................................... 30
SV ANVÄNDNINGSHANDBOK.............................................................. 35
NO BRUKSVEILEDNING........................................................................ 39
FI KÄYTTÖOHJEET ............................................................................. 43
DA BRUGSVEJLEDNING ...................................................................... 47
RU РУКОВОДСТВО ПО ЭКСПЛУАТАЦИИ .......................................... 52
ET KASUTUSJUHEND .......................................................................... 57
LV LIETOŠANAS PAMĀCĪBA................................................................ 62
LT NAUDOTOJO VADOVAS ................................................................. 67
UK ІНСТРУКЦІЯ З ЕКСПЛУАТАЦІЇ ...................................................... 72
HU HASZNÁLATI ÚTMUTATÓ ............................................................... 77
CS NÁVOD K POUŽITÍ .......................................................................... 82
SK NÁVOD NA POUŽÍVANIE ................................................................ 87
RO MANUAL DE FOLOSIRE.................................................................. 92
PL INSTRUKCJA UŻYTKOWANIA ........................................................ 97
HR KNJIŽICA S UPUTAMA .................................................................. 102
SL NAVODILO ZA UPORABO............................................................. 107
EL ΟΔΗΓΊΕΣ ΧΡΉΣΗΣ .........................................................................112
TR KULLANIM KITAPÇIĞI ....................................................................118
BG РЪКОВОДСТВО НА ПОТРЕБИТЕЛЯ .......................................... 123
KK ПАЙДАЛАНУШЫ НҰСҚАУЛЫҒЫ.................................................. 128
MK УПАТСТВО ЗА КОРИСНИК .......................................................... 133
SQ UDHËZUES PËR PËRDORIMIN .................................................... 138
SR КОРИСНИЧКО УПУТСТВО .......................................................... 143
152 ..................................................................................... AR
EN USER MANUAL
ENGLISH
3
WE’RE THINKING OF YOU
Thank you for purchasing an Electrolux appliance. You’ve chosen a product that brings with
it decades of professional experience and innovation. Ingenious and stylish, it has been
designed with you in mind. So whenever you use it, you can be safe in the knowledge that
you’ll get great results every time. Welcome to Electrolux.
Visit our website to:
Get usage advice, brochures, trouble shooter, service information:
www.electrolux.com
Register your product for better service:
www.electrolux.com/productregistration
Buy Accessories, Consumables and Original spare parts for your appliance:
www.electrolux.com/shop
ENVIRONMENT CONCERNS
Recycle the materials with the symbol . Put the packaging in applicable containers to
recycle it. Help protect the environment and human health and to recycle waste of electrical
and electronic appliances. Do not dispose appliances marked with the symbol with the
household waste. Return the product to your local recycling facility or contact your municipal
offi ce department for household waste or the shop where you purchased this product.
CUSTOMER CARE AND SERVICE
We recommend the use of original spare parts.
When contacting Service, ensure that you have the following data available.
The information can be found on the rating plate. Model, PNC, Serial Number.
Warning / Caution-Safety information.
General information and tips
Environmental information.
Subject to change without notice.
4
www.electrolux.com
Caution! Accessible parts of the hood
1.
SAFETY INSTRUCTIONS
may became hot when used with
Caution! Closely follow the instructions
cooking appliance.
set out in this manual. All responsibility,
With regards to the technical and safety
for any eventual inconveniences,
measures to be adopted for fume
damages or fires caused by not
discharging it is important to closely follow
complying with the instructions in this
the regulations provided by the local
manual, is declined. The extractor hood
authorities. The hood must be regularly
has been designed exclusively for
cleaned on both the inside and outside (AT
domestic use.
LEAST ONCE A MONTH).
Warning! Do not connect the appliance
This must be completed in accordance
to the mains until the installation is fully
with the maintenance instructions provided
complete.
in this manual). Failure to follow the
Before any cleaning or maintenance
instructions provided in this user guide
operation, disconnect hood from
regarding the cleaning of the hood and
the mains by removing the plug or
fi lters will lead to the risk of fi res.
disconnecting the mains electrical
Do not use or leave the hood without the
supply.
lamp correctly mounted due to the possible
Always wear work gloves for all installation
risk of electric shocks.
and maintenance operations.
We will not accept any responsibility for
The appliance is not intended for use by
any faults, damage or fi res caused to the
children or persons with impaired physical,
appliance as a result of the non-observance
sensorial or mental faculties, or if lacking
of the instructions included in this manual.
in experience or knowledge, unless they
are under supervision or have been trained
2. USE
in the use of the appliance by a person
responsible for their safety.
The hood serves to aspirate the fumes and
This appliance is designed to be operated
vapors resulting from cooking.
by adults, children should be monitored
The attached installation manual indicates
to ensure that they do not play with the
the version to be used depending on the
appliance. This appliance is designed to be
model you have, the suction version with
operated by adults. Children should not be
allowed to tamper with the controls or play
external evacuation or fi ltering with
with the appliance.
Never use the hood without effectively
internal recirculation .
mounted grating!
The hood must NEVER be used as
a support surface unless specifi cally
3. INSTALLATION
indicated.
The mains power supply must correspond
The premises where the appliance is
to the rating indicated on the plate situated
nstalled must be suffi ciently ventilated,
inside the hood. If provided with a plug
when the kitchen hood is used together with
connect the hood to a socket in compliance
other gas combustion devices or other fuels.
with current regulations and positioned in
The ducting system for this appliance must
an accessible area, after installation. If it not
not be connected to any existing ventilation
fi tted with a plug (direct mains connection)
system which is being used for any other
or if the plug is not located in an accessible
purpose such as discharging exhaust fumes
area, after installation, apply a double
from appliances burning gas or other fuels.
pole switch in accordance with standards
The fl aming of foods beneath the hood itself
which assures the complete disconnection
is severely prohibited.
of the mains under conditions relating to
The use of exposed fl ames is detrimental
over-current category III, in accordance with
to the fi lters and may cause a fi re risk,
installation instructions.
and must therefore be avoided in all
Warning! Before re-connecting the
circumstances.
hood circuit to the mains supply and
Any frying must be done with care in order
to make sure that the oil does not overheat
checking the efficient function, always
and ignite.
check that the mains cable is correctly
assembled.
ENGLISH
5
Warning! Power cable replacement must
4.2 NON-washable activated charcoal
be undertaken by the authorised service
fi lter - The saturation of the charcoal fi lter
assistance centre or similar qualifi ed
occurs after more or less prolonged use,
depending on the type of cooking and the
person.The minimum distance between
regularity of cleaning of the grease fi lter.
the supporting surface for the cooking
In any case it is necessary to replace the
equipment on the hob and the lowest part
cartridge at least every four mounths.
of the range hood must be not less than
The charcoal fi lter may NOT be washed or
50cm from electric cookers and 65cm from
regenerated.
gas or mixed cookers. If the instructions for
installation for the gas hob specify a greater
distance, this must be adhered to.
4. MAINTENANCE
ATTENTION! Before performing any
maintenance operation, isolate the hood
from the electrical supply by switching off at
the connector and removing the connector
fuse. Or if the appliance has been
connected through a plug and socket, then
the plug must be removed from the socket.
The cooker hood should be cleaned
regularly (at least with the same frequency
with which you carry out maintenance of the
fat fi lters) internally and externally. Clean
using the cloth dampened with neutral liquid
detergent. Do not use abrasive products.
DO NOT USE ALCOHOL!
Warning! Failure to carry out the basic
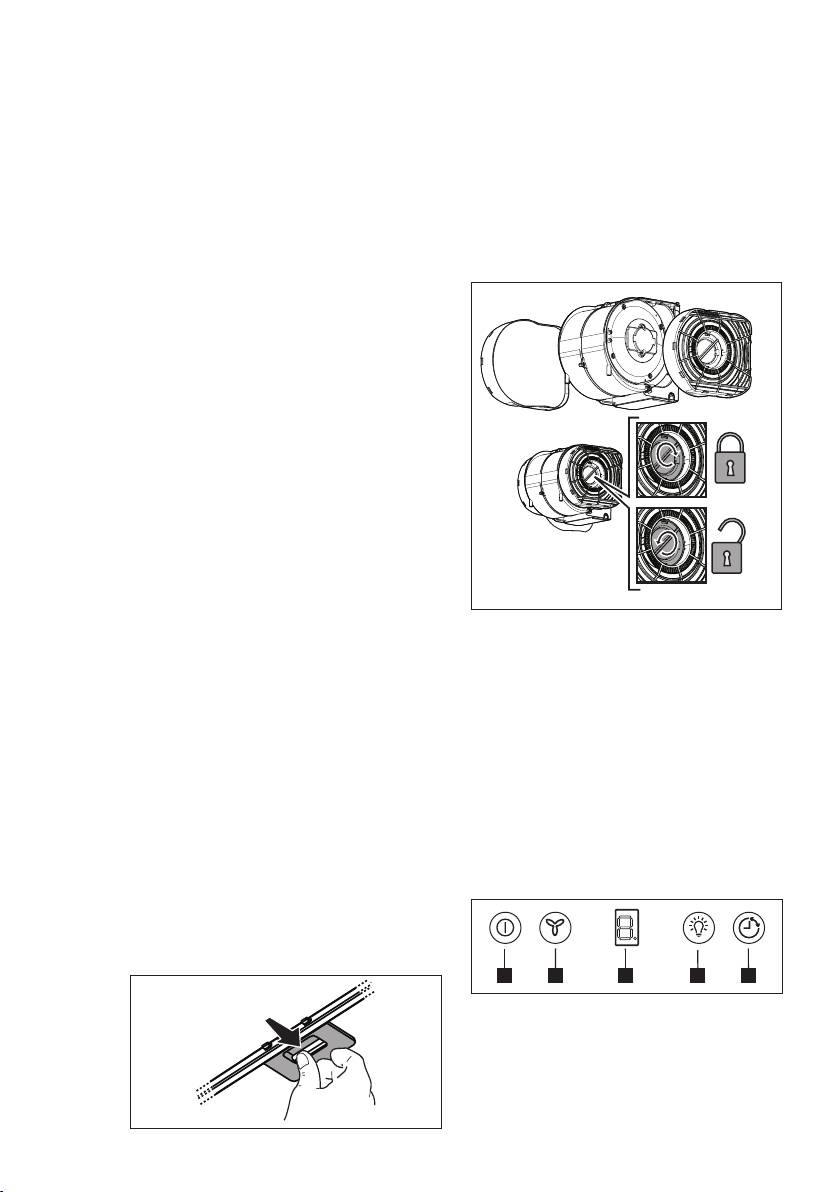
5. CONTROLS
cleaning recommendations of the cooker
The hood is fi tted with a control panel with
hood and replacement of the fi lters may
aspiration speed selection control and a
cause fi re risks. Therefore, we recommend
light switch to control cooking area lights.
observing these instructions.
Use the high suction speed in cases
The manufacturer declines all responsibility
of concentrated kitchen vapours. It is
for any damage to the motor or any
fi re damage linked to inappropriate
recommended that the cooker hood suction
maintenance or failure to observe the above
is switched on for 5 minutes prior to cooking
safety recommendations.
and to leave in operation during cooking
and for another 15 minutes approximately
4.1 Grease fi lter - The grease fi lter must
after terminating cooking.
be cleaned once a month using non
The control switches are located on the
aggressive detergents, either by hand or
unit’s front panel:
in the dishwasher, which must be set to a
low temperature and a short cycle. When
washed in a dishwasher, the grease fi lter
may discolour slightly, but this does not
affect its fi ltering capacity.
11 2 435
1. Motor ON/OFF button
By pressing the button, the hood starts
at speed 1.
Pressing the button (OFF) while the
hood is in function turns the latter off.
2. Speed increase button
By pressing the button, the hood starts

6
www.electrolux.com
at speed 1.
Pressing the button (while the hood is
Charcoal fi lter indicator
on) modifi es the motor speed:
After 320 hours of operation, the number
Speed 1: the number “1” appears on
“2” starts fl ashing on the display.
the display
Press and hold button 1 or 3 to reset the
Speed 2: the number “2” appears on
indicator.
the display
Carry out maintenance on the charcoal fi lter
Speed 3: the number “3” appears on
according to the indications of this manual.
the display
When both fi lter signals appear
High-speed: the number “4” appears
simultaneously, numbers “1” and “2” will
(fl ashing) on the display
alternately fl ash on the display.
The high-speed function is regulated by
Reset the indicator by performing the
a timer. The standard time setting is 5’,
above-mentioned procedure twice.
at the end of which the hood adjusts to
speed 2.
The fi rst operation resets the grease fi lter
Press button 2 to deactivate this
indicator, while the second operation resets
function before the set time expires;
the charcoal fi lter indicator.
the hood will adjust to speed 1. Press
The charcoal fi lter indicator is not active in
button 1 to turn the hood off.
the standard mode.
3. Lights ON/OFF button
If the hood is used in the recirculation
4. Speed timer button
mode, the charcoal fi lter indicator must be
5. Display
activated.
Speed timer button
Perform the following steps to activate
Press button “4” to activate the speed
the charcoal fi lter indicator:
timer; the hood turns off once the set time
Turn the hood off and keep buttons 2 and 3
expires.
pressed for 3”.
The timer functions in the following way:
The numbers “1” and “2” will fl ash for 2”
• Speed 1 - 20 minutes (the number “1”
once the function has been activated.
and a small fl ashing LED light appear
Charcoal fi lter indicator deactivation:
on the display)
Turn the hood off and keep buttons 1 and 2
• Speed 2 - 15 minutes (the number “2”
pressed for 3”.
and a small fl ashing LED light appear
The number “1” will fl ash for 2” to indicate
on the display)
that the function has been deactivated.
• Speed 3 - 10 minutes (the number “3”
and a small fl ashing LED light appear
on the display)
6. LIGHTING
• High-speed - 5 minutes (the number
Disconnect the hood from the electricity.
“4” and a small fl ashing LED light
Warning! Prior to touching the light bulbs
appear on the display)
ensure they are cooled down.
Press button 1 or button 4 to turn the hood
Replace with a new 12 Volt, 20 Watt
off while the speed timer is in function; by
(Max) halogen light made for a GU4 base
pressing button 2, the hood returns to the
Ø35mm.
set speed.
Grease fi lter indicator
After 80 hours of operation, the number “1”
starts fl ashing on the display.
Press and hold button 1 or 3 to reset the
indicator.
Carry out maintenance on the grease fi lter
according to the indications of this manual.
Оглавление
- WE’RE THINKING OF YOU
- WIR DENKEN AN SIE
- NOUS PENSONS À VOUS
- WE DENKEN AAN U
- PENSAMOS EN USTED
- ESTAMOS A PENSAR EM SI
- PENSATI PER VOI
- WE’RE THINKING OF YOU
- VI TENKER PÅ DEG
- WE’RE THINKING OF YOU
- VI TÆNKER PÅ DIG
- МЫ ДУМАЕМ О ВАС
- SULLE MÕELDES
- MĒS DOMĀJAM PAR JUMS
- PUIKIEMS REZULTATAMS PASIEKTI
- МИ ДУМАЄМО ПРО ВАС
- TÖRŐDÜNK ÖNNEL
- MYSLÍME NA VÁS
- MYSLÍME NA VÁS
- NE GÂNDIM LA DUMNEAVOASTRĂ
- Z MYŚLĄ O TOBIE
- MISLIMO NA VAS
- MISLIMO NA VAS
- ΜΕ ΓΝΩΜΟΝΑ ΤΙΣ ΑΝΑΓΚΕΣ ΣΑΣ
- SİZİ DÜŞÜNÜR
- НИЕ МИСЛИМ ЗА ВАС
- СІЗ ОЙЫМЫЗДА БОЛДЫҢЫЗ
- НИЕ МИСЛИМЕ НА ВАС
- ME JU NË MENDJE
- МИ МИСЛИМО НА ВАС
- PENSATI PER VOI
