Kenwood IC800: инструкция
Раздел: Бытовая, кухонная техника, электроника и оборудование
Тип: Утюг
Инструкция к Утюгу Kenwood IC800

Kenwood Limited, New Lane, Havant, Hampshire PO9 2NH, UK
www.kenwoodworld.com
56395/4
s
y
s
t
e
m
o
n
i
n
g
l
s
t
e
a
m
i
r
s
i
o
n
a
r
o
f
e
s
p
IC700 series
IC800 series

English 2 - 6
Nederlands 7 - 11
Français 12 - 17
Deutsch 18 - 23
Italiano 24 - 28
Português 29 - 31
Español 32 - 39
Dansk 40 - 44
Svenska 45 - 49
Norsk 50 - 54
Suomi 55 - 59
Türkçe 60 - 64
Ïesky 65 - 69
Magyar 70 - 74
Polski 75 - 80
Русский 81 - 86
Ekkgmij 87 - 92
Slovenský 93 - 97
Slovensko 98 - 102
UNFOLD
y
s
t
e
m
n
i
n
g
s
l
s
t
e
a
m
i
r
o
s
i
on
a
r
o
f
e
s
p

●
It is extremely dangerous to direct
safety
the steam towards people or
When cleaning, never unscrew the
animals.
boiler cap whilst the unit is
●
Only use water with this appliance.
pressurised. Steam will shoot out
●
During use, the steam station must
and burn you. Always switch off,
be stable and used in a horizontal
unplug and leave overnight before
position.
commencing to clean the boiler.
●
Never attempt to attach any
●
Don’t get burnt by the iron’s steam,
unauthorised accessories to the
hot water, soleplate or iron rest.
steam station. Outlet 19 should only
● Care should be taken when using
be used with the Kenwood Multicare
the appliance due to the emission of
accessory kit.
steam.
●
Never let the iron touch or rest
●
Keep children away from the steam
against the water tank.
station. And make sure they can’t
●
This appliance is not intended for
grab the cords and pull the steam
use by persons (including children)
station down.
with reduced physical, sensory or
●
Trailing cords are a hazard, keep
mental capabilities, or lack of
them out of the way to prevent
experience and knowledge, unless
accidents.
they have been given supervision or
●
Never iron clothes being worn.
instruction concerning use of the
●
Never put the steam station, cord or
appliance by a person responsible
plug in liquid – you could get an
for their safety.
electric shock.
●
Children should be supervised to
●
Always remove the water tank from
ensure that they do not play with the
the steam station when filling from a
appliance.
tap.
●
Only use the appliance for its
●
Don’t let the power and steam
intended domestic use. Kenwood
supply cords touch hot parts.
will not accept any liability if the
●
During ironing pauses and after use
appliance is subject to improper use,
always place the iron flat on the iron
or failure to comply with these
rest of the steam station.
instructions.
●
Never leave the steam station on
before plugging in
unattended.
Make sure your electricity supply is
●
Never use a damaged steam station.
the same as the one shown on the
Get it checked or repaired: see
underside of the steam station.
‘service and customer care’.
●
This iron complies with European
●
Do not use the steam station if it has
Economic Community Directive
been dropped, or if there are any
89/336/EEC.
visible signs of danger or it is
before using for the first time
leaking.
1 Remove all packaging and any
●
Don’t touch the appliance with wet
stickers or labels.
or damp hands.
2Wind excess cord around the base
●
Always switch off and unplug the
of the steam station.
steam station before fitting or
removing the detachable iron.
●
Always unplug the steam station
when not in use and allow to cool
before moving or cleaning.
2

3Test the iron on an old cloth to make
using your steam station
sure the soleplate and water tank are
clean. We recommend that you
1 Fit the detachable iron into it’s
allow steam to disperse by pressing
socket: Lower the outlet cover, then
the steam button in order to release
with the arrow on the connector
any residues that may have built up
uppermost, push into the socket
during the manufacturing process.
until fully home. To remove, squeeze
●
Repeat step 3 after prolonged
the ribs on either side of the
periods of storage.
connector and pull out . Never
remove the iron by pulling on the
cord.
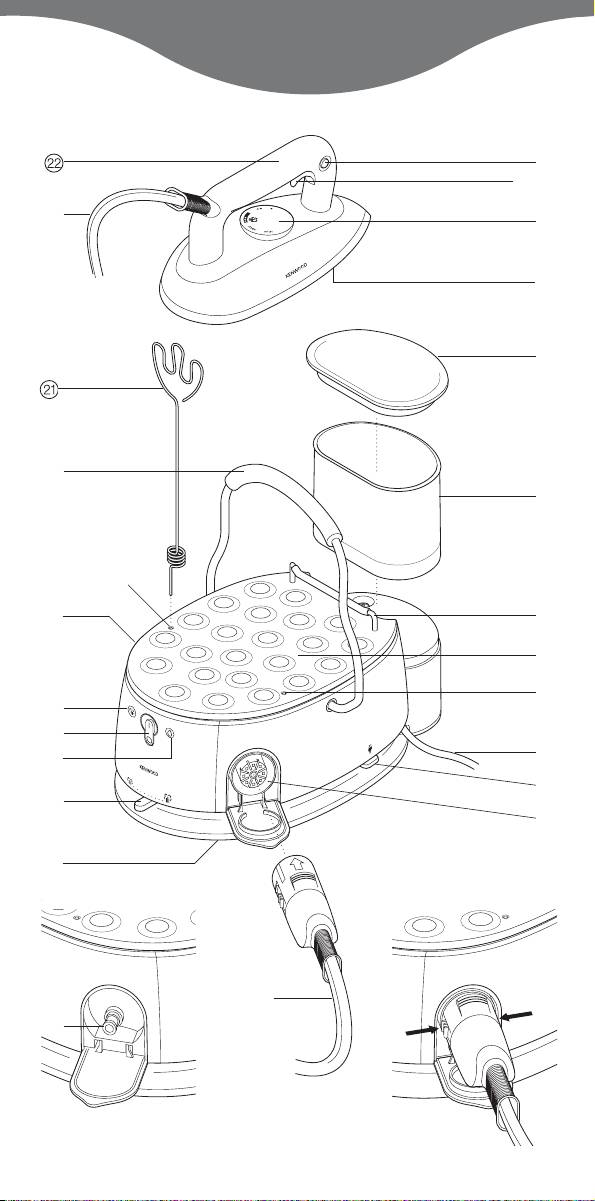
know your Kenwood
2 Place the steam station on the
steam station
support of the ironing board or any
lock for continuous steam
other stable surface nearby with the
steam button
iron sitting on the iron rest. Make sure
temperature control with
the steam station is unplugged and
indicator light
that the power and steam supply
soleplate
cords are unrolled and not kinked.
water tank cover
3 Fit the cord cactus into one of the
water tank
cord cactus locations. Place the
water tank guard rail
steam supply cord into one of the
iron rest
grooves on the other end of the cord
cord cactus locations
cactus. This will keep the cord in an
power supply cord
upright position.
cord storage
filling with water
outlet for detachable iron
Either
steam supply cord
1 Lift off the water tank cover and fill
boiler cap
with water. Replace the cover.
variable steam control
Or
low water indicator light
2 Remove the tank by lifting off. Lift off
on/off button
the cover, then fill the tank under the
ready to steam indicator light
tap. Re-fit the cover. Replace the
outlet for Multicare accessory kit*
tank into its original position by
carry handle
gently pushing into place.
cord cactus
●
Filtered water is best as it reduces
detachable iron
limescale, prolonging the life of your
PTFE soleplate not illustrated
steam station (Kenwood water filters
(model IC800 series only)
are widely available). Alternatively
use 50% tap water and 50% distilled
* The Multicare accessory kit model
water.
ICK01 is not included with model
●
Do not add anything else to the
IC700 series, but can be purchased
water such as water from clothes
separately by contacting the shop
driers, scented water, water from
where you purchased the steam
refrigerators, air conditioners,
station.
batteries, bottled mineral water or
rain water. These contain organic
waste or mineral elements that
become concentrated when heated
and cause spitting, brown staining or
premature wear to the steam station.
3

●
If you need to refill your steam
steam ironing
station during use, we recommend
1 Make sure there is water in the tank.
the empty water tank is removed for
Plug into the power supply and
filling. If filled whilst fitted, always
switch on.
unplug the steam station first.
2Turn the temperature control to the
desired setting. For best results
choosing the right
when steaming we recommend that
temperature
the temperature control should be
Follow the clothes label advice.
set to .
Match the dots on the label to the
It is possible to vary the amount of
dots on the temperature control. If
steam produced. If the iron is set to
there’s no label, here’s a guide on
● move the variable steam control to
which temperature to choose:
the left for minimum steam. If
●● is
selected move the variable steam
hints
●
control to the middle and if
●●● is
Start on clothes needing the lowest
selected move the variable control to
temperature, then work upwards.
the right for maximum steam.
(This lowers the risk of burning
3Wait until the green ready to steam
something because an iron switched
light glows indicating that the correct
from ‘hot’ to ‘cool’ takes time to
pressure has been reached. This
cool down.)
●
takes about 3 minutes. Also wait
For mixed fibres, eg cotton ●●● and
until the temperature control
polyester
●, use the lowest suitable
indicator light has gone off.
temperature
●.
●
●
During use you may hear a slight
If in doubt, start with a low
humming coming from the steam
temperature on a part that won’t be
station. This means that the pump is
seen (eg a shirt tail).
operating and passing water from
the tank to the boiler where the
setting the temperature
steam is generated for ironing. This
Before switching on the steam
will be accompanied by the red low
station, make sure that the lock for
water indicator light glowing.
continuous steam is in the off
4 Before starting to iron or if you have
position by firmly pressing the lock
not used the steam function for a
on the left hand side of the iron. This
few minutes or if you have recently
will ensure that the steam button is
cleaned the steam station, hold the
released.
iron away from your ironing and
1 Plug the steam station into the
press the steam button several
power supply.
times. This will enable any cold
2 Switch on, the blue light will glow.
water condensed in the pipes etc.,
3Turn the temperature control to the
to be removed from the steam
temperature you want, the light
circuit.
under the control will glow. When the
5To produce steam whilst ironing
iron reaches the set temperature, the
clothes press the steam button. For
light will go out. (During ironing, this
continuous steam, press the steam
light will go on and off as your iron
button and then press the lock for
maintains the right temperature.)
continuous steam on the right hand
side of the iron. To stop continuous
dry ironing
steam, press the button on the left
Follow the procedure above for
hand side.
setting the temperature.
Care should be taken not to press
the steam button.
4

When using the steam function, the
3 When the green ready to steam light
green ready to steam indicator light
glows pull the material slightly with
will go off.
one hand: hold the iron upright with
●
It is possible to vary the amount of
the other.
steam produced. Move the variable
4Tilt the iron forwards, then move it
steam control to the right for
down the material, pressing the
maximum steam and to the left for
steam button.
minimum steam.
●
Never steam clothes being worn.
6 The red low water indicator light will
Keep your hands away from the
glow continuously when the water
steam and soleplate.
tank becomes empty. This will be
●
Always ensure that the iron is facing
accompanied by a continuous
away from the user and/or others
humming noise of the pump. Should
when vertical steaming.
this occur we recommend you
●
For material other than linen or
switch off the steam station. Remove
cotton, keep the iron off the material
the water tank and refill.
to avoid burning it.
Note: For prolonged use always
ensure there is water in the water
care and cleaning
tank.
●
Always switch off, unplug and allow
hints
to cool overnight before cleaning or
●
Wool and velvet. Guide the iron 2 cm
storing.
above the fabric, depressing the steam
●
Empty the water tank.
button. The power of steam smoothes
●
When carrying the unit, always use
away creases and revitalises the fabric.
the carry handle and make sure the
Do not pull the fabric.
iron is secure before moving.
●
Vertical ironing – suits, dresses and
the outside
curtains are smoothed, renewed and
soleplate
put into shape again while they are
●
Don’t scratch the outside by ironing
hanging (see below).
anything hard eg zips.
PTFE soleplate
●
To remove minor remains of material
(model IC800 only)
stuck to the soleplate, rub
The soleplate can be fitted when
lengthways with a soft, damp, non-
ironing delicate items such as silk.
metallic cleaning pad.
Follow the instructions given on the
casing
packaging and keep them handy for
●
Wipe with a damp cloth.
future use. Always take care when
fitting, particularly if the iron is hot.
If the soleplate (Kenwood model
ICSP01) is not included in pack it
can be purchased separately from
the shop where you purchased your
steam station.
steaming the creases out of
curtains, hanging clothes,
wall hangings
1 Make sure there is water in the tank.
2Turn the temperature control to
.
5
the inside
service and customer
important
care
To extend the life of your steam
station and to avoid a build up of
●
If the cord is damaged it must, for
scale, it is essential that you rinse
safety reasons, be replaced by
out the boiler after every 10 refills or
KENWOOD or an authorised
once a month. If you live in a hard
KENWOOD repairer.
water area increase the frequency of
If you need help with:
cleaning. Do not use chemical
●
using your appliance
descaling agents or vinegar as they
●
servicing or repairs
may damage your appliance.
Contact the shop where you bought
●
Clean the boiler making sure it has
your appliance.
been allowed to cool overnight first.
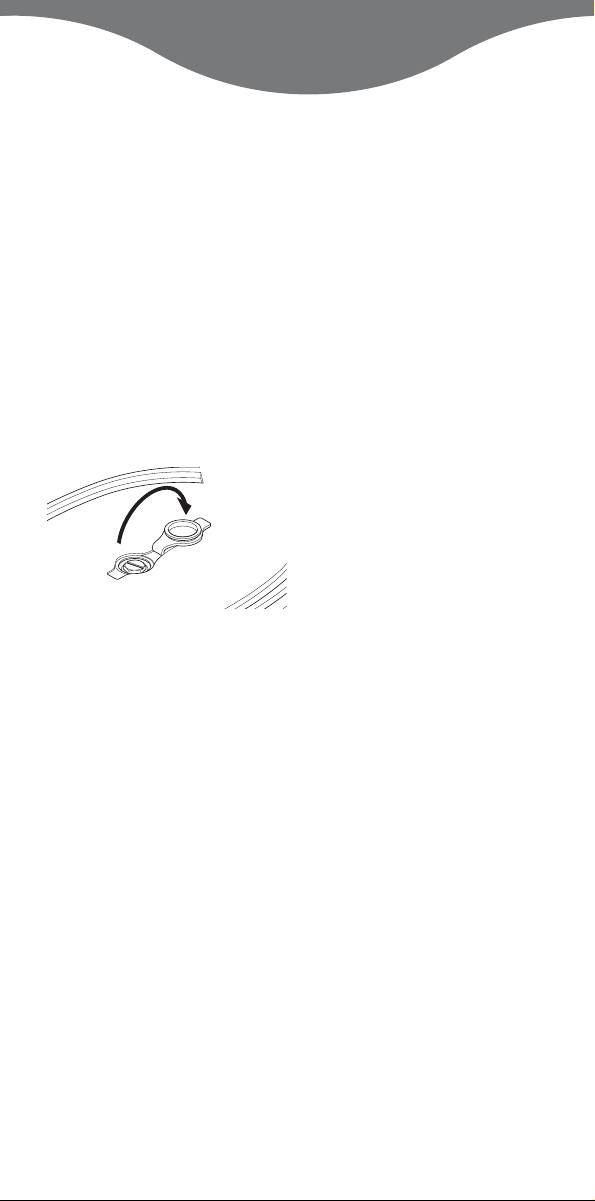
Turn the steam station upside down
and pull back the flap covering the
boiler cap .
Unscrew the boiler cap using a coin
and empty out any water. Add one
cup of tap or filtered water and
shake the appliance then empty out
all the water. Repeat this operation
until the water from the boiler comes
out clear and clean.
When cleaning is finished pour
500ml fresh tap or filtered water into
the boiler and screw the boiler cap
back on again without using
excessive force. Replace the cover.
The unit is now ready to use.
important: Aways add 500ml
water direct to the boiler after
cleaning to prevent damaging the
steam station.
6
