Kenwood FP 481: инструкция
Раздел: Бытовая, кухонная техника, электроника и оборудование
Тип: Кухонный Комбайн
Характеристики, спецификации
Инструкция к Кухонному Комбайну Kenwood FP 481

Kenwood Limited, New Lane, Havant, Hampshire PO9 2NH, UK
www.kenwood.co.uk
55127/2
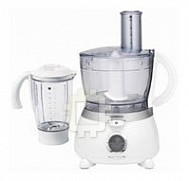
FP479/FP481
P
2
1
0

English 2 - 4
Nederlands 5 - 7
Français 8 - 10
Deutsch 11 - 13
Italiano 14 - 16
Dansk 17 - 19
Svenska 20 - 22
Norsk 23 - 25
Suomi 26 - 28
Pycckий 29 - 31
EÏÏËÓÈο 32 - 34
Ïesky 35 - 37
Magyar 38 - 40
Polski 41 - 44
UNFOLD
1
P
2
1
0
P
1
2
0
P
1
2
0
P
0
1
2
(FP479)

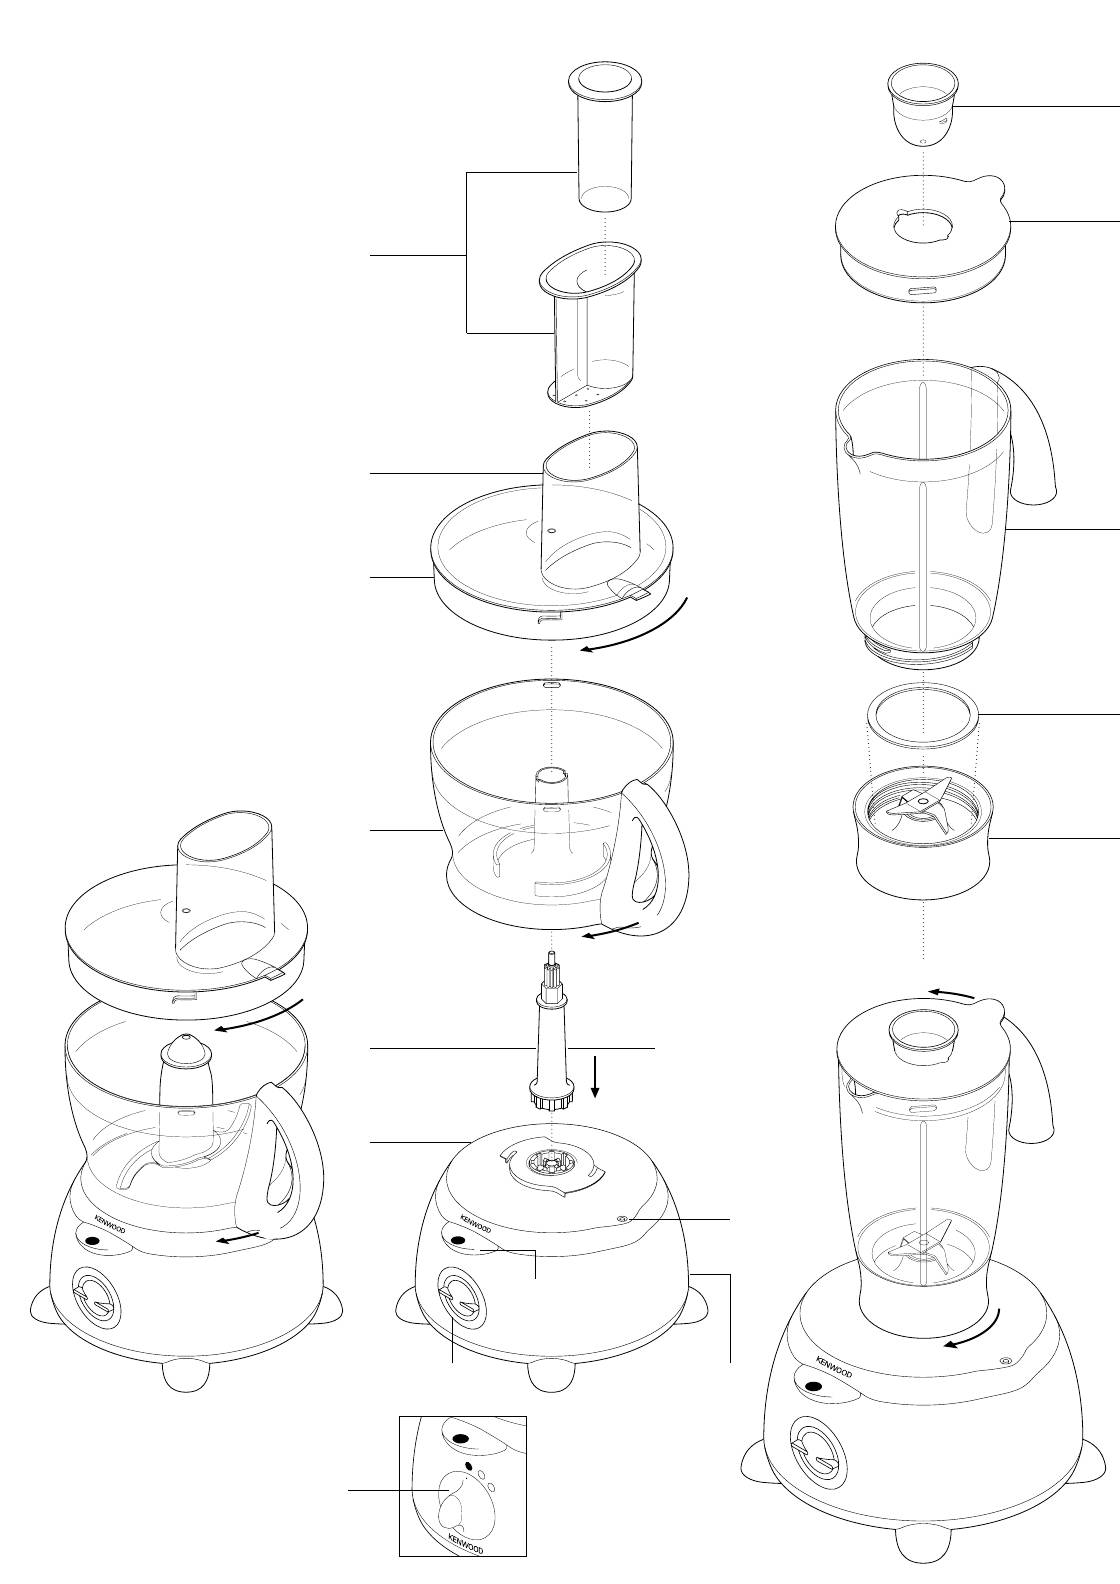
safety
liquidiser
●
The blades and discs are very sharp, handle with care.
a
filler cap
Always hold the knife blade by the finger grip
lid
at the top, away from the cutting edge, both
a
jug
when handling and cleaning.
sealing ring
●
Always remove the knife blade before pouring contents from the bowl.
blade unit
●
Keep hands and utensils out of the processor bowl and liquidiser jug whilst
connected to the power supply.
additional attachments
●
Switch off and unplug:
knife blade
●●
before fitting or removing parts
dough tool
●●
after use
twin beater geared whisk
●●
before cleaning
maxi-blend canopy
●
Never use your fingers to push food down the feed tube. Always use the
thick slicing/coarse shredding disc
pusher/s supplied.
thin slicing/fine shredding disc
●
Before removing the lid from the bowl or liquidiser from the power unit:-
geared citrus press
●●
switch off;
spatula
●●
wait until the attachment/blades have completely stopped;
●●
Be careful not to unscrew the liquidiser jug from the blade unit.
Optional Attachments (Not supplied with your food processor)
●
Allow hot liquids to cool before blending in the liquidiser - if you haven’t fitted
The attachments listed below are included in attachment pack MA280. To
the lid securely and it comes off, you could get splashed.
purchase pack MA280 contact the dealer from whom you purchased your food
●
Do not use the lid to operate the processor, always use the on/off speed control.
processor.
●
This machine will be damaged and may cause injury if the
interlock mechanism is subjected to excessive force.
fine (Julienne style) chipper disc
●
This machine is not intended for use by young children or infirm persons without
rasping disc
supervision.
mill
●
Never use an unauthorised attachment.
centrifugal juicer
●
Don’t let children play with this machine.
mini bowl
●
Never leave the machine on unattended.
disc storage box
●
Never use a damaged machine. Get it checked or repaired: see ‘service’.
●
Never let the power unit, cord or plug get wet.
●
to use your food processor
Don’t let excess cord hang over the edge of a table or worktop or touch hot
surfaces.
1 Fit the detachable shaft onto the power unit .
●
Never misuse your food processor and only use it for its intended domestic use.
2 Then fit the bowl. Place the handle towards the back and turn clockwise until it
locks .
before plugging in
●
3 Fit an attachment over the drive shaft.
Make sure your electricity supply is the same as the one shown on the
●
Always fit the bowl and attachment onto the machine before adding ingredients.
underside of your machine.
●
4 Fit the lid - ensuring the top of the drive shaft locates into the centre of the lid.
This appliance complies with European Economic Community Directive
●
Do not use the lid to operate the processor, always use the on/off
89/336/EEC.
speed control.
before using for the first time
5 Switch on and select a speed.
1 Remove all packaging including the plastic blade covers from the knife blade.
●
The processor won’t work if the bowl and lid are fitted
Take care the blades are very sharp. These covers should be discarded
incorrectly.
as they are to protect the blade during manufacture and transit only.
●
Use the pulse control for short bursts. The pulse will operate for as long as the
2 Wash the parts see ‘cleaning’
lever is held down.
3 Push excess cord into the back of the machine.
6 Reverse the above procedure to remove the lid, attachments and bowl.
●
Always switch off before removing the lid.
key
important
●
Your processor is not suitable for crushing or grinding coffee beans, or
processor
converting granulated sugar to caster sugar.
●
power unit
When adding almond essence or flavouring to mixtures avoid contact with the
detachable drive shaft
plastic as this may result in permanent marking.
bowl
lid
to use your liquidiser
feed tube
1 Fit the sealing ring into the blade unit .
pushers
2 Screw the jug onto the blade unit.
safety interlock
3 Put your ingredients into the jug.
cord storage
4 Put the filler cap in the lid, then turn.
pulse control
5 Lock the lid onto the jug so that the thumb tab is over the handle (To unlock the
speed control
lid, push the thumb tab .)
6 Place the liquidiser onto the power unit and turn to lock .
7 Select a speed or use the pulse control.
hints
●
When making mayonnaise, put all the ingredients, except the oil into the liquidiser.
Then with the machine running, pour the oil into the filler cap and let it run through.
●
Thick mixtures, eg pates and dips, may need scraping down. If it’s difficult to
process, add more liquid.
●
When crushing ice, add 15mls (1tbsp) water to 6 ice cubes. Use the pulse control.
2

important
●
Re-knead by hand only. Re-kneading in the bowl is not recommended as it may
●
Allow hot liquids to cool before blending in the liquidiser – if you haven’t fitted
cause the processor to become unstable.
the lid securely and it comes off, you could get splashed.
●
To ensure the long life of your liquidiser, never run it for longer than 60 seconds.
twin beater geared whisk
Switch off as soon as you’ve got the right consistency.
Use for light mixtures only eg egg whites, cream,
●
Don’t process spices - they may damage the plastic.
evaporated milk and for whisking eggs and sugar for
●
The machine won’t work if the liquidiser is fitted incorrectly.
fatless sponges. Heavier mixtures such as fat and flour
●
Don’t put dry ingredients into the liquidiser before switching on. If necessary, cut
will damage it.
them into pieces; remove the filler cap; then with the machine running, drop
them through one by one.
using the whisk
●
Don’t use the liquidiser as a storage container. Keep it empty before and after
1 Fit the drive shaft and bowl onto the power unit.
use.
●
Never blend more than 1
1
2 Push each beater securely into the drive head .
⁄2 litres (2pts 12floz) - less for frothy liquids like
3 Fit the whisk by carefully turning until it drops over the
milkshakes.
drive shaft.
4 Add the ingredients.
choosing a speed for all functions
5 Fit the lid - ensuring the end of the shaft locates into the centre of the lid.
6 Switch on.
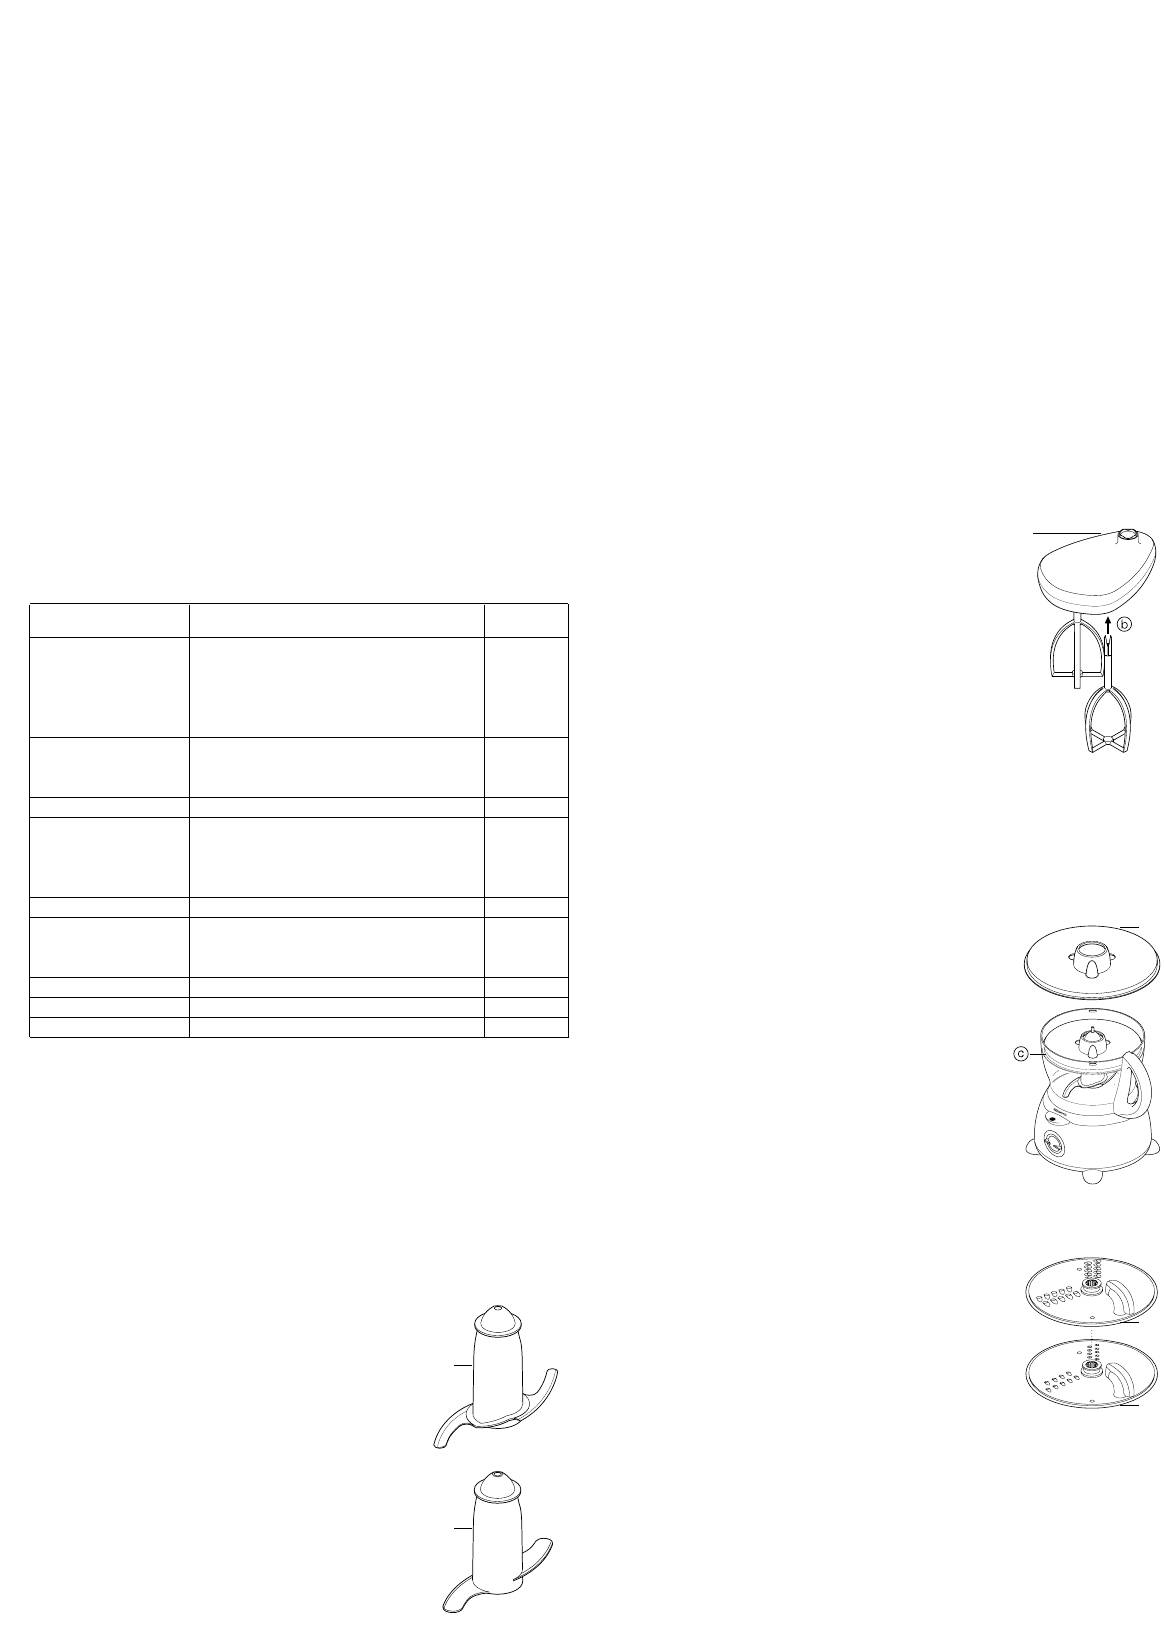
tool/attachment function speed
knife blade Cake making 2
hints
Rubbing fat into flour 1 – 2
●
Best results are obtained when the eggs are at room temperature.
Adding water to combine
●
Ensure the bowl and whisks are clean and free from grease before whisking.
pastry ingredients 1 – 2
Chopping/pureeing/pates 2
maxi-blend canopy
whisk egg whites 2
When blending liquids, use the maxi-blend canopy with
egg & sugar for fatless sponges 2
the knife blade. It allows you to increase the liquid
cream 1 – 2
processing capacity from 800mls to 1.5 litres, prevents
dough tool yeasted mixes 1 – 2
leaking and improves the chopping performance of the
discs - slicing/ Firm food items such as carrots,
blade.
shredding/ hard cheeses 1 – 2
1 Fit the drive shaft and bowl onto the power unit.
chipping/ Softer items such as cucumbers,
2 Fit the knife blade.
rasping tomatoes 1
3 Add ingredients to be processed.
citrus press Citrus fruits 1
4 Fit the canopy over the top of the blade ensuring it sits
liquidiser Lighter blending eg. batters, milkshakes 1
on the ledge inside the bowl . Do not push down
Soups, sauces, pate and mayonnaise 2
on the canopy, hold by the centre grip.
mill All processing 2
*
5 Fit the lid and switch on.
centrifugal juicer Fruit and vegetables 2
*
mini bowl All processing 2
*
slicing/shredding discs
optional attachments
*
maximum capacities
reversible slicing/shredding discs - thick ,
●
Shortcrust pastry Flour wt 340g
thin
●
Yeast dough Flour wt 500g
Use the shredding side for cheese, carrots, potatoes
●
One Stage Cake Total wt 1.5Kg
and foods of a similar texture.
●
Chopping meat Total wt 600g
Use the slicing side for cheese, carrots, potatoes,
●
liquid with canopy 1.5litres
cabbage, cucumber, courgette, beetroot and onions.
●
Twin geared whisk 6 egg whites
safety
using the attachments
●
Never remove the lid until the cutting disc has
see chart above for speed of each attachment.
completely stopped.
●
Handle the cutting discs with care - they are
knife blade/ dough tool
extremely sharp
The knife blade is the most versatile of all the attachments. The length of the
processing time will determine the texture achieved. For coarser textures use
the pulse control.
Use the knife blade for cake and pastry making, chopping raw and cooked
meat, vegetables, nuts, pate, dips, pureeing soups and to also make crumbs
from biscuits and bread. It can also be used for yeasted
dough mixes if the dough tool is not supplied.
Use the dough tool for yeasted mixes.
hints
knife blade
●
Cut food such as meat, bread, vegetables into cubes
approximately 2cm/3/4in before processing.
●
Biscuits should be broken into pieces and added down
the feed tube whilst the machine is running.
●
When making pastry use fat straight from the fridge cut
into 2cm/3/4in.cubes.
●
Take care not to over-process.
dough tool
●
Place the dry ingredients in the bowl and add the liquid
down the feed tube whilst the machine is running.
Process until a smooth elastic ball of dough is formed
this will take 60 - 90 secs.
P
0
1
2
20
21
3

to use the cutting discs
care & cleaning
1 Fit the drive shaft and bowl onto the power unit.
●
Always switch off and unplug before cleaning.
2 Holding by the centre grip , place the disc onto the
●
Handle the blades and cutting discs with care - they are extremely sharp.
drive shaft with the appropriate side uppermost .
●
Some foods may discolour the plastic. This is perfectly normal and won’t harm
3 Fit the lid.
the plastic or affect the flavour of your food. Rub with a cloth dipped in
4 Choose which size feed tube you want to use. The
vegetable oil to remove the discolouration.
pusher contains a smaller feed tube for processing
power unit
individual items or thin ingredients.
●
Wipe with a damp cloth, then dry. Ensure that the interlock area is clear of food
To use the small feed tube - first put the large
debris.
pusher inside the feed tube.
●
Store excess cord in the storage area at the back of the machine.
To use the large feed tube - use both pushers
together.
liquidiser
5 Put the food in the feed tube.
1 Empty the jug before unscrewing it from the blade unit.
6 Switch on and push down evenly with the pusher -
2 Wash the jug by hand.
never put your fingers in the feed tube.
3 Remove and wash the sealing ring.
4 Don’t touch the sharp blades - brush them clean using hot soapy water, then
hints
rinse thoroughly under the tap. Don’t immerse the blade unit in water.
●
Use fresh ingredients
5 Leave to dry upside down.
●
Don’t cut food too small. Fill the width of the large feed tube fairly full. This
prevents the food from slipping sideways during processing. Alternatively use
twin beater geared whisk
the small feed tube.
●
Detach the beaters from the drive head by gently pulling them free. Wash in
●
When using the chipper disc, place ingredients horizontally.
warm soapy water.
●
When slicing or shredding: food placed upright comes out shorter than food
●
Wipe the drive head with a damp cloth, then dry. Do not immerse the
placed horizontally .
drive head in water.
●
There will always be a small amount of waste on the plate or in the bowl after
all other parts
processing.
●
Wash by hand, then dry.
●
Alternatively they can be washed on the top rack of your dishwasher.
service & customer care
●
If the cord is damaged it must, for safety reasons, be replaced by Kenwood or
an authorised Kenwood repairer.
If you need help with:
●
Using your machine
●
Servicing or repairs
Contact the shop where you brought the food processor.
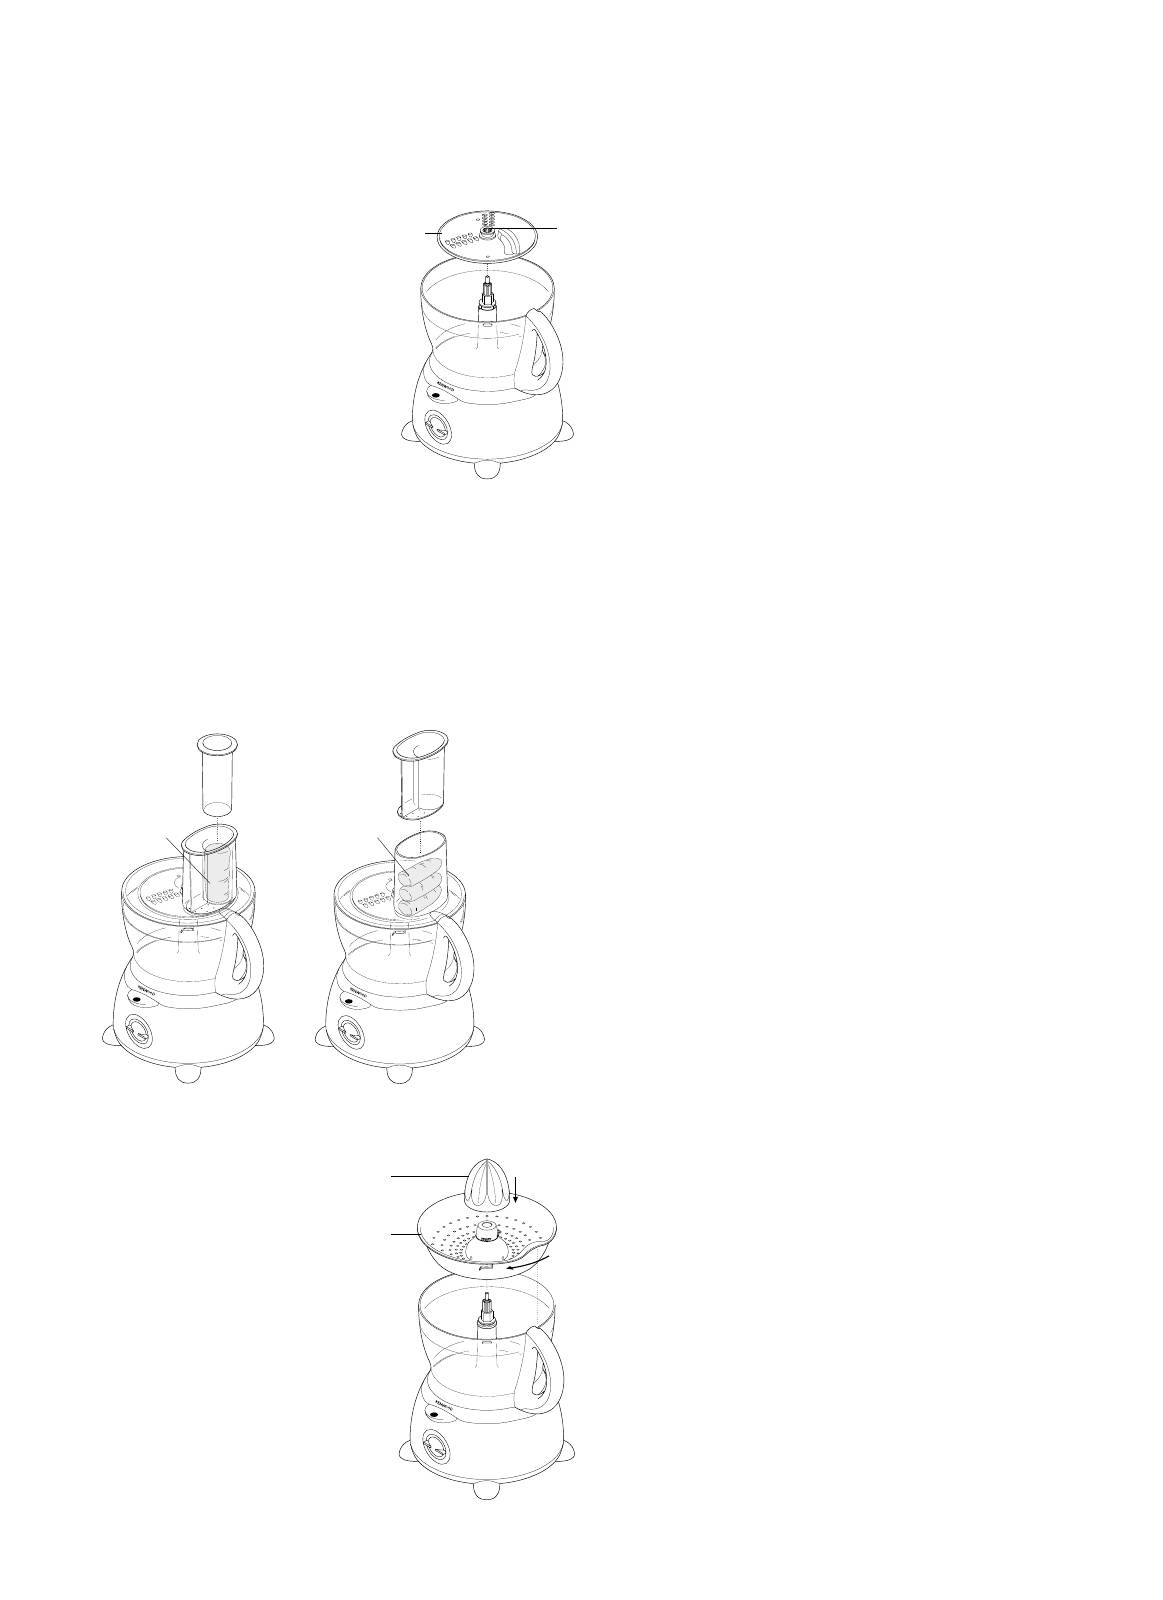
citrus press
Use the citrus press to squeeze the juice from
citrus fruits (eg oranges, lemons, limes and
grapefruits).
cone
sieve
to use the citrus press
1 Fit the drive shaft and bowl onto the power
unit.
2 Fit the sieve into the bowl - ensuring the sieve
handle is locked into position directly over the
bowl handle .
3 Place the cone over the drive shaft turning until
it drops all the way down .
4 Cut the fruit in half. Then switch on and press
the fruit onto the cone.
●
The citrus press will not operate if the
sieve is not locked correctly.
4
P
0
1
2
P
P
0
1
2
0
1
2
P
0
1
2
d
e
d
e
f
g
f
g
i
h
h
i

Nederlands
Vouw voor het lezen a.u.b. de voorpagina met illustraties uit
veiligheid
blender
●
De messen en schijven zijn scherp: u dient ze voorzichtig te
a
vulkap
behandelen. Houd het snijvlak altijd bij de
deksel
vingergreep vast aan de bovenzijde, van de
a
kan
snijkant af, zowel bij het werken als het
afsluitring
schoonmaken.
messeneenheid
●
Voordat u de inhoud uit de kom giet, dient u altijd eerst het mes te verwijderen.
●
Haal altijd de stekker uit het stopcontact, voordat u met uw handen of
extra hulpstukken
gereedschappen in de kom van de machine of de blenderkan komt.
snijmes
●
Zet het apparaat uit en trek de stekker uit het stopcontact:
deeggereedschap
●●
alvorens onderdelen aan te brengen of te verwijderen
aangedreven dubbele garde
●●
na gebruik
blenderkap
●●
voor het schoonmaken
schijf voor dik snijden/grof raspen
●
Gebruik nooit uw vingers om voedsel in de invoerkoker te duwen. Gebruik altijd
schijf voor dun snijden/fijn raspen
21
de bijgeleverde stamper.
citruspers met verschillende standen
22
●
Voordat u het deksel van de kom of de blender van het motorhuis verwijdert:
spatel
23
●●
zet het apparaat uit;
●●
wacht totdat de hulpstukken / messen helemaal tot stilstand zijn gekomen;
Optionele accessoires (niet meegeleverd met uw foodprocessor)
●●
Let er op de blenderkan niet van de messeneenheid af te schroeven.
De onderstaande accessoires worden geleverd in het pakket MA280. Als u
●
Laat hete vloeistoffen afkoelen voordat u ze mengt in de blender - indien u het
pakket MA280 wilt aanschaffen, kunt u contact opnemen met de dealer bij wie u
deksel niet stevig heeft aangebracht kan het loskomen zodat u wordt besproeid.
uw foodprocessor heeft gekocht.
●
Gebruik nooit het deksel om de keukenmachine te bedienen, maar altijd de
aan/uit-knop.
schijf voor dunne schijfjes (juliennestijl)
●
Deze machine wordt beschadigd en kan letsel veroorzaken
raspschijf
molen
wanneer er te veel kracht wordt uitgeoefend op het
sapcentrifuge
veiligheidsmechanisme.
minikom
●
Dit apparaat mag niet zonder toezicht door jonge kinderen of personen met
schijvenopbergdoos
een handicap gebruikt worden.
●
Gebruik nooit een niet bij het apparaat behorend hulpstuk.
gebruik van uw keukenmachine
●
Laat kinderen niet met dit apparaat spelen.
●
De machine mag nooit op de stroom aangesloten zijn als er niemand bij is.
1 Plaats de afneembare as op het motorblok .
●
Gebruik nooit een beschadigde machine. Laat een beschadigd apparaat
2 Breng vervolgens de kom aan. Richt de handgreep eerst naar achteren en draai
nakijken of repareren: zie onder ‘service’.
deze vervolgens met de klok mee totdat deze vastklikt .
●
Laat het motorhuis, het netsnoer of de stekker nooit nat worden.
3 Plaats een hulpstuk op de aandrijfas.
●
Laat het snoer nooit over de rand van een tafel of werkblad hangen of in
●
Breng altijd eerst de kom en het hulpstuk aan op het apparaat voordat u
aanraking komen met hete oppervlakken.
ingrediënten toevoegt.
●
Gebruik de keukenmachine nooit voor iets anders dan waarvoor deze is
4 Breng het deksel aan - verzeker u ervan dat de bovenkant van de aandrijfas
bedoeld.
zich in het midden van het deksel bevindt.
●
Gebruik nooit het deksel om de keukenmachine te bedienen,
alvorens het apparaat aan te sluiten
maar altijd de aan/uit snelheidsregelaar.
●
Controleer of de netspanning overeenkomt met het op de onderkant van het
5 Zet het apparaat aan en kies een snelheid.
apparaat aangegeven voltage.
●
De keukenmachine werkt niet wanneer de kom en het deksel niet
●
Dit apparaat voldoet aan de richtlijn van de Europese Economische
correct zijn aangebracht.
Gemeenschap 89/336/EEG.
●
Gebruik de pulsknop voor korte pulsen. De puls duurt zolang als de knop
voordat u het apparaat voor het eerst gebruikt
ingedrukt gehouden wordt.
1 Verwijder al het verpakkingsmateriaal, inclusief de kunststof beschermhoezen
6 Volg de bovenstaande procedure in omgekeerde volgorde om het deksel, de
van de messen. Wees voorzichtig, de messen zijn erg scherp. Deze
hulpstukken en de kom te verwijderen.
hoezen zijn alleen bedoeld om de messen tijdens de fabricage en het transport
●
Zet het apparaat altijd uit voordat u het deksel verwijdert.
te beschermen; u kunt deze weggooien.
belangrijk
2 Reinig de onderdelen: zie onder ‘reinigen’.
●
Deze keukenmachine is niet geschikt voor het persen of malen van koffiebonen
3 Berg het overbodige snoer in de speciale opbergruimte aan de achterkant van
of voor het vermalen van kristalsuiker tot basterdsuiker.
het apparaat op.
●
Wanneer u amandelessence of -smaakstof aan mengsels toevoegt, dient u het
contact met kunststof te vermijden, aangezien dit permanente vlekken kan geven.
sleutel
gebruik van uw blender
keukenmachine
1 Bevestig de afsluitring in de messeneenheid .
motorhuis
2 Schroef de kan op de messeneenheid.
losmaakbare aandrijfas
3 Plaats uw ingrediënten in de kan.
kom
4 Plaats de vulkap in het deksel en draai deze.
deksel
5 Bevestig het deksel op de kan zodat het lipje zich boven de handgreep bevindt
invoerkoker
(Om het deksel los te maken, drukt u op het lipje .)
stampers
6 Plaats de blender op het motorhuis en draai deze vast .
veiligheidsmechanisme
7 Kies een snelheid of gebruik de pulsknop.
opbergvak snoer
handige tips
pulsknop
●
Bij het maken van mayonaise, plaatst u alle ingrediënten behalve de olie in de
snelheidsknop
blender. Schenk vervolgens de olie in de vulkap terwijl de machine draait en laat
deze vermengen.
5
●
Bij dikke mengsels, bijvoorbeeld patés of dipsauzen, kan het nodig zijn om te
nuttige tips
schrapen. Wanneer de verwerking moeilijk gaat, voeg dan meer vloeistof toe.
snijmes
●
Bij het fijnmalen van ijs, voegt u 15 ml (1 eetlepel) water toe per 6 ijsblokjes.
●
Snijd producten zoals vlees, brood en groenten in blokjes van ongeveer 2 cm
Gebruik de pulsknop.
voor verwerking.
●
Biscuits moeten in stukken worden gebroken en in de invoerkoker ingebracht
belangrijk
terwijl de machine draait.
●
Laat hete vloeistoffen afkoelen voordat u ze mengt in de blender - indien u het
●
Bij het bereiden van gebak, gebruik vet dat direct uit de ijskast in blokjes van 2
deksel niet stevig heeft aangebracht kan het loskomen zodat u wordt besproeid.
cm is gesneden.
●
Gebruik de blender nooit langer dan 60 seconden achter elkaar om de
●
Zorg ervoor de producten niet te fijn te bewerken.
levensduur van uw blender te verlengen. Schakel het apparaat uit zodra u de
deeg gereedschap
gewenste consistentie heeft verkregen.
●
Plaats de droge ingrediënten in de kom en giet de vloeistof in de invoerkoker
●
Verwerk geen kruiden - deze kunnen het plastic beschadigen.
terwijl de machine draait. Ga door totdat er zich een elastische deegbal heeft
●
Het apparaat werkt niet wanneer de blender onjuist is aangebracht.
gevormd. Dit duurt 60 - 90 seconden.
●
Zet de blender niet aan met alleen droge ingrediënten. Indien nodig, snijdt u de
●
Kneed het opnieuw, alleen met de hand. Het wordt niet aanbevolen om het
ingrediënten in stukken; verwijdert u de vulkap; en laat u ze er vervolgens één
herkneden in de kom uit te voeren aangezien de keukenmachine daar instabiel
voor één invallen terwijl het apparaat aanstaat.
van kan worden.
●
Gebruik de blender niet om voeding in te bewaren. Zorg dat deze zowel voor
als na gebruik leeg is.
aangedreven dubbele garde
●
Meng nooit meer dan 1
1
/2
liter - of minder voor schuimende vloeistoffen zoals
Gebruik voor de lichte mengsels en het kloppen van
milkshakes.
eieren bijvoorbeeld alleen eiwitten, room, poedermelk en
suiker voor vetvrije biscuits. Zwaardere mengsels zoals
een snelheid kiezen voor elke functie
vet en bloem beschadigen de garde.
werktuig/hulpstuk functie snelheid
het gebruik van de garde
snijmes Taarten bakken 2
1 Bevestig de aandrijfas en de kom op het motorhuis.
Vet in bloem wrijven 1 - 2
2 Druk iedere menger stevig in de aandrijfkop .
b
Water toevoegen om te combineren
3 Breng de garde aan door deze zorgvuldig te draaien
Ingrediënten voor gebak 1 - 2
totdat zij over de aandrijfas valt.
Hakken/pureren/patés 2
4 Voeg de ingrediënten toe.
garde eiwitten 2
5 Breng het deksel aan - controleer of de bovenkant van
ei & suiker voor vetvrije biscuits 2
de aandrijfas zich in het midden van het deksel bevindt.
room 1 - 2
6 Zet het apparaat aan.
deeggereedschap gistmengsels 1 - 2
schijven - snijden/ Stevige voedingsproducten zoals wortels,
handige tips
raspen/ harde kazen 1 - 2
●
De beste resultaten worden verkregen wanneer de eieren op kamertemperatuur zijn.
hakken/ Zachtere producten zoals komkommers,
●
Controleer of de kom en de gardes schoon en vetvrij zijn voordat u gaat kloppen.
raspen tomaten 1
citruspers Citrusvruchten 1
blenderkap
blender Zachter blenden, bijvoorbeeld
Gebruik de blenderkap en het snijmes bij het mengen
opkloppen, milkshakes 1
van vloeistoffen. Hiermee kunt u de capaciteit voor het
Soepen, sauzen, paté en mayonaise 2
verwerken van vloeistoffen vergroten van 800 ml tot 1,5
*molen Alles 2
liter, lekken voorkomen en de hakprestaties van het mes
*sapcentrifuge Fruit en groente 2
vergroten.
*minikom Alles 2
1 Bevestig de aandrijfas en de kom aan het motorhuis.
*optionele accessoires
2 Plaats het snijmes.
3 Voeg de te bewerken ingrediënten toe.
maximum capaciteit
4 Plaats de kap over de bovenzijde van het mes en
●
Kruimeldeeg Bloem gewicht 340 g
controleer dat deze rust op de rand aan de binnenkant
●
Gistdeeg Bloem gewicht 500 g
van de kom . Druk niet op de kap, houd deze
c
●
Biscuitgebak Totaalgewicht 1,5 Kg
vast aan de centrale handgreep.
●
Gehakt vlees Totaalgewicht 600 g
5 Plaats het deksel en zet het apparaat aan.
●
Vloeistof met deksel 1,5 liter
●
Aangedreven dubbele garde 6 eiwitten
schijven voor snijden/raspen
het gebruik van de hulpstukken
omkeerbare schijven voor snijden/raspen - dik
, dun
21
zie de bovenstaande tabel voor de snelheid van ieder hulpstuk.
Gebruik de raspzijde voor kaas, wortels, aardappels en
producten met een vergelijkbare structuur.
snijmes/ deeggereedschap
20
Gebruik de snijzijde voor kaas, wortels, aardappels,
Het snijmes is het meest veelzijdige van alle
kool, courgette, bieten en uien.
hulpstukken. De verwerkingstijd bepaalt de verkregen
structuur. Gebruik de pulsknop voor een grovere
veiligheid
structuur.
21
Gebruik het snijmes voor het bakken van taarten en
●
Verwijder het deksel nooit voordat de
gebak, het hakken van rauw en gekookt vlees,
snijschijf geheel tot stilstand is gekomen.
groenten, noten, paté, dipsauzen, gepureerde soepen
●
De snijschijven zijn scherp - u dient ze voorzichtig te behandelen.
en verder om biscuits en brood te verkruimelen. Het kan
ook worden gebruikt om gegiste deegmengsels te
maken indien het deeggereedschap niet is bijgeleverd.
Gebruik het deeggereedschap voor gegiste
deegmengsels.
6
P
0
1
2
gebruik van de snijschijven
onderhoud & reiniging
1 Bevestig de aandrijfas en de kom op het motorhuis.
●
Zet het apparaat altijd uit en trek de stekker uit het stopcontact voordat u het
2 Houd de schijf bij de handgreep in het midden vast
d
gaat schoonmaken.
en plaats de schijf op de aandrijfas met de juiste zijde
●
Messen en snijschijven zijn zeer scherp - ga er voorzichtig mee om.
naar boven .
e
●
Het plastic kan verkleuren door sommige voedselproducten. Dit is normaal,
3 Breng het deksel aan.
levert geen schade op aan het plastic en beïnvloedt de smaak van uw voedsel
4 Kies het formaat invoerkoker dat u wilt gebruiken.
niet. U kunt deze verkleuringen verwijderen met een doek die licht bevochtigd is
De stamper bevat een kleinere invoerkoker voor het
met plantaardige olie.
verwerken van losse producten of dunne
Motorhuis
ingrediënten.
●
Veeg af met een vochtige doek, en droog dan af. Controleer of het
Om de kleine invoerkoker te gebruiken - plaatst u
veiligheidsmechanisme vrij is van voedselresten.
eerst de grote stamper in de invoerkoker.
●
Berg het overbodige snoer op in het opbergvak aan de achterzijde van het
Om de grote invoerkoker te gebruiken - gebruikt u
apparaat.
beide stampers tegelijk.
5 Plaats het voedsel in de invoerkoker.
blender
6 Zet het apparaat aan en druk de stamper
1 Maak de kan leeg voordat u deze van de messeneenheid losschroeft.
gelijkmatig naar beneden - steek nooit uw vingers in de invoerkoker.
2 Was de kan met de hand.
3 Verwijder en was de afsluitring.
nuttige tips
4 Raak de scherpe messen niet aan - borstel ze schoon met heet water en zeep,
●
Gebruik verse ingrediënten
en spoel ze zorgvuldig af onder de kraan. Dompel de messeneenheid
●
Snij het voedsel niet te klein. Vul de grote invoerkoker behoorlijk en over de hele
niet onder in water.
breedte. Dit voorkomt dat het voedsel opzij glipt tijdens de verwerking. U kunt
5 Laat het ondersteboven opdrogen.
ook de kleine invoerkoker gebruiken.
●
Wanneer u de hakschijf gebruikt, plaats de ingrediënten dan horizontaal.
aangedreven dubbele garde
●
Bij het snijden of raspen: verticaal geplaatste producten worden korter
f
●
Maak de gardes los van de aandrijfkop door ze voorzichtig los te trekken.
gesneden dan horizontaal geplaatste producten .
g
Wassen in warm water met zeep.
●
Er zal na verwerking altijd een kleine hoeveelheid afval overblijven op de plaat of
●
Veeg de aandrijfkop af met een vochtige doek, en droog deze dan af. Dompel
in de kom.
de aandrijfkop niet onder in water.
alle andere onderdelen
●
Met de hand afwassen, en dan afdrogen.
●
Ze kunnen ook worden gewassen op het bovenste rek van uw afwasmachine.
service & ondersteuning
●
Als het snoer beschadigd is, moet het om veiligheidsredenen door Kenwood of
een door Kenwood erkende monteur worden vervangen.
Als u hulp nodig heeft bij het volgende:
●
Het gebruik van uw apparaat
●
Service of reparatie
Neem dan contact op met de winkel waar u het apparaat heeft gekocht.
citruspers
22
Gebruik de citruspers om het sap van
citrusvruchten uit te persen (b.v. sinaasappels,
citroenen, limoenen en grapefruits).
kegel
zeef
het gebruik van de citruspers
1 Bevestig de aandrijfas en de kom op het
motorhuis.
2 Plaats de zeef in de kom - verzeker u ervan dat
de handgreep van de zeef direct boven de
handgreep van de kom is vastgezet .
h
3 Plaats de kegel over de aandrijfas totdat deze
geheel naar beneden valt .
i
4 Snijd het fruit in tweeën. Zet het apparaat
vervolgens aan en druk het fruit op de kegel.
●
De citruspers werkt niet als de zeef
niet correct is vastgezet.
7
P
0
1
2
e
d
P
P
0
1
2
0
1
2
f
g
P
0
1
2
i
h


