Kenwood DMX100: инструкция
Раздел: Авто, мото оборудование и транспорт
Тип: Автомобильный Мультимедиацентр
Характеристики, спецификации
Инструкция к Автомобильному Мультимедиацентру Kenwood DMX100

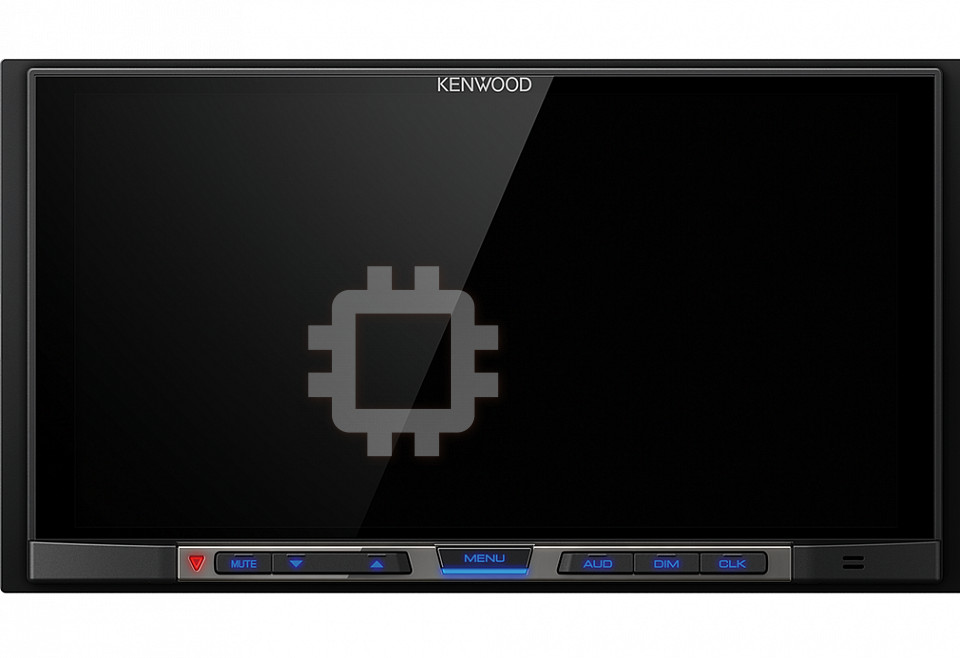
DMX100
MONITOR WITH RECEIVER
INSTRUCTION MANUAL
МОНИТОР С РЕСИВЕРОМ
МОНІТОР З ПРИЙМАЧЕМ
• Updated information (the latest Instruction Manual, etc.) is
available from
<http://www.kenwood.com/cs/ce/>.
• Обновленная информация (последняя версия инструкции
по эксплуатации и т.д.) доступна по ссылке
<http://www.kenwood.com/cs/ce/>.
• Оновлена інформація (остання інструкція з експлуатації
тощо) доступна на сайті
<http://www.kenwood.com/cs/ce/>.
B5A-1694-00 (Q)© 2016 JVC KENWOOD Corporation

Contents
Before use
Before use ....................................................................................2
Precautions
How to read this manual .......................................................................................2
Precautions ....................................................................................................................2
#WARNING
Getting Started .......................................................................... 3
Clock settings ............................................................................................................... 3
Ñ To prevent injury or re, take the
Touch panel adjustment ....................................................................................... 3
following precautions:
Basics .............................................................................................4
Functions of the Buttons on the Front Panel .......................................... 4
• To prevent a short circuit, never put or leave any
Common operations ...............................................................................................4
metallic objects (such as coins or metal tools) inside
TOP MENU screen descriptions ........................................................................ 5
the unit.
Source control screen descriptions ............................................................... 5
• Do not watch or fix your eyes on the unit’s display
USB .................................................................................................6
when you are driving for any extended period.
Preparation .....................................................................................................................6
• If you experience problems during installation,
Playback operations .................................................................................................6
consult your KENWOOD dealer.
iPod/iPhone ................................................................................8
Preparation .....................................................................................................................8
Ñ Precautions on using this unit
Playback operations .................................................................................................8
• When you purchase optional accessories, check
Radio ........................................................................................... 10
with your KENWOOD dealer to make sure that they
Radio Basic Operation..........................................................................................10
work with your model and in your area.
Presetting stations ................................................................................................. 10
• The Radio Data System or Radio Broadcast Data
FM RDS features ....................................................................................................... 10
Tuner Setup ..................................................................................................................11
System feature won’t work where the service is not
External Components ...........................................................11
supported by any broadcasting station.
Using external audio/video players .............................................................11
Ñ Protecting the monitor
Rear view camera .....................................................................................................11
Controlling Audio ...................................................................12
• To protect the monitor from damage, do not
Controlling General Audio ................................................................................ 12
operate the monitor using a ballpoint pen or similar
Equalizer Control ..................................................................................................... 12
tool with the sharp tip.
Subwoofer settings ............................................................................................... 12
Installation .................................................................................13
Ñ Cleaning the Unit
Before Installation ................................................................................................... 13
If the front panel of this unit is stained, wipe it with
Installing the unit .................................................................................................... 14
a dry soft cloth such as a silicon cloth. If the front
About this Unit .........................................................................16
panel is stained badly, wipe the stain off with a cloth
More information .................................................................................................... 16
moistened with neutral cleaner, then wipe it again
Troubleshooting .......................................................................................................17
with a clean soft dry cloth.
Copyrights ....................................................................................................................17
Specifications ............................................................................................................ 18
! CAUTION
• Applaying spray cleaner directly to the unit may affect
its mechanical parts. Wiping the front panel with a
hard cloth or using a volatile liquid such as thinner
or alcohol may scratch the surface or erase screened
print.
Ñ How to reset your unit
If the unit or the connected unit fails to operate
properly, reset the unit.
Reset button
How to read this manual
Ñ Remote controller
• The panels shown in this guide are examples used to
You can control the unit with remote control KNA-
provide clear explanations of the operations. For this
RCDV331 (optional accessory). Turn its operation
reason, they may be different from the actual panels.
mode switch to “DVD” before use.
• In operation procedures, bracket shape indicates the
key or button you should control.
< >: indicates the name of panel buttons.
[ ]: indicates the name of touch keys
2

Getting Started
1 Turn the ignition key of your car to ACC.
Clock settings
The unit is turned on.
2 Press the <MENU> button.
Ñ Synchronizing the clock time with FM RDS
3 Touch [SETUP].
Activate [RDS Clock Sync]. See “Tuner Setup”
(P.11).
Ñ Adjusting the clock manually
1 Touch [Clock Adjust] on the General screen.
Clock screen appears.
2 Select the hour or minute.
4 Touch [General].
3 Set the clock time.
5 Touch the corresponding key and set the value.
4 Touch [6].
Touch panel adjustment
1 Touch [Touch] on the SETUP screen.
Beep
Activates or deactivates the key-touch tone.
2 Follow the instruction on the screen and touch
“ON” (Default), “OFF”
the center of each +.
Clock Mode
Selects time format.
“12 Hour”, “24 Hour” (Default)
Clock Adjust
Adjust the clock time. See “Clock settings” (P.3).
Language
Select the language used for the control screen and
setting items. Default is “English”.
1) Touch [Language].
2) Select the desired language.
• To cancel the touch panel adjustment, touch
3) Touch [ 6 ].
[Cancel].
Device Name
Displays the Device Name.
6 Touch [6].
English |
3
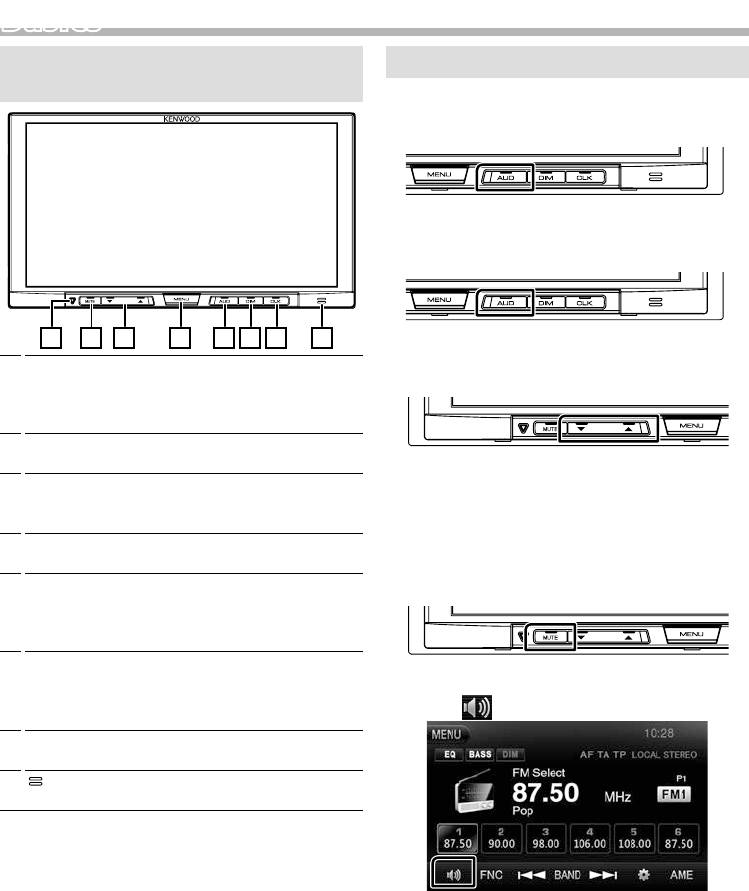
BasicsBasics
Functions of the Buttons on the Front
Common operations
Panel
Ñ Turning on the power
1 Press the <AUD> button.
Ñ Turning o the power
1 Press and hold the <AUD> button.
1 2 3 4 5 6 7 8
Ñ Adjusting the volume
1
s (Reset)
• If the unit or the connected unit fails to operate
1 Press the <S> or <R> button.
properly, the unit returns to factory settings when
this button is pressed.
2
MUTE
• Mutes the sound.
✎ NOTE
3
R , S (Volume)
• The volume will go up until 15 when you keep
• Adjusts volume. The volume will go up until 15
pressing [ R ].
when you keep pressing [ R ].
4
MENU
Ñ Mutes the sound
• Displays the TOP MENU screen. (P.5)
On the monitor panel:
5
AUD
1 Press the <MUTE> button.
• Displays the Equalizer screen. (P.12)
• Pressing for 1 second turns the power off.
• When the power off, turns the power on.
6
DIM
• Select dimmer mode.
On the source control screen:
– OFF: The display do not dim.
1 Touch [ ].
– ON: The display dim.
7
CLK
• Displays the Clock screen.
8
(Remote Sensor)
• Receives the remote control signal.
To restore the sound, touch the button again, or
adjust the volume.
4
Basics
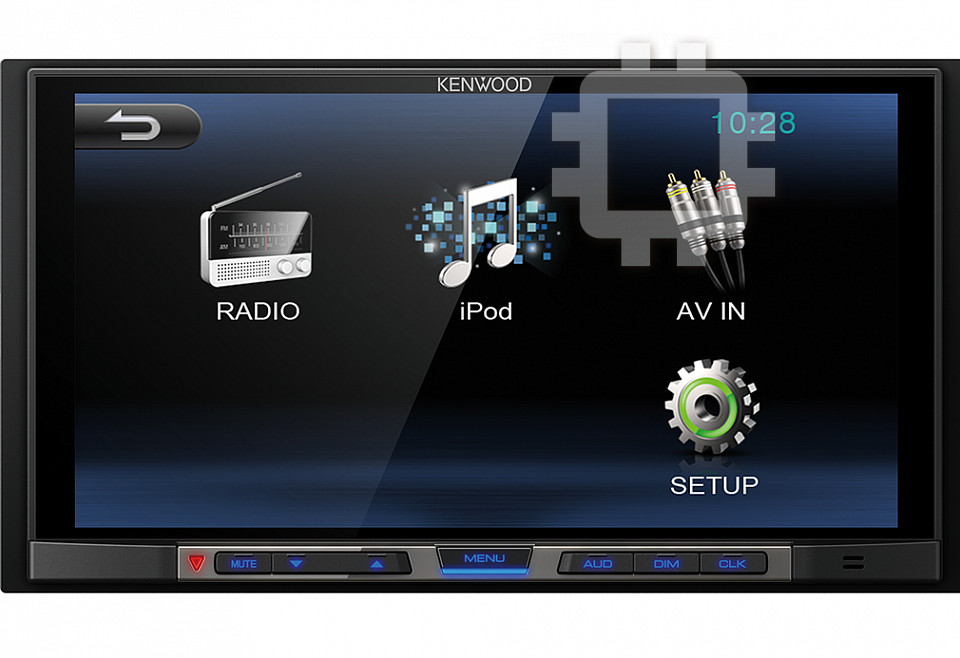
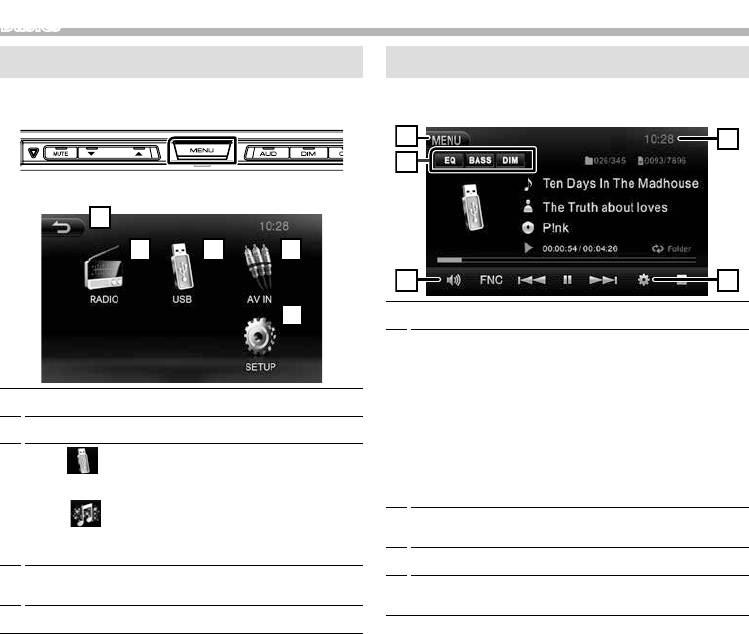
TOP MENU screen descriptions
1 Press the <MENU> button.
TOP MENU screen appears.
English |
5
1
2
5
3
4
Source control screen descriptions
You can perform source playback operations on the
source control screen.
1
Returns to previous screen.
2
Switches to the radio broadcast. (P.10)
3
[USB]
Plays files on a USB device. (P.6)
[iPod]
Plays an iPod/iPhone. ( P.8)
• When iPod/iPhone is connected.
4
Switches to an external component connected to
the AV-IN input terminal. (P.11)
5
Displays the SETUP screen. (P.3)
2
3
4
5
1
1
Displays the TOP MENU screen.
2
[EQ]
Displays the Equalizer screen. (P.12)
[BASS]
Sets the amount of bass boost among “OFF” (gray)/
“ON” (white).
[DIM]
Select dimmer mode.
OFF: The display do not dim.
ON: The display dim.
3
Mutes the sound.
Touch the button again, or adjust the volume.
4
Displays the SETUP screen. (P.3)
5
Clock display
Touch to displays the Clock screen.
USBUSB
Preparation
Playback operations
Ñ Connecting a USB device
Ñ Control the music you are listening to on
the source control screen.
1 Remove the cap of the USB terminal.
2 Connect the USB device with the USB cable.
The unit reads the device and playback starts.
Ñ To disconnect the USB device:
1 Press the <MENU> button.
2 Touch a source other than [USB].
3 Detach the USB device.
Ñ Usable USB device
This unit can play MPEG1/ MPEG2/ MPEG4/ MP3/
WMA/ AAC/ JPEG les stored in a USB mass storage
class device. (P.16)
• File system: FAT16/ FAT32
• This unit can recognize a total of 9 999 files and 999
folders (a maximum of 9 999 files per folder).
• The maximum number of characters:
– Folder names : 50 characters
– File names : 50 characters
– Tag : 30 characters
✎ NOTE
• When the USB device is connected to this unit, it can
be charged through the USB cable.
• Install the USB device in the place where it will not
affect safe driving.
• You cannot connect a USB device via a USB hub and
Multi Card Reader.
• Take backups of the audio files used with this unit.
The files can be erased depending on the operating
conditions of the USB device.
We shall have no compensation for any damage
arising from any erased data.
• No USB device comes with this unit. You need to
purchase a commercially available USB device.
• Cap the USB terminal whenever not using.
6
4
1
6
3
2
5
1
The jacket of the currently playing file is displayed.
2
D, etc. : Playback status
##:##:## : Playing time/ Total playing time
Play time bar : Touch to change the playing
position.
: Repeat playback mode indicator
: Random playback mode indicator
3
D H : Plays or pauses.
[E] [F] : Searches the previous/next content.
Touch and hold to fast forward or fast backward.
[FNC] : Displays the Function screen. (P.7)
4
Searches file. (P.7)
5
Displays the information of the current file.
Only a file name and a folder name are displayed if
there is no tag information.
6
Current playback item information (folder no./file
no.).
Ñ For Video playback
1 When the operation buttons are not displayed on
the screen, touch the display.
4
3
2
2
1
1
The operation buttons disappear when 1 is
touched or when no operation is done for about 5
seconds.
2
To switch the operation buttons.

USB
Ñ Function menu
3
[Zoom] : Select the zoom ratio.
“Off”, “x2”, “x3”, “x4”, “1/2”, “1/3”, “1/4”
1 Touch [FNC].
[R] [S] [T] [U] : Scrolls the screen.
Function screen appears.
4
Select the screen mode. 16:9 ratio, 4:3 ratio
2 Set each item as follows.
Ñ Selecting a track in a list
1 Touch [ ].
2 Select whether you search by audio files [ ],
video files [ ] or picture files [ ].
1
Repeat *
Selects Repeat playback mode.
All (Default): Repeats all files in the USB device.
(
All indicator lights up.)
One: Repeats the current file.
(
One indicator lights up.)
3 Touch [6] to moves to the upper hierarchy.
Folder: Repeats all files in the current folder.
4 Touch the desired folder.
(
Folder indicator lights up.)
1
Random (Audio le only) *
Selects Random playback mode.
On: Randomly plays all files.
(
All indicator lights up.)
O (Default): Normal playback.
Video Setting (Video/ picture le only)
You can adjust image quality in video screen.
[Brightness]: Adjusts the brightness. (00 to 08)
When you touch a folder its contents are displayed.
[Contrast]: Adjusts the contrast. (00 to 08)
[Color]: Adjusts the color. (00 to 08)
5 Touch desired item from the content list.
[Reset]: To clear the adjustment.
Playback starts.
• Touch [6] to moves to the upper hierarchy.
*1 You cannot activate repeat mode and random mode
✎ NOTE
at the same time.
• The source control screen appears when you touch
3 Touch [6].
[6] at the top hierarchy.
English |
7
iPod/iPhoneiPod/iPhone
Preparation
Playback operations
Ñ Connecting iPod/iPhone
Ñ Control the music you are listening to on
• For Lightning connector models: Use USB Audio
the source control screen.
cable for iPod/iPhone—KCA-iP103 (optional
accessory).
• For details about connecting iPod/iPhone, see page
16 .
1 Remove the cap of the USB terminal.
2 Connect the iPod/iPhone.
The unit reads the device and playback starts.
Ñ To disconnect the iPod/iPhone
1 Press the <MENU> button.
2 Touch a source other than [iPod].
3 Detach the iPod/iPhone.
Ñ Connectable iPod/iPhone
The following models can be connected to this unit.
Made for
• iPhone 6s Plus
• iPhone 6s
• iPhone 6 Plus
• iPhone 6
• iPhone 5s
• iPhone 5c
• iPhone 5
• iPod touch (6th generation)
• iPod touch (5th generation)
✎ NOTE
• If you start playback after connecting the iPod, the
music that has been played by the iPod is played first.
In this case, “Reading” is displayed without displaying
a folder name, etc. Changing the browse item will
display a correct title, etc.
• Cap the USB terminal whenever not using.
8
4
1
6
3
2
5
1
Artwork (Shown if the track contains artwork)
2
D, etc. : Playback status
##:##:## : Playing time/ Total playing time
Play time bar : For confirmation of current playing
position
: Repeat playback mode indicator
: Random playback mode indicator
3
D H : Plays or pauses.
[E] [F] : Searches the previous/next content.
Touch and hold to fast forward or fast backward.
[FNC] : Displays the Function screen. (P.9)
4
Searches content. (P.9)
5
Displays the information of the current file.
6
Current playback item information.
iPod/iPhone
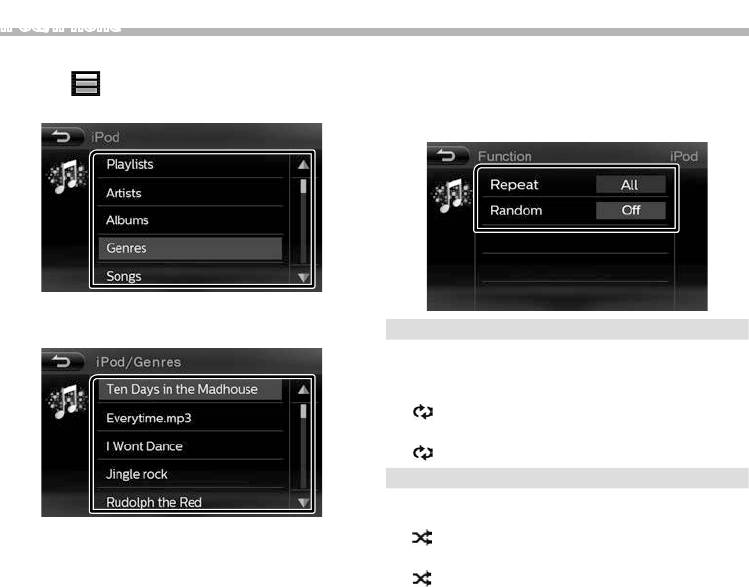
Ñ Selecting a content in a list
Ñ Function menu
1 Touch [ ].
1 Touch [FNC].
Function screen appears.
2 Touch the desired category.
2 Set each item as follows.
The list is sorted by selected category.
1
Repeat *
3 Touch desired item.
Selects Repeat playback mode.
O: Repeat off
One: Functions the same as Repeat One.
(
One indicator lights up.)
All (Default): Functions the same as Repeat All.
(
All indicator lights up.)
1
Random *
Selects random playback mode.
Songs: Functions the same as Shuffle Songs.
Playback starts.
(
Songs indicator lights up.)
• Touch [6] to moves to the upper hierarchy.
Albums: Functions the same as Shuffle Albums.
✎ NOTE
(
Albums indicator lights up.)
• The source control screen appears when you touch
O (Default): Random off
[6] at the top hierarchy.
*1 You cannot activate repeat mode and random mode
at the same time.
3 Touch [6].
English |
9
Оглавление
- Contents Before use
- Getting Started
- Radio
- External Components
- Controlling Audio
- Installation
- About this Unit
- Содержание Перед эксплуатацией
- Приступая к работе
- Радио
- Внешние устройства
- Управление аудио
- Установка
- Информация об устройстве
- Зміст Перед використанням
- Запуск
- Радіо
- Зовнішні компоненти
- Керування звуком
- Встановлення
- Інформація про пристрій


