Kenwood CM480 series: инструкция
Раздел: Кофеварки и кофемашины
Тип: Кофе-Машина
Инструкция к Кофе-Машину Kenwood CM480 series

Kenwood Limited, New Lane, Havant, Hampshire PO9 2NH, UK
www.kenwood.co.uk
56088/3
CM470 series
CM480 series
1
2
1
8
1
0
1
5
8
1
2
6
9
4
6
2
3
1
2
18
1
0
1
5
8
12
6
9
4
6
2
3

English 2 - 4
Nederlands 5 - 8
Français 9 - 12
Deutsch 13 - 16
Italiano 17 - 20
Português 21 - 24
Español 25 - 28
Dansk 29 - 32
Svenska 33 - 35
Norsk 36 - 38
Suomi 39 - 42
Türkçe 43 - 46
Ïesky 47 - 50
Magyar 51 - 54
Polski 55 - 58
Русский 59 - 63
Ekkgmij 64 - 68
´¸∂w
71 - 69
UNFOLD
12
18
10
15
6
9
12
18
10
15
8
12
6
9
4
6
2
3

before using for the first time
safety
1 Remove all packaging.
● Watch out for steam, never lift the
2 Wash the parts: see ‘care and
tank lid during the brewing cycle.
cleaning’.
● CM470 series only: never touch
3 Push excess cord inside the back of
the hotplate.
the machine.
● Always lift the lid using the lid
4 Run two lots of water through the
opening lip.
machine (without coffee) to clean it
● Don’t touch hot parts including the
out. Fill the tank to the top cup mark
cup storage area.
when you do this. See ‘to make
● Keep children away from the
coffee’.
machine. And never let the cord
hang down where a child could
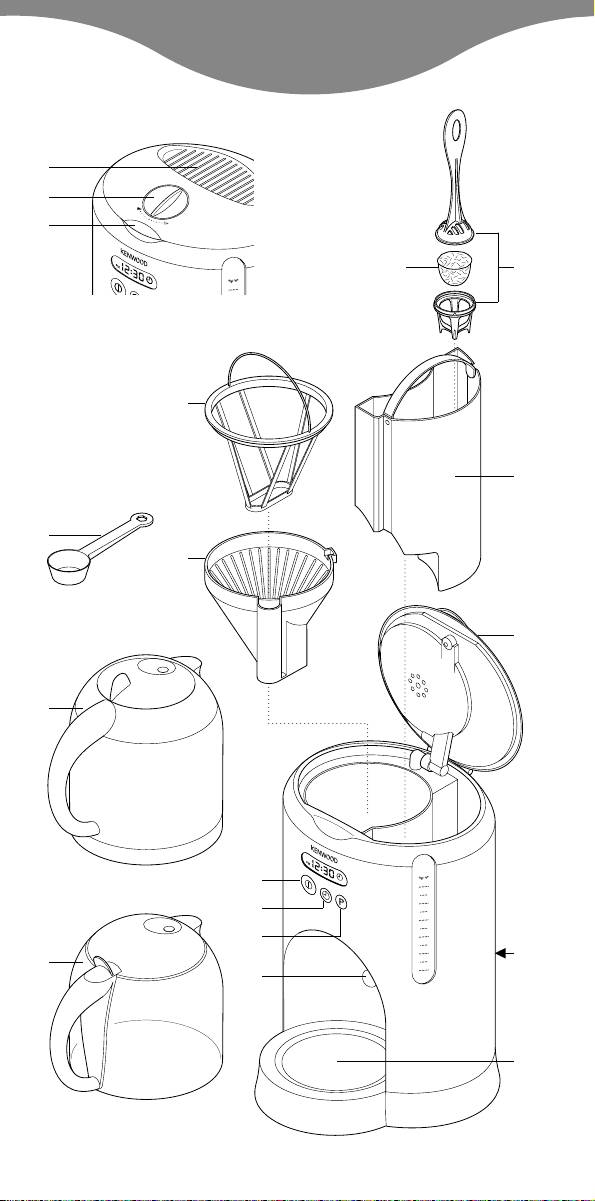
key
grab it. Push excess cord inside the
water filter
back of the machine.
water filter holder
● Never use a damaged machine. Get
removable water tank
it checked or repaired: see ‘service’.
lid
● Never put the machine in water or
compartment for excess cord
let the cord or plug get wet - you
hotplate (model CM470 series only)
could get an electric shock.
anti drip activating device
● Unplug:
program button
●●
before filling with water
clock button
●●
before cleaning
on/off button with indicator light
●●
after use.
glass carafe and lid
● Never leave the machine on
(model CM470 series only)
unattended.
thermal carafe and lid
● Don’t let the cord touch hot parts.
(model CM480 series only)
● Don’t let infirm people use the
measuring spoon
machine without supervision.
filter holder
● Don’t let children play with this
permanent coffee filter (or use a
machine.
paper filter instead)
● Only use the machine for its
lid opening lip
intended domestic use.
aroma control
● Always make sure there is water in
cup storage area
the tank before switching on.
● This coffee maker is only suitable for
to make coffee
use with the type of carafe supplied.
1 Lift the lid.
2 Lift out the water tank from the
before plugging in
coffee maker.
Make sure your electricity supply is
3 Separate the water filter holder by
the same as the one shown on the
pulling the unit apart and place the
underside of your machine.
water filter inside. Fit the unit back
●
This machine complies with
together.
European Economic Community
4 Turn the handle on the water filter
Directive 89/336/EEC.
holder and align the arrow on the
base with the letter for the current
corresponding month eg F for
February.
2

5 Lower the water filter holder into the
To stop the brewing process at any
water tank and fit into position in the
time, press the on/off button. The
recess.
back light of the display will come on
6 Fill the tank with the desired amount
for one minute and then go off
of water. The water must be
automatically.
between the top and bottom cup
14Don’t remove the carafe until
marks. Do not fill above the MAX
brewing has finished.
level. (Alternatively fill the water tank
CM470 series
when fitted inside the coffee maker
● The hot plate will keep your coffee
but take care not to cause spillage.)
hot, but the sooner you drink it, the
● Use cold water. We recommend
better it will taste.
using filtered water from a Kenwood
● Your coffee maker will keep the
Water Filter as it reduces limescale.
coffee warm and then automatically
Never use warm or fizzy water.
switch off after 2 hours. To manually
7 Replace the water tank back into the
switch off earlier, press the on/off
coffee maker.
button.
8 Ensure the filter holder is in position
CM480 series
in the coffee maker.
● To pour coffee after brewing has
9 Fit either the permanent filter
finished, unscrew the lid 180° so
supplied or a paper filter into the
that the tab on the lid is in line with
filter holder. Add the coffee, use the
the pouring spout. Once the desired
spoon provided (approximately 1
amount of coffee has been poured,
level spoon per cup or to taste).
screw the lid back on to best retain
10Close the lid and adjust the aroma
the coffee temperature.
control as required. Turn the control
● As soon as all the coffee has
to the left for stronger coffee and to
brewed, switch off and unplug the
the right for weaker coffee.
machine.
11 CM470 series
● If you haven’t used the machine for
● Put the carafe on the hotplate.
a while, run one lot of water through
CM480 series
it (without coffee) to clean it out. Fill
To achieve the best performance,
the water tank to the top cup mark
rinse the thermal carafe with hot
when you do this.
water immediately before switching
● Never put the carafe in the
on the coffee maker.
microwave.
● Screw the lid onto the thermal
carafe. For brewing, the lid should
to set the clock
be fully closed with the tab on the
lid in line with the carafe handle. Put
1 Plug in the coffee maker, the
the carafe on the base.
backlight will come on and the
12 Plug into the power supply and
display will flash.
press the on/off button.
2 Select the correct time of day by
13Press the on/off button twice to start
pressing the clock button once and
brewing immediately. The on/off
the time will advance by 1 minute.
button will glow and the coffee
Press and hold down the button and
maker will start to operate. The back
the time will advance in 15 minute
light of the display will come on and
intervals.
automatically switch off after 10
● If required, press the program
minutes.
button once to change between the
12 and 24 hour clock.
3

3 To set the clock press the on/off
carafe, lid, permanent filter,
button or wait 1 minute for it to
filter holder, water filter
automatically set.
holder
● To re-adjust the clock at any time,
●
Wash, then dry.
press and hold the clock button for
body
5 seconds and adjust the clock as
●
Wipe with a damp cloth, then dry.
above.
Don’t use abrasives - they’ll scratch
Note – the backlight of the display
the plastic and metal surfaces.
will automatically turn off after 1
minute.
descaling
With use, the display will indicate
to program automatic brew
when the coffee maker requires
1 Set the clock to the correct time (see
descaling. A series of solid lines will
‘to set the clock’).
gradually appear and when 4 appear
2 Press the program button, the clock
in the display and flash , the
symbol and the display will flash.
coffee maker has completed 100
3 Press the clock button until the
cycles or more and requires
desired brewing time is displayed
descaling (see ‘to descale’).
(follow procedure in ‘to set the
clock’).
important
4 Press the on/off button to confirm
When descaling always remove the
the automatic time selected. (The
water filter and water filter holder
display panel and the on/off indicator
first.
light will flash).
5 Press the program button to return
to descale
to the current time of day (the on/off
1 Buy a suitable descaler.
button will continue to flash). The
2 Descale the machine.
brewing cycle will begin once the set
3 After descaling, run several lots of
time is reached and the on/off
water through the machine to clean
button will stop flashing.
it out. Fill the tank to the top cup
●
If you want to check the automatic
mark when you do this.
time selected, press the program
4 Wash the parts.
button.
5 To reset the descale counter to zero,
●
To override the automatic brewing
press the clock and program button
operation press the on/off button
at the same time for 2 seconds.
and the coffee maker will start
immediately. Press the button again
service
to switch off.
●
If the cord is damaged it must, for
safety reasons, be replaced by
care & cleaning
Kenwood or an authorised Kenwood
●
Always switch off, unplug and allow
repairer.
to cool before cleaning.
If you need help with:
●
Never put the machine in water or let
●
using your machine or
the cord or plug get wet.
●
servicing, spare parts or repairs
●
Don’t wash parts in the dishwasher.
Contact the shop where you bought
water filter
your machine.
●
Change and discard the water filter
after 70 brewing operations or within
a calender month whichever is
sooner.
4
