Kenwood KDC-BT520U: инструкция
Раздел: Авто, мото оборудование и транспорт
Тип: Автомагнитола
Характеристики, спецификации
Инструкция к Автомагнитоле Kenwood KDC-BT520U
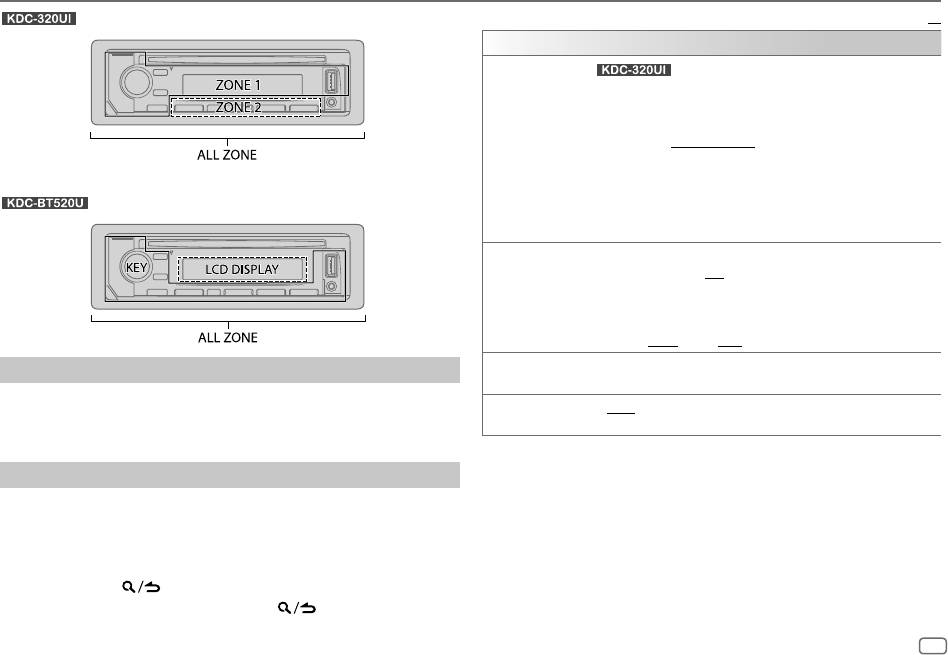
KDC-320UI
KDC-BT520U
CD-RECEIVER
INSTRUCTION MANUAL
CD-RECEIVER
BEDIENUNGSANLEITUNG
SINTOLETTORE STEREO COMPACT DISC
ISTRUZIONI PER L’USO
CD-PECИBEP
ИHCTPУKЦИЯ ПO ЭKCПЛУATAЦИИ
B5A-2096-00 (EN)© 2017 JVC KENWOOD Corporation
JS_KWD_KDC_320UI_EN_C_7.indd 1JS_KWD_KDC_320UI_EN_C_7.indd 1 7/7/2017 1:54:09 PM7/7/2017 1:54:09 PM
Data Size: B6L (182 mm x 128 mm)
Book Size: B6L (182 mm x 128 mm)
For Israel
Information on Disposal of Old Electrical and Electronic Equipment and Batteries (applicable
for countries that have adopted separate waste collection systems)
Products and batteries with the symbol (crossed-out wheeled bin) cannot be disposed as household waste.
Old electrical and electronic equipment and batteries should be recycled at a facility capable of handling
these items and their waste byproducts.
Contact your local authority for details in locating a recycle facility nearest to you. Proper recycling and
waste disposal will help conserve resources whilst preventing detrimental effects on our health and the
environment.
Notice: The sign “Pb” below the symbol for batteries indicates that this battery contains lead.
Entsorgung von gebrauchten elektrischen und elektronischen Geräten und Batterien
(anzuwenden in Ländern mit einem separaten Sammelsystem für solche Geräte)
Das Symbol (durchgestrichene Mülltonne) auf dem Produkt oder seiner Verpackung weist darauf hin, dass
dieses Produkt nicht als normaler Haushaltsabfall behandelt werden darf, sondern an einer Annahmestelle
für das Recycling von elektrischen und elektronischen Geräten und batterien abgegeben werden muss.
Durch Ihren Beitrag zur korrekten Entsorgung dieses Produktes schützen Sie die Umwelt und die
Gesundheit Ihrer Mitmenschen.
Unsachgemässe oder falsche Entsorgung gefährden Umwelt und Gesundheit. Weitere Informationen
über das Recycling dieses Produktes erhalten Sie von Ihrer Gemeinde oder den kommunalen
Entsorgungsbetrieben.
Achtung: Das Zeichen „Pb“ unter dem Symbol fur Batterien zeigt an, dass diese Batterie Blei enthalt.
Informazioni sullo smaltimento delle vecchie apparecchiature elettriche ed elettroniche e
delle batterie (valide per i paesi che hanno adottato sistemi di raccolta differenziata)
I prodotti e le batterie recanti il simbolo di un cassonetto della spazzatura su ruote barrato non possono
essere smaltiti insieme ai normali rifiuti di casa.
I vecchi prodotti elettrici ed elettronici e le batterie devono essere riciclati presso un’apposita struttura in
grado di trattare questi prodotti e di smaltirne i loro componenti.
Per conoscere dove e come recapitare tali prodotti nel luogo a voi più vicino, contattare l’apposito ufficio
comunale. Un appropriato riciclo e smaltimento aiuta a conservare la natura e a prevenire effetti nocivi alla
salute e all’ambiente.
Nota: Il simbolo “Pb” sotto al simbolo delle batterie indica che questa batteria contiene piombo.
i
JS_KWD_KDC_320UI_EN_C_7.indd iJS_KWD_KDC_320UI_EN_C_7.indd i 7/7/2017 1:54:10 PM7/7/2017 1:54:10 PM
Data Size: B6L (182 mm x 128 mm)
Book Size: B6L (182 mm x 128 mm)

Дата изготовления (месяц/год) находится на этикетке устройства.
В соответствии с Законом Российской Федерации “О защите прав потребителей” срок службы
The marking of products using lasers
(годности) данного товара “по истечении которого он может представлять опасность для жизни,
The label is attached to the chassis/case and says that the component uses laser beams that have been
здоровья потребителя, причинять вред его имуществу или окружающей среде” составляет семь (7)
classified as Class1. It means that the unit is utilizing laser beams that are of a weaker class. There is no
лет со дня производства.
danger of hazardous radiation outside the unit.
Дополнительные косметические материалы к данному товару, поставляемые вместе с ним, могут
храниться в течение двух (2) лет со дня его производства.
Kennzeichnung von Geräten mit Laser-Abtastern
Срок службы (годности), кроме срока хранения дополнительных косметических материалов,
Das Etikett ist am Chassis/Gehäuse angebracht und besagt, dass sich die Komponente Laserstrahlen
упомянутых в предыдущих двух пунктах, не затрагивает никаких других прав потребителя, в
bedient, die als Laserstrahlen der Klasse 1 klassifiziert wurden. Dies weist darauf hin, dass sich das Gerät
частности, гарантийного обслуживания KENWOOD, которое он может получить в соответствии с
Laserstrahlen bedient, die einer schwächeren Klasse angehören. Das bedeutet, dass durch den sehr
законом о правах потребителя или других законов, связанных с ним.
schwachen Laserstrahl keine Gefahr durch gefährliche Strahlungen außerhalb des Geräts besteht.
Условия хранения:
Etichetta per i prodotti che impiegano raggi laser
Температура : от -30°C до +85°C
L’etichetta si trova sul rivestimento o sulla scatola e serve ad avvertire che il componente impiega raggi
Влажность : от 0% до 90%
laser che sono stati classificati come classe 1. Ciò significa che l’apparecchio utilizza raggi laser di una classe
inferiore. Non c’è alcun pericolo di radiazioni pericolose all’esterno dell’apparecchio
Маркировка изделий, использующих лазеры
К корпусу устройства прикреплена табличка, указывающая, что устройство использует лазерные
лучи класса 1. Это означает, что в устройстве используются лазерные лучи слабой интенсивности.
Они не представляют опасности и не распространяют опасную радиацию вне устройства.
ii
JS_KWD_KDC_320UI_EN_C_7.indd iiJS_KWD_KDC_320UI_EN_C_7.indd ii 7/7/2017 1:54:10 PM7/7/2017 1:54:10 PM
Data Size: B6L (182 mm x 128 mm)
Book Size: B6L (182 mm x 128 mm)

English
Español
Hereby, JVCKENWOOD declares that the radio equipment
Por la presente, JVCKENWOOD declara que el equipo
“KDC-320UI/KDC-BT520U” is in compliance with
de radio “KDC-320UI/KDC-BT520U” cumple la Directiva
Directive 2014/53/EU.
2014/53/EU.
Declaration of Conformity with regard to the RE Directive 2014/53/EU
The full text of the EU declaration of conformity is available
El texto completo de la declaración de conformidad con la
Declaration of Conformity with regard to the RoHS Directive 2011/65/EU
at the following internet address:
UE está disponible en la siguiente dirección de internet:
Manufacturer:
http://www.kenwood.com/cs/ce/eudoc/
http://www.kenwood.com/cs/ce/eudoc/
JVC KENWOOD Corporation
Français
Português
3-12, Moriya-cho, Kanagawa-ku, Yokohama-shi, Kanagawa, 221-0022, JAPAN
Par la présente, JVCKENWOOD déclare que l’équipement
Deste modo, a JVCKENWOOD declara que o equipamento
EU Representative:
radio « KDC-320UI/KDC-BT520U » est conforme à la
de rádio “KDC-320UI/KDC-BT520U” está em conformidade
JVCKENWOOD Europe B.V.
directive 2014/53/UE.
com a Diretiva 2014/53/UE.
Amsterdamseweg 37, 1422 AC UITHOORN, THE NETHERLANDS
L’intégralité de la déclaration de conformité UE est
O texto integral da declaração de conformidade da UE está
disponible à l’adresse Internet suivante :
disponível no seguinte endereço de internet:
Konformitätserklärung in Bezug auf die RE-Vorschrift 2014/53/EU
http://www.kenwood.com/cs/ce/eudoc/
http://www.kenwood.com/cs/ce/eudoc/
Konformitätserklärung in Bezug auf die RoHS-Vorschrift 2011/65/EU
Deutsch
Polska
Hersteller:
Hiermit erklärt JVCKENWOOD, dass das Funkgerät
Niniejszym, JVCKENWOOD deklaruje, że sprzęt radiowy
JVC KENWOOD Corporation
“KDC-320UI/KDC-BT520U” der Richtlinie 2014/53/EU
“KDC-320UI/KDC-BT520U” jest zgodny z dyrektywą
3-12, Moriya-cho, Kanagawa-ku, Yokohama-shi, Kanagawa, 221-0022, JAPAN
entspricht.
2014/53/UE.
EU-Vertreter:
Der volle Text der EU-Konformitätserklärung steht unter
Pełny tekst deklaracji zgodności EU jest dostępny pod
JVCKENWOOD Europe B.V.
der folgenden Internetadresse zur Verfügung:
adresem:
Amsterdamseweg 37, 1422 AC UITHOORN, Niederlande
http://www.kenwood.com/cs/ce/eudoc/
http://www.kenwood.com/cs/ce/eudoc/
Nederlands
Český
Dichiarazione di conformità alla Direttiva RE 2014/53/EU
Hierbij verklaart JVCKENWOOD dat de radioapparatuur
Společnost JVCKENWOOD tímto prohlašuje, že rádiové
Dichiarazione di conformità relativa alla direttiva RoHS 2011/65/EU
“KDC-320UI/KDC-BT520U” in overeenstemming is met
zařízení “KDC-320UI/KDC-BT520U” splňuje podmínky
Produttore:
Richtlijn 2014/53/EU.
směrnice 2014/53/EU.
JVC KENWOOD Corporation
De volledige tekst van de EU-verklaring van
Plný text EU prohlášení o shodě je dostupný na následující
3-12, Moriya-cho, Kanagawa-ku, Yokohama-shi, Kanagawa, 221-0022, JAPAN
overeenstemming is te vinden op het volgende
internetové adrese:
Rappresentante UE:
internetadres:
http://www.kenwood.com/cs/ce/eudoc/
JVCKENWOOD Europe B.V.
http://www.kenwood.com/cs/ce/eudoc/
Magyar
Amsterdamseweg 37, 1422 AC UITHOORN, THE NETHERLANDS
Italiano
JVCKENWOOD ezennel kijelenti, hogy a
Con la presente, JVCKENWOOD dichiara che l΄apparecchio
„KDC-320UI/KDC-BT520U “ rádióberendezés megfelel a
Декларация соответствия относительно Директивы RE 2014/53/EU
radio “KDC-320UI/KDC-BT520U” è conforme alla Direttiva
2014/53/EU irányelvnek.
Декларация соответствия относительно Директивы RoHS 2011/65/EU
2014/53/UE.
Az EU konformitási nyilatkozat teljes szövege az alábbi
Производитель:
Il testo integrale della dichiarazione di conformità UE è
weboldalon érhető el:
JVC KENWOOD Corporation
disponibile al seguente indirizzo internet:
http://www.kenwood.com/cs/ce/eudoc/
3-12, Moriya-cho, Kanagawa-ku, Yokohama-shi, Kanagawa, 221-0022, ЯПОНИЯ
http://www.kenwood.com/cs/ce/eudoc/
Представительство в EC:
JVCKENWOOD Europe B.V.
Amsterdamseweg 37, 1422 AC UITHOORN, НИДЕРЛАНДЫ
iii
JS_KWD_KDC_320UI_EN_C_7.indd iiiJS_KWD_KDC_320UI_EN_C_7.indd iii 7/7/2017 1:54:10 PM7/7/2017 1:54:10 PM
Data Size: B6L (182 mm x 128 mm)
Book Size: B6L (182 mm x 128 mm)

Svenska
Dansk
Lietuviškai
БЪЛГАРСКИ
Härmed försäkrar JVCKENWOOD att
Herved erklærer JVCKENWOOD, at radioudstyret
Šiuo JVCKENWOOD pažymi, kad radijo įranga
С настоящото JVCKENWOOD декларира,
radioutrustningen “KDC-320UI/KDC-BT520U” är i
“KDC-320UI/KDC-BT520U” er i overensstemmelse
„KDC-320UI/KDC-BT520U“ atitinka 2014/53/EB
че радиооборудването на “KDC-320UI/
enlighet med direktiv 2014/53/EU.
med Direktiv 2014/53/EU.
direktyvos reikalavimus.
KDC-BT520U” е в съответствие с Директива
Den fullständiga texten av EU-försäkran
EU-overensstemmelseserklæringens fulde ordlyd
Visą EB direktyvos atitikties deklaracijos tekstą
2014/53/ЕС.
om överensstämmelse finns på följande
er tilgængelig på følgende internetadresse:
galite rasti šiuo internetiniu adresu:
Пълният текст на ЕС декларацията за
Internetadress:
http://www.kenwood.com/cs/ce/eudoc/
http://www.kenwood.com/cs/ce/eudoc/
съответствие е достъпен на следния интернет
http://www.kenwood.com/cs/ce/eudoc/
адрес:
Ελληνικά
Malti
http://www.kenwood.com/cs/ce/eudoc/
Suomi
Με το παρόν, η JVCKENWOOD δηλώνει ότι ο
B’dan, JVCKENWOOD jiddikjara li t-tagħmir tar-
JVCKENWOOD julistaa täten, että radiolaite
ραδιοεξοπλισμός «KDC-320UI/KDC-BT520U»
radju “KDC-320UI/KDC-BT520U” huwa konformi
Turkish
“KDC-320UI/KDC-BT520U” on direktiivin
συμμορφώνεται με την Οδηγία 2014/53/ΕΕ.
mad-Direttiva 2014/53/UE.
Burada, JVCKENWOOD “KDC-320UI/KDC-BT520U”
2014/53/EU mukainen.
Το πλήρες κείμενο της δήλωσης συμμόρφωσης
It-test kollu tad-dikjarazzjoni ta’ konformità huwa
radyo ekipmanının 2014/53/AB Direktifine uygun
EU-vaatimustenmukaisuusvakuutusvaatimus
της ΕΕ είναι διαθέσιμο στην ακόλουθη διεύθυνση
disponibbli fl-indirizz intranet li ġej:
olduğunu bildirir.
löytyy kokonaisuudessaan seuraavasta internet-
στο διαδίκτυο:
http://www.kenwood.com/cs/ce/eudoc/
AB uyumluluk deklarasyonunun tam metni
osoitteesta:
http://www.kenwood.com/cs/ce/eudoc/
aşağıdaki internet adresinde mevcuttur.
HRVATSKI / SRPSKI JEZIK
http://www.kenwood.com/cs/ce/eudoc/
http://www.kenwood.com/cs/ce/eudoc/
Eesti
JVCKENWOOD ovim izjavljuje da je radio oprema
Slovensko
Käesolevaga JVCKENWOOD kinnitab, et
“KDC-320UI/KDC-BT520U” u skladu s Direktivom
Русский
S tem JVCKENWOOD izjavlja, da je radijska oprema
„KDC-320UI/KDC-BT520U “ raadiovarustus on
2014/53/EU.
JVCKENWOOD настоящим заявляет, что
» KDC-320UI/KDC-BT520U « v skladu z Direktivo
vastavuses direktiiviga 2014/53/EL.
Cjeloviti tekst deklaracije Europske unije o
радиооборудование «KDC-320UI/KDC-BT520U»
2014/53/EU.
ELi vastavusdeklaratsiooni terviktekst on
usklađenosti dostupan je na sljedećoj internet
соответствует Директиве 2014/53/EU.
Celotno besedilo direktive EU o skladnosti je
kättesaadav järgmisel internetiaadressil:
adresi:
Полный текст декларации соответствия
dostopno na tem spletnem naslovu:
http://www.kenwood.com/cs/ce/eudoc/
http://www.kenwood.com/cs/ce/eudoc/
ЕС доступен по следующему адресу в сети
http://www.kenwood.com/cs/ce/eudoc/
Интернет:
Latviešu
ROMÂNĂ
http://www.kenwood.com/cs/ce/eudoc/
Slovensky
JVCKENWOOD ar šo deklarē, ka radio aparatūra
Prin prezenta, JVCKENWOOD declară că
Spoločnosť JVCKENWOOD týmto vyhlasuje, že
„KDC-320UI/KDC-BT520U” atbilst direktīvas
echipamentul radio “KDC-320UI/KDC-BT520U”
Українська
rádiové zariadenie „KDC-320UI/KDC-BT520U “
2014/53/ES prasībām.
este în conformitate cu Directiva 2014/53/UE.
Таким чином, компанія JVCKENWOOD заявляє,
vyhovuje smernici 2014/53/EÚ.
Pilns ES atbilstības deklarācijas teksts ir pieejams
Textul integral al declarației de conformitate UE
що радіообладнання «KDC-320UI/KDC-BT520U»
Celý text EÚ vyhlásenia o zhode nájdete na
šādā tīmekļa adresē:
este disponibil la urmatoarea adresă de internet:
відповідає Директиві 2014/53/EU.
nasledovnej internetovej adrese:
http://www.kenwood.com/cs/ce/eudoc/
http://www.kenwood.com/cs/ce/eudoc/
Повний текст декларації про відповідність ЄС
http://www.kenwood.com/cs/ce/eudoc/
можна знайти в Інтернеті за такою адресою:
http://www.kenwood.com/cs/ce/eudoc/
iv
JS_KWD_KDC_320UI_EN_C_7.indd ivJS_KWD_KDC_320UI_EN_C_7.indd iv 7/7/2017 1:54:10 PM7/7/2017 1:54:10 PM
Data Size: B6L (182 mm x 128 mm)
Book Size: B6L (182 mm x 128 mm)
CONTENTS
BEFORE USE
BEFORE USE 2
IMPORTANT
•
To ensure proper use, please read through this manual before using this product. It is especially important that you read and observe
BASICS 3
Warning and Caution in this manual.
GETTING STARTED 4
•
Please keep the manual in a safe and accessible place for future reference.
1 Select the display language
and cancel the demonstration
WARNING
2 Set the clock and date
•
Do not operate any function that takes your attention away from safe driving.
3 Set the initial settings
Caution
RADIO 6
Volume setting:
AUX 7
•
Adjust the volume so that you can hear sounds outside the car to prevent accidents.
•
Lower the volume before playing digital sources to avoid damaging the speakers by the sudden increase of the output level.
CD/USB/iPod/ANDROID 8
General:
•
Avoid using the external device if it might hinder safe driving.
Spotify 10
•
Make sure all important data has been backed up. We shall bear no responsibility for any loss of recorded data.
BLUETOOTH® 11
•
Never put or leave any metallic objects (such as coins or metal tools) inside the unit to prevent a short circuit.
•
If a disc error occurs due to condensation on the laser lens, eject the disc and wait for the moisture to evaporate.
AUDIO SETTINGS 17
•
USB rating is indicated on the main unit. To view, detach the faceplate.
( 3)
•
Depending on the types of cars, the antenna will automatically extend when you turn on the unit with the antenna control wire connected
DISPLAY SETTINGS 21
( 30)
. Turn off the unit or change the source to STANDBY when parking at a low ceiling area.
TROUBLESHOOTING 22
REFERENCES 24
How to read this manual
Maintenance
•
Operations are explained mainly using buttons on the faceplate of .
More information
•
English indications are used for the purpose of explanation. You can select the display language from the
[FUNCTION]
menu.
( 5)
•
[XX]
indicates the selected items.
SPECIFICATIONS 27
•
( XX)
indicates references are available on the stated page.
INSTALLATION/
CONNECTION 28
2
ENGLISH
JS_KWD_KDC_320UI_EN_EN_7.indd 2JS_KWD_KDC_320UI_EN_EN_7.indd 2 7/7/2017 1:54:27 PM7/7/2017 1:54:27 PM
Book Size: B6L (182 mm x 128 mm)
Data Size: B6L (182 mm x 128 mm)
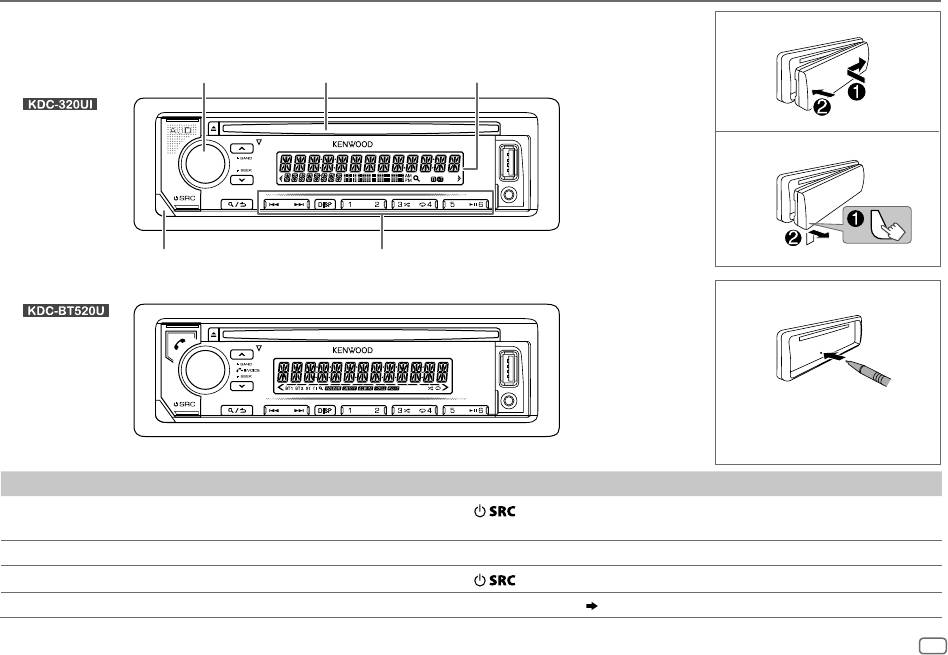
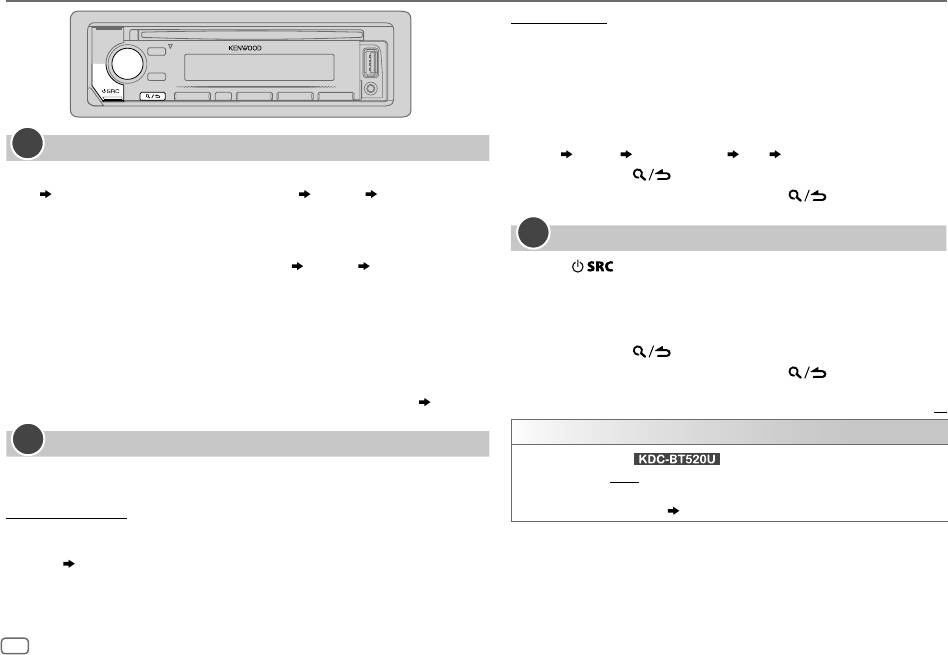
BASICS
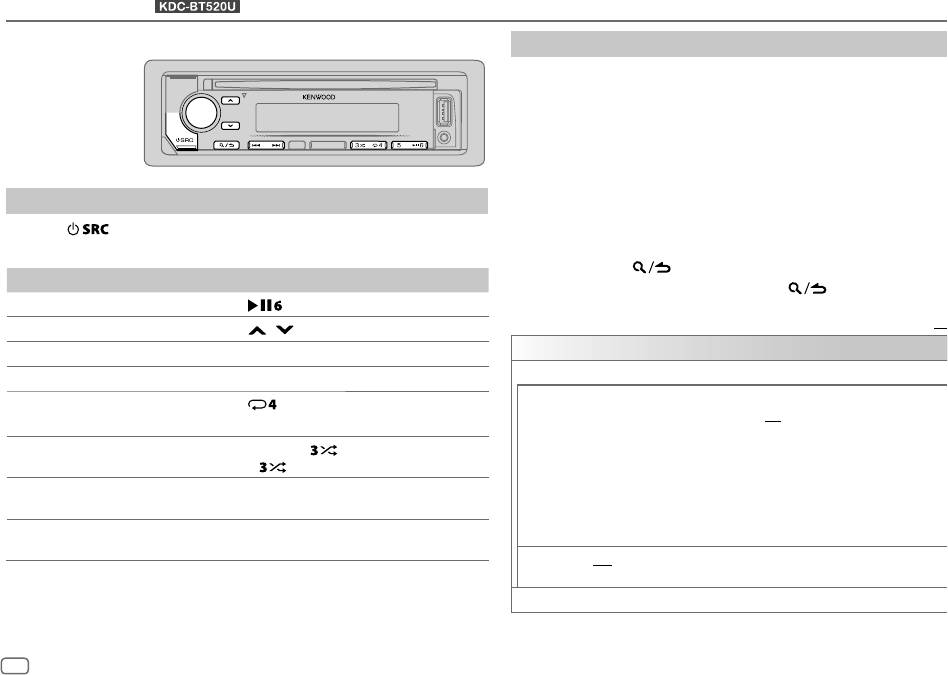
Faceplate
Attach
Volume knob
Loading slot Display window
Detach
Detach button
Flashes when the unit enters searching status.
How to reset
Reset the unit within 5seconds
after detaching the faceplate.
To On the faceplate
Turn on the power
Press
.
• Press and hold to turn off the power.
Adjust the volume Turn the volume knob.
Select a source
Press
repeatedly.
Change the display information Press DISP repeatedly.
( 26)
ENGLISH
3
JS_KWD_KDC_320UI_EN_EN_7.indd 3JS_KWD_KDC_320UI_EN_EN_7.indd 3 7/7/2017 1:54:27 PM7/7/2017 1:54:27 PM
Book Size: B6L (182 mm x 128 mm)
Data Size: B6L (182 mm x 128 mm)
GETTING STARTED
To set the date
7 Turn the volume knob to select
[DATE FORMAT]
, then press the
knob.
8 Turn the volume knob to select
[DD/MM/YY]
or
[MM/DD/YY]
, then
press the knob.
9 Turn the volume knob to select
[DATE SET]
, then press the knob.
10 Turn the volume knob to make the settings, then press the
knob.
1
Select the display language and cancel the demonstration
Day
Month Year or Month Day Year
When you turn on the power for the first time (or
[FACTORY RESET]
is set to
11 Press and hold to exit.
[YES]
,
5
), the display shows: “SEL LANGUAGE” “PRESS” “VOLUME KNOB”
To return to the previous setting item, press .
1 Turn the volume knob to select
[ENG]
(English),
[RUS]
(Russian) or
[SPA]
(Spanish), then press the knob.
3
Set the initial settings
[ENG]
is selected for the initial setup.
Then, the display shows: “CANCEL DEMO”
“PRESS” “VOLUME KNOB”.
1
Press repeatedly to enter STANDBY.
2 Press the volume knob.
2 Press the volume knob to enter
[FUNCTION]
.
[YES]
is selected for the initial setup.
3 Turn the volume knob to select an item (see the following
3 Press the volume knob again.
table), then press the knob.
“DEMO OFF” appears.
4 Repeat step 3 until the desired item is selected or activated.
5 Press and hold to exit.
Then, the display shows the selected crossover type: “2-WAY X ’ OVER” or
To return to the previous setting item, press .
“3-WAY X ’ OVER”
• To change the crossover type, see “Change the crossover type”.
( 5)
Default:
XX
AUDIO CONTROL
2
Set the clock and date
SWITCH
(For )
1
Press the volume knob to enter
[FUNCTION]
.
PREOUT
*
REAR
/
SUB-W
: Selects whether rear speakers or a subwoofer are
2 Turn the volume knob to select
[CLOCK]
, then press the knob.
connected to the line out terminals on the rear (through an external
To adjust the clock
amplifier).
( 31)
3 Turn the volume knob to select
[CLOCK ADJUST]
, then press the knob.
4 Turn the volume knob to make the settings, then press the knob.
Hour
Minute
5 Turn the volume knob to select
[CLOCK FORMAT]
, then press the knob.
6 Turn the volume knob to select
[12H]
or
[24H]
, then press the knob.
4
ENGLISH
JS_KWD_KDC_320UI_EN_EN_7.indd 4JS_KWD_KDC_320UI_EN_EN_7.indd 4 7/7/2017 1:54:27 PM7/7/2017 1:54:27 PM
Data Size: B6L (182 mm x 128 mm)
Book Size: B6L (182 mm x 128 mm)
GETTING STARTED
DISPLAY
FACTORY RESET YES
:Resets the settings to default (except the stored station).;
NO
:Cancels
EASY MENU
(For )
When entering
[FUNCTION]
...
CLOCK
ON
:ZONE 1 illumination changes to white color.;
CLOCK DISPLAY
ON
:The clock time is shown on the display even when the unit is
OFF
:ZONE 1 illumination remains as
[COLOR SELECT]
color.
( 21)
turned off.;
OFF
:Cancels.
•
ZONE 2 illumination changes to light blue color when you enter
[FUNCTION]
,
irregardless of the
[EASY MENU]
setting.
ENGLISH
Select the display language for
[FUNCTION]
menu and music
•
Refer to the illustration on page 21 for zone identification.
РУССКИЙ
information if applicable.
TUNER SETTING
By default,
[ENGLISH]
is selected.
ESPANOL
PRESET TYPE
NORMAL
:Memorizes one station for each preset button in each band (FM1/
FM2/FM3/MW/LW).;
MIX
:Memorizes one station for each preset button,
regardless of the selected band.
Change the crossover type
SYSTEM
1
Press repeatedly to enter STANDBY.
KEY BEEP
*
ON
:Activates the keypress tone.;
OFF
:Deactivates.
2 Press and hold number buttons 4 and 5 to enter crossover
select.
SOURCE SELECT
The current crossover type appears.
SPOTIFY SRC
ON
:Enables SPOTIFY in source selection.;
OFF
:Disables.
( 10)
3 Turn the volume knob to select “2WAY” or “3WAY”, then press
the knob.
BUILT-IN AUX
ON
:Enables AUX in source selection.;
OFF
:Disables.
( 7)
4 Turn the volume knob to select “YES” or “NO”, then press the
knob.
P-OFF WAIT
Applicable only when the demonstration mode is turned off.
The selected crossover type appears.
Sets the duration when the unit will automatically turn off (while in standby
mode) to save the battery.
• To cancel, press and hold
.
20M
: 20minutes;
40M
: 40minutes;
60M
: 60minutes;
– – –
:Cancels
• To adjust the selected crossover settings,
( 19)
.
CD READ 1
:Automatically distinguishes between audio file disc and music CD.;
2
:Forces
Caution
to play as a music CD. No sound can be heard if an audio file disc is played.
Select a crossover type according to how the speakers are
F/W UPDATE
connected.
( 30)
If you select a wrong type:
UPDATE SYSTEM
• The speakers may damage.
F/W UP xxxx
YES
:Starts upgrading the firmware.;
NO
:Cancels (upgrading is not activated).
• The output sound level may be extremely high or low.
For details on how to update the firmware, visit <www.kenwood.com/cs/ce/>.
* Not applicable if 3-way crossover is selected.
ENGLISH
5
JS_KWD_KDC_320UI_EN_EN_7.indd 5JS_KWD_KDC_320UI_EN_EN_7.indd 5 7/7/2017 1:54:28 PM7/7/2017 1:54:28 PM
Book Size: B6L (182 mm x 128 mm)
Data Size: B6L (182 mm x 128 mm)
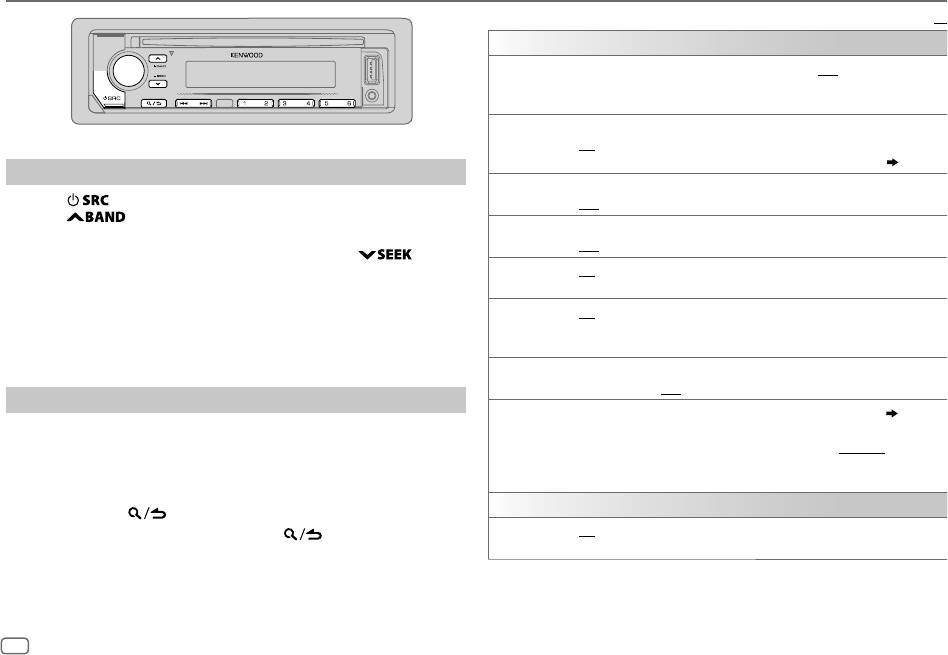
RADIO
Default:
XX
TUNER SETTING
LOCAL SEEK
ON
: Searches only stations with good reception. ;
OFF
: Cancels.
•
Settings made are applicable only to the selected source/station. Once
you change the source/station, you need to make the settings again.
AUTO
YES
:Automatically starts memorizing 6 stations with good reception.;
MEMORY
NO
:Cancels.
•
Selectable only if
[NORMAL]
is selected for
[PRESET TYPE]
.
( 5)
Search for a station
MONO SET
ON
:Improves the FM reception, but the stereo effect may be lost.;
1
Press repeatedly to select RADIO.
OFF
:Cancels.
2 Press repeatedly to select FM1/FM2/FM3/MW/LW.
NEWS SET ON
: The unit will temporarily switch to News Programme if available. ;
3 Press S/T to search for a station.
OFF
:Cancels.
• To change the searching method for S/T: Press
repeatedly.
REGIONAL ON
: Switches to another station only in the specific region using the “AF”
AUTO1 : Automatically search for a station.
control.;
OFF
:Cancels.
AUTO2 : Search for a preset station.
AF SET ON
: Automatically searches for another station broadcasting the same
MANUAL : Manually search for a station.
program in the same Radio Data System network with better reception
• To store a station: Press and hold one of the number buttons (1to6).
when the current reception is poor.;
OFF
:Cancels.
• To select a stored station: Press one of the number buttons (1to6).
TI ON
:Allows the unit to temporarily switch to Traffic Information if available
(“TI” lights up).;
OFF
:Cancels.
Other settings
PTY SEARCH
1
Turn the volume knob to select the available Program Type
( 7)
, then
1
Press the volume knob to enter
[FUNCTION]
.
press the knob.
2 Turn the volume knob to select an item (see the following table),
2
Turn the volume knob to select the PTY language (
ENGLISH
/
FRENCH
/
then press the knob.
GERMAN
), then press the knob.
3 Repeat step 2 until the desired item is selected/activated or follow
3
Press
S
/
T
to start searching.
the instructions stated on the selected item.
CLOCK
4 Press and hold to exit.
To return to the previous setting item, press .
TIME SYNC
ON
:Synchronizes the unit’s time to the Radio Data System station time.;
OFF
:Cancels.
6
ENGLISH
JS_KWD_KDC_320UI_EN_EN_7.indd 6JS_KWD_KDC_320UI_EN_EN_7.indd 6 7/7/2017 1:54:28 PM7/7/2017 1:54:28 PM
Data Size: B6L (182 mm x 128 mm)
Book Size: B6L (182 mm x 128 mm)
RADIO
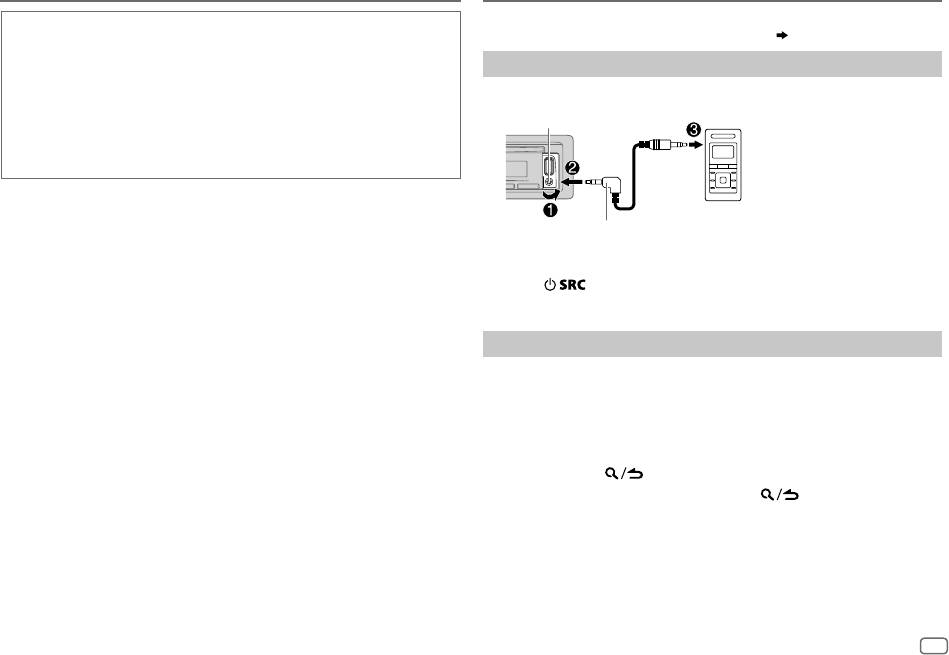
AUX
Preparation:
Available Program Type for
[PTY SEARCH]
Select
[ON]
for
[BUILT-IN AUX]
for
[SOURCE SELECT]
.
( 5)
SPEECH
:
NEWS
,
AFFAIRS
,
INFO
(information),
SPORT
,
EDUCATE
,
DRAMA
,
CULTURE
,
SCIENCE
,
VARIED
,
WEATHER
,
FINANCE
,
CHILDREN
,
SOCIAL
,
Start listening
RELIGION
,
PHONE IN
,
TRAVEL
,
LEISURE
,
DOCUMENT
MUSIC
:
POP M
(music),
ROCK M
(music),
EASY M
(music),
LIGHT M
(music),
1
Connect a portable audio player (commercially available).
CLASSICS
,
OTHER M
(music),
JAZZ
,
COUNTRY
,
NATION M
(music),
Auxiliary input jack
OLDIES
,
FOLK M
(music)
Portable audio
The unit will search for the Program Type categorized under
[SPEECH]
or
player
[MUSIC]
if selected.
•
[LOCAL SEEK]
/
[MONO SET]
/
[NEWS SET]
/
[REGIONAL]
/
[AF SET]
/
[TI]
/
[PTY SEARCH]
is
selectable only when the band is FM1/FM2/FM3.
3.5mm stereo mini plug with “L” shaped connector
• If the volume is adjusted during reception of traffic information or news
(commercially available)
bulletin, the adjusted volume is memorized automatically. It will be
applied the next time traffic information or news bulletin is turned on.
2 Press repeatedly to select AUX.
3 Turn on the portable audio player and start playback.
Set the AUX name
While listening to a portable audio player connected to the unit...
1 Press the volume knob to enter
[FUNCTION]
.
2 Turn the volume knob to select
[SYSTEM]
, then press the knob.
3 Turn the volume knob to select
[AUX NAME SET]
, then press the knob.
4 Turn the volume knob to select an item, then press the knob.
AUX
(default)/
DVD
/
PORTABLE
/
GAME
/
VIDEO
/
TV
5 Press and hold to exit.
To return to the previous setting item, press .
ENGLISH
7
JS_KWD_KDC_320UI_EN_EN_7.indd 7JS_KWD_KDC_320UI_EN_EN_7.indd 7 7/7/2017 1:54:28 PM7/7/2017 1:54:28 PM
Book Size: B6L (182 mm x 128 mm)
Data Size: B6L (182 mm x 128 mm)
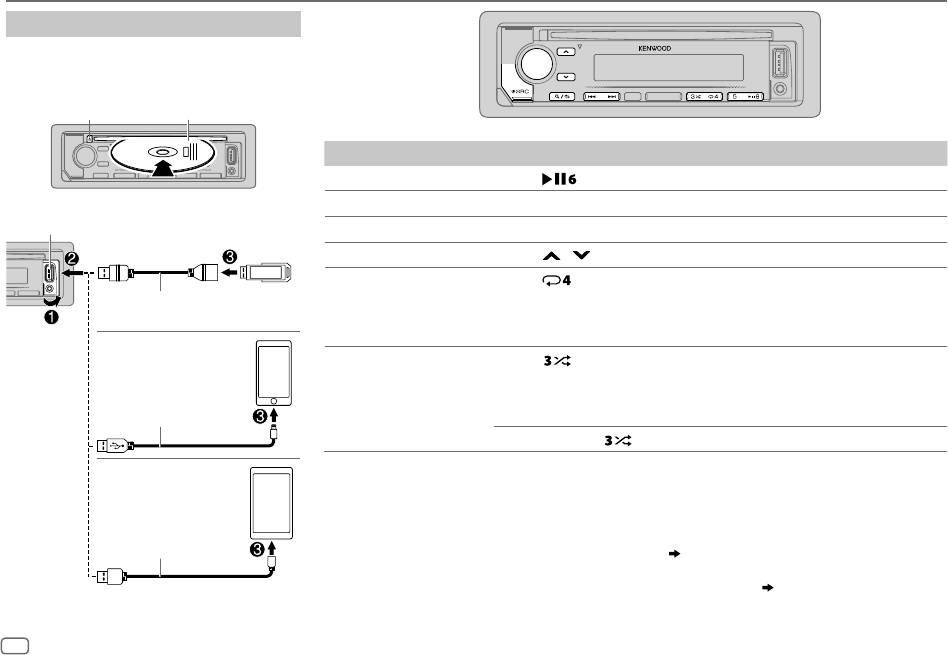
CD/USB/iPod/ANDROID
Start playback
The source changes automatically and
playback starts.
CD
M
Eject disc
Label side
To On the faceplate
Playback/pause Press .
Reverse/Fast-forward
*
4
Press and hold S/T.
USB input terminal
Select a track/file
Press S/T.
USB
Select a folder
*
5
Press / .
Repeat play
*
6
Press repeatedly.
CA-U1EX (max.: 500mA)
TRACK REPEAT
/
ALL REPEAT
: Audio CD
(optional accessory)
FILE REPEAT
/
FOLDER REPEAT
/
ALL REPEAT
: MP3/WMA/AAC/WAV/FLAC file
FILE REPEAT
/
FOLDER REPEAT
/
REPEAT OFF
: iPod or ANDROID
iPod/iPhone
Random play
*
6
Press repeatedly.
DISC RANDOM
/
RANDOM OFF
: Audio CD
KCA-iP102/KCA-iP103 (optional
*
FOLDER RANDOM
/
RANDOM OFF
: MP3/WMA/AAC/WAV/FLAC file, iPod or
accessory)
1
or accessory of the
iPod/iPhone
*
2
ANDROID
Press and hold
to select
ALL RANDOM
.
*
7
*
1
ANDROID
*
3
KCA-iP102 : 30-pin type, KCA-iP103 : Lightning type
*
2
Do not leave the cable inside the car when not using.
*
3
When connecting an Android device, “Press [VIEW] to install KENWOOD MUSIC PLAY APP” is shown. Follow the instructions
to install the application. You can also install the latest version of KENWOOD MUSIC PLAY application on your Android device
USB cable
*
2
before connecting. For more information, visit <www.kenwood.com/cs/ce/>.
(commercially available)
*
4
For ANDROID: Applicable only when
[BROWSE MODE]
is selected.
( 9)
*
5
For CD: Only for MP3/WMA/AAC files. This does not work for iPod/ANDROID.
*
6
For iPod/ANDROID: Applicable only when
[MODE OFF]
/
[BROWSE MODE]
is selected.
( 9)
*
7
For CD: Only for MP3/WMA/AAC files.
8
ENGLISH
JS_KWD_KDC_320UI_EN_EN_7.indd 8JS_KWD_KDC_320UI_EN_EN_7.indd 8 7/7/2017 1:54:29 PM7/7/2017 1:54:29 PM
Data Size: B6L (182 mm x 128 mm)
Book Size: B6L (182 mm x 128 mm)
CD/USB/iPod/ANDROID
1 Press .
Select control mode
2 Turn the volume knob to select a folder/list, then press the knob.
While in iPod USB source, press 5 repeatedly.
3 Turn the volume knob to select a file, then press the knob.
MODE ON
: Control iPod using the iPod itself. However, you can still play/
pause, file skip, fast-forward or reverse from this unit.
Quick Search
(applicable only for CD, USB and ANDROID source)
MODE OFF
: Control iPod from this unit.
If you have many files, you can search through them quickly.
Turn the volume knob quickly to browse through the list quickly.
While in ANDROID source, press 5 repeatedly.
BROWSE MODE
: Control Android device from this unit via KENWOOD
Skip Search
(applicable only for iPod USB and ANDROID source)
MUSIC PLAY application installed in the Android device.
Press S/T to search at a preset skip search ratio.
HAND MODE
: Control Android device using the Android device itself via
( 10, [SKIP SEARCH])
other media player applications installed in the Android
• Pressing and holding S/T searches at a 10
%
ratio.
device. However, you can still play/pause and file skip from
Alphabet search
(applicable only for iPod USB and ANDROID source)
this unit.
You can search for a file according to the first character.
For iPod USB source
Select music drive
1 Turn the volume knob quickly to enter character search.
2 Turn the volume knob to select the character.
While in USB source, press 5 repeatedly.
• Select “
Stored songs in the following drive will be played back.
*
” to search for a character other than AtoZ, 0to9.
3 Press S/T to move to the entry position.
• Selected internal or external memory of a smartphone (Mass Storage
• You can enter up to 3characters.
Class).
4 Press the volume knob to start searching.
• Selected drive of a multiple drives device.
For ANDROID source
1 Press / to enter character search.
Listen to TuneIn Radio/TuneIn Radio Pro/Aupeo
2 Turn the volume knob to select the character.
^A^: Upper case letters (A to Z)
While listening to TuneIn Radio, TuneIn Radio Pro or Aupeo, connect the
_A_: Lower case letters (a to z)
iPod/iPhone to the USB input terminal of the unit.
-0-: Numbers (0 to 9)
• The unit will output the sound from these applications.
***
: Character other than AtoZ, 0to9
3 Press the volume knob to start searching.
Select a file from a folder/list
• To return to the root folder/first file/top menu, press 5.
(Not applicable for
For iPod/ANDROID, applicable only when
[MODE OFF]
/
[BROWSE MODE]
is
BT AUDIO source.)
selected.
• To return to the previous setting item, press .
• To cancel, press and hold
.
ENGLISH
9
JS_KWD_KDC_320UI_EN_EN_7.indd 9JS_KWD_KDC_320UI_EN_EN_7.indd 9 7/7/2017 1:54:29 PM7/7/2017 1:54:29 PM
Book Size: B6L (182 mm x 128 mm)
Data Size: B6L (182 mm x 128 mm)
CD/USB/iPod/ANDROID
Spotify
Preparation:
Settings to use KENWOOD Remote application
Install the latest version of the Spotify application on your device (iPhone/
KENWOOD Remote application is designed to control the KENWOOD car
iPod touch), then create an account and log in to Spotify.
receiver’s operations from the iPhone/iPod (via USB input terminal).
• Select
[ON]
for
[SPOTIFY SRC]
in
[SOURCE SELECT]
.
( 5)
Preparation:
Install the latest version of KENWOOD Remote application on your device
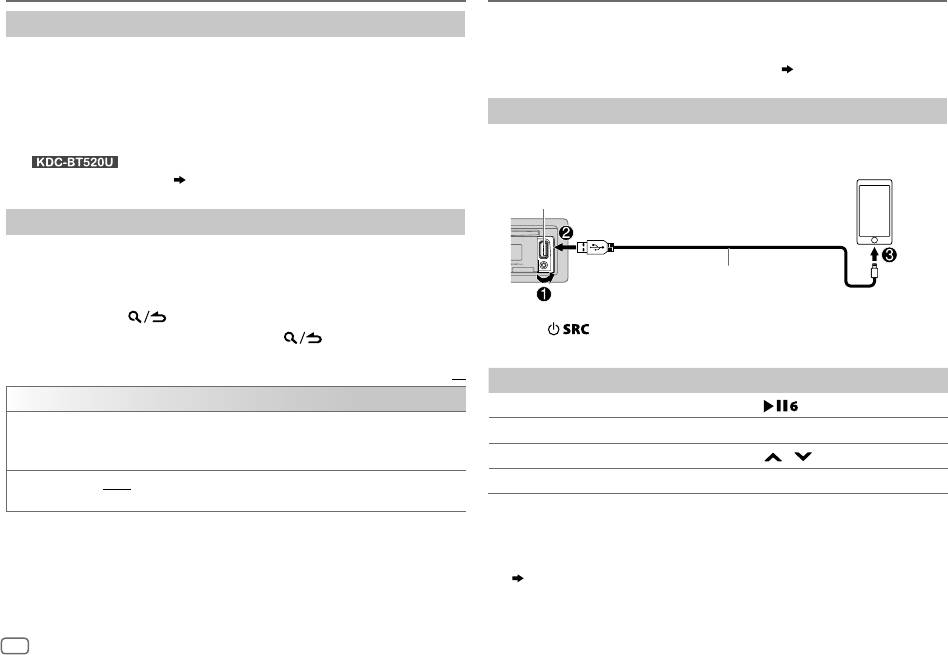
Start listening
before connecting. For more information, visit
<www.kenwood.com/cs/ce/>.
1
Open the Spotify application on your device.
2 Connect your device to the USB input terminal.
For
, you can also make the settings in the same way as
connection via Bluetooth.
( 16, 17)
USB input terminal
Other settings
1
Press the volume knob to enter
[FUNCTION]
.
2 Turn the volume knob to select an item (see the following table),
KCA-iP102/KCA-iP103 (optional accessory)
*
1
then press the knob.
or accessory of the iPod/iPhone
*
2
3 Repeat step 2 until the desired item is selected or activated.
4 Press and hold to exit.
3 Press repeatedly to select SPOTIFY.
To return to the previous setting item, press .
Broadcast starts automatically.
Default:
XX
To On the faceplate
USB
Playback/pause Press .
MUSIC DRIVE DRIVE CHANGE
:The next drive (
[DRIVE 1]
to
[DRIVE 4]
) is selected
Skip a track
Press S
*
4
/T.
automatically and playback starts.
3
Repeat steps
1
to
3
to select the following drives.
Thumbs up or thumbs down
*
Press / .
SKIP SEARCH 0.5%
/
1%
/
5%
/
10%
: While listening to iPod USB or ANDROID source,
Start radio Press and hold 5.
selects the skip search ratio over the total files.
*
1
KCA-iP102: 30-pin type, KCA-iP103: Lightning type.
*
2
Do not leave the cable inside the car when not using.
*
3
This feature is available for tracks in Radio only. If thumbs down is selected, the current
track is skipped.
*
4
( 11)
10
ENGLISH
JS_KWD_KDC_320UI_EN_EN_7.indd 10JS_KWD_KDC_320UI_EN_EN_7.indd 10 7/7/2017 1:54:29 PM7/7/2017 1:54:29 PM
Data Size: B6L (182 mm x 128 mm)
Book Size: B6L (182 mm x 128 mm)

Spotify
BLUETOOTH®
(for )
BLUETOOTH — Connection
To On the faceplate
Repeat play
*
5
Press repeatedly.
Supported Bluetooth profiles Supported Bluetooth codecs
REPEAT ALL
/
REPEAT ONE
*
4
/
REPEAT OFF
– Hands-Free Profile (HFP)
– Sub Band Codec (SBC)
Random play
*
5
– Advanced Audio Distribution Profile (A2DP)
Press repeatedly.
*
4
– Advanced Audio Coding (AAC)
– Audio/Video Remote Control Profile (AVRCP)
SHUFFLE ON
/
SHUFFLE OFF
– Serial Port Profile (SPP)
*
4
– Phonebook Access Profile (PBAP)
Available for premium account users only.
*
5
Available for tracks in Playlists only.
Connect the microphone
Save favorite song information
Rear panel
While listening to the Radio on Spotify...
Microphone
Press and hold the volume knob.
(supplied)
“SAVED” appears and the information is stored to “Your Music”
or “Your Library” on your Spotify account.
Microphone input jack
To unsave, repeat the same procedure.
“REMOVED” appears and the information is removed from
Adjust the
“Your Music” or “Your Library” on your Spotify account.
microphone angle
Secure using cord clamps
(not supplied) if necessary.
Search for a song or station
1
Press .
Pair and connect a Bluetooth device for the first time
2 Turn the volume knob to select a list type, then press the
knob.
1
Press to turn on the unit.
The list types displayed differ depending on the
2 Search and select this unit model name (KDC-BT5**) on the Bluetooth device.
information sent from Spotify.
“PAIRING”
“PASS XXXXXX” Device name “PRESS” “VOLUME KNOB”
3 Turn the volume knob to select the desired song or
appears on the display.
station.
• For some Bluetooth devices, you may need to enter the Personal Identification
4 Press the volume knob to confirm.
Number (PIN) code immediately after searching.
You can browse through the list quickly by turning the
3 Press the volume knob to start pairing.
volume knob quickly.
“PAIRING OK” appears when pairing is completed.
To cancel, press and hold
.
Once pairing is completed, Bluetooth connection is established automatically. “BT1”
and/or “BT2” on the display window lights up.
ENGLISH
11
JS_KWD_KDC_320UI_EN_EN_7.indd 11JS_KWD_KDC_320UI_EN_EN_7.indd 11 7/7/2017 1:54:29 PM7/7/2017 1:54:29 PM
Book Size: B6L (182 mm x 128 mm)
Data Size: B6L (182 mm x 128 mm)
BLUETOOTH®
(for )
• This unit supports Secure Simple Pairing (SSP).
BLUETOOTH — Mobile phone
• Up to five devices can be registered (paired) in total.
• Once the pairing is completed, the Bluetooth device will remain
registered in the unit even if you reset the unit. To delete the
paired device,
15, [DEVICE DELETE]
.
• A maximum of two Bluetooth phones and one Bluetooth audio
device can be connected at any time.
However, while in BT AUDIO source, you can connect to five
Bluetooth audio devices and switch between these five devices.
( 16)
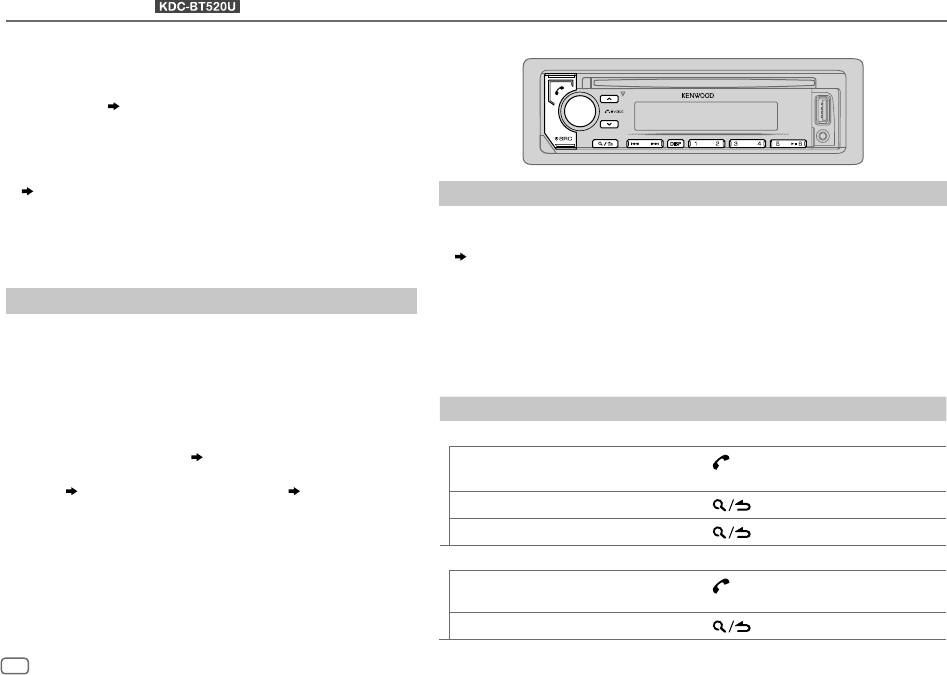
Receive a call
• Some Bluetooth devices may not automatically connect to the
unit after pairing. Connect the device to the unit manually.
When there is an incoming call:
• Refer to the instruction manual of the Bluetooth device for
• The unit answers the call automatically if
[AUTO ANSWER]
is set to a selected time.
more information.
( 13)
During a call:
Auto Pairing
• If you turn off the unit or detach the faceplate, the Bluetooth connection is
disconnected.
When you connect iPhone/iPod touch/Android device to the USB
input terminal, pairing request (via Bluetooth) is automatically
The following operations may differ or not available depending on the connected
activated.
phone.
Press the volume knob to pair once you have confirmed the
device name.
To On the faceplate
Automatic pairing request is activated only if:
First incoming call...
– Bluetooth function of the connected device is turned on.
–
[AUTO PAIRING]
is set to
[ON]
.
( 15)
Answer a call
Press
or the volume knob or one of
– KENWOOD MUSIC PLAY application is installed on the Android
the number buttons (1 to 6).
device
( 8)
and
[BROWSE MODE]
is selected.
( 9)
Reject a call
Press
.
End a call
Press
.
While talking on the first incoming call...
Answer another incoming call
Press
.
and hold the current call
Reject another incoming call
Press
.
12
ENGLISH
JS_KWD_KDC_320UI_EN_EN_7.indd 12JS_KWD_KDC_320UI_EN_EN_7.indd 12 7/7/2017 1:54:30 PM7/7/2017 1:54:30 PM
Data Size: B6L (182 mm x 128 mm)
Book Size: B6L (182 mm x 128 mm)
BLUETOOTH®
(for )
To On the faceplate
Answer incoming call automatically
1
Press to enter Bluetooth mode.
While having two active calls...
2 Turn the volume knob to select
[SETTINGS]
, then press the knob.
End current call and
Press .
3 Turn the volume knob to select
[AUTO ANSWER]
, then press the knob.
activate held call
4 Turn the volume knob to select an item, then press the knob.
1
to
30
(in seconds)/
OFF
(default)
Swap between the
Press
.
5 Press and hold to exit.
current call and held call
To return to the previous setting item, press .
Adjust the phone volume
Turn the volume knob during a call.
[00]
to
[35]
(Default:
[15]
)
• This adjustment will not affect the
volume of the other sources.
Make a call
Switch between hands-free
Press
during a call.
You can make a call from the call history, phonebook, or dialing the
and private talk modes
• Operations may vary according to the
number. Call by voice is also possible if your mobile phone has the
connected Bluetooth device.
feature.
1 Press to enter Bluetooth mode.
Improve the voice quality
“(First device name)” appears.
• If two Bluetooth phones are connected, press again to switch to
While talking on the phone...
another phone.
1 Press the volume knob to enter
[FUNCTION]
.
“(Second device name)” appears.
2 Turn the volume knob to select an item (see the following table),
2 Turn the volume knob to select an item (see the following table),
then press the knob.
then press the knob.
3 Repeat step 2 until the desired item is selected or activated.
3 Repeat step 2 until the desired item is selected/activated or follow
4 Press and hold to exit.
the instructions stated on the selected item.
To return to the previous setting item, press .
4 Press and hold to exit.
To return to the previous setting item, press .
Default:
XX
MIC GAIN –10
to
+10
(
–4
):The sensitivity of the microphone increases as the
CALL HISTORY
(Applicable only if the phone supports PBAP.)
number increased.
1
Press the volume knob to select a name or a phone number.
NR LEVEL –5
to
+5
(
0
):Adjust the noise reduction level until the least noise is
• “I” indicates call received, “O” indicates call made, “M” indicates call
being heard during a phone conversation.
missed.
• Press
DISP
to change the display category (NUMBER or NAME).
ECHO CANCEL –5
to
+5
(
0
):Adjust the echo cancellation delay time until the least
• “NO DATA” appears if there is no recorded call history.
echo is being heard during a phone conversation.
2
Press the volume knob to call.
ENGLISH
13
JS_KWD_KDC_320UI_EN_EN_7.indd 13JS_KWD_KDC_320UI_EN_EN_7.indd 13 7/7/2017 1:54:30 PM7/7/2017 1:54:30 PM
Book Size: B6L (182 mm x 128 mm)
Data Size: B6L (182 mm x 128 mm)

BLUETOOTH®
(for )
PHONE BOOK
(Applicable only if the phone supports PBAP.)
Make a call using voice recognition
1
Turn the volume knob quickly to enter alphabet search mode (if the
1
Press and hold to activate the voice recognition of the
phonebook contains many contacts).
connected phone.
The first menu (ABCDEFGHIJK) appears.
2 Speak the name of the contact you want to call or the voice
• To go to the other menu (LMNOPQRSTUV or WXYZ1
*
), press
command to control the phone functions.
/
.
• Supported Voice Recognition features vary for each phone. Refer to the
• To select the desired first letter, turn the volume knob or press
instruction manual of the connected phone for details.
S/T
, then press the knob.
• This unit also supports the intelligent personal assistant function of
Select “1” to search with numbers and select “
*
” to search with
iPhone.
symbols.
2
Turn the volume knob to select a name, then press the knob.
3
Turn the volume knob to select a phone number, then press the knob
Settings in memory
to call.
Store a contact in memory
•
The phonebook of the connected phone is automatically transferred to
the unit when pairing.
You can store up to 6 contacts into the number buttons (1 to 6).
•
Contacts are categorized as: HM (home), OF (office), MO (mobile), OT
1 Press to enter Bluetooth mode.
(other), GE (general)
2 Turn the volume knob to select
[CALL HISTORY]
,
[PHONE BOOK]
, or
•
This unit can display only non-accent letters. (Accent letters such as “Ú”
[NUMBER DIAL]
, then press the knob.
is shown as “U”.)
3 Turn the volume knob to select a contact or enter a phone number.
If a contact is selected, press the volume knob to show the phone
NUMBER DIAL
1
Turn the volume knob to select a number (0 to 9) or character
number.
(
, #, +).
4 Press and hold one of the number buttons (1 to 6).
2
Press
S/T
to move the entry position.
“STORED” appears when the contact is stored.
Repeat steps
1
and
2
until you finish entering the phone number.
To erase a contact from the preset memory, select
[NUMBER DIAL]
in step 2
3
Press the volume knob to call.
and store a blank number.
VOICE
Speak the name of the contact you want to call or the voice command to
control the phone functions.
( Make a call using voice recognition)
Make a call from memory
BATT LOW
/
MID
/
FULL
*
:Shows the strength of the battery.
1
Press to enter Bluetooth mode.
2 Press one of the number buttons (1 to 6).
NO SIGNAL
/
LOW
/
MID
/
MAX
*
:Shows the strength of the current received signal.
3 Press the volume knob to call.
*
Functionality depends on the type of the phone used.
“NO MEMORY” appears if there is no contacts stored.
14
ENGLISH
JS_KWD_KDC_320UI_EN_EN_7.indd 14JS_KWD_KDC_320UI_EN_EN_7.indd 14 7/7/2017 1:54:30 PM7/7/2017 1:54:30 PM
Data Size: B6L (182 mm x 128 mm)
Book Size: B6L (182 mm x 128 mm)
BLUETOOTH®
(for )
Other settings
Bluetooth test mode
1
Press the volume knob to enter
[FUNCTION]
.
You can check the connectivity of the supported profile
2 Turn the volume knob to select an item (see the following table), then press the
between the Bluetooth device and the unit.
knob.
• Make sure there is no Bluetooth device paired.
3 Repeat step 2 until the desired item is selected/activated or follow the
1 Press and hold .
instructions stated on the selected item.
“PLEASE PAIR YOUR PHONE PIN 0000” appears.
4 Press and hold to exit.
2 Search and select this unit model name (KDC-BT5**)
To return to the previous setting item, press .
on the Bluetooth device.
3 Operate the Bluetooth device to confirm pairing.
Default:
XX
“TESTING” flashes on the display.
BT MODE
The connectivity result (OK or NG) appears after the test.
PHONE SELECT
Selects the phone or audio device to connect or disconnect.
PAIRING: Pairing status
“
*
” appears in front of the device name when connected.
HF CNT: Hands-Free Profile (HFP) compatibility
“
” appears in front of the current playback audio device.
AUD CNT: Advanced Audio Distribution Profile (A2DP)
AUDIO SELECT
•
You can only connect a maximum of two Bluetooth phones and one Bluetooth audio
compatibility
device at any time.
PB DL: Phonebook Access profile (PBAP) compatibility
DEVICE DELETE
1
Turn the volume knob to select a device to delete, then press the knob.
To cancel test mode, press and hold
to turn off the
2
Turn the volume knob to select
[YES]
or
[NO]
, then press the knob.
unit.
PIN CODE EDIT
Changes the PIN code (up to 6 digits).
(0000)
1
Turn the volume knob to select a number.
2
Press
S
/
T
to move the entry position.
Repeat steps
1
and
2
until you finish entering the PIN code.
3
Press the volume knob to confirm.
RECONNECT ON
:The unit automatically reconnect when the last connected Bluetooth device is within
range.;
OFF
:Cancels.
AUTO PAIRING ON
:The unit automatically pair supported Bluetooth device (iPhone/iPod touch/Android
device) when it is connected through USB input terminal.Depending on the operating
system of the connected device, this function may not work. ;
OFF
:Cancels.
INITIALIZE YES
:Initializes all the Bluetooth settings (including stored pairing, phonebook, and etc.).;
NO
:Cancels.
ENGLISH
15
JS_KWD_KDC_320UI_EN_EN_7.indd 15JS_KWD_KDC_320UI_EN_EN_7.indd 15 7/7/2017 1:54:30 PM7/7/2017 1:54:30 PM
Book Size: B6L (182 mm x 128 mm)
Data Size: B6L (182 mm x 128 mm)
BLUETOOTH®
(for )
BLUETOOTH — Audio
Settings to use KENWOOD Remote application
While in BT AUDIO
KENWOOD Remote application is designed to control the KENWOOD
source, you can
car receiver’s operations from the iPhone/iPod (via Bluetooth or via
connect to five
USB input terminal) or Android smartphone (via Bluetooth).
Bluetooth audio
devices and switch
Preparation:
between these five
Install the latest version of KENWOOD Remote application on your
devices.
device before connecting. For more information, visit
<www.kenwood.com/cs/ce/>.
Audio player via Bluetooth
1 Press the volume knob to enter
[FUNCTION]
.
2 Turn the volume knob to select an item (see the following
1
Press repeatedly to select BTAUDIO.
table), then press the knob.
2 Operate the Bluetooth audio player to start playback.
3 Repeat step 2 until the desired item is selected or activated.
4 Press and hold to exit.
To On the faceplate
To return to the previous setting item, press .
Playback/pause Press .
Default:
XX
Select group or folder Press
/ .
REMOTE APP
Reverse/Forward skip
Press S/T.
SELECT
Select the device (IOS or ANDROID) to use the application.
Reverse/Fast-forward
Press and hold S/T.
IOS YES
:Selects iPhone/iPod to use the application via Bluetooth or
Repeat play Press
repeatedly.
connected via USB input terminal.;
NO
:Cancels.
ALL REPEAT
,
FILE REPEAT
,
REPEAT OFF
If IOS is selected, select iPod BT source (or iPod USB if your iPhone/iPod is
Random play Press and hold to select
ALL RANDOM
.
connected via USB input terminal) to activate the application.
• Press
to select
RANDOM OFF
.
•
The connectivity of the application will be interrupted or disconnected
if:
Select a file from a folder/list
Refer to “Select a file from a folder/list” on
– You change from iPod BT source to any playback source connected
page 9.
via the USB input terminal.
Switch between connected
Press 5.
*
– You change from iPod USB source to iPod BT source.
Bluetooth audio devices
ANDROID YES
:Selects Android smartphone to use the application via Bluetooth.;
NO
: Cancels.
*
Pressing the “Play” key on the connected device itself also causes switching of sound output from
the device.
ANDROID LIST
*:Selects the Android smartphone to use from the list.
Operations and display indications may differ according to their availability
*
Displayed only when
[ANDROID]
of
[SELECT]
is set to
[YES]
.
on the connected device.
16
ENGLISH
JS_KWD_KDC_320UI_EN_EN_7.indd 16JS_KWD_KDC_320UI_EN_EN_7.indd 16 7/7/2017 1:54:30 PM7/7/2017 1:54:30 PM
Data Size: B6L (182 mm x 128 mm)
Book Size: B6L (182 mm x 128 mm)
BLUETOOTH®
(for )
AUDIO SETTINGS
While listening to any source...
STATUS
Shows the status of the selected device.
IOS CONNECTED
: You are able to use the application using the iPhone/iPod
1 Press the volume knob to enter
[FUNCTION]
.
connected via Bluetooth or USB input terminal.
(For
) Press AUD to enter
[AUDIO CONTROL]
directly.
IOS NOT CONNECTED
: No IOS device is connected to use the application.
2 Turn the volume knob to select an item (see the following table),
ANDROID CONNECTED
: You are able to use the application using the Android
then press the knob.
smartphone connected via Bluetooth.
3 Repeat step 2 until the desired item is selected or activated.
ANDROID NOT CONNECTED
: No Android device is connected to use the
4 Press and hold to exit.
application.
To return to the previous setting item, press .
Default:
XX
Listen to iPhone/iPod via Bluetooth
AUDIO CONTROL
You can listen to the songs on the iPhone/iPod via Bluetooth on this unit.
SUB-W LEVEL
LEVEL –50
to
LEVEL +10
(
LEVEL 0
): Adjusts the subwoofer
output level.
Press repeatedly to select iPodBT.
• You can operate the iPod/iPhone in the same way as iPod/iPhone via
MANUAL EQ
The sound elements (frequency level, tone level, Q factor) are
USB input terminal.
( 8)
preset into each selection.
• If you plug in an iPhone/iPod to the USB input terminal while listening
62.5HZ LEVEL LEVEL –9
to
LEVEL +9
(
LEVEL 0
):Adjusts
to iPodBT source, the source automatically change to iPodUSB. Press
the level to memorize for each source.
to select iPodBT if the device is still connected via Bluetooth.
(Before making an adjustment, select the
source you want to adjust.)
Internet radio via Bluetooth
BASS EXTEND ON
:Turns on the extended bass.;
Listen to Spotify
OFF
:Cancels.
You can listen to Spotify on the iPhone/iPod/Android device via
100HZ
/
160HZ
/
250HZ
/
LEVEL –9
to
LEVEL +9
(
LEVEL 0
):Adjusts the level to
Bluetooth on this unit.
400HZ
/
630HZ
/
1KHZ
/
memorize for each source. (Before making an adjustment, select
• Make sure the USB input terminal is not connected to any device.
1.6KHZ
/
2.5KHZ
/
4KHZ
/
the source you want to adjust.)
6.3KHZ
/
10KHZ
/
16KHZ
Preparation:
Select
[ON]
for
[SPOTIFY SRC]
in
[SOURCE SELECT]
.
( 5)
Q FACTOR 1.35
/
1.50
/
2.00
:Adjust the quality factor.
1 Open the Spotify application on your device.
PRESET EQ NATURAL
/
ROCK
/
POPS
/
EASY
/
TOP40
/
JAZZ
/
POWERFUL
/
USER
:
2 Connect your device via Bluetooth connection.
( 11)
Selects a preset equalizer suitable to the music genre.
3 Press repeatedly to select SPOTIFY (for iPhone/iPod) or
(Select
[USER]
to use the settings made in
[MANUAL EQ]
.)
SPOTIFY BT (for Android device).
The source switches and broadcast starts automatically.
BASS BOOST LEVEL1
/
LEVEL2
/
LEVEL3
/
LEVEL4
/
LEVEL5
or
LV1
/
LV2
/
LV3
/
LV4
/
LV5
:Selects your preferred bass boost level.;
OFF
:Cancels.
• You can operate Spotify in the same way as Spotify via USB input
terminal.
( 10)
ENGLISH
17
JS_KWD_KDC_320UI_EN_EN_7.indd 17JS_KWD_KDC_320UI_EN_EN_7.indd 17 7/7/2017 1:54:31 PM7/7/2017 1:54:31 PM
Book Size: B6L (182 mm x 128 mm)
Data Size: B6L (182 mm x 128 mm)
AUDIO SETTINGS
LOUDNESS LEVEL1
/
LEVEL2
or
LV1
/
LV2
:Selects your preferred low and high frequencies boost to
Crossover settings
produce a well-balanced sound at a low volume level.;
OFF
:Cancels.
Below are the available setting items for 2-way crossover
SUBWOOFER SET ON
:Turns on the subwoofer output.;
OFF
:Cancels.
and 3-way crossover.
FADER
(Not applicable if 3-way crossover is selected.)
SPEAKER SIZE
R15
to
F15
(
0
):Adjusts the rear and front speaker output balance.
Selects according to the connected speaker size for
BALANCE L15
to
R15
(
0
):Adjusts the left and right speaker output balance.
optimum performance.
VOLUME OFFSET –15
to
+6
(
0
):Preset the initial volume level of each source. (Before adjustment, select the
•
The frequency and slope settings are automatically set
source you want to adjust.)
for the crossover of the selected speaker.
•
When 2-way crossover is selected, if
[NONE]
is selected
SOUND EFFECT
for
[TWEETER]
of
[FRONT]
,
[REAR]
and
[SUBWOOFER]
for
SOUND RECNSTR
(Not applicable for RADIO source and AUX source.)
[SPEAKER SIZE]
, the
[X ‘ OVER]
setting of the speaker is not
(Sound
ON
:Creates realistic sound by compensating the high-frequency components and restoring
available.
reconstruction)
the rise-time of the waveform that are lost in audio data compression.;
OFF
:Cancels.
• When 3-way crossover is selected, if
[NONE]
is selected
for
[WOOFER]
of
[SPEAKER SIZE]
, the
[X ’ OVER]
setting of
SPACE ENHANCE
(Not applicable for RADIO source.)
[WOOFER]
is not available.
SMALL
/
MEDIUM
/
LARGE
or
SML
/
MED
/
LRG
:Virtually enhances the sound space.;
OFF
:Cancels.
X ‘ OVER
SND REALIZER LEVEL1
/
LEVEL2
/
LEVEL3
or
LV1
/
LV2
/
LV3
:Virtually makes the sound more realistic.;
• [FRQ]
/
[F - HPF FRQ]
/
[R - HPF FRQ]
/
[SW LPF FRQ]
/
[HPF FRQ]
/
OFF
:Cancels.
[LPF FRQ]
: Adjusts the crossover frequency for the
selected speakers (high pass filter or low pass filter).
STAGE EQ LOW
/
MIDDLE
/
HIGH
or
LOW
/
MID
/
HI
:Virtually adjust the sound position heard from the
If
[THROUGH]
is selected, all signals are sent to the
speakers.;
OFF
:Cancels.
selected speakers.
DRIVE EQ ON
: Boosts the frequency to reduce the noise heard from outside the car or running noise
•
[F - HPF SLOPE]
/
[R - HPF SLOPE]
/
[SW LPF SLOPE]
/
[HPF SLOPE]
/
of the tyres.;
OFF
:Cancels.
[LPF SLOPE]
/
[SLOPE]:
Adjusts the crossover slope.
Selectable only if a setting other than
[THROUGH]
is
SPEAKER SIZE
Depending on the crossover type you have selected
( 5)
, 2-way crossover or 3-way
crossover setting items will be shown.
( 19)
selected for the crossover frequency.
X’OVER
By default, 2-way crossover type is selected.
• [SW LPF PHASE]
/
[PHASE]:
Selects the phase of the speaker
output to be in line with the other speaker output.
DTA SETTINGS
For settings,
20, Digital Time Alignment settings
.
• [GAIN LEFT]
/
[GAIN RIGHT]
/
[F - HPF GAIN]
/
[R - HPF GAIN]
/
CAR SETTINGS
[SW LPF GAIN]
/
[GAIN]
:
Adjusts the output volume of the
• : For 2-way crossover:
[SUB-W LEVEL]
/
[SUBWOOFER SET]
is selectable only if
selected speaker.
[SWITCH PREOUT]
is set to
[SUB-W]
.
( 4)
•
[SUB-W LEVEL]
is selectable only if
[SUBWOOFER SET]
is set to
[ON]
.
18
ENGLISH
JS_KWD_KDC_320UI_EN_EN_7.indd 18JS_KWD_KDC_320UI_EN_EN_7.indd 18 7/7/2017 1:54:31 PM7/7/2017 1:54:31 PM
Data Size: B6L (182 mm x 128 mm)
Book Size: B6L (182 mm x 128 mm)
AUDIO SETTINGS
2-way crossover setting items
3-way crossover setting items
SPEAKER SIZE
SPEAKER SIZE
FRONT SIZE
8CM
/
10CM
/
12CM
/
13CM
/
16CM
/
17CM
/
18CM
/
4×6
/
TWEETER
SMALL
/
MIDDLE
/
LARGE
5×7
/
6×8
/
6×9
/
7×10
MID RANGE
8CM
/
10CM
/
12CM
/
13CM
/
16CM
/
17CM
/
18CM
/
4×6
/
5×7
/
6×8
/
6×9
TWEETER
SMALL
/
MIDDLE
/
LARGE
/
NONE
(not connected)
WOOFER
*
2
16CM
/
20CM
/
25CM
/
30CM
/
38CM OVER
/
NONE
(not connected)
REAR 8CM
/
10CM
/
12CM
/
13CM
/
16CM
/
17CM
/
18CM
/
4×6
/
5×7
/
6×8
/
6×9
/
X ' OVER
7×10
/
NONE
(not connected)
TWEETER HPF FRQ
1KHZ
/
1.6KHZ
/
2.5KHZ
/
4KHZ
/
5KHZ
/
6.3KHZ
/
8KHZ
/
SUBWOOFER
*
1*2
16CM
/
20CM
/
25CM
/
30CM
/
38CM OVER
/
NONE
(not connected)
10KHZ
/
12.5KHZ
X ' OVER
SLOPE
–6DB
/
–12DB
TWEETER FRQ
1KHZ
/
1.6KHZ
/
2.5KHZ
/
4KHZ
/
5KHZ
/
6.3KHZ
/
8KHZ
/
PHASE
REVERSE
(180°)/
NORMAL
(0°)
10KHZ
/
12.5KHZ
GAIN –8
to
0
GAIN LEFT
–8
to
0
MID RANGE HPF FRQ
30HZ
/
40HZ
/
50HZ
/
60HZ
/
70HZ
/
80HZ
/
90HZ
/
100HZ
/
GAIN RIGHT
–8
to
0
120HZ
/
150HZ
/
180HZ
/
220HZ
/
250HZ
/
THROUGH
FRONT HPF F - HPF FRQ
30HZ
/
40HZ
/
50HZ
/
60HZ
/
70HZ
/
80HZ
/
90HZ
/
100HZ
/
HPF SLOPE
–6DB
/
–12DB
120HZ
/
150HZ
/
180HZ
/
220HZ
/
250HZ/THROUGH
LPF FRQ
1KHZ
/
1.6KHZ
/
2.5KHZ
/
4KHZ
/
5KHZ
/
6.3KHZ
/
8KHZ
/
F - HPF SLOPE
–6DB
/
–12DB
/
–18DB
/
–24DB
10KHZ
/
12.5KHZ
/
THROUGH
F - HPF GAIN
–8
to
0
LPF SLOPE
–6DB
/
–12DB
REAR HPF R - HPF FRQ
PHASE
REVERSE
(180°)/
NORMAL
(0°)
R - HPF SLOPE
(Refer
FRONT HPF
settings above.)
GAIN –8
to
0
R - HPF GAIN
WOOFER
*
2
LPF FRQ 30HZ
/
40HZ
/
50HZ
/
60HZ
/
70HZ
/
80HZ
/
90HZ
/
100HZ
/
SUBWOOFER
SW LPF FRQ 30HZ
/
40HZ
/
50HZ
/
60HZ
/
70HZ
/
80HZ
/
90HZ
/
100HZ
/
120HZ
/
150HZ
/
180HZ
/
220HZ
/
250HZ
/
THROUGH
LPF
*
1
*
2
120HZ
/
150HZ
/
180HZ
/
220HZ
/
250HZ
/
THROUGH
SLOPE
–6DB
/
–12DB
SW LPF SLOPE
–6DB
/
–12DB
/
–18DB
/
–24DB
PHASE
REVERSE
(180°)/
NORMAL
(0°)
SW LPF PHASE
REVERSE
(180°)/
NORMAL
(0°)
GAIN –8
to
0
SW LPF GAIN –8
to
0
*
1
For : Selectable only when
[SWITCH PREOUT]
is set to
[SUB-W]
.
( 4)
*
2
Selectable only when
[SUBWOOFER SET]
is set to
[ON]
.
( 18)
ENGLISH
19
JS_KWD_KDC_320UI_EN_EN_7.indd 19JS_KWD_KDC_320UI_EN_EN_7.indd 19 7/7/2017 1:54:31 PM7/7/2017 1:54:31 PM
Book Size: B6L (182 mm x 128 mm)
Data Size: B6L (182 mm x 128 mm)

AUDIO SETTINGS
•
Before making an adjustment for
[DISTANCE]
and
[GAIN]
of
[DTA SETTINGS]
, select the
Digital Time Alignment settings
speaker you want to adjust:
Digital Time Alignment sets the delay time of the speaker output to
When 2-way crossover is selected:
create a more suitable environment for your vehicle.
FRONT LEFT
/
FRONT RIGHT
/
REAR LEFT
/
REAR RIGHT
/
SUBWOOFER
• For more information,
Determining the value for [DISTANCE] and [GAIN] of
– You can only select
[REAR LEFT]
,
[REAR RIGHT]
and
[SUBWOOFER]
if a setting other
[DTA SETTINGS].
than
[NONE]
is selected for
[REAR]
and
[SUBWOOFER]
of
[SPEAKER SIZE]
.
( 19)
When 3-way crossover is selected:
DTA SETTINGS
TWEETER LEFT
/
TWEETER RIGHT
/
MID LEFT
/
MID RIGHT
/
WOOFER
POSITION
Selects your listening position (reference point).
– You can only select
[WOOFER]
if a setting other than
[NONE]
is selected for
[WOOFER]
of
ALL
:Not compensating;
FRONT RIGHT:
Front right seat;
[SPEAKER SIZE]
.
( 19)
FRONT LEFT
:Front left seat;
FRONT ALL
:Front seat
•
[FRONT ALL]
is displayed only when
[2-WAY X ’ OVER]
is selected.
•
[R-SP LOCATION]
of
[CAR SETTINGS]
is selectable only if:
( 5)
– 2-way crossover is selected.
( 5)
– A setting other than
[NONE]
is selected for
[REAR]
of
[SPEAKER SIZE]
.
( 19)
DISTANCE 0CM
to
610CM
:Fine adjust the distance to compensate. (Before
making an adjustment, select the speaker you want to adjust.)
Determining the value for [DISTANCE] and [GAIN] of [DTA SETTINGS]
GAIN –8DB
to
0DB
:Fine adjust the output volume of the selected speaker.
(Before making an adjustment, select the speaker you want to adjust.)
If you specify the distance from the center of the
currently set listening position to every speaker,
DTA RESET YES
:Resets the settings (
[DISTANCE]
and
[GAIN]
) of the selected
the delay time will be automatically computed
[POSITION]
to default.;
NO
:Cancels.
and set.
CAR SETTINGS
Identify your car type and rear speaker location in order to make the
1
Determine the center of the currently set
adjustment for
[DTA SETTINGS]
.
listening position as the reference point.
2
Measure the distances from the reference
CAR TYPE COMPACT
/
FULL SIZE CAR
/
WAGON
/
MINIVAN
/
SUV
/
point to the speakers.
MINIVAN(LONG)
:Selects the type of vehicle.;
OFF:
Not
3
Calculate the differences between the
compensating.
distance of the furthest speaker (rear
R-SP LOCATION
Selects the location of the rear speakers in your vehicle to calculate the
speaker) and other speakers.
furthest distance from the listening position selected (reference point).
4
Set the
[DISTANCE]
calculated in step
3
for
•
DOOR
/
REAR DECK
:Selectable only when
[CAR TYPE]
is selected as
individual speakers.
[OFF]
,
[COMPACT]
,
[FULL SIZE CAR]
,
[WAGON]
or
[SUV]
.
5
Adjust
[GAIN]
for individual speakers.
•
2ND ROW
/
3RD ROW
:Selectable only when
[CAR TYPE]
is selected
Example: When
[FRONT ALL]
is selected as the
as
[MINIVAN]
or
[MINIVAN(LONG)]
.
listening position
20
ENGLISH
JS_KWD_KDC_320UI_EN_EN_7.indd 20JS_KWD_KDC_320UI_EN_EN_7.indd 20 7/7/2017 1:54:31 PM7/7/2017 1:54:31 PM
Data Size: B6L (182 mm x 128 mm)
Book Size: B6L (182 mm x 128 mm)
DISPLAY SETTINGS
: Zone identification for color and brightness settings
Default:
XX
DISPLAY
COLOR
(For )
SELECT
Select color for
ALL ZONE
,
ZONE 1
and
ZONE 2
separately.
1
Select a zone. (See the illustration on the left column.)
2
Select a color for the selected zone.
INITIAL COLOR
/
VARIABLE SCAN
/
CUSTOM R/G/B
/preset colors
*
To make your own color, select
[CUSTOM R/G/B]
. The color you have made
will be stored in
[CUSTOM R/G/B]
.
1
Press the volume knob to enter the detailed color adjustment.
: Zone identification for brightness settings
2
Press
S
/
T
to select the color (
R
/
G
/
B
) to adjust.
3
Turn the volume knob to adjust the level (
0
to
9
), then press the knob.
DIMMER
Dim the illumination.
ON
:Dimmer is turned on.;
OFF
:Cancels.
DIMMER TIME
:Set the dimmer on and off time.
1
Turn the volume knob to adjust the
[ON]
time, then press the knob.
2
Turn the volume knob to adjust the
[OFF]
time, then press the knob.
(Default:
[ON]
:
18:00
;
[OFF]
:
6:00
)
BRIGHTNESS
1
Select a zone. (See the illustration on the left column.)
Set the dimmer
2
0
to
31
: Select your preferred brightness level for the selected zone.
Press and hold DISP to turn on or off the dimmer.
TEXT SCROLL AUTO
/
ONCE
:Select whether to scroll the display information automatically,
• If you have set
[DIMMER TIME]
, it will be canceled once you press and
or scroll only once.;
OFF
:Cancels.
hold this button.
*
Preset colors:
RED1
/
RED2
/
RED3
/
PURPLE1
/
PURPLE2
/
PURPLE3
/
PURPLE4
/
BLUE1
/
BLUE2
/
BLUE3
/
SKYBLUE1
/
SKYBLUE2
/
LIGHTBLUE
/
AQUA1
/
AQUA2
/
GREEN1
/
Other settings
GREEN2
/
GREEN3
/
YELLOWGREEN1
/
YELLOWGREEN2
/
YELLOW
/
ORANGE1
/
ORANGE2
/
1
Press the volume knob to enter
[FUNCTION]
.
ORANGERED
2 Turn the volume knob to select an item (see the following table),
then press the knob.
3 Repeat step 2 until the desired item is selected/activated or follow
the instructions stated on the selected item.
4 Press and hold to exit.
To return to the previous setting item, press .
ENGLISH
21
JS_KWD_KDC_320UI_EN_EN_7.indd 21JS_KWD_KDC_320UI_EN_EN_7.indd 21 7/7/2017 1:54:31 PM7/7/2017 1:54:31 PM
Book Size: B6L (182 mm x 128 mm)
Data Size: B6L (182 mm x 128 mm)
TROUBLESHOOTING
Symptom Remedy
Symptom Remedy
Sound cannot be heard.
•
Adjust the volume to the optimum level.
Correct characters are not
•
This unit can only display uppercase letters, numbers,
•
Check the cords and connections.
displayed (e.g. album
and a limited number of symbols.
name).
•
Depending on the display language you have selected
“MISWIRING CHECK WIRING
Turn the power off, then check to be sure the
( 5)
, some characters may not be displayed
THEN PWR ON” appears.
terminals of the speaker wires are insulated properly.
correctly.
Turn the power on again.
“NA FILE” Make sure the disc contains supported audio files.
“PROTECTING SEND SERVICE”
Send the unit to the nearest service center.
( 25)
General
appears.
“NO DISC” Insert a playable disc into the loading slot.
•
Sound cannot be heard.
Clean the connectors.
( 24)
•
The unit does not turn on.
“TOC ERROR” Make sure the disc is clean and inserted properly.
•
Information shown on the
“PLEASE EJECT” Reset the unit. If this does not solve the problem,
display is incorrect.
consult your nearest service center.
The unit does not work at all. Reset the unit.
( 3)
“NO DEVICE” Connect a USB device, and change the source to USB
•
Radio reception is poor.
Connect the antenna firmly.
again.
•
Static noise while listening
Radio
“COPY PRO” A copy-protected file is played.
to the radio.
CD/USB /iPod
“UNSUPPORTED DEVICE”
•
Check whether the connected device is compatible
Disc cannot be ejected.
Press and hold
M
to forcibly eject the disc. Be careful
with this unit and ensure the file systems are in
not to drop the disc when it is ejected. If this does not
supported formats.
( 25)
solve the problem, reset the unit.
( 3)
•
Reattach the device.
Noise is generated. Skip to another track or change the disc.
“UNRESPONSIVE DEVICE” Make sure the device is not malfunction and reattach
Tracks do not play back as you
Playback order is determined when files are recorded.
the device.
intended them to play.
“USB HUB IS NOT
This unit cannot support a USB device connected via a
“READING” keeps flashing. Do not use too many hierarchical levels or folders.
SUPPORTED”
USB hub.
CD/USB /iPod
Elapsed playing time is not
This is caused by how the tracks are recorded.
•
The source does not
The USB port is drawing more power than the design
correct.
change to “USB” when
limit. Turn the power off and unplug the USB device.
you connect a USB device
Then, turn on the power and reattach the USB device.
“LOADING” appears when you
This unit is still preparing the iPod/iPhone music list.
while listening to another
If this does not solve the problem, turn the power off
enter search mode by pressing
It may take some time to load, try again later.
source
and on (or reset the unit) before replacing with another
.
•
“USB ERROR” appears
USB device.
22
ENGLISH
JS_KWD_KDC_320UI_EN_EN_7.indd 22JS_KWD_KDC_320UI_EN_EN_7.indd 22 7/7/2017 1:54:32 PM7/7/2017 1:54:32 PM
Data Size: B6L (182 mm x 128 mm)
Book Size: B6L (182 mm x 128 mm)
TROUBLESHOOTING
Symptom Remedy
Symptom Remedy
“NO MUSIC” Connect a USB device that contains playable audio files.
“DISCONNECTED” USB is disconnected from the head unit. Please make sure
the device is connected properly through USB.
“iPod ERROR”
•
Reconnect the iPod.
“CONNECTING”
•
Connected via USB input terminal: The device is
CD/USB /iPod
•
Reset the iPod.
connecting to the head unit. Please wait.
•
Connected via Bluetooth: The Bluetooth is disconnected.
•
Sound cannot
•
Reconnect the Android device.
Spotify
Please check Bluetooth connection and make sure both
be heard during
•
If in
[HAND MODE]
, launch any media player application
the device and the unit are paired and connected.
playback.
on the Android device and start playback.
•
Sound output only
•
If in
[HAND MODE]
, relaunch the current media player
“CHECK APP” The Spotify application is not connected properly, or user is
from the Android
application or use another media player application.
not login. End the Spotify application and restart, then login
device.
•
Restart the Android device.
to your Spotify account.
•
If this does not solve the problem, the connected Android
No Bluetooth device is
•
Search from the Bluetooth device again.
device is unable to route the audio signal to unit.
( 25)
detected.
•
Reset the unit.
( 3)
Cannot playback at
•
Make sure KENWOOD MUSIC PLAY APP is installed on the
Bluetooth pairing
•
Make sure you have entered the same PIN code to both
[BROWSE MODE]
.
Android device.
( 8)
cannot be made.
the unit and Bluetooth device.
•
Reconnect the Android device and select the appropriate
•
Delete pairing information from both the unit and the
control mode.
Bluetooth device, then perform pairing again.
( 11)
ANDROID
•
If this does not solve the problem, the connected Android
device does not support
[BROWSE MODE]
.
( 25)
Echo or noise is heard
•
Adjust the microphone unit’s position.
( 11)
during a phone
•
Check the
[ECHO CANCEL]
setting.
( 13)
“NO DEVICE” or
•
Switch off the developer options on the Android device.
conversation.
“READING” keeps
•
Reconnect the Android device.
flashing.
•
If this does not solve the problem, the connected Android
Phone sound quality
•
Reduce the distance between the unit and the Bluetooth
device does not support
[BROWSE MODE]
.
( 25)
is poor.
device.
•
Move the car to a place where you can get a better signal
Playback is intermittent
Turn off the power saving mode on the Android device.
reception.
or sound skips.
Bluetooth® (for )
Voice calling method is
•
Use voice calling method in a more quiet environment.
“ANDROID ERROR”/
•
Reconnect the Android device.
not successful.
•
Reduce the distance from the microphone when you
“NADEVICE”
•
Restart the Android device.
speak the name.
•
Make sure the same voice as the registered voice tag is
used.
ENGLISH
23
JS_KWD_KDC_320UI_EN_EN_7.indd 23JS_KWD_KDC_320UI_EN_EN_7.indd 23 7/7/2017 1:54:32 PM7/7/2017 1:54:32 PM
Book Size: B6L (182 mm x 128 mm)
Data Size: B6L (182 mm x 128 mm)
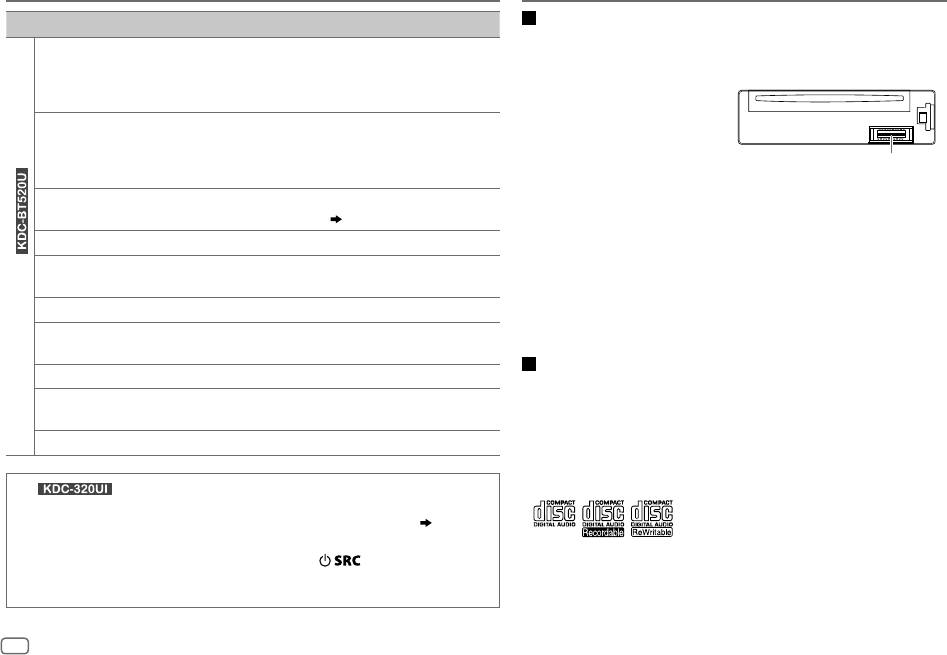
TROUBLESHOOTING
REFERENCES
Symptom Remedy
Maintenance
Cleaning the unit
Sound is being
•
Reduce the distance between the unit and the Bluetooth audio
Wipe off dirt on the faceplate with a dry silicone or soft cloth.
interrupted or skipped
player.
during playback of a
•
Turn off, then turn on the unit and try to connect again.
Cleaning the connector
Bluetooth audio player.
•
Other Bluetooth devices might be trying to connect to the unit.
Detach the faceplate and clean the
The connected
•
Check whether the connected Bluetooth audio player supports
connector gently with a cotton swab,
Bluetooth audio player
Audio/Video Remote Control Profile (AVRCP). (Refer to the
being careful not to damage the
cannot be controlled.
instructions of your audio player.)
connector.
Connector (on the reverse
•
Disconnect and connect the Bluetooth player again.
side of the faceplate)
“DEVICE FULL” The number of registered devices has reached its limit. Retry after
Handling discs
deleting an unnecessary device.
( 15, DEVICE DELETE)
•
Do not touch the recording surface of the disc.
“N/A VOICE TAG” Make sure the same voice as the registered voice tag is used.
•
Do not stick tape etc. on the disc, or use a disc with tape stuck on it.
•
Do not use any accessories for the disc.
“NOT SUPPORT” The connected phone does not support Voice Recognition feature or
•
Clean from the center of the disc and move outward.
phonebook transfer.
•
Clean the disc with a dry silicone or soft cloth. Do not use any solvents.
“NO ENTRY”/“NO PAIR” There is no registered device connected/found via Bluetooth.
•
When removing discs from this unit, pull them out horizontally.
Bluetooth® (for )
•
Remove burrs from the center hole and disc edge before inserting a disc.
“ERROR” Try the operation again. If “ERROR” appears again, check if the
device supports the function you have tried.
More information
“NO INFO”/“NO DATA” Bluetooth device cannot get the contact information.
For: – Latest firmware updates and latest compatible item list
“HF ERROR XX”/
Reset the unit and try the operation again. If this does not solve the
– KENWOOD original application
“BT ERROR”
problem, consult your nearest service center.
– Any other latest information
Visit <www.kenwood.com/cs/ce/>.
“SWITCHING NG” The connected phones might not support phone switching feature.
General
(For )
•
This unit can only play the following CDs:
Muting upon the reception of a phone call
Connect the MUTE wire to your telephone using a commercial telephone accessory.
( 30)
When a call comes in, “CALL” appears.
(The audio system pauses.)
•
For detailed information and notes about the playable audio files, visit
•
To continue listening to the audio system during a call, press . “CALL” disappears and
<www.kenwood.com/cs/ce/audiofile/>.
the audio system resumes.
When the call ends, “CALL” disappears.
(The audio system resumes.)
24
ENGLISH
JS_KWD_KDC_320UI_EN_EN_7.indd 24JS_KWD_KDC_320UI_EN_EN_7.indd 24 7/7/2017 1:54:32 PM7/7/2017 1:54:32 PM
Data Size: B6L (182 mm x 128 mm)
Book Size: B6L (182 mm x 128 mm)

REFERENCES
Playable files
About Android device
•
Playable audio file:
•
This unit supports Android OS 4.1 and above.
For disc: MP3 (.mp3), WMA (.wma), AAC (.aac)
•
Some Android devices (with OS 4.1 and above) may not fully support Android Open Accessory
For USB mass storage class device: MP3 (.mp3), WMA (.wma), AAC (.aac), AAC (.m4a),
(AOA) 2.0.
WAV (.wav), FLAC (.flac)
•
If the Android device supports both mass storage class device and AOA 2.0, this unit always
•
Playable disc media: CD-R/CD-RW/CD-ROM
playback via AOA 2.0 as priority.
•
Playable disc file format: ISO 9660 Level 1/2, Joliet, Long file name
•
Playable USB device file system: FAT12, FAT16, FAT32
About Spotify
Even when audio files comply with the standards listed above, playback may be impossible
•
Spotify application supports:
depending on the types or conditions of media or device.
– iPhone 4S, 5, 5S, 5C, 6, 6 Plus, 6S, 6S Plus, SE, 7, 7 Plus (iOS 8 or above)
The AAC (.m4a) file in a CD encoded by iTunes cannot be played on this unit.
– iPod touch (5th and 6th generation)
– Android OS 4.0.3 or above
Unplayable discs
•
Spotify is a third-party service, therefore the specifications are subject to change without
•
Discs that are not round.
prior notice. Accordingly, compatibility may be impaired or some or all of the services may
•
Discs with coloring on the recording surface or discs that are dirty.
become unavailable.
•
Recordable/ReWritable discs that have not been finalized.
•
Some functions of Spotify cannot be operated from this unit.
•
8cm CD. Attempting to insert using an adapter may cause malfunction.
•
For issues using the application, please contact Spotify at <www.spotify.com>.
About USB devices
About Bluetooth (for )
•
You cannot connect a USB device via a USB hub.
•
Depending on the Bluetooth version of the device, some Bluetooth devices may not be able
•
Connecting a cable whose total length is longer than 5m may result in abnormal playback.
to connect to this unit.
•
This unit cannot recognize a USB device whose rating is other than 5V and exceeds 1.5A.
•
This unit may not work with some Bluetooth devices.
•
Signal conditions vary, depending on the surroundings.
About iPod/iPhone
•
Via USB:
Made for
– iPod touch (5th and 6th generation)
– iPod nano (7th generation)
– iPhone 4S, 5, 5S, 5C, 6, 6 Plus, 6S, 6S Plus, SE, 7, 7 Plus
•
Via Bluetooth (for )
Made for
– iPod touch (5th and 6th generation)
– iPhone 4S, 5, 5S, 5C, 6, 6 Plus, 6S, 6S Plus, SE, 7, 7 Plus
•
You cannot operate iPod if “KENWOOD” or “ ” is displayed on iPod.
•
Depending on the version of the operating system of the iPod/iPhone, some functions may
not operate on this unit.
ENGLISH
25
JS_KWD_KDC_320UI_EN_EN_7.indd 25JS_KWD_KDC_320UI_EN_EN_7.indd 25 7/7/2017 1:54:32 PM7/7/2017 1:54:32 PM
Book Size: B6L (182 mm x 128 mm)
Data Size: B6L (182 mm x 128 mm)
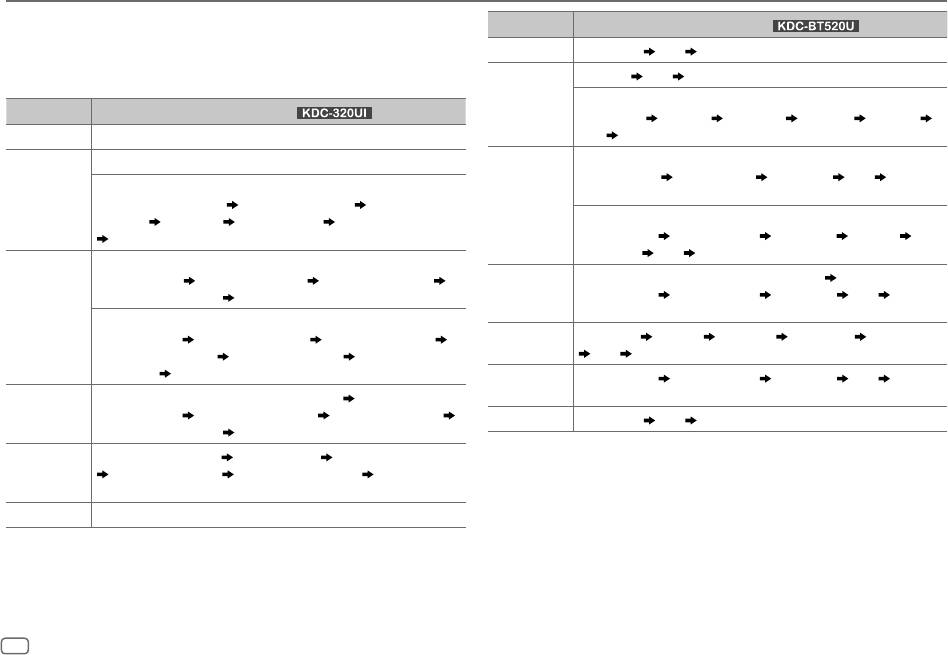
REFERENCES
Change the display information
Source name
Display information (for
)
Each time you press
DISP
, the display information changes.
•
If the information is unavailable or not recorded, “NO TEXT”, “NO INFO”, or other information
STANDBY Source name
Clock (back to the beginning)
(eg. station name, playing time) appears.
RADIO Frequency
Clock (back to the beginning)
(For FM Radio Data System stations only)
Source name
Display information (for
)
Station name Radio text Radio text+ Title/Artist Frequency
STANDBY Source name (Date/Clock)
Clock
(back to the beginning)
RADIO Frequency (Date/Clock)
CD or USB
(For CD-DA)
Disc name/Artist Track title/Artist Playing time Clock
(For FM Radio Data System stations only)
(back to the beginning)
Station name (Date/Clock) Radio text (Date/Clock) Radio text+
(R.TEXT+)
Title (Artist) Title (Date/Clock) Frequency (Date/Clock)
(For MP3/WMA/AAC/WAV/FLAC files)
(back to the beginning)
Song title/Artist Album title/Artist Folder name File name
Playing time
Clock (back to the beginning)
CD or USB
(For CD-DA)
Track title (Artist) Track title (Disc name) Track title (Date/Clock)
iPod USB/
When
[MODE OFF]
/
[BROWSE MODE]
is selected
( 9)
:
Playing time (Date/Clock)
(back to the beginning)
iPodBT or
Song title/Artist
Album title/Artist Playing time Clock
ANDROID
(back to the beginning)
(For MP3/WMA/AAC/WAV/FLAC files)
Song title (Artist) Song title (Album title) Song title (Date/Clock)
SPOTIFY/
Context title
Song title Artist name Album name Playing time
File name (Folder name)
File name (Date/Clock) Playing time
SPOTIFY BT
Clock (back to the beginning)
(Date/Clock)
(back to the beginning)
BT AUDIO Song title/Artist
Album title/Artist Playing time Clock
iPod USB or
When
[MODE OFF]
/
[BROWSE MODE]
is selected
( 9)
:
(back to the beginning)
ANDROID
Song title (Artist)
Song title (Album name) Song title (Date/Clock)
AUX Source name
Clock (back to the beginning)
Playing time (Date/Clock)
(back to the beginning)
SPOTIFY Context title (Date/Clock)
Song title (Artist) Song title (Album name)
Song title (Date/Clock) Playing time (Date/Clock)
(back to the beginning)
AUX Source name (Date/Clock)
26
ENGLISH
JS_KWD_KDC_320UI_EN_EN_7.indd 26JS_KWD_KDC_320UI_EN_EN_7.indd 26 7/7/2017 1:54:32 PM7/7/2017 1:54:32 PM
Data Size: B6L (182 mm x 128 mm)
Book Size: B6L (182 mm x 128 mm)

SPECIFICATIONS
FM Frequency Range 87.5 MHz — 108.0 MHz (50 kHz space)
USB Standard USB1.1, USB2.0 Full Speed
Usable Sensitivity (S/N=26dB) 0.71μV/75Ω
File System FAT12/16/32
Quieting Sensitivity
2.0μV/75Ω
Maximum Supply Current DC5V
1.5A
(DINS/N=46dB)
MP3 Decode Compliant with MPEG-1/2 Audio Layer-3
Frequency Response (±3dB) 30 Hz — 15 kHz
USB
WMA Decode Compliant with Windows Media Audio
Signal-to-Noise Ratio (MONO) 64 dB
Tuner
AAC Decode AAC-LC “.aac”, “.m4a” files
Stereo Separation (1kHz) 40dB
WAV Decode Linear-PCM
MW
Frequency Range 531kHz — 1611kHz (9kHz space)
FLAC Decode FLAC file (Up to 96kHz/24bit)
(AM)
Usable Sensitivity (S/N=20dB) 28.2μV
Version Bluetooth 3.0
LW
Frequency Range 153kHz — 279kHz (9kHz space)
(AM)
Frequency Range 2.402GHz — 2.480GHz
Usable Sensitivity (S/N=20dB) 50.0μV
Output Power +4dBm (MAX), 0dBm (AVE) Power Class 2
Laser Diode GaAIAs
Maximum Communication
Line of sight approx. 10m (32.8ft)
Digital Filter (D/A) 8 times over sampling
Range
Spindle Speed 500rpm — 200rpm (CLV)
Profile HFP 1.6 (Hands-Free Profile)
A2DP (Advanced Audio Distribution Profile)
Wow & Flutter Below measurable limit
AVRCP 1.5 (Audio/Video Remote Control Profile)
Frequency Response (±1dB) 20Hz — 20kHz
Bluetooth (for )
SPP (Serial Port Profile)
PBAP (Phonebook Access Profile)
Total Harmonic Distortion (1kHz) 0.01%
Signal-to-Noise Ratio (1kHz) 105 dB
CD player
Frequency Response (±3dB) 20Hz—20kHz
Dynamic Range 90dB
Input Maximum Voltage 1000mV
Auxiliary
Channel Separation 85dB
Input Impedance 30kΩ
MP3 Decode Compliant with MPEG-1/2 Audio Layer-3
WMA Decode Compliant with Windows Media Audio
AAC Decode AAC-LC “.aac” files
ENGLISH
27
JS_KWD_KDC_320UI_EN_EN_7.indd 27JS_KWD_KDC_320UI_EN_EN_7.indd 27 7/7/2017 1:54:34 PM7/7/2017 1:54:34 PM
Book Size: B6L (182 mm x 128 mm)
Data Size: B6L (182 mm x 128 mm)
SPECIFICATIONS
INSTALLATION/CONNECTION
Warning
Maximum Output Power 50W×4
•
The unit can only be used with a 12V DC power supply, negative ground.
Full Bandwidth Power 22W×4 (at less than 1% THD)
•
Disconnect the battery’s negative terminal before wiring and mounting.
Speaker Impedance 4Ω—8Ω
•
Do not connect Battery wire (yellow) and Ignition wire (red) to the car chassis or Ground wire
(black) to prevent a short circuit.
Tone Action Band 1: 62.5Hz±9dB
•
To prevent short circuit:
Band 2: 100Hz±9dB
– Insulate unconnected wires with vinyl tape.
Band 3: 160 Hz±9dB
– Be sure to ground this unit to the car’s chassis again after installation.
Band 4: 250 Hz±9dB
– Secure the wires with cable clamps and wrap vinyl tape around the wires that come into
Band 5: 400 Hz±9dB
contact with metal parts to protect the wires.
Band 6: 630Hz±9dB
Band 7: 1kHz±9dB
Audio
Caution
Band 8: 1.6kHz±9dB
•
For safety’s sake, leave wiring and mounting to professionals. Consult the car audio dealer.
Band 9: 2.5kHz±9dB
•
Install this unit in the console of your vehicle. Do not touch the metal parts of this unit during
Band 10: 4kHz±9dB
and shortly after use of the unit. Metal parts such as the heat sink and enclosure become hot.
Band 11: 6.3kHz±9dB
•
Do not connect the
[
wires of speakers to the car chassis or Ground wire (black), or connect
Band 12: 10kHz±9dB
them in parallel.
Band 13: 16kHz±9dB
•
Mount the unit at an angle of less than 30º.
Preout Level/Load (CD)
: 4000mV/10kΩ
•
If your vehicle wiring harness does not have the ignition terminal, connect Ignition wire (red)
: 2500mV/10kΩ
to the terminal on the vehicle’s fuse box which provides 12 V DC power supply and is turned
on and off by the ignition key.
Preout Impedance ≤600Ω
•
Keep all cables away from heat dissipate metal parts.
•
After the unit is installed, check whether the brake lamps, blinkers, wipers, etc. on the car are
Operating Voltage 14.4V (10.5V—16V allowable)
working properly.
Maximum Current Consumption 10A
•
If the fuse blows, first make sure the wires are not touching car’s chassis, then replace the old
fuse with one that has the same rating.
Operational Temperature Range –10°C—+60°C
General
Installation Size (W×H×D) 182mm×53mm×158mm
Net Weight (includes Trimplate,
1.3kg
Mounting Sleeve)
Subject to change without notice.
28
ENGLISH
JS_KWD_KDC_320UI_EN_EN_7.indd 28JS_KWD_KDC_320UI_EN_EN_7.indd 28 7/7/2017 1:54:34 PM7/7/2017 1:54:34 PM
Data Size: B6L (182 mm x 128 mm)
Book Size: B6L (182 mm x 128 mm)
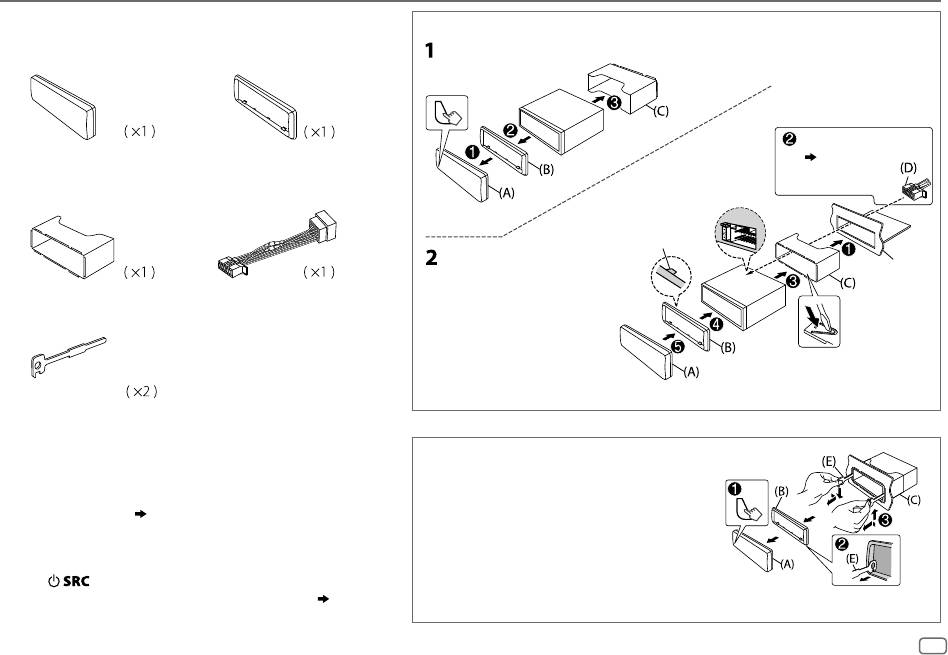
INSTALLATION/CONNECTION
Part list for installation
Installing the unit (in-dash mounting)
(A)
Faceplate
(B)
Trim plate
Do the required wiring.
( 30)
(C)
Mounting sleeve
(D)
Wiring harness
Hook on the top side
Orientate the trim plate as
Dashboard of
illustrated before fitting.
your car
(E)
Extraction key
Bend the appropriate tabs to hold the
mounting sleeve firmly in place.
Basic procedure
How to remove the unit
1
Remove the key from the ignition switch, then disconnect the
1
Detach the faceplate.
[
terminal of the car battery.
2
Fit the catch pin on the extraction keys into
2
Connect the wires properly.
the holes on both sides of the trim plate,
See Wiring connection.
( 30)
then pull it out.
3
Install the unit to your car.
3
Insert the extraction keys deeply into the
See Installing the unit (in-dash mounting).
slots on each side, then follow the arrows as
4
Connect the
[
terminal of the car battery.
shown on the illustration.
5
Press to turn on the power.
6
Detach the faceplate and reset the unit within 5 seconds.
( 3)
ENGLISH
29
JS_KWD_KDC_320UI_EN_EN_7.indd 29JS_KWD_KDC_320UI_EN_EN_7.indd 29 7/7/2017 1:54:35 PM7/7/2017 1:54:35 PM
Book Size: B6L (182 mm x 128 mm)
Data Size: B6L (182 mm x 128 mm)
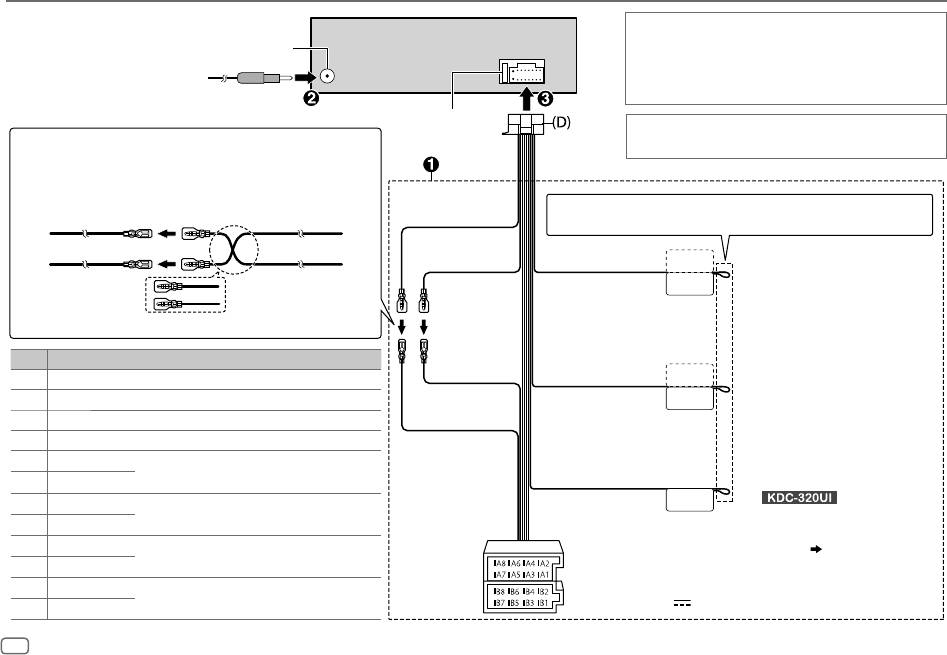
INSTALLATION/CONNECTION
Wiring connection
If your car does not have an ISO terminal:
Antenna terminal
We recommend installing the unit with a commercially
available custom wiring harness specific for your car and leave
this job to professionals for your safety. Consult your car audio
dealer.
Fuse (10A)
When connecting to an external amplifier, connect its ground
Connecting the ISO connectors on some VW/Audi or Opel
wire to the car’s chassis to avoid damaging the unit.
(Vauxhall) automobiles
You may need to modify the wiring of the supplied wiring harness as
illustrated below.
If no connections are made, do not let the wire come out from the tab.
A7 (Red) Ignition wire (Red)
Yellow (Battery wire)
UnitVehicle
STEERING WHEEL
Red (Ignition wire)
Light blue/yellow
REMOTE INPUT
To the steering wheel remote control
A4 (Yellow)
Battery wire (Yellow)
(Steering remote
REMOTE CONT
adapter
control wire)
Default wiring
Pin
Color and function (for ISO connectors)
To the power control terminal when
Red (A7)
*
2
ANT CONT
A4 Yellow
:
Battery
Blue/White
using the optional power amplifier
A5 Blue/White
*
1
:
Power control
(Power control wire/
P. CONT
or to the antenna control terminal in
Antenna control wire)
A7 Red
:
Ignition (ACC)
Yellow (A4)
the vehicle
A8 Black
:
Earth (ground) connection
B1
Purple
]
To connect the Kenwood navigation
:
Rear speaker (right)
system, refer your navigation manual
B2
Purple/black
[
For 3-way crossover: Tweeter (right)
Brown
MUTE
B3
(Mute control wire)
(For
)
Gray
]
:
Front speaker (right)
To the terminal that is grounded
B4
Gray/black
[
For 3-way crossover: Mid range speaker (right)
when the telephone rings or during
B5
White
]
:
Front speaker (left)
conversation.
( 24)
B6
White/black
[
For 3-way crossover: Mid range speaker (left)
ISO connectors
B7
NOTE: Total output for Blue/White wire
Green
]
:
Rear speaker (left)
(
*
1
) + (
*
2
) is 12V 350mA
B8
Green/black
[
For 3-way crossover: Tweeter (left)
30
ENGLISH
JS_KWD_KDC_320UI_EN_EN_7.indd 30JS_KWD_KDC_320UI_EN_EN_7.indd 30 7/7/2017 1:54:35 PM7/7/2017 1:54:35 PM
Data Size: B6L (182 mm x 128 mm)
Book Size: B6L (182 mm x 128 mm)
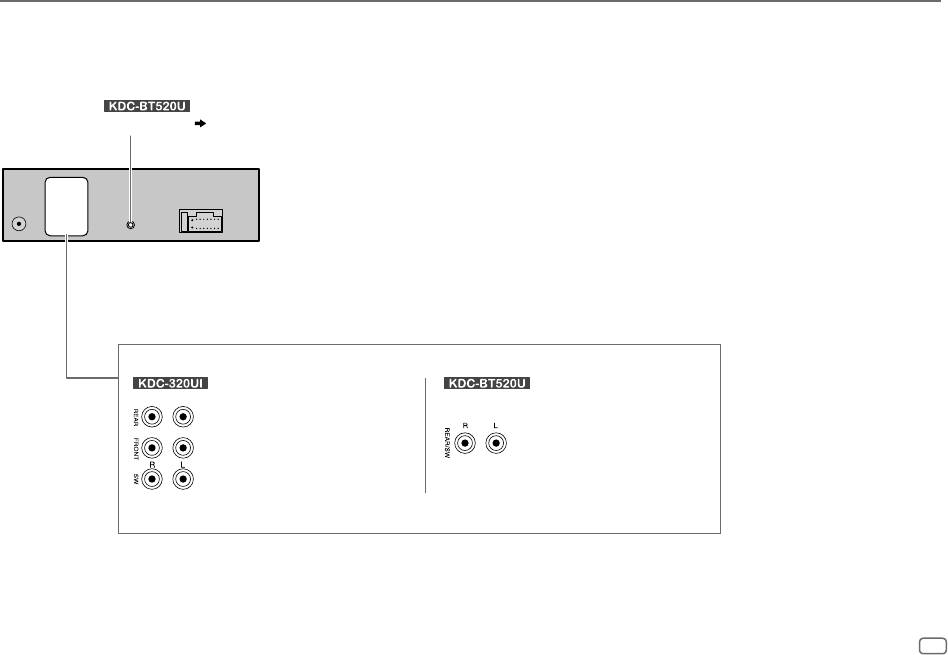
INSTALLATION/CONNECTION
Connecting external components
(For
)
Microphone input jack
( 11)
Output terminals
Rear/Front/Subwoofer output
Rear/Subwoofer output
For 3-way crossover:
For 3-way crossover:
Tweeter/Mid Range/Woofer output
Woofer output
ENGLISH
31
JS_KWD_KDC_320UI_EN_EN_7.indd 31JS_KWD_KDC_320UI_EN_EN_7.indd 31 7/7/2017 1:54:35 PM7/7/2017 1:54:35 PM
Book Size: B6L (182 mm x 128 mm)
Data Size: B6L (182 mm x 128 mm)


