Electrolux NPX 6 SENSOMATIC: CHAPTER CHAPTER
CHAPTER CHAPTER: Electrolux NPX 6 SENSOMATIC
81
81
PREFERENCES
CHAPTER
CHAPTER
This section provides a comprehensive review of the Preferences for Torq. Open the
Preferences by clicking the Preferences icon.
Note:
An additional tab appears on the right side of the
15
1
Preferences window when certain M-Audio products (such as the
Xponent DJ controller) are being used in conjunction with Torq.
This tab contains parameters relating specifically to the operation of
the connected M-Audio device. To learn more about the contents
of this additional tab, refer to your new hardware’s User Guide.
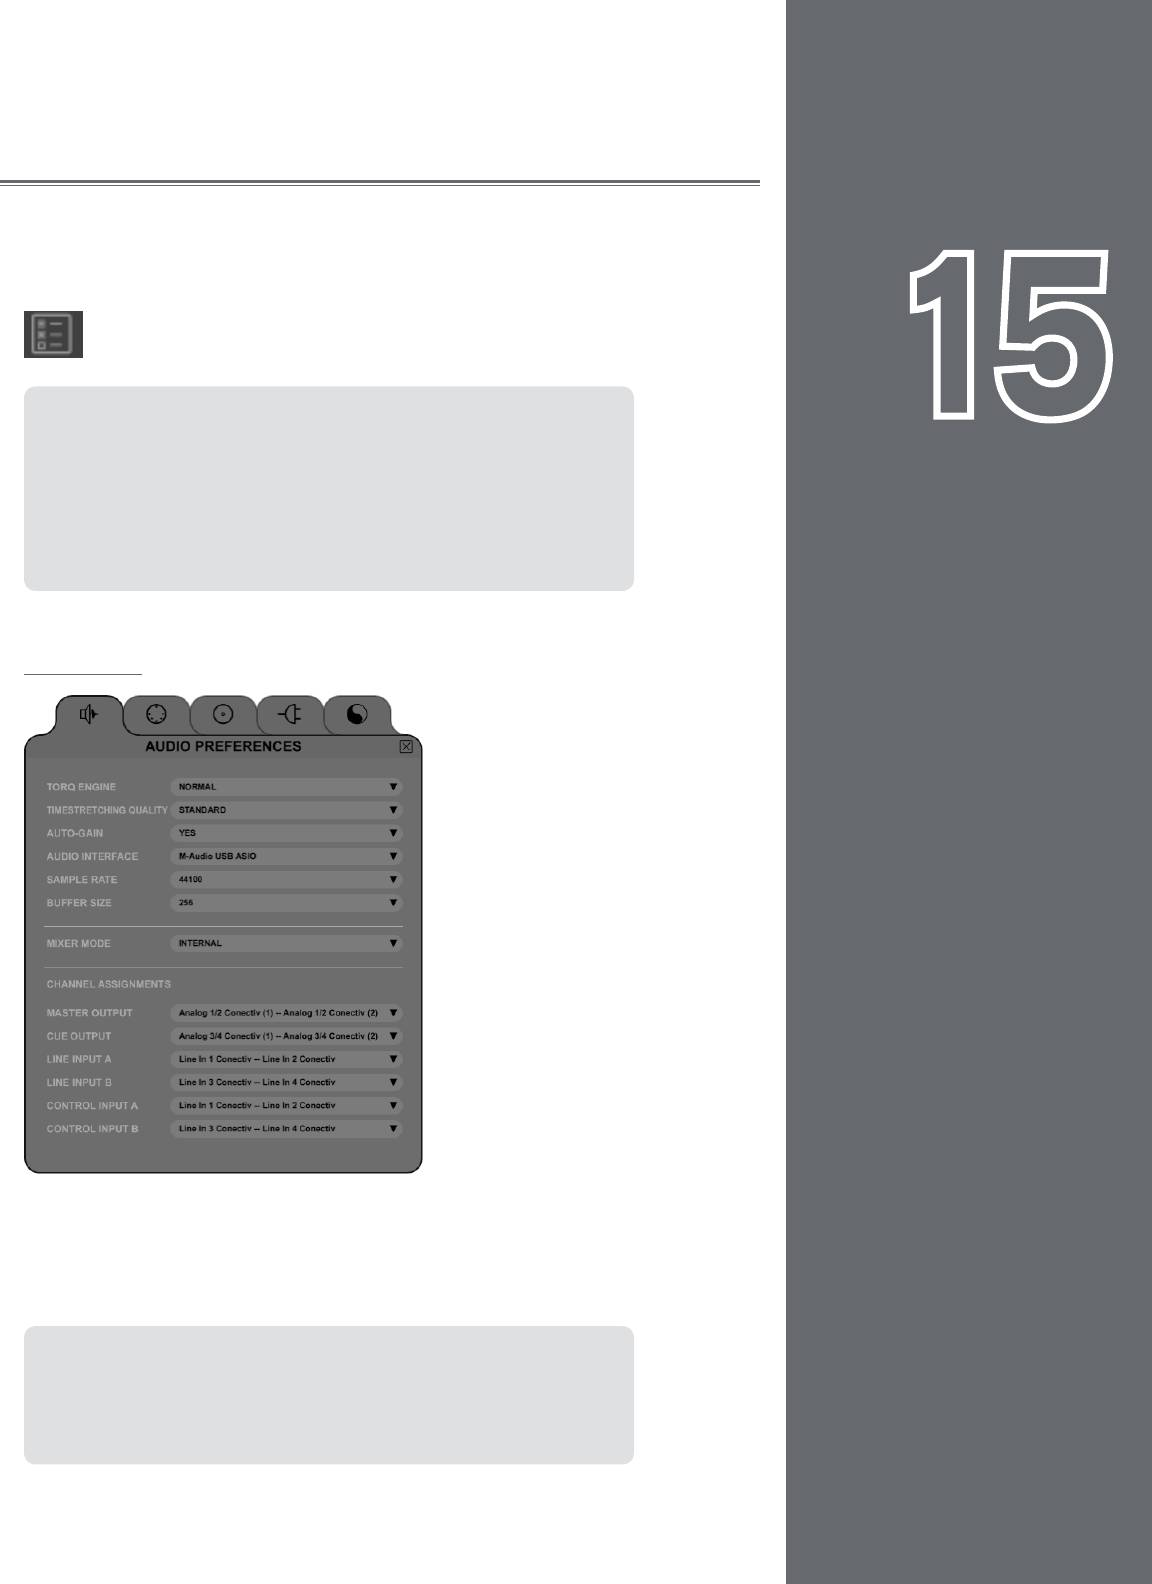
Audio Tab
This tab houses options relating to the audio interface used with Torq. You’ll select the
interface to use, set sampling rates and buffer sizes, and assign the various inputs and
outputs. Torq supports ASIO and DirectX protocols on Windows and Core Audio on
Mac OS X.
Note: Although Torq will work with a single stereo output audio
interface, it is recommended that you use a multiple-output audio
interface. The extra outputs allow you to make use of song cueing, i.e.
pre-listening to a song on headphones before you mix it.
English
English

Torq 1.5 User Guide Chapter 1
Torq 1.5 User Guide Chapter 15
82
82
Torq Engine
This preference chooses the quality level of Torq’s audio engine. Normal is the default setting and should be used if you
experience no performance problems. Economy is the second option and should only be used if using a slow computer.
When Economy is selected, the quality of the resampling and EQ algorithms will be reduced thus lessening the CPU load.
Timestretching Quality
This preference chooses the type of Time-stretching to be used by Torq. The various time-stretching methods will create
different CPU loads:
• Standard: This is Torq’s default time-stretching algorithm and creates a very low CPU load. It is suitable for
making small changes in Key or Speed, but drastic changes will yield audio artifacts.
• Elastique: This mode employs the Elastique algorithm designed by zPlane. This algorithm will create a greater
CPU load, but the audio quality will be much higher. This algorithm is better suited for making more drastic
changes to pitch and key and yields very few audio artifacts. This is the preferred algorithm if you have a fast
computer.
Auto Gain
When this preference is set to Yes, Torq will automatically set the Gain Knob to a position that brings the volume of a
song up to 0dB RMS whenever a new one is loaded onto a Deck. This will ensure that the volumes of your tracks are
matched well before doing a mix.
Audio Interface
This preference allows you to select an audio interface for Torq.
1. Click the Audio Interface box.
2. A menu will be displayed, listing all audio interfaces currently connected to your computer.
3. Select the audio interface you want to use with Torq.
Sample Rate
Below the Audio Interface selection you will see sample rate adjustment. Increasing this value will improve sound quality
(depending on your source material) but will also place heavier demands on your computer. It is therefore recommended
to leave the sample rate only as high as you need it to be. If you only play MP3 files or songs from CDs, you won’t really
have any reason to raise this value beyond 44,100 since that is the sampling rate used by MP3s and CDs

Torq 1.5 User Guide Chapter 1
Torq 1.5 User Guide Chapter 15
83
83
Buffer Size
The other important setting for your audio interface is the Buffer Size. This parameter can cause a lot of confusion for
some users, but is actually not that complicated. To understand how the buffer size affects the performance of Torq, you
must understand a little bit about how your computer processes audio.
Multi-tasking is a term that refers to doing multiple jobs all at once. It’s what allows your computer to run more than one
program at a time (i.e. listening to iTunes while surfing the Web). While it looks like the computer is doing two separate
things at once, it’s actually not—it’s still doing only one task at a time, but changing between tasks faster than you
can see.
This provides for a streamlined computing experience, but creates a problem when using audio applications. Audio is
non-stop—a 5-minute song will play for 5 minutes without interruption. So how can the computer keep audio playing
while it’s jumping around to do other tasks? The answer is buffering. An audio buffer is a temporary “storage tank” that
can hold a brief moment of audio. The computer will fill the audio buffer with music then let the buffer play while it does
other things (like update the clock on your screen, check your network connections, monitor RAM usage, etc.). When
all things work properly, the computer will complete its other tasks and fill the buffer with more data before the buffer
empties, thus resulting in perfect audio while multi-tasking.
If the audio buffer happens to empty before the computer can fill it with more data, the audio playback will stop until the
computer can fill the buffer again. These “dropouts” happen very quickly, not sounding like prolonged gaps of silence, but
sounding more like clicks and pops or otherwise distorted audio. When this happens, the solution is to either lighten the
CPU load (by closing unnecessary applications or processes that are wasting the computer’s time) or by increasing the
size of the audio buffer, allowing it to play longer (thus giving the computer enough time to perform its other tasks).
So why not just go with a large buffer size and avoid dropouts? The problem is that increasing the buffer size increases
the system latency. Latency is the time between when you tell the computer to do something (such as activating an EQ
Kill) and when you actually hear the results from the speakers. If you have a large audio buffer, the buffer will have to play
out its entire contents before you’ll hear any new EQ changes in the audio. When DJing, this can be a nightmare if you’re
trying to do things with accurate timing—all of your actions will have a delayed effect on the music.
The solution is to set the buffer size as low as it can go without inducing any audio problems. This is just like playing a
game of limbo:
1. Load some music into a Deck and play it.
2. While the music is playing, open the Audio Preferences.
3. If music is playing back properly, open the Buffer Size menu and select the next smallest buffer size. The buffer
will be updated immediately and the music will continue to play.
4. Listen to the music for a moment. If it sounds clean (no click, pops, or glitches), then lower the Buffer Size to the
next lowest setting.
5. Keep repeating this procedure, listening to the quality of the audio each time, until you reach a setting where the
audio breaks up.
6. Once you find this lower threshold, set the Buffer Size to the next highest setting (the last one that worked
properly) and your system will be optimized.
While Torq should be very stable at these settings, keep in mind that the system performance can be
compromised as you increase the CPU load. This is most notable when using CPU-intensive VST effects or the
Elastique time-stretching algorithm. Loading one of these effects may cause pops and click in your audio, at which
point you will have to increase the buffer size until the audio is clean again.
✓ Note: Using some external VST effects can introduce additional audio buffering within the Torq application. When
this happens, your manipulations of the Decks will seem sluggish—this is a side effect of the VST plug-in in use and
is not related to this buffer setting.

Torq 1.5 User Guide Chapter 1
Torq 1.5 User Guide Chapter 15
84
84
Mixer Mode
This option allows you to switch between Internal and External Mixer mode.
Internal Mixer mode: This is the default setting where Torq’s on-screen mixer is used to blend the signals from
the Decks.
External Mixer mode: This will bypass the Torq mixer and route each Deck to its own output pair on your audio
interface. These individual stereo outputs can then be connected to your favorite DJ mixer in the same manner as
two turntables or CDJ’s. You’ll then mix and cue your tracks using your DJ mixer instead of Torq’s Mixer.
< Channel Assignments
Once you have selected an audio interface and selected a mixer mode, you can assign the outputs of Torq to the
channels of the selected audio interface. The assignment options will differ depending on which mixer mode is
active:
» Internal Mixer
• Master Output — Click to access the drop-down menu and select the stereo output pair for the
Torq Master Output. This is the output you will connect to the speakers.
• Cue Output — Click to access the drop-down menu and select the stereo output pair for cueing
(or pre-listening) to the output of a Deck. This is the output for the headphones.
• Line Input A — Click to access the drop-down menu and select the stereo input pair for use as
the Line Input for Channel A of the Mixer.
• Line Input B — Click to access the drop-down menu and select the stereo input pair for use as
the Line Input for Channel B of the Mixer.
• Control Input A — Click to access the drop-down menu and select the stereo input to which
your left turntable or CD player is connected. This is also the Control Input used by AMPutate
mode.
• Control Input B — Click to access the drop-down menu and select the stereo input to which
your right turntable or CD player is connected.
» External Mixer
• Deck A Output — Click to access the drop-down menu and select the stereo output for Deck A.
This signal will not be processed by Torq’s Mixer—it will be fed into a stereo channel of an external
DJ mixer.
• Deck B Output — Click to access the drop-down menu and select the stereo output for Deck B.
This signal will not be processed by Torq’s Mixer—it will be fed into a stereo channel of an external
DJ mixer.
• Sampler — Click to access the drop-down menu and select the stereo output for Torq’s Sampler.
• Line Input A — Click to access the drop-down menu and select the stereo input pair for use as
the Line Input for Channel A of the Mixer.
• Line Input B — Click to access the drop-down menu and select the stereo input pair for use as
the Line Input for Channel B of the Mixer.
• Control Input A — Click to access the drop-down menu and select the stereo input to which
your left turntable or CD player is connected. This is also the Control Input used by AMPutate
mode.
• Control Input B — Click to access the drop-down menu and select the stereo input to which
your right turntable or CD player is connected.
✓ Note: When Torq is being used as a ReWire slave (explained earlier in this guide), the Audio Interface
options will be disabled.
Torq 1.5 User Guide Chapter 1
Torq 1.5 User Guide Chapter 15
85
85
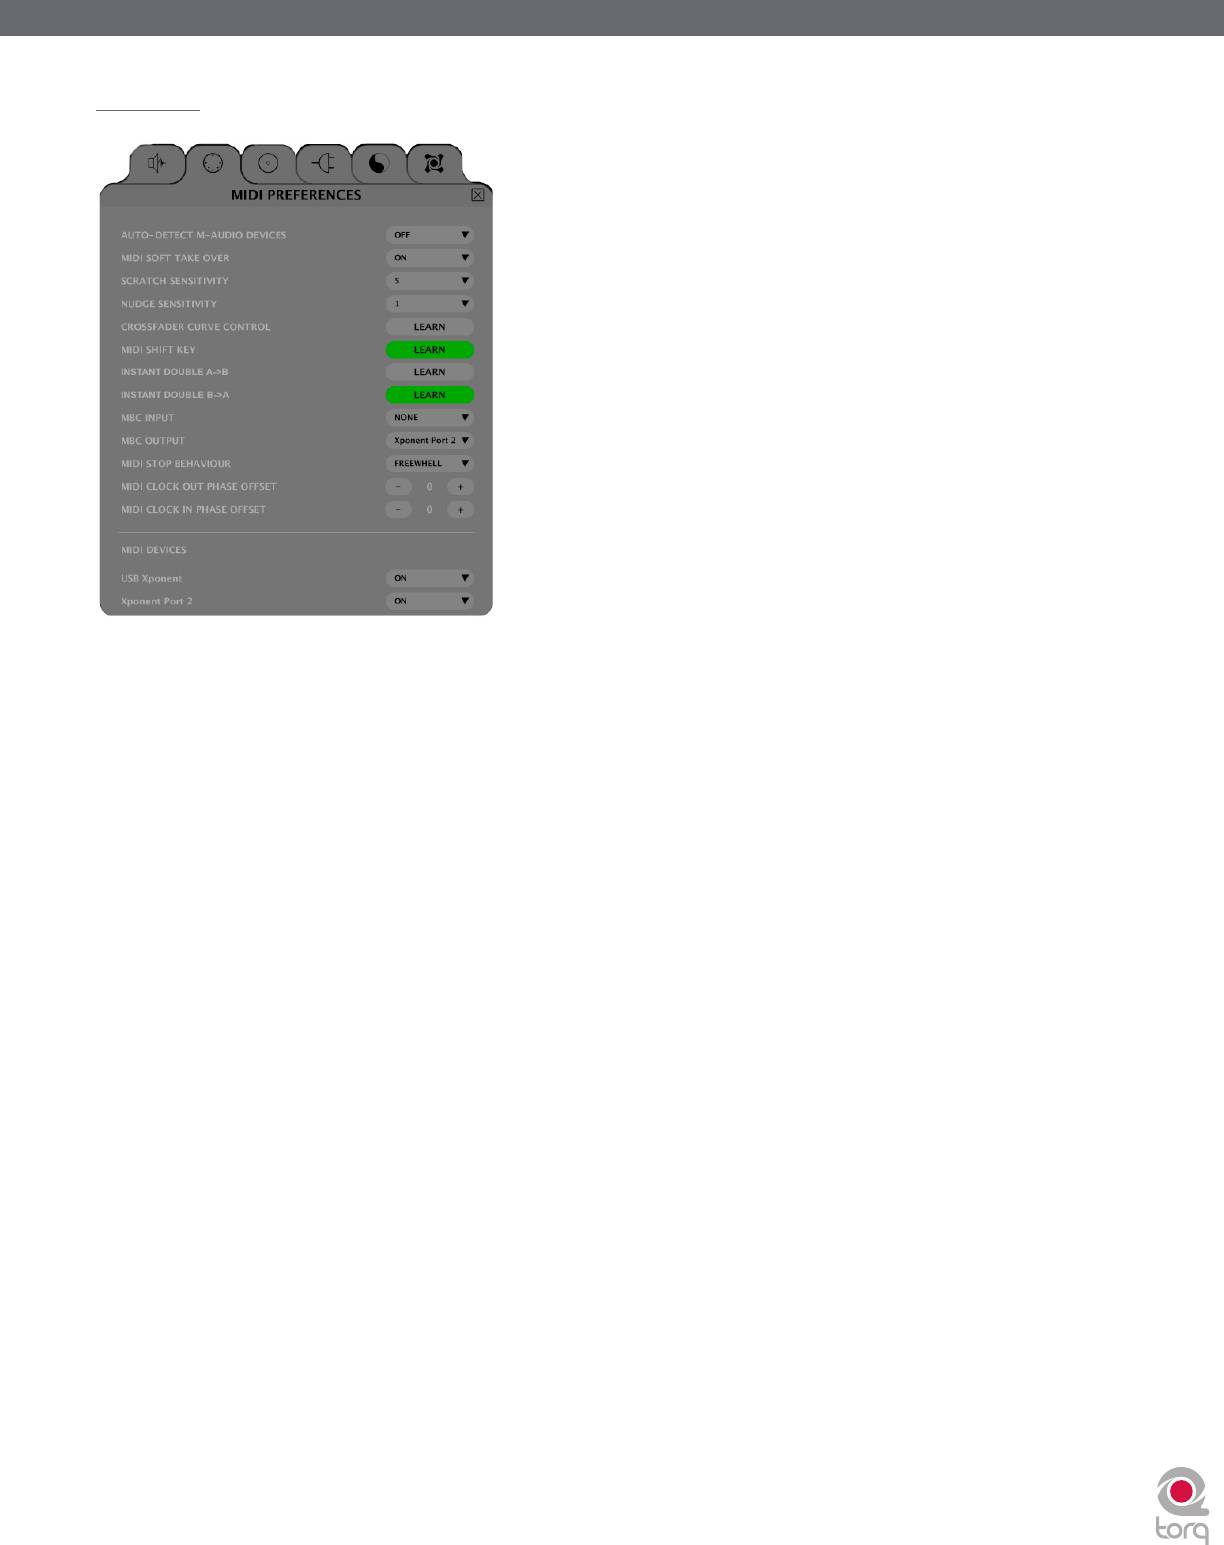
MIDI Tab
This tab features all options pertaining to Auto-Setup and MIDI control.
Auto-Detect M-Audio Devices ([On]/Off)
When this option is enabled, Torq will automatically set the Audio and MIDI interface options to those of any known
M-Audio controller and interface that is connected to your system. This will ensure proper operation of Torq and
connected devices.
✓ Note: If you have created a custom mapping for your controllers or special assignments for your audio interface and don’t
want Torq to replace these mappings with the defaults upon the next startup, leave this option turned off.
MIDI Soft Takeover
Some of the features in Torq work automatically, such as Auto Gain and Auto Sync. When these features are used, it is
possible that the position of the on-screen controls can change (i.e. the Speed Slider can move to a new location when
matching tempos). When this happens, the position of the controls on your MIDI controller will no longer match those
on screen.
The MIDI Soft Takeover preference determines what will happen when you move one of these MIDI controls. When
MIDI Soft Takeover is Off, Torq’s on-screen controls will immediately jump to match the location of the MIDI control as
soon as you move it. This can cause undesired parameter jumps (i.e. the speed of a song suddenly increases to match the
position of the MIDI slider).
If MIDI Soft Takeover is set to On, Torq will not respond to the MIDI control until you’ve moved it to a location that
matches the on-screen control. When this happens, a transparent version of the control will be shown on screen. This
transparent control shows the location of the MIDI control in reference to the position of the on-screen control. Simply
move the MIDI control until the transparent control lines up with the actual control on screen. When that occurs, the
transparent control will disappear and Torq will resume reacting to MIDI control.

Torq 1.5 User Guide Chapter 1
Torq 1.5 User Guide Chapter 15
86
86
Scratch Sensitivity
This option allows you to configure how rapidly a Deck
will respond to messages sent from a MIDI controller (it
DJ oriented MIDI controllers with turntable
platters will vary in how they handle scratching and
has no effect on External Control with Vinyl or CDs). It is
nudging. Certain products will allow you to control
designed for controllers that will move the waveform back
only nudging, while others (such as the M-Audio
and forth, typically those with jog wheels.
Xponent) will allow you to control both nudging
1. By increasing the number, the Deck will respond
and scratching. Refer to the product’s user guide to
more rapidly.
learn if each turntable platter is capable of sending
2. By decreasing the number, the Deck will respond
out both MIDI note and CC information. If so,
more slowly.
assign each turntable’s MIDI note and CC commands
to the corresponding Main Waveform Display in
Nudge Sensitivity
Torq (this is done using the “MIDI Learn” feature
This setting allows you to adjust Torq’s sensitivity to
described in the MIDI Preferences section of this
“nudging” or gradually slipping the phase of one deck to
guide).
match the phase of the other deck.
If your turntable can only send out MIDI CC
By default this parameter is set to 5, however:
information but not MIDI note data (i.e., the
turntable is not touch sensitive), then you will only
1. By increasing the number, the Deck will nudge your
be able to control nudging. Assign the turntable’s
track more rapidly.
MIDI CC output to control the corresponding Main
2. By decreasing the number, the Deck will nudge
Waveform Display in Torq (again, this is done using
your track more gradually.
the “MIDI Learn” feature described in the MIDI
Preferences section of this guide).
Note that this setting differs from the “Scratch Sensitivity”
parameter which changes Torq’s sensitivity to scratches, which
“push” or “pull” your waveform much more quickly and forcefully than a nudge. Unlike a scratch, a nudge very gently slows down
or speeds up a track and is used to fine tune the timing of two tracks.
Crossfader Curve Control
This preference allows you to assign a MIDI controller to the Crossfader Curve parameter. You can then control the
Crossfader Curve with a knob or slider on your MIDI controller.
1. Press the button labeled “Learn” to activate it. The button will turn red.
2. Turn a knob on your MIDI controller.
3. Torq will immediately assign the knob to the Crossfader Curve and the button will turn green. Check this by
looking at the Crossfader graphic in the main window while turning the knob.
MIDI SHIFT Key
When using Torq, the SHIFT key on your computer’s keyboard is used rather often. This option lets you assign a MIDI
Note to function as “SHIFT” in Torq, thus allowing you to do SHIFT-based combinations (such as SHIFT+Nudge) entirely
from an external MIDI controller. To assign a MIDI note:
1. Press the button labeled “Learn” to activate it. The button will turn red.
2. Push a button or key on your MIDI controller. The MIDI Shift Key button will turn green.
3. Torq will immediately assign the button as a Shift key for use within the program.
Instant Doubles
Torq will automatically copy the song from one Deck and place it on the other when using the Instant Doubles feature.
This function can be triggered by keys on your computer’s keyboard or with an external MIDI controller. There are two
preferences here—Instant Double A->B will copy the song from Deck A over to Deck B while Instant Doubles B->A will
do the opposite. To assign keys to these actions:
1. Click the button labeled “Learn” to activate it. It will turn red.
2. Push a button or key on your MIDI controller or keyboard. The Learn button will turn green.
3. Torq will immediately assign the key or button to the action—it is now ready for use.

Torq 1.5 User Guide Chapter 1
Torq 1.5 User Guide Chapter 15
87
87
MIDI Clock
Torq’s Global Tempo can be slaved to an external device that transmits MIDI Clock (called MBC in Torq). When you
then enable Global Tempo, all aspects of Torq (the Sampler and synced Decks) will follow the MIDI Clock. Torq can
also transmit its Global Tempo as MIDI Clock so that other MIDI equipment can synchronize with Torq. External drum
machines, groove boxes, synths, etc. will all follow Torq’s Global Tempo, provided they can receive MIDI Clock.
In order to use these MBC features, you’ll need to have a MIDI interface connected to your computer. Some of the
M-Audio DJ products, such as the Xponent, have a MIDI interface built into them. If you do not have a MIDI interface
on your product (or are already using them for connections to other devices), you’ll need to add MIDI ports to your
computer. A solution is the M-Audio UNO, a simple 1-input, 1-output MIDI interface that connects to a USB port on
your computer. The UNO can be found at almost any music dealer or online retailer.
< Setting up MBC Input
To slave Torq’s Global Tempo to an external MIDI device:
1. Connect the MIDI Output of the external device to a MIDI Input on your computer.
2. In Torq’s MIDI Preferences, select the MIDI Input port mentioned above as the MBC Input. Close the
Preferences.
3. Click the Global button in Torq’s toolbar to enable Global Tempo. Torq’s Global Tempo will run
independently until an incoming MIDI Clock is received.
4. Enable transmission of MIDI Clock in your external device. Please refer to the product’s user manual for
the proper method of doing this.
5. Start the external device (possibly by pressing Play or Run).
6. Torq’s Global Tempo will change to match the tempo of the external device. The Global Tempo LEDs will
also chase in time with the external device.
< Setting up MBC Output
To slave an external MIDI device to Torq’s Global Tempo:
1. Connect a MIDI Output from your computer to the MIDI Input of the external MIDI device.
2. In Torq’s MIDI Preferences, select the MIDI Output port mentioned above as the MBC Output and close
the Preferences.
3. On your external MIDI device, enable reception of MIDI Clock. Please refer to the product’s user manual
for the proper method of doing this.
4. On some external devices, you’ll need to put it into a “standby” mode where it waits for MIDI Clock
before it starts to run. This may require pressing Play or Run—please check with the product’s user
manual to see if this is required.
5. In Torq, enable the Global Tempo in the Toolbar. When activated, Torq will begin to transmit MIDI Clock
at the specified tempo, but the external devices will not run.
6. In order to start the external devices, a MIDI Start command must be sent from Torq. In order to do
this, click the MIDI I/O indicator in Torq’s Toolbar. The button will turn yellow when clicked, indicating
that Torq is waiting for the downbeat of the music you’re playing. When the downbeat arrives, Torq will
transmit the MIDI Start command and the external device should begin to play. The Global Tempo LEDs
will also begin to chase, indicating your current position within a bar.

Torq 1.5 User Guide Chapter 1
Torq 1.5 User Guide Chapter 15
88
88
< MIDI Stop Behavior
This preference determines what Torq will do when it receives a MIDI Stop command from an external device.
• STOP: When set to Stop, Torq will stop all Decks and Samples upon receiving MIDI Stop.
• FREEWHEEL: When set to Freewheel, Torq will continue to play, essentially ignoring the MIDI Stop
command, thus allowing the DJ set to continue after stopping the external device.
< MIDI Clock Phase Offset
These two parameters are used to adjust the timing between Torq and the external MIDI devices. If Torq is
following the MIDI Clock from an external device, use the MIDI Clock In Phase Offset option to align Torq. If
Torq is transmitting MIDI Clock to an external device, use the MIDI Clock Out Phase Offset option to align the
external device to Torq.
< Applications for MIDI Clock
Here is a brief list of possible applications for MIDI Clock. This isn’t an exhaustive list—there are surely more
possibilities that can be listed here and they are only limited by your creativity.
• External Drum Machine: Dance music is dance music thanks to the drums. You can make your DJ
sets even more dance-heavy by layering your own custom beats on the fly with an external drum machine.
Add extra kick drums and hi-hats. Double-up a snare drum with a hand clap. Create drum fills where none
existed before. Simply slave the drum machine to Torq using MIDI Clock and it will play in time with the
Global Tempo, even if you change the Global Tempo.
• External Synth/Sequencer: Beats are easy to add, but you may want to take it to the next level
and actually add your own synth parts on top of your mixes. New bass lines. Sound effects. Rapid-fire
sequencer patterns. Simply slave the external sequencer to Torq and you’re ready to go.
• Swapping DJs: If you’re in the middle of a Torq set and another Torq DJ is ready to play after you, you
can transmit your Global Tempo to that DJ allowing him to sync up everything on his computer to yours,
thus allowing for automatic beat-matched transitions between DJs. If you’re the first DJ, set your computer
to output MBC and set your last track as the Tempo Master (that will engage Global Tempo and transmit
it to the MIDI Output). If you’re the second DJ, set your computer to receive MBC and enable your Global
Tempo. Your computer will now be in sync with the other DJ. If you’re the second DJ, you should also set
your MIDI Stop preference to “Freewheel” to ensure that Torq doesn’t stop when the first DJ presses stop
on his system.
• Dual-DJ: If one DJ could sync the beginning of his set up to the end of another DJ’s set, then why not
sync up the entire length of both your sets? By sharing MIDI Clock between two computers running Torq,
two DJs can sync themselves together and create a massive 4-Deck mixing extravaganza.
• Torq and Live: Torq’s ReWire capabilities allow it to be run alongside applications such as Ableton Live
on the same computer. MIDI Clock will allow you to sync up the two applications across two computers.
While you won’t be able to transfer audio from Torq to the other application without making additional
audio interface connections, you can at least get both programs to run in sync with each other. Then,
adding clips in Live or tracks in Torq will result in one synchronized performance between both computers.
MIDI Devices
This list shows all MIDI devices currently recognized by Torq. Each device is listed by name and is followed by a box which
selects the device as being On or Off.
If you wish to use a device as a controller for Torq, click the drop-down menu and select On to activate it. Leave any
controller you do not wish to use with Torq set to Off.
Torq 1.5 User Guide Chapter 1
Torq 1.5 User Guide Chapter 15
89
89
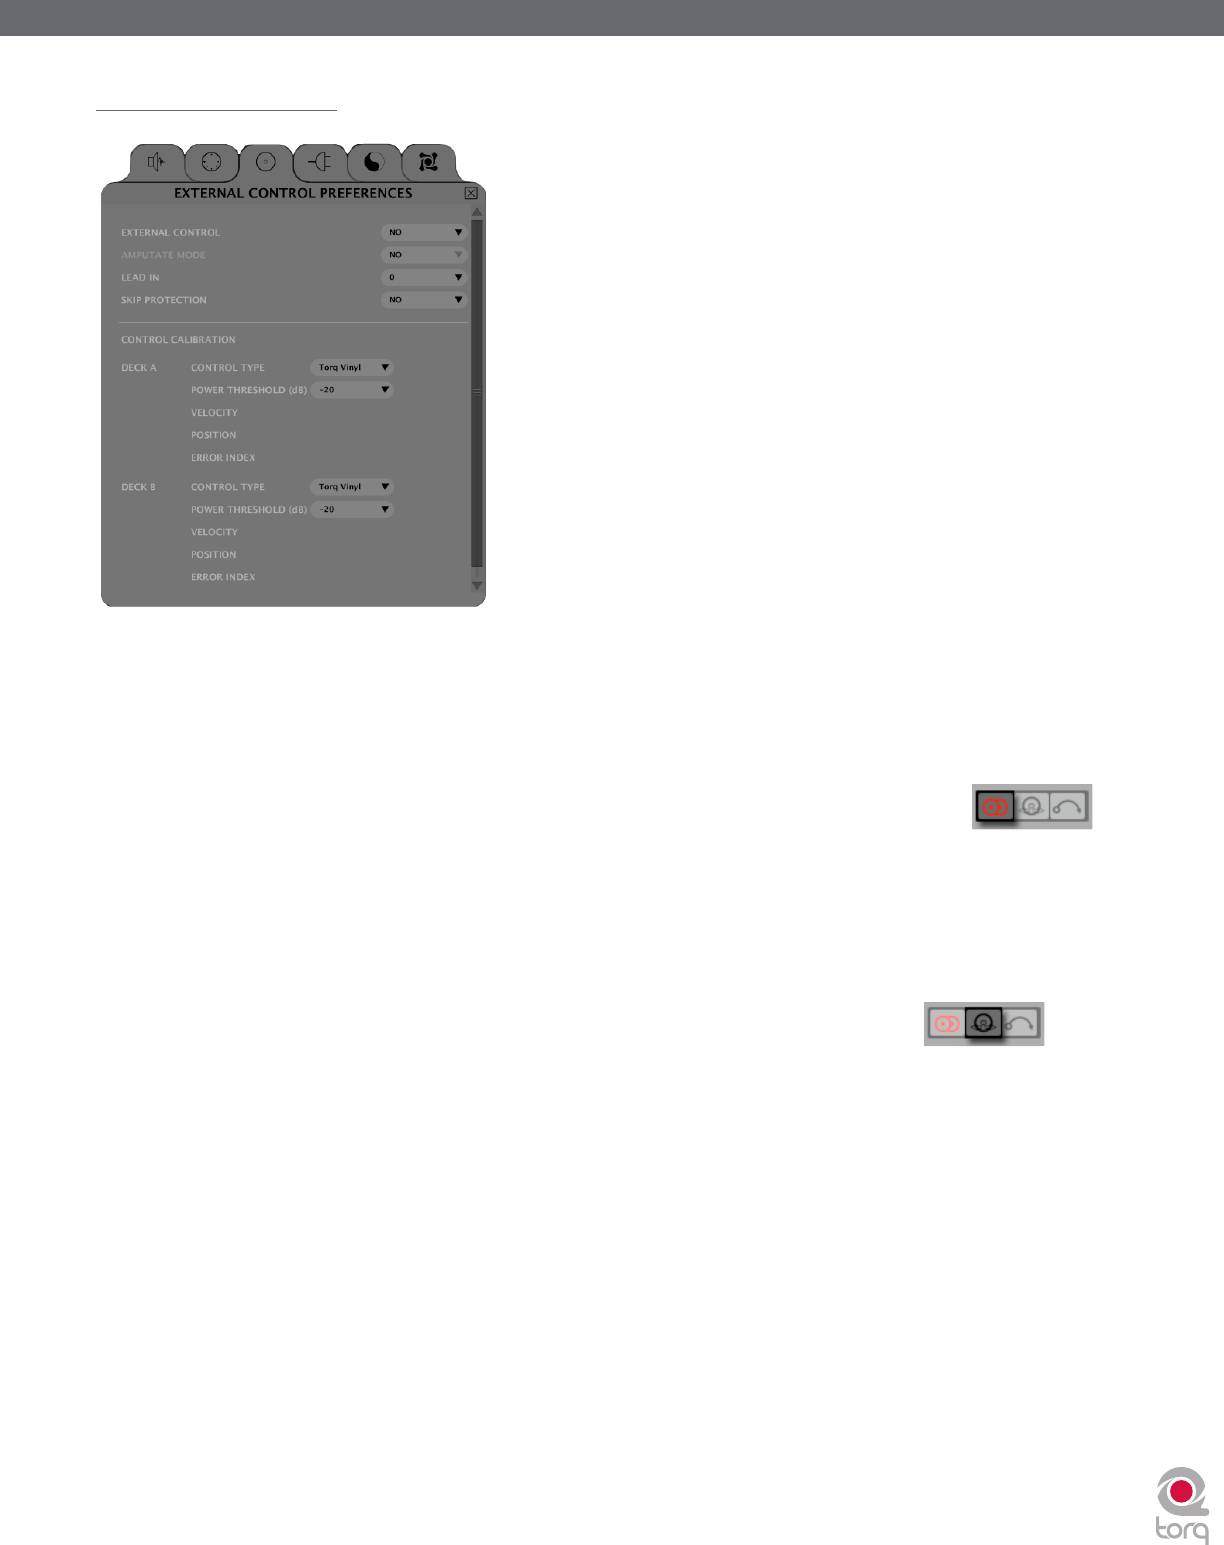
External Control Tab
This preference tab holds the options pertaining to external vinyl and CD control, as well as the option for enabling AMPutate mode.
External Control
When set to Yes, this option enables external vinyl or CD control for the Decks. The Deck Play/Pause buttons will also
change to Absolute/Relative buttons when this option is enabled (see External Control section earlier in this manual).
✓ Note: The state of External Control is also shown in the Toolbar. Clicking the External Control icon will
turn External Control on and off allowing you to toggle the state without having to open the Preferences.
AMPutate Mode
This option enables AMPutate mode, which allows one external control source to control either of the Decks. In
this mode, you can press the Vinyl button on the Deck you wish to control with record or CD. All other Decks will
automatically switch to Hybrid or CDJ mode.
✓ Note: The state of AMPutate Mode is also shown in the Toolbar. Clicking the AMPutate icon will turn
AMPutate Mode on and off allowing you to toggle the state without having to open the Preferences.
Lead In
Any practiced DJ knows that playing and scratching records will eventually destroy them. If the needle is exceptionally
heavy or if you scratch in the same place a lot, the grooves in the record can be eaten away thus tarnishing the sound
quality. This frequently happens at the beginning of records and is something DJs call “cue burn”.
With traditional records, cue burn was something to pay attention to because it didn’t sound very good. When using
control records like the Torq Vinyls, cue burn becomes a serious issue. This is due to the fact that you use the same two
records to play every song in your set all the time and because Torq might not be able to track the motion in a section
of the vinyl with cue burn. If you’re using Absolute mode, every song will begin at the same place on the record (at the
beginning). Constantly cueing and scratching in this area will eat away at the grooves on the Torq Vinyl.
When using traditional records, spotting cue burn is easy: you hear it. It sounds like the record is really dirty (as if it had
been scrubbed with sandpaper). However, when using the Torq Vinyl, you won’t hear cue burn because Torq will still
be playing pristine digital audio files. Instead of hearing the audio get scratchy when your control records start getting
burned, you’ll find that Torq’s ability to follow the control records is compromised. This usually manifests itself right
at the beginning of each song—the music will jump around erratically. This is because Torq is unable to determine the
proper location because the signal from the control records has been damaged.

Torq 1.5 User Guide Chapter 1
Torq 1.5 User Guide Chapter 15
90
90
So, instead of hearing the audio get scratchy when your control records start getting burned, you’ll find that Torq’s ability
to follow the control records is compromised. This usually manifests itself right at the beginning of each song—the music
will jump around erratically. This is because Torq is unable to determine the proper location because the signal from the
control records has been damaged.
The usual solution for this is to either flip the record over to the other side or, if you’ve already done that, to throw the
record away and get a new one. However, using the “Lead In” option in the Preferences, you can extend the life of your
control records.
By default, Lead In is set to “0” which causes the music to start playing from the beginning of the record. Increasing
Lean In to “1” will make the music wait for an additional rotation of the record before starting. So, when the start of the
record gets burned, increase the Lead In by one value. Once that new location is burned, increase the Lead In again. Once
you’ve burned both sides of the record with the Lead In set to 5, you’ll have to buy a replacement.
Skip Protection
Skip Protection is a special feature that can help avoid embarrassing mistakes or unfortunate circumstances when using
the Torq Control records. When this option is active, Torq will maintain playback of the music even if the needle skips
across the record, be it from wind, someone bumping the DJ booth, etc. The way this works is similar to Relative mode
(the position of the needle will be ignored after it skips) except that the music will not stop playing immediately when the
needle comes off the record. If the needle looses contact with the record, the music will continue to play for about half of
a second. If the needle makes contact with the record again within that time, you’ll never hear the music stop. Be aware
that this feature has its limits: If the record player is bumped such that the tonearm bounces completely off the record,
the music will stop.
✓ Note: Skip Protection can be turned on and off from Torq’s Toolbar. Simply click the Skip Protection button
to toggle the feature.
Control Calibration
The settings within this preference are used to configure each input pair of Torq for use with external control records or
CDs. For vinyl control, you can use the Torq Control Vinyl records or some versions of the Ms. Pinky control records.
» Control Type (Gen1, Gen2, Gen3, Torq Vinyl, Torq CD)—this pop-up menu allows you to set the
vinyl or CD source to use for the Deck. To use the Torq Control Vinyl or Torq Control CD, select “Torq Vinyl”
or “Torq CD,” respectively. Gen1, Gen2, and Gen3 are for use with Ms Pinky records generations 1, 2, and 3.
» Power Threshold—this setting sets the minimum signal necessary to make External Control work. If this
setting is too low, quiet noises picked up by the turntable could be interpreted incorrectly as control signals. If
this setting is too high, the Deck will not respond to the external control signals at slow speeds. This should be
set as low as possible without introducing any anomalies. Please see the “External Control Calibration” section
earlier in this manual for the proper calibration procedure.
» Velocity—this display allows you to see the influence of the external control input. When working properly,
playing back the Control Vinyl or CD at its original speed should result in a number very close to 1.0 in this field.
» Position—when external control is working properly, this display will show a number that increases as the
source plays forward.
» Error Index—if the number displayed in this field is below 1.5, the control source is being read properly. If the
number is higher than 2.0, the display will turn red, indicating problems with the incoming control signal. You will
then need to adjust your control settings, clean your records, and/or replace your stylus to fix this.

Torq 1.5 User Guide Chapter 1
Torq 1.5 User Guide Chapter 15
91
91
Plug-ins Tab
Torq allows you to use VST plug-in effects to further enhance and mangle your music. VSTs can be stored in various locations
on your hard drive, and these preferences will choose the plug-in locations for Torq to use.
System VST Plug-in Directory
This preference gives you the option to use your system VST plug-in directory as the VST folder for Torq.
1. Click the arrow next to the first option and select “yes” from the drop-down menu.
2. Torq will now use the VST plug-ins found at the path listed in the window just below.
Custom VST Plug-in Directory
This preference allows you to select an alternate folder of VST plug-ins for Torq to use. This will allow you to specify only
specific plug-ins to use by copying only the ones you need into a unique folder that you create.
1. Click the arrow next to the first option and select “Yes” from the drop-down menu.
2. Torq will now use the alternate VST plug-ins found at the path listed in the window just below.
3. To change the path, click on the path name.
4. This will open a standard System dialog box.
5. Select the folder in which your alternate VST plug-ins are stored.
Torq 1.5 User Guide Chapter 1
Torq 1.5 User Guide Chapter 15
92
92
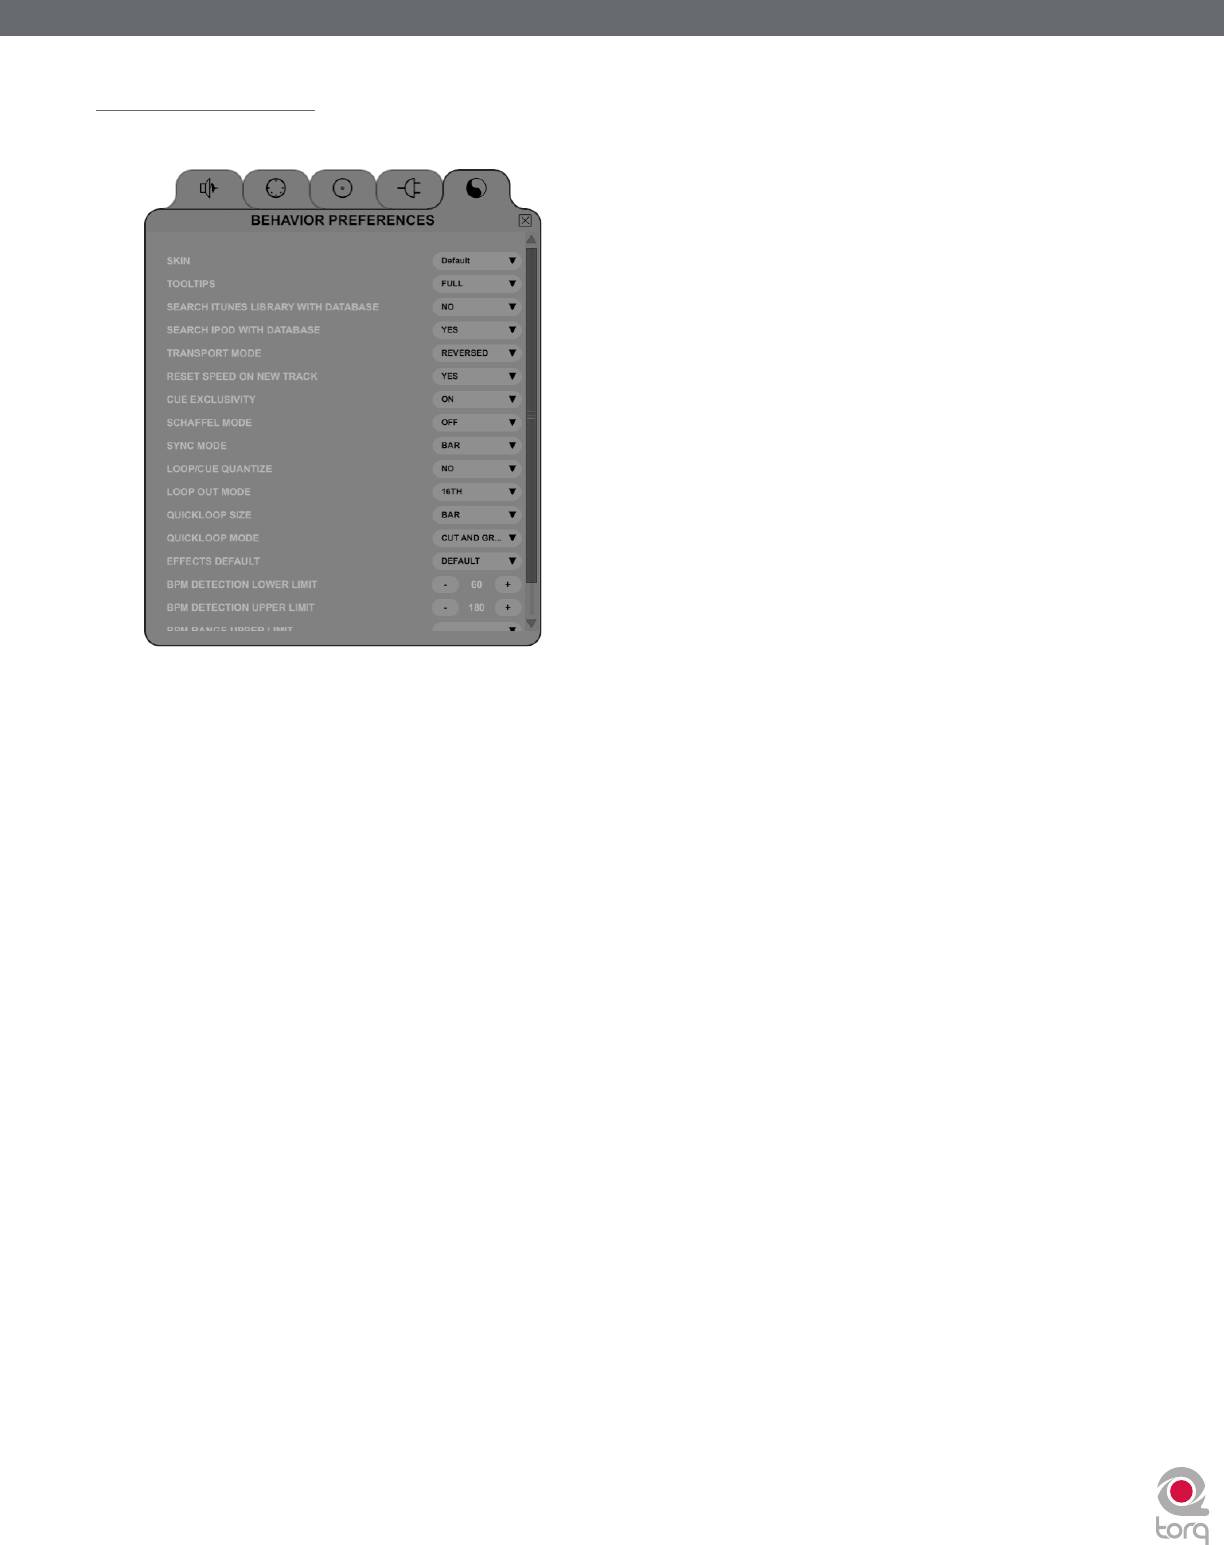
Miscellaneous Tab
This tab contains miscellaneous options that affect the behavior of certain features of Torq.
Skin
This option allows you to select a different “Skin” or color scheme for Torq.
1. Click to drop down the Skin menu.
2. Select a skin (color-scheme) from the list.
3. Torq will change its color scheme, but all interface features will maintain their shape and orientation within the
interface.
Tooltips
If you hover your mouse over a control in Torq, often a small Tooltip will appear describing the function of the control.
Additionally, when you move a knob or slider with the mouse, a Tooltip will be displayed showing the new setting of the
knob or slider. This preference chooses the level of detail in the Tooltips.
» Full—When selected, all Tooltips will be displayed, both when you hover your mouse and when you operate a
control.
» Adjust—When selected, the only Tooltips that will appear are those showing the adjustment applied to a knob
or slider. The normal Tooltips seen when hovering the mouse over a control will be hidden.
» None—When selected will disable all Tooltips entirely.
Search iTunes Library with Database
If you happen to have a copy of Apple iTunes installed on your computer, selecting “Yes” for this option will integrate
its Music Library into Torq’s Database. Any songs currently a part of your iTunes Library will be instantly accessible in
Torq along with all other folders assigned to the Database. If this option is off, you’ll have to specifically select the iTunes
Library in the Browser window to view its contents.
Search iPod with Database
When this preference is set to Yes, any connected iPods will have their music libraries incorporated into the Database
for instant searching. If this option is off, you will have to specifically select the iPod Library in the Browser to view its
contents.

Torq 1.5 User Guide Chapter 1
Torq 1.5 User Guide Chapter 15
93
93
Transport Mode
The Nudge and Offset buttons in the Decks can have their directions reversed using this preference. By default, this
option is set to Reverse, meaning the buttons operate in a manner similar to a DJ using turntables. Instead of pressing
right to go faster or ahead in the song, you’ll press left (just like the closest edge of a record spinning past a DJ). If you
prefer more of a “tape machine” style control, switch this option to “Normal.”
Reset Speed on New Track
When this option is set to Yes, Torq will reset the speed of a Deck to 0% (original tempo) every time a new song is
loaded onto the Deck. With this option set to No, Torq will maintain the position of the Speed Slider even after loading
a new song. This is the preferred mode when using MIDI to control the Speed Sliders since the position of the on-screen
slider will remain synced to the position of the MIDI slider.
Cue Exclusivity
This option affects how the Deck Cue buttons behave.
When this option is On, pressing the Cue button on a channel will cause the other Cue button on the other channel to
turn off. This will ensure that you are only hearing one audio source through your headphones at a given time.
When this option is Off, you can cue multiple channels at once. These Cue sources are mixed and heard through
your headphones simultaneously. With each channel that is added to the Cue mix, the overall Cue bus volume will be
attenuated by 3dB in order to keep it from clipping.
Schaffel Mode
Schaffel is German for “shuffle,” which has become a popular form of dance music based on a triplet rhythm as opposed
to a straight 16th-note rhythm.
When this mode is activated, any of the effects (or parameters that quantize their values) will include triplets in their
quantizing options.
Take the Strobe effect for example: The Parameter knob changes the rate of the Strobe effect. Normally, this would
select rates of 1⁄2, 1⁄4, 1/8, 1/16, and 1/32. With Schaffel engaged, the knob would quantize to 1⁄2, 1⁄4, 1/8, 1/8T, 1/16T,
and 1/32T. The “T” after the number stands for “Triplet.”
✓ Note: Selecting a triplet quantization will give the effect or parameter a “shuffled” or funky feel.
✓ Note: Schaffel Mode can also be turned on and off from Torq’s toolbar. Click the Schaffel button to toggle Schaffel Mode
on and off.
Sync Mode
This option determines the “forcefulness” of the synchronization used in Torq.
» Bar—When selected, Torq will align a synced Deck to the tempo and downbeat of the other Deck or Global
Tempo. Any attempts to adjust the alignment of the track will result in Torq forcing the tracks back into
synchronization with their downbeats aligned (the thick lines of the Phase Grids will be aligned with each other
at all times).
» Beat—When selected, Torq will match a synced Deck to the tempo and beat of the other Deck or Global
Tempo with no regard to the downbeats in the Phase Grids. Any attempts to realign the synced Deck will result
in Torq forcing the track back into alignment with the nearest beat (the thick lines of the Phase Grids may be out
of alignment with each other).
» Tempo Only—When selected, Torq will only match the tempo of a synced Deck to the other Deck or Global
Tempo. When you press Play on the Deck, Torq will not force the song into alignment. It will be up to you to
start the music at the right moment and keep it in alignment.
✓ Note: The Sync Mode can also be changed from Torq’s toolbar. Each time you click the Sync Mode button, it will
cycle through Bar, Beat, and Tempo modes.

Torq 1.5 User Guide Chapter 1
Torq 1.5 User Guide Chapter 15
94
94
Loop/Cue Quantize
By default, Torq does not quantize actions such as creating loops or QuickCues. This gives you the freedom to set these
points wherever you wish.
If Quantize is set to “Yes”, Torq will force each new Loop or QuickCue you make to the nearest 16th-note. This can help
ensure that your QuickCues and Loops occur right on beat when creating them on-the-fly.
✓ Note: Enabling Quantize does not change the positions of QuickCues or Loop points that are already set in a song. It only
governs the creation of new QuickCues and Loops.
✓ Note: Quantize can be turned on and off from Torq’s toolbar. Clicking the Quantize button will toggle it on and off.
Loop Out Mode
The default setting for this preference is “16th”. When set this way, Torq will make sure that a Loop Out marker is set at
a position that is quantized to the 16th-note relative to the position of the Loop In marker. In this mode, you can create
loops that are any number of 16th-notes long. For example, you can create a loop that is 16 16th-notes long (1 bar). You
could make a loop that is 2 bars, 1.5 bars, .5 bars (2 beats), etc. You can also make loops of strange lengths such as 15
16th-notes long. Loops like that will appear to fall out of sync because they don’t have even loop lengths.
To prevent some of the uncommon loop lengths that can be generated when using the “16th” setting, you can switch this
preference to “Smart”. In this mode, Torq will force every loop to a length that will always loop in time with the music.
Basically, it allows you to make a loop as small as a 16th-note and grows in powers of two from there. Therefore, you can
achieve the following loop lengths: 1/16-bar, 1/8-bar, 1/4-bar, 1/2-bar, 1 bar, 2 bars, 4 bars, 8 bars, 16 bars, etc.
QuickLoop Size
This option affects how the QuickLoop buttons behave.
When this preference is set to “Bar,” your loops will be established in lengths of musical bars. When this preference is set
to “Beat,” your loops will be established in lengths of musical beats.
QuickLoop Mode
This preference determines the behavior of the QuickLoop buttons after a QuickLoop has been engaged. By default, this
preference is set to “Cut and Grow”. In this mode, each additional press of a QuickCue button will cut the current loop
length in half. Therefore, if you press the 2 button to create a 2-bar loop, pressing 2 again will reduce the loop to 1 bar
in length. Pressing 2 again will cut the loop to half a bar (2 beats). You can continue pressing 2 again and again and the
loop will get smaller and smaller to the point where only a high-pitched sound is heard. If you hold the SHIFT key while
pressing the QuickLoop button, the loop will grow in length—doubling its previous length. There is no limit to how long
the loop can be, other than the length of the song.
The alternative setting for this preference is “Direct”. This mode more accurately resembles the loop functions on some
DJ CD players. After you’ve created your loop by pressing one of the QuickLoop buttons, you can use the QuickLoop
buttons to divide the loop length by their value. For example, pressing the 1 button will create a 1-bar loop. If you then
press 2, you will end up with a half-bar (2 beat) loop since 1 divided by 2 is 1/2. If you press the 4 button, the loop will
become 1 beat long (1 bar divided by 4 equals 1/4-bar [1 beat]). If you then press 1 again, the loop will return to its
original length (1 divided by 1 is 1). Another example: Press 2 to capture a 2 beat loop. Press 8 to reduce that loop to a
16th-note in length (2 beats divided by 8 equals 1/4-beat [16th-note]).

Torq 1.5 User Guide Chapter 1
Torq 1.5 User Guide Chapter 15
95
95
Beat Detection Style
Torq attempts to determine the tempo and phase of a song when you load it into a Deck. Coaxing a computer to “hear”
the tempo of a song is partially art and science—this preference is here to assist when the science fails.
In the Beat Detection Style menu, you will find a list of various musical styles/genres. Choosing one of the styles will tell
Torq to alter its analysis algorithm for all future file analysis. Choosing a matching style will greatly improve the accuracy
of Torq’s beat detection.
For example, if you have “House” selected here and attempt to analyze a group of Drum & Bass tracks, the analysis will
return the incorrect tempo (it will be too slow). Set this preference to “Drum & Bass” then re-analyze the affected files.
Those files will now be analyzed with the proper tempo.
Beat Detection Limits
You can further fine-tune the beat-detection by setting your own upper and lower limits for the BPM. Once set, Torq will
ensure that all analyzed BPMs return within the specified tempo range.
✓ Note: Whenever you set your own upper and lower BPM limits, the Beat Detection Style will automatically be changed to
“Custom”.
Sample Counter
Pressing this button will reset the automatic numbering of newly recorded samples back to “000.”


