Electrolux NPX 6 SENSOMATIC: CHAPTER CHAPTER
CHAPTER CHAPTER: Electrolux NPX 6 SENSOMATIC
60
60
MIXER
CHAPTER
CHAPTER
Step one when DJing is controlling the music. That’s what Torq’s Decks are for. Step two
is blending, or mixing, the music together. As you’d expect, Torq has a section for that,
too. While existing in software, Torq’s Mixer sounds and behaves just like a top-of-the-
line hardware mixer. It is therefore instantly familiar to anyone who has used a mixer
before, and it is capable of performing the same tricks and techniques utilized by DJs on
traditional hardware mixers.
10
1
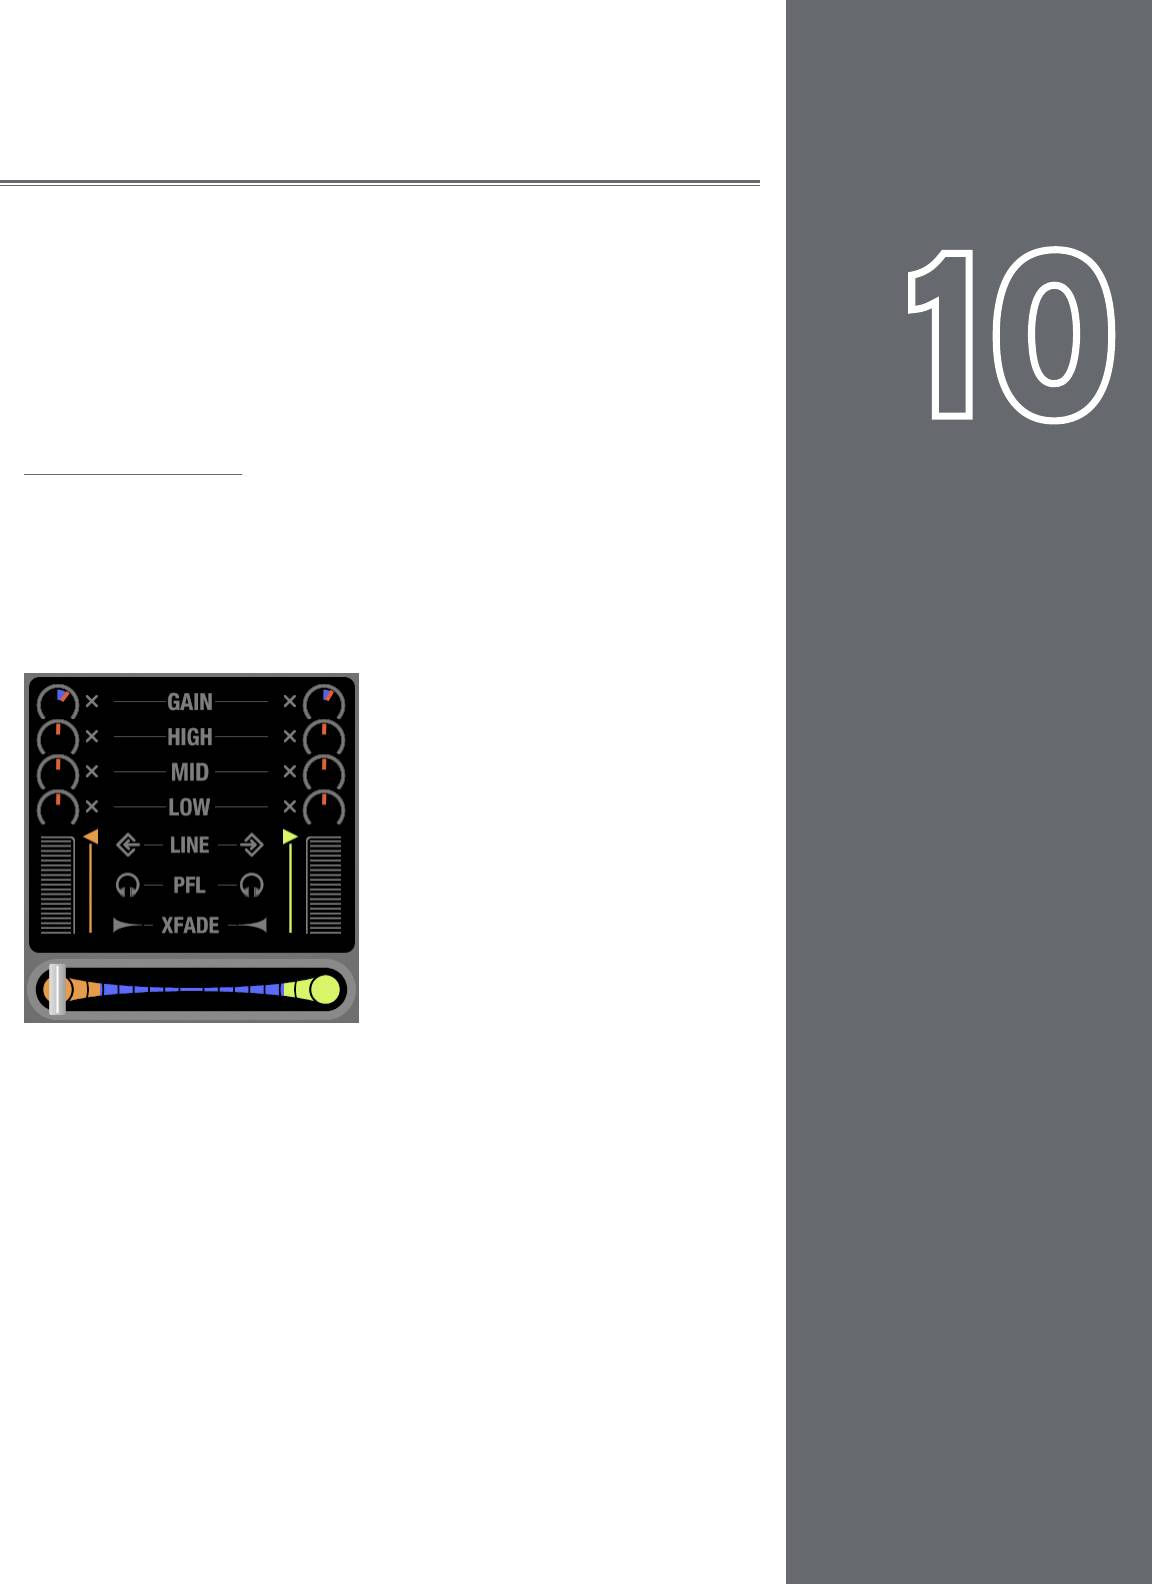
Mixer Architecture
Before you start tweaking knobs and sliders on the Mixer, you should have a basic
understanding of the components in the mixer and the signal flow between the
components. Without this basic understanding, some controls may seem to be
misbehaving or completely inoperative, only because you’ve unknowingly set another
control to a conflicting position. Additionally, there are some terms you should get to
know, as they will be used repeatedly throughout this User Manual.
Channels
When audio from a Deck enters the Mixer, it enters a channel. A channel is a
section within a mixer that processes a single audio signal. Since Torq has two
Decks, the Mixer has two channels, one for each Deck. While the signals from
both Decks enter the same mixer, they remain separate in their respective
channels, allowing you to process them differently before mixing them together
into a single channel (which is what your audience hears).
English
English

Torq 1.5 User Guide Chapter 1
Torq 1.5 User Guide Chapter 10
61
61
Gain/Mute
When audio from a Deck enters a channel in the Mixer, the first thing it runs into is the Gain control (seen at the top of
each channel in the mixer). This knob will increase or decrease the volume of the incoming audio signal, allowing you to
boost the level of quiet songs or reduce the level of loud ones. This is a basic step in both maintaining high-quality audio
and matching the levels of the two songs you’re mixing together.
Torq’s Gain knobs will boost or cut the incoming signal by up to 12dB. The “X” button next to the Gain knob is the Mute
button. Activating this button will mute the incoming audio—resulting in a silent channel.
EQ/Kills
Next in the signal chain is the Equalizer, or EQ for short. While the Gain knob (above) increases or decreases the level
of the entire audio signal in the channel, an EQ increases or decreases the level of only a specific frequency range within
the audio signal. Torq is equipped with a 3-band EQ, meaning it can control the levels of three different frequency ranges
(bands), named High, Mid, and Low.
The 3-band EQ is comprised of three knobs and three buttons arranged vertically in each mixer channel. Naturally, the
High EQ is above the Mid EQ, which is above the Low EQ. The “X” buttons next to each EQ knob is a Kill. Activating
these buttons will completely remove, or kill, the associated frequency band from the audio—activating all three at the
same time will therefore completely mute the audio signal.
EQ may very well be the most powerful tool on the DJ mixer (though some would argue that the crossfader is the
ultimate weapon). The EQ controls are used to (1) improve the sound quality of poorly recorded or produced songs, (2)
assist in matching the overall frequency content of two songs, (3) add emphasis to the music by removing or isolating one
or more of the frequency ranges, and (4) mix songs together in a “jigsaw” fashion by swapping the frequency ranges of
two songs as they play together.
Old songs typically don’t have as much bass as today’s tracks. Therefore, you’ll often use the Low EQ to boost the bass
(low frequencies) of the old song to match the louder bass of a recent song. Without doing this, it may sound like the
music gets quieter as you mix from the recent song to the older one.
Likewise, even tracks recorded within the same year can sound different from one another, even when playing at the same
volumes. This is usually because one song will have stronger Mid frequencies compared to the other. If the bass parts in
both songs sound like they’re the same volume, you can use the Mid EQ to “turn down” the louder song until it more
closely matches the quieter song.
DJs also like to mix things up during their sets by adding their own manipulations to the songs they play. For example, a DJ
might cut the High and Low frequencies from a track a few beats before the chorus of a song, then bring them back right
when the chorus starts (the perfect job for Torq’s High and Low Kill buttons).
When two songs are playing at the same time, you’ll frequently find that the music sounds muddy. This is normally due
to “un-complementary” bass content in the two songs. This can be as simple as the two songs being in different keys, or
could occur if both songs have long, sustained bass notes. In order to clean things up, you can simply remove the bass
from one of the songs with one of the Low Kill buttons. This will leave the bass from the other song in the mix, so it will
still sound natural. When you’re ready, press both Low Kill buttons at the same time. This will kill the bass in the first
track while bringing in the bass from the other. This will sound like the bass part in the overall mix has changed (which it
has) and the mix will still sound full. You can also swap frequencies with the other frequency bands. You can also make the
swaps less abrupt by using the EQ knobs instead.

Torq 1.5 User Guide Chapter 1
Torq 1.5 User Guide Chapter 10
62
62
PFL/Headphone Cue
Once the audio signal leaves the EQ, it is sent to two different locations. One location is the PFL Button, which looks like
a pair of headphones. PFL stands for Pre-Fader Listen, which refers to hearing an audio signal without being under the
influence of the Volume fader (on some mixers, this function is called “Cue”). That definition may not make sense if you’re
not familiar with a mixer, so think of it as a way to privately hear the music in a mixer channel regardless of what your
audience can or cannot hear.
This is what a DJ uses to listen to the next song before he plays it for his audience. When you press the PFL button, that
channel is sent to the PFL section, which is described below. You’ll be able to hear the music on the headphones and you’ll
even be able to record it into the Sampler.
Channel Volume Faders
Besides going to the PFL, the audio leaving the EQ also goes to the Channel Volume fader. This is the primary volume
control for the channel (though it is subordinate to the crossfader) which works just like a volume fader on a traditional
mixer. You can match volumes of the two tracks using the Channel Volume faders. However, some DJs prefer the
technique of leaving the Channel Volume faders fully up—you then match the volumes of the songs using the Gain knobs.
The reason for this is that you’re then free to use the Channel Volume faders for other effects such as volume fades, cuts,
and stutter effects, similar to the scratch techniques used on the Crossfader. Whichever approach you choose is entirely
up to you.
✓ Note: You can quickly return a Channel Volume fader to full volume by holding SHIFT and clicking on the fader.
Line Input Buttons
Located above the PFL icons in each channel of the Mixer is a Line Input icon. Clicking this icon will activate the line
input for that channel. This will allow you to feed audio from an external audio source (such as a CD player or turntable
connected to your audio interface) for mixing with Torq’s Mixer. All functions, such as EQ, Gain, Effects, and PFL, will still
work even when using external audio sources.
✓ Note: In order for Line Input to work you will need to assign audio channels to the Line Inputs in the Audio tab of the
Preferences. See the Preferences section for more information on setting up these inputs.
Crossfader
After the audio leaves the individual mixer channels via the Channel Volume faders, the signals enter their respective
sides of the Crossfader. The Crossfader is the large horizontal fader just below the Mixer. As you will see, its name is very
appropriate as it allows you to fade between the two channels in a motion that goes side to side across the mixer. When
the Crossfader is in its middle location, you will hear both of the mixer channels. If you move the Crossfader all the way
to the left, you will only hear the channel for the left Deck. Similarly, if you move the Crossfader all the way to the right,
you will only hear the right Deck.
The Crossfader was invented to offer DJs an easy way to fade out of one song while fading in another using only one
hand. Indeed, it still performs this task quite well. However, since its introduction, DJs have taken this simple tool and
transformed it into a virtual razor blade that allows them to perform lightning-fast cuts, scratches, and a myriad of other
techniques.
✓ Note: Torq’s Crossfader has been designed to be very quick and responsive. However, if you are only using a mouse to
control Torq, you probably won’t be able to use the Crossfader for more than fading between songs. If you want to use
the Crossfader for cuts and scratching, we recommend you control the Crossfader using one of the real crossfaders found
on M-Audio controllers, such as Xponent, since the tactile response of the Crossfader comprises part of the scratching
technique.

Torq 1.5 User Guide Chapter 1
Torq 1.5 User Guide Chapter 10
63
63
< Crossfader Curve
Speaking of scratching, one of the improvements to crossfader design is an adjustable Crossfader Curve. This
refers to the rate at which the songs fade in and out as the crossfader is moved from one side to the other.
At one extreme is the Equal Power Contour, which is good for slow fades between two songs. As you move the
fader from the edge toward the center, it will slowly fade in one song. However, as it is fading in this song, it will
also start fading out the other song. The end result is that the overall volume remains the same as you fade, even
when both songs are playing at the same time.
At the other extreme of the adjustable range is the Hard Cut. This shape causes a song to fade in to full volume
almost immediately after moving the fader inward from the edge. Similarly, the other song will not begin to fade
out until the crossfader is almost all the way at the other edge. Then, right before the crossfader reaches the
edge, the other song will fade down. This is the shape preferred by scratch DJs as they can cut in a track to full
volume with very little motion of their hand. When performed quickly, you don’t even hear the volume fade up
and down—it sounds as if the sound is being abruptly cut in and out.
When Torq is launched for the first time, the Crossfader Curve will be set to a happy medium between these
two extremes. You can, of course, change this curve using either of the following:
» Adjusting with the Mouse
1. Hold down the SHIFT key on your computer keyboard
2. While holding down shift, click and drag over the Crossfader. The Crossfader itself will not move, but
the graphic below the Crossfader will change to indicate the new curve. As the blue bars expand toward
the edges, the curve approaches the Hard Cut shape. With no blue bars, the curve is an Equal Power
Contour.
» Adjusting via MIDI
1. Click the Preferences button to open the Preferences menu.
2. Click the MIDI tab.
3. Click the Learn button next to Crossfader Curve. The button will turn red.
4. Move the knob or fader that you want to use for Crossfader Curve control. Torq will read the incoming
MIDI messages and immediately assign it to the Crossfader Curve.
5. Exit the Preferences.
< Crossfader Assign
Another part in the evolution of the Crossfader is the Crossfader Assign. As explained above, the left Deck is
routed to the left side of the Crossfader while the right Deck is routed to the right side. Clicking the Crossfader
Assign buttons will swap the assignments so that the left Deck will be heard when the Crossfader is at the right,
and vice versa. This is sometimes known as “hamster style” control.
< Transform Buttons
Another feature to aid scratch DJs is the Transform button. The Transform buttons are found at the left and
right sides of the Crossfader. Pressing a Transform button will cause the associated channel to temporarily
bypass the Crossfader and go straight to the main mix. For example, if the Crossfader is fully left, you’ll only hear
the left Deck. If you press the right Transform button, you’ll hear the right Deck along with the left Deck.


