Electrolux Z8822GP: English
English: Electrolux Z8822GP
3
esp
sve
gre
ned
por
ita
nor
suo
de
rus
fra
eng
dan
English
Before starting
• Unpack your UltraOne model and the Aeropro system and check that all accessories are
included*.
• The Aeropro system consists of a hose, handle, tube and nozzle specifically designed
for your UltraOne and which may vary from model to model.
• Read the Operating Instructions.
• Pay special attention to the Safety advice chapter.
Enjoy your Electrolux UltraOne!
Table of contents:
How to use the vacuum cleaner
. . . . . . . . . . . . . . . . . . . . . . . . . . . . . . . . . . . . . . . . . . . . . . . . . . . . . .4-5
Tips on how to get the best results
. . . . . . . . . . . . . . . . . . . . . . . . . . . . . . . . . . . . . . . . . . . . . . . . . . .6-7
Replacing the filters
. . . . . . . . . . . . . . . . . . . . . . . . . . . . . . . . . . . . . . . . . . . . . . . . . . . . . . . . . . . . . . . . . .8-9
Cleaning the Aeropro nozzle and changing the battery in remote handle
. . . . . . . . . . . 10-11
Troubleshooting
. . . . . . . . . . . . . . . . . . . . . . . . . . . . . . . . . . . . . . . . . . . . . . . . . . . . . . . . . . . . . . . . . . . . . 12
Safety advice
. . . . . . . . . . . . . . . . . . . . . . . . . . . . . . . . . . . . . . . . . . . . . . . . . . . . . . . . . . . . . . . . . . . . . . . . 13
Consumer information and sustainability policy
. . . . . . . . . . . . . . . . . . . . . . . . . . . . . . . . . . . . . . . 13
Description of your UltraOne:
1 Display
2 Hepa filter cover
3 Hepa filter
4 Parking slot
5 Power cord
6 Motor filter
7 Motor filter holder
8 S-bag®
9 Dust compartment cover
10 Button for Aeropro 3in1 compartment and dustbag comparment
11 Aeropro 3in1 compartment
12 Aeropro 3in1 nozzle
13 Aeropro hose
14 Handle
15 Aeropro telescopic tube
16 Parking clip
17 Display for models with manual control
18 Aeropro classic handle
19 Aeropro ergo handle
20 Aeropro nozzle
21 Display for models with remote control
22 Aeropro remote control handle
23 Aeropro remote control handle for motorized nozzle
24 Aeropro motorized nozzle
25 Aeropro turbo nozzle*
26 Aeropro parketto nozzle*
* Accessories may vary from model to model.
Indhold
Dansk
Inden start
• Pak din UltraOne-model og Aeropro-systemet ud, og kontrollér, at alt tilbehør
medfølger*.
• Aeropro-systemet består af slange, håndtag, rør og mundstykke, som er udviklet netop
til din UltraOne, og det kan variere fra model til model.
• Læs brugervejledningen.
• Vær specielt opmærksom på kapitlet om sikkerhedsanvisningerne.
Nyd din Electrolux UltraOne!
Indholdsfortegnelse:
Sådan bruges støvsugeren
. . . . . . . . . . . . . . . . . . . . . . . . . . . . . . . . . . . . . . . . . . . . . . . . . . . . . . . . . . .4-5
Tip til, hvordan du opnår de bedste resultater
. . . . . . . . . . . . . . . . . . . . . . . . . . . . . . . . . . . . . . . . .6-7
Udskiftning af filtre
. . . . . . . . . . . . . . . . . . . . . . . . . . . . . . . . . . . . . . . . . . . . . . . . . . . . . . . . . . . . . . . . . . .8-9
Rengøring af Aeropro-mundstykket og udskiftning af batteriet i håndtaget med
fjernbetjening.
. . . . . . . . . . . . . . . . . . . . . . . . . . . . . . . . . . . . . . . . . . . . . . . . . . . . . . . . . . . . . . . . . . . . 10-11
Fejlfinding
. . . . . . . . . . . . . . . . . . . . . . . . . . . . . . . . . . . . . . . . . . . . . . . . . . . . . . . . . . . . . . . . . . . . . . . . . . . 12
Sikkerhedsanvisninger . . . . . . . . . . . . . . . . . . . . . . . . . . . . . . . . . . . . . . . . . . . . . . . . . . . . . . . . . . . . . . . 13
Forbrugerinformation og politik om bæredygtighed
. . . . . . . . . . . . . . . . . . . . . . . . . . . . . . . . . . 13
Beskrivelse af din UltraOne:
1 Display
2 Hepa-filterdæksel
3 Hepa-filter
4 Parkeringssystem
5 Strømledning
6 Motorfilter
7 Motorfilterholder
8 S-bag®
9 Låg til poserum
10 Knap til Aeropro 3in1-rum og poserum
11 Aeropro 3in1-rum
12 Aeropro 3in1-mundstykke
13 Aeropro-slange
14 Håndtag
15 Aeropro-teleskoprør
16 Pakeringssystem
17 Skærm på modeller med manuel justering
18 Aeropro classic-håndtag
19 Aeropro ergo-håndtag
20 Aeropro-mundstykke
21 Skærm på modeller med fjernbetjening
22 Aeropro-håndtag med fjernbetjening
23 Aeropro-håndtag med fjernbetjening af mundstykke med motor
24 Aeropro-mundstykke med motor
25 Aeropro turbo-mundstykke*
26 Aeropro parketto-mundstykke*
* Tilbehør kan variere fra model til model.
Content
4
Click!
Click!
Click!
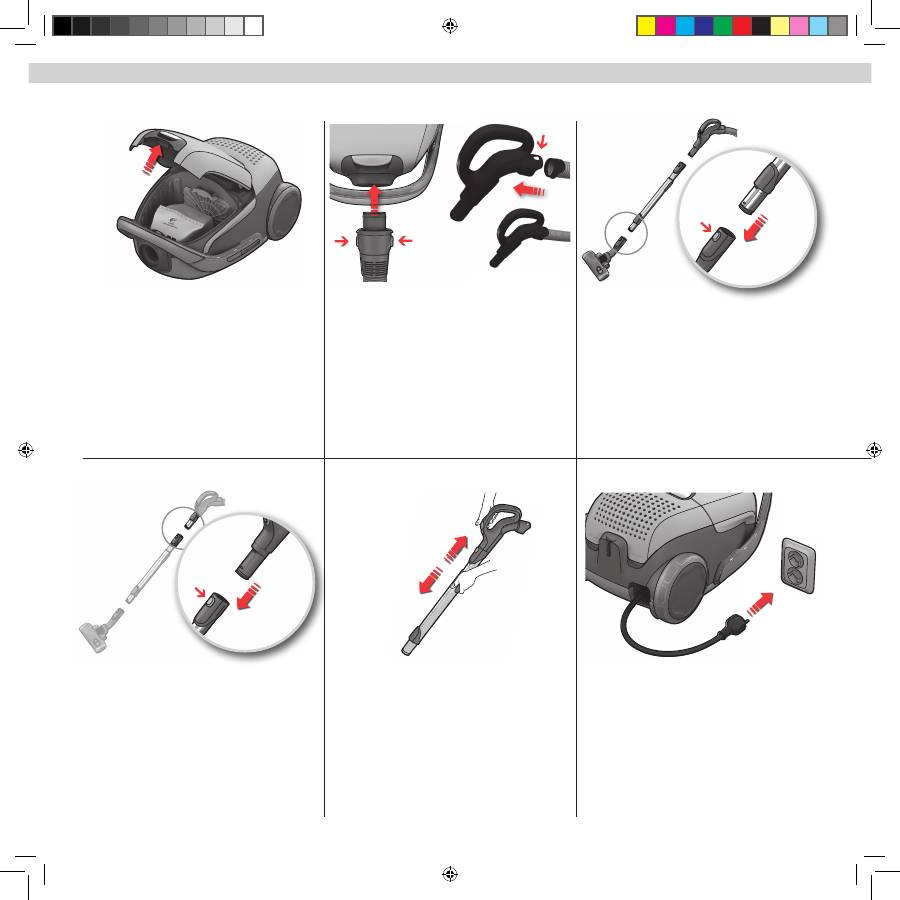
1.
Open the cover by pulling the button.
Check that the
s-bag® is in place.
4. Attach the telescopic tube to the hose handle
(to
remove it, press the lock button and pull the hose
handle out).
5. Adjust the telescopic tube
by holding the lock with
one hand and pulling the handle with the other hand.
6. Pull out the power cord and plug it into the mains.
2. Insert the hose
(to remove it, press the lock buttons
and pull the hose out).
Insert the hose into the hose handle until the catches
click to engage (press the catches to release the hose).
3. Attach the telescopic tube to the floor nozzle
(to
remove it, press the lock button and pull the nozzle
off).
How to use the vacuum cleaner / Sådan bruges støvsugeren
1.
Åbn låget ved at trække i knappen.
Kontroller, at
s-bag® posen er anbragt korrekt.
2. Montér slangen
(tryk på låseknappen, og træk slangen
ud for at fjerne den).
Sæt slangen i slangehåndtaget, så den klikker på
plads (tryk på låsen for at udløse slangen).
3. Montér teleskoprøret til gulvmundstykket
(tryk på
låseknappen, og træk mundstykket ud for at fjerne
det).
4. Montér teleskoprøret til slangens håndtag
(tryk på
låseknappen, og træk slangehåndtaget ud for at fjerne
det).
5. Justér teleskoprøret
ved at holde låsen med den ene
hånd og trække i håndtaget med den anden hånd.
6. Tag el-ledningen ud, og sæt den i en stikkontakt.
Оглавление
- Dansk ..........................................................2–13
- 17 18 19 20 25 21 22 23 24 26 4 10 11 16 13 15 14 32 1 5 4 6 7 8 9 12
- English
- Start/stop the vacuum cleaner and adjust suction power / Start/stop støvsugeren, og justér sugestyrken
- Parking positions / Opbevaringspositioner Air valve Aeropro 3in1 nozzle
- Replacing the Hepa filter / Udskiftning af Hepa-filter
- Cleaning the Aeropro nozzle / Rengøring af Aeropro-mundstykketCleaning the Aeropro motorized nozzle / Rengøring af Aeropro-mundstykket med motor
- Changing the battery in remote handle / Udskiftning af batteriet i håndtaget med fjernbetjening
- Consumer information and sustainability policy Forbrugerinformation og produktpolitik
- 17 18 19 20 25 21 22 23 24 26 4 10 11 16 13 15 14 32 1 5 4 6 7 8 9 12
- Français
- Места для хранения / Positions de rangement Réglage de débit d’air Accessoire Aeropro 3 en 1
- Замена фильтра Hepa / Remplacement du filtre Hepa
- Чистка насадки Aeropro / Nettoyage du suceur AeroproЧистка насадки Aeropro / Nettoyage de la brosse électrique motorisé Aeropro
- Замена аккумулятора в рукоятке дистанционного управления / Remplacement des piles de la poignée de flexible avec télécommande
- Информация для потребителя и экологическая политика
- Informations consommateur et fin de vie
- 17 18 19 20 25 21 22 23 24 26 4 10 11 16 13 15 14 32 1 5 4 6 7 8 9 12
- Suomi
- Pölynimurin käynnistäminen ja imutehon säätäminen / Ein-/Ausschalten des Staubsaugers und Saugleistungsregulierung
- Säilytysasennot / Parkpositionen Ilmaventtiili Aeropro 3in1 -suutin
- Hepa-suodattimen vaihtaminen / Wechseln des Hepa-Filters
- Aeropro-suuttimen puhdistaminen / Reinigen der Aeropro BodendüseAeropro-moottoroidun suuttimen puhdistaminen / Reinigen der Aeropro-Elektrodüse
- Kaukosäätimen pariston vaihtaminen / Auswechseln der Batterie im Handgriff mit Fernbedienung
- Kuluttajaneuvonta ja kestävä suunnittelu Verbraucherinformationen und Nachhaltigkeitsgrundsätze
- 17 18 19 20 25 21 22 23 24 26 4 10 11 16 13 15 14 32 1 5 4 6 7 8 9 12
- Italiano
- Accensione/spegnimento dell’aspirapolvere e regolazione / Starte/stoppe støvsugeren og justere sugestyrken
- Posizioni di parcheggio / Parkeringsstillinger Valvola dell’aria Bocchetta Aeropro 3in1
- Sostituzione del filtro Hepa / Bytte Hepa-filteret
- Pulizia della bocchetta Aeropro / Rengjøre Aeropro-munnstykketPulizia della bocchetta Aeropro motorizzata / Rengjøre det motoriserte Aeropro-munnstykket
- Sostituzione della batteria nell’impugnatura con comando a distanza / Bytte batteriet i håndtaket med fjernkontroll
- Informazioni per l’utente e politica di sostenibilità Forbrukerinformasjon og miljøretningslinjer
- 17 18 19 20 25 21 22 23 24 26 4 10 11 16 13 15 14 32 1 5 4 6 7 8 9 12
- Nederlands
- De stofzuiger aan- en uitzetten en de zuigkracht instellen / Ligue/desligue o aspirador e ajuste o poder de sucção
- Parkeerstanden / Posições de arrumação Luchtklep Aeropro 3in1-mondstuk
- Het Hepa-filter vervangen / Substituição do filtro Hepa
- Het Aeropro-mondstuk reinigen / Limpeza do bocal do AeroproHet gemotoriseerde Aeropro-mondstuk reinigen / Limpeza do bocal monitorizado do Aeropro
- De batterij van de afstandsbediening vervangen / Substituição das pilhas da pega com controlo remoto
- Klantinformatie en milieubeleid Informação ao consumidor e política de sustentabilidade
- 17 18 19 20 25 21 22 23 24 26 4 10 11 16 13 15 14 32 1 5 4 6 7 8 9 12
- Español
- Posiciones de parada / Parkeringslägen Válvula de aire Boquilla 3 en 1 Aeropro
- Cambio del filtro Hepa / Byta Hepa-filter
- Limpieza de la boquilla Aeropro / Rengöring av Aeropro-munstyckeLimpieza de la boquilla motorizada Aeropro / Rengöring av Aeropro-motormunstycket
- Cambio de la pila en el asa con mando a distancia / Byta batteri i fjärrkontrollen
- 17 18 19 20 25 21 22 23 24 26 4 10 11 16 13 15 14 32 1 5 4 6 7 8 9 12
- Ελληνικά
- Θέσεις στάθμευσης Βαλβίδα αέρα Ακροφύσιο Aeropro 3in1
- Αντικατάσταση του φίλτρου Hepa
- Καθαρισμός του ακροφυσίου Aeropro Καθαρισμός του μηχανοκίνητου ακροφυσίου Aeropro
- Αλλαγή της μπαταρίας στη λαβή με τηλεχειριστήριο
- Πληροφορίες για τον καταναλωτή και πολιτική βιωσιμότητας
- English
- Nederlands
- 2193890-30
