Electrolux EWC1350: Installation
Installation: Electrolux EWC1350
18 electrolux
The consumption data shown on this chart is to be considered purely indicative, as it
may vary depending on the quantity and type of laundry, on the inlet water temperature
and on the ambient temperature.
Installation
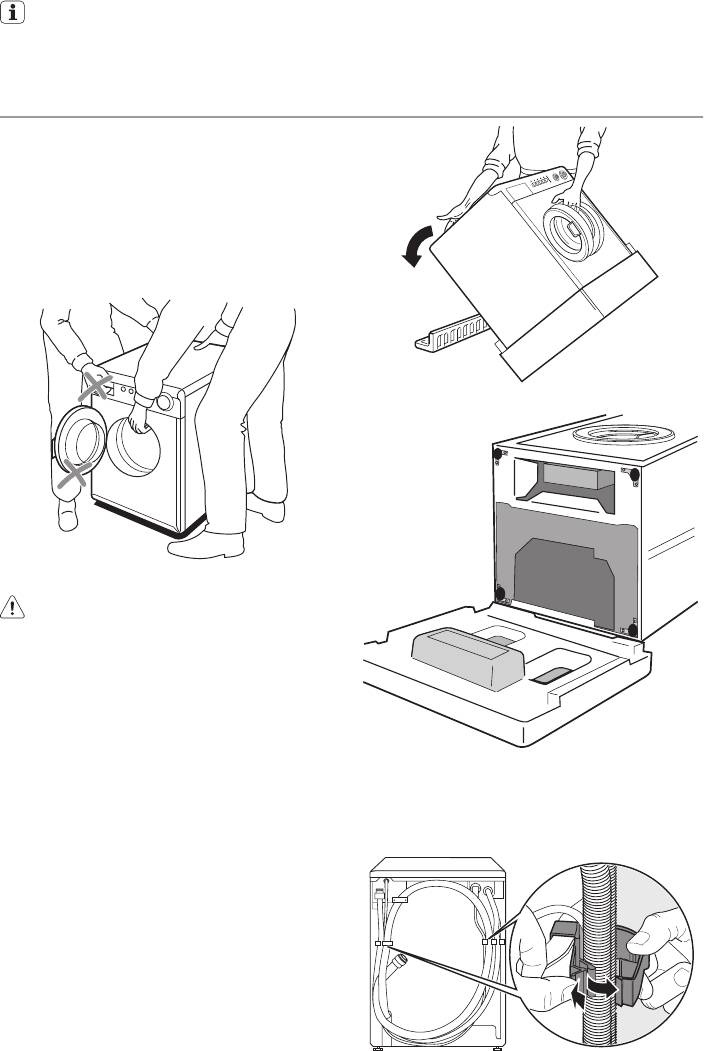
Lifting the machine
Be careful when lifting the machine. Incorrect
methods of lifting can cause physical injuries
and also increase the risk of damage to the
machine. Open the door and take hold of the
top inside of the door opening. You can also
lift the machine by gripping the rear overhang
of the top.
Warning! Never lift the machine by
gripping it’s control panel, door, or
detergent dispenser.
Unpacking
When supplied the washing machine is
packed using a number of locking devices/
packing pieces to prevent drum and motor
from damage in transit All transit bolts and
2. Return machine to it's upright position
packing must be removed before using the
and remove the power supply cable and
appliance.
the draining and inlet hose from the hose
You are advised to keep all transit devices so
holders on the rear of the appliance.
that they can be refitted if the machine ever
has to be transported again.
1. Spread some of the polystyrene packag-
ing materials on the floor behind the ma-
chine and then lay the machine carefully
rear side down on them. Make sure that
no hoses are crushed in the process. Re-
move the polystyrene base and the sup-
port bar which the machine rests on.
electrolux 19
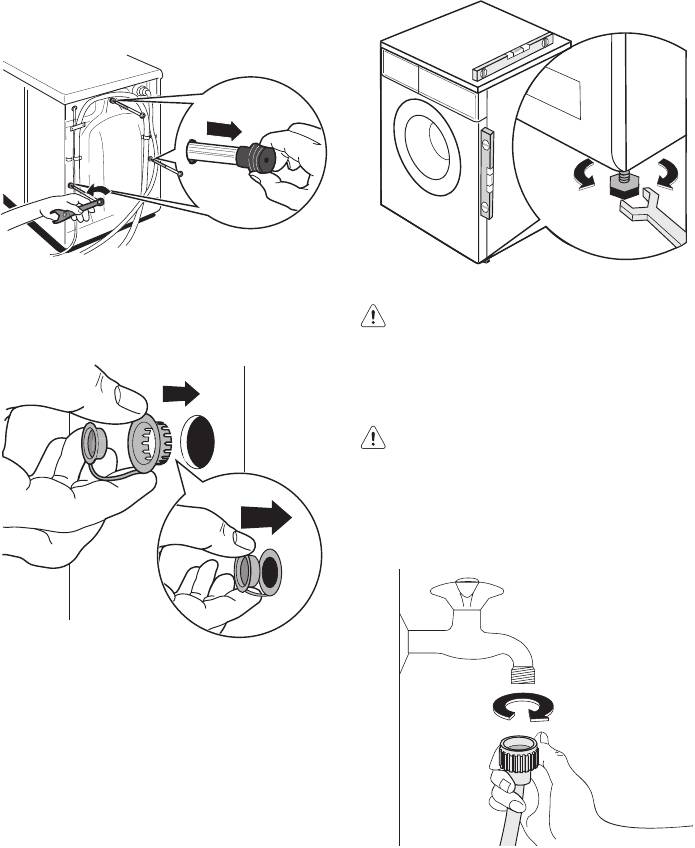
3. With a suitable spanner unscrew and re-
move the three screws and their spacers
on machine's rear.
4. The three holes must then be plugged
with the plastic plug caps supplied in the
Caution! Never place cardboard, wood
bag containing the instruction booklet,
or similar materials under the machine to
which can be found inside the drum.
compensate for any unevenness in the
floor.
Water inlet
Warning! This appliance must be
connected to a cold water supply.
1. Connect the water inlet hose supplied
with the machine to a tap with a 3/4"
thread. Always use the hose supplied
with the appliance.
Positioning
Install the machine on a flat hard floor. Make
sure that air circulation around the machine
is not impeded by carpets, rugs etc. Check
that the machine does not touch the wall or
furniture. Level the washing machine by rais-
ing or lowering the two front feet. If necessa-
ry, check the setting with a spirit level. Any
necessary adjustment can be made with a
spanner. Accurate levelling prevents vibra-
tion, noise and displacement of the machine
If necessary, use the suitable or supplied
during operation.
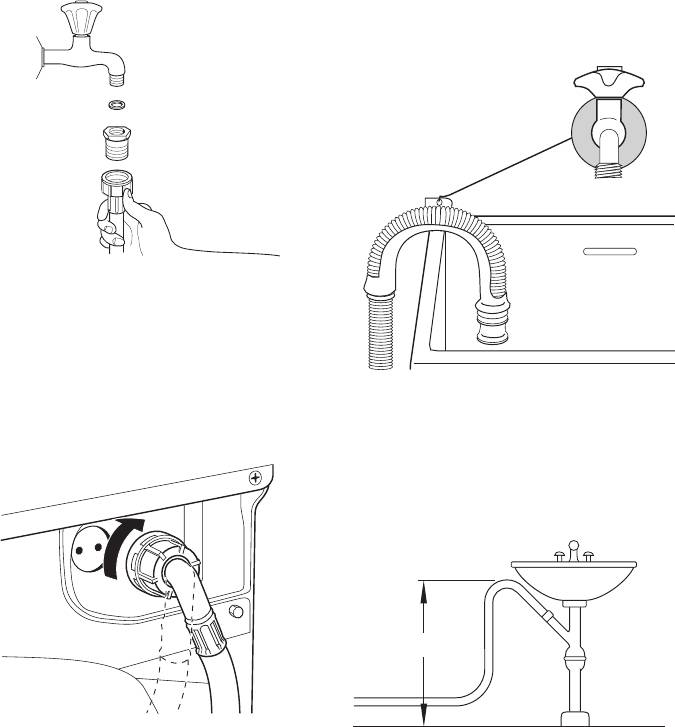
restrictor (1/2”).
20 electrolux
Hooked over the edge of a sink using
the plastic hose guide supplied with
the machine.
Important! Do not use the hose from
your previous machine to connect to the
water supply.
2. The machine end of the inlet hose can be
turned in any direction. Set the hose cor-
rectly by loosening the ring nut. After po-
In this case, make sure the end cannot come
sitioning the inlet hose, be sure to tighten
unhooked when the machine is emptying.
the ring nut again to prevent leaks.
This could be done by tying it to the tap with
a piece of string or attaching it to the wall.
In a sink drain pipe with a trap.
650-800 mm
The inlet hose must not be lengthened. If it is
too short and you do not wish to move the
tap, you will have to purchase a new, longer
The drain hose can be connected directly in-
hose specially designed for this type of use.
to the pipe (e.g. beneath a washtub or sink),
above the water trap. The drain hose must
Important! Before connecting up the
be arranged so that some part of it’s length
machine to new pipework or to pipework that
is routed up to a level corresponding to the
has not been used for some time, run off a
top edge of the tub and fixed in place there.
reasonable amount of water to flush out any
debris that may have collected in the pipes.
Directly into a drain pipe at a height of not
Water drainage
less than 65 cm and not more than 80 cm.
The end of the drain hose can be positioned
Their must be an air gap around and below
in three ways:
the end of drain hose. This means that the
internal diameter of the standpipe must be
larger than the outer diameter of the hose.
Оглавление
- EWC 1050 EWC 1350
- Electrolux. Thinking of you.
- Product description
- Control panel
- Before first use
- Helpful hints and tips
- Washing programmes
- Care and cleaning
- What to do if…
- Technical data
- Installation
- Environment concerns
- Electrolux. Thinking of you.
- Описание изделия
- Панель управления
- Перед первым использованием
- Полезные советы
- Программы мойки
- Уход и чистка
- Что делать, если ...
- Технические данные
- Установка
- Охрана окружающей среды
- Electrolux. Thinking of you.
- Descripción del producto
- Panel de mandos
- Antes del primer uso
- Consejos útiles
- Programas de lavado
- Mantenimiento y limpieza
- Qué hacer si…
- Datos técnicos
- Instalación
- Aspectos medioambientales


