Pioneer VSX-1025-K: Connecting to the network Connecting an HDMI-equipped through LAN interface component to the front panel input
Connecting to the network Connecting an HDMI-equipped through LAN interface component to the front panel input: Pioneer VSX-1025-K
Table of contents
- IMPORTANT VENTILATION CAUTION
- Flow of settings on the receiver
- Chapter 1: Before you start Checking what’s in the box Loading the batteries Installing the receiver
- Chapter 2: Controls and displays Front panel
- Controls and displays02
- Display
- Controls and displays02
- Remote control
- Controls and displays02
- Chapter 3: Connecting your equipment Rear panel
- Connecting your equipment03
- Connecting your equipment 03 Determining the speakers’ application
- Connecting your equipment03
- Placing the speakers Some tips for improving sound quality
- Connecting the speakers
- Installing your speaker system
- Bi-amping your speakers Bi-wiring your speakers
- Selecting the Speaker system
- About the audio connection About the video converter
- Connecting your TV and playback components
- Connecting your equipment03 About HDMI
- Connecting your DVD player with no HDMI output
- Connecting your TV with no HDMI input
- Connecting a satellite/cable Connecting a HDD/DVD receiver or other set-top box recorder, VCR and other video sources
- Connecting other audio components
- Connecting AM/FM antennas
- MULTI-ZONE setup
- Connecting Optional Bluetooth ADAPTER
- Connecting to the network Connecting an HDMI-equipped through LAN interface component to the front panel input
- Connecting to the front panel video terminal
- Connecting a USB device Connecting a USB device for Advanced MCACC output
- Connecting an IR receiver Operating other Pioneer components with this unit’s sensor
- Plugging in the receiver
- Chapter 4: Basic Setup Changing the OSD display language (OSD Language) Automatically conducting optimum sound tuning (Auto MCACC)
- Basic Setup04
- Basic Setup 04
- Basic Setup04 Problems when using the Auto MCACC Setup The Input Setup menu
- Input function default and possible settings
- Chapter 5: Basic playback Playing a source
- Playing an iPod
- Basic playback05 Finding what you want to play Switching the iPod controls
- Playing back audio files stored on a Playing a USB device USB memory device
- Basic playback controls
- About playable file formats Music files Photo files
- Listening to the radio
- Saving station presets Listening to station presets Naming station presets
- An introduction to RDS
- Bluetooth ® ADAPTER for Wireless Enjoyment of Music
- Basic playback05 Listening to music contents of a Bluetooth wireless technology device with your system
- Listening to Internet radio stations
- Basic playback05
- Chapter 6: Listening to your system
- Listening to your system06
- Listening in stereo
- Using Front Stage Surround Using Stream Direct Advance
- Selecting MCACC presets Choosing the input signal
- Better sound using Phase Control
- Chapter 7: Control with HDMI function Making Control with HDMI connections
- HDMI Setup
- Before using synchronization About synchronized operations
- Setting the PQLS function
- Cautions on the Control with HDMI function
- Chapter 8: Using other functions Setting the Audio options
- Setting What it does Option(s)
- Setting What it does Option(s)
- Setting the Video options
- Setting What it does Option(s)
- Switching the speaker terminals Using the MULTI-ZONE controls
- Making an audio or a video recording MULTI-ZONE remote controls
- Dimming the display Reducing the level of an analog signal Checking your system settings Using the sleep timer
- Resetting the system Default system settings
- Chapter 9: Controlling the rest of your system Operating multiple receivers Setting the remote to control other components
- Selecting preset codes directly Programming signals from other remote controls
- Erasing one of the remote control button settings
- Resetting the input assignment Direct function of one of the input function buttons
- Multi operation and System off
- Controlling the rest of your system09
- Clearing all the remote control settings Controlling components
- Button(s) TV TV (Monitor) BD/DVD HDD/DVR VCR SAT/CATV
- Controlling the rest of your system 09 Button(s) LD
- Chapter 10: The Advanced MCACC menu Making receiver settings from the Advanced MCACC menu
- Automatic MCACC (Expert)
- The Advanced MCACC menu10
- The Advanced MCACC menu 10
- The Advanced MCACC menu10 Manual MCACC setup
- The Advanced MCACC menu 10
- The Advanced MCACC menu10 Standing Wave
- Acoustic Calibration EQ Adjust
- Using Acoustic Calibration EQ Professional
- The Advanced MCACC menu 10
- Checking MCACC Data
- Standing Wave Output MCACC data Acoustic Cal EQ
- Data Management
- The Advanced MCACC menu 10 Clearing MCACC presets
- Chapter 11: The System Setup and Other Setup menus Making receiver settings from the System Setup menu Manual speaker setup
- The System Setup and Other Setup menus 11 Speaker system setting
- Speaker Setting
- The System Setup and Other Setup menus 11 Speaker Distance Channel Level
- Network Setup menu
- The System Setup and Other Setup menus 11
- The Other Setup menu
- The System Setup and Other Setup menus 11 Remote Control Mode Setup
- Chapter 12: Additional information Power Symptom Remedy
- Symptom Remedy No sound Symptom Remedy
- Symptom Remedy Other audio problems Symptom Remedy
- Symptom Remedy
- Video Symptom Remedy
- Settings Symptom Remedy
- Professional Calibration EQ graphical output Symptom Remedy Display Symptom Remedy
- Symptom Remedy Remote control Symptom Remedy
- HDMI Symptom Remedy
- Symptom Remedy Important information regarding the HDMI connection
- USB interface Symptoms Causes Remedies
- ADAPTER PORT Symptom Remedy Internet radio Symptoms Causes Remedies
- Symptoms Causes Remedies
- About iPod Surround sound formats
- Auto Surround, ALC and Stream Direct with different input signal formats Stereo (2 channel) signal formats
- Preset code list
- Additional information12
- Additional information 12
- DVD
- BD DVR (BDR, HDR) VCR
- Satellite Set Top Box
- Additional information 12
- Additional information12 Satellite Set Top Box (SAT/PVR Combination)
- Cable Set Top Box Cable Set Top Box (Cable/PVR Combination) CD CD-R Laser Disc Player Cassete Deck Digital Tape MD
- Specifications
- Cleaning the unit
Connecting your equipment03
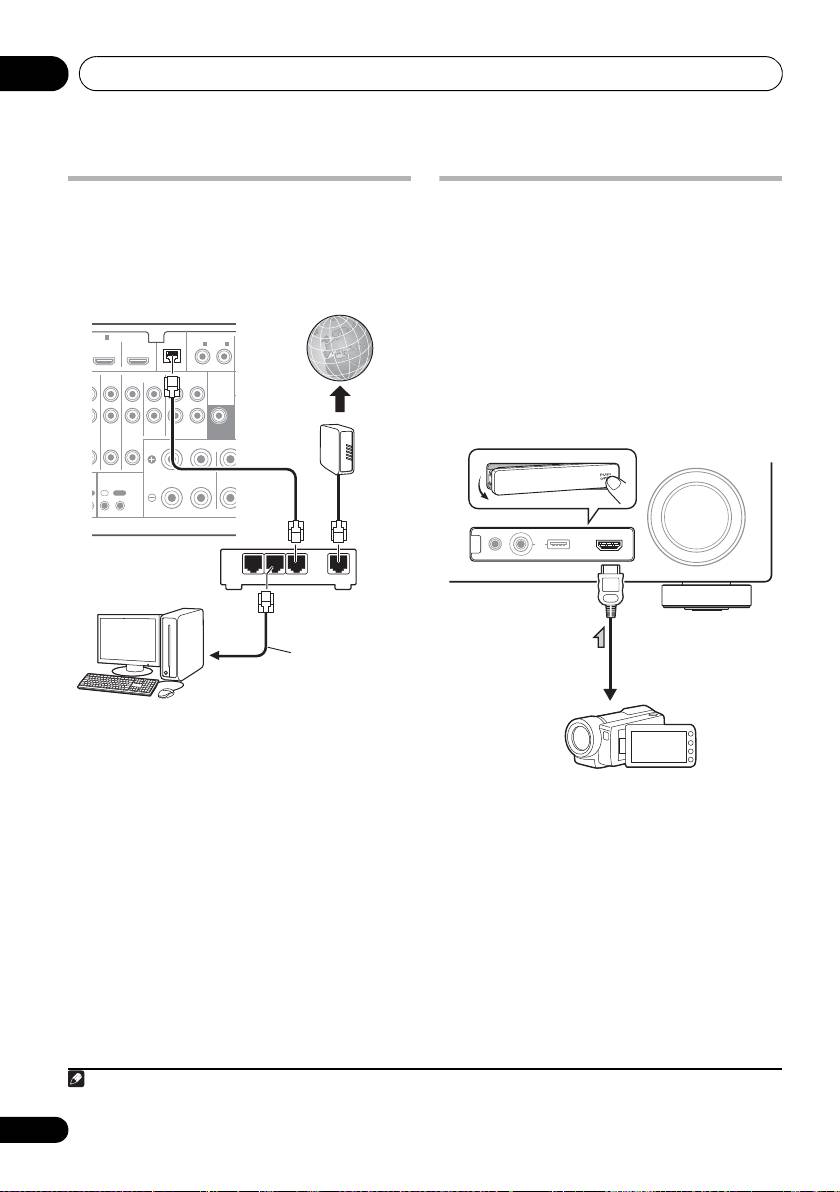
Connecting to the network
Connecting an HDMI-equipped
through LAN interface
component to the front panel
By connecting this receiver to the network via
input
the LAN terminal, you can listen to Internet
(VSX-1020/VSX-1025 only)
1
radio stations.
There is an HDMI input terminal on the front
panel. High quality pictures can be viewed via
the receiver simply by connecting an HDMI-
equipped video camera with a single HDMI
cable. HDMI-equipped components other than
video cameras can also be connected to this
terminal.
Connect the LAN terminal on this receiver to
the LAN terminal on your router (with or
without the built-in DHCP server function) with
a straight LAN cable (CAT 5 or higher).
Turn on the DHCP server function of your
router. In case your router does not have the
built-in DHCP server function, it is necessary to
set up the network manually. For details, see
Network Setup menu on page 104.
LAN terminal specifications
LAN terminal . . . . . . . . . . . . . . . . . . Ethernet jack
10BASE-T/100BASE-TX
34
En
Note
ASSIGNABLE
(
DVD
)
FRONT CENT
R
1 To listen to Internet radio stations, you must sign a contract with an ISP (Internet Service Provider) beforehand.
E
L
D
IN
4
OUT
LAN
COAXIAL
(
10/100
)
IN
1
IN
2
(
CD
)
PRE OUT
TV/SAT
VIDEO
CD
CD-R/TAPE
SUBWOOFER
IN
IN
IN
OUT IN
CONTROL
I
T
IN
OUT
LAN
321
WAN
Internet
Modem
VSX-1020/VSX-1025
Router
LAN cable
(sold separately)
to LAN port
PC
CONTROL ON
/
OFF
MASTER
VOLUME
VIDEO CAMERA
iPod
iPhone
MCACC
SETUP MIC
USB HDMI 5
Video camera, etc.
VSX-1020_SYXCN.book 34 ページ 2010年3月12日 金曜日 午前9時10分
