Asus WL-169gE: instruction
Class: Household, kitchen appliances, electronics and equipment
Type:
Manual for Asus WL-169gE
Table of contents
- Installation Procedures Installing the WLAN utilities and driver Reading the WLAN status indicators
- One Touch Wizard
- Conguring with the WLAN utility (Infrastructure)
- Conguring with the WLAN utility (Ad Hoc)
- ASUS WLAN Control Center
- Quick Start Guide
- ASUS Wireless Settings Utility Status - Status
- Quick Start Guide
- Quick Start Guide Status - Connection
- Status - IP Cong Status - Ping
- Cong - Basic
- Cong - Advanced
- Quick Start Guide
- Cong - Encryption
- Quick Start Guide Data encryption
- Cong - Authentication
- Survey - Site Survey
- Link State
- Windows XP Wireless Options
- Quick Start Guide

Content
English ................................................................. 1
Français ............................................................. 23
繁體中文 ............................................................ 45
简体中文 ............................................................ 67
日本語 ................................................................ 89
한국어 ...............................................................111
Русский ............................................................. 133
Deutsch ........................................................... 155
Español............................................................ 177
Italiano ............................................................. 199
Polski ............................................................... 221
Türkçe
............................................................. 243
česky ............................................................... 265
Nederlands ...................................................... 287

English
Wireless Local Area Network Card
WL-169gE
(For 802.11g & 802.11b Wireless Networks)
Quick Start Guide
®
80 2. 11
g Br oa d Ra ng e
1
Quick Start Guide
Installation Procedures
English
Important: Install the WLAN card utilities before inserting the WLAN Card
into your computer.
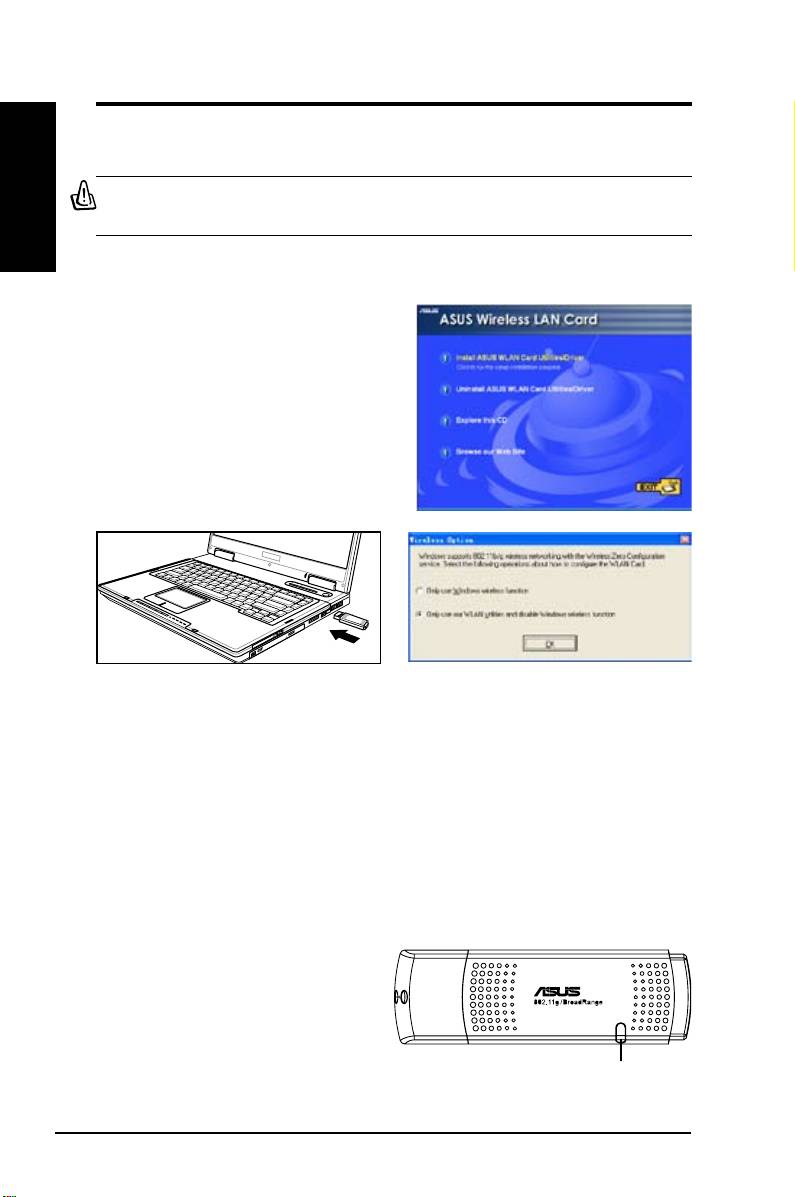
Installing the WLAN utilities and driver
Follow these instructions to install the
WLAN card utilities and driver. Insert
the support CD into your optical drive.
If autorun is enabled in your computer,
the CD automatically displays the utility
menu. Click
Install ASUS WLAN Card
Utilities/Driver
. If autorun is disabled,
double-click SETUP.EXE in the root
directory of the CD.
Carefully insert the WLAN card into your
Windows XP users: When the program is
computer’s USB2.0 port. Windows will
launched for the rst time (during Windows
automatically detect and congure the WLAN
restart), you are asked to choose one utility
card using the utilities and drivers installed in
to congure the WLAN Card. Select "Only
the previous steps.
use our WLAN utilities and disable Windows
wireless function".
Reading the WLAN status indicators
The device comes with a LED that inidicates the status of the WLAN Card.
2 ASUS WLAN Card
LED
Blinking:
Searching for or connected to an AP.
OFF:
No wireless connection.
Quick Start Guide
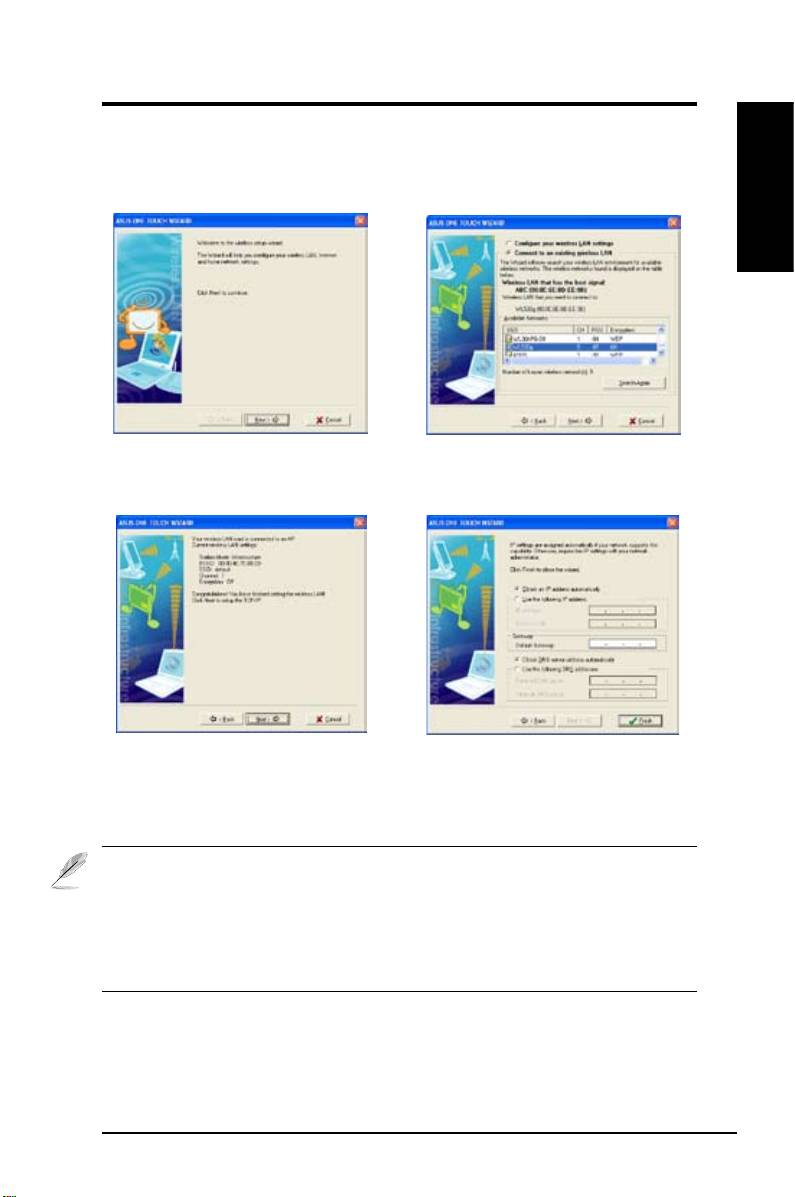
One Touch Wizard
Use the One Touch Wizard to setup your wireless connection with an existing
wireless LAN.
English
1. Launch One Touch Wizard from Start
2. Select an AP from the
Available Networks
menu and click
Next
to set up your
then click
Next
.
wireless network.
3. Connection is complete. Click
Next
to
4. Choose to obtain an IP address or to
setup the IP address for the WLAN card.
assign static address manually for your
WLAN card. When IP setting is complete,
click
Finish
to exit the One Touch Wizard.
Note: If the access point you want to connect has set up encryption
policies, you must congure the same encryption on your WLAN Card.
Select "Congure your wireless LAN settings" radio button in step 2 and
make settings accordingly. When the encryption settings are complete,
you can launch the One Touch Wizard once again to set up the connection
with your AP.
ASUS WLAN Card 3
Quick Start Guide
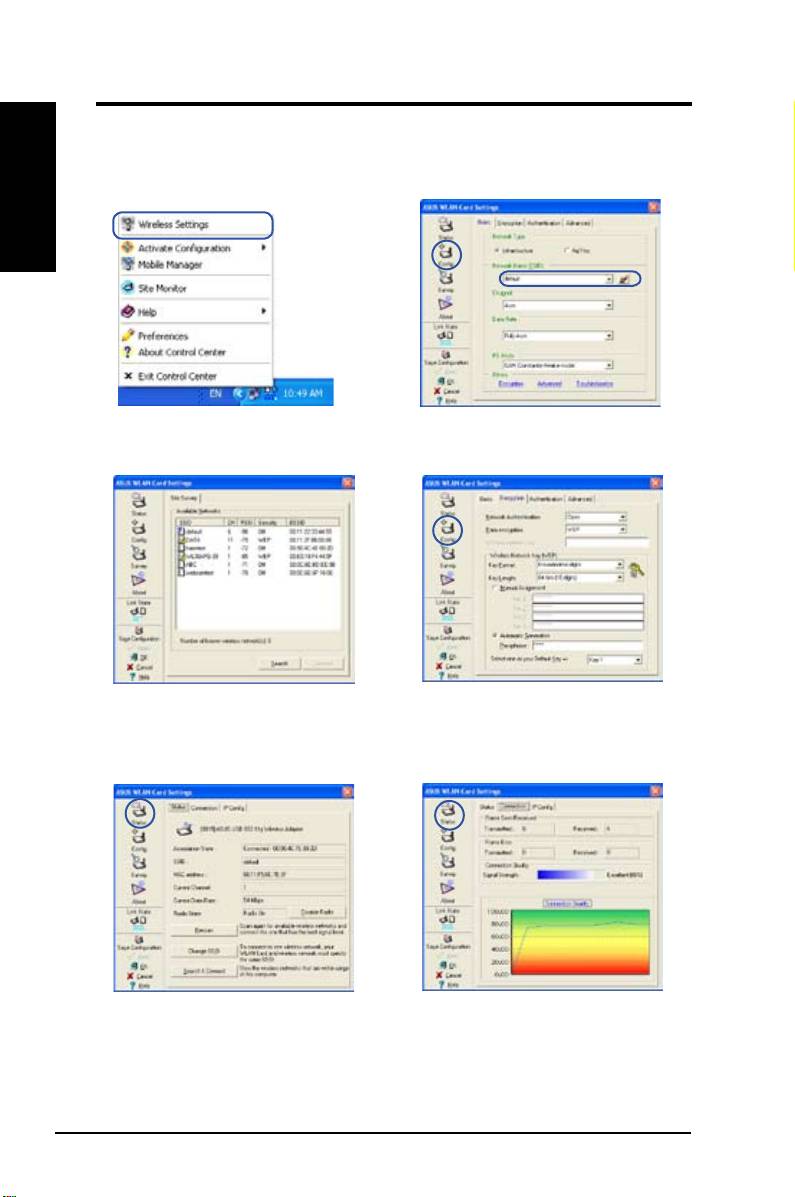
Conguring with the WLAN utility (Infrastructure)
English
Use ASUS WLAN utlity to get connected with an existing wireless network.
1. Right-click the wireless connection icon
2. Click the
Config
button to set the
SSID
and select
Wireless Settings.
(network name) to that of your wireless AP.
3. Use
Site Survey
if you don’t know the
4. Encryption settings must match those
SSID of your access point(s).
at the access point. Ask your network
administrator about settings if necessary.
Click
Apply
to activate your settings.
5. Check the
Status
page to see the
6. Check the
Connection
tab to see the
association state. If connection is
signal strength. Click
OK
to exit the utility.
established, the box shows “Connected -
xx:xx:xx:xx:xx:xx”.
4 ASUS WLAN Card
Quick Start Guide
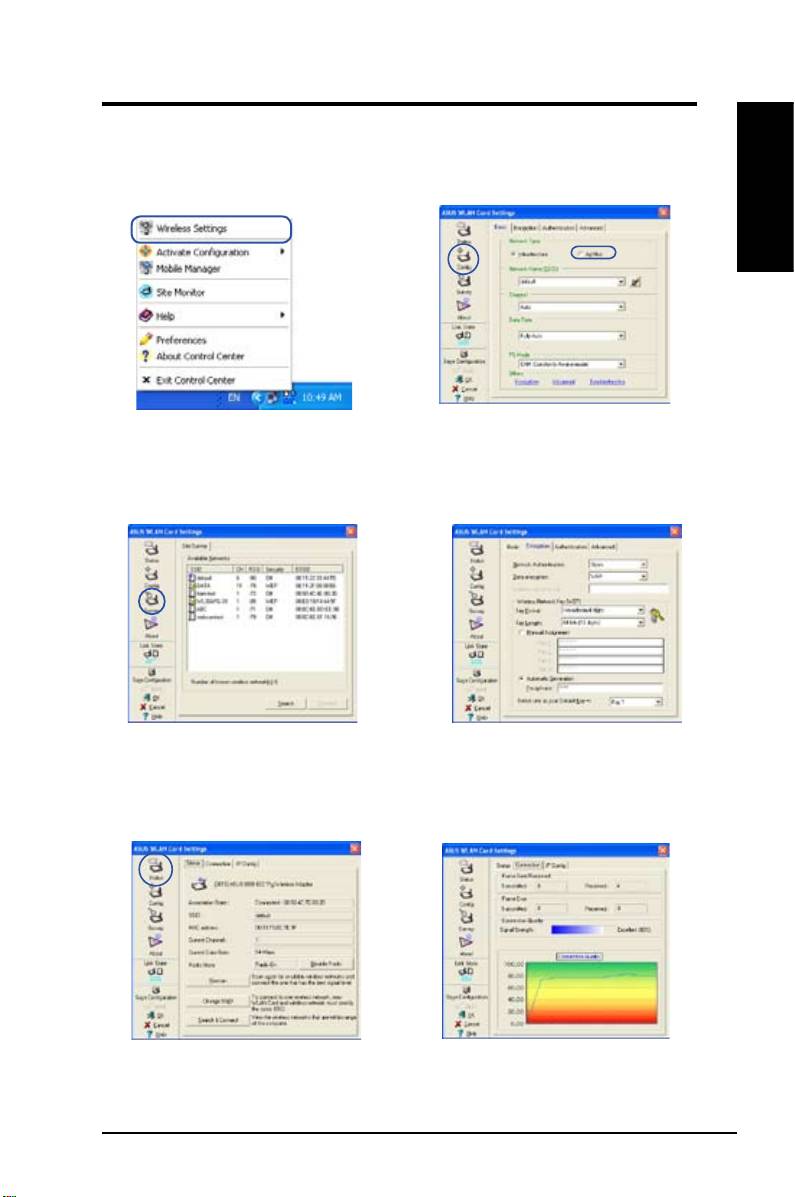
Conguring with the WLAN utility (Ad Hoc)
The WLAN card supports Ad Hoc mode which allows communication between
wireless stations without an AP.
English
1. Right-click the wireless connection icon
2. Click the
Config
button to set the WLAN
and select
Wireless Settings.
Card to
Ad Hoc
connection mode, Set the
SSID
to that of the target Ad Hoc node,
then select a
Channel
on which the Ad Hoc
nodes are to communicate.
3. Click the
Survey
button to scan for the Ad
4. If the encryption settings of your WLAN
Hoc nodes. Select the node you want to
Card are different from those of the other
communicate with and press
Connect
.
Ad Hoc nodes, you are prompted to make
the encryption of the two nodes identical.
Click
Apply
to activate the settings.
5. Check the
Status
page to see the association
6. Check the
Connection
tab to see the
state. If connection is established, the box
signal strength. Click
OK
to exit the utility.
shows “Connected - xx:xx:xx:xx:xx:xx”.
ASUS WLAN Card 5
Quick Start Guide
ASUS WLAN Control Center
English
ASUS WLAN Control Center is an application which makes it easier to launch
WLAN applications and activate network location settings. The WLAN Control
Center starts automatically when system boots. When WLAN Control Center is
running, you can see a Control Center icon on the Windows taskbar.
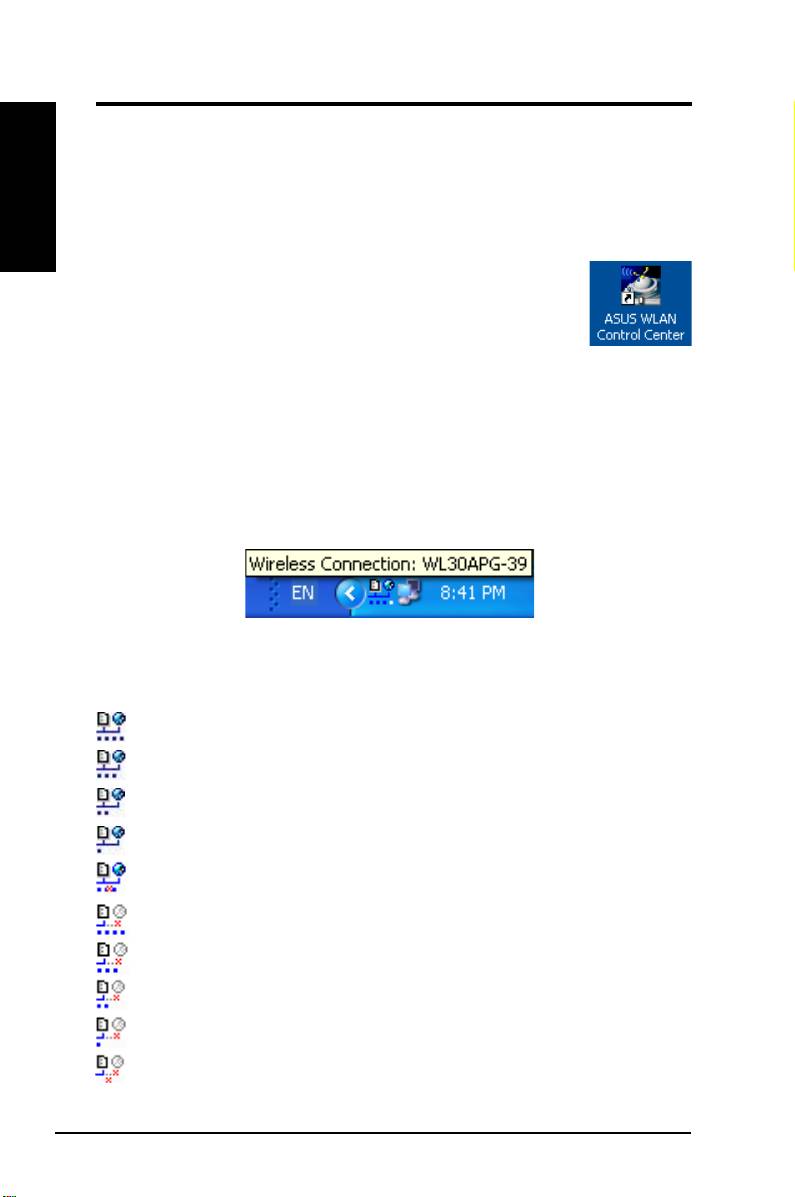
Starting the Control Center
• Select
ASUS WLAN Control Center
in Windows Start
menu, or
• Double-click the
ASUS WLAN Control Center
icon on the desktop.
Using the Control Center
The Control Center taskbar icon displays the following information:
• Link quality of the WLAN Card (Excellent, Good, Fair, Poor, Not Linked)
• Whether the WLAN Card is connected to a network (Blue: Connected,
Gray: Not Connected)
Taskbar Icon and Status
Wireless Status Icons (on the taskbar)
Excellent
link quality and
connected to Internet
(Infrastructure)
Good
link quality and
connected to Internet
(Infrastructure)
Fair
link quality and
connected to Internet
(Infrastructure)
Poor
link quality and
connected to Internet
(Infrastructure)
Not linked
but
connected to Internet
(Infrastructure)
Excellent
link quality but
not connected to Internet
(Infrastructure)
Good
link quality but
not connected to Internet
(Infrastructure)
Fair
link quality but
not connected to Internet
(Infrastructure)
Poor
link quality but
not connected to Internet
(Infrastructure)
Not linked
and
not connected to Internet
(Infrastructure)
6 ASUS WLAN Card
Quick Start Guide
Taskbar icon - Right-click menu
Right-click the taskbar icon to show the following menu items:
•
Wireless Settings
– Launches Wireless Settings application.
English
•
Activate Conguration
– Allows you to choose a preset prole.
•
Mobile Manager
– Launches Mobile Manager application.
•
Site Monitor –
Launches the Site Monitor application.
•
Preferences
– Customizes the Control Center program. You can
create a Control Center shortcut on the desktop and decide whether to
start Control Center when system boots.
•
About Control Center
-Shows the version of Control Center.
•
Exit
– Closes the Control Center program.
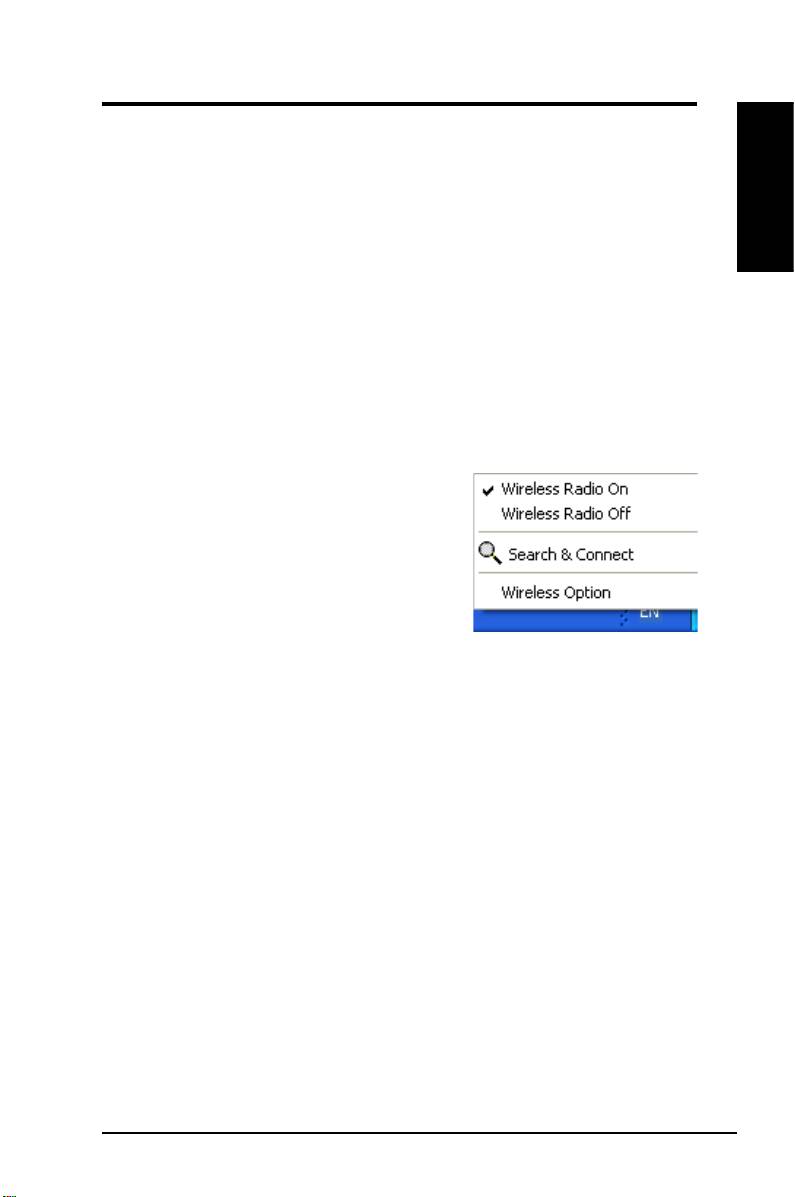
Taskbar icon - Left-click menu
Left-click the taskbar icon to show the
following menu items:
•
Wireless Radio On
– Turns the
wireless radio ON.
•
Wireless Radio Off
– Turns the
wireless radio OFF.
Taskbar Left-Click Menu
•
Search & Connect
– View the
properties of available access points.
®
®
•
Wireless Option
(Windows
XP only) – Choose Windows
Wireless
Zero Conguration (WZC) service or ASUS utilities to congure your
WLAN card.
Taskbar Icon - Launch Wireless Settings
Double-click the taskbar icon to launch the Wireless Settings utility.
ASUS WLAN Card 7
Quick Start Guide
ASUS Wireless Settings Utility
English
Wireless Settings is an application for controling the WLAN Card. Use Wireless
Settings to view or modify the conguration settings and monitor the operational
status of your WLAN Card. When Wireless Settings is launched, you can see the
tabbed property sheets which categorize the conguration options into groups.
Starting Wireless Settings
• Open the Windows
Control Panel
, then double-click the
ASUS
WLAN
Card Settings
icon.
or
• Click the Windows
Start
button, select
Programs | ASUS Utility |
WLAN Card | Wireless Settings
.
or
• Right-click the
Control Center icon
on the Windows taskbar, select
Wireless Settings
.
NOTE: If you have more than one ASUS WLAN device installed on your
computer, you may see a device selection window when you launch the “
Wireless Settings” utility. Select the device you want when such situation
occurs.
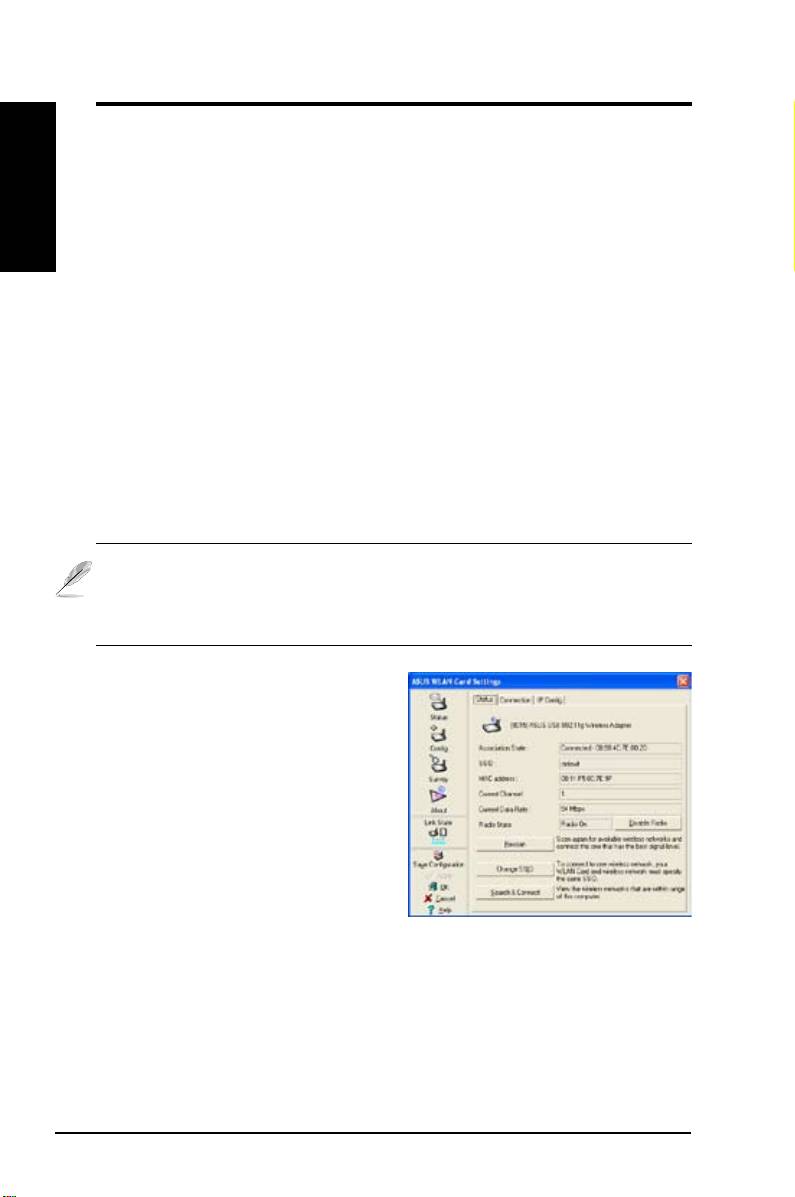
Status - Status
You can view the information about
the WLAN Card from the Status menu.
The status elds are blank if the WLAN
Card is not installed. You can turn
off the WLAN Card by clicking the
“Disable Radio” button.
Association State
Displays the connection status as
follows:
Connected -
The card is now associated with one wireless LAN device. When
operating in Infrastructure mode, this field shows the MAC address of the
access point with which the WLAN Card is communicating. When operating
in Ad Hoc
mode, this eld shows the virtual MAC address used by computers
participating in the Ad Hoc
network.
8 ASUS WLAN Card

Quick Start Guide
Scanning... -
The station is attempting to authenticate and associate with the
designated access point or Ad Hoc node.
Disconnected -
The WLAN Card is installed to the system, but it has not
connected to a wireless device.
English
SSID
Displays the Service Set Identier (SSID) of the device that the card is either
associated or intending to join.
MAC address
Indicates the hardware address of the WLAN Card. MAC address is a unique
identier for networking devices (typically written as twelve hexadecimal digits
0 through 9 and A through F, six hexadecimal numbers separated by colons,
i.e. 00:E0:18:F0:05:C0).
Current Channel
Displays the radio channel to which the card is currently tuned. This number
changes as the radio scans the available channels.
Current Data Rate
Displays the current data rate in megabits per second (Mbps).
Radio State
Shows the wireless radio status: ON or OFF.
Radio On -
When the wireless radio is turned ON, the following icon
appears in the upper left of the Status page.
Radio Off-
When the wireless radio is turned OFF, the following icon
appears in the upper left of the Status page.
Buttons
Rescan –
Make the WLAN Card rescan all available devices. If the current link
quality or signal strength is poor, rescanning can be used to push the radio off
a weak access point and search for a better link with another access point. This
function will take several seconds to complete.
Change SSID
– Click on this button to set the SSID to that of the AP you want
to connect.
Search & Connect
– Click on this button to connect to an available wireless AP.
ASUS WLAN Card 9
Quick Start Guide
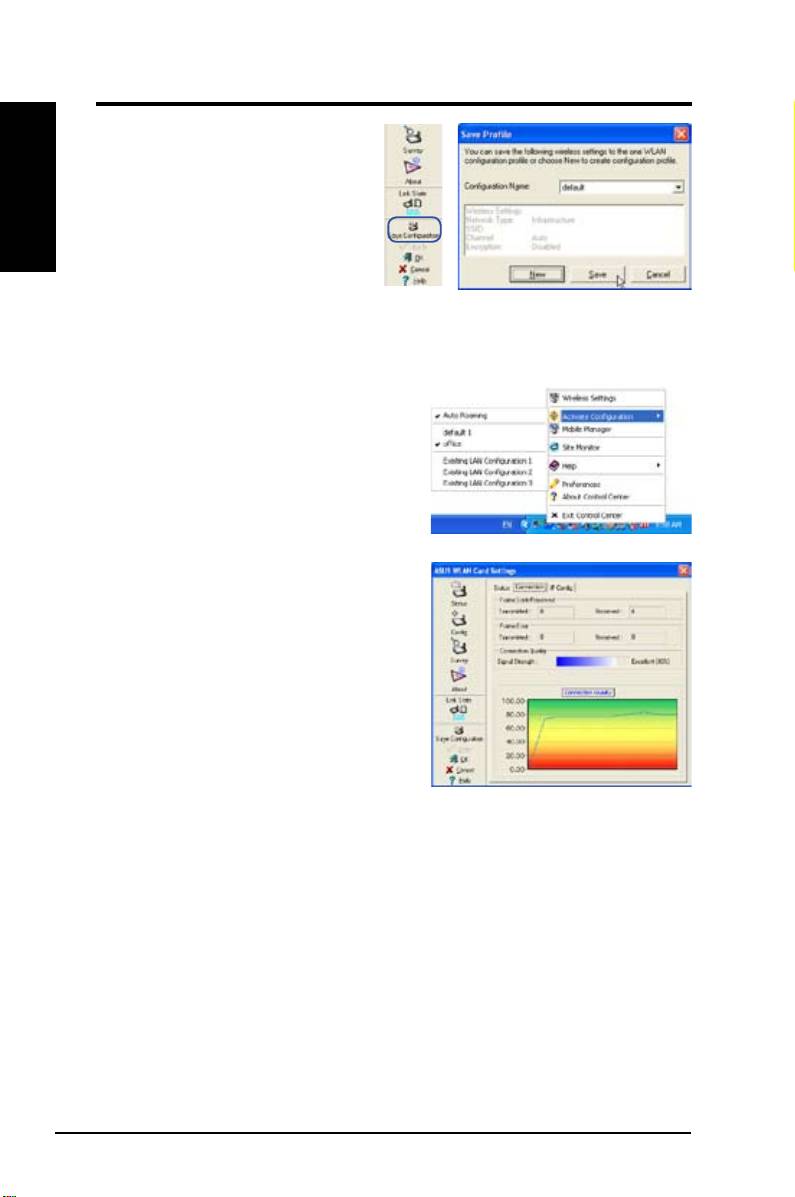
Save Conguration
English
When you make settings for a
certain working environment, you
may need to save your settings
to a profile. Profiles will help you
combine all your settings for work,
home, roaming, and other situations
so that you do not have to repeat
settings every time. For example, when you travel from home to work, choose
a “ofce” prole that contains all your settings for ofce use. When you travel
back to home, choose an “home” prole.
Activate Conguration
Auto roaming is enabled by default and
will automatically switch to APs of better
siganal. You can uncheck it if you want to
connect to a specied access point using
a particular prole.
Status - Connection
You can view the current link statistics
about the WLAN Card. These statistics are
updated once per second and are valid if the
WLAN Card is correctly installed.
Frame Sent/Received
Transmitted
- The number of frames that
were transmitted.
Received
- The number of frames that were received.
Frame Error
Transmitted
- The number of frames that were not successfully transmitted.
Received
- The number of frames that were not successfully received.
Connection Quality
Signal Strength -
Shows the link qualilty of the access point or Ad Hoc node
the WLAN Card is currently connected to. Ratings are: Excellent, Good, Fair,
and Poor.
Overall Connection Quality
The overall connection quality is derived from the current signal strength. A
graphic chart uses percentage to show signal quality.
10 ASUS WLAN Card
Quick Start Guide
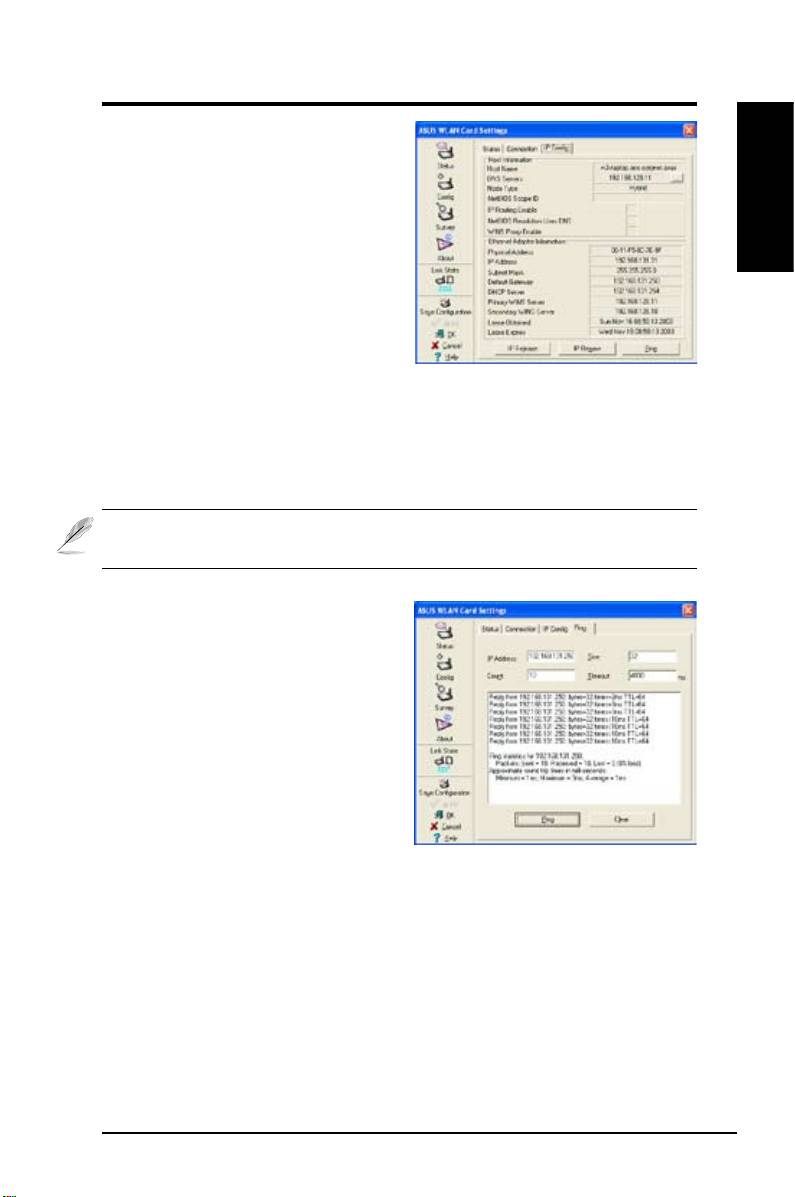
Status - IP Cong
IP Cong tab shows all the current host
and WLAN Card information including
host name, DNS servers, IP address,
English
subnet mask and default gateway.
Button
IP Release
- If you want to remove the
current IP address, click this button
to release the IP address from DHCP
server.
IP Renew
- If you want to obtain a new IP address from DHCP server, click this
button to renew the IP address.
Ping
- Click this button to reveal the hidden tab page “Ping” which is used to
ping the devices in your network.
NOTE: The IP Release and IP Renew buttons can only be used on the
WLAN Card which gets IP address from DHCP server.
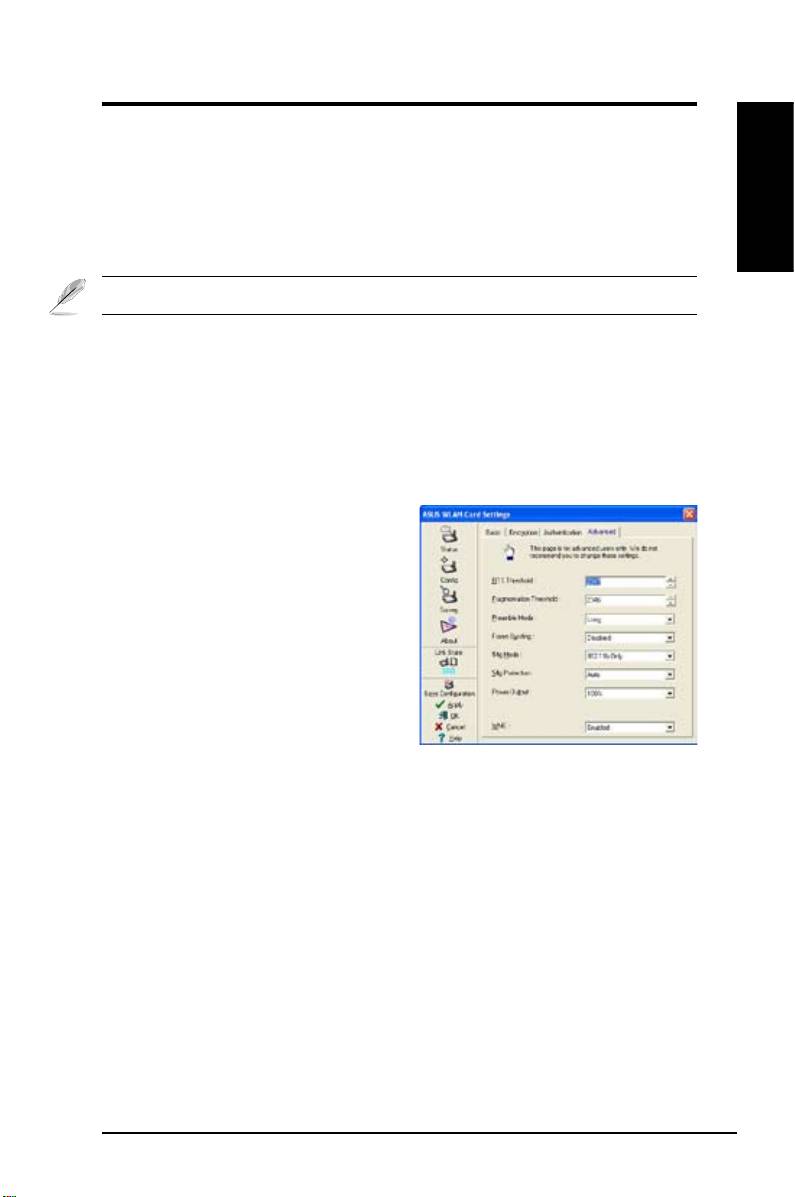
Status - Ping
Click the "Ping" button in Status-IP
Cong tab to open this page. The Ping
tab allows you to verify the accessibility
of other computers or network devices.
To ping a connection:
1. Type the IP address of the device you
want to verify in the IP Address eld.
2. Configure the pi ng session by
assigning the ping packet size and
number of packet to send, and the timeout value (in milliseconds).
3. Click the “Ping” button.
During the ping session, the Ping button toggles into a Stop button. To cancel
the ping session, click the “Stop” button.
The session eld displays information on the veried connection including the
roundtrip time (minimum, maximum, and average) and packets sent, received,
and lost after a ping session.
Click the “Clear” button to clear the session eld.
ASUS WLAN Card 11

Quick Start Guide
Cong - Basic
English
This page enables you to change the
WLAN Card congurations.
Network Type
Infrastructure
– Infrastructure means
to establish a connection with an access
point. Once connected, the access
point allows you to access wireless
LAN and wired LAN (Ethernet). The
Channel eld turns to
Auto
when
Infrastructure
is selected.
Ad Hoc
– Ad Hoc means to communicate directly with other wireless clients
without using an access point. An “Ad Hoc” network is typically formed quickly
and easily without pre-planning. For example, share meeting notes between
attendants in a meeting room.
Network Name (SSID)
SSID stands for “Service Set Identifier”, which is a string used to identify a
wireless LAN. Use the SSID to connect with a known access point. You can
enter a new SSID or select one from the drop-down list box. If you get connected
by designating the SSID, you are only to connect the AP with the SSID you
assigned. If the AP is removed from the network, your WLAN Card does not
roam automatically to other APs. SSIDs must all be printable characters and
having a maximum of 32 case sensitive characters, such as “ Wireless”.
NOTE: Set the SSID to a null string, if you wish to allow your station to
connect to any access point it can nd. But you cannot use null string in
Ad Hoc mode.
Channel
Use the Channel field to select the radio channel for WLAN Card. In an
"infrastructure" network, your WLAN Card will automatically select the correct
channel to communicate with an access point, this parameter will be xed in
"Auto" and cannot be changed. In an "Ad Hoc" network, you can decide which
channel to use for the WLAN Card. With the same channel setting, all WLAN
Cards can communicate with each other in the Ad-Hoc network.
The radio channels you can use depend on the regulations in your country.
For United States (FCC) and Canada (IC), channels 1 to 11 are supported. For
Europe (ETSI), channels 1 to 13 are supported. For operation in Japan (MKK),
channels 1 to 14 are supported.
12 ASUS WLAN Card
Quick Start Guide
Data Rate
Select the transmit data rate (fix or auto). The data rates supported for the
WLAN Cards are:
English
Fully Auto –
The adapter will adjust to the most suitable transmission rate.
Fixed –
Fix data rate to 1, 2, 5.5, 6, 9, 11, 12, 18, 24, 36, 48, or 54 Mbps.
Click Apply to save and activate the new congurations.
Others
Encryption –
Click on this to show the "Encryption" tab.
Advanced –
Click on this to show the "Advanced" tab. In most cases, the
default values do not have to be changed.
Troubleshooting
–
Click on this to show the Troubleshooting utility.
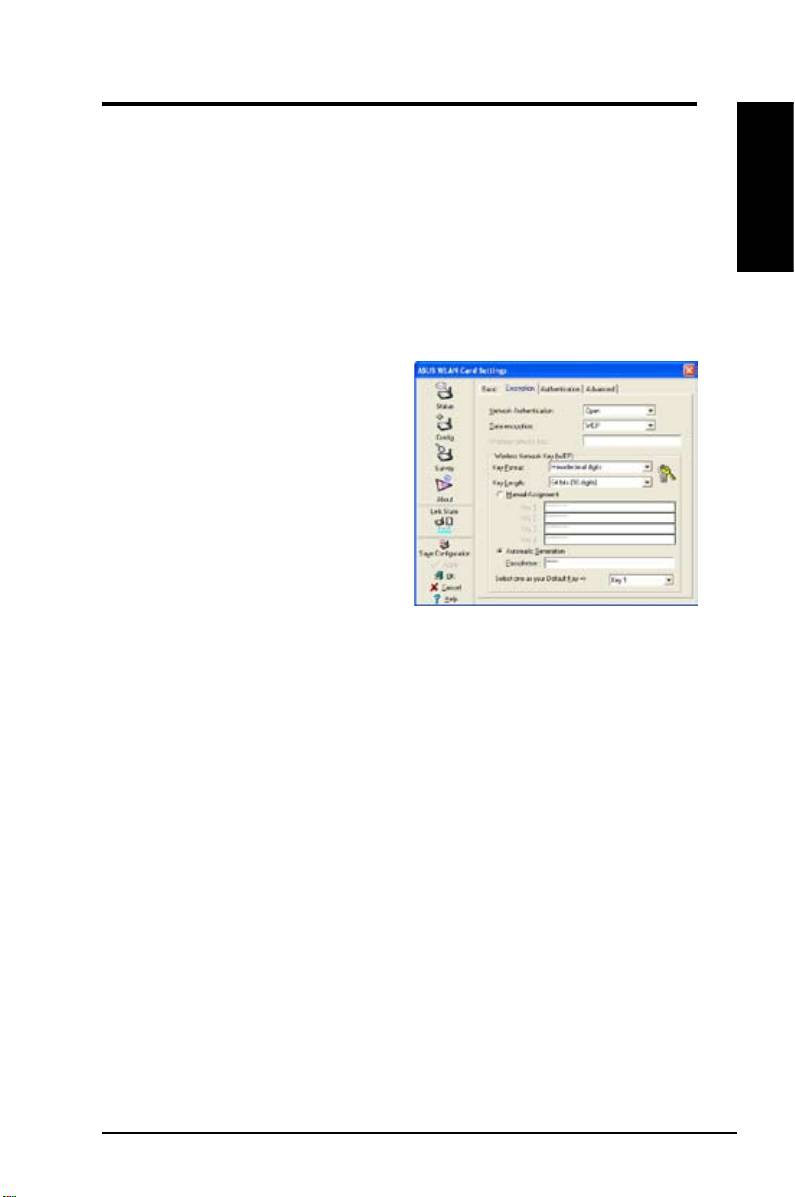
Cong - Advanced
Click Advanced on Config-Basic page
to reveal this tab. This section allows
you to set up additional parameters
for the wireless card. We recommend
using the default values for all items in
this window.
RTS Threshold (0-2347)
The RTS/CTS (Request to Send/Clear
to Send) function is used to minimize
collisions among wireless stations. When RTS/CTS is enabled, the router
refrains from sending a data frame until another RTS/CTS handshake is
completed. Enable RTS/CTS by setting a specic packet size threshold. The
default value (2347) is recommended.
Fragmentation Threshold (256-2346)
Fragmentation is used to divide 802.11 frames into smaller pieces (fragments)
that are sent separately to the destination. Enable fragmentation by setting
a specic packet size threshold. If there is an excessive number of collisions
on the WLAN, experiment with different fragmentation values to increase the
reliability of frame transmissions. The default value (2346) is recommended for
normal use.
ASUS WLAN Card 13

Quick Start Guide
Preamble Mode
English
This parameter is used to control whether frames will transmit with the Long or Short
Preamble. The default value is Long Preamble.
Frame Bursting
Frame Bursting technology is a standard-based Wi-Fi performance
enhancement technology which improves wireless network efficiency and
boosts throughput.
54g Mode
802.11b only -
support both 802.11b adapters.
All of these modes only pertain to when the STA is creating their own IBSS
network. The default ad-hoc mode is 802.11b only.
54g LRS (Limited Rate Support)
- is used to communicate with older 11b
clients that only support 4 rates. But 54g cards can still use all 12 rates.
54g Auto -
support both 802.11b and 802.11g adapters.
54g Only -
will support ONLY high-performance 54g adapters.
All of these modes only pertain to when the STA is creating their own IBSS
network.
54g Protection
Extended Rate PHY (ERP) protection mechanism of 802.11g denition.
Auto –
Automatically change as AP announcement.
Disabled -
Always send frame without protection.
Power Output
Denes transmit power level. Conguration options: 100%, 75%, 50%, 25%.
Click Apply to save and activate the new congurations.
14 ASUS WLAN Card
Quick Start Guide
Cong - Encryption
This page enables you to congure the Wireless LAN Card encryption settings.
For data confidentiality in a wireless environment, IEEE 802.11 specifies a
Wired Equivalent Privacy (WEP) algorithm to offer transmission privacy. The
English
WEP uses keys to encrypt and decrypt data packets. The encryption process
can scramble frame bits to avoid disclosure to others. The WPA/WPA2 is
improved security system for 802.11 which are developed to overcome the
weakness of the WEP protocol.
Network Authentication
Since there is no precise bound in
wireless LANs, the WLAN users need
to implement certain mechanism
to provide security soluction. The
Authentication policies in this tab
provide protection of different levels
such as Open, WEP, WPA, and WPA2.
Open
- Select this option to make the
network operate on Open System
mode, which use no authentication
algorithm. Open stations and APs can authenticate with each other without
checking any WEP Key, even if there is.
Shared
- Select this option to make the network operate on Shared key mode.
In a Share Key Authentication system, four-step exchange of frames is required
to validate that the station is using the same WEP Key as the access point.
WPA-PSK/ WPA2-PSK
- Select this option to enable WPA Pre-Shared Key
under Infrastructure mode. It enables communication between your client and
APs using WPA-PSK/WPA2-PSK encryption mode.
WPA/ WPA2
- The network is operating in IEEE 802.1x authentication mode.
This mode is for environments with RADIUS (Remote Access Dial-in User
Service). In a RADIUS environment, various Extensible Authentication Protocol
(EAP) are supported, including PEAP, TLS/Smart Card, TTLS, and LEAP.
ASUS WLAN Card 15

Quick Start Guide
Data encryption
English
For Open and Shared authentication mode, the configuration options of
encryption type are Disabled and WEP. For WPA, WPA-PSK, WPA2 and
WPA2-PSK authentication mode, Temporal Key Integrity Protocol (TKIP)
encryption and Advanced Encryption Standard (AES) encryption are supported.
Disabled
- Disable the encryption function.
WEP
- WEP Key is used to encrypt your data before it is transmitted over air.
You will only be able to communicate with wireless devices that have use the
same WEP keys.
TKIP
- TKIP uses an encryption algorithm methods which is more stringent
than the WEP algorithm. It also uses existing WLAN calculation facilities to
perform encryption. TKIP veries the security conguration after the encryption
keys are determined.
AES:
AES is a symmetric 128-bit block encryption technique which works
simultaneously on multiple network layers.
Wireless Network Key
This option is enabled only if you select WPA-PSK or WPA2-PSK authentication
mode. Select “TKIP” or “AES” in the encryption led as encryption mode to
begin the encryption proceed. Note: 8 to 63 characters are required in this eld.
Wireless Network Key (WEP)
This option is congurable only if you enable WEP in Network Authentication
eld. The WEP Key is a 64 bits (5 byte) or 128 bits (13 byte) Hexadecimal
digits which is used to encrypt and decrypt data packets.
Key Format
You can enter the WEP Key as a Hexadecimal digits (0~9, a~f, and A~F), or as
ASCII characters, based on the state of the Key Format.
Key Length
For 64 bits encryption, each key contains 10 hex digits or 5 ASCII characters.
For 128 bits encryption, each key contains 26 hex digits or 13 ASCII characters.
Two ways to assign WEP keys
1. Manual Assignment
- When you click this radio button, the cursor appears
in the eld for Key 1. For 64-bit encryption, you are required to enter four
WEP Keys. Each Key contains exactly 10 hex digits (0~9, a~f, and A~F).
For 128-bit encryption, you are required to enter four WEP Keys. Each Key
contains exactly 26 hex digits (0~9, a~f, and A~F).
16 ASUS WLAN Card
Quick Start Guide
2. Automatic Generation
- Type a combination of up to 64 letters,
numbers, or symbols in the Passphrase box, the Wireless Settings Utility
automatically uses an algorithm to generate four WEP Keys.
English
Select one as your Default Key
The Default Key eld allows you specify which of the four encryption keys is to
use for transmitting data over wireless LAN. You can change the default key
by clicking on the downward arrow, selecting the number of the key you want
to use, and clicking the “Apply” button. If the access point or station with which
you are communicating uses the identical key by the same sequence, you can
use any of the keys as the default on your WLAN Card.
Click the “Apply” button after you have created the encryption keys, the
Wireless Settings Utility uses asterisks to mask your keys.
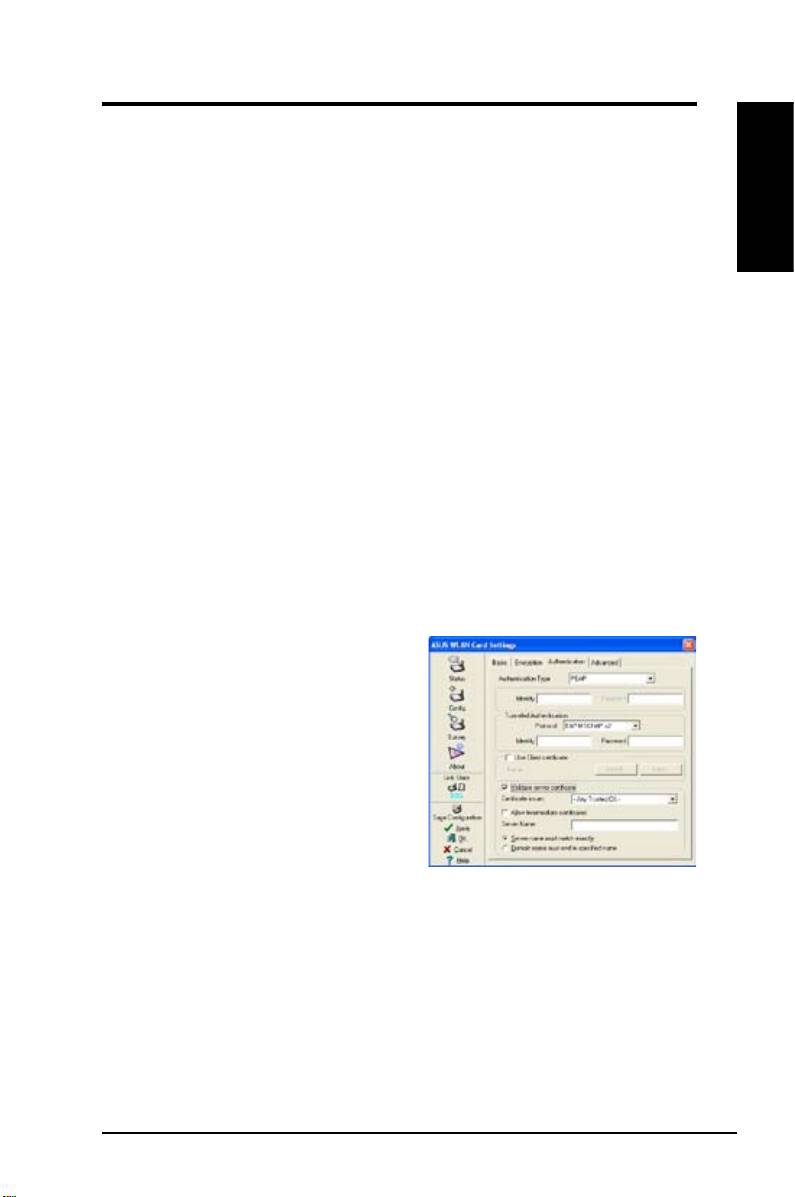
Cong - Authentication
This tab allows you to set the security settings to match those of your AP. It is
congurable only if you have set Network Authentication to WPA or WPA2 in
Cong-Encryption tab.
Authentication Type
The authentication type methods include:
PEAP:
PEAP (Protected Extensible
Authentication Protocol) authentication
is a version of Extensible Authentication
Protocol (EAP). EAP ensures mutual
authentication between a wireless client
and a server that resides at the network
operations center.
TLS/Smart Card:
TLS (Transport Layer
Security) authentication is performed to
create an encrypted tunnel and achieve server-side authentication in a manner
similar to Web server authentication using Secure Sockets Layer (SSL) protocol.
This method uses digital certicates to verify the identity of a client and server.
TTLS:
TTLS authentication uses certicates to authenticate the server, and
a simpler method to authenticate the client, all the while maintaining similar
security properties to TLS like mutual authentication and a shared secret for
session WEP key.
ASUS WLAN Card 17

Quick Start Guide
LEAP:
LEAP (Light Extensible Authentication Protocol) authentication is a
English
version of Extensible Authentication Protocol (EAP). EAP ensures mutual
authentication between a wireless client and a server that resides at the
network operations center.
MD5:
MD5 is a one-way encrypting algorithm that uses user name and passwords.
This method does not support key management, but require a pre-congured key
if data encryption is used.
Survey - Site Survey
Use the Site Survey tab to view statistics
on the wireless networks available to the
WLAN Card. Use the Site Survey tab to
view the following network parameters.
•
SSID:
The SSID of the available
networks.
•
Channel:
The channel used by
each network.
•
RSSI:
The Received Signal Strength Indication (RSSI) transmitted by
each network. This information is helpful in determining which network to
associate to. The value is then normalized to a dBm value.
•
Encryption:
Wireless network encryption information. All devices in
the network should use the same encryption method to ensure the
communication.
•
BSSID:
The media access control (MAC) address of the access point or
the Basic Service Set ID of the Ad Hoc node.
NOTE: Some access points may disable SSID broadcast and hide
themselves from “Site Survey” or “Site Monitor”, however, you can
connect such AP if you know their SSID.
Buttons
Search
– To scan all available wireless networks and show the scan result in the
“Available Network” list.
Connect
– To associate with a network by selecting the network from the
“Available Network” list and clicking this button.
18 ASUS WLAN Card
Quick Start Guide
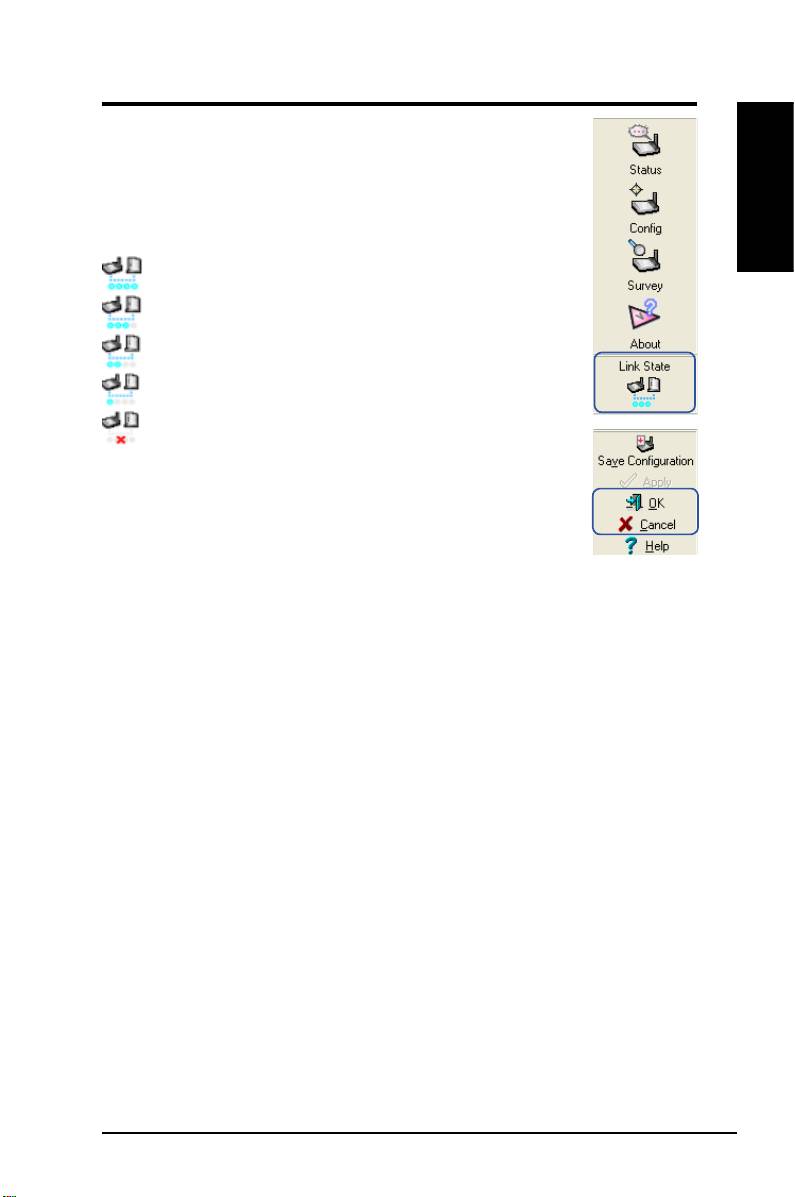
Link State
WLAN Card “Link State” icon appears on the left side of the
WLAN Card Settings. Use the icon to view the current signal
status.
English
Excellent Link Quality (Infrastructure)
Good Link Quality (Infrastructure)
Fair Link Quality (Infrastructure)
Poor Link Quality (Infrastructure)
Not linked (Infrastructure)
Exit Wireless Settings
To exit Wireless Settings, you can click
OK
or
Cancel
.
ASUS WLAN Card 19
