Asus Xonar D2/PM: instruction
Class: Computer Accessories
Type:
Manual for Asus Xonar D2/PM
Table of contents
- English ....................................................................................... 1
Table of content
English ....................................................................................... 1
Français ..................................................................................... 11
Deutsch ..................................................................................... 21
Italiano ..................................................................................... 31
Español ..................................................................................... 41
Português .................................................................................. 51
Pyccкий
.................................................................................... 61
Hrvatski ..................................................................................... 71
U8466_Xonar_D2_D2X_QSG_inside_co1 1 6/28/13 3:38:54 PM
English
®
ASUS
Xonar D2
audio card
Installation Guide
ASUS Xonar D2 Installation Guide
1
U8466.indb 1 6/28/13 4:07:15 PM
English
2
ASUS Xonar D2 Installation Guide
®
ASUS
Xonar D2 installation
1.1 Installation requirements
To ensure a successful installation of the Xonar D2 audio card, your computer must
meet the following requirements:
• IBM compatible PC with one PCI 2.1 (or higher) compatible slot for the audio
card
®
®
• Microsoft
Windows
Vista/XP(32/64bit)/MCE2005
®
®
• Intel
Pentium
4 1.4GHz or AMD K7 1400 CPU or faster CPU
• > 256 MB DRAM system memory
• > 60 MB available HDD space for driver installation package; >200MB space
available for Ableton Live and >320MB for Cakewalk package
• CD-ROM drive (or DVD-ROM drive) for software installation
• High-quality headphones, powered analog speakers, or digital speakers with
Dolby Digital or DTS decoders to enjoy the Ultra-High Fidelity sounds of the
card
Before the installation, check your ASUS Xonar D2 audio card package for the
following items:
• ASUS Xonar D2 audio card
• ASUS Xonar D2 support CD
U8466.indb 2 6/28/13 4:07:16 PM
English
ASUS Xonar D2 Installation Guide
3
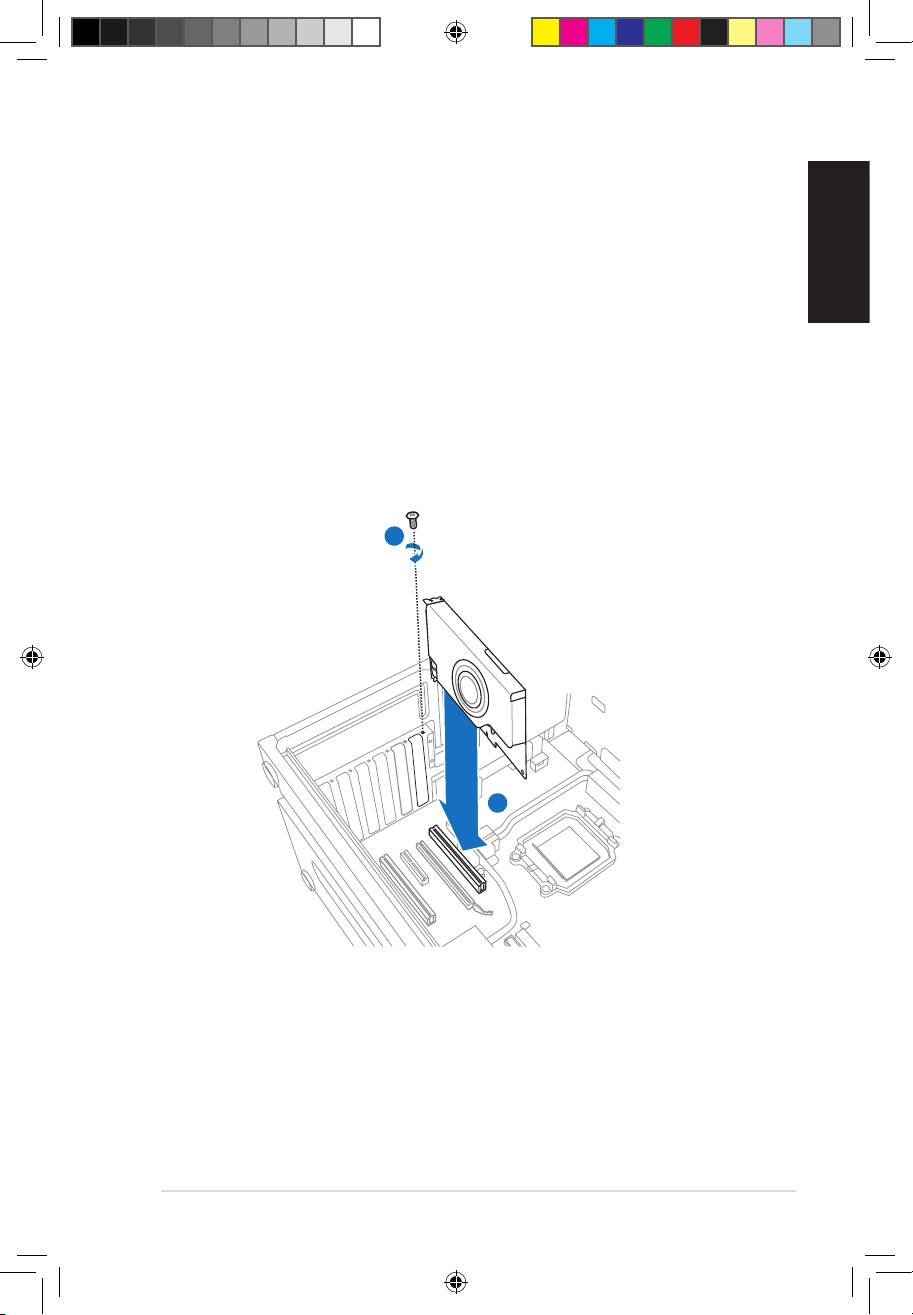
1.2 Card installation
To install ASUS Xonar audio card:
1. Touch the metal back or side panel of the computer to avoid static electricity.
2. Power OFF the computer, the monitor, and all other peripheral devices
connected to your computer.
3. Unplug the computer power cord from your computer and power outlet.
4. Remove the chassis cover.
5. Locate an empty PCI slot on the motherboard.
6. Align and insert the Xonar card into the PCI slot until it seats in place. Make
7. Secure the bracket screw that holds the Xonar D2 audio card in place. Refer
to the picture below for the bracket screw hole.
8. Put back the chassis cover.
9. Reconnect all cables.
10. Plug the power cord to the computer and to a wall socket & power strip.
11. Power ON the computer.
1
2
U8466.indb 3 6/28/13 4:07:18 PM
English
4
ASUS Xonar D2 Installation Guide
1.3 Driver installation
After installing the Xonar D2 audio card on your computer, you need to install
the device driver that enables the Xonar D2 audio card to work with Windows
operating system.
The version and content of the driver CD are subject to change without notice.
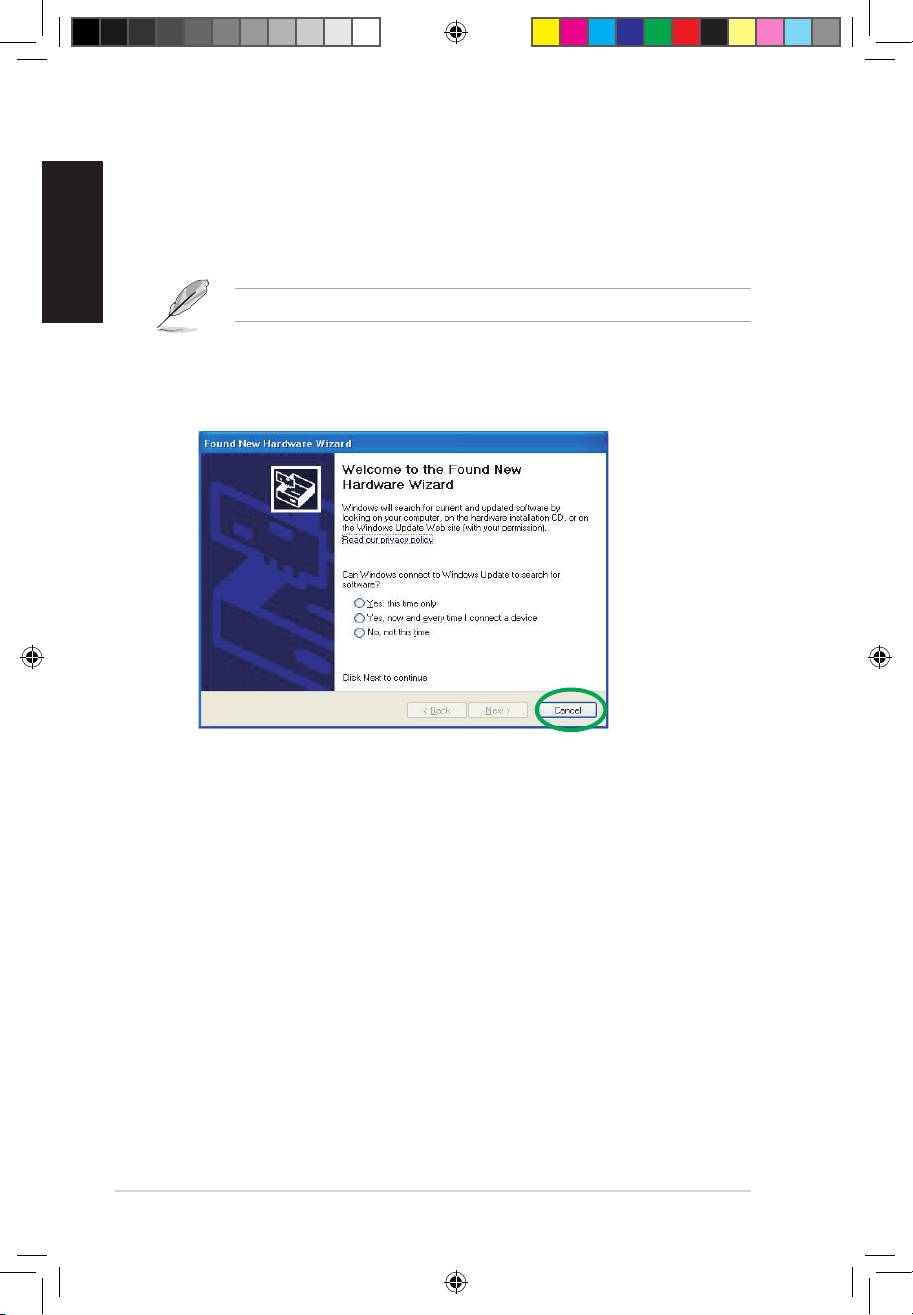
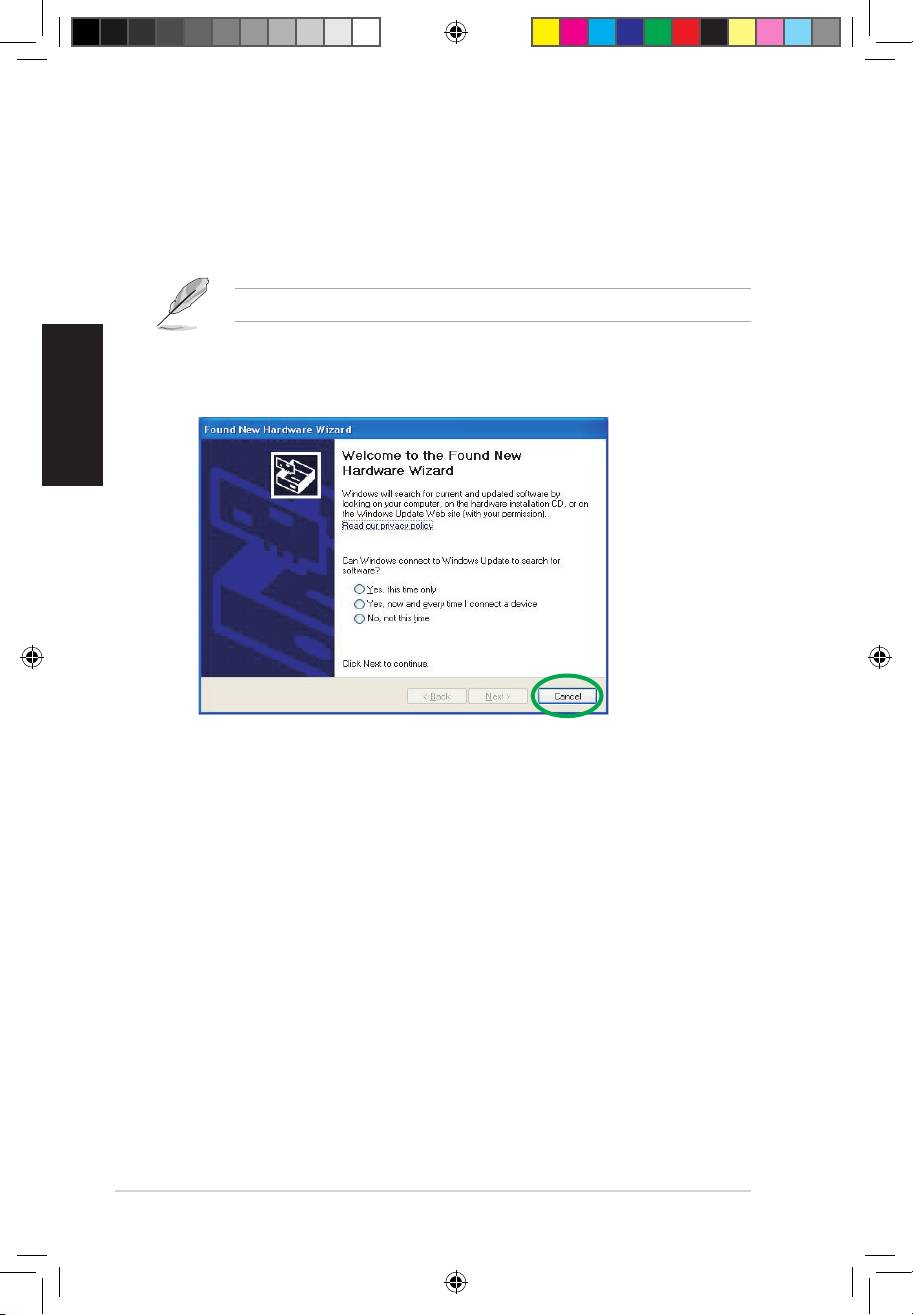
If you have already installed the ASUS Xonar D2 audio card, the Found New
Hardware Wizard window may pop up before or during driver installation. See
1.3.1 Installing the Audio Card Driver
To install the device driver:
1. Click Cancel from the Found New Hardware wizard window.
2. Insert the ASUS Xonar D2 support CD into your optical drive.
If autorun is enabled, the ASUS Xonar Card Driver screen appears
automatically. Go to step 5.
If Autorun is not enabled in your computer, perform step 3.
3. Click My Computer on your desktop and double-click the optical drive icon.
4. Double-click the setup.exe icon located on the optical drive.
5. Follow the on-screen instructions to complete the installation. Read the “END
USER LICENSE AGREEMENT” in the process and make sure that you
understand and accept it before continuing the installation.
You can choose to restart the computer later if desired.
U8466.indb 4 6/28/13 4:07:20 PM
English
ASUS Xonar D2 Installation Guide
5
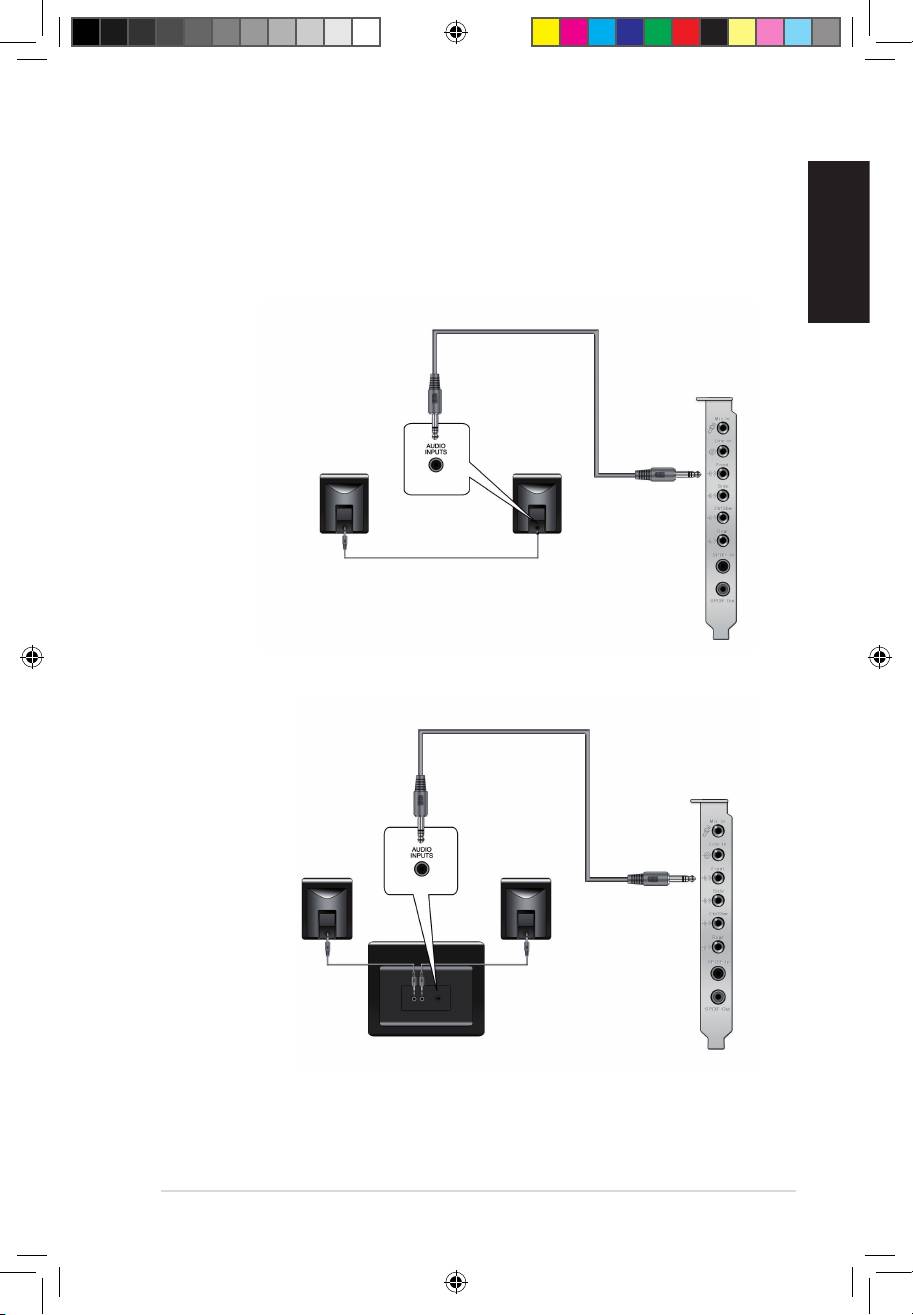
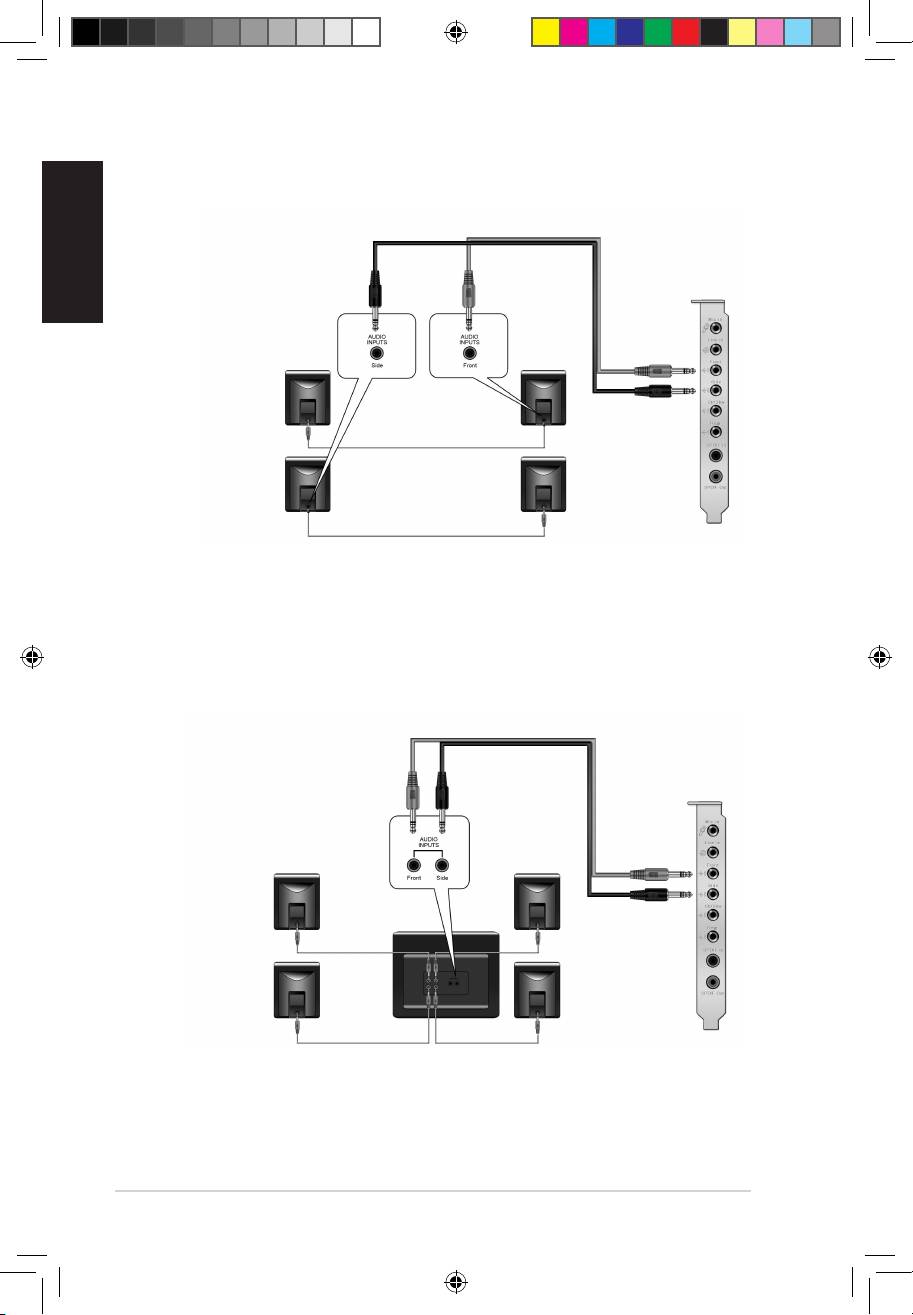
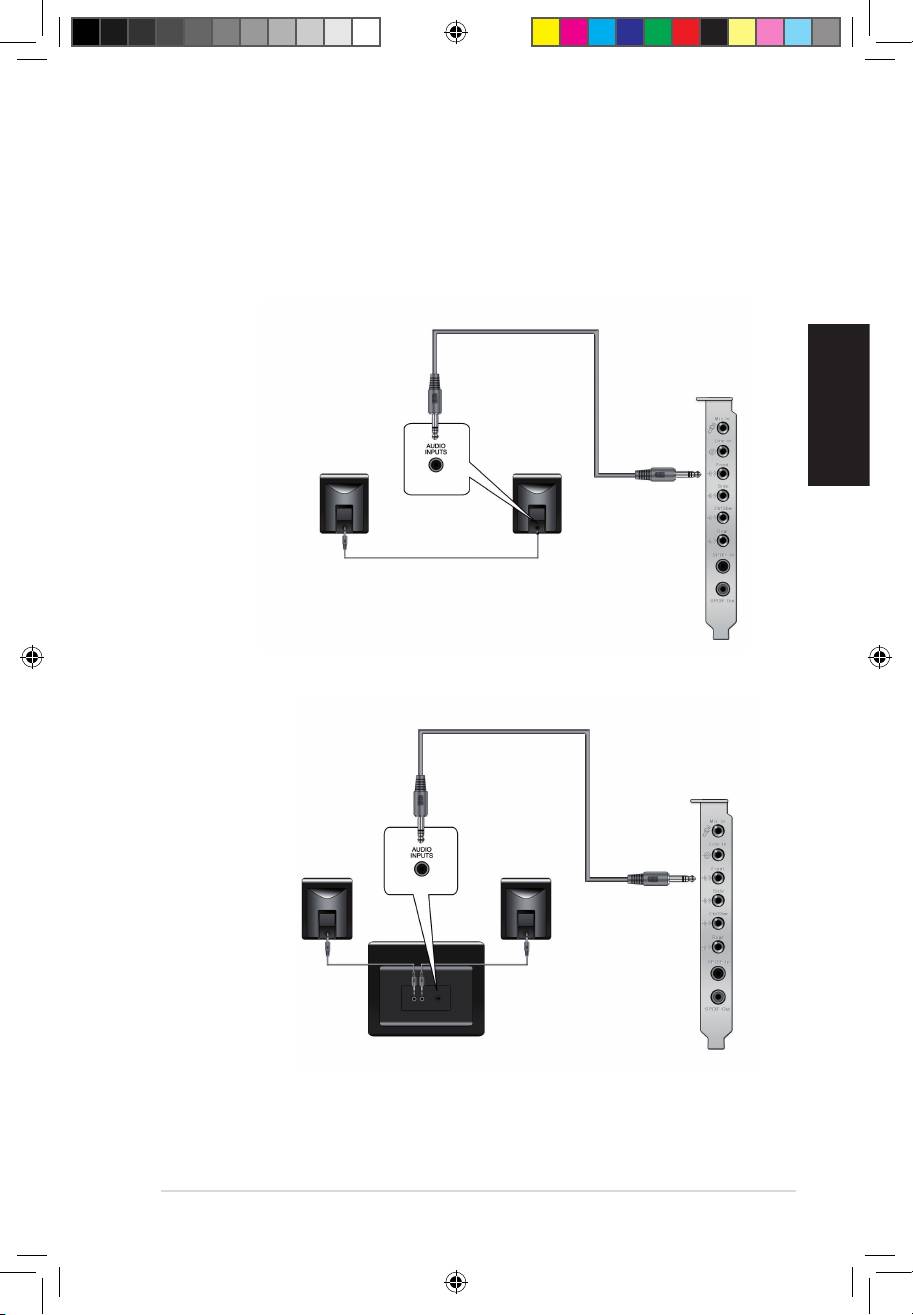
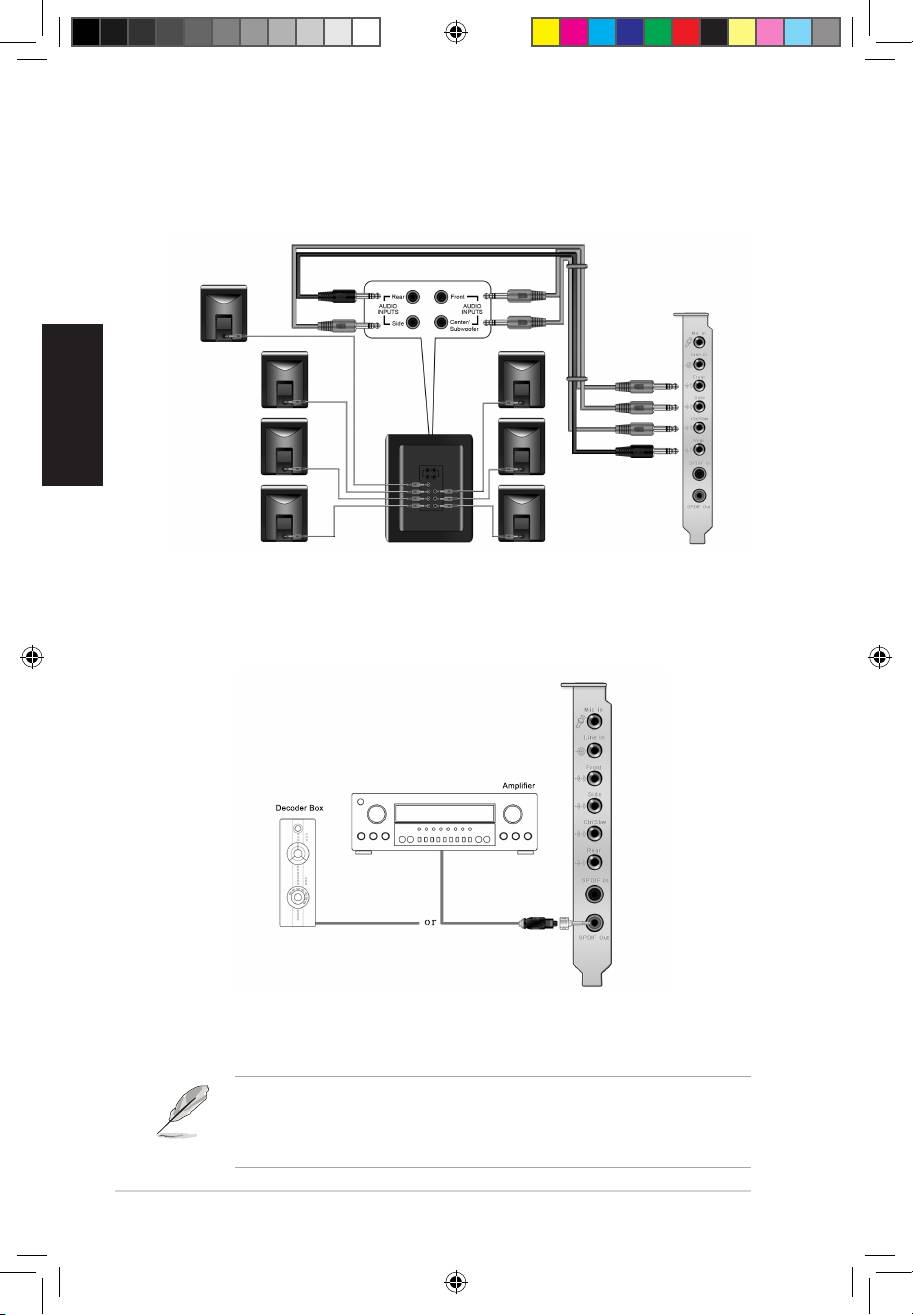
1.4 Connecting speakers
For Analog Spakers
2 Speakers
2.1 Speakers
U8466.indb 5 6/28/13 4:07:24 PM
English
6
ASUS Xonar D2 Installation Guide
4 Speakers
4.1 Speakers
U8466.indb 6 6/28/13 4:07:25 PM

English
ASUS Xonar D2 Installation Guide
7
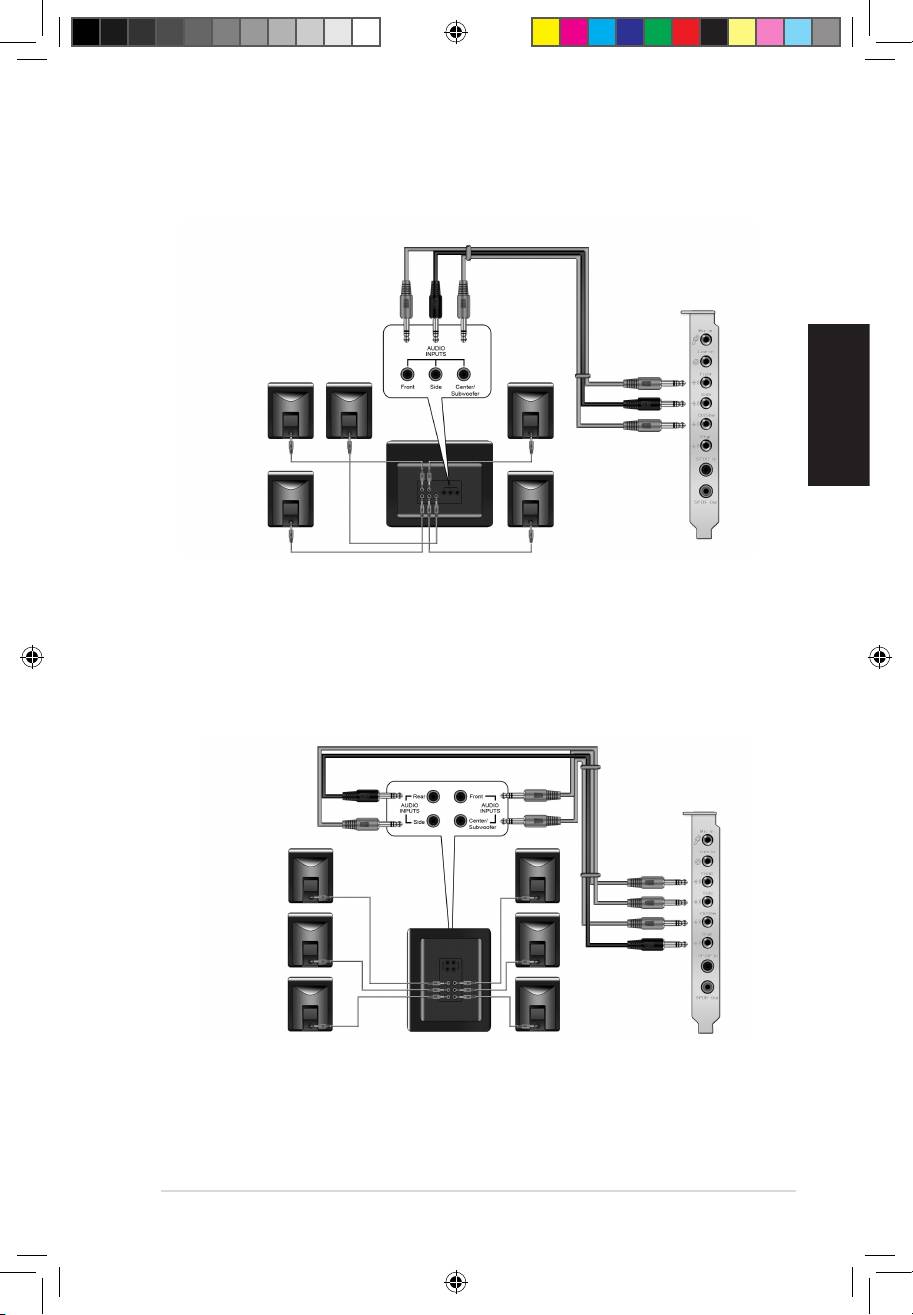
5.1 Speakers
6.1 Speakers
U8466.indb 7 6/28/13 4:07:27 PM

English
8
ASUS Xonar D2 Installation Guide
7.1 Speakers
For Digital Speakers
SPDIF Out
Plug the optical TOSLINK adaptor into the S/PDIF-Out combo connector. Then,
connect your MD/CD/DVD player’s S/PDIF in port to the optical adaptor with the
TOSLINK optical cable
You can also use a coaxial cable for a S/PDIF connection. Just plug the coaxial
RCA male connector to the S/PDIF-Out combo jack and connect the other end
into the coaxial S/PDIF input on your decoder.
U8466.indb 8 6/28/13 4:07:34 PM
English
ASUS Xonar D2 Installation Guide
9
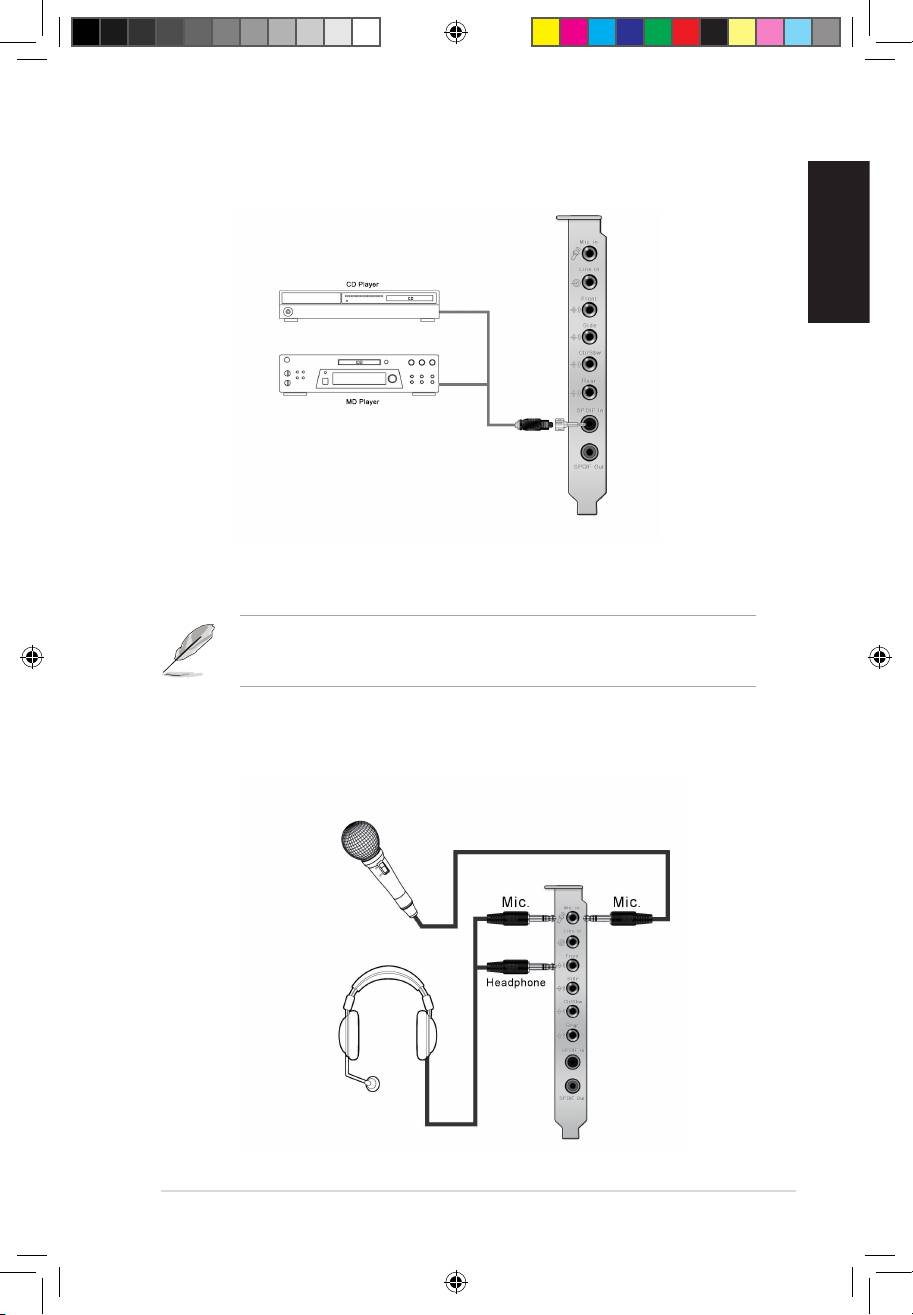
SPDIF In
Plug the optical TOSLINK adaptor into the S/PDIF-In combo connector. Then,
connect your MD/CD/DVD player’s S/PDIF out port to the optical adaptor with the
TOSLINK optical cable
You can also use a coaxial cable for a S/PDIF digital connection. Just plug the
coaxial RCA male connector to the S/PDIF-In combo jack and connect the other
end into the coaxial S/PDIF output on the player.
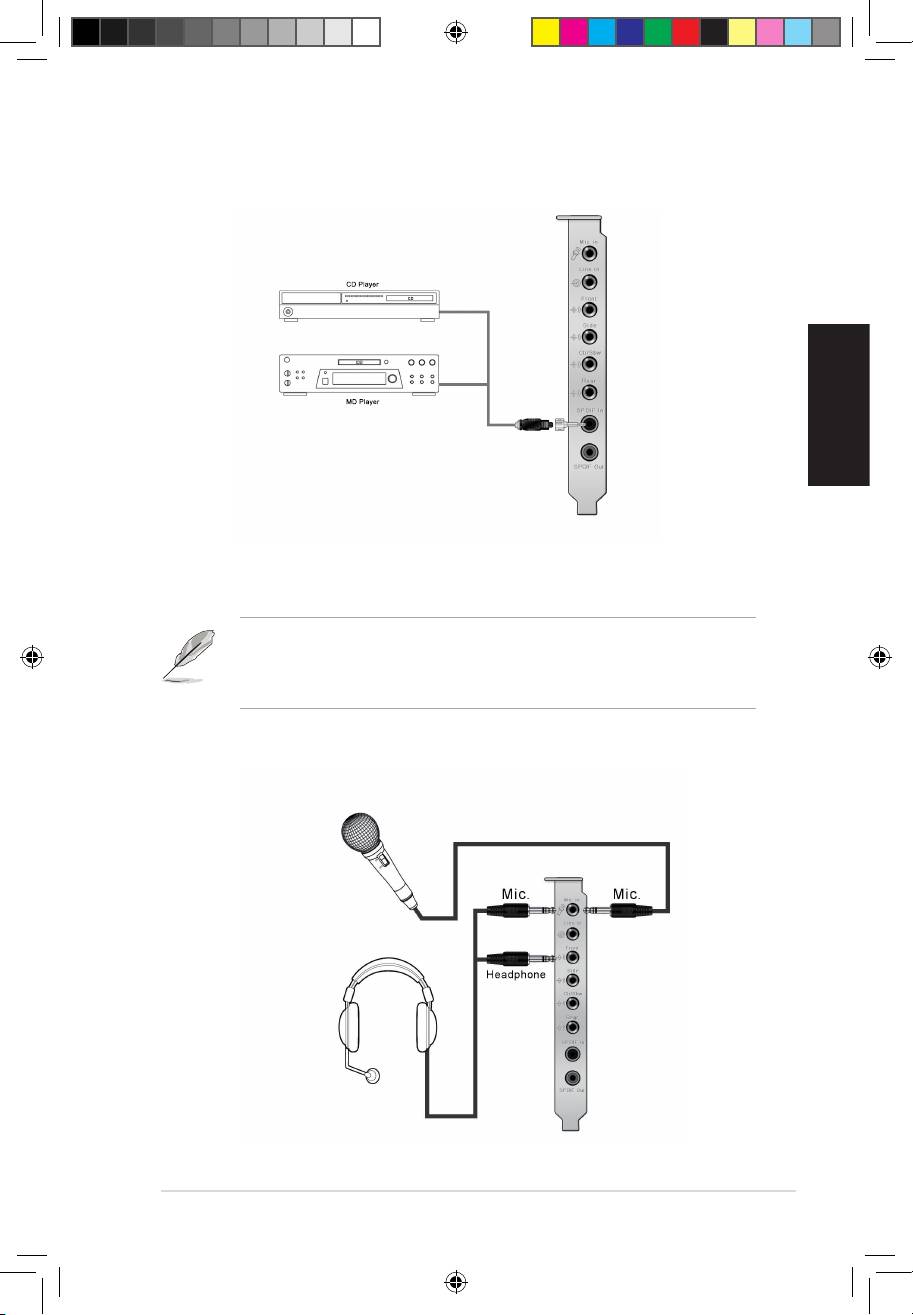
Connecting headphone / microphone
U8466.indb 9 6/28/13 4:07:39 PM
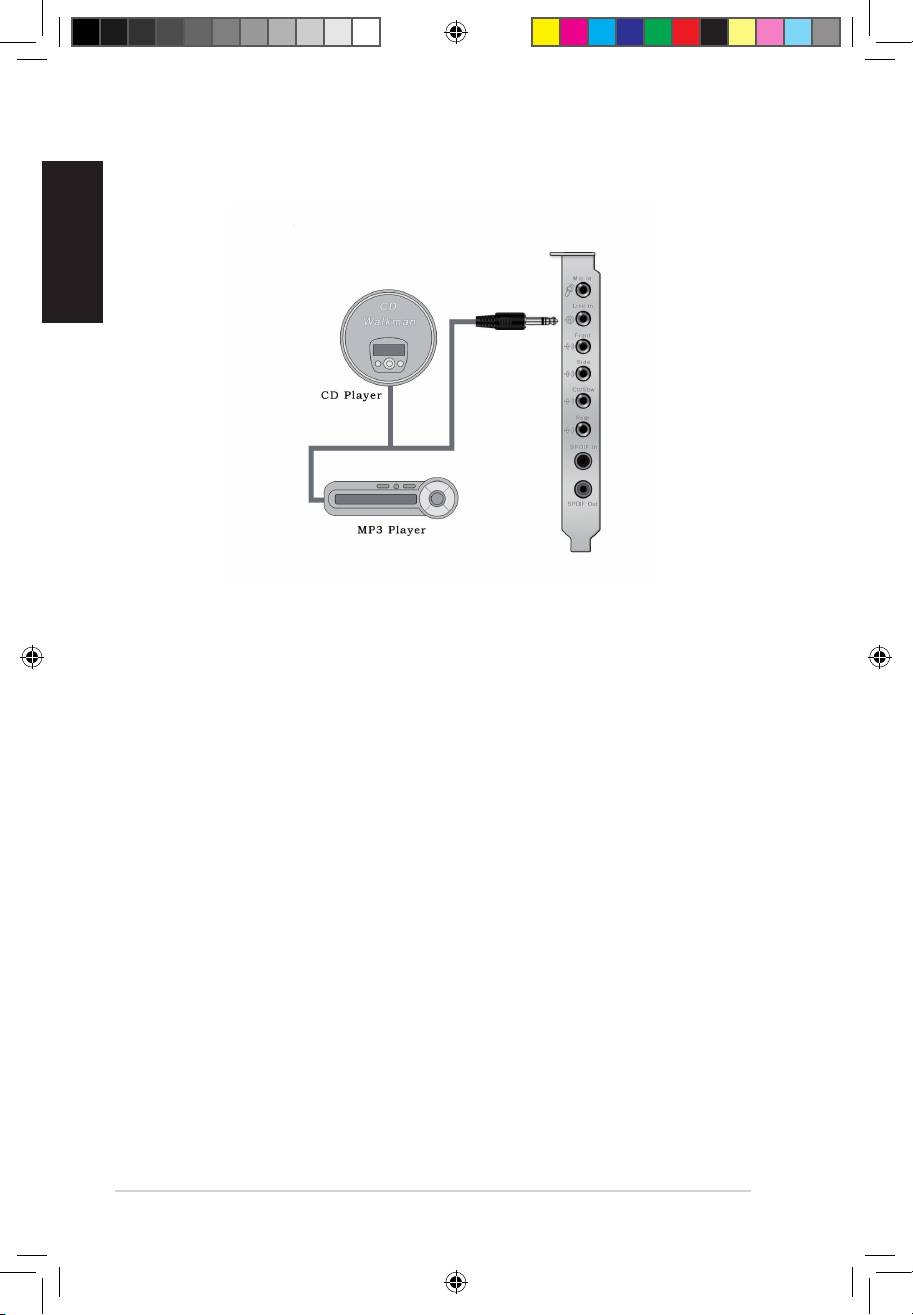
Connecting Line-In audio sources
English
10
ASUS Xonar D2 Installation Guide
U8466.indb 10 6/28/13 4:07:40 PM

®
ASUS
Xonar D2
Carte son
Français
Guide d’installation
Guide d’installation ASUS Xonar D2
11
U8466.indb 11 6/28/13 4:07:42 PM

Français
12
Guide d’installation ASUS Xonar D2
®
Installation de la carte son ASUS
Xonar D2
1.1 Congurationrequise
Avant d’installer la carte son Xonar D2, assurez-vous que votre ordinateur puisse
satisfaire aux critères suivants:
• PC avec un slot PCI 2.1 (ou supérieur) disponible pour l’installation de la carte
son
®
®
• Microsoft
Windows
Vista/XP(32/64bits)/MCE2005
®
®
• Un processeur Intel
Pentium
4 1.4GHz ou AMD K7 1400 ou supérieur
• Mémoire DRAM supérieure à 256 Mo
• Plus de 60 Mo d’espace disque disponible pour l’installation des pilotes; plus
de 200 Mo d’espace disque disponible pour l’installation du pack Ableton Live
et plus de 320 Mo pour l’installation du pack Cakewalk
• Un lecteur de CD-ROM (ou DVD-ROM) pour l’installation des logiciels
• Des écouteurs de haute qualité, des haut-parleurs analogiques ou numériques
pleinement de la qualité audio délivrée par la carte son
les éléments suivants:
• Carte son ASUS Xonar D2
• CD de support ASUS Xonar D2
U8466.indb 12 6/28/13 4:07:42 PM

Français
Guide d’installation ASUS Xonar D2
13
1.2 Installation de la carte
Pour installer la carte son ASUS Xonar:
1. Touchez une des parties métalliques de votre châssis pour vous décharger
de l’életricité statique.
2. Eteingnez l’ordinateur, le moniteur, ainsi que tous les autres périphériques
connectés à votre PC.
3. Débranchez le cordon d’alimentation de votre ordinateur et de la prise
électrique.
4. Retirez le panneau latéral du châssis.
5. Localisez un slot PCI libre sur la carte mère.
6. Alignez et insérez la carte son Xonar sur le slot PCI jusqu’à ce qu’elle soit
bien en place. Assurez-vous que les connecteurs dorés sont correctement
insérés dans le slot.
7. Sécurisez la carte Xonar D2 au châssis à l’aide d’une vis. Référez-vous à
l’illustration ci-dessous pour localiser le pas de vis.
8. Replacez le panneau latéral du châssis.
9. Reconnectez tous les câbles.
10. Branchez une extrémité du cordon d’alimentation au bloc d’alimentation de
votre ordinateur puis l’autre extrémité à une prise électrique.
11. Allumez l’ordinateur.
1
2
U8466.indb 13 6/28/13 4:07:43 PM
Français
14
Guide d’installation ASUS Xonar D2
1.3 Installation des pilotes
Une fois la carte son Xonar D2 installée sur votre ordinateur, vous devrez installer
le pilote permettant à la carte son Xonar D2 de fonctionner sous un système
d’exploitation Windows.
La version et le contenu du CD des pilotes peuvent changer sans avertissement.
Si vous avez déjà installé la carte son ASUS Xonar D2, la fenêtre de l’Assistant
1.3.1 Installer le pilote de la carte son
Pour installer le pilote de la carte son:
1. Cliquez sur Annuler lors de l’apparition de la fenêtre de l’Assistant ajout de
nouveau matériel.
2. Insérez le CD de support de la carte son ASUS Xonar D2 dans votre lecteur
optique.
Si l’Exécution automatique est activée, l’écran d’installation du pilote ASUS
Si l’Exécution automatique n’est pas activée sur votre PC, passez à l’étape 3.
3. Cliquez sur Poste de travail et double-cliquez sur l’icône de votre lecteur optique.
4. Double-cliquez sur l’icône setup.exe du CD de support.
5. Suivez les instructions apparaissant à l’écran pour terminer l’installation.
Lisez le contrat de license “END USER LICENSE AGREEMENT” et
acceptez-le pour pouvoir continuer.
6. Une fois l’installation terminée, il peut vous être demandé de redémarrer
votre ordinateur. Vous pouvez toutefois choisir de redémarrer ultérieurement.
U8466.indb 14 6/28/13 4:07:44 PM
Français
Guide d’installation ASUS Xonar D2
15
1.4 Connexion des haut-parleurs
Connexion de haut-parleurs analogiques
Congurationà2haut-parleurs
Conguration2.1
U8466.indb 15 6/28/13 4:07:46 PM

Français
16
Guide d’installation ASUS Xonar D2
Congurationà4haut-parleurs
Conguration4.1
U8466.indb 16 6/28/13 4:07:47 PM
Français
Guide d’installation ASUS Xonar D2
17
Conguration5.1
Conguration6.1
U8466.indb 17 6/28/13 4:07:48 PM
Français
18
Guide d’installation ASUS Xonar D2
Conguration7.1
Congurationdehaut-parleursnumériques
Sortie SPDIF
Branchez l’adaptateur TOSLINK optique sur le connecteur S/PDIF-Out. Puis,
connectez le port d’entrée S/PDIF de votre lecteur MD/CD/DVD à l’adaptateur
optique du câble TOSLINK.
Vous pouvez aussi utiliser un câble coaxial pour une connexion S/PDIF.
Connectez simplement une extrémité du connecteur mâle RCA coaxial au
connecteur S/PDIF-Out, puis l’autre extrémité au port d’entrée S/PDIF coaxial
de votre lecteur.
U8466.indb 18 6/28/13 4:07:53 PM
Français
Guide d’installation ASUS Xonar D2
19
Entrée SPDIF
Branchez l’adaptateur TOSLINK optique sur le connecteur S/PDIF-In. Puis,
connectez le port de sortie S/PDIF de votre lecteur MD/CD/DVD à l’adaptateur
optique du câble TOSLINK.
Vous pouvez aussi utiliser un câble coaxial pour une connexion S/PDIF.
Connectez simplement une extrémité du connecteur mâle RCA coaxial au
connecteur S/PDIF-In, puis l’autre extrémité au port de sortie S/PDIF coaxial on
de votre lecteur.
Connexion d’un casque / microphone
U8466.indb 19 6/28/13 4:07:58 PM
