Asus VW195: instruction
Class: Computer equipment, hardware, accessories
Type: Monitor

Manual for Asus VW195
Table of contents

Table of content
ASUS contact information ............................................................ii
English ....................................................................................... 1
Français ....................................................................................... 7
Deutsch ..................................................................................... 13
Italiano ..................................................................................... 19
Español ..................................................................................... 25
Pyccкий
..................................................................................... 31
Nederlands ................................................................................. 37
繁體中文 ..................................................................................... 43
简体中文 ..................................................................................... 49
日本語
..................................................................................... 55
한국어
..................................................................................... 61
Português .................................................................................. 67
Türkçe ..................................................................................... 73
..................................................................................... 79
ไทย
..................................................................................... 85
Dansk ..................................................................................... 91
Suomi ..................................................................................... 97
Norsk ...................................................................................103
Svenska ...................................................................................109
Polski ...................................................................................115
Česky
...................................................................................121
Magyar ...................................................................................127
Română
...................................................................................133
Srpski ...................................................................................139
Ελληνικά
...............................................................................145
Indonesia
.................................................................................151
Български
..............................................................................157
Slovensky
................................................................................163
iQuick Start Guide

ASUS contact information
ASUSTeK COMPUTER INC.
Address 15 Li-Te Road, Peitou, Taipei, Taiwan 11259
Telephone +886-2-2894-3447
Fax +886-2-2890-7798
E-mail info@asus.com.tw
Web site www.asus.com.tw
Technical Support
Telephone +86-21-38429911
Online support support.asus.com
ASUS COMPUTER INTERNATIONAL (America)
Address 44370 Nobel Drive, Fremont, CA 94538, USA
Fax +1-510-608-4555
Web site usa.asus.com
Technical Support
Telephone +1-812-282-2787
Support fax +1-812-284-0883
Online support support.asus.com
ASUS COMPUTER GmbH (Germany and Austria)
Address HarkortStr.21-23,D-40880Ratingen,Germany
Telephone +49-2102-95990
Fax +49-2102-959911
Web site www.asus.de
Online contact www.asus.de/sales
Technical Support
Telephone +49-1805-010923
Support Fax +49-2102-9599-11
Online support support.asus.com
ii Quick Start Guide
English
VW195/VW225
Series
LCD Monitor
Quick Start Guide
1Quick Start Guide
English
2 Quick Start Guide
Safety information
• Before setting up the monitor, carefully read all the documentation that came
with the package.
• The monitor should be operated only from the type of power source indicated
on the label. If you are not sure of the type of power supplied to your home,
consult your dealer or local power company.
• Use the appropriate power plug which complies with your local power standard.
• To ensure satisfactory operation, use the monitor only with UL listed computers
technician or your retailer.
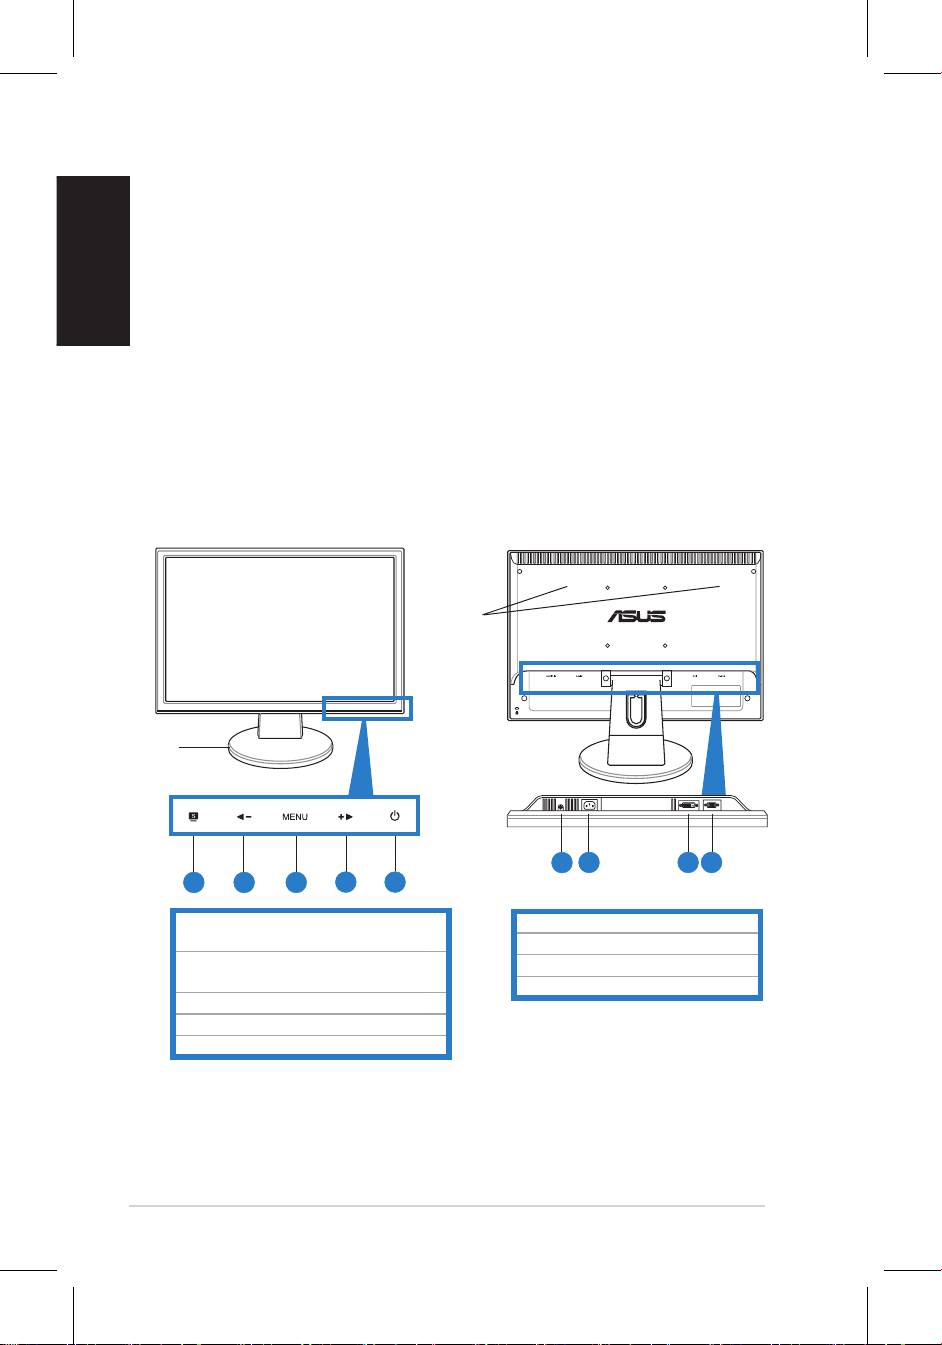
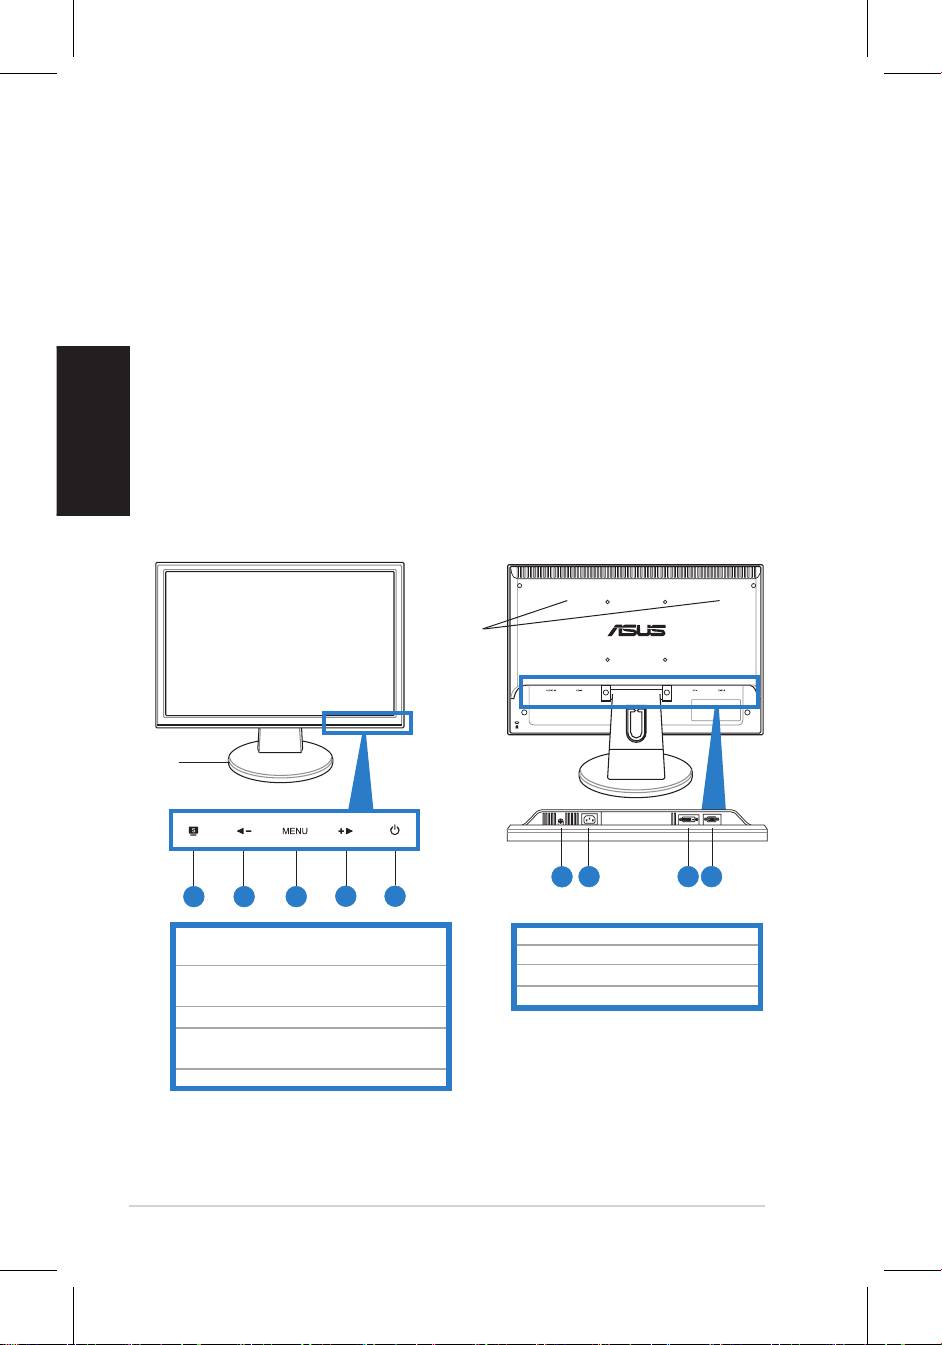
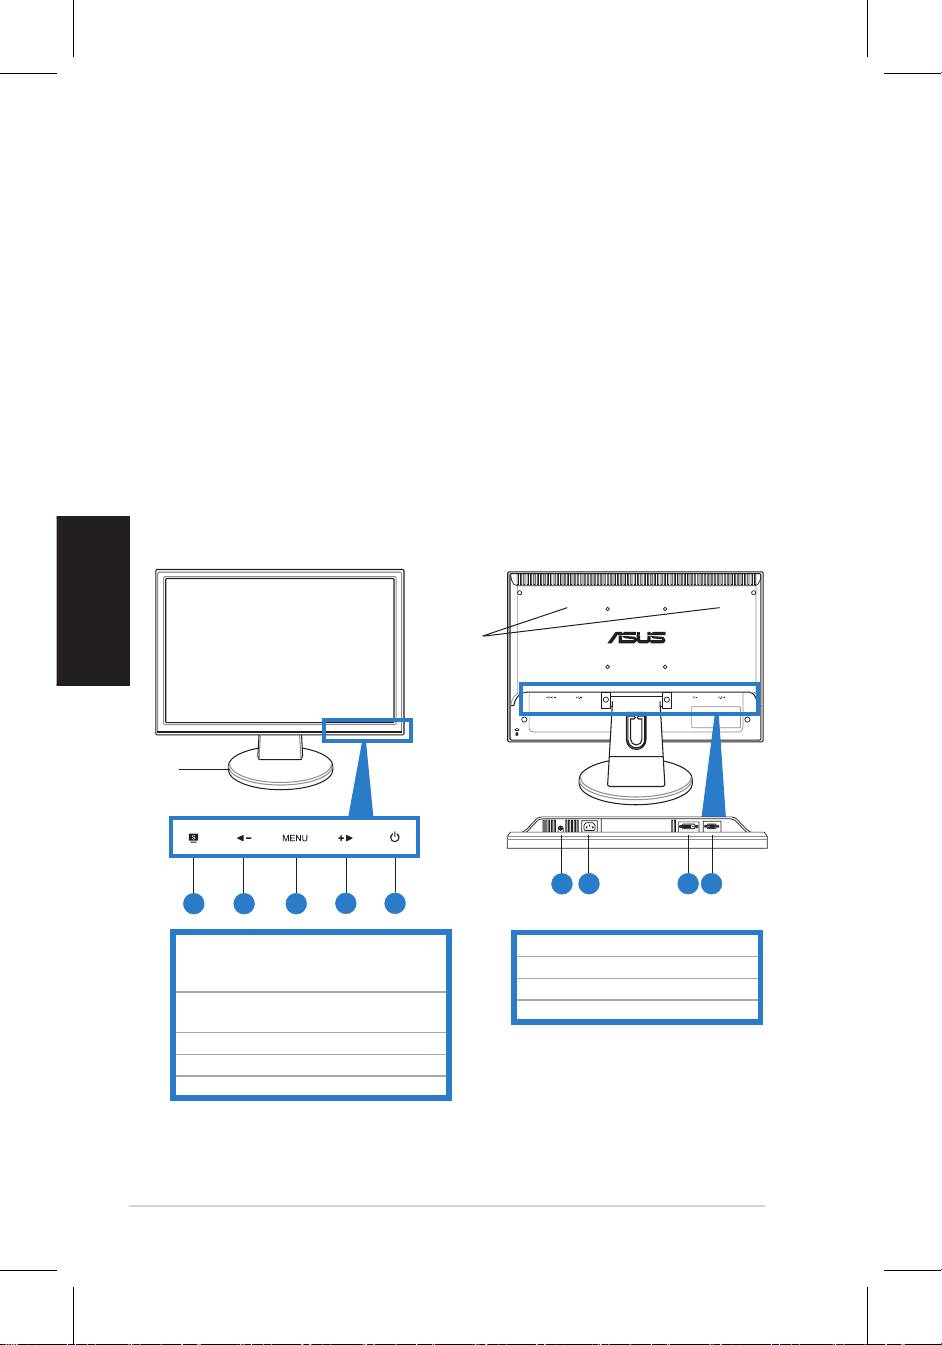
Monitor introduction
Front view Rear view
Stereo
speakers
Base
1
2 3 4
1 2 3
4 5
MENU button
3. MENU / Enter / Selection button
5. Power button
* Hotkey for 5 video preset mode selection.
** Adjusts the image automatically by
pressing the button for 2–3 seconds
(VGA mode only).
*** Volume hotkey for model with speaker.
Contrast hotkey for model without
speaker.
English
3Quick Start Guide
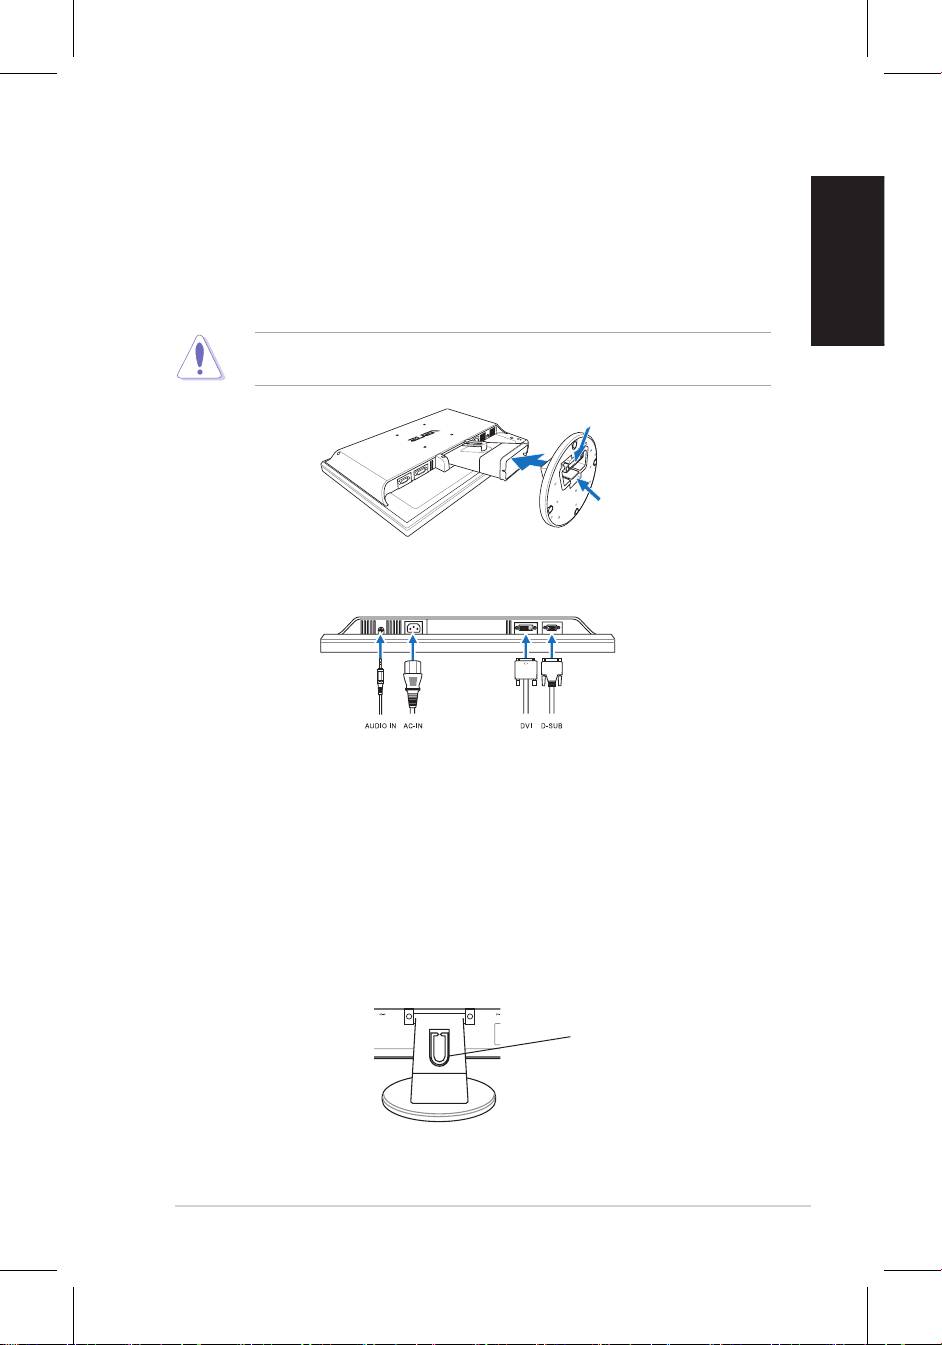
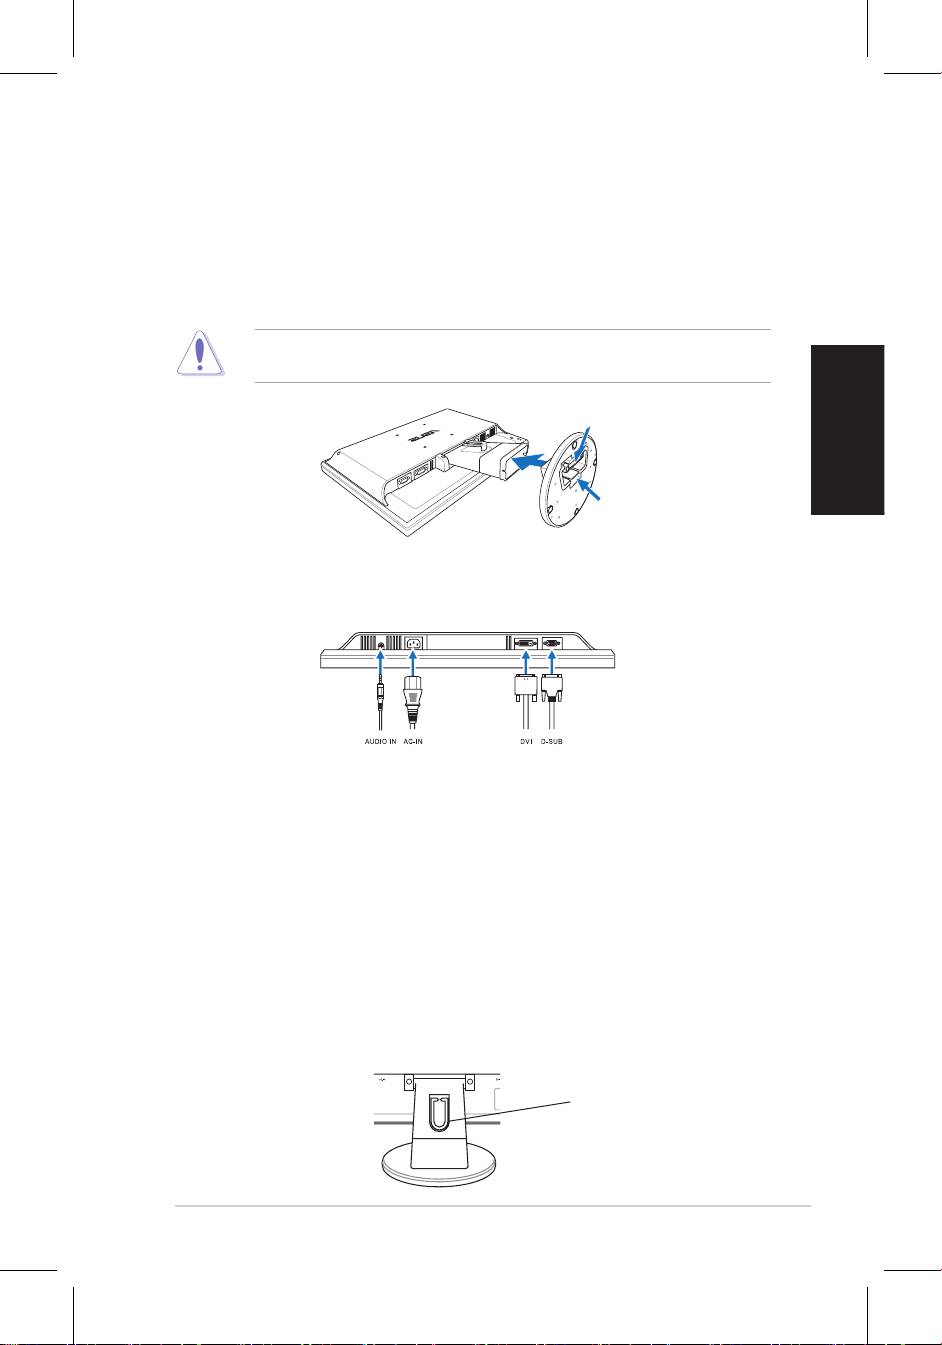
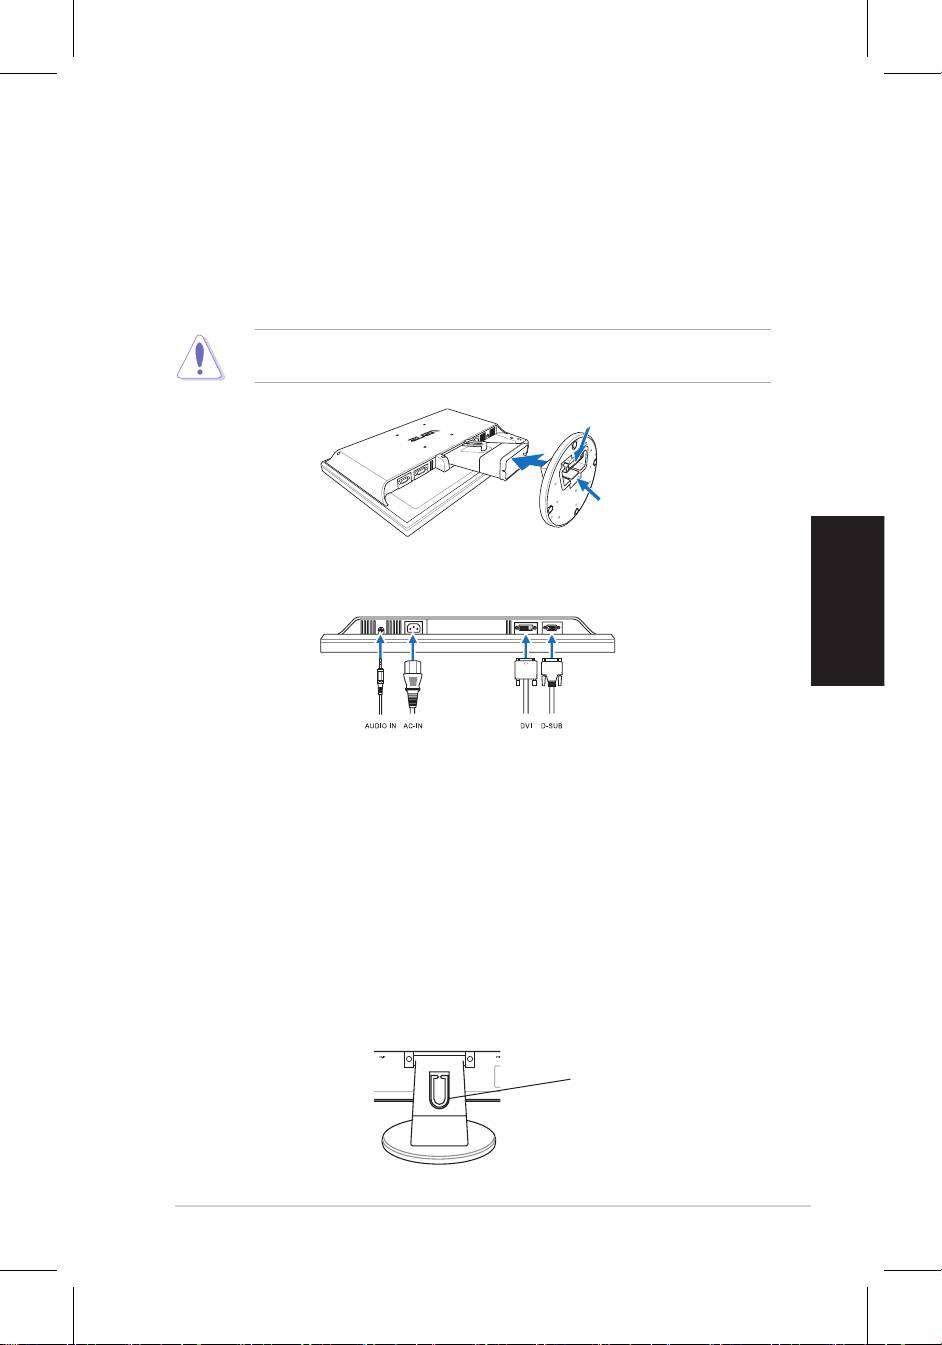
Assembling the monitor base
To assemble the monitor base:
1. Have the front of the monitor face down on a table.
that the base has been connected successfully.
We recommend that you cover the table surface with soft cloth to prevent
damage to the monitor.
Connecting the cables
•
To connect the audio cable
: connect one end of the audio cable to the
•
To connect the power cord
: connect one end of the power cord securely to
•
To connect the VGA/DVI cable
:
2. Gather all the cables with the cable hook.
Cable hook
English
Quick Start Guide
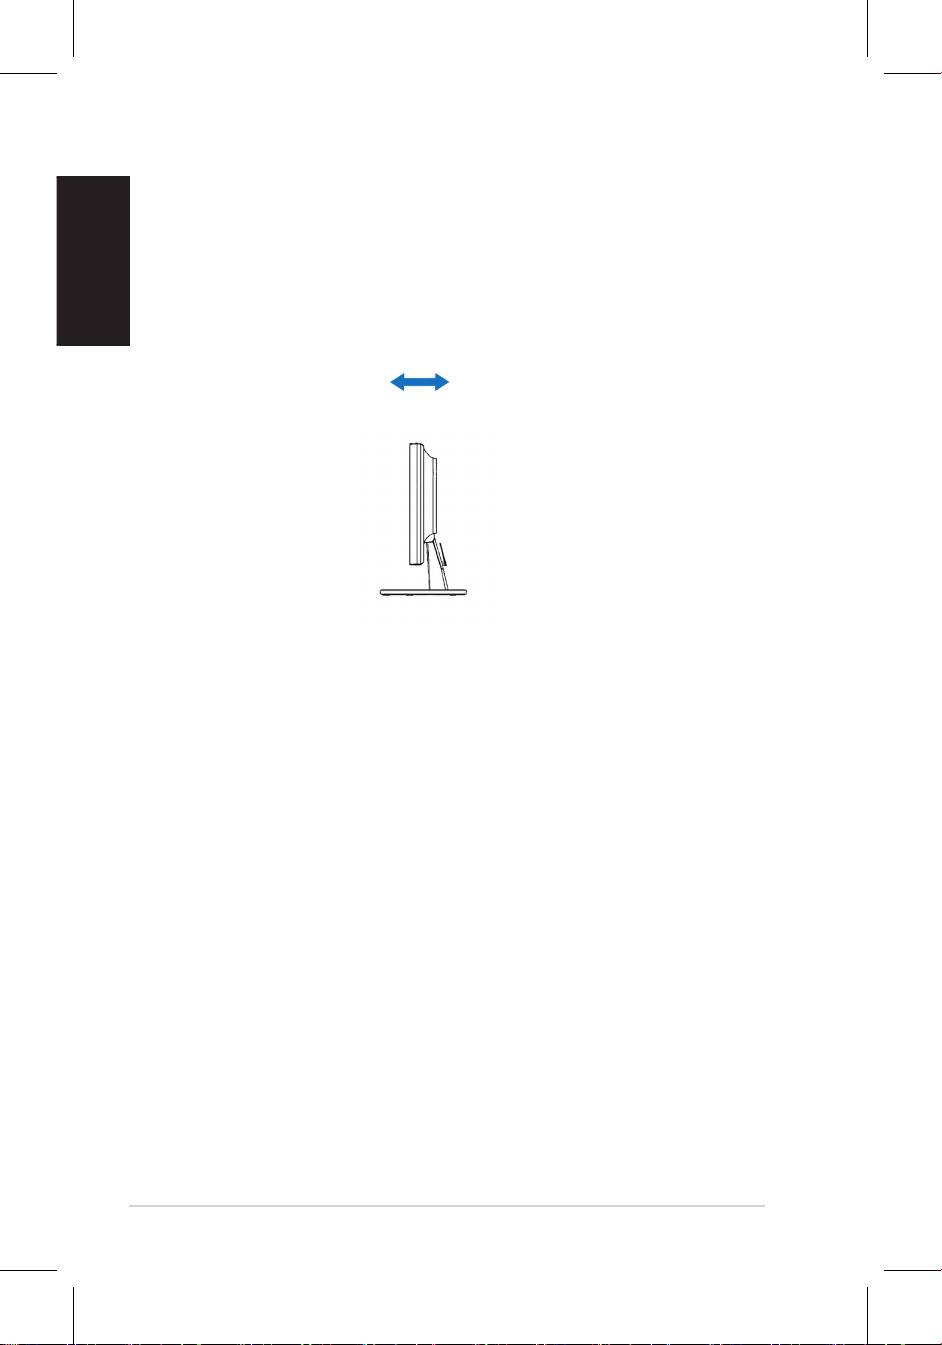
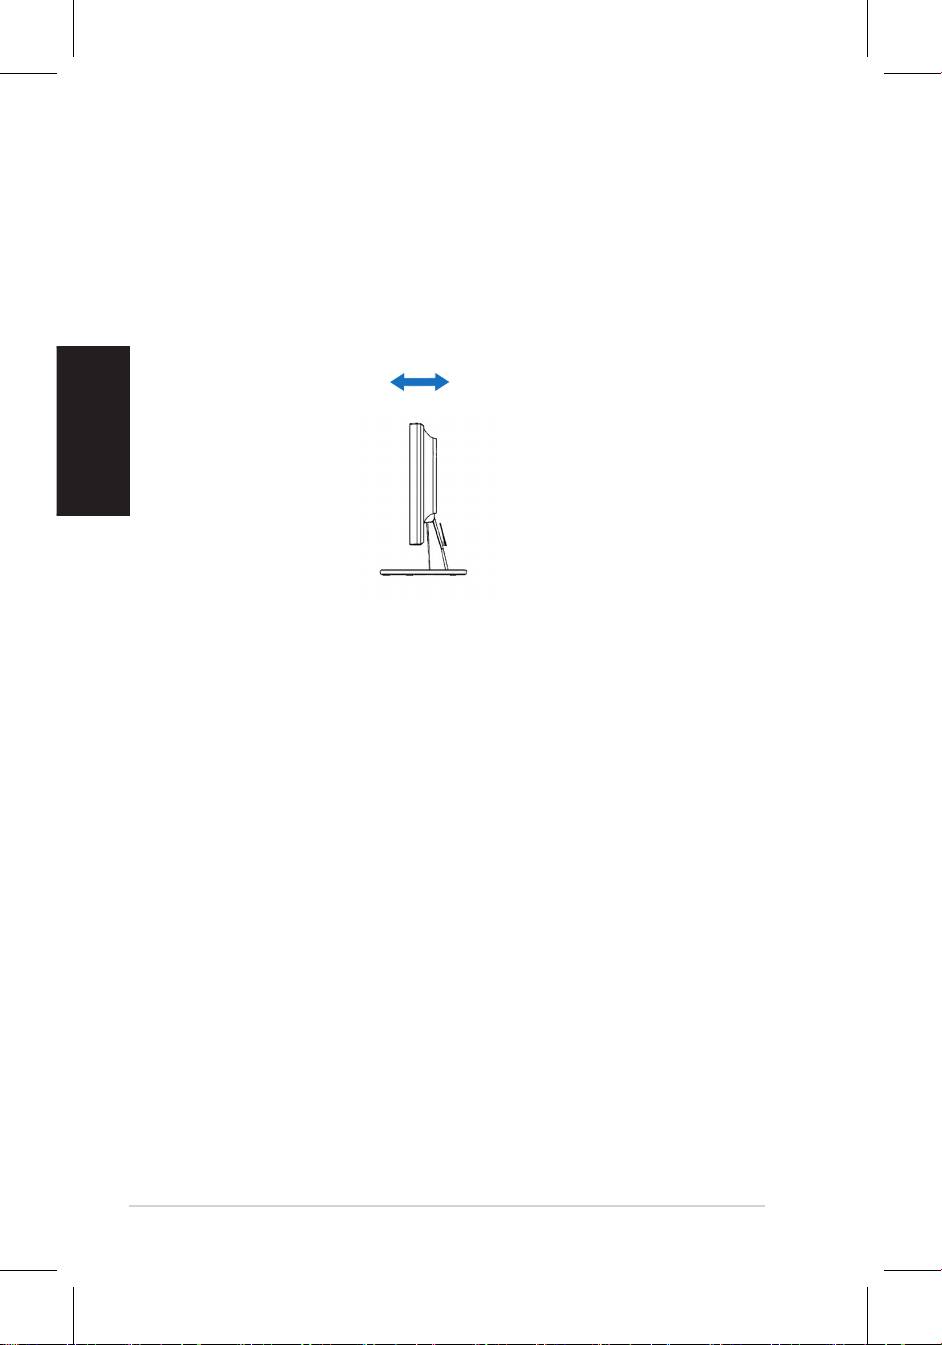
Adjusting the monitor
• For optimal viewing, we recommend that you look at the full face of the monitor,
• Hold the stand to prevent the monitor from falling when you change its angle.
-3º~20º
English
5Quick Start Guide
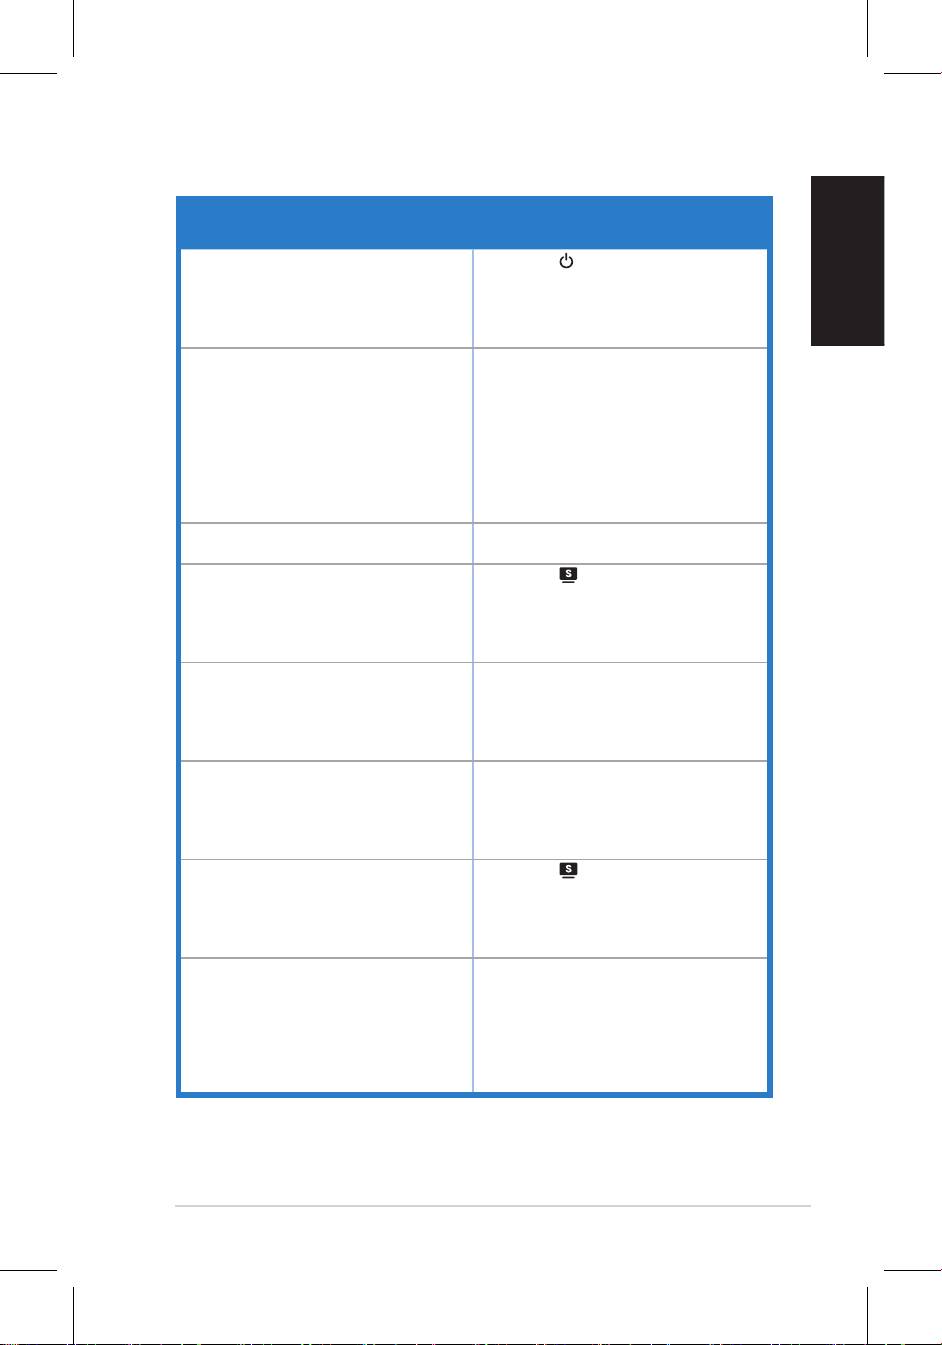
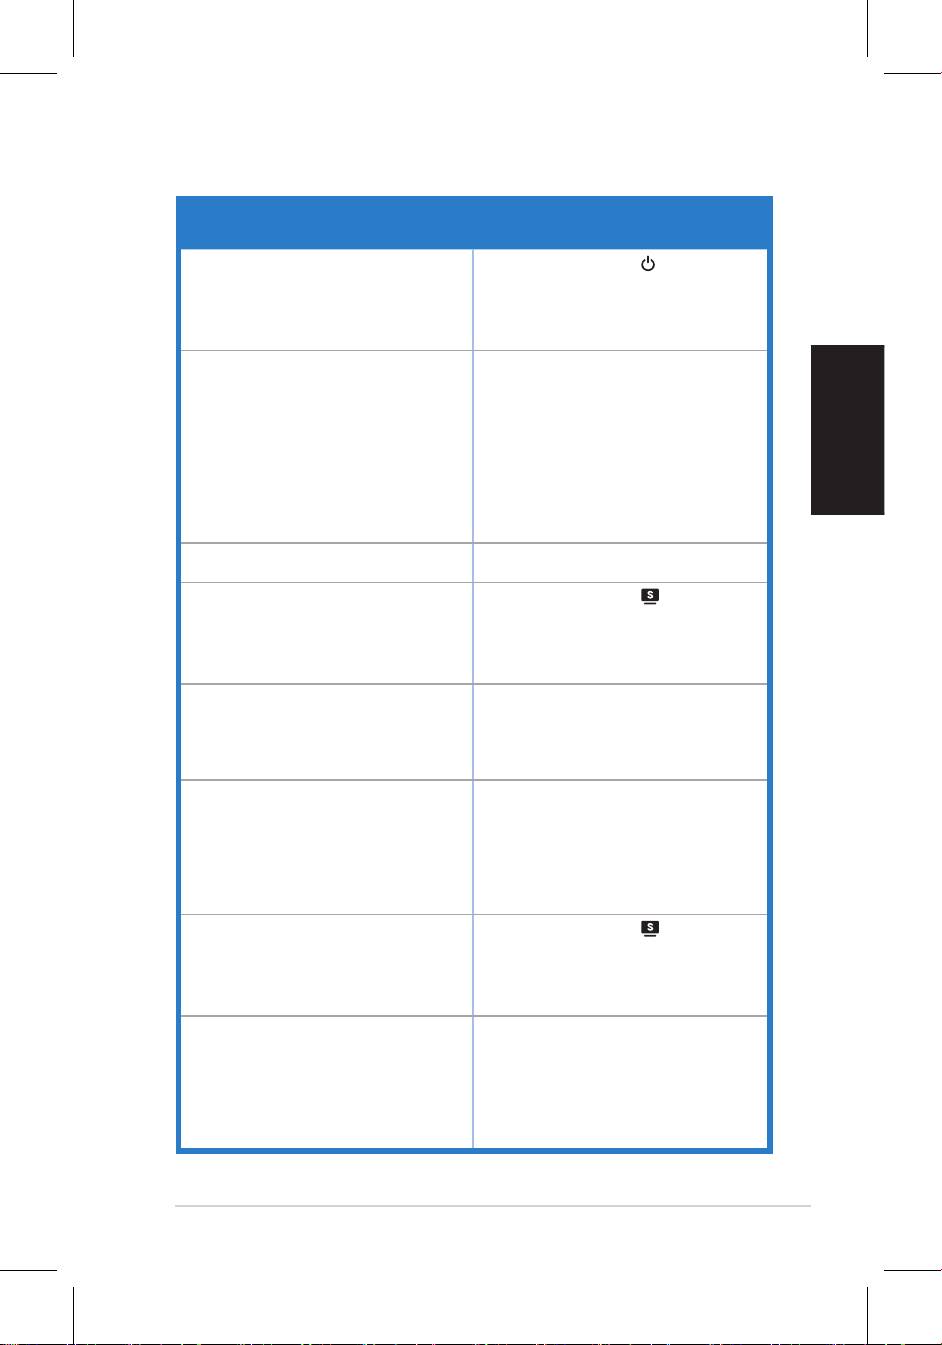
Troubleshooting (FAQ)
Problem Possible Solution
Power LED is not ON • Press the button to check if the monitor
is in the ON mode.
connected to the monitor and the power
outlet.
The power LED lights amber and there is no
screen image
in the ON mode.
• Make sure the signal cable is properly
connected the monitor and the computer.
• Inspect the signal cable and make sure
none of the pins are bent.
available monitor to check if the computer
is properly working.
Screen image is too light or dark
settings via OSD.
• Press the button for two seconds to
properly
settings
via OSD.
Screen image bounces or a wave pattern is
• Make sure the signal cable is properly
present in the image
connected to the monitor and the
computer.
• Move electrical devices that may cause
electrical interference.
Screen image has color defects (white does
• Inspect the signal cable and make sure
not look white)
that none of the pins are bent.
• Perform Reset via OSD.
• Press the button for two seconds to
mode only).
OSD.
No sound or sound is low • Ensure that the audio cable is properly
connected to the monitor and the
computer.
monitor and computer.
• Ensure that the computer sound card
driver is properly installed and activated.
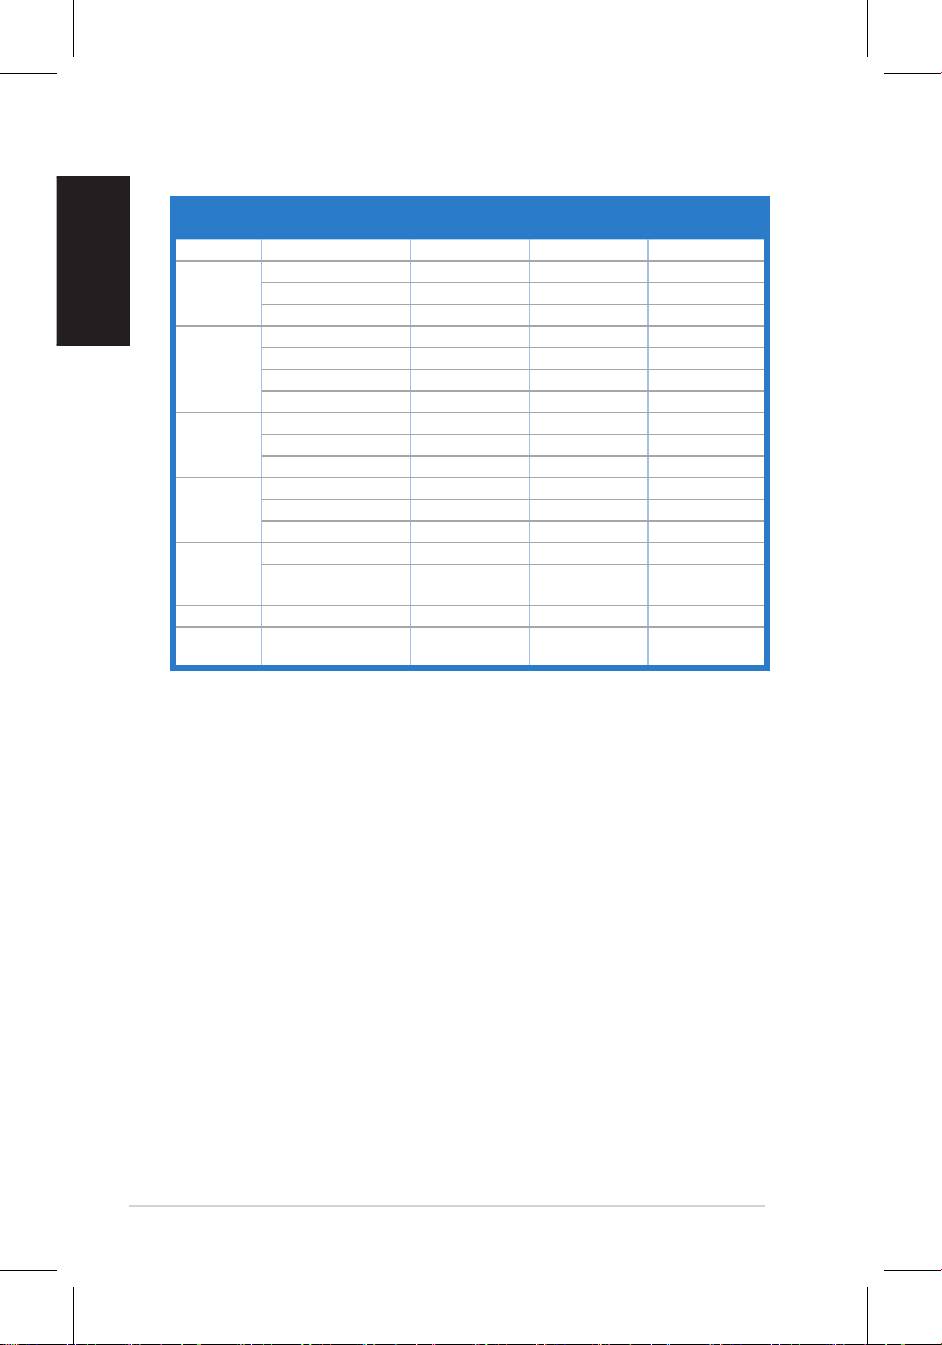
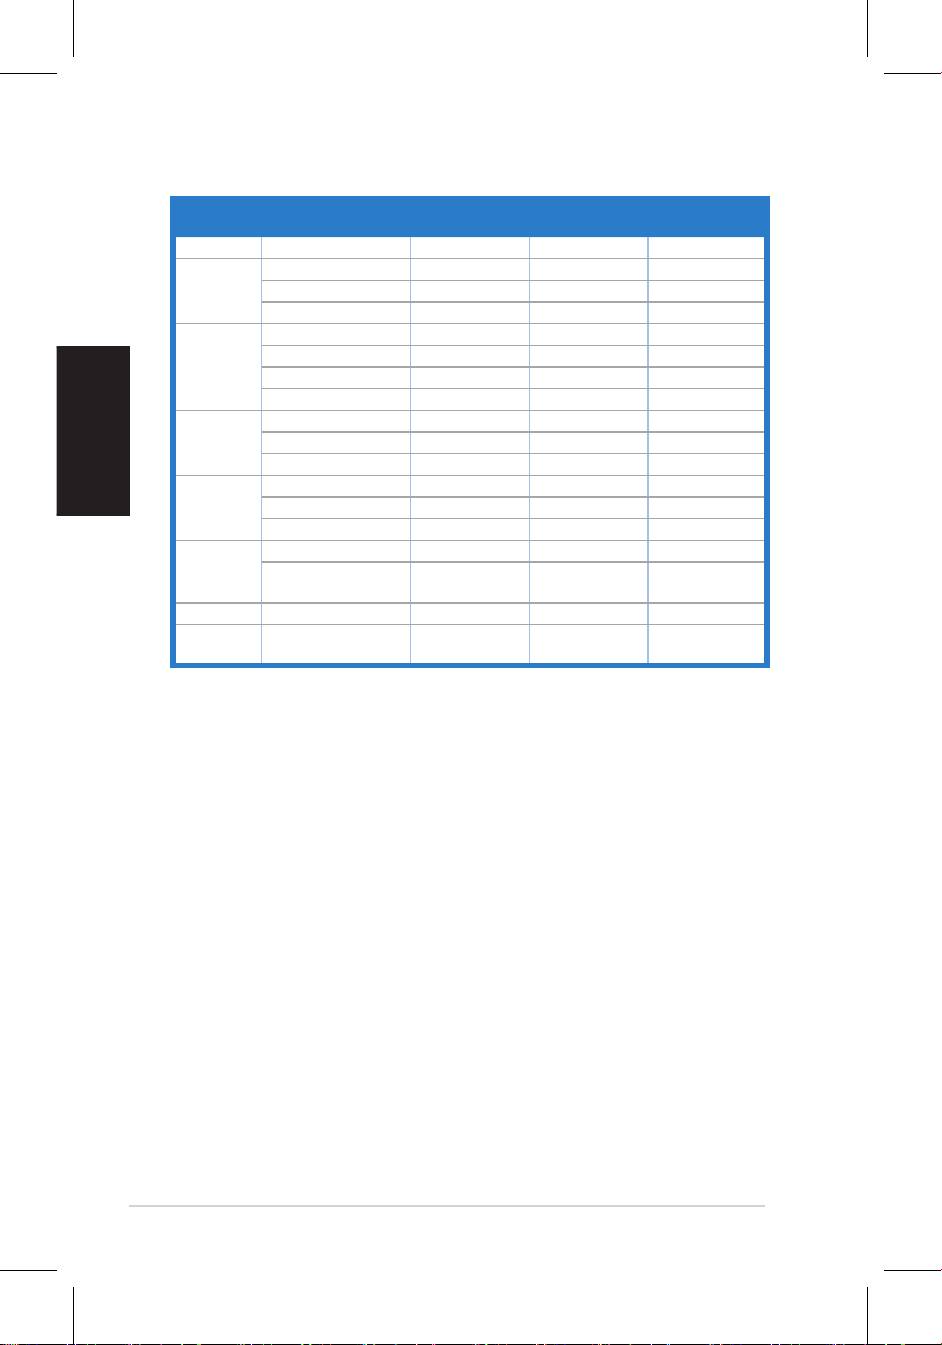
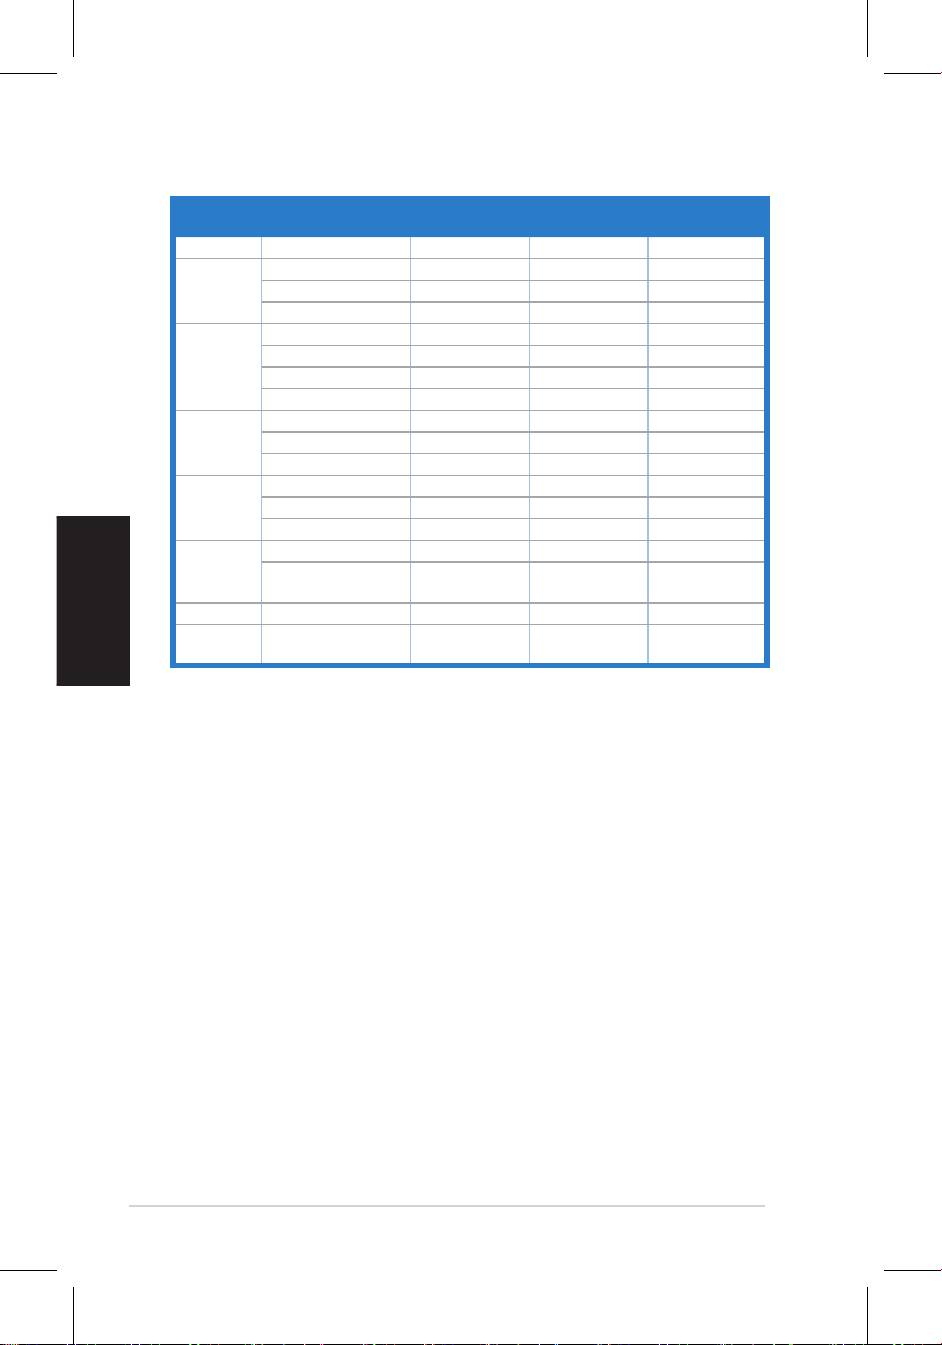
Supported operating modes
Standard Resolution
Horizontal
Vertical
Pixel
English
Frequency
Frequency
Frequency
DOS
* Modes not listed in the table may not be supported. For optimal resolution, we recommend that
you choose a mode listed in the table above.
6 Quick Start Guide
Moniteur LCD
Séries
VW195/
Français
VW225
Guide de démarrage
rapide
7Guide de démarrage rapide
Français
8 Guide de démarrage rapide
Informations sur la sécurité
incluse dans le paquet.
à la pluie ou à l’humidité.
• Le moniteur ne doit être utilisé qu’avec le type de source d’alimentation indiqué sur
l’étiquette à l’arrière. Si vous n’êtes pas sûr du type d’alimentation électrique dont vous
•
Introduction au moniteur
Vue avant Vue arrière
Haut-
parleurs
stéréo
Base
1
2 3 4
1 2 3
4 5
1.
1. Port d’entrée audio
auto** / Quitter MENU
2. Port d’alimentation
2. Bouton de sélection Bas /
3.
Raccourci volume ou contraste***
3. Bouton MENU / Entrée / Sélection
Raccourci luminosité
5. Bouton d’alimentation
* Raccourci d’activation de 5 modes vidéo.
** Ajuste l’image automatiquement via la pression de ce bouton pendant 2–3 secondes (disponible
en mode VGA uniquement).
*** Raccourci de volume réservé aux modèles à haut-parleurs.
Raccourci de contraste réservé aux modèles sans haut-parleurs.
Français
9Guide de démarrage rapide
Assembler la base du moniteur
Pour assembler la base du moniteur :
léger cliquetis se fera entendre si la base a été correctement connectée.
d’endommager le moniteur.
Connecter les câbles
1.
•
Pour connecter le câble audio
:
l’ordinateur.
•
Pour connecter le cordon d’alimentation
source électrique.
•
Pour connecter le câble VGA / DVI VGA / DVI
:
a.
b.
ordinateur.
c.
Crochet
Français
Guide de démarrage rapide
Ajuster l’inclinaison
• Pour une visualisation optimale, il est recommandé de faire face au moniteur et
son inclinaison.
•
-3º~20º
Français
11Guide de démarrage rapide
Dépannage (FAQ)
Problème Solution possible
Le voyant d’alimentation ne s’allume pas
le moniteur est bien sous tension.
connecté au moniteur et à une prise
électrique.
Le voyant d’alimentation s’allume en ambré
et aucune image n’apparaît à l’écran
sous tension.
vous assurer qu’aucune des broches ne
sont pliées.
L’image est trop claire ou trop sombre
luminosité via OSD.
L’image n’est pas correctement centrée ou
de mauvaise taille
via OSD.
L’image saute et des vaguelettes
apparaissent à l’écran
pouvant causer des interférences
électriques.
Les couleurs apparaissant à l’écran sont
anormales (les blancs n’apparaissent pas
vous assurer qu’aucune des broches ne
blanc)
sont pliées.
via OSD.
L’image est trouble ou brouillée
l’image.
Fréquence via OSD.
Pas de son ou son trop bas
correctement connecté au moniteur et au
du moniteur.
Modes de fonctionnement supportés
Standard Résolution Fréquence
Fréquence
Pixel
horizontale
verticale
DOS
Français
* Les modes non listés dans ce tableau peuvent ne pas être supportés. Pour une résolutionLes modes non listés dans ce tableau peuvent ne pas être supportés. Pour une résolution
optimale, il est recommandé de sélectionner un mode listé dans le tableau.
12 Guide de démarrage rapide
VW195/VW225
Series
LCD-Monitor
Deutsch
Schnellstarthilfe
13Schnellstarthilfe
Deutsch
14 Schnellstarthilfe
Sicherheitsinformationen
•
Informationen.
Regen oder Feuchtigkeit aus.
sicher, erkundigen Sie sich bei Ihrem Energieversorgungsunternehmen vor Ort.
übereinstimmen.
• Sollten technische Probleme mit dem Produkt auftreten, kontaktieren Sie den
Monitoreinführung
Vorderansicht Rückansicht
Stereo-
Lautsprecher
Ständer
1
2 3 4
1 2 3
4 5
Feineinstellung** /
3.
* Hotkey für 5 voreingestellte Videoansichten.
** Passt das Bild automatisch an, wenn der Knopf für 2-3
Sekunden gedrückt wird (nur im VGA-Modus).
*** Lautstärken-Taste für Modelle mit Lautsprechern, Kontrast-
Taste für Modelle ohne Lautsprecher.
Deutsch
15Schnellstarthilfe
Montage des Standbeins
Anschließen der Kabel
•
So schließen Sie das Audiokabel an
•
So schließen Sie das Netzkabel an
Steckdose.
•
So schließen Sie das VGA- / DVI-Kabel an
:
c. Ziehen Sie die Schrauben fest.
Kabelhaken

Deutsch
16 Schnellstarthilfe
Einstellen des Monitors
umkippt.
-3º~20º

Deutsch
17Schnellstarthilfe
Problembehandlung (Häug gestellte Fragen)
Problem Mögliche Lösung
• Berühren Sie den
ob der Monitor eingeschaltet ist.
Monitor und der Stromquelle verbunden ist.
eingeschaltet sind.
• Stellen Sie sicher, dass das Signalkabel korrekt mit
• Prüfen Sie, ob die Pole des Signalkabels verbogen
sind.
ein.
• Berühren Sie den
proportioniert
Einstellungen über das OSD.
• Stellen Sie sicher, dass das Signalkabel korrekt mit
an
hervorrufen könnten.
• Prüfen Sie, ob die Pole des Signalkabels verbogen
sind
• Führen Sie ein Reset über das OSD aus.
stellen Sie die Farbtemperatur über das OSD ein.
• Drücken Sie den
• Stellen Sie sicher, dass der Soundkartentreiber
Unterstützte Betriebsmodi
Standard Auflösung Horizontale
Vertikale
Pixel
Frequenz
Frequenz
DOS
Deutsch
* Nicht in der Tabelle aufgeführte Modi werden wahrscheinlich nicht unterstützt. Für optimaleNicht in der Tabelle aufgeführte Modi werden wahrscheinlich nicht unterstützt. Für optimale
Auösung wird empfohlen, einen Modus aus der obigen Tabelle auszuwählen.
18 Schnellstarthilfe


