Asus DSL-N11: instruction
Class: Networks, communications, telecommunications, internet, security
Type:
Manual for Asus DSL-N11
Table of contents
EC Declaration of Conformity
We, the undersigned,
Manufacturer:
ASUSTek COMPUTER INC.
Address, City:
No. 150, LI-TE RD., PEITOU, TAIPEI 112, TAIWAN R.O.C.
Country:
TAIWAN
Authorized representative in Europe:
ASUS COMPUTER GmbH
Address, City: HARKORT STR. 21-23, 40880 RATINGEN
Country:
GERMANY
declare the following apparatus:
Product name:
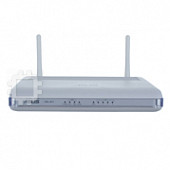
11n Wireless ADSL modem router
Model name:
DSL-N11
conform with the essential requirements of the following directives:
2004/108/EC-EMC Directive
EN 55022:2006+A1:2007
EN 55024:1998+A1:2001+A2:2003
EN 61000-3-2:2006
EN 61000-3-3:1995+A1:2001+A2:2005
EN 55013:2001+A1:2003+A2:2006
EN 55020:2007
1999/5/EC-R &TTE Directive
EN 300 328 V1.7.1(2006-10)
EN 301 489-1 V1.8.1(2008-04)
EN 300 440-1 V1.4.1(2008-05)
EN 301 489-3 V1.4.1(2002-08)
EN 300 440-2 V1.2.1(2008-03)
EN 301 489-4 V1.3.1(2002-08)
EN 301 511 V9.0.2(2003-03)
EN 301 489-7 V1.3.1(2005-11)
EN 301 908-1 V3.2.1(2007-05)
EN 301 489-9 V1.4.1(2007-11)
EN 301 908-2 V3.2.1(2007-05)
EN 301 489-17 V1.3.2(2008-04)
EN 301 893 V1.4.1(2005-03)
EN 301 489-24 V1.4.1(2007-09)
EN 50360:2001
EN 302 326-2 V1.2.2(2007-06)
EN 50371:2002
EN 302 326-3 V1.3.1(2007-09)
EN 62311:2008
EN 301 357-2 V1.3.1(2006-05)
EN 50385:2002
2006/95/EC-LVD Directive
EN 60950-1:2006 EN60065:2002+A1:2006
CE marking
(EC conformity marking)
Position : CEO
Name : Jerry Shen
Declaration Date: Apr. 14, 2009
Year to begin affixing CE marking:2009
Signature : __________

Appendices
Notices
Federal Communications Commission Statement
This device complies with Part 15 of the FCC Rules. Operation is subject to the
following two conditions:
• This device may not cause harmful interference.
• This device must accept any interference received, including interference that
may cause undesired operation.
This equipment has been tested and found to comply with the limits for a class
B digital device, pursuant to part 15 of the FCC Rules. These limits are designed
to provide reasonable protection against harmful interference in a residential
installation.
This equipment generates, uses and can radiate radio frequency energy and, if
not installed and used in accordance with the instructions, may cause harmful
interference to radio communications. However, there is no guarantee that
interference will not occur in a particular installation. If this equipment does cause
harmful interference to radio or television reception, which can be determined
by turning the equipment off and on, the user is encouraged to try to correct the
interference by one or more of the following measures:
• Reorient or relocate the receiving antenna.
• Increase the separation between the equipment and receiver.
• Connect the equipment into an outlet on a circuit different from that to which
the receiver is connected.
• Consult the dealer or an experienced radio/TV technician for help.
Caution: Any changes or modications not expressly approved by the party responsible for
compliance could void the user’s authority to operate the equipment.
FCC Radiation Exposure Statement
This equipment complies with FCC radiation exposure limits set forth for an uncontrolled
environment. This equipment should be installed and operated with minimum distance
20cm between the radiator & your body.
This transmitter must not be co-located or operating in conjunction with any other
antenna or transmitter. 2.4GHz operation of this product in the U.S.A. is rmware-limited
to channels 1 through 11.
FCC Part 68 REQUIREMENTS
This equipment complies with Part 68 of the FCC rules and the requirements
adopted by the ACTA. On the bottom of this equipment is a label that contains,
among other information, a product identier in the format US: ASUDL01BDSLN11.
If requested, this number must be provided to the telephone company.
The REN is used to determine the number of devices that may be connected to a
telephone line. Excessive RENs on a telephone line may result in the devices not
ringing in response to an incoming call. In most but not all areas, the sum of RENs
should not exceed ve (5.0). To be certain of the number of devices that may be
connected to a line, as determined by the total RENs, contact the local telephone
company. For products approved after July 23, 2001, the REN for this product is
part of the product identier that has the format US: ASUDL01BDSLN11. The digits
represented by 01are the REN without a decimal point (e.g., 03 is a REN of 0.3).
For earlier products, the REN is separately shown on the label.
A plug and jack used to connect this equipment to the premises wiring and
telephone network must comply with the applicable FCC Part 68 rules and
requirements adopted by the ACTA. A compliant telephone cord and modular
plug is provided with this product. It is designed to be connected to a compatible
modular jack that is also compliant. See installation instructions for details.
If your equipment causes harm to the telephone network, the telephone company
may discontinue your service temporarily. If possible, they will notify you in
advance. But if advance notice is not practical, you will be notified as soon as
possible. You will be informed of your right to le a complaint with the FCC. Your
telephone company may make changes in it is facilities, equipment, operations or
procedures that could affect the proper functioning of your equipment. If they do,
you will be notied in advance to give you an opportunity to maintain uninterrupted
telephone service.
If you experience trouble with this telephone equipment, Please contact the
following address and phone number for information on obtaining service or
repairs.
The telephone company may ask that you disconnect this equipment from the
network until the problem has been corrected or until you are sure that the
equipment is not malfunctioning.
This equipment may not be used on coin service provided by the telephone
company. Connection to party lines is subject to state tariffs.
COMPANY: ASUS Computer International
ADDRESS: 44370 Nobel Drive, Fremount, CA 94536 USA
TEL NO: 510-739-3777 ext.4530
IC (Canada)
1. 2.4GHz Mobile device (ex. 11b/g/n AP/Router) with xed antenna:
( Industry Canada Statement )
This device complies with RSS-210 of the Industry Canada Rules.
Operation is subject to the following two conditions:
1) this device may not cause interference and
2) this device must accept any interference, including interference that may cause
undesired operation of the device
This Class A digital apparatus complies with Canadian ICES-003.
Cet appareil numerique de la class A est conforme a la norme NMB-003 du
Canada.
IC Radiation Exposure Statement
This equipment complies with Canada radiation exposure limits set forth for
uncontrolled environments. This equipment should be installed and operated with
minimum distance 20cm between the radiator & your body.
This transmitter must not be co-located or operating in conjunction with any other
antenna or transmitter.
2.4GHz operation of this product in Canada is firmware-limited to channels 1
through 11.
CE (Europe)
WLAN 2.4GHz device:
This device can be operated in the EU without restrictions indoor.
However, operated outdoors in France is restricted to 2400 ~ 2454 MHz
(Channel 1 ~ 7).
Safety
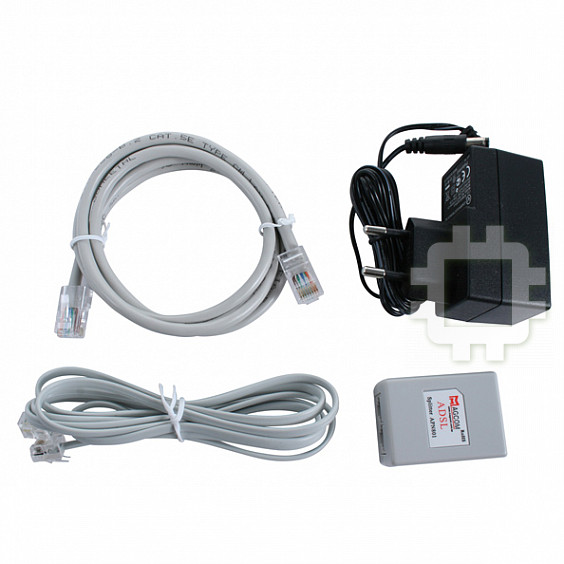
1. For apply CSA not control power adapter:
This unit is to be used with an external power adaptor of a Class 2 or level 3 type
and Approved type suitable for use in the North America of equipment installation,
having an output voltage rating of 15 V dc, and output current rating of 0.8 A or
equivalent.
The external AC adapter must be complied with the requirements of LPS (Limited
Power Sources).
Power Supply
Leader
EU: MV12-Y150080-C5
UK: MV12-Y150080-B2
AU: MU12-2150080-A3

Manufacturer:
ASUSTeK Computer Inc.
Tel: +886-2-2894-3447
Address: No. 150, LI-DE RD., PEITOU, TAIPEI 112,
TAIWAN
Authorised representative
ASUS Computer GmbH
in Europe:
Address: HARKORT STR. 21-23, 40880 RATINGEN,
GERMANY
Authorised distributors
BOGAZICI BIL GISAYAR SAN. VE TIC. A.S.
in Turkey:
Tel: +90 212 3311000
Address: AYAZAGA MAH. KEMERBURGAZ CAD.
NO.10 AYAZAGA/ISTANBUL
INDEX BILGISAYAR SISTEMLERI MUHENDISLIK
SAN. VE TIC. A.S.
Tel: +90 212 3312121
Address: AYAZAGA MAH: CENDERE YOLU NO:9
AYAZAGA/ISTANBUL
REACH
Complying with the REACH (Registration, Evaluation, Authorization, and Restriction of
Chemicals) regulatory framework, we publish the chemical substances in our products at
ASUS REACH website at http://green.asus.com/english/REACH.htm.

Index
1. English ................................................................................1
2.
.............................................................................
5
3.
Eesti
....................................................................................8
4. Lietuvių .............................................................................
11
5. Latviski ..............................................................................
14
6. Magyar ..............................................................................
17
7. Polski ................................................................................
20
8. Română ............................................................................
23
9.
26
10.
Slovenščina
........................................................................29
11.
............................................................................32
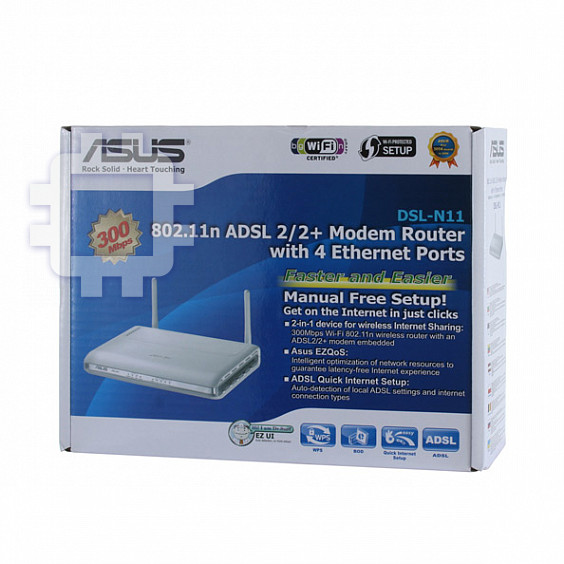
DSL-N11
11n Wireless ADSL modem Router
(For ASUS EZ UI)
Quick Start Guide
®
R
ADSL
LAN
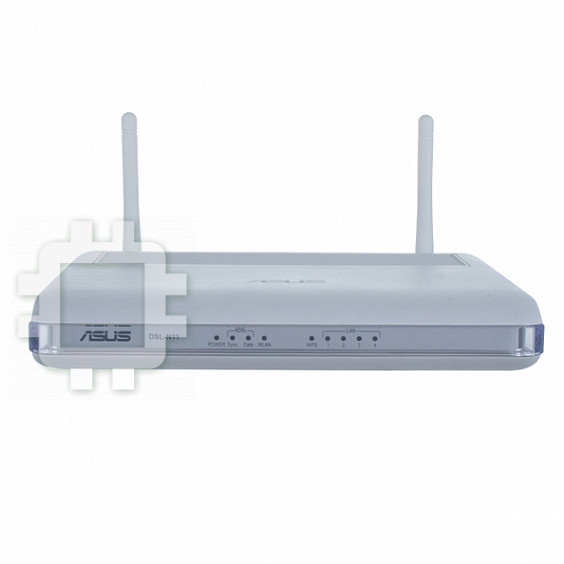
DSL-N11
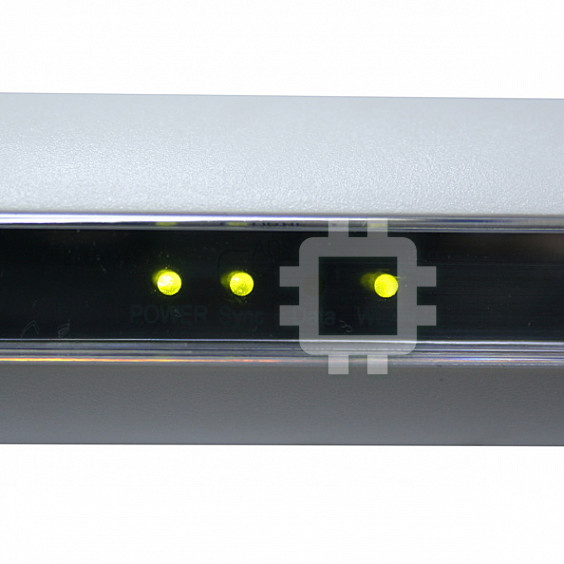
POWER Sync Data WLAN WPS 1 2 3 4
DSL-N11 Wireless Router Quick Start Guide
2
R
DSL-N11
POWERSync DataWLAN WPS 1 2 3 4
ADSL
LAN
English
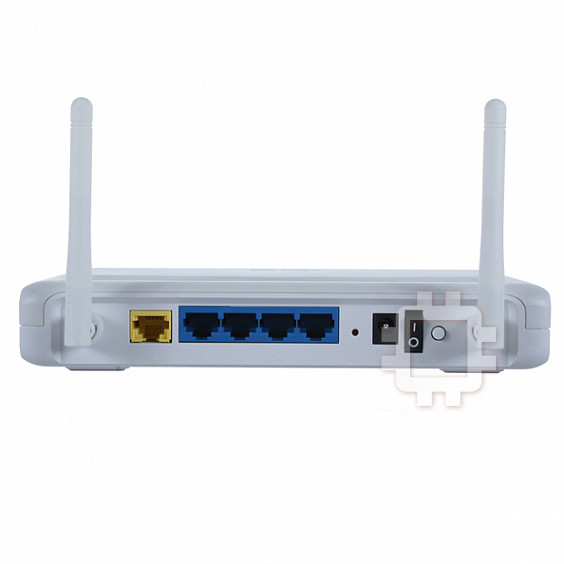
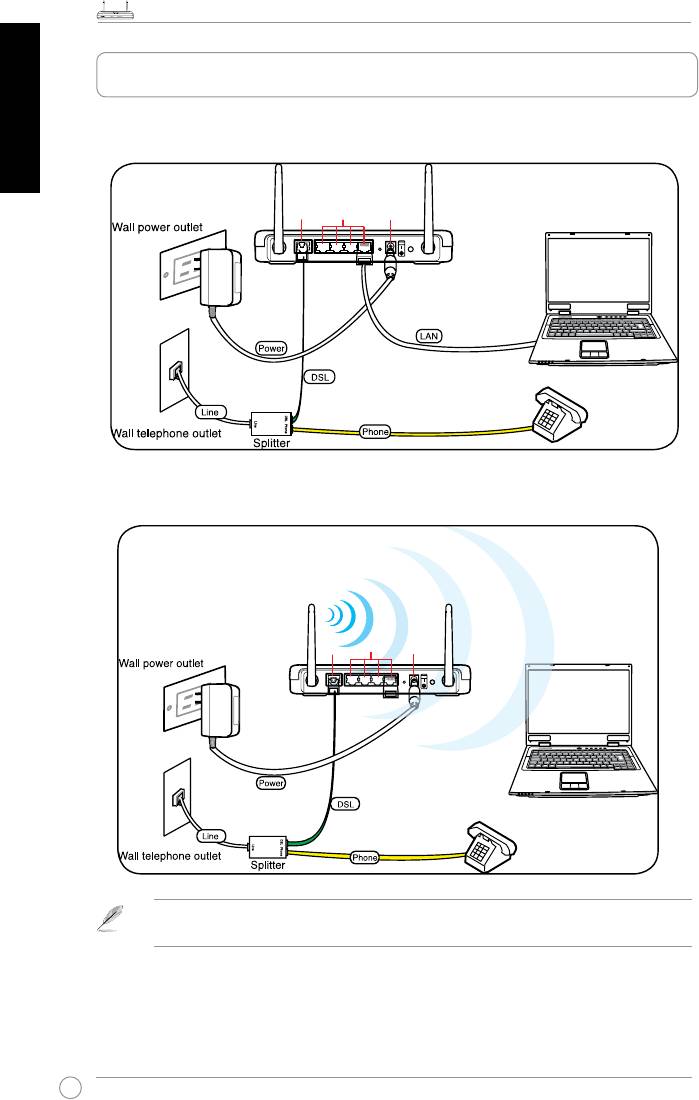
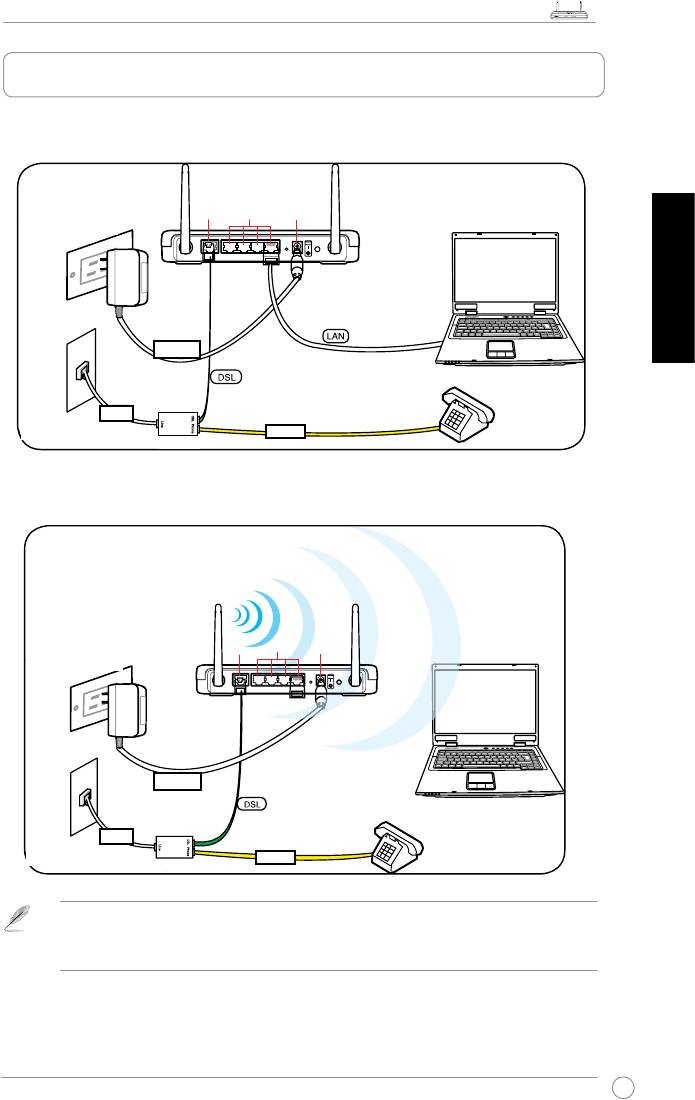
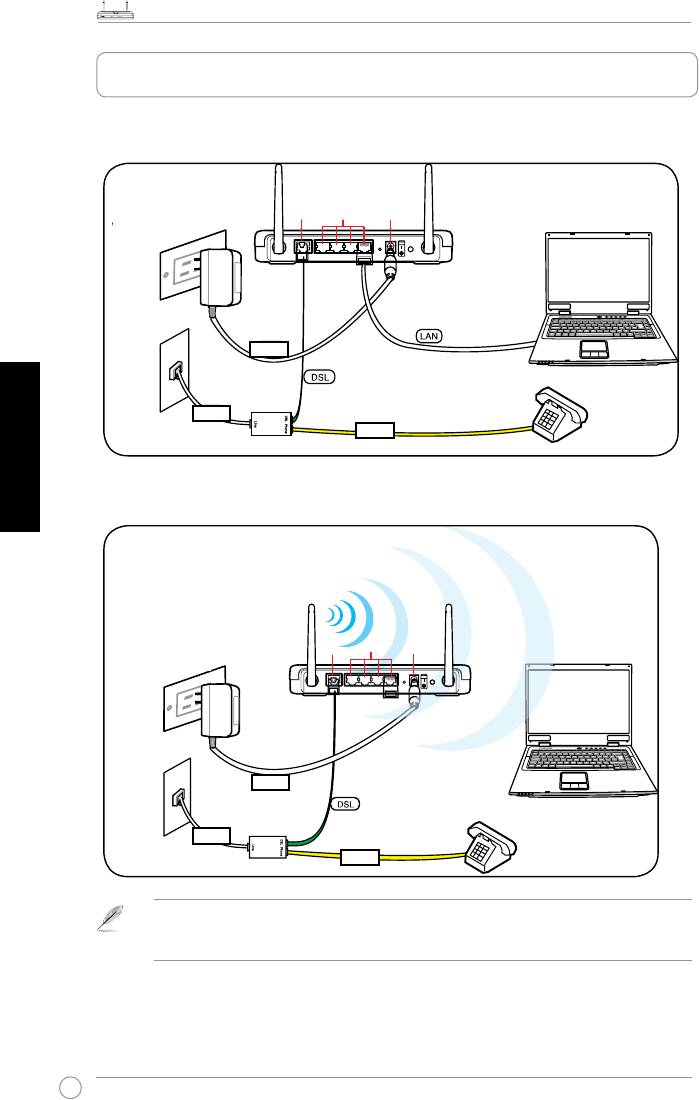
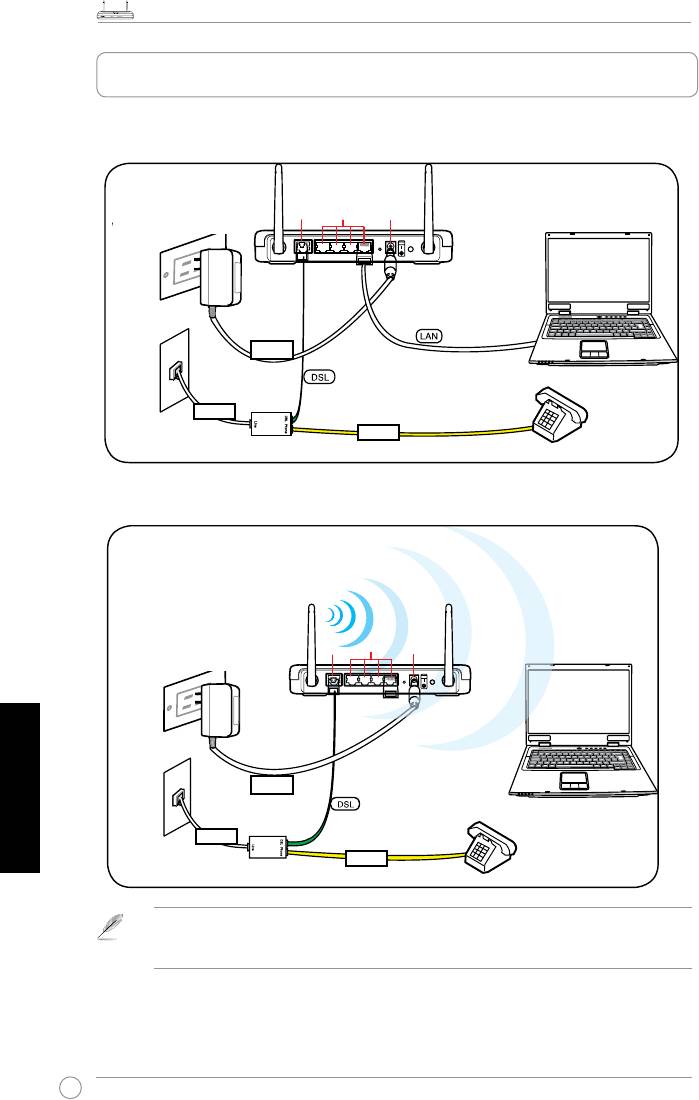
1. Setting up the hardware
Wired connection
Wireless connection
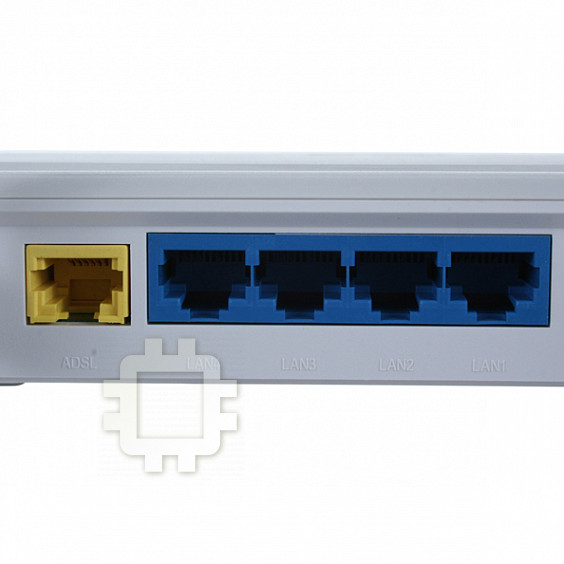
ADSL
LAN1-4
DC In
ADSL
LAN1-4
DC In
For establishing a wireless connection, use an IEEE 802.11b/g/n compatible WLAN card. Refer
to your WLAN card/adapter user manual for wireless connection procedures.
DSL-N11 Wireless Router Quick Start Guide
3
R
DSL-N11
POWERSync DataWLAN WPS 1 2 3 4
ADSL
LAN
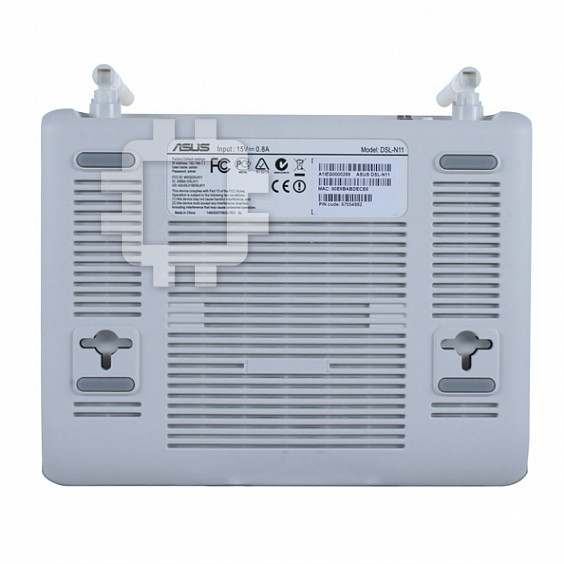
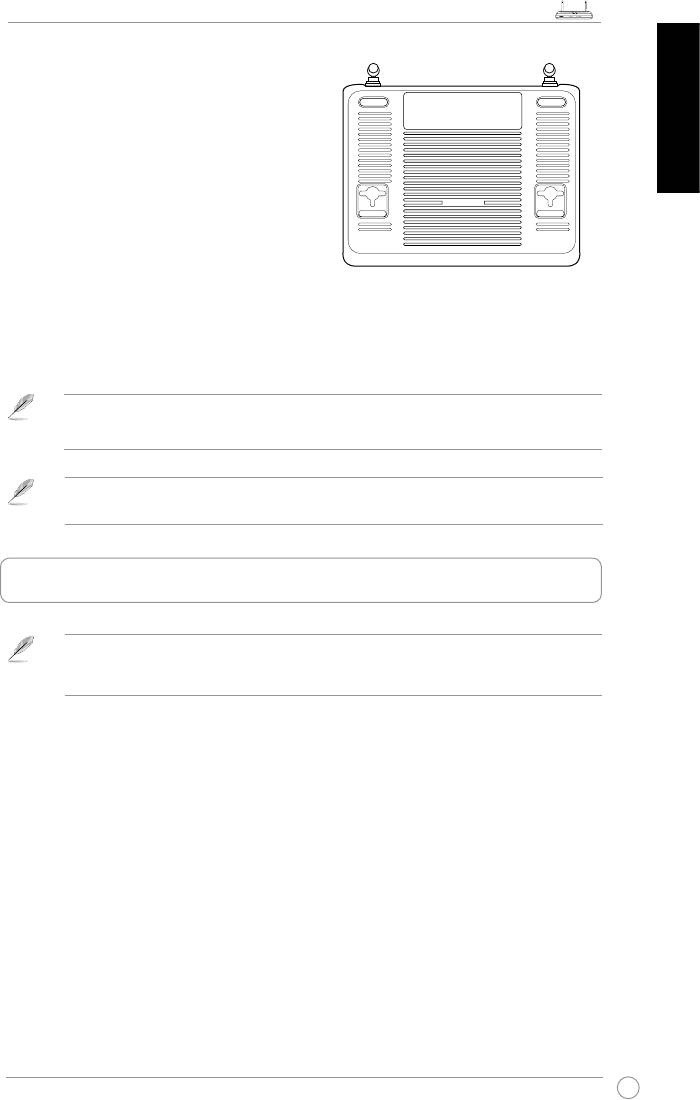
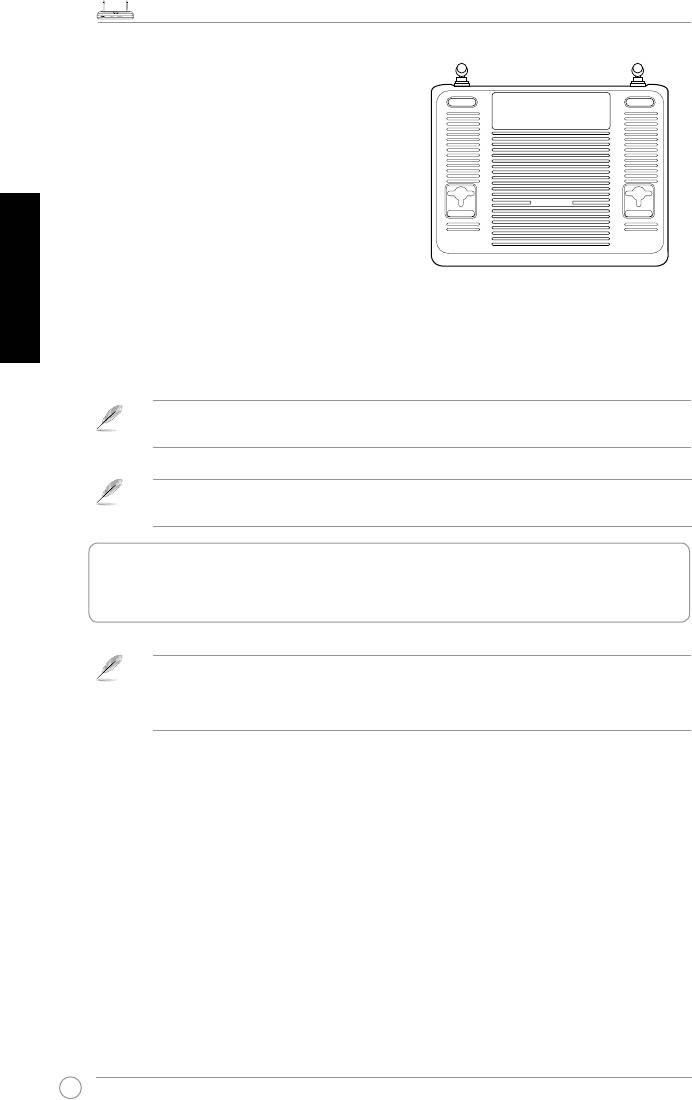
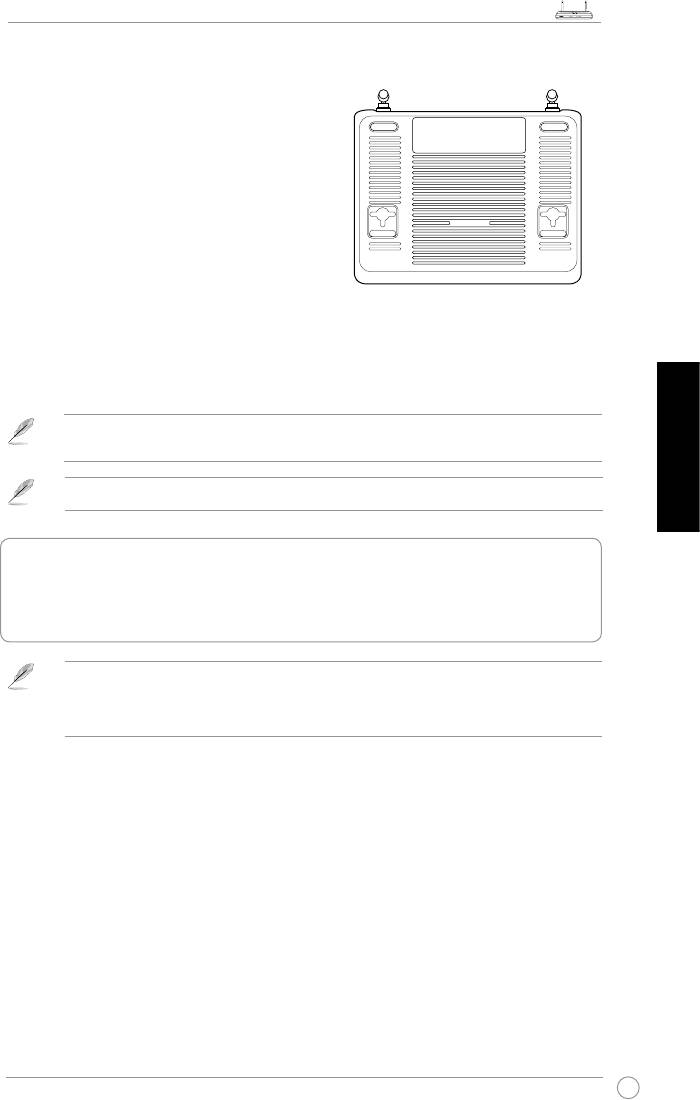
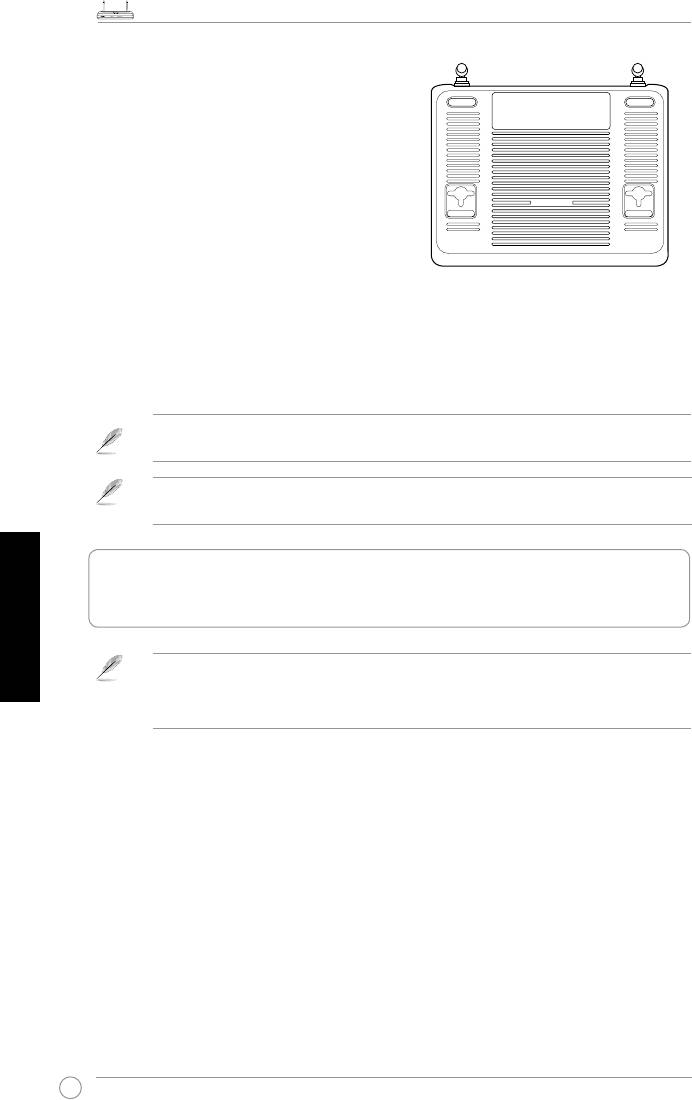
Mounting options
Out of the box, the ASUS Wireless
Router is designed to sit on a raised
at surface like a le cabinet or a book
English
shelf. The unit may also be converted
for mounting to a wall or ceiling.
To mount the ASUS Wireless Router:
1. Look on the underside for the two
mounting hooks.
2. Mark two upper holes on a wall or on
a raised at surface.
3. Tighten two screws until only 1/4'' is showing.
4. Latch the hooks of the ASUS Wireless Router onto the screws.
Note:
Re-adjust the screws if you cannot latch the ASUS Wireless Router onto the screws or if it
is too loose.
When mounting on the wall, ensure that the ASUS Wireless Router is located near a
power outlet.
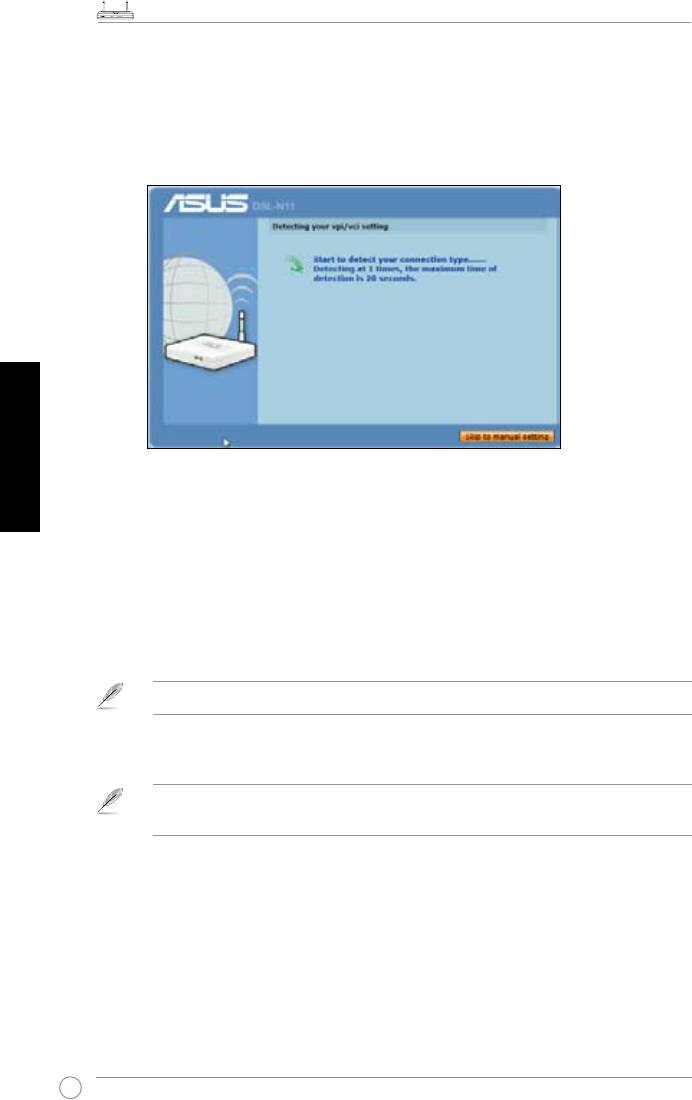
2. Using the ASUS Quick Internet Setup (QIS)
By default, there is no security encryption for the ASUS Wireless Router. To protect your network
from malicious attacks or unauthorized access, click
Advanced Setting
>
Wireless
on the web
GUI. For more details, refer to the user manual included in the support CD.
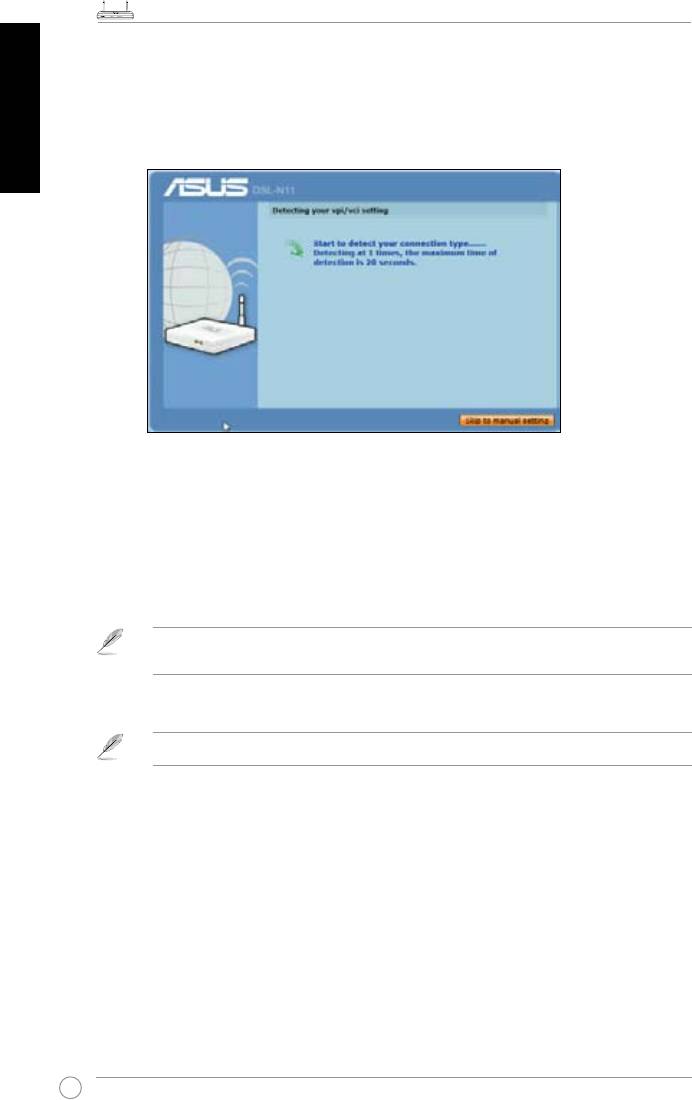
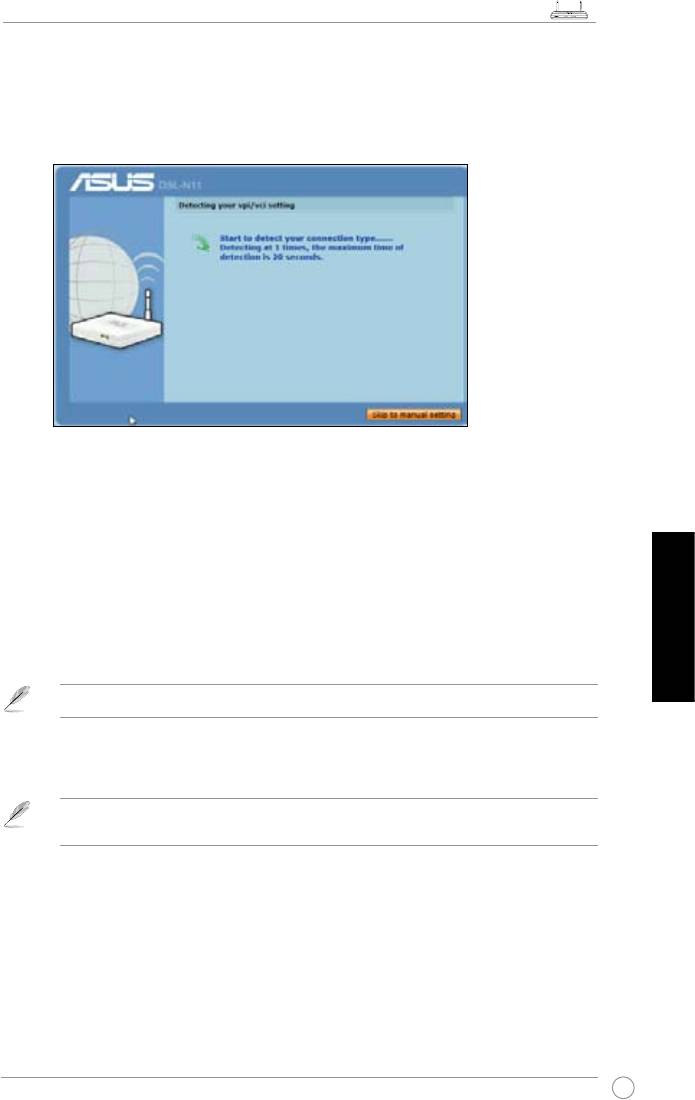
The ASUS Quick Internet Setup (QIS) function automatically detects your Internet
connection settings. If the ASUS Wireless Router cannot automatically detect
your Internet connection type, you may need to manually set up your Internet
connection settings.
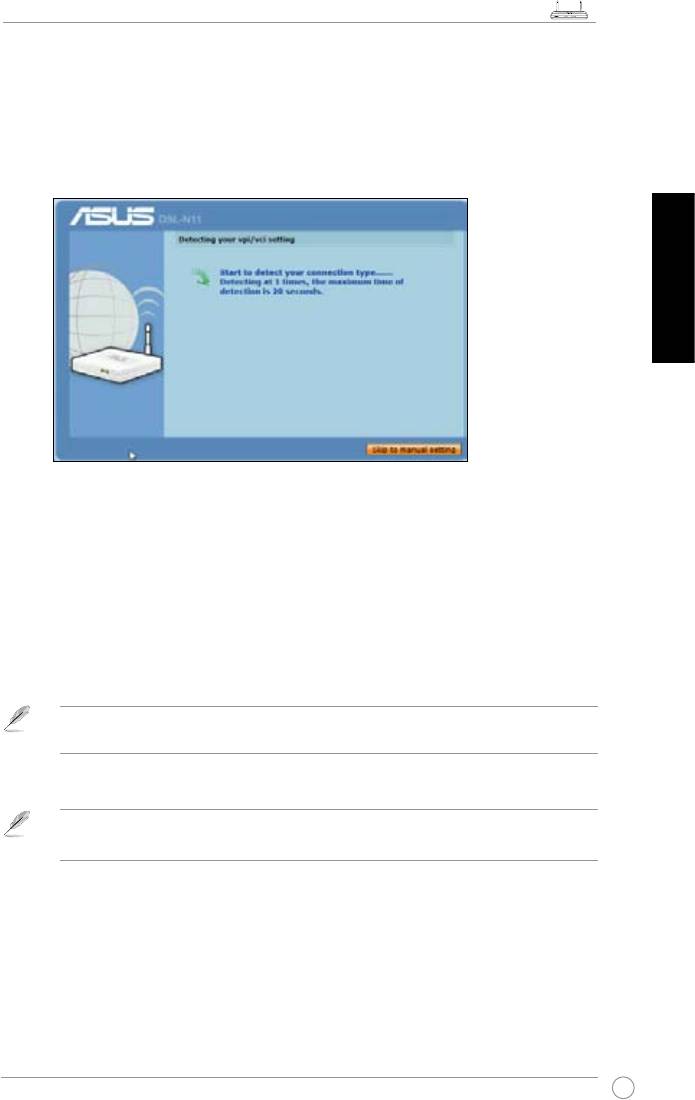
To use the ASUS Quick Internet Setup (QIS):
1. Launch the web browser. Wait for about 20 seconds for QIS to automatically
detect your Internet connection type.
2. Key in your connection type’s username and password, then click
Apply
.
3, After the Internet connection type setup is completed, select any of these
options:
Going to Internet
: Click to surf the Internet.
Simply Wireless Security Setting
: Click to congure the wireless security settings.
DSL-N11 Wireless Router Quick Start Guide
4
R
DSL-N11
POWERSync DataWLAN WPS 1 2 3 4
ADSL
LAN
English
Manually setting up your Internet connection
To manually set up your Internet connection:
1.
If ASUS QIS cannot automatically detect your Internet connection type, click
Skip to manual settings
.
2. Select your
Country
and
ISP
, then click
Next
. If your country and ISP are not
on the list, select
Not list
and key in your VPI and VCI then click
Next
. You may
ask your ISP for VPI/VCI values.
3. On the login page, key in the default user name (
admin
) and password (
admin
).
4. The router supports these connection types: PPP over ATM (PPPoA), PPP over
Ethernet (PPPoE), MAC Encapsulation Routing (MER), IP over ATM (IPoA),
and Bridging. Select your connection type and follow the onscreen instructions.
Obtain the required information about your Internet connection type from your Internet Service
Provider (ISP).
5. When done, click
Save/Reboot
.
For more details on ASUS QIS, refer to the user manual included in the support CD.
Ръководство за бърз старт на безжичен рутер DSL-N11
5
R
DSL-N11
POWERSync DataWLAN WPS 1 2 3 4
ADSL
LAN
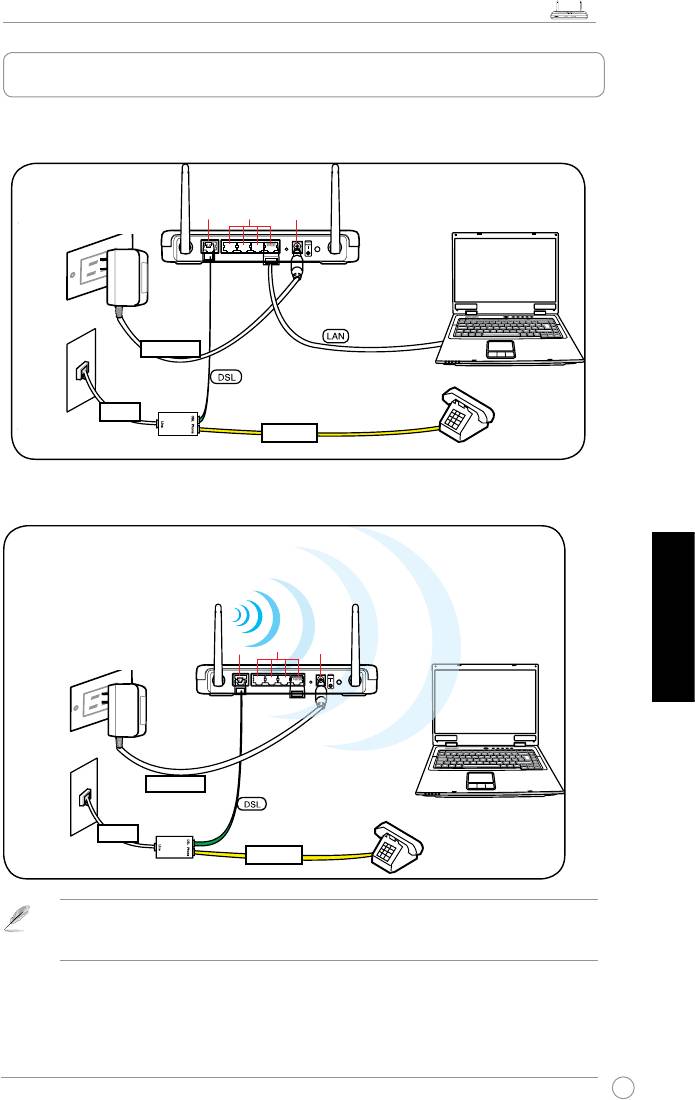
1. Настройване на хардуера
Връзка с кабели
Български
Безжична връзка
ADSL
LAN1-4
DC In
ADSL
LAN1-4
DC In
Забележка:
Ръководство за бърз старт на безжичен рутер DSL-N11
6
R
DSL-N11
POWERSync DataWLAN WPS 1 2 3 4
ADSL
LAN
Монтиране
Български
Забележка:
2. Използване на ASUS Quick Internet Setup (Бързо
конфигуриране на интернет)
Advanced Setting
(Разширени настройки) Wireless (Безжични)
Apply (Приложи)
Going to Internet (Влизане в интернет)
Simply Wireless Security Setting
Ръководство за бърз старт на безжичен рутер DSL-N11
7
R
DSL-N11
POWERSync DataWLAN WPS 1 2 3 4
ADSL
LAN
Ръчно конфигуриране на интернет връзка
Ръчно конфигуриране на интернет връзка:
Skip to manual settings (Пропусни към ръчни
настройки).
Български
Country (Държава) ISP (Интернет доставчик) Next (Напред
Not list (Не е
в списъка) Next (Напред)
admin
admin
Save/Reboot (Запиши/Рестартирай).
Забележка:
Traadita ruuteri DSL-N11 lühijuhend
8
R
DSL-N11
POWERSync DataWLAN WPS 1 2 3 4
ADSL
LAN
1. Riistvara häälestamine
Traadiga ühendus
Eesti
Traadita ühendus
ADSL
LAN1-4
DC In
ADSL
LAN1-4
DC In
Seinakontakt
Toide
Liin
Telefoni seinapistikupesa
Telefon
Jagur
Seinakontakt
Toide
Liin
Telefoni seinapistikupesa
Telefon
Jagur
Märkus:Traadita ühenduse loomiseks vajate te standardiga IEEE 802.11b/g/n ühilduvat
WLAN kaarti. Traadita ühenduse häälestamiseks vajalike toimingute kirjelduse leiate wireless
võrgukaardi kasutusjuhendist.
Traadita ruuteri DSL-N11 lühijuhend
9
R
DSL-N11
POWERSync DataWLAN WPS 1 2 3 4
ADSL
LAN
Monteerimise valikud
Pakendist väljavõetult tuleks ASUS DSL-
N11 traadita ruuter paigutada ühetasasele
pinnale nagu nt kapile või raamaturiiulile.
Seadme saab monteerida ka seinale või
lakke.
Ruuteri ASUS ASUS DSL-N11
monteerimine:
1. Seadme põhjalt leiate kaks
kinnituskonksu.
2. Tehke seina või kergitatud tasapinnale
kaks auku.
3. Keerake kruvid aukudesse, jättes nendest nähtavale ligikaudu veerand tolli (60
mm) pikkuse osa.
4. Sobitage ruuteri ASUS DSL-N11 põhjal olevad süvised kruvidele.
Märkus: Kui ASUS traadita ruuteri kinnitamine ei õnnestu või kui kinnitus ei ole kindel,
siis reguleerige kruvisid.
Eesti
Seinale paigaldamisel veenduge, et ASUS traadita ruuter asub toitepistikupesa lähedal.
2. ASUS’e funktsiooni Quick Internet Setup
(Kiirhäälestus Interneti kaudu (QIS))
kasutamine
Vaikekonguratsioonis ASUS’e traadita ruuteri võrguliiklust ei krüpteerita. Kaitsmaks oma võrku
kuritahtlike rünnete või volitamatu juurdepääsu eest, valige
Advanced Setting (Täpsemad
sätted) > Wireless (Traadita ühendus
) veebi graafilises kasutajaliideses. Täpsemat teavet
leiate seadmega kaasnenud tugi-CD-lt.
ASUS’e funktsioon Quick Internet Setup (Kiirhäälestus Interneti kaudu (QIS))
tuvastab automaatselt Interneti-ühenduse tüübi. Kui ASUS traadita ruuter ei
tuvasta automaatselt teie Interneti-ühenduse tüüpi, siis on võimalik, et peate
Interneti-ühenduse sätted käsitsi häälestama.
ASUS’e funktsiooni Quick Internet Setup (Kiirhäälestus Interneti kaudu (QIS))
kasutamiseks:
1. Käivitage veebibrauser. Oodake ligikaudu 20 sekundit, et funktsioon QIS
tuvastaks automaatselt teie Interneti-ühenduse tüübi.
2. Sisestage kasutatava ühendustüübi kasutajanimi ja parool, seejärel klõpsake
käsku
Apply (Rakenda).
3. Pärast Interneti-ühenduse tüübi häälestamist valige üks määrang järgmistest:
Going to Internet (Internetti minek):
Internetis surfamiseks klõpsake seda valikut.
Simply Wireless Security Setting
(Traadita ühenduse turvasäte)
: klõpsake seda
valikut, et kongureerida traadita ühenduse sätteid.
Traadita ruuteri DSL-N11 lühijuhend
10
R
DSL-N11
POWERSync DataWLAN WPS 1 2 3 4
ADSL
LAN
Interneti-ühenduse käsitsi häälestamine
Interneti-ühenduse käsitsi häälestamiseks:
1. Kui ASUS’e funktsioon QIS ei tuvasta automaatselt Interneti-ühenduse
tüüpi, siis klõpsake käsku
Skip to manual settings (Mine üle käsitsi
häälestamisele).
Eesti
2. Valige määrangud
Country (Riik)
ja
ISP
, seejärel klõpsake käsku
Next (Edasi).
Kui teie riiki ja ISP-d ei ole loendis, siis valige määrang
Not list (Ei ole loendis)
ja sisestage VPI ning VCI, seejärel klõpsake käsku
Next (Edasi)
. VPI/VCI-
väärtuste teadasaamiseks pöörduge ISP poole.
3.
Sisselogimise leheküljel sisestage vaikimisi kasutajanimi (
admin
) ja parool
(
admin
).
4. Ruuter toetab neid ühendustüüpe: PPP over ATM (PPPoA), PPP over Ethernet
(PPPoE), MAC Encapsulation Routing (MER), IP over ATM (IPoA) ja Bridging.
Valige oma ühendustüüp ja järgige ekraanijuhiseid.
Vajalikku teavet Interneti-ühenduse tüübi kohta saate oma Interneti-teenuse pakkujalt (ISP-lt).
5. Kui olete lõpetanud, siis klõpsake käsku
Save/Reboot (Salvesta/Taaskäivita).
Pange tähele: Täpsemat teavet funktsiooni ASUS QIS kohta leiate seadmega kaasnenud
tugi-CD-lt.
Belaidžio maršrutizatoriaus DSL-N11 greitojo paleidimo instrukcija
11
R
DSL-N11
POWERSync DataWLAN WPS 1 2 3 4
ADSL
LAN
1. Techninės įrangos įrengimas
Laidinis ryšys
Belaidis ryšys
Lietuvių
ADSL
LAN1-4
DC In
ADSL
LAN1-4
DC In
Sieninis maitinimo lizdas
Maitinimas
Linija
Sieninis kištukas telefonui
Telefonas
Atšakotuvas
Sieninis maitinimo lizdas
Maitinimas
Linija
Sieninis kištukas telefonui
Telefonas
Atšakotuvas
Pastaba: Laidiniam ryšiui užmegzti naudokite su IEEE 802.11b/g/n suderinamą belaidžio
vietinio tinklo plokštę. Vadovaukitės belaidžio adapterio vartotojo vadovo aprašoma belaidžio
ryšio užmezgimo procedūra.
Belaidžio maršrutizatoriaus DSL-N11 greitojo paleidimo instrukcija
12
R
DSL-N11
POWERSync DataWLAN WPS 1 2 3 4
ADSL
LAN
Montavimo galimybės
Išimtas iš dėžės, ASUS belaidis
maršrutizatorius DSL-N11 turi būti
laikomas ant pakilaus plokščio
paviršiaus, pavyzdžiui, ant spintelės
arba lentynos. Jį taip pat galima
pritaikyti montavimui ant sienos arba
lubų.
ASUS DSL-N11 montavimas:
1. Apatinėje pusėje suraskite du
montavimo kablius.
2. Sienoje arba ant pakilaus plokščio paviršiaus padarykite dvi kablius
atitinkančias skyles.
3. Į jas sukite varžtelius, kol liks kyšoti 0,6 cm.
4. Užksuokite ASUS DSL-N11 kablius ant varžtelių.
Pastaba: Koreguokite varžtelių gylį, jei neįmanoma užksuoti ASUS belaidžio maršrutizatoriaus
ant varžtelių arba jei jis kabo per laisvai.
Montuodami prie sienos įsitikinkite, kad ASUS bevielis maršrutizatorius yra netoli
maitinimo lizdo.
Lietuvių
2. ASUS sparčiosios interneto sąrankos (SIS)
naudojimas
ASUS bevielis maršrutizatorius neturi nustatytojo saugos šifravimo. Norėdami apsaugoti savo
tinklą nuo piktavališkų atakų ar neįgaliotos priegos žiniatinklio granėje sąsajoje spustelėkite
Advanced Setting (Išplėstinis nustatymas)
>
Wireless (Bevielis)
. Išsamesnės informacijos
žr. naudotojo vadovą, kurį rasite pagalbiniame kompaktiniame diske.
ASUS sparčiosios interneto sąrankos (SIS) funkcija automatiškai aptiks jūsų
interneto ryšio nustatymus. Jei ASUS bevielis maršrutizatorius automatiškai
neaptinka jūsų interneto ryšio tipo, gali tekti rankiniu būdu nustatyti interneto ryšio
nustatymus.
Jei norite naudoti ASUS sparčiąją interneto sąranką (SIS):
1. Paleiskite žiniatinklio naršyklę. Palaukite maždaug 20 sekundžių kol SIS
automatiškai aptiks interneto ryšio tipą.
2. Pritaikykite savo ryšio tipo naudotojo vardą ir slaptažodį, tada spustelėkite
Apply (Taikyti)
.
3. Užbaigę interneto ryšio tipo sąranką pasirinkite vieną šių parinkčių:
Going to Internet (Eiti į internetą)
: Spustelėkite, jei norite naršyti internetą.
Simply Wireless Security Setting (Paprasto bevielio saugumo parametrai)
:
Spustelėkite, jei norite kongūruoti bevielio saugumo parametrus.
Belaidžio maršrutizatoriaus DSL-N11 greitojo paleidimo instrukcija
13
R
DSL-N11
POWERSync DataWLAN WPS 1 2 3 4
ADSL
LAN
Interneto ryšio nustatymas rankiniu būdu
Jei norite rankiniu būdu nustatyti interneto ryšį:
1. Jei ASUS SIS automatiškai neaptinka interneto ryšio tipo, spustelėkite
Skip to
manual settings (Pereiti prie rankinio nustatymo).
2. Pasirinkite
Country (Šalį)
ir
ISP
, tada spustelėkite
Next (Toliau)
. Jei jūsų šalies
ir ISP nėra sąraše, pasirinkite
Not list (Ne sąraše)
ir pritaikykite savo VPI ir
VCI, tada spustelėkite
Next (Toliau)
. VPI/VCI reikšmėms jūsų gali paprašyti
nurodyti ISP.
3.
Prisijungimo puslapyje įveskite numatytąjį vartotojo vardą (
admin
) ir slaptažodį
(
admin
).
4. Maršrutizatorius palaiko šių tipų ryšį: PPP per ATM (PPPoA), PPP per eternetą
(PPPoE), „MAC Encapsulation Routing“ (MER), IP per ATM (IPoA) ir tiltinis
sujungimas („Bridging“). Pasirinkite ryšio tipą ir laikykitės ekrane pateikiamų
Lietuvių
instrukcijų.
Reikiamą informaciją apie interneto ryšio tipą gausite iš interneto ryšio tiekėjo (ISP).
5. Atlikę spustelėkite
Save /Reboot (Įrašyti / įkelti operacinę sistemą iš naujo).
Pastaba:Daugiau informacijos apie ASUS SIS ieškokite palaikymo kompaktiniame diske
esančiame vartotojo vadove.
DSL-N11 Bezvadu maršrutizētāja ātras uzstādīšanas rokasgrāmata
14
R
DSL-N11
POWERSync DataWLAN WPS 1 2 3 4
ADSL
LAN
1. Aparatūras uzstādīšana
Pieslēgšana ar vadiem
Bezvadu pieslēgšana
Latviski
ADSL
LAN1-4
DC In
ADSL
LAN1-4
DC In
Strāvas kontaktligzda
Strāva
Līnija
Tālruņa kontaktligzda
Tālrunis
Sadalītājs
Strāvas kontaktligzda
Strāva
Līnija
Tālruņa kontaktligzda
Tālrunis
Sadalītājs
Piezīme: Lai realizētu bezvadu savienojumus, lietojiet WLAN karti, kura ir saderīga ar IEEE
802.11b/g/n. Lai realizētu bezvadu pieslēgšanas procedūru, vadieties pēc bezvadu adaptera
lietotāja rokasgrāmatas.
- 1
- 2


