Asus WL-330N: instruction
Class: Networks, communications, telecommunications, internet, security
Type:
Manual for Asus WL-330N
Table of contents

®
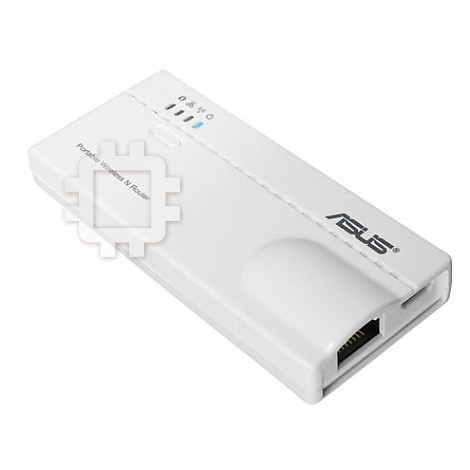
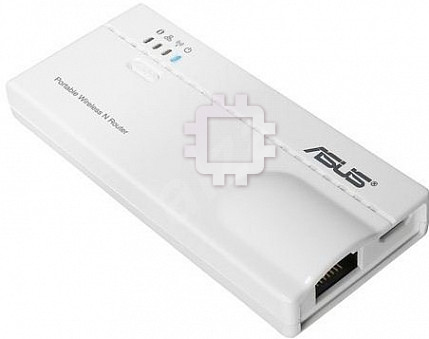
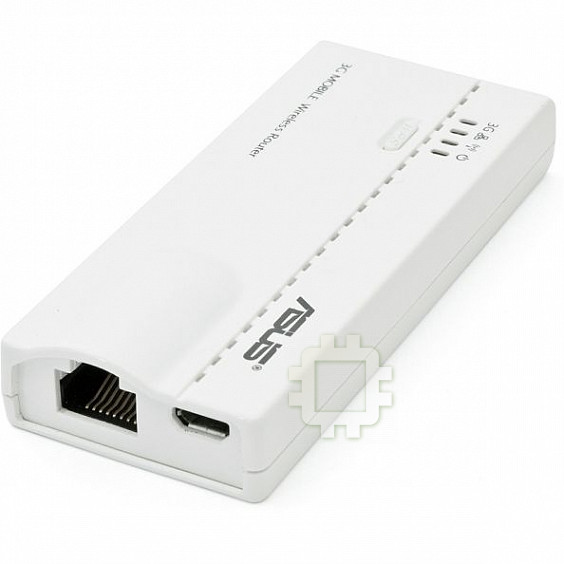
WL-330N
Portable Wireless N Router
Quick Start Guide
(For detail setup information, please check user manual in CD)
U6758 / Second Edition / August 2011
English .........................................................................................................................3
Français .......................................................................................................................7
Deutsch .......................................................................................................................11
Italiano ........................................................................................................................15
Русский .......................................................................................................................19
Български ..................................................................................................................23
Čeština .........................................................................................................................27
Dansk ...........................................................................................................................31
Nederlands ................................................................................................................35
Suomi ...........................................................................................................................39
Ελληνικά ......................................................................................................................43
Magyar ........................................................................................................................47
Lietuvių .......................................................................................................................51
Norsk ............................................................................................................................55
Polski ............................................................................................................................59
Português ...................................................................................................................63
Română .......................................................................................................................67
Slovensky....................................................................................................................71
Español ........................................................................................................................75
Svenska .......................................................................................................................79
Українська .................................................................................................................83
English
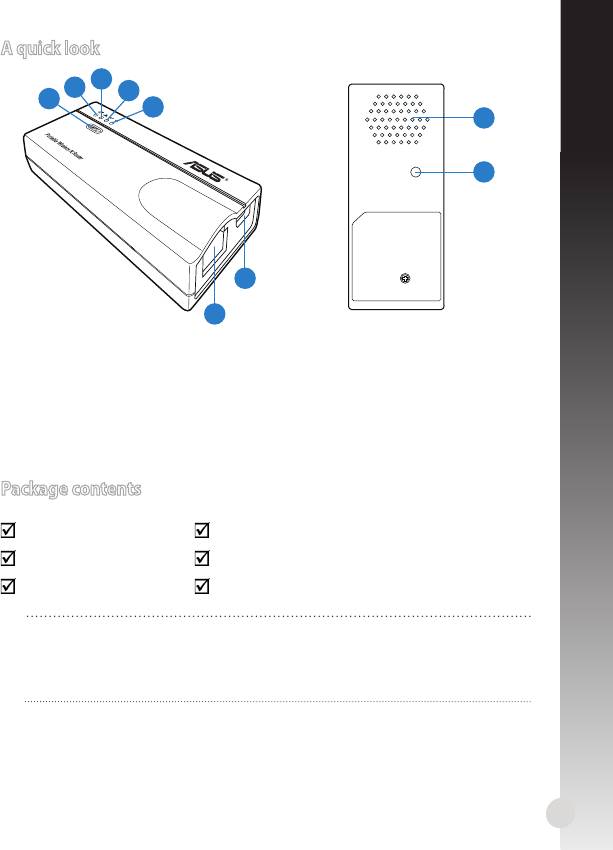
A quick look
3
2
4
1
5
8
9
6
7
1) WPS button 6) DC in (micro USB) port
2) Link status LED 7) Ethernet port
3) Network LED 8) Air vent
4) Wireless LED 9) Restore button
5) Power LED
Package contents
WL-330N Support CD (User Manual, utilities, GPL)
Micro USB power cord Quick Start Guide
Network cable Universal power adapter (110V ~ 240V)
NOTES:
• If any of the items is damaged or missing, contact your retailer.
• For more details on the WL-330N's functions and features, refer to the
user manual included in the support CD.
3

Getting started
English
NOTE: For Wireless Router mode, start from step 1. For other operation
modes, start from step 2.
1. Unplug and disconnect the wires/cables from your existing modem setup.
a: Unplug the AC adapter from the power outlet and disconnect it from your
cable/ADSL modem.
b: Disconnect the network cable from your cable/ADSL modem.
2. Connect and turn on your wireless router.
a: Using a network cable, connect your computer to the wireless router’s LAN port.
b: To power the wireless router, use its power adapter or its micro USB power cord
.
3. Log into the wireless router's web graphics user interface (web GUI).
a: Ensure that the wireless LED is blinking.
b: In your web browser, key in 192.168.1.1. Key in admin as the default user-
name and password.
c: From the web GUI, select the operation mode and congure its settings for
your wireless network setup.
NOTES:
• For more details. refer to the user manual included in the support CD.
• If the web GUI does not launch, refer to the Troubleshooting section.
4
Modem
a
b
Wireless LED
English
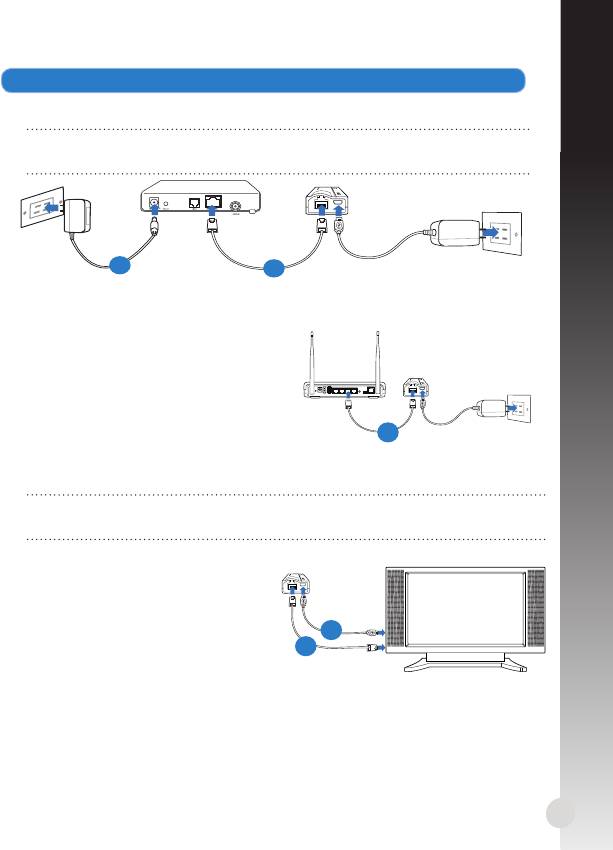
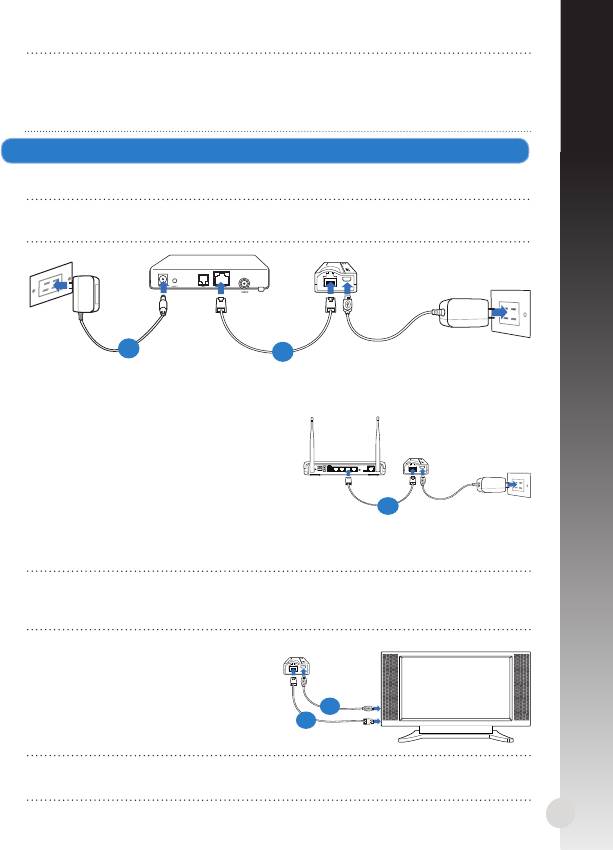
4. Set up the devices according to your selected operation mode.
Wireless Router mode
IMPORTANT: Ensure that you unplug and disconnect the wires/cables
from your existing modem setup.
a: Plug the modem's power adapter to a power source.
b: Using a network cable, connect the modem and the wireless router.
Access Point mode
a: Using a network cable, connect the
access point and the wireless router.
Repeater and Hotspot modes
Simply power on the wireless router using its power adapter or its micro USB
power cord. A network cable is not needed.
NOTE: For more details on using the micro USB cord to power the wireless
router, refer to step 2 of the Getting started section.
Wireless Network Adapter mode
a: Connect the micro USB power cord
to the Ethernet-enabled device
such as an Internet TV.
b: Use a network cable to connect the
Ethernet-enabled device and the
wireless router.
5
Modem
a
b
ANT ANTReset Power On/Off USB LAN4 LAN3 LAN2 LAN1 WPS
On Off
ADSL
a
a
b

NOTE: For more details on the operation modes, refer to the Operation
modes section.
English
Frequently Asked Questions
Q1: I cannot access the web GUI to congure the wireless router settings.
• Close all running web browsers and launch again.
• Follow the steps below to congure your computer settings based on its
operating system.
Windows 7
A. Disable the proxy server, if enabled.
1. Click Start > Internet Explorer to launch the web browser.
2. Click Tools > Internet options > Connections tab > LAN settings.
3. From the Local Area Network (LAN) Settings screen, untick Use a proxy
server for your LAN.
4. Click OK when done.
B. Set the TCP/IP settings to automatically obtain an IP address.
1. Click Start > Control Panel > Network and Internet > Network and Sharing
Center > Manage network connections.
2. Select Internet Protocol Version 4 (TCP/IPv4), then click Properties.
3. Tick Obtain an IP address automatically.
4. Click OK when done.
C. Disable the dial-up connection, if enabled.
1. Click Start > Internet Explorer to launch the browser.
2. Click Tools > Internet options > Connections tab.
3. Tick Never dial a connection.
4. Click OK when done.
Mac 10.5.8
A. Disable the proxy server, if enabled.
1. From the menu bar, click Safari > Preferences... > Advanced tab.
2. Click Change Settings... in the Proxies eld.
3. From the list of protocols, deselect FTP Proxy and Web Proxy (HTTP).
4. Click OK when done.
B. Set the TCP/IP settings to automatically obtain an IP address.
1. Click the Apple icon > System Preferences > Network.
2. Select Ethernet and select Using DHCP in the Congure eld.
3. Click Apply when done.
6
Français
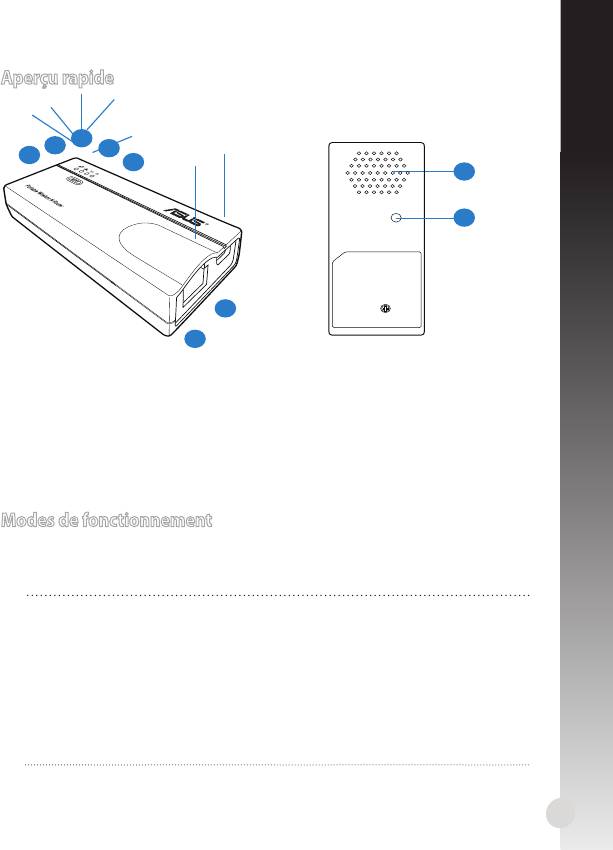
Aperçu rapide
3
2
4
1
5
8
9
6
7
1)
Bouton WPS
6) Prise d’alimentation (micro USB)
2) Voyant d’état du lien 7) Port réseau Ethernet
3) Voyant réseau 8) Fentes d’aération
4) Voyant sans l 9) Bouton de restauration
5) Voyant d’alimentation
Modes de fonctionnement
Le ASUS WL-330N intègre six modes de fonctionnement : Wireless Router,
Point d'accès, Point d'accès public (Partage de compte WiFi), Répéteur et
Adaptateur réseau sans l.
REMARQUES :
• Utilisez l'utilitaire Device Discovery contenu dans le CD de support pour
obtenir l'adresse IP dynamique du routeur sans l.
• Avant de dénir le routeur sans l en mode Point d'accès public,
Répéteur Adaptateur réseau sans l, assurez-vous de relier votre
ordinateur et le routeur sans l par le biais d'un câble réseau.
• Si vous ne parvenez pas à changer de mode, vous pouvez aussi restaurer
les paramètres par défaut en appuyant sur le bouton RESET du WL-
330N3G lorsque celui-ci est allumé.
7
Mise en route
REMARQUE : En mode Routeur sans l, suivez les instructions à partir de l'étape
1. Pour tous les autres modes de fonctionnement, passez directement à l'étape 2.
Français
1.
Déconnectez tous les câbles de votre conguration modem actuelle.
a : Débranchez l’adaptateur secteur de la prise électrique et du modem câble/ADSL.
b : Déconnectez le câble réseau du modem câble/ADSL.
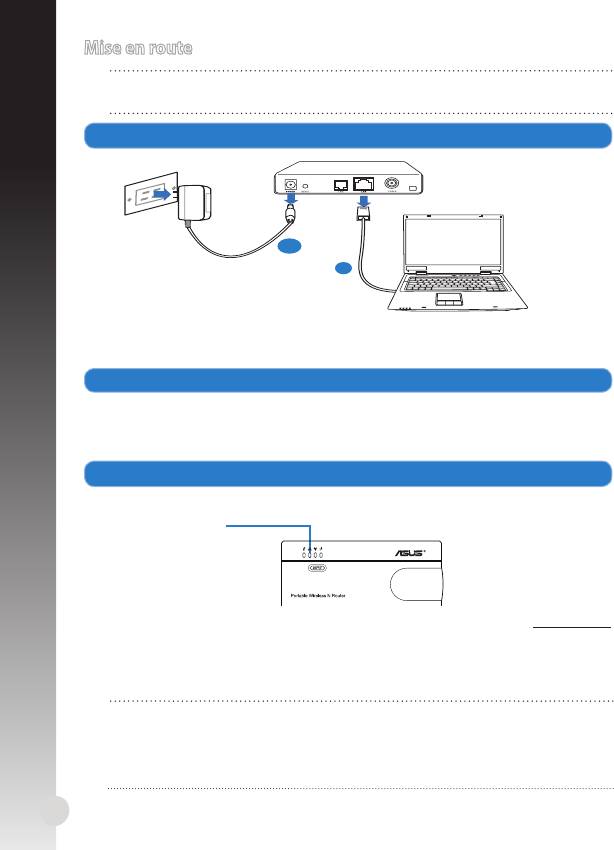
2. Connectez et allumez votre routeur sans l.
a : À l’aide d’un câble réseau, connectez votre ordinateur au port réseau local (LAN) du
routeur sans l .
b : Utilisez l’adaptateur secteur (1) ou le câble micro USB (2) pour alimenter le routeur.
3. Connectez-vous à l'interface de conguration Web du routeur sans l.
a : Vériez que le voyant de connexion réseau sans l clignote.
Voyant de
réseau sans l
b :
Dans la barre d'adresse de votre navigateur Internet, entrez l'adresse 192.168.1.1.
Saisissez admin comme nom d'utilisateur et mot de passe par défaut.
c :
Dans l'interface de conguration, sélectionnez un mode de fonctionnement
et congurez les paramètres appropriés.
REMARQUES :
• Pour plus de détails, consultez le manuel de l'utilisateur contenu dans le
CD de support.
• Si vous ne parvenez pas à ouvrir l'interface de conguration Web, repor-
tez-vous à la section FAQ.
8
Modem
a
b
Français
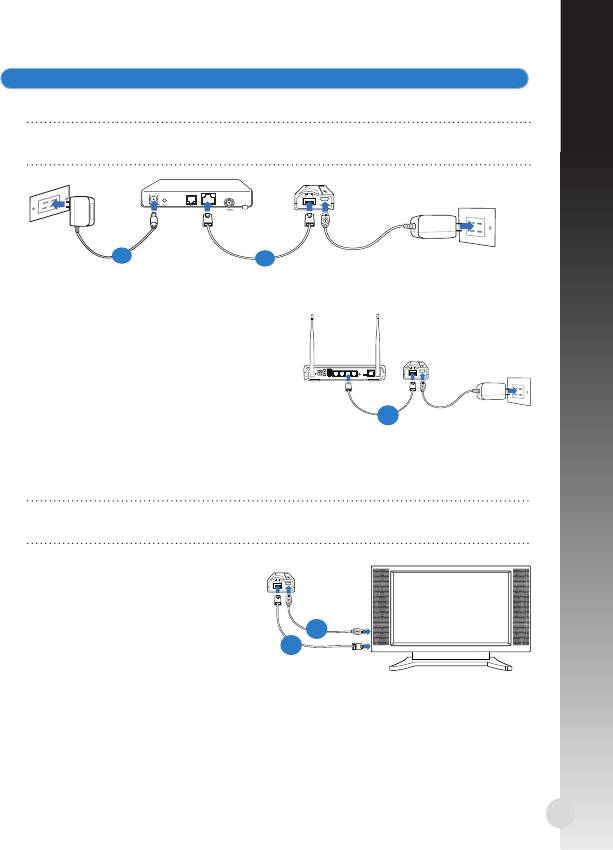
4. Congurez votre clients sans l en fonction du mode de fonctionnement.
Mode Routeur sans l
IMPORTANT : Assurez-vous d’avoir déconnecter tous les câbles de votre
conguration modem existante.
a : Reliez l’adaptateur secteur de votre modem à une source d’alimentation.
b : Utilisez un câble réseau pour connecter le modem au routeur sans l.
Mode Point d’accès
a: Utilisez un câble réseau pour connecter
le point d’accès au routeur sans l.
Modes Répéteur et Point d’accès public
Utilisez simplement l’adaptateur secteur ou le câble micro USB pour alimenter
le routeur. L’utilisation d’un câble réseau n’est pas nécessaire.
REMARQUE : Pour plus de détails sur l’utilisation du câble micro USB pour
alimenter le routeur, consultez l’étape 2 de la section Mise en route.
Mode Adaptateur réseau sans l
a: Connectez le câble micro USB à
un périphérique disposant d’un
connecteur réseau Ethernet (ex :
Téléviseur).
b: Utilisez un câble réseau pour relier
le périphérique et le routeur sans
l.
9
Modem
a
b
ANT ANTReset Power On/Off USB LAN4 LAN3 LAN2 LAN1 WPS
On Off
ADSL
a
a
b

REMARQUE : Pour plus de détails sur les diérents modes de fonctionne-
ment, consultez la section Modes de fonctionnement.
Français
FAQ
Q1: Je ne parviens pas à accéder au Gestionnaire de configuration Web pour
régler les paramètres sans l du routeur.
• Redémarrez votre explorateur Internet.
• Suivez les étapes suivantes pour congurer votre ordinateur en fonction du
système d’exploitation utilisé.
Windows 7
A. Désactivez le serveur proxy si celui-ci est activé.
1. Cliquez sur Démarrer > Internet Explorer pour lancer le navigateur.
2. Cliquez sur Outils > Options Internet > onglet Connexions > Paramètres réseau.
3. À partir de l’écran Paramètres du réseau local, décochez l’option Utiliser un
serveur proxy pour votre réseau local.
4. Cliquez sur OK une fois terminé.
B. Congurez les paramètres TCP/IP pour l’obtention automatique d’une
adresse IP.
1. Cliquez sur Démarrer > Panneau de conguration > Réseau et Internet
> Centre réseau et partage > Gérer les connexions réseau.
2. Sélectionnez Protocole Internet version 4 (TCP/IPv4), puis cliquez sur Propriétés.
3. Cochez l’option Obtenir une adresse IP automatiquement.
4. Cliquez sur OK une fois terminé.
C. Désactivez la numérotation de votre connexion à distance si celle-ci est active.
1. Cliquez sur Démarrer > Internet Explorer pour lancer le navigateur.
2. Cliquez sur Outils > Options Internet > onglet Connexions.
3. Cochez l’option Ne jamais établir de connexion.
4. Cliquez sur OK une fois terminé.
Mac 10.5.8
A. Désactivez le serveur proxy si celui-ci est activé.
1. Dans la barre des menus, cliquez sur Safari > Préférences... > onglet Avancées.
2. Cliquez sur Modier les réglages... dans le champ Proxies.
3. Dans la liste des protocoles, décochez les options Proxy FTP et Proxy web
sécurisé (HTTPS).
4. Cliquez sur OK une fois terminé.
B. Congurez les paramètres TCP/IP pour l’obtention automatique d’une
adresse IP.
1. Cliquez sur la Pomme > Préférences Système > Réseau.
2. Sélectionnez Ethernet puis Via DHCP dans le champ Congurer.
3. Cliquez sur Appliquer une fois terminé.B. Set the TCP/IP settings to auto-B. Set the TCP/IP settings to auto-
matically obtain an IP address.
10

Deutsch
Übersicht
3
2
4
1
5
8
9
6
7
1) WPS-Taste 6) Micro USB-Anschluss (DC-in, Gleichstrom)
2) Verbindungsstatus-LED 7) Ethernet-Anschluss
3) Netzwerk-LED 8) Belüftungsönungen
4) Drahtlos-LED 9) Wiederherstellungstaste
5) Strom-LED
Betriebsarten
ASUS WL-330N bietet Ihnen fünf Betriebsmodi: Wireless Router (Drahtloser
Router), Access Point (AP) (Zugrispunkt, AP), Hotspot (WiFi Account Sharing)
(Hotspot, WiFi Kontofreigabe), Repeater und Wireless Network Adapter (Draht-
loser Netzwerkadapter).
HINWEISE:
• Um die dynamische IP-Adresse des WL-330N anzuzeigen, verwenden Sie
die Anwendung Device Discovery (Gerätesuche) auf der Support-CD.
• Bevor Sie Hotspot-, Repeater- oder Network Adapter (Netzwerkadapter)-
Modus einrichten, sollten Sie ein Netzwerkkabel verwenden, um den
Computer mit dem WL-330N zu verbinden.
• Falls der Moduswechsel fehlschlägt, drücken Sie bei eingeschalteten
ASUS WL-330N die Wiederherstellungstaste, um das System auf dessen
Werkseinstellungen zurückzusetzen.
11
Erste Schritte
HINWEIS: Bei Drahtloser Router-Modus beginnen Sie mit Schritt 1 und bei
Deutsch
allen anderen Modi beginnen Sie mit Schritt 2.
1.
Trennen und entfernen Sie alle Kabel/Leitungen Ihrer alten Modemkonguration.
a: Ziehen Sie den AC-Adapter aus der Steckdose und trennen Sie ihn vom
Kabel/ADSL-Modem.
b: Trennen Sie das Netzwerkkabel vom Kabel/ADSL-Modem.
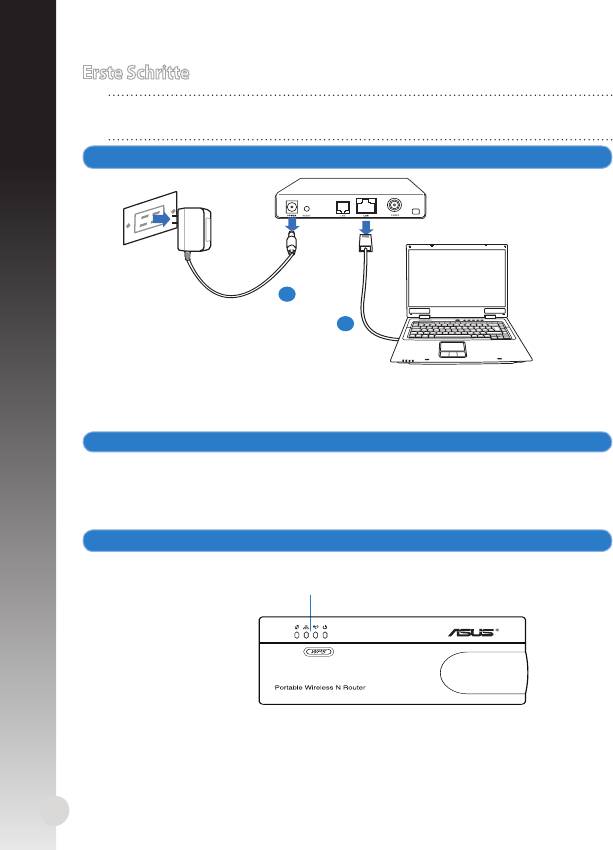
2. Verbinden und schalten Sie den drahtlosen Router ein.
a: Verwenden Sie ein Netzwerkkabel, um den Computer mit dem LAN-An-
schluss Ihres drahtlosen Routers zu verbinden.
b: Für die Stromversorgung Ihres drahtlosen Routers verwenden Sie einen
Netzadapter oder dessen Micro USB-Stromkabel.
3.
Melden Sie sich bei der webbasierten, graschen Benutzeroberäche (Web-GUI) an.
a: Die Drahtlos-LED sollte blinken.
Drahtlos-LED
b: Geben Sie 192.168.1.1 in Ihren Webbrowser ein. Standardbenutzername/
Kennwort ist admin.
c: Wählen Sie in der Web-GUI einen Betriebsmodus und kongurieren Sie
dessen Einstellungen, um das drahtlose Netzwerk einzurichten.
12
Modem
a
b
Deutsch
4. Richten Sie das Gerät je nach gewähltem Betriebsmodus ein.
Wireless Router mode (Drahtloser Router-Modus)
WICHTIG: Trennen und entfernen Sie alle Kabel/Leitungen Ihrer alten
Modemkonguration.
a: Verbinden Sie den Netzadapter des Modems mit der Stromversorgung.
b: Verwenden Sie ein Netzwerkkabel, um den Modem und den drahtlosen
Router zu verbinden.
Access Point Mode (Zugrispunktmodus)
a: Verwenden Sie ein Netzwerkkabel, um
den Zugrispunkt mit dem Router zu
verbinden.
Repeater- und Hotspot-Modus
Schließen Sie den Netzadapter oder das Micro USB-Stromkabel an die Strom-
versorgung an. Ein Netzwerkkabel wird nicht benötigt.
HINWEIS: Für weitere Details zur Verwendung des Micro USB-Stromkabels
für die Stromversorgung Ihres Routers beziehen Sie sich auf Schritt 2 in
Erste Schritte.
Wireless Network Adapter mode (Drahtloser Netzwerkadaptermodus) (Drahtloser Netzwerkadaptermodus)(Drahtloser Netzwerkadaptermodus)
a: Verbinden Sie das Micro USB-Strom-
kabel mit einem Ethernet-Fähigen
Gerät wie Internet TV.
b: Verwenden Sie ein Netzwerkkabel,
a
um das Ethernet-Fähige Gerät mit
b
dem drahtlosen Router zu verbinden.
HINWEIS: Für weitere Details zu den Betriebsmodi beziehen Sie sich auf den
Abschnitt Betriebsarten.
13
Modem
a
b
ANT ANTReset Power On/Off USB LAN4 LAN3 LAN2 LAN1 WPS
On Off
ADSL
HINWEISE:
• Für weitere Details beziehen Sie sich auf das Handbuch auf der Support-CD.
• Falls Sie die Web-GUI nicht laden können, beziehen Sie sich auf die Fehler-
behandlung.
a

Häug gestellte Fragen
F1: Ich kann nicht auf die web GUI zugreifen, um die Einstellungen des
drahtlosen Routers zu kongurieren.
Deutsch
• Starten Sie alle geöneten Browser wieder neu.
• Um die Computereinstellungen zu kongurieren, folgen Sie, je nach Be-
triebssystem, den nachstehenden Anweisungen.
Windows 7
A. Deaktivieren Sie den Proxyserver (falls aktiviert).
1. Klicken Sie auf Start > Internet Explorer, um den Webbrowser zu laden.
2. Klicken Sie auf Extras (Tools) > Internetoptionen (Internet options) > Aus-
wahl Verbindungen (Connections) > LAN-Einstellungen (LAN settings).
3. Im Fenster Einstellungen für lokales Netzwerk, deaktivieren Sie Proxy-
server für LAN verwenden (Use a proxy server for your LAN).
4. Wenn abgeschlossen, klicken Sie auf OK.
B. Setzen Sie die TCP/IP-Einstellungen auf automatische IP-Erkennung.
1. Klicken Sie auf Start > Systemsteuerung (Control Panel) > Netzwerk
und Internet (Network and Internet) > Netzwerk- und Freigabecenter
(Network and Sharing Center) > Netzwerkverbindungen verwalten
(Manage network connections).
2. Wählen Sie Internetprotokoll Version 4 (TCP/IPv4) (Internet Protocol
Version 4 (TCP/IPv4)) und klicken Sie dann auf Eigenschaften (Properties).
3. Wählen Sie IP-Adresse automatisch beziehen (Obtain an IP address
automatically).
4. Wenn abgeschlossen, klicken Sie auf OK.
C. Deaktivieren Sie die DFÜ-Verbindung, falls aktiviert.
1. Klicken Sie auf Start > Internet Explorer, um den Browser zu starten.
2. Klicken Sie auf Extras (Tools) > Internetoptionen (Internet options) >
Auswahl Verbindungen (Connections).
3. Wählen Sie Keine Verbindung wählen (Never dial a connection).
4. Wenn abgeschlossen, klicken Sie auf OK.
Mac 10.5.8
A. Deaktivieren Sie den Proxyserver (falls aktiviert).
1. Klicken Sie in der Menüleiste auf Safari > Einstellungen... (Preferences...)
> Auswahl Erweitert (Advanced).
2. Klicken Sie unter Proxies auf Einstellungen ändern... (Change Settings...).
3. Deaktivieren Sie in der Protokollliste FTP Proxy und Web Proxy (HTTP).
4. Wenn abgeschlossen, klicken Sie auf Jetzt Anwenden (Apply Now).
B. Setzen Sie die TCP/IP-Einstellungen auf automatische IP-Erkennung.
1. Klicken Sie auf das Apple-Symbol > Systemeinstellungen... (System
Preferences) > Netzwerk (Network).
2. Wählen Sie Ethernet > Congure (Weitere Optionen) und wählen Sie
dann unter TCP/IP > Congure IPv4 (IPv4 kongurieren) die Auswahl
DHCP (Using DHCP).
3. Wenn abgeschlossen, klicken Sie auf Jetzt Anwenden (Apply Now).
14
Italiano
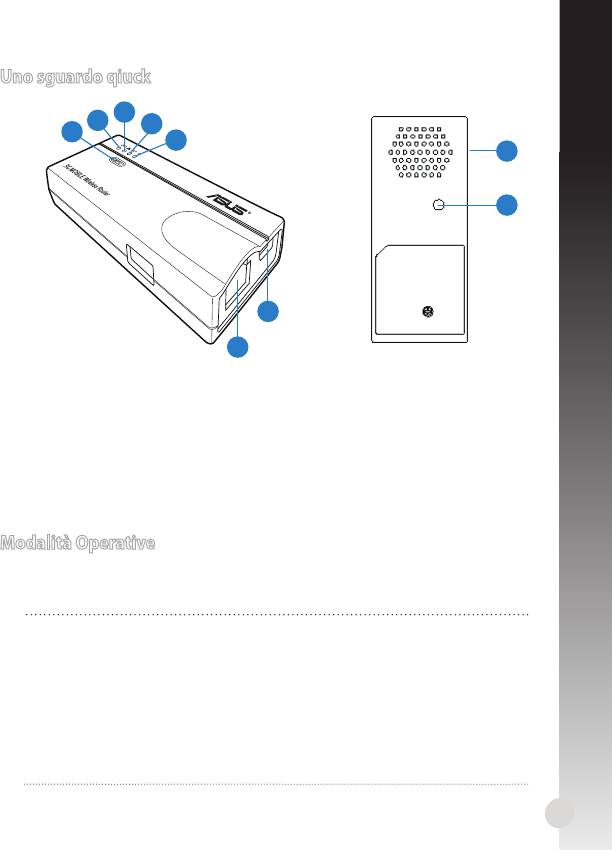
Uno sguardo qiuck
3
2
4
1
5
8
9
6
7
1) Pulsante WPS 6) Porta DC in (micro USB)
2) LED stato connessione 7) Porta Ethernet
3) LED Rete 8) Fori per la Ventilazione
4) LED Wireless 9) Pulsante di Reset
5) LED Aliment.
Modalità Operative
ASUS WL-330N è caratterizzato da cinque modalità operative: Router Wireless,
Access Point (AP), Hotspot (WiFi Account Sharing), Ripetitore e Adattatore di
Rete Wireless.
NOTE:
• Per ottenere l'indirizzo IP dinamico del WL-330N, utilizzare l'utilitàWL-330N, utilizzare l'utilitàN, utilizzare l'utilità, utilizzare l'utilitàtilizzare l'utilità
Device Discovery nel CD di supporto CD.
• Prima di impostare il WL-330N in modalità Hotspot, Ripetitore o in modalità Hotspot, Ripetitore o Hotspot, Ripetitore o
Adattatore di Rete, assicurarsi di aver collegato il computer e il WL-330N
tramite un cavo di rete.
• Se non è possibile cambiare modalità, si possono ripristinare
manualmente le impostazioni predenite, premendo sul pulsante di
reset di ASUS WL-330N, mentre è acceso.
15
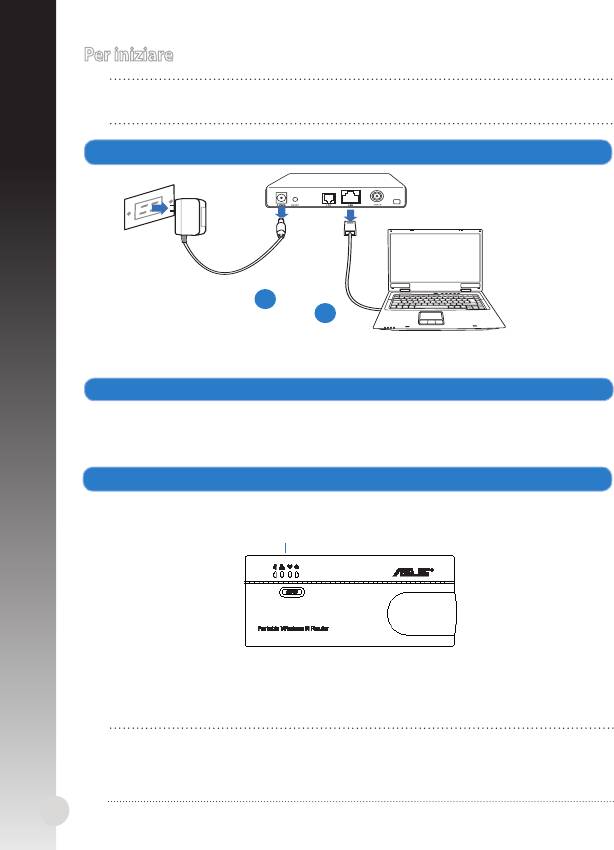
Per iniziare
NOTA: per la modalità Router Wireless, iniziare dal punto 1. Per le altre
modalità operative, iniziare dal punto 2.
Italiano
1. Disconnettere i cavi dal modem.
a: Disinserire l’adattatore AC dalla presa elettrica e dal modem ADSL/via cavo.
b: Disconnettere il cavo di rete dal modem ADSL/via cavo.
2. Connettere e accendere il router wireless.
a: Tramite un cavo di rete, collegare il computer alla porta LAN del router wireless.
b: Per alimentare il router wireless, utilizzare l’ adattatore di corrente in dotazione
o il cavo di alimentazione micro USB.
3. Accedere all’interfaccia graca del wireless router (web GUI).
a: Assicurarsi che il LED wireless lampeggi.
LED Wireless
b: Nel browser web, digitare prima 192.168.1.1. e poi “admin” come nome
utente e password predenita.
c: Dall’interfaccia graca web, selezionare la modalità operativa e congurare
le impostazioni per la congurazione di rete wireless.
NOTE:
• Per approfondimenti. consultare il manuale utente nel CD di supporto.
• Se non si visualizza l'interfaccia utente, consultare la sezione relativa alla
risoluzione dei problemi.
16
Modem
a
b
Italiano
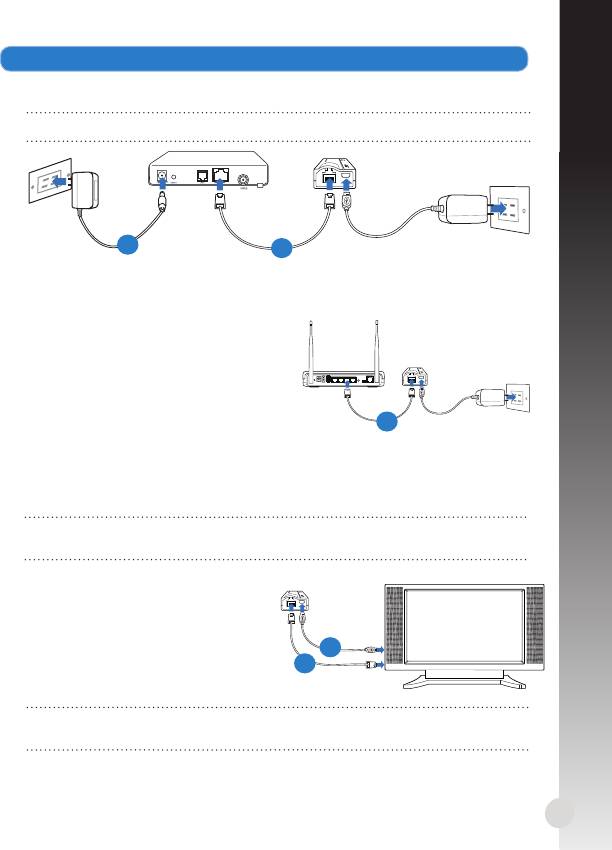
4. Impostare i dispositivi in base alla modalità operativa selezionata.
Modalità Router Wireless
IMPORTANTE: assicurarsi di aver disconnesso i cavi dal modem.
a: Collegare l’adattatore di corrente del modem ad una sorgente di alimentazione.
b: Tramite un cavo di rete, collegare il modem e il router wireless.
Modalità Access Point
a: Tramite un cavo di rete, collegare il
punto di accesso e il router wireless.
Modalità Ripetitore e Hotspot
Fornire alimentazione al router wireless tramite l’adattatore di corrente o il cavo di
alimentazione micro USB in dotazione. Non è necessario utilizzare un cavo di rete.
NOTA: per approfondimenti sull’utilizzo di un cavo micro USB per alimentare
il router wireless, vedere il punto 2 della sezione Per iniziare.
Modalità Adattatore di Rete Wireless
a: Collegare il cavo di alimentazione
micro USB al dispositivo abilitato
Ethernet, come una Internet TV.
b: Utilizzare un cavo di rete per colle-
gare il dispositivo abilitato Ethernet
e il router wireless.
NOTA: per approfondimenti sulle modalità operative, consultare la
sezione Modalità Operative.
17
Modem
a
b
ANT ANTReset Power On/Off USB LAN4 LAN3 LAN2 LAN1 WPS
On Off
ADSL
a
a
b

Domande Ricorrenti
Q1: Impossibile accedere all’interfaccia graca web per congurare le
Italiano
impostazioni del router wireless.
• Chiudere tutti i browser web in esecuzione e poi riavviarli.
• Seguire la procedura sottostante per congurare le impostazioni del com-
puter in base al sistema operativo utilizzato.
Windows 7
A. Disattivare il server proxy, se abilitato.
1. Selezionare Start > Internet Explorer per avviare il browser web.
2. Selezionare Strumenti > Opzioni Internet > scheda Connessioni >
Impostazioni LAN.
3. Dalla schermata Impostazioni rete locale (LAN), deselezionare la casella di
controllo Utilizza un server proxy per le connessioni LAN.
4. Al termine, premere OK.
B. Congurare le impostazioni TCP/IP per ottenere automaticamente un
indirizzo IP.
1. Selezionare Start > Pannello di Controllo > Rete e Internet > Centro
connessioni di rete e condivisione > Gestisci connessioni di rete.
2. Selezionare Protocollo Internet versione 4 (TCP/IPv4) e quindi fare clic su
Proprietà.
3. Fare clic su Ottieni automaticamente un indirizzo IP.
4. Al termine, premere OK.
C. Disattivare la connessione telefonica, se abilitata.
1. Selezionare Start > Internet Explorer per avviare il browser web.
2. Selezionare Strumenti > Opzioni Internet > scheda Connessioni.
3. Selezionare Non utilizzare mai connessioni remote.
4. Al termine, premere OK.
Mac 10.5.8
A. Disattivare il server proxy, se abilitato.
1. Dalla barra menu, cliccare Safari > Preferenze... > scheda Avanzate.
2. Cliccare Modica impostazioni... nel campo Proxy.
3. Dall’elenco dei protocolli, deselezionare Proxy FTP e Proxy Web (HTTP).
4. Al termine, premere OK.
B. Congurare le impostazioni TCP/IP per ottenere automaticamente un
indirizzo IP.
1. Cliccare sull’icona Apple > Preferenze di Sistema > Network.
2. Selezionare Ethernet e poi Utilizzo di DHCP nel campo Congura.
3. Al termine, premere Applica.
18
Русский
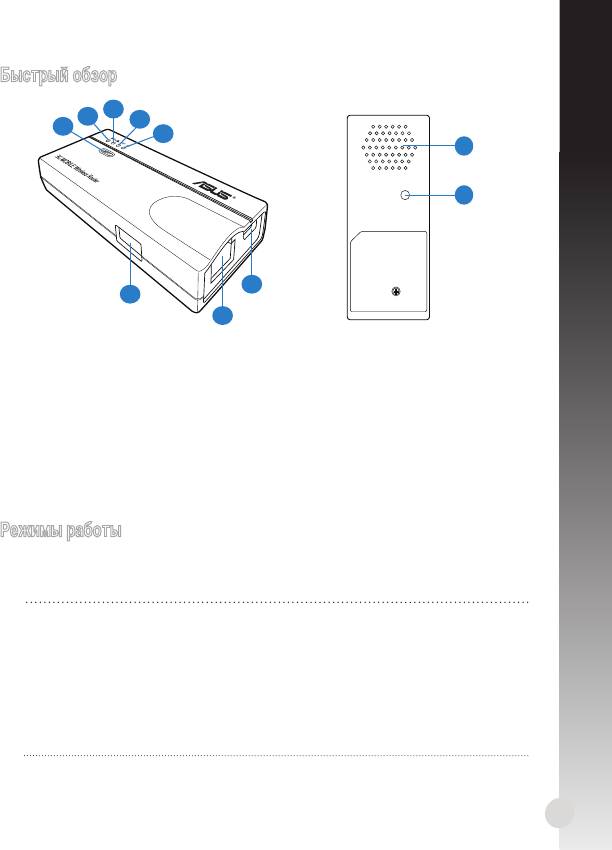
Быстрый обзор
3
2
4
1
5
9
10
6
8
7
1) WPS кнопка 6) DC in (микро-USB) порт
2) Link индикатор 7) Ethernet порт
3) Индикатор сети 8) Вентиляционные отверстия
4) Индикатор беспроводной связи 9) Кнопка сброса
5) Индикатор питания
Режимы работы
ASUS WL-330N предоставляет пять режимов работы: беспроводной роутер,
точка доступа (AP), Hotspot(Публичная WiFi), повторитель и беспроводной
сетевой адаптер.
ПРИМЕЧАНИЯ:
• ДляполученияIPадресаWL-330N'sиспользуйтеутилитуDeviceDiscoveryс
компакт-диска.
• Перед установкой WL-330N в режим Hotspot, повторителя или в сетевого
адаптера, убедитесь,чтоВы соединили компьютер и WL-330N с помощью
сетевогокабеля.
• Если вы можете переключить режим, Вы можете вернуться к заводским
настройкам,нажавкнопку“Restore”наASUSWL-330N.
19
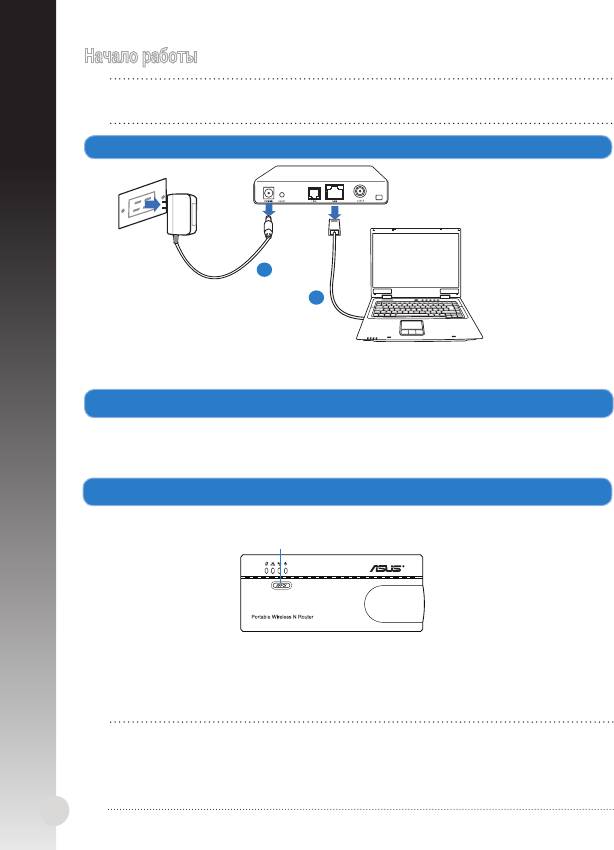
Начало работы
ПРИМЕЧАНИЕ:Длярежимабеспроводногороутераначнитесшага1.Для
другихрежимовработы,начинаясшага2.
1. Отключите провода/кабели от модема.
Русский
a: Отключитеблокпитанияотрозеткииоткабельного/ADSLмодема.
b: Отключитесетевойкабельоткабельного/ADSLмодема.
2. Подключите и включите беспроводной роутер.
С
помощьюсетевогокабеляподключитекомпьютеркLANпортуроутера.
b:
Длявключениябеспроводногороутера,используйтеегоблокпитанияилимикроUSB
кабель.
3. Войдите в веб-интерфейс роутера (web GUI).
a: Убедитесь,чтоиндикаторбеспроводнойсвязимигает.
Индикатор беспроводной связи
b: Вадреснойстрокебраузеравведите192.168.1.1.Введитеadminкакимя
пользователяипарольпоумолчанию.
c: Ввеб-интерфейсевыберитережимработыисконфигурируйтепараметры
беспроводнойсети.
ПРИМЕЧАНИЯ:
• Дляполученияподробнойинформации.обратитеськруководству
пользователянакомпакт-диске.
• Есливеб-интерфейснезапускается,обратитеськразделуУстранение
неисправностей.
20
Modem
a
b


