Asus RT-AC52U: instruction
Class: Computer equipment, hardware, accessories
Type:
Manual for Asus RT-AC52U
Table of contents
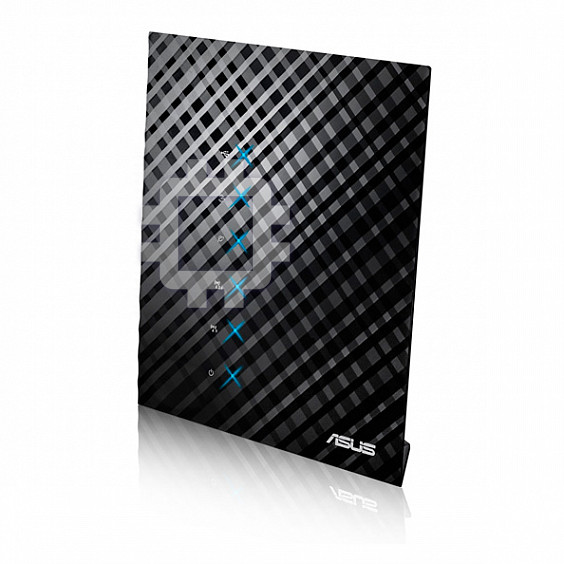
RT-AC52U
802.11ac Dual Band Router
Quick Start Guide
®
EEU8162 / First Edition / May 2013
EEU8162_RT-AC52U_QSG.indb 1 6/14/13 4:10:29 PM
Table of contents
English .............................................................................................7
Български ......................................................................................21
Čeština .............................................................................................35
Magyar ............................................................................................49
Latviski ............................................................................................63
Lietuvių ...........................................................................................77
Polski ................................................................................................91
Română ...........................................................................................105
Русский ...........................................................................................119
Slovensky........................................................................................133
Türkçe ..............................................................................................147
Українська .....................................................................................161
Deutsch ...........................................................................................175
Hrvatski ...........................................................................................189
Srpski ...............................................................................................203
Slovenščina ....................................................................................217
EEU8162_RT-AC52U_QSG.indb 2 6/14/13 4:10:29 PM

Note / Забележка / Poznámka / Megjegyzés/piezīme/
Pastaba/ Uwaga/ Notă/
Примечание
/ Obs/not/
Примітка
/
Hinweis/NAPOMENA / BELEŠKA /OPOMBA
• For more details, refer to the user manual included in the
support CD.
•
За повече информация, вижте ръководството на потребителя,
намиращо се на помощния CD диск.
• Podrobnější informace viz uživatelská příručka na podpůrném
disku CD.
• A további részleteket illetően tekintse meg a támogató CD-n
lévő felhasználói útmutatót.
• Detalizētāku informāciju meklējiet atbalsta CD esošajā lietotāja
rokasgrāmatā.
• Išsamiau žr. vartotojo vadovą, esantį šiame pagalbos
kompaktiniame (CD) diske.
• Dalsze szczegółowe informacje znajdują się w podręczniku
użytkownika na pomocniczym dysku CD.
•
Pentru mai multe detalii, consultaţi manualul de utilizare inclus pe CD-
ul suport.
•
Для получения дополнительной информации обратитесь к
руководству пользователя на компакт-диске.
•
Viac podrobností nájdete v návode na obsluhu na CD s
podporou.
•
Daha fazla ayrıntı için destek CD'sinde bulunan kullanıcı
kılavuzuna bakın.
•
Детальніше див. посібник користувача на компакт-диску
підтримки
.
• Weitere Details nden Sie im Benutzerhandbuch auf der
Support-CD.
• Dodatne pojedinosti potražite u korisničkom priručniku na CD-u
podrške.
• Za više detalja, pogledajte uputstvo za korišćenje koje se nalazi
na CD-u za podršku.
• Za več podrobnosti glejte uporabniški priročnik na priloženem
CD-ju.
EEU8162_RT-AC52U_QSG.indb 3 6/14/13 4:10:30 PM

Package contents
RT-AC52U AC adapter
Network cable Quick Start Guide
Support CD (User Manual/utilities) Warranty card
Stand
NOTE: If any of the items is damaged or missing, please contact your
retailer.
English
A quick look
1) USB 2.0 LED 6) Power LED 11) Power switch
2) LAN LED 7) WPS button 12) Power (DC-IN) port
3) WAN LED 8) USB 2.0 port 13) Reset button
4) 2.4GHz LED 9) LAN ports 14) Wi-Fi button
5) 5GHz LED 10) WAN port 15) Wall-mount hooks
7
EEU8162_RT-AC52U_QSG.indb 7 6/14/13 4:10:36 PM

English
NOTES:
•
USB External HDD/Flash disk:
• The wireless router works with most USB HDDs/Flash disks up to
3TB and supports read-write access for FAT16, FAT32, EXT2, EXT3,
and NTFS.
• To safely remove the USB disk, launch the web GUI
(http://192.168.1.1), then in the Network Map page's upper right
corner, click the USB icon and click Eject USB disk.
• For the list of le system and hard disk partitions that the
wireless router supports, visit http://event.asus.com/networks/
disksupport
•
Network Printer Server:
• Network printer utility is supported on Windows®XP, Windows®
Vista, and Windows® 7. To install the utility on Mac OS, please go to
USB Application > Network Printer Server and click Download
Now!. Then select Use LPR protocol for sharing.
• For the list of printers that the wireless router supports, visit
http://event.asus.com/networks/printersupport
•
3G/4G USB modems:
• For a list of veried USB modems, please visit:
http://event.asus.com/2009/networks/3gsupport.
• The router will reboot for settings to take eort.
8
EEU8162_RT-AC52U_QSG.indb 8 6/14/13 4:10:37 PM

Positioning your wireless router
For the best wireless signal transmission between the wireless router and the
network devices connected to it, ensure that you:
• Place the wireless router in a centralized area for a maximum wireless coverage
for the network devices.
• Keep the device away from metal obstructions and away from direct sunlight.
• Keep the device away from 802.11g or 20MHz only Wi-Fi devices, 2.4GHz
computer peripherals, Bluetooth devices, cordless phones, transformers,
heavy-duty motors, uorescent lights, microwave ovens, refrigerators, and other
English
industrial equipment to prevent signal interference or loss.
•
For the best front-to-rear coverage, place the wireless router in an upright
position
.
•
For the best up-to-down coverage, place the wireless router in an inclined
position
.
• Always update to the latest rmware. Visit the ASUS website at
http://www.asus.com to get the latest rmware updates.
9
EEU8162_RT-AC52U_QSG.indb 9 6/14/13 4:10:54 PM

Before you proceed
English
1. Unplug and disconnect the wires/cables from your existing modem setup
and release your computer’s outmoded IP address.
a: Unplug the AC adapter from the power outlet and disconnect it from your
cable/ADSL modem.
b: Disconnect the network cable from your cable/ADSL modem.
c: Reboot your computer (recommended).
10
Modem
OFF
!
c
a
b
WARNING! Before disconnecting the wires/cables, ensure that your
cable/ADSL modem has been turned o for at least two minutes. If your
modem has a backup battery, remove it as well.
EEU8162_RT-AC52U_QSG.indb 10 6/14/13 4:10:56 PM
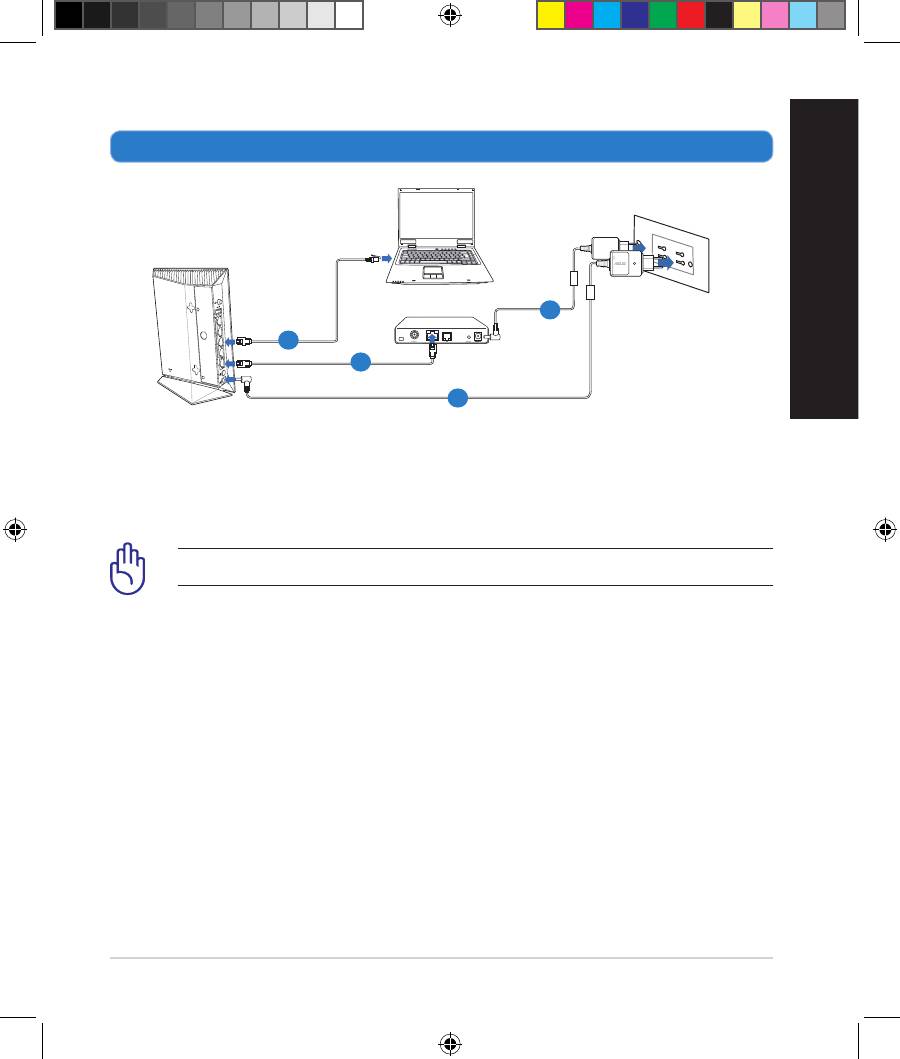
2. Set up your wireless environment.
English
11
4
Modem
2
3
1
1: Insert your wireless router’s AC adapter to the DC-IN port and plug it to a
power outlet.
2: Using the bundled network cable, connect your computer to your wireless
router’s LAN port.
IMPORTANT! Ensure that the WAN and LAN LEDs are blinking.
3: Using another network cable, connect your modem to your wireless router’s
WAN port.
4: Insert your modem’s AC adapter to the DC-IN port and plug it to a power
outlet.
EEU8162_RT-AC52U_QSG.indb 11 6/14/13 4:10:59 PM
3. Disable some settings on your computer.
English
A. Disable the proxy server, if enabled.
B. Set the TCP/IP settings to automatically obtain an IP address.
C. Disable the dial-up connection, if enabled.
NOTE: For more details on disabling your computer settings, refer to
Frequently Asked Questions (FAQs).
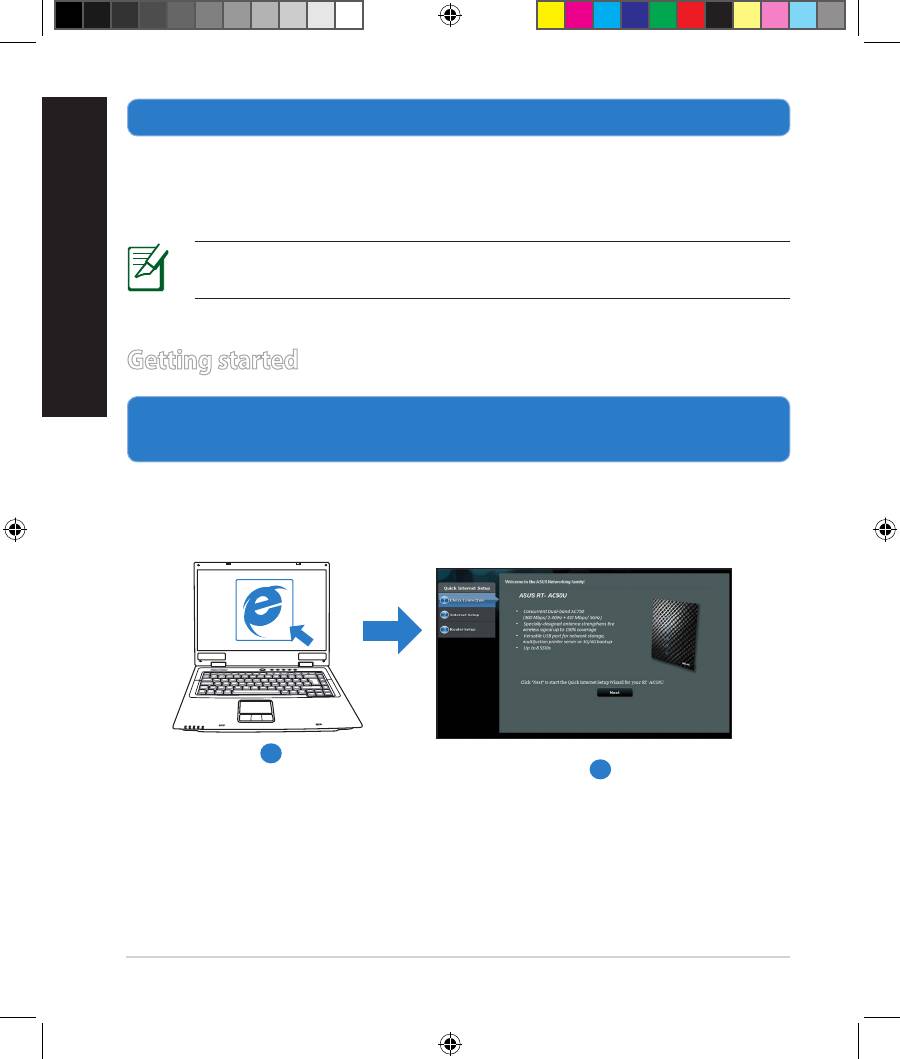
Getting started
1. Congure your wireless settings via the wireless router’s web graphics
user interface (web GUI).
a: Launch your web browser such as Internet Explorer, Firefox, Google Chrome,
or Safari.
a
b
12
EEU8162_RT-AC52U_QSG.indb 12 6/14/13 4:11:03 PM
NOTE: If QIS does not launch automatically, follow these steps to
manually launch QIS:
• On your web browser, key in
http://192.168.1.1 and run the Quick
Internet Setup (QIS) Wizard again.
• Disable the proxy settings, dial-up connection, and set your TCP/IP
settings to automatically obtain an IP address. For more details, refer
to the FAQs section or use the Setup Wizard in the support CD for
auto-diagnosis.
English
b: The wireless router’s Quick Internet Setup (QIS) feature automatically detects
if your ISP connection type is Dynamic IP, PPPoE, PPTP, L2TP, and Static IP.
Key in the necessary information for your connection type.
NOTE: The auto-detection of your ISP connection type takes place
when you congure the wireless router for the rst time or when your
wireless router is reset to its default settings.
IMPORTANT! Obtain the necessary information about your Internet
connection type from your Internet Service Provider (ISP).
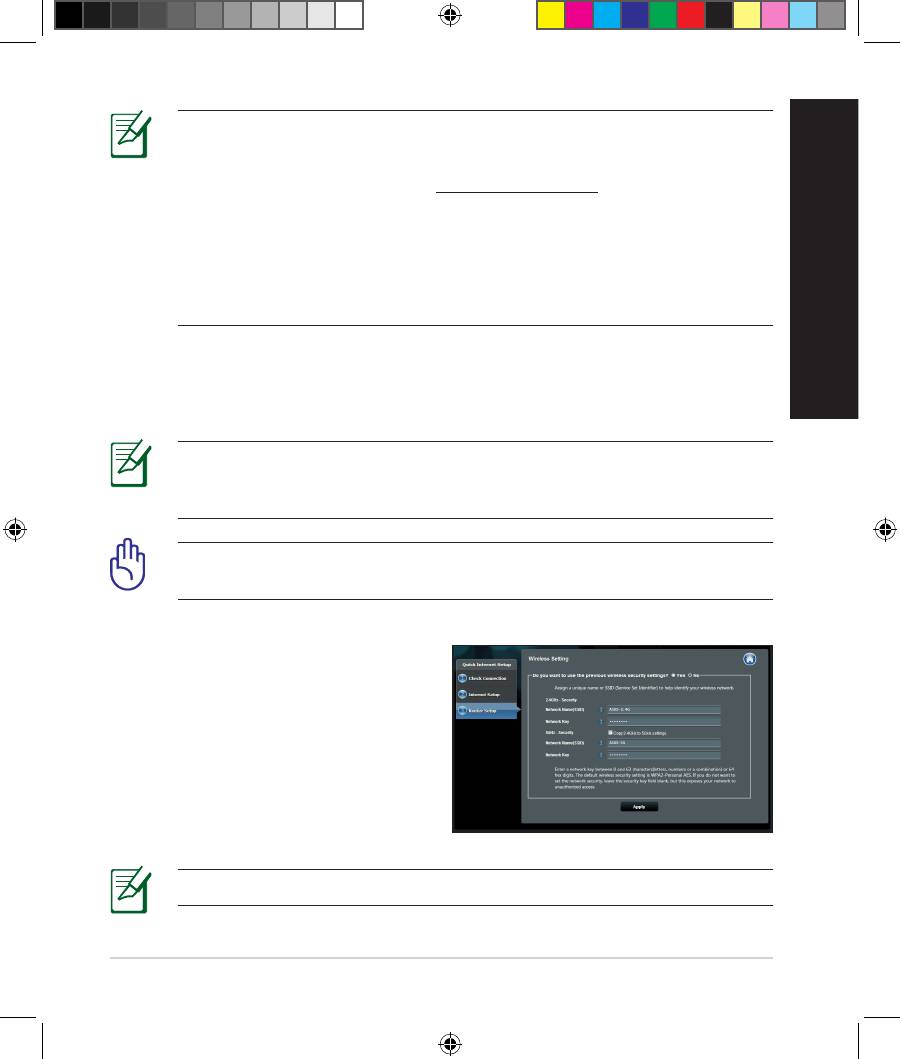
c: Assign the network name (SSID) and
security key for your 2.4GHz and
5GHz wireless connection. Click Ap-
ply when done.
d: Your Internet and wireless settings
are displayed. Click Next to con-
tinue.
e: Read the wireless network con-
nection tutorial. When done, click
Finish.
NOTE: You can assign a network name with up to 32 characters.
13
EEU8162_RT-AC52U_QSG.indb 13 6/14/13 4:11:04 PM
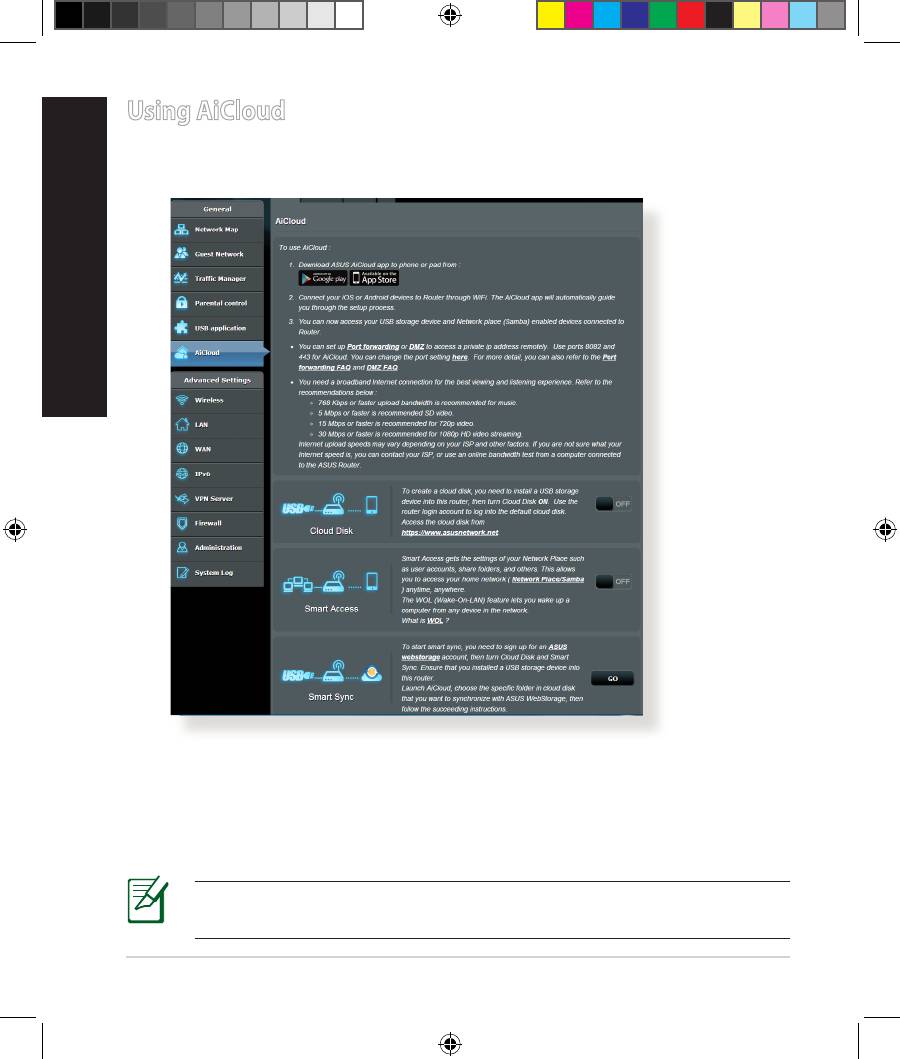
Using AiCloud
English
AiCloud is a cloud service application that allows you to save, sync, share, and
access your les.
To use AiCloud:
1. From Google Play Store or Apple Store, download and install the ASUS Ai-
Cloud app to your smart device.
2. Connect your smart device to your network. Follow the instructions to com-
plete the AiCloud setup process.
NOTE: For more details, please refer to the user manual included in
the support CD.
14
EEU8162_RT-AC52U_QSG.indb 14 6/14/13 4:11:06 PM
Frequently Asked Questions (FAQs)
After following the steps, I still cannot access the wireless router’s web
graphics user interface (web GUI) to congure the wireless router settings.
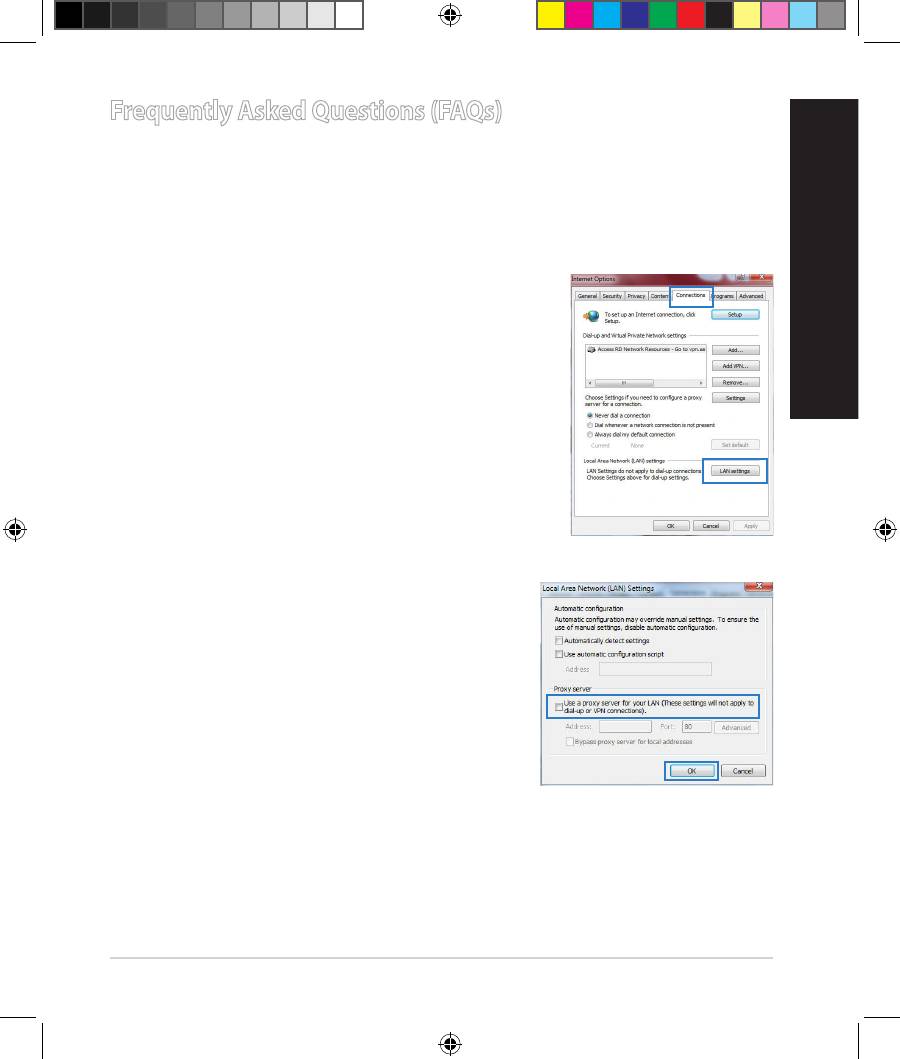
A. Disable the proxy server, if enabled.
Windows® 7
1. Click Start > Internet Explorer to launch the web
browser.
English
2. Click Tools > Internet options > Connections tab
> LAN settings.
3. From the Local Area Network (LAN) Settings
screen, untick Use a proxy server for your
LAN.
4. Click OK when done.
15
EEU8162_RT-AC52U_QSG.indb 15 6/14/13 4:11:07 PM
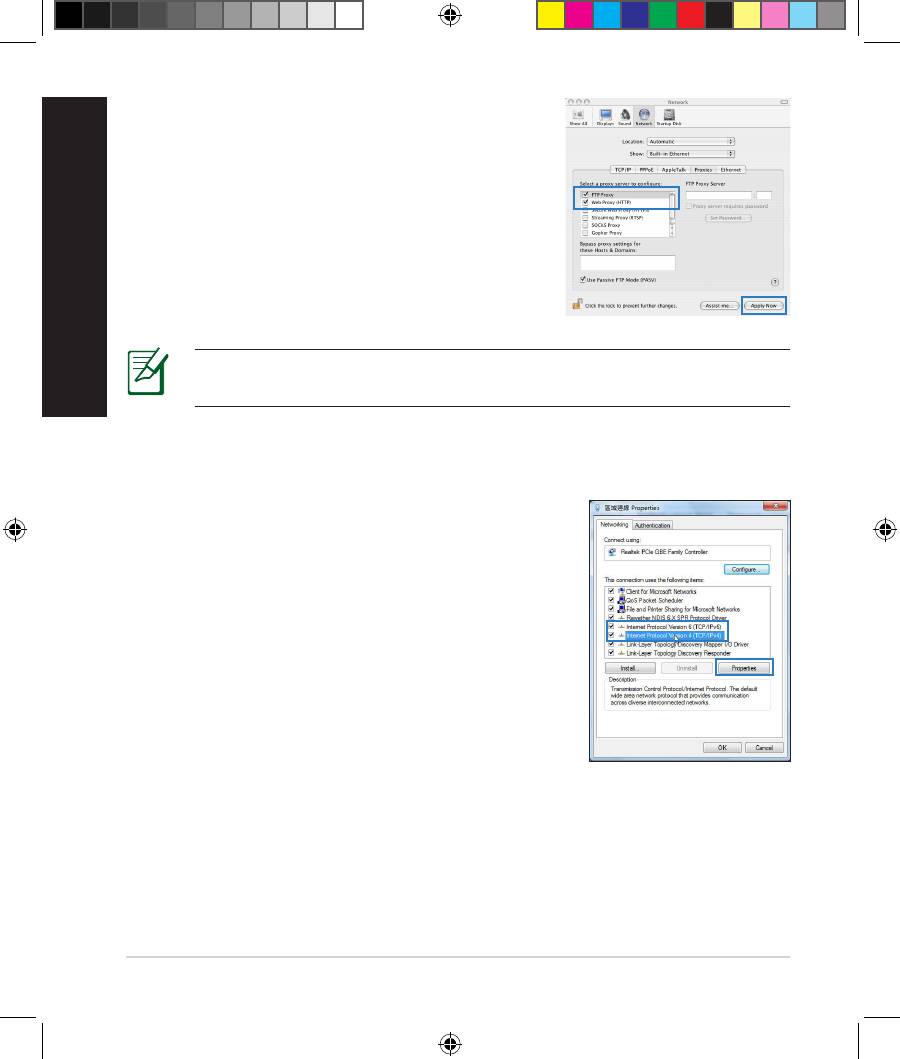
MAC OS
English
1. From your Safari browser, click Safari > Prefer-
ences > Advanced > Change Settings...
2. From the Network screen, deselect FTP Proxy
and Web Proxy (HTTP).
3. Cllick Apply Now when done.
NOTE: Refer to your browser's help feature for details on disabling the
proxy server.
B. Set the TCP/IP settings to automatically obtain an IP address.
Windows® 7
1. Click Start > Control Panel > Network and
Internet > Network and Sharing Center >
Manage network connections.
2. Select Internet Protocol Version 4 (TCP/IPv4)
or Internet Protocol Version 6 (TCP/IPv6), then
click Properties.
16
EEU8162_RT-AC52U_QSG.indb 16 6/14/13 4:11:08 PM
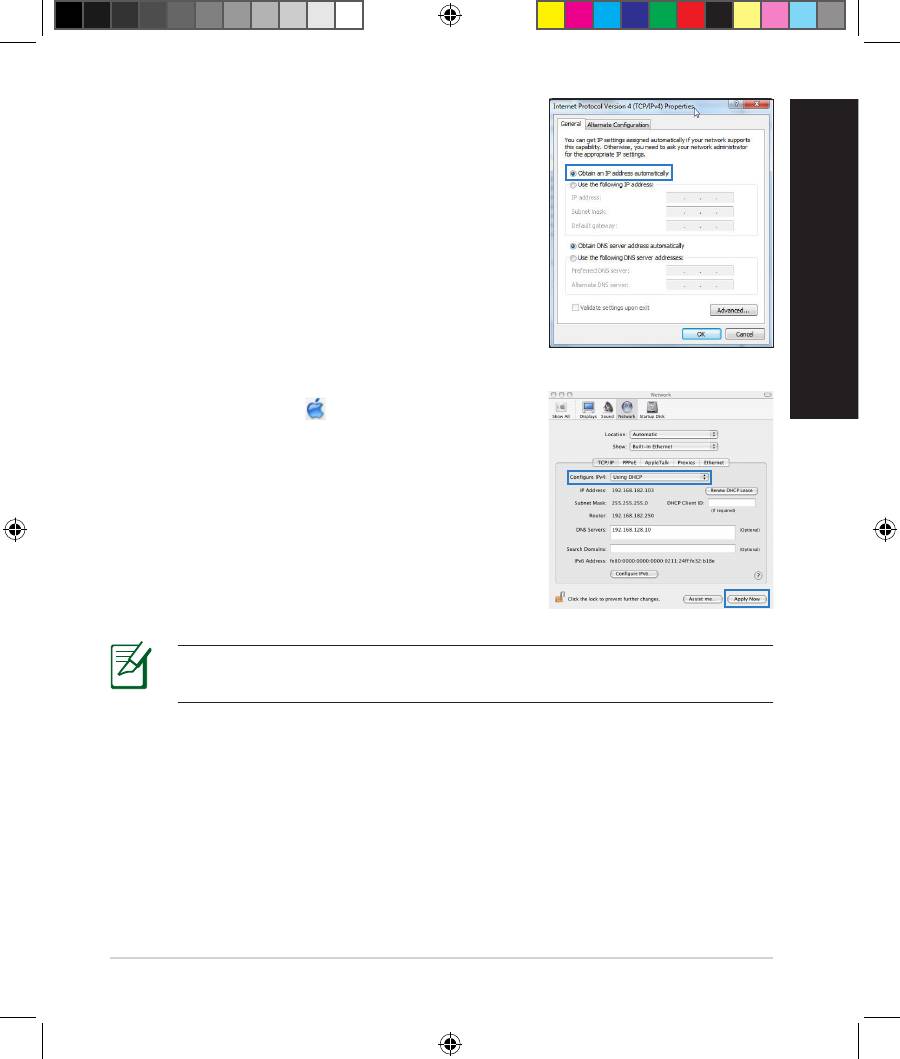
3. To obtain the IPv4 IP or IPv6 IP settings automat-
ically, tick Obtain an IPv4 address automati-
cally or Obtain an IPv6 address automatically.
4. Click OK when done.
English
MAC OS
1. Click the Apple icon located on the top left of
your screen.
2. Click System Preferences > Network >
Congure...
3. From the TCP/IP tab, select Using DHCP in the
Congure IPv4 dropdown list.
4. Cllick Apply Now when done.
NOTE: Refer to your operating system’s help and support feature for
details on conguring your computer’s TCP/IP settings.
17
EEU8162_RT-AC52U_QSG.indb 17 6/14/13 4:11:09 PM
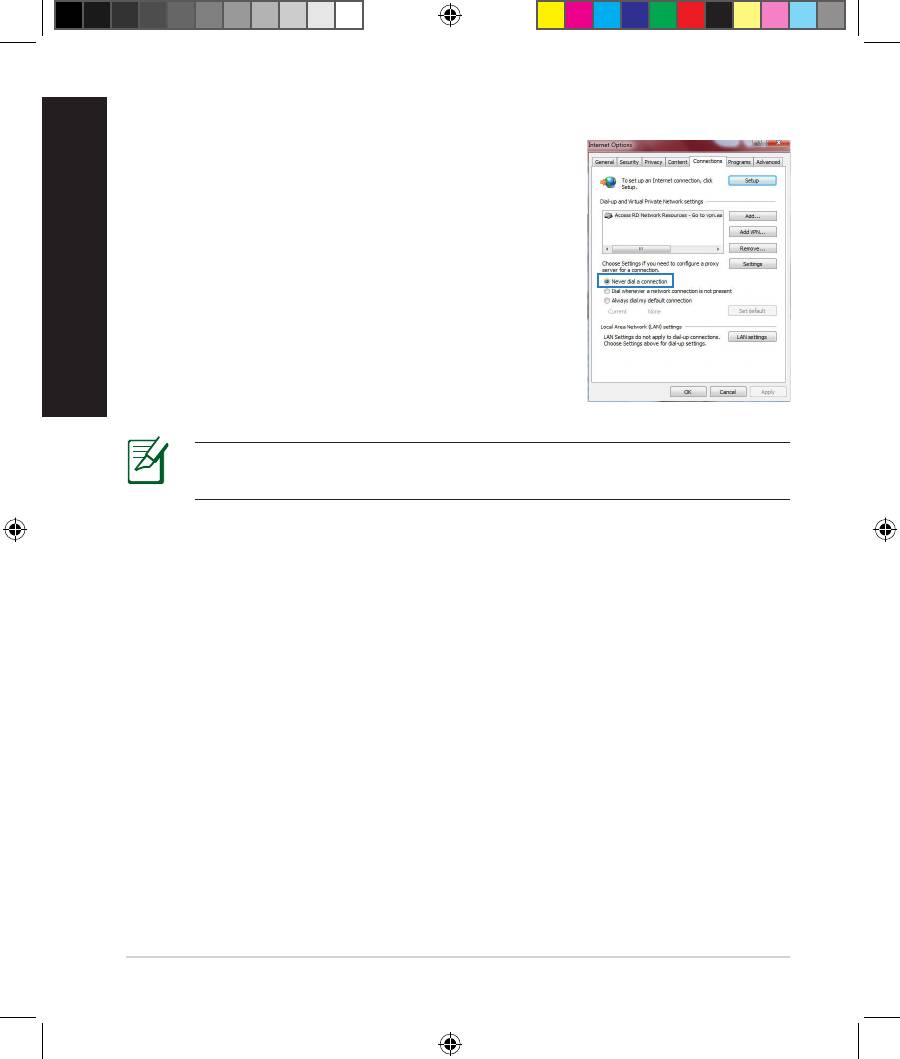
C. Disable the dial-up connection, if enabled.
English
Windows® 7
1. Click Start > Internet Explorer to launch the
browser.
2. Click Tools > Internet options > Connections tab.
3. Tick Never dial a connection.
4. Click OK when done.
NOTE: Refer to your browser's help feature for details on disabling
the dial-up connection settings.
D. Close all running web browsers.
The client cannot establish a wireless connection with the router.
Out of Range:
• Put the router closer to the wireless client.
• Try to change the channel settings.
Authentication:
• Use wired connection to connect to the router.
• Check the wireless security settings.
• Press the Reset button at the rear panel for more than ve seconds.
18
EEU8162_RT-AC52U_QSG.indb 18 6/14/13 4:11:10 PM
Cannot nd the router:
• Press the Reset button at the rear panel for more than ve seconds.
• Check the setting in the wireless adapter such as SSID and encryption
settings.
Cannot access the Internet via wireless LAN adapter.
• Move the router closer to the wireless client.
• Check whether the wireless adapter is connected to the correct wireless
router.
English
• Check whether the wireless channel in use conforms to the channels avail-
able in your country/area.
• Check the encryption settings.
• Check if the ADSL or Cable connection is correct.
• Retry using another Ethernet cable.
If the ADSL “LINK” light blinks continuously or stays o, Internet access is
not possible - the Router is unable to establish a connection with the ADSL
network.
• Ensure that all your cables are all properly connected .
• Disconnect the power cord from the ADSL or cable modem, wait a few min-
utes, then reconnect the cord.
• If the ADSL light continues to blink or stays OFF, contact your ADSL service
provider.
Network name or encryption keys are forgotten.
• Try setting up the wired connection and conguring the wireless encryption
again.
• Press the Reset button of the wireless router for more than ve seconds.
• Factory default settings:
User name / Password:
IP address:
SSID:
admin / admin
192.168.1.1
ASUS
19
EEU8162_RT-AC52U_QSG.indb 19 6/14/13 4:11:10 PM
Where can I nd more information about the wireless router?
English
• User Manual in the support CD
• Online FAQ site: http://support.asus.com/faq
• Technical Support site: http://support.asus.com
• Customer Hotline: Refer to the Support Hotline in this Quick Start Guide
SUPPORT HOTLINE
Area Hotline Number Support
Availability
Languages
Taiwan 0800-093-456;
Traditional
Mon. to Fri.
02-81439000
Chinese
9:00-12:00;
13:30-18:00
USA/
1-812-282-2787 English Mon. to Fri.
Canada
8:30-12:00am EST
(5:30am-9:00pm PST)
Sat. to Sun.
9:00am-6:00pm EST
(6:00am-3:00pm PST)
Brazil 4003 0988 (Capital) Portuguese
Mon. to Fri.
9:00am-18:00
0800 880 0988
(demais localidades)
20
EEU8162_RT-AC52U_QSG.indb 20 6/14/13 4:11:10 PM
Бърз преглед
RT-AC52U Адаптер за променлив ток
Мрежов кабел Ръководство за бърз старт
Помощен CD диск (Ръководство на потребителя/помощни програми)
Гаранционна карта
Стойка
ЗАБЕЛЕЖКА: Ако някой от компонентите е повреден или липсва,
свържете се с Вашия търговски представител.
Бърз преглед
български
6) Индикатор на
14) Пpeвклю
ц
ватeл на
1) USB 2.0 индикатор
захранването
захранването
2) LAN индикатор 7) WPS бутон 12) Порт захранване (DC-IN)
3) WAN индикатор 8) USB 2.0 портове 13) Бутон за нулиране
4) 2.4GHz индикатор 9) LAN Портове 14) Wi-Fi бутон
5) 5GHz индикатор 10) WAN Порт 15)
Куки за монтиране на стена
21
EEU8162_RT-AC52U_QSG.indb 21 6/14/13 4:11:16 PM

български
ЗАБЕЛЕЖКИ:
•
USB Външен хард / флаш диск:
• Безжичният рутер работи с повечето USB хард дискове и флаш
дискове до 2 TB и поддържа достъп четене-писане за FAT16,
FAT32, EXT2, EXT3 и NTFS.
• За сигурно изключване на USB диска стартирайте
потребителския интерфейс от мрежата GUI (http://192.168.1.1),
след това на страница Network Map (Карта на мрежата) в
горния десен ъгъл щракнете иконата на USB и щракнете Eject
USB 1 (Изхвърляне на USB 1).
• Списъка на системните и дискови раздели, поддържани от
безжичния рутер, можете да намерите на http://event.asus.
com/networks/disksupport
•
Сървър на мрежов принтер:
• Помощната програма за мрежови принтери се поддържа от
Windows®XP, Windows® Vista, и Windows® 7 За инсталиране на
помощната програма на Mac OS, отидете в USB Application
(USB приложение) > Network Printer Server (Сървър на
мрежов принтер) и щракнете върху Download Now! (Изтегли
сега!). След което изберете Use LPR protocol for sharing
(Използвай LPR протокол за споделяне). .
• За списък с принтери, които се поддържат от безжичния рутер,
посетете
http://event.asus.com/networks/printersupport
•
3G/4G USB модеми:
• За списък с проверени USB модеми, посетете visit:
http://event.asus.com/2009/networks/3gsupport.
• Рутерът ще се рестартира, за да започнат да важат настройките.
22
EEU8162_RT-AC52U_QSG.indb 22 6/14/13 4:11:17 PM
Разположение на безжичния рутер
За постигане на максимално добро предаване на безжичните сигнали
между безжичния рутер и свързаните с него мрежови устройства трябва:
• Да поставите безжичния рутер на централно място за максимално покритие
на мрежовите устройства.
• Рутерът да е отдалечен от метални прегради и да не е изложен на слънчева
светлина.
• Рутерът да е отдалечен от Wi-Fi устройства 802.11g или 20MHz, компютърни
периферни устройства 2.4GHz, Bluetooth (блутут) устройства, безжични
телефони, трансформатори, мощни мотори, флуоресцентни лампи,
микровълнови печки, хладилници и други промишлени машини за
избягване на смущенията или загубите на сигна
български
•
Рутерът ще се рестартира, за да започнат да важат настройките.
•
Рутерът ще се рестартира, за да започнат да важат настройките.
• Винаги използвайте най-новите версии на фърмуера. Посетете сайта на
ASUS http://www.asus.com за сваляне на последните версии на фърмуера.
23
EEU8162_RT-AC52U_QSG.indb 23 6/14/13 4:11:34 PM


