Asus P5V-VM DH: instruction
Class: Computer equipment, hardware, accessories
Type: Motherboard
Manual for Asus P5V-VM DH
Table of contents
English
™
DH Remote
User Guide
Copyright © 2006 ASUSTeK COMPUTER INC. All Rights Reserved.

Welcome
Tired of sticking to your PC and busy with your keyboard and mouse? With the
English
ASUS DH Remote, you can play, pause, or adjust the volume on any songs
desired without leaving your sofa. Have DH Remote in your hand and do more with
your PC at a distance away!
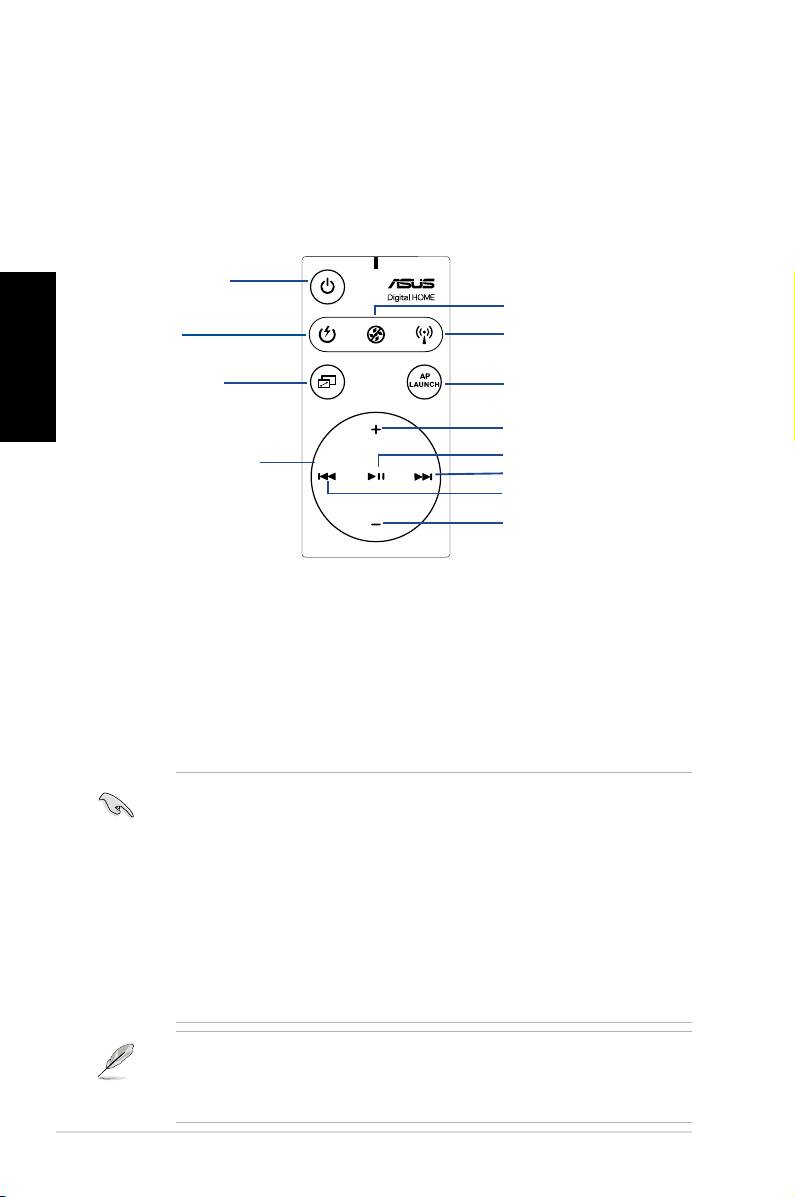
Overview of the ASUS DH Remote
1. Power
5. Noise Off
2. Quick Power
6. EZ WiFi
3. Full Screen
7. Application Launch
Volume Up
Play/Pause
4. Media Control Zone
Next
Previous
Volume Down
1. Power: Turns the computer on/off
2. Quick Power: Puts the computer quickly into sleep mode which is S3
3. Full Screen: Puts the media application into full screen
4. Media Control Zone: Controls the media application
5. Noise Off: Reduces the noise coming from the computer
6. EZ WiFi: Puts the computer quickly into sleep mode but allowing WiFi-AP Solo™
to still operate
7. Application Launch: Launches the media application
• TouseQuickPower,saveyourdatarst.
• The Noise Off mode is suitable only for light-loading computer operations like
word processing and web page browsing, and it will intelligently adjust the fan
speed according to the system loading.
• Different system equipments (the number of VGA, PSU, chassis fan) will act
on the effect of Noise Off.
• *When using a fan speed controllable VGA card or a fanless VGA card,
remember to connect the power fan and chassis fan cable to the fan connector
on the motherboard to get a better Noise Off effect.
*Not all power supply units have fan connectors, refer to the the motherboard
manual for details.
EZ-WiFi mode is suitable especially when you are away from the PC and still want
to download data or use devices like wireless applications and Skype phone. Re-
press the EZ-WiFi function button to disable the EZ-WiFi function.
2
DH Remote

English
DH Remote
3
ASUS >>USB receiver
USB receiver
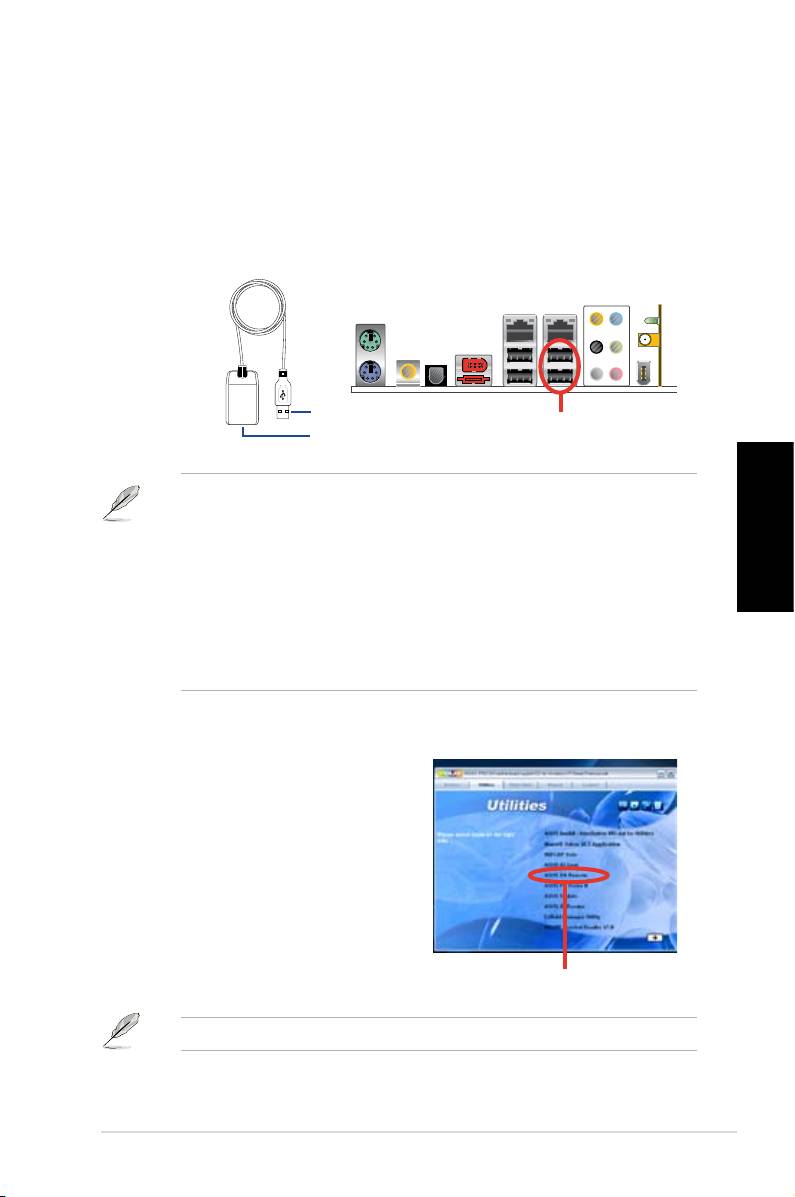
Infrared Receiver Installation
USB IR Receiver
Your motherboard will come bundled with a IR Receiver, simply connect the USB
end to your PC USB ports under the LAN2 port and place the IR receiver end at a
suitable place without hindrance.
IR Receiver
USB end
USB Ports
Infrared end
• The valid IR function distance is 6m depending on the environment.
Suggest you to aim at the IR receiver when using the ASUS DH Remote to
ensure a smooth and successful operation.
• These two USB ports support USB wake-up capability. So when the
computer is not turned on, removing USB devices such as the ASUS IR
receiver from these two ports will start up the PC.
• Back I/O differs depending on the motherboards.
• Supports operating system: Windows XP, 2003 server, XP (64-bit), and
2003 server (64-bit).
Software Installation
Before enjoying the convenience the ASUS
DH Remote brings you, you need to install
the software after the infrared receiver
installation. Simplyclickandinstallthele
ASUS DH Remote from Utilities menu of
the Motherboard Support CD package for
thersttime,anditwilllaunchautomatically
everytime you start up your PC.
ASUS DH Remote
The
Utilites
screen differs depending on the motherboard.

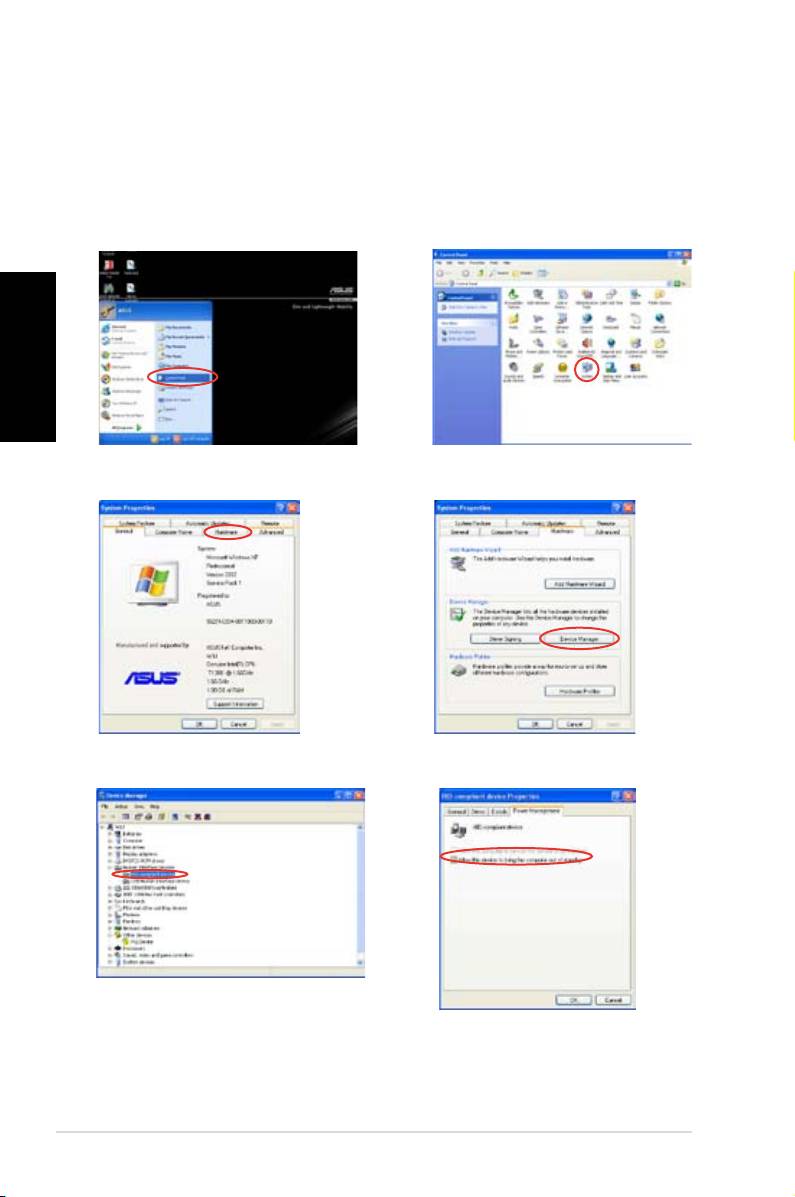
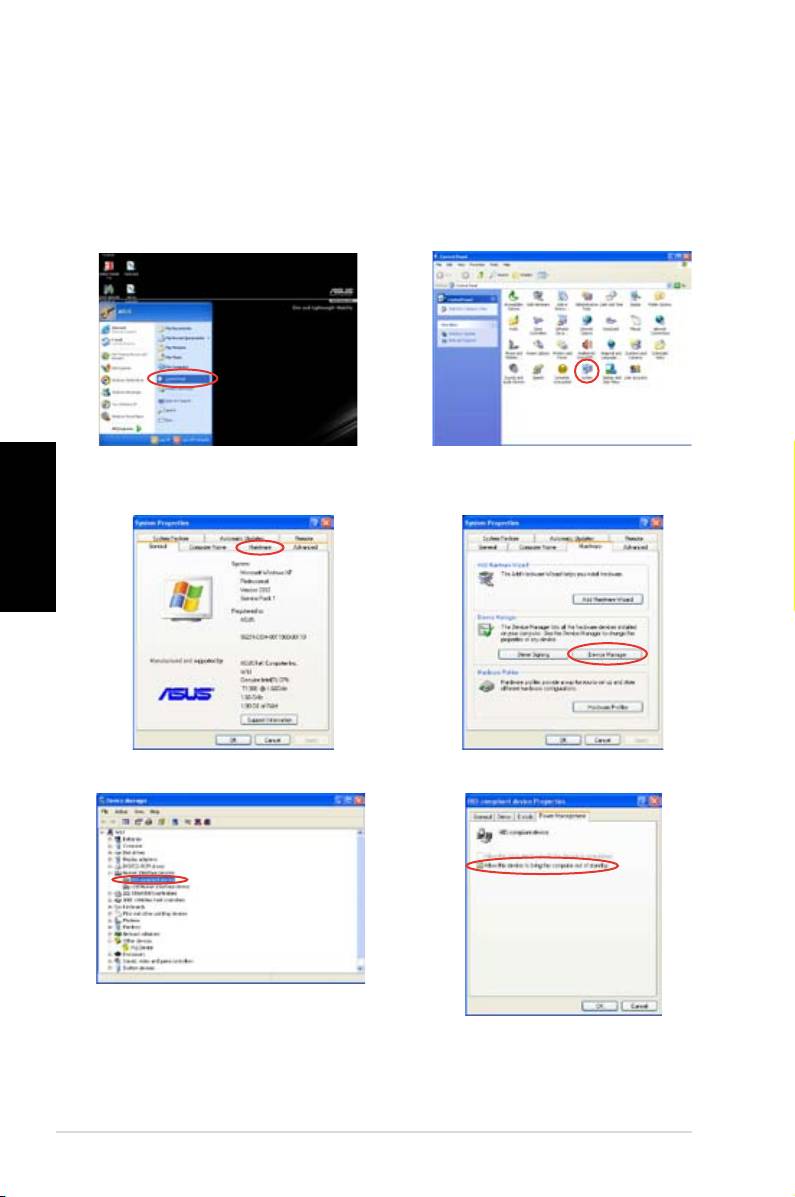
Activating HID-Compliant Devices
English
Due to the limitation of the operating system, if you remove the IR receiver from
the previous port and have it reinstall into the other USB port, the IR receiver will
not function. To activate the HID-compliant devices again, go to Device Manager/
Power Manager and check the box of Allow this device to bring the computer
out of standby.
1. Click Start and choose Control
2. Double click
System
.
Panel.
3. Click
Hardware
. 4. Click
Device Manager
.
5. Select
HID-compliant devices
. 6. Ch e c k th e b o x of
A l l o w
th is device to bring the
computer out of standby
.
4
DH Remote

ASUS DH Remote Settings
After the installation of the ASUS DH Remote software, the utility screen will show
upandallowsyoutoconguretheASUSDHRemotesettings.Setupthefunction
keys step by step.
English
1
2
3
1. Power On / Off Key
Setting this item to Hibernate allows you to lead your PC to the Windows S4
mode, which enables your PC to enter Hibernate faster and return to full power
much more quickly.
• You have to check the box of Enable Power Key before using the ASUS
DH Remote to turn on and off your PC or to have it hibernate. Visit www.
microsoft.com for details about Hibernate.
• Power On/Off button does not support MS-DOS Mode.
• Check the box of Enable power on after power loss Function Switch.
Whenever the power cord of your PC is removed from the outlet or there is
a power failure, your PC will auto-boot and shut down around few seconds
to enable Power On Function of DH Remote after the power supply is back.
Multimedia Keys
2. Prole
There are nine default applications in the Prole drop-downmenuandvesetsof
User Dene.
Default applications are Media Player, iTunes, PowerDVD, WinDVD, QuickTime,
Real Player, DivX Player, WinAmp and Power Point. (Default applications in the
ASUS DH Remote software may change without notice.)
3. Path
Thesoftwarewillhelplocatetheexecutable(.exe)leoftheninedefault
applications.Ifthe.exeleisnotlocated,clickBrowse to direct the correct path.
The.exelesoftheUser Dene applications need to be located manually before
you using the ASUS DH Remote.
• Saveafterthe.exelepathisdirected.
• Iftheexecutableleisrelocatedortheapplicationisre-installed,youhave
toredirectthelepathforacorrectASUSDHRemoteoperation.
DH Remote
5
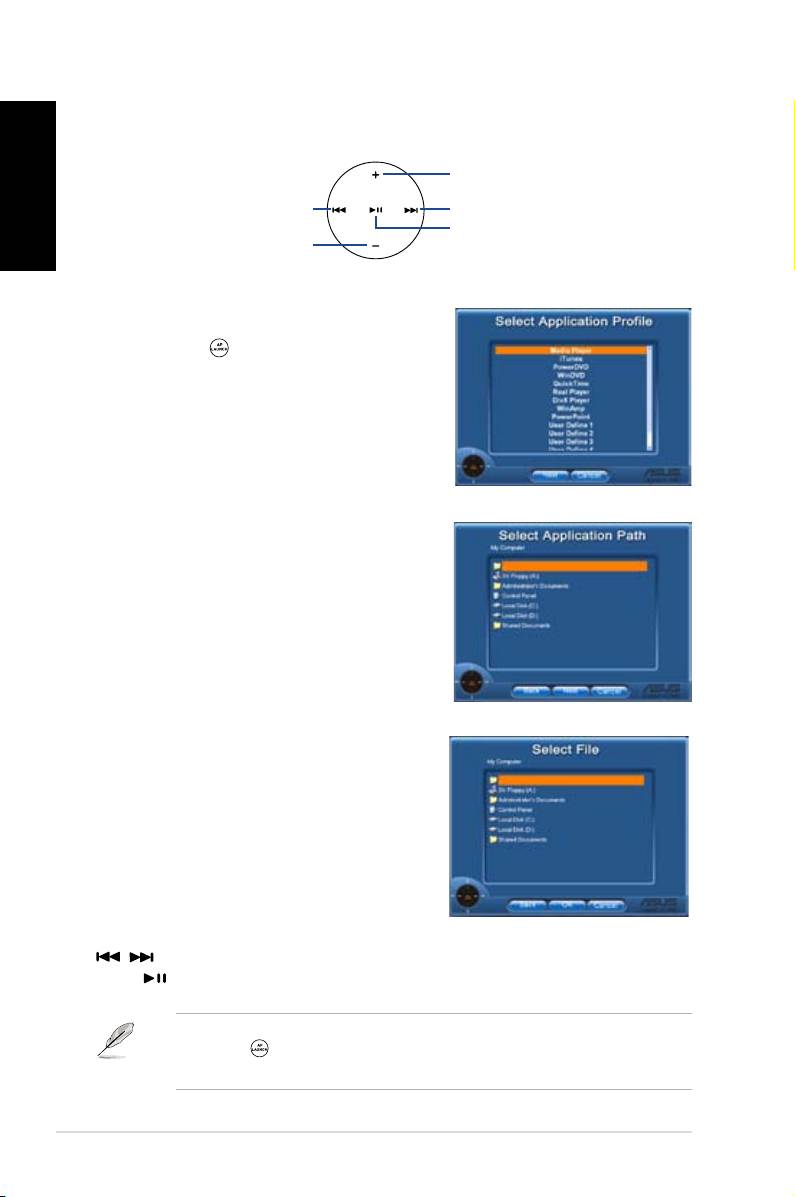
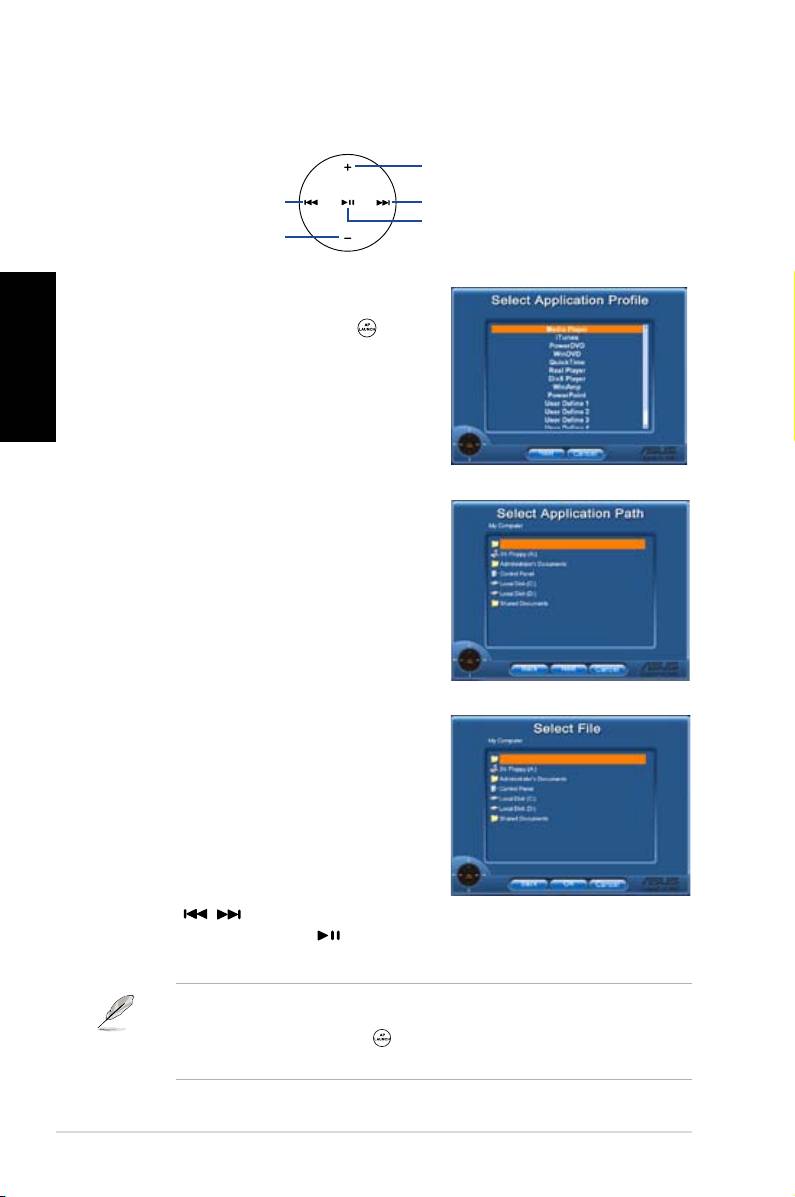
AP Launch Button and AP Launch Menu
Navigate with the media control zone.
English
upward
leftward
rightward
enter
downward
Select Application Prole
After you press on the remote control, an
applicationprolewillbedisplayedonthe
screen. Use the remote control to navigate and
initiate a desired application.
Select Application Path
If the software fails to locate the executable
leoftheapplicatonattherst-timeuse,the
Select Application Path screen will appear.
Specify the correct path on screen.
Select File
After selecting the correct path, you should
selectthecorrectexecutablele(.exe)ofthe
application for launching the application.
Iftheexecutableleislocatedbythesoftware
successfully or you have already set up
correctly in advance, this screen will show up
directly when the application is chosen. After
selectingadesiredle,folderorCDROM,use
/ to choose Back/OK/Cancel and then
press toconrm.
• For music listening, making playlists beforehand is suggested.
• Press again toclosetheapplicationandagaintore-launchtheprole
menu.
6
DH Remote

Dene Hotkeys for Application
If you want to use the Media Control Zone to control non-default applications, such
as ACDSee, you can select User Dene from the drop-down menu and rename
it by pressing Rename. The ASUS DH Remote software has correctly set up nine
popularapplicationsanddenedthefuntionbuttonsforyour convenient operation.your convenient operation. convenient operation.
English
User Dene
After clicking the box of
Use Hotkeys for Application
,youarefreetodenethe
hotkeysoftheUserDeneapplications.
Select User Dene 1~5 from the Proledrop-downmenuforhotkeysdenition.Press
Save to save the new setup or press the Default button to clear ALL personalized
setupsandrestoretotheoriginaldenitions.
• Theremotecontrolbuttonswillfunctiononlywhenthedenitionsofthe
application hotkeys are correct.
• Thehotkeydenitionsmayvarywithdifferentsoftwareversions.Clickthebox
of Redene default hotkeystogivenewcorrectdenitionsifneeded.Press
SavebuttontosavetheredenitionsorpressReset button to restore to the
defaulthotkeysdenition.
Aftertheinitialsetup,youwillndanASUSDHRemoteicon on the Windows
OS taskbar. Click the icon and select Settings to launch the utility screen.
DH Remote
7
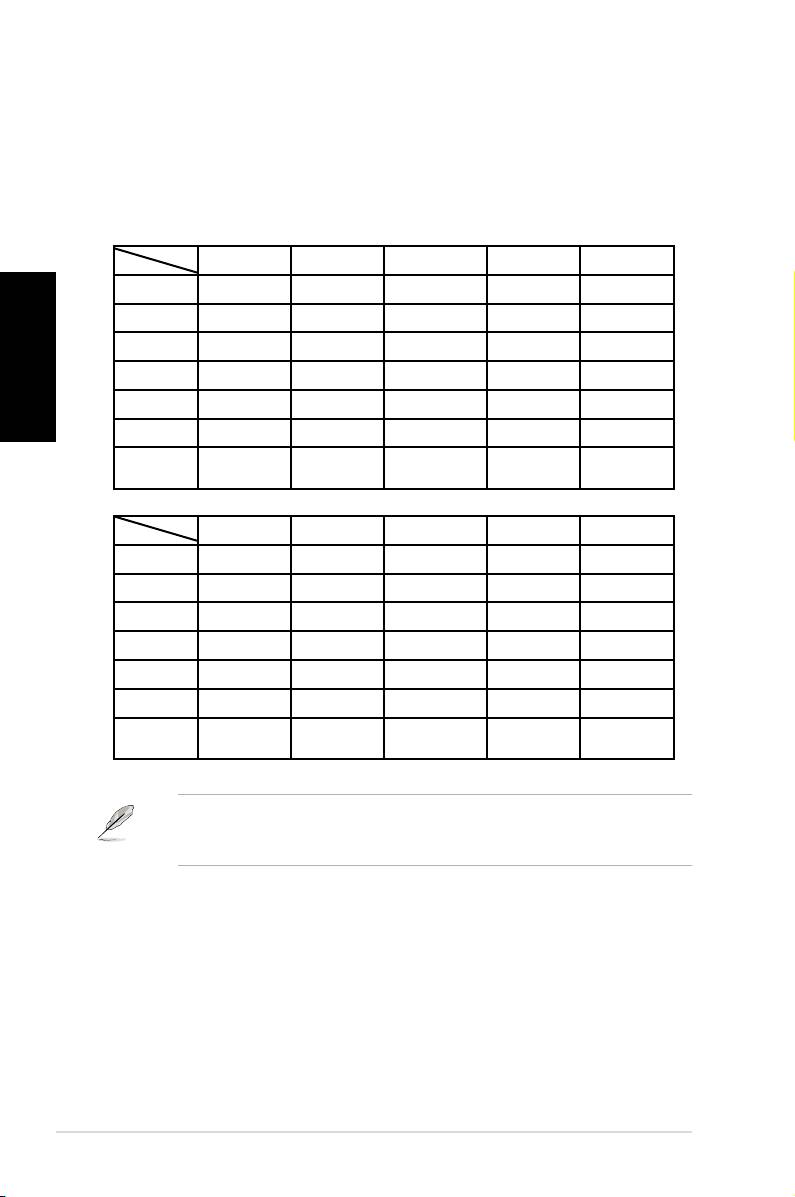
Appendix
The Function Buttons and AP Prole
English
The ASUS DH Remote software helps you set up the correspondence
between the function buttons on the remote to the function hotkeys of nine
popularapplicationsinadvanceandleavesvesetsfor
User Dene
.
Media Player iTunes PowerDVD WinDVD QuickTime
Full Screen v v v v v
Play/Pause v v v/x v v
Vol+ v v v v v
Vol- v v v v v
Ch+ v v v v x
Ch- v v v v x
*NOTE
only play, no pause
Real Player DivX Player WinAmp Power Point User Defne
Full Screen v v x v
Play/Pause v v v/x Full Screen
Vol+ v x v B
Vol- v x v ESC
Ch+ v x v Page Down
Ch- v x v Page Up
*NOTE
only play, no pause
Ifyoundthe9defaultapplicationsinsufcientandwould liketoadddifferent
applications, you are able to rename the 5 sets User Dene and create your
preferred applications and favorable setups.
8
DH Remote
™
DH Remote
Français
Guide
Copyright © 2006 ASUSTeK COMPUTER INC. Tous droits réservés.
Bienvenue
Fatigué d’avoir à être collé à votre PC et de manipuler souris et clavier ? Avec la
télécommande ASUS DH Remote, vous pouvez lire, mettre en pause, ou ajuster le
volume de vos musiques favorites sans avoir à quitter le confort de votre canapé.
Prenez DH Remote en main et contrôlez votre PC à distance.
Vue d'ensemble de la télécommande
1. Alimentation
5. Réduction du bruit
Français
2. Veille
6. EZ WiFi
3. Plein écran
7. AP Launch
Augmentation du volume
Lecture/Pause
4. Zone de contrôle
Suivant
multimédia
Précédent
Baisse du volume
1. Alimentation: Démarre ou éteint l'ordinateur.
2. Veille: Bascule l'ordinateur en mode veille (S3).
3. Plein écran: Bascule l'application multimédia en mode plein écran.
4. Zone de contrôle multimédia: Contrôle l'application multimédia.
5. Réduction du bruit: Réduit les nuisances sonores émises par l'ordinateur.
6. EZ WiFi: Bascule l'ordinateur en mode veille tout en maintenant la fonction WiFi-
AP Solo™ active.
7. AP Launch: Exécute l'application multimédia
• Avant d’utiliser le mode veille, veuillez d’abord sauvegarder vos données.
• La fonction Réduction du bruit n’est applicable qu’aux opérations à faible
charge tel que le traitement de texte ou la navigation sur Internet, et permet
d’ajuster la vitesse du ventilateur selon la charge système.
• Différents composants système (carte graphique, alimentation, ventilateur du
châssis) réagiront lors de l’activation de la Réduction du bruit.
• *Lors de l’utilisation d’une carte graphique sans ventilateur ou supportant
le contrôle du ventilateur, veillez à connecter les câbles d’alimentation du
ventilateurs d’alimentation et châssis à leur connecteur de ventilation respectif
sur la carte mère pour de meilleurs résultats.
*Toutes les alimentations ne possèdent pas de connecteurs de ventilation, reportez-
vous au manuel de votre carte mère pour plus de détails.
L’utilisation de la fonction EZ-WiFi est très utile lorsque vous êtes absent mais
souhaitez tout de même continuer à télécharger des données ou utiliser des
applicationssansltelqu'untéléphoneSkype.RéappuyezsurleboutonEZ-WiFi
pour désactiver cette fonction.
2
DH Remote

Installation du récepteur infrarouge (IR)
Récepteur IR USB
Votre carte mère est accompagnée d'un récepteur infrarouge (IR). Connectez
le connecteur USB du récepteur à un des ports USB de votre PC localisé sous
le port LAN2, et placez le récepteur infrarouge dans un endroit ne causant pas
d'interférences.
Français
• La portée du signal IR est d’environ 6 mètres selon l’environnement
d’opération. Il est recommandé de diriger la télécommande ASUS DH
Remote vers le récepteur infrarouge pour un meilleur fonctionnement.
• Les deux ports USB supportent la fonction de réveil via USB. Lorsque
l’ordinateur est en veille, retirer des périphériques USB, tel que le récepteur
infrarouge ASUS, démarrera le PC.
• Lacongurationdupanneaud’E/Speutvarierselonlemodèledecartemère.
• Systèmes d’exploitation supportés: Windows XP, 2003 server, XP (64-bits),
et 2003 server (64-bits).
Installation logicielle
Avant toute utilisation de la
télécommande ASUS DH Remote,
il est nécessaire d’installer l’utilitaire
ASUS DH Remote. Après avoir
infrarouge,
installé le récepteur
installezlechierASUS DH Remote
localisé dans le menu Utilities du CD
de support accompagnant votre carte
mère. Une fois l’utilitaire installé, celui-
ci sera automatiquement exécuté à
chaque démarrage de votre PC.
DH Remote
3
ASUS >>USB receiver
USB receiver
connecteur USB
Ports USB
Récepteur IR
ASUS DH Remote
L'écran
Utilites
peut varier selon le modèle de carte mère.
Activer les périphériques compatibles HID
En raison des limitations du système d’exploitation, si vous retirez le récepteur IR de son
port USB pour le réinstaller sur un port USB différent, le récepteur infrarouge ne pourra pas
fonctionner. Pour réactiver les périphériques compatibles HID, accédez au Gestionnaire
de périphériques et cochez l’option Allow this device to bring the computer out
of standby (Permettre à ce périphérique de sortir l’ordinateur du mode veille).
Français
1. Cliquez sur Démarrer et sélectionnez
2. Double-cliquez sur
Système
.
Panneau de conguration.
3. Cliquez sur l'onglet
Matériel
. 4. Cliquez sur
Gestionnaire de
périphériques
.
5. Sélectionnez
HID-compliant
6. Cochez l'option
Allow this
devices
(Périphériques
device to bring the computer
compatibles HID).
out of standby
(Permettre
à ce périphérique de sortir
l'ordinateur du mode veille).
4
DH Remote

Paramètres ASUS DH Remote
Unefoisl’installationdulogicielASUSDHRemoteterminée,l’utilitaireafchera
unécrandecongurationsdesparamètresASUSDHRemote.Congurezles
touches de fonction par étapes.
1
2
3
Français
1. Power On / Off Key (bouton d’alimentation)
CongurercetélémentsurHibernate (Veille prolongée) permet de basculer votre
PC en mode Windows S4, autorisant ce dernier à entrer et sortir du mode veille
prolongée plus rapidement.
• Il est nécessaire de cocher l’option Enable Power Key (Activer le bouton
d’alimentation) avant de pouvoir utiliser votre télécommande ASUS DH
Remote pour activer/désactiver votre PC ou le basculer en veille prolongée.
Visitez www.microsoft.com pour plus de détails sur le mode de veille prolongée.
• Le bouton d’alimentation ne supporte pas le mode MS-DOS.
• Cochez l’option Enable power on after power loss Function Switch.
(Activer la mise sous tension après une perte d’alimentation). Lorsque
le cordon d’alimentation de votre PC est débranché ou lorsqu’une perte
d’alimentation se produit, votre PC redémarrera automatiquement puis
s’éteindra pendant quelques secondes pour réactiver la fonction de mise
sous tension de la télécommande une fois fois l’alimentation rétablie.
Multimedia Keys (touches multimédia)
2. Prole (prol)
Il existe neuf applications par défaut dans le menu déroulant Prole, plus cinq
autrescongurablesvial’optionUser Dene (Congurationutilisateur).
Les applications par défaut sont Media Player, iTunes, PowerDVD, WinDVD,
QuickTime, Real Player, DivX Player, WinAmp et Power Point. (Les applications
par défaut de l’utilitaire ASUS DH Remote peuvent changer sans avertissement.)
3. Path (emplacement)
L‘utilitairevousaideàlocaliserleschiersexécutables(.exe)desneufapplications
pardéfaut.Silechier.exen’estpaslocalisé,cliquezsurBrowse (Parcourir) pour
unelocalisationmanuelle.Leschiers.exedesapplicationsUser Dene doivent être
localisés manuellement.
• Sauvegardezvoschangementsunefoislechier.exelocalisé.
• Silechierexécutableestdéplacéousil’applicationestréinstallée,ilest
nécessairederelocaliserl’emplacementdeschiers.exe.
DH Remote
5
Bouton et menu AP Launch
Naviguez dans les menus via la zone de contrôle multimédia.
Haut
Gauche
Droite
Entrée
Bas
Sélectionner une application
Français
Lorsque vous pressez sur le bouton de
la télécommande, une liste d’applications
seraafchéeàl’écran.Utilisezla
télécommande pour naviguer et initier
l’application désirée.
Sélectionner un emplacement
d’application
Si l’utilitaire ne parvient pas à localiser le
chierexécutabledel’application,l’écran
Select Application Path apparaîtra.
Spéciezalorsl’emplacementcorrectede
l’application.
Sélectionner un chier
Une fois l’emplacement trouvé, sélectionnez
lechierexécutable(.exe)del’aplication.
Silalocalisationduchierexécutable,par
l’utilitaire ou manuellement, est réussie,
cet écran apparaîtra lorsque l’application
est choisie. Après avoir sélectionner le
chier,dossier,ouCD-ROMdésiré,utilisez
les boutons / pour choisir Back/
OK/Cancel, puis appuyez sur pour
conrmer.
• Pourl’écoutedechiersaudio,lacréationdelistesdelectureest
recommandée.
• Appuyez de nouveau sur pour fermer l’application et retourner au menu
principal.
6
DH Remote

Créer des raccoucis
Si vous souhaitez utiliser la zone de contrôle multimédia pour contrôler une
application ne faisant pas partie de la liste des applications par défaut, tel que
ACDSee, sélectionnez User Denedepuislalistedesprolsdisponibleset
renommez-la en pressant le bouton Rename.
User Dene (Conguration utilisateur)
Après avoir coché l'option
Use Hotkeys for Application
(Utiliser les raccourcis
d'application), il est possible de définir des raccourcis pour les applications
conguréesparl'utilisateur.
Français
Sélectionnez User Dene 1~5 depuis le menu déroulant Prolepourdénir
des raccourcis. Appuyez sur Save (Sauvegarder) pour enregistrer la nouvelle
congurationousurleboutonDefault (Par défaut) pour annuler TOUS les
changements effectués et restaurer les paramètres par défaut.
• les boutons de la télécommande ne fonctionnent que si les raccourcis
assignés aux applications sont corrects.
• Ladénitiondesraccourcispeutvarierselonlaversiondel'utilitaire.Cochez
la case Redene default hotkeys(Redénirlesracourcispardéfaut)pour
redénir les raccourcis par défaut de l'utilitaire.Appuyez sur Save pour
enregistrer les changements ou sur Reset pour rétablir les réglages par défaut.
Aprèslacongurationinitialedel’utilitaireASUSDHRemote,l’icône apparaîtra
sur la barre des tâches de Windows. Cliquez sur cette icône et sélectionnez
Settings(Paramètres)pourafcherl’écrandel’utilitaire.
DH Remote
7
Appendice
Boutons de fonction et AP Prole
L'utilitaireASUSDH Remote vouspermetdecongurer la correspondance entre
les boutons de la télécommande et les raccourcis de neuf applications populaires
pluscinqautresapplicationsdéniesparl'utilisateur.
Media Player iTunes PowerDVD WinDVD QuickTime
Plein écran v v v v v
Français
Lect./Pause v v v/x v v
Vol+ v v v v v
Vol- v v v v v
Ch+ v v v v x
Ch- v v v v x
*NOTE
Pas de fonction
pause
Real Player DivX Player WinAmp Power Point User Defne
Plein écran v v x v
Lect./Pause v v v/x Plein écran
Vol+ v x v B
Vol- v x v Echap
Ch+ v x v Page Down
Ch- v x v Page Up
*NOTE
Pas de fonction
pause
Si vous souhaitez ajouter de nouvelles applications, en plus des neuf déjà
disponibles, vous pouvez utiliser l’option User Define et configurer cinq
applications additionelles.
8
DH Remote
™
DH Remote
Deutsch
Benutzerhandbuch
Copyright © 2006 ASUSTeK COMPUTER INC. Alle Rechte vorbehalten.

Willkommen
Sind Sie es leid, am PC festzusitzen und nur mit Tastatur und Maus zu hantieren?
Mit der ASUS DH Remote-Fernbedienung können Sie die Musikwiedergabe
starten, anhalten und die Lautstärke verändern, ohne von Ihrem Sofa aufstehen zu
müssen. Mit der DH Remote in der Hand beherrschen Sie Ihren PC aus der Ferne!
ASUS DH Remote - Übersicht
1. Ein/Aus
5. Lärmreduzierung
2. Quick Power
6. EZ WiFi
3. Vollbild
7. Anwendungsstart
Lautstärke auf
Play/Pause
4. Media Control Zone
Weiter
Deutsch
Zurück
Lautstärke ab
1. Ein/Aus: Schaltet den Computer Ein/Aus
2. Quick Power: Versetzt den Computer sofort in den S3-Ruhezustand
3. Vollbild: Wechselt in Media-Anwendungen zum Vollbildmodus
4. Media Control Zone: Steuert die Media-Anwendungen
5. Lärmreduzierung: Verringert die vom Computer erzeugten Geräusche
6. EZ WiFi: Versetzt den Computer schnell in den Ruhezustand, aber führt
weiterhin WiFi-AP Solo™ aus
7. Anwendungsstart: Öffnet Media-Anwendungen
• Speichern Sie Ihre Daten, bevor Sie Quick Power nutzen.
• Die Lärmreduzierung ist nur sinnvoll, wenn der Computer keine
leistungsfordernden Anwendungen ausführt. Die Lüftergeschwindigkeit wird
je nach Systemlast angepasst.
• Die jeweilige Systemausstattung (Anzahl der installierten Grakkarten,
Netzteile, Gehäuselüfter) wirkt sich auf die Lärmreduzierung aus.
• *Wenn Sie eine Grakkarte mit Lüftergeschwindigkeitskontrolle oder eine
lüfterlose Grafikkarte verwenden, verbinden Sie die Netzteillüfter- und
Gehäuselüfterkabel mit den Lüfteranschlüssen des Motherboards, um eine
bessere Lärmreduzierung zu erzielen.
*Nicht alle Netzteile verfügen über Lüfteranschlüsse. Details siehe Handbuch
des Motherboards.
Der EZ-WiFi-Modus ist besonders nützlich, wenn Sie sich vom PC entfernen, aber
trotzdem weiterhin Daten herunterladen oder Geräte wie Wireless-Anwendungen
oder Skype-Telefone nutzen wollen. Drücken Sie die EZ-WiFi-Funktionstaste erneut,
um die EZ-WiFi-Funktion zu deaktivieren.
2
DH Remote
Installation des Infrarot-Empfängers
USB IR-Empfänger
Ihrem Motherboard ist ein IR-Empfänger beigelegt. Verbinden Sie einfach das
USB-Ende mit einem der USB-Ports Ihres PCs unterhalb des LAN2-Anschlusses,
und positionieren Sie den IR-Empfänger an einer passenden Stelle ohne
Hindernisse.
• Die normale IR-Betriebsentfernung betragt bis zu sechs Meter, je nach
Umgebung. Es wird empfohlen, Ihren IR-Empfänger in Richtung der ASUS DH
Remote zu positionieren, um eine ungehinderte Nutzung zu garantieren.
• Die zwei USB-Ports unterstützen die USB-Weckfunktion. Daher kann das
Deutsch
Entfernen von USB-Geräten wie dem IR-Empfänger bei ausgeschaltetem
System dazu führen, dass der PC gestartet wird.
• Die Ein- und Ausgänge an der Rückseite unterscheiden sich je nach
Motherboard.
• Unterstützte Betriebsysteme: Windows XP, 2003 Server, XP (64-Bit), und
2003 Server (64-Bit).
Software-Installation
Bevor Sie die Bequemlichkeit der ASUS
DH Remote genießen können, müssen
Sie die Software nach der Installation
des Infrarot-Empfängers installieren.
Klicken Sie einfach auf die Datei
ASUS DH Remote im Utilities-Menü
der Motherboard Support-CD, und die
Software wird bei jedem Start Ihres PCs
automatisch ausgeführt.
DH Remote
3
ASUS >>USB receiver
USB receiver
IR-Empfänger
USB-Ende
USB-Ports
Infrarot-Ende
ASUS DH Remote
Das
Utilites
-Menü fällt in verschiedenen Motherboards unterschiedlich aus.
Aktivieren der HID-konformen Geräte
Aufgrund der Einschränkungen des Betriebssystems funktioniert der Infrarot-
Empfänger nicht, wenn Sie ihn von einem Port entfernen und an einem anderen
USB-Port anschließen. Um die HID-konformen Geräte erneut zu aktivieren, gehen
Sie zum Geräte-Manager und klicken Sie die Box Allow this device to bring the
computer out of standby an.
1. Klicken Sie auf Start und wählen
2. Doppelklicken Sie auf
System
.
Deutsch
Sie die Systemsteuerung.
3. Klicken Sie auf
Hardware
. 4. Wählen Sie
Geräte-Manager
.
5. Wählen Sie
HID-konforme
6. Wählen Sie
Allow this device
Geräte
.
to bring the computer out of
standby
.
4
DH Remote
