Asus Xonar HDAV1.3 Slim: instruction
Class: Computer Accessories
Type:
Manual for Asus Xonar HDAV1.3 Slim
Table of contents
- English ��������������������������������������������������������������1
- 1. Package contents 2. System requirements
- 3. Hardware introduction 3.1 Xonar HDAV 1.3 Slim card layout No Item Description Coaxial and optical TOSLINK combo digital output port�
- 3.2 Card installation
- 4. Driver installation

Index
English ��������������������������������������������������������������1
Français ������������������������������������������������������������7
Deutsch ����������������������������������������������������������13
Italiano ������������������������������������������������������������19
Español�����������������������������������������������������������25
Português �������������������������������������������������������31
Русский ������������������������������������������������������������37
English
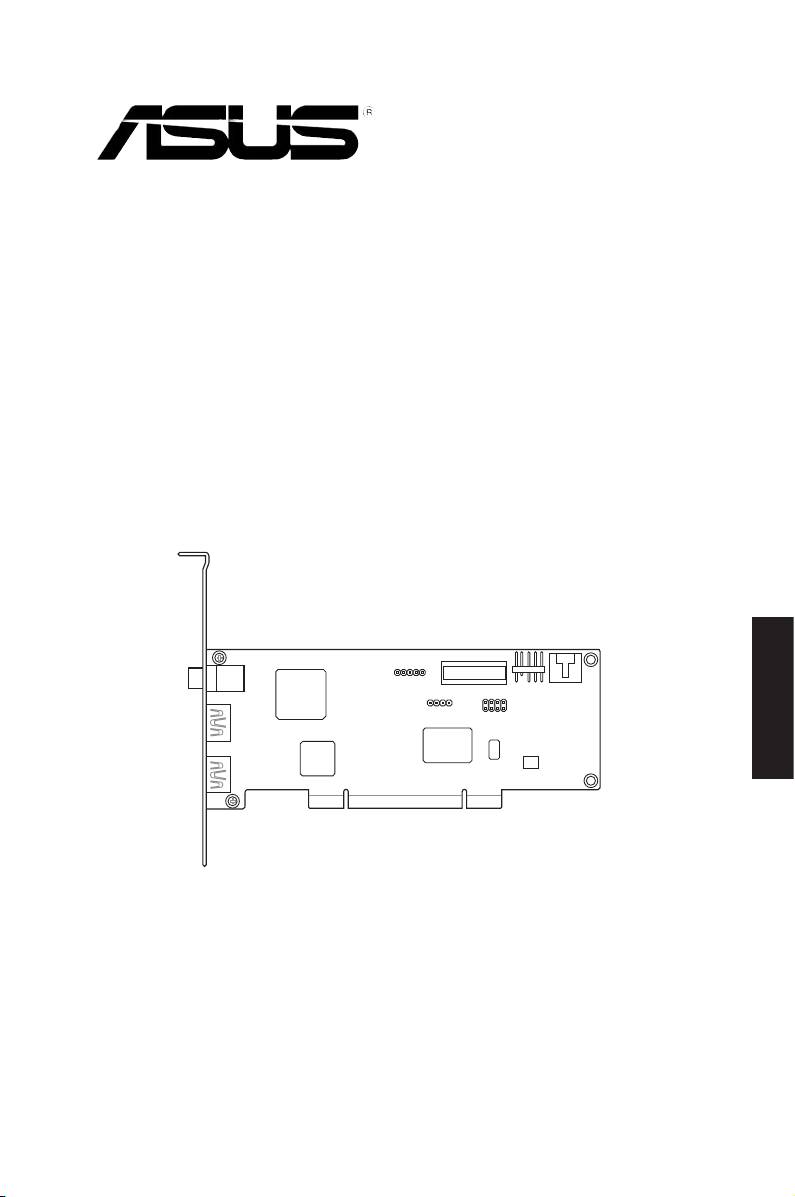
Xonar HDAV 1.3 Slim
AV card
Quick Start Guide

1. Package contents
Check your ASUS Xonar HDAV 1�3 Slim AV card package for the following items:
English
• ASUS Xonar HDAV 1�3 Slim PCI AV card
• HDMI cable x1
• DVI-to-HDMI cable x1
• S/PDIF TOSLINK optical adapter x1
• LowprolePCIcardbracketx1
• Support CD
• Quick Start Guide
• ArcSoft TotalMedia Theatre Blu-Ray Disc Software Player CD
2. System requirements
To ensure a successful installation of the Xonar HDAV 1�3 Slim AV card, your
computer must meet the following requirements:
• One graphics card with DVI or HDMI out port (to AV card for HDMI function):
256MB NVIDIA GeForce8400 and above, or
256MB AMD (ATI) HD2400 and above
• One PCI 2�1 (or higher) compatible slot for the Xonar HDAV 1�3 Slim card
®
®
• Microsoft
Windows
Vista/ XP(32/64bit)/ MCE2005
®
®
• Intel
Pentium
4 1�4GHz or AMD Athlon 1400 CPU or faster CPU
• 512 MB (or above) DRAM system memory for Blu-Ray Disc playback
• 100 MB available HDD space for driver installation package;
additional 120 MB available for TMT
• CD-ROM drive (or DVD-ROM drive ) for software installation;
Blu-ray/HD-DVD compatible ROM drive for HD movie playback
• An HDMI-ready AV receiver or TV/monitor set (v�1�3 is better), home theater
system,high-qualityheadphonesorspeakers,toenjoytheultra-highdelity
audio and video of the AV card
2
ASUS Xonar HDAV 1�3 Deluxe Slim Quick Start Guide
3. Hardware introduction
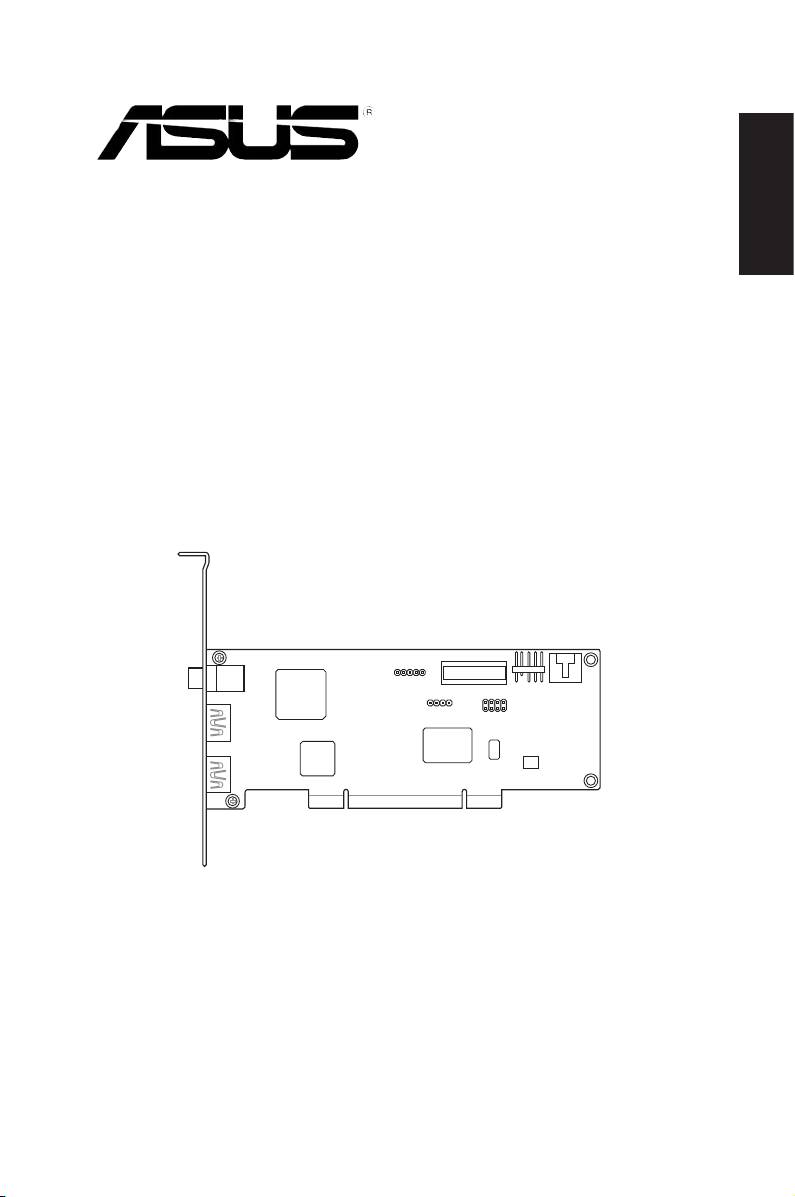
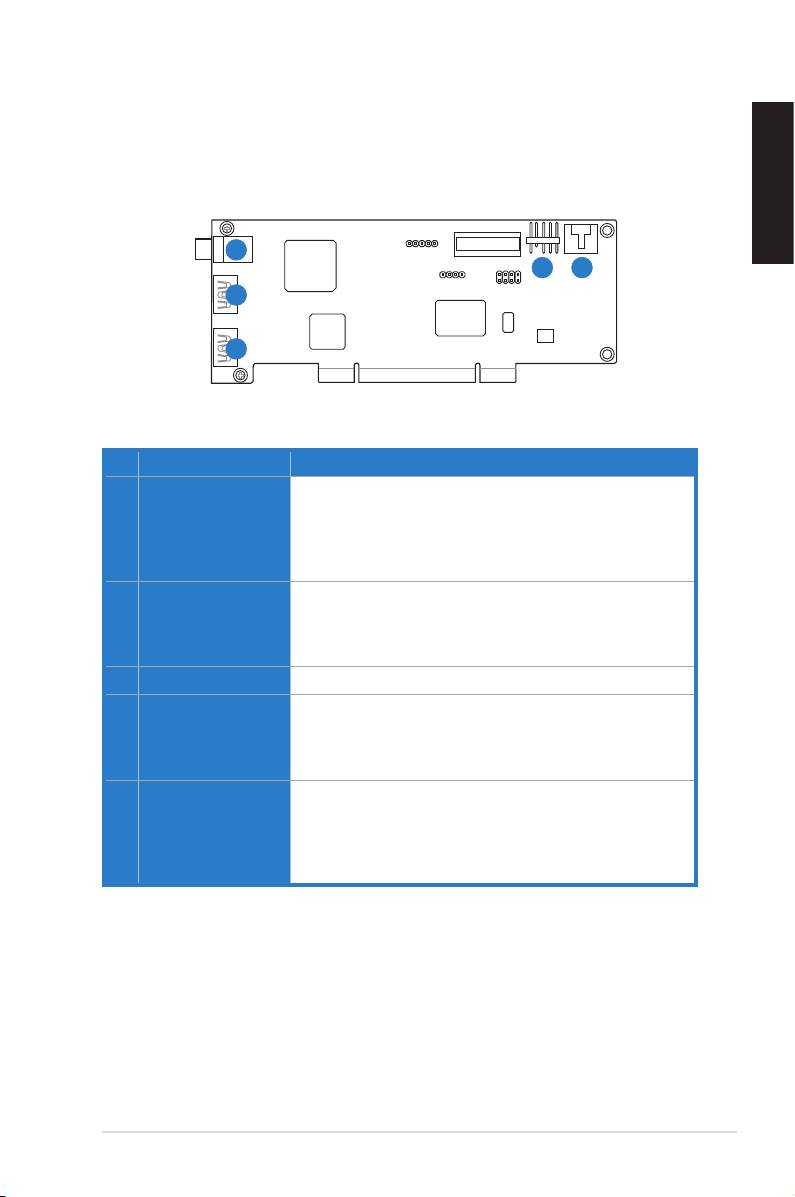
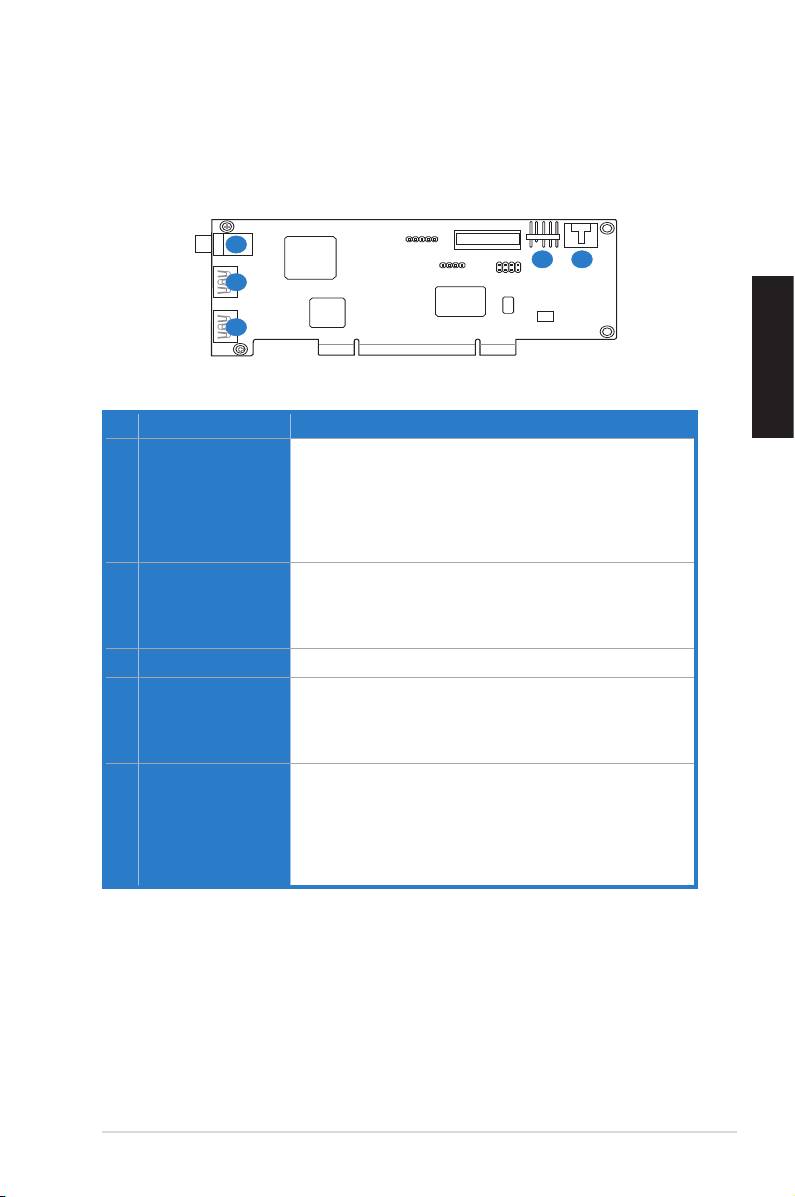
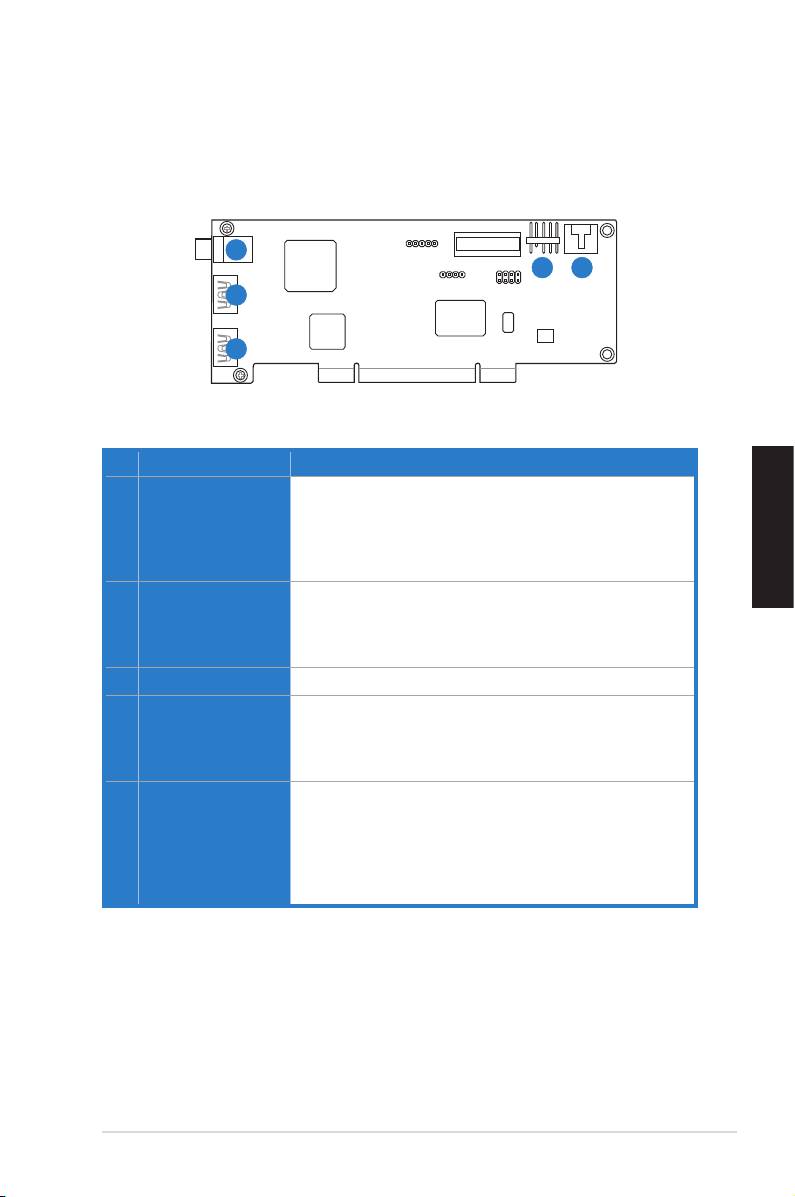
3.1 Xonar HDAV 1.3 Slim card layout
English
1
4
5
2
3
No Item Description
1 S/PDIF Out port
Coaxial and optical TOSLINK combo digital output port�
Connects to an external digital decoder or digital speaker
systems, Home Theater systems, AV receivers for outputting
digital audio including PCM, Dolby Digital, DTS, WMA-Pro,
etc�
2 HDMI In port (for DVI
Connects to the DVI port of a graphics card using the
signal input)
bundled HDMI-to-DVI cable for DVI signal transmission, or
connects to the HDMI Out port of an HDMI graphics card
using an HDMI cable�
3 HDMI Out port
Connects to a device with HDMI support�
4 Front panel audio
Connect one end of the front panel audio cable to the front
header
panel audio header on the Xonar HDAV 1�3 Slim card, with
the other end to the chassis-mounted front panel audio I/O
module�
5 Aux Input Header
Usually connects to the Analog Audio output of TV tuner card
or other sound source inside your PC system� (To monitor
yourTVtunercard’saudiofromthisAux-In,youmustenable
the“monitor”functionforAux-InintheXonarHDAVCenter‘s
recording mixer�)
ASUS Xonar HDAV 1�3 Deluxe Slim Quick Start Guide
3

3.2 Card installation
Securing the Xonar HDAV 1.3 Slim card:
English
1� Power OFF the computer, the monitor,
and all other peripheral devices
connected to your computer�
2� Unplug the computer power cord from
your computer and power outlet�
3� Touch the metal back or side panel of
the computer to avoid static electricity�
4� Remove the chassis cover�
5� Remove the metal bracket from an available PCI slot for the Xonar HDAV
Slim card�
6� Carefully insert the Xonar HDAV Slim card into the PCI slot� Ensure the
Xonar HDAV Slim card sits properly in place�
7� Secure the Xonar HDAV Slim card with screws or metal brackets�
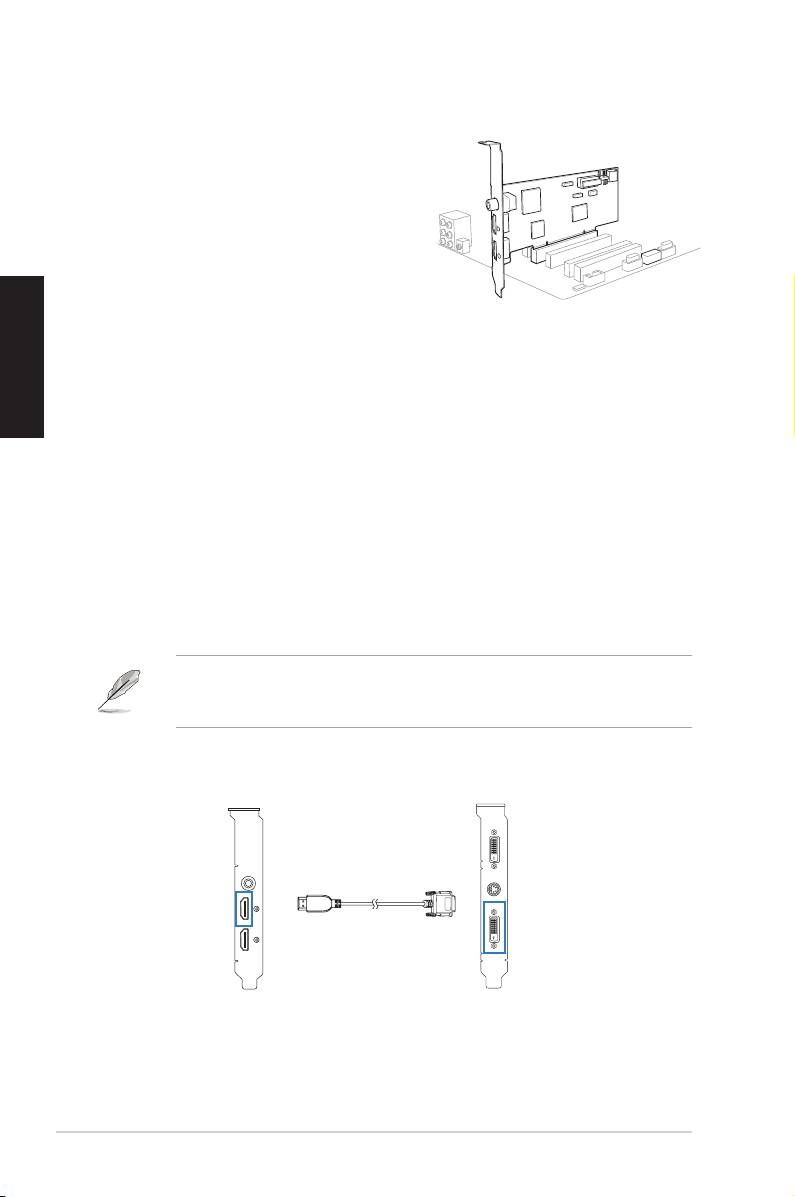
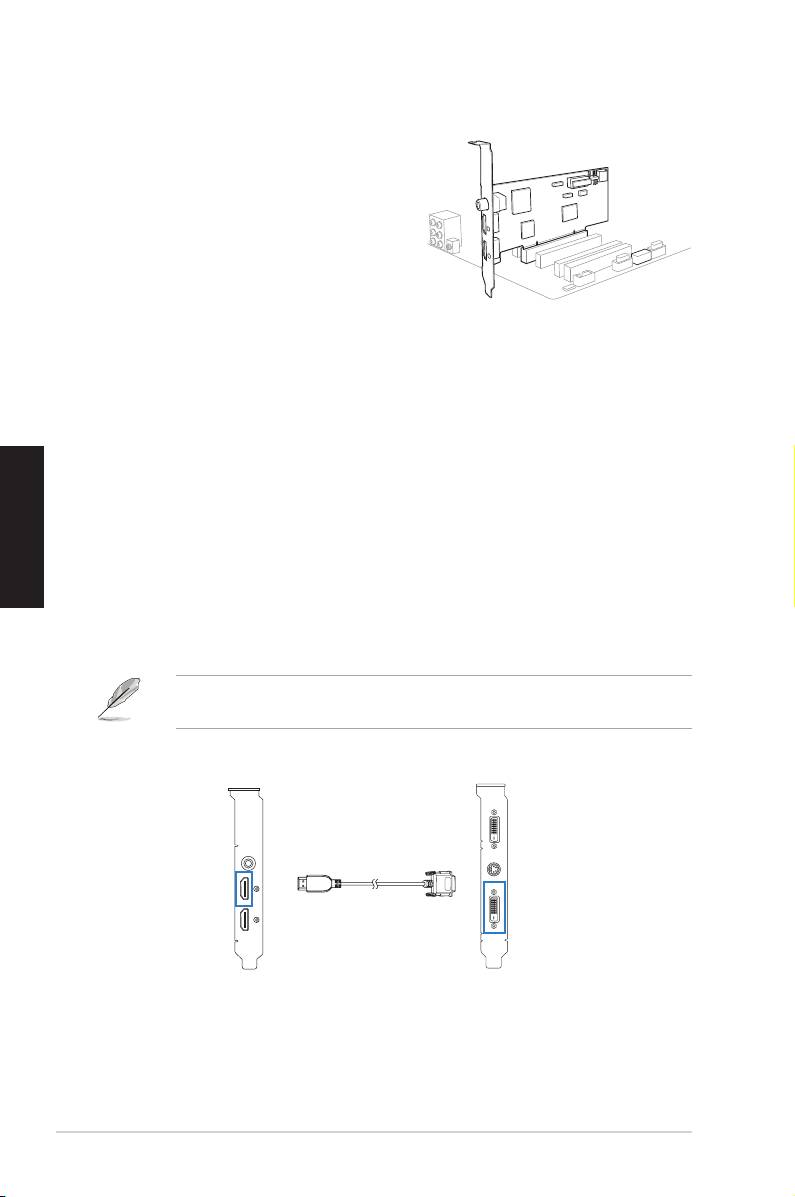
Connecting to a discrete graphics card and an HDMI display device:
1� Install a discrete graphics card on your motherboard�
2� Using the bundled DVI-to-HDMI cable, connect the DVI Out port of the
graphics card to the HDMI In port of the Xonar HDAV Slim card�
If you are using an HDMI graphics card, connect your graphics card with the
Xonar HDAV Slim card using the HDMI cable that comes with your graphics
card package�
Xonar HDAV Slim card Graphics card
HDMI In
DVI Out
DVI-to-HDMI cable
4
ASUS Xonar HDAV 1�3 Deluxe Slim Quick Start Guide
1
2
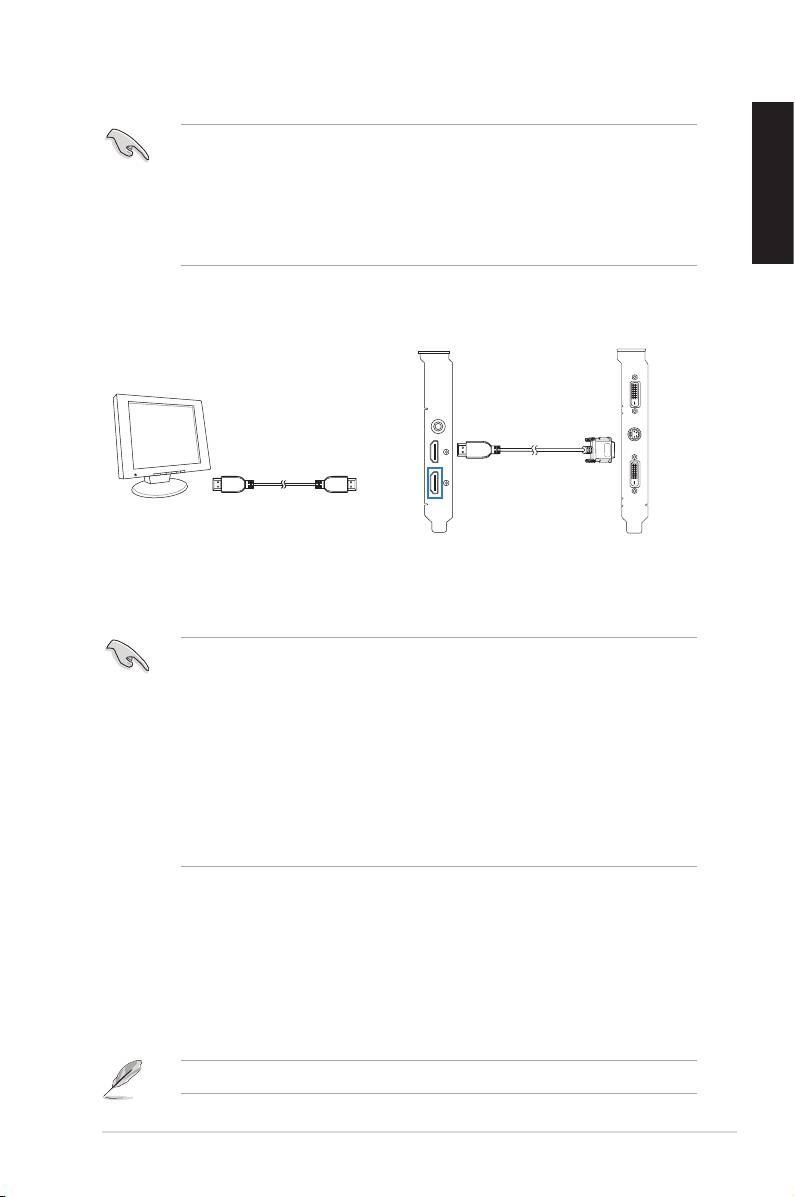
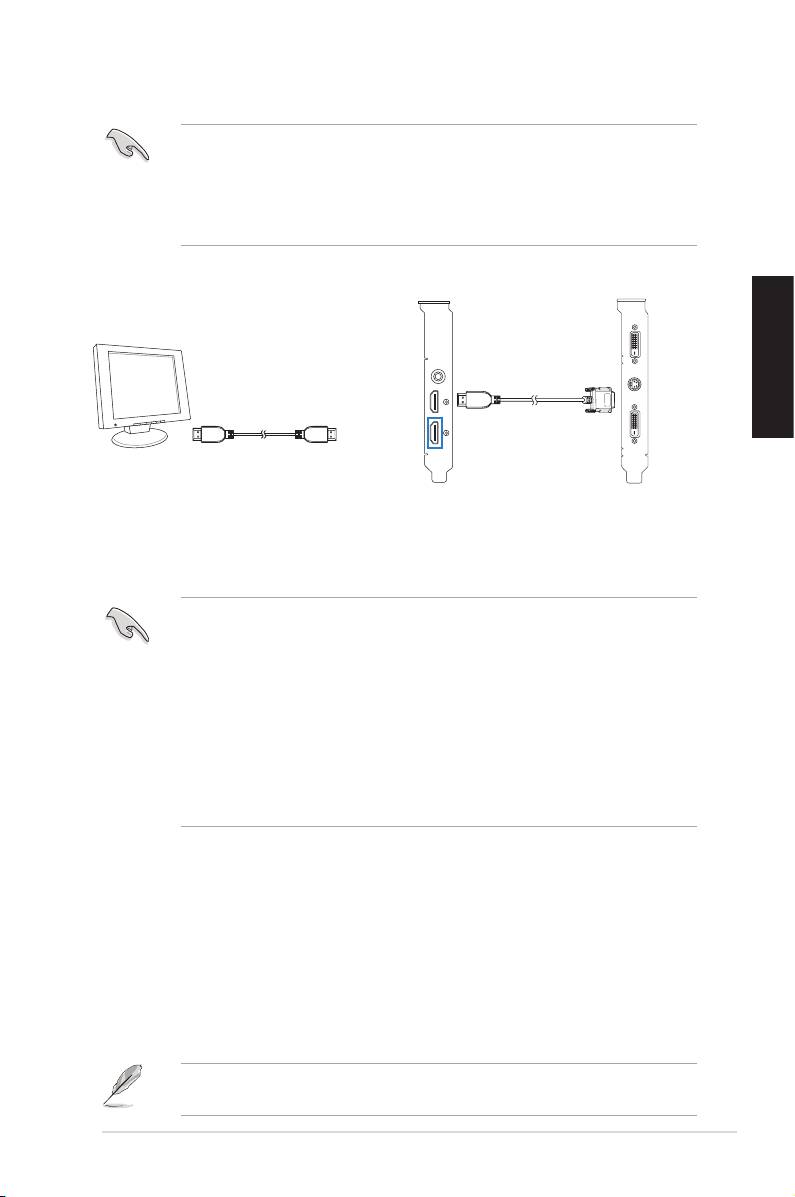
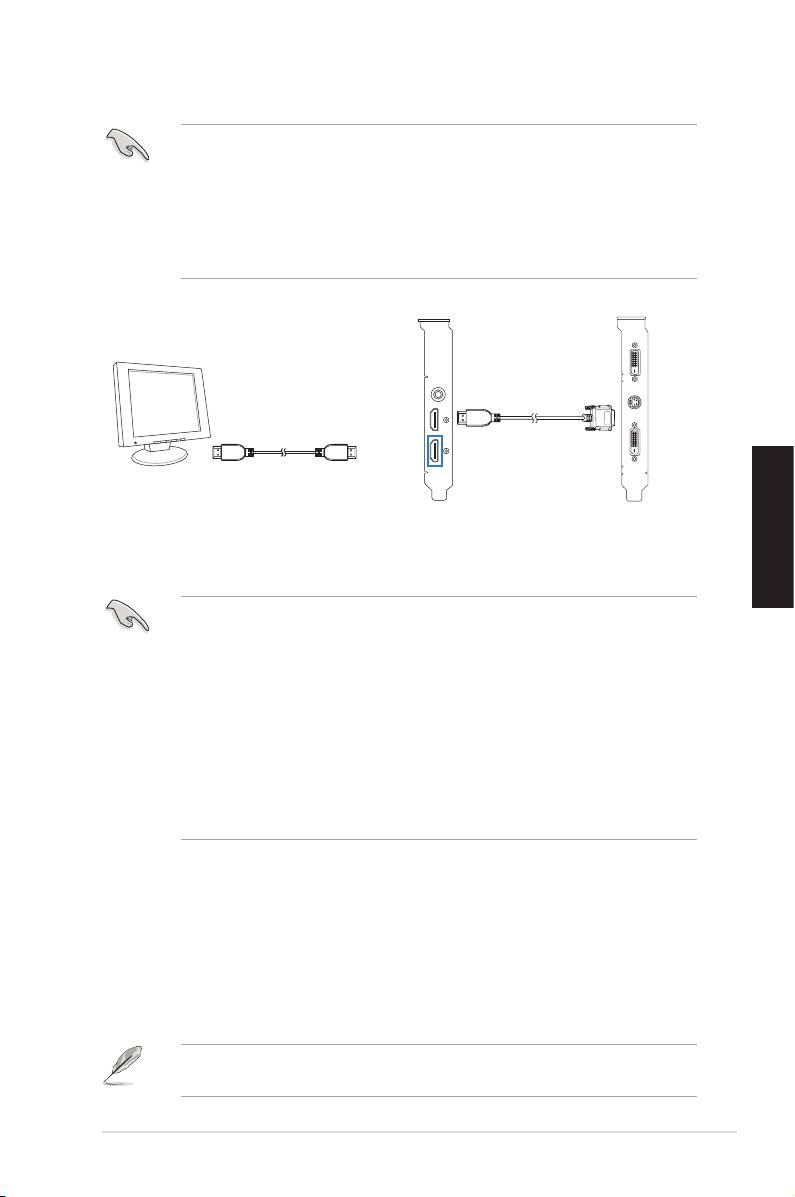
3� Using an HDMI cable, connect one end to the HDMI out port of the Xonar
HDAV Slim card and the other end to the HDMI display device�
• Ensure that you have properly connected the DVI-to-HDMI cable for normal
video signal transmission� Otherwise, there might be no video on your
HDMI display device�
• HDMI AV output will work only when the source graphics card and the
English
terminal display device are both properly connected to the Xoanrd HDAV
Slimcard’sHDMIinput/outputports.
Graphics card
HDMI display device
Xonar HDAV Slim card
HDMI Out
DVI-to-HDMI cable
HDMI cable
4. Driver installation
Installing the Xonar HDAV Slim card driver
• Ensure that you have installed the VGA card driver before installing the
Xonar HDAV driver� Otherwise, driver installation error may occur�
• Some LCD TVs with HDMI inputs do not support PC video resolutions
and may lose audio signals as well, excepting on the following video
resolutions: 480i/p (640x480, 720x480), 720p (1280x720), and 1080i/p
(1920x1080)� Hence, it is suggested that you set your LCD TV to one of
these TV resolutions�
• If you are using an ASUS graphics card with the ASUS Enhance Display
driver installed, ensure to remove the driver before installing the Xonar
HDAV driver� Otherwise, the GamerOSD driver installation error may occur�
1� After you have installed the Xonar HDAV Slim card, turn on your computer�
®
Windows
automatically detects the HDAV card and searches for device
drivers� When prompted for the drivers, click Cancel�
2� Insert the support CD into the optical drive� If Autorun is enabled in your
system, the setup starts automatically� If not, run setup.exe from your
support CD�
3. Followtheonscreeninstructionstonishtheinstallation.
The version and content of the driver CD are subject to change without notice�
ASUS Xonar HDAV 1�3 Deluxe Slim Quick Start Guide
5

English
6
ASUS Xonar HDAV 1�3 Deluxe Slim Quick Start Guide
Xonar HDAV 1.3 Slim
Français
Carte Audio/Vidéo
Guide de démarrage
rapide

1. Contenu de la boîte
VériezquelaboîtedevotrecarteAVASUSXonarHDAV1.3Slimcontientbienles
éléments suivants :
• Carte AV PCI ASUS Xonar HDAV 1�3 Slim
• Câble HDMI x1
• Adaptateur DVI-vers-HDMI x1
• Adaptateur S/PDIF TOSLINK optique x1
• Support de carte PCI demi-hauteur x1
Français
• CD de support
• Guide de démarrage rapide
• CD contenant le logiciel de lecture de disques Blu-Ray «ArcSoft TotalMedia
Theatre»
2. Pré-requis système
Avantd’installerlacarteXonarHDAV1.3Slim,assurez-vousquevotreordinateur
puisse satisfaire aux critères suivants :
• Une carte graphique avec un port DVI ou HDMI (vers la carte AV pour la
fonction HDMI) :
NVIDIA GeForce8400 256Mo et supérieur, ou
AMD (ATI) HD2400 256Mo et supérieur
• Un slot PCI 2�1 (ou supérieur) pour la carte Xonar HDAV 1�3 Slim
®
®
• Microsoft
Windows
Vista/ XP(32/64bit)/ MCE2005
®
®
• Un processeur Intel
Pentium
4 1�4GHz ou AMD Athlon 1400 ou supérieur
• Mémoire DRAM de 512 Mo (ou plus) pour la lecture de disques Blu-Ray
• 100Mod’espacedisquedisponiblepourl’installationdespilotes+120Mo
pourl’installationdel’applicationTMT
• UnlecteurdeCD-ROM(ouDVD-ROM)pourl’installationdeslogicielsouun
lecteurBlu-ray/HD-DVDROM(pourlalecturedelmsenhautedénition)
• Un récepteur audio/vidéo ou un téléviseur/moniteur compatible HDMI (le
support HDMI v�1�3 est préférable), un home cinéma, des écouteurs de haute
qualité,deshaut-parleursanalogiquesounumériquespourproterpleinement
de la qualité audio délivrée par la carte audio/vidéo
8
ASUS Xonar HDAV 1�3 Deluxe Slim - Guide de démarrage rapide
3. Introduction au matériel
3.1 Layout de la carte Xonar HDAV 1.3 Slim
1
4
5
2
3
Français
N° Élément Description
1 Port de sortie S/PDIF
PortdesortienumériqueTOSLINK(Optique+Coaxial).
Se connecte à un décodeur numérique externe, un home
cinéma, un système de haut-parleurs numériques ou un
récepteurpourlatransmissiond’unsignalaudionumérique
supportant les technologies PCM, Dolby Digital, DTS, WMA-
Pro, etc�
2 Port d’entrée HDMI
SeconnecteauportDVId’unecartegraphiquevia
(pour la réception
l’adaptateurDVI-vers-HDMIfournipourunetransmissionde
d’un signal DVI)
signal DVI, OUauportdesortieHDMId’unecartegraphique
via un câble HDMI�
3 Port de sortie HDMI
Se connecte à un périphérique intégrant un port HDMI�
4 En-tête audio pour
Connectez une extrémité du câble audio du panneau avant
panneau avant
devotrePCàl’en-têteaudiopourpanneauavantdelacarte
XonarHDAV1.3Slim,puisl’autreextrémitéaumoduled’E/S
du panneau avant du châssis�
5 En-tête d’entrée
Se connecte généralement au port de sortie audio
auxiliaire
analogiqued’unecartetunerTVoutoutautresourceaudio
interne du PC� (Pour surveiller les signaux audio de votre
carte tuner TV depuis ce port, vous devrez activer la fonction
desurveillanceduport“Aux-In”àpartirdel’utilitaireaudio
Xonar HDAV Center�)
ASUS Xonar HDAV 1�3 Deluxe Slim - Guide de démarrage rapide
9
3.2 Installation de la carteInstallation de la carte
Sécuriser la carte Xonar HDAV 1.3 Slim : 1.3 Slim :
1. �teignez l’ordinateur, le moniteur et tous�teignezl’ordinateur,lemoniteurettous
les périphériques connectés au PC�
2. Débranchezlecordond’alimentationde
l’ordinateuretdelapriseélectrique.
3. Touchezl’arrièremétalliqueou
le panneau latéral du châssis de
l’ordinateurpourvousdéchargerde
Français
l’électricitéstatique.
4� Retirez le panneau latéral du châssis�
5. Retirezlescachesmétalliquesd’unslotPCIpourpouvoirinstallerlacarte
Xonar HDAV Slim�
6� Insérez délicatement la carte PCI� Assurez-vous que la carte est bien enInsérez délicatement la carte PCI� Assurez-vous que la carte est bien en PCI� Assurez-vous que la carte est bien enAssurez-vous que la carte est bien en
place�
7. Sécurisezlacarteàl’aidedevisoudescachesmétalliques.
Connecter une carte graphique et un périphérique d’afchage HDMI :
1� Installez une carte graphique sur votre carte mère�Installez une carte graphique sur votre carte mère�
2. Àl’aidedel’adaptateurDVI-vers-HDMIfourni,connectezleportdesortieDVI
delacartegraphiqueauportd’entréeHDMIdelacarte Xonar HDAV Slim. Xonar HDAV Slim�
Si vous utilisez une carte graphique HDMI, connectez la carte graphique à
lacarteXonarHDAVSlimàl’aideducâbleHDMIaccompagnantvotrecarte
graphique�
Carte Xonar HDAV Slim
10
ASUS Xonar HDAV 1�3 Deluxe Slim - Guide de démarrage rapide
1
2
Carte graphique
Entrée HDMI
Sortie DVI
Adaptateur DVI-vers-HDMI
3. À l’aide d’un câble HDMI, connectez le port de sortie HDMI de la carte XonarÀl’aided’uncâbleHDMI,connectezleportdesortieHDMIdelacarteXonar
HDAVSlimauportd’entréeHDMIdupériphériqued’afchage.
• Assurez d’avoir correctement connecté l’adaptateur DVI-vers-HDMI pourAssurezd’avoircorrectementconnectél’adaptateurDVI-vers-HDMIpour
une transmission du signal vidéo normale�
• La transmission de signal HDMI ne fonctionne que lorsque la carte
graphiqueouleterminald’afchageestcorrectementreliéauxports
d’entrée/sortieHDMIdelacarteXonarHDAV.
Carte Xonar HDAV Slim
Carte graphique
Périphérique
d’afchage HDMI
Français
Sortie HDMI
Adaptateur DVI-vers-HDMI
Câble HDMI
4. Installation du piloteInstallation du pilote
Installer le pilote de la carte Xonar HDAV Slim Slim
• Assurez-vous d’avoir installé le pilote d’afchage avant d’installer le piloteAssurez-vousd’avoirinstallélepiloted’afchageavantd’installerlepilote
XonarHDAV.Sinon,deserreursd’installationpeuventsurvenir.
• Certains téléviseurs LCD intégrant des ports HDMI ne supportent pas les
résolutions vidéo PC et peuvent aussi perdre le signal audio, exceptés
pour les résolutions vidéo suivantes : 480i/p (640x480, 720x480), 720p
(1280x720), et 1080i/p (1920x1080)� Il est donc recommandé de régler
votretéléviseursurl’unedecesrésolutions.
• Si vous utilisez une carte graphique ASUS et avez installé le pilote ASUS
EnhanceDisplay,désinstallezcepiloteavantd’installerceluidelacarte
XonarHDAV.Sinon,l’installationdupiloteGamerOSDpeutéchouée.
®
1� Une fois la carte Xonar HDAV installée, allumez votre PC� Windows
détectera
automatiquement la carte HDAV Slim et lancera la recherche du pilote
approprié.Lorsquelafenêtred’installationdupiloteapparaît,cliquezsur
Annuler�
2. InsérezleCDdesupportdansvotrelecteuroptique.Sil’Exécution
automatiqueestactivée,leprocessusdecongurationdémarre
automatiquement.Sicen’estpaslecas,cliquezsurlechiersetup.exe
contenu dans le CD de support�
3. Suivezlesinstructionsàl’écranpourterminerl’installation.
LaversionetlecontenuduCDdesupportpeuventêtremodiéssansavis
préalable�
ASUS Xonar HDAV 1�3 Deluxe Slim - Guide de démarrage rapide
11

Français
12
ASUS Xonar HDAV 1�3 Deluxe Slim - Guide de démarrage rapide
Xonar HDAV 1.3 Slim
AV-Karte
Schnellstartanleitung
Deutsch

1. Verpackungsinhalt
Überprüfen Sie Ihre ASUS Xonar HDAV 1�3 Slim AVKartenverpackung auf folgenden
Inhalt:
• ASUS Xonar HDAV 1�3 Slim PCI AV-Karte
• 1x HDMI-Kabel
• 1x DVI-zu-HDMI-Kabel
• 1x optischer S/PDIF TOSLINK-Adapter
• 1xachePCI-Kartenklemme
• Support-CD
• Schnellstartanleitung
• ArcSoft TotalMedia Theatre Blu-Ray Disc Software Player CD
2. Systemanforderungen
Deutsch
Um eine erfolgreiche Installation der Xonar HDAV 1�3 Slim AV-Karte zu
gewährleisten, muss Ihr Computer die folgenden Anforderungen erfüllen:
• EineGRakkartemitDVI-oderHDMI-Ausgang(zuAV-KartefürdieHDMI-
Funktion):
256MB NVIDIA GeForce8400 oder höher
256MB AMD (ATI) HD2400 oder höher
• Ein PCI 2�1 (oder höher) -kompatibler Steckplatz für die Xonar HDAV 1�3 Slim-
Karte
®
®
• Microsoft
Windows
Vista/ XP(32/64Bit)/ MCE2005
®
®
• Intel
Pentium
4 1�4GHz oder AMD Athlon 1400 CPU oder schnellerer
Prozessor
• 512 MB (oder höher) DRAM Systemspeicher für Blu-Ray-Disc-Wiedergabe
• 100 MB freier Festplattenspeicher für de Treiberinstallation;
zusätzliche 120 MB für TMT verfügbar
• CD-ROM- oder DVD-ROM-Laufwerk für die Software-Installation;
Blu-Ray/HD-DVD-kompatibles ROM-Laufwerk für HD-Filmwiedergabe
• Ein HDMI-fähiger AV-Receiver oder TV/Monitor (v�1�3 ist besser),
Heimkinosystem, hochwetige Kofphörere oder Lautsprecher, um die ultra-HiFi
Audio- und Video-AV-Karte zu erleben
14
ASUS Xonar HDAV 1�3 Deluxe Slim - Schnellstartanleitung
3. Hardwareeinführung
3.1 Xonar HDAV 1.3 Slim-Kartenansicht
1
4
5
2
3
Nr. Element Beschreibung
1 S/PDIF-Ausgang
Koaxialer und optischer TOSLINK-Combo-Digitalausgang�
für den Anschluss von externen digitalen Decodern oder
digitalen Lautsprechersystemen, Heimkinoanlagen,
AV-Receivern für die Ausgabe von digitalen Audio,
eingeschlossen PCM, Dolby Digital, DTS, WMA-Pro, usw�
Deutsch
2 HDMI-Eingang (für
VerbindetdenDVI-PorteinerGrakkartemittelsdes
DVI-Signaleingang)
mitgelieferten HDMI-auf-DVI-Kabels für die DVI-
Signalübertragung, oder verbindet einen HDMI-Ausgang
einerHDMI-GrakkartemittelseinesHDMI-Kabels.
3 HDMI-Ausgang
Verbidung zu einem Gerät mit HDMI-Unterstützung�
4 Frontseitenanschluss
Verbinden Sie ein Ende des Frontpanel-Audio-Kabels
mit dem Anschluss für die Blende auf der Xonar Essence
STX-Karte und das andere Ende mit dem am Gehäuse
befestigten Frontblenden E/A-Modul�
5 Aux-
Normalerweise der Anschluss für den analogen Tonausgang
Eingangsanschluss
der TV-Tunerkarte oder anderen Tonausgabegeräten in
Ihrem PC-System� (Um den Ton Ihrer TV-Tunerkarte von
diesem Anschluss zu überwachen, müssen Sie für Aux-In
die Funktion „Überwachen“ im Xonar Essence STX Audio
Center-Aufnahme-Mixer aktivieren�)
ASUS Xonar HDAV 1�3 Deluxe Slim - Schnellstartanleitung
15
3.2 Karteninstallation
Sichern der Xonar HDAV 1.3 Slim-Karte:
1� Schalten Sie den Computer, den Monitor
und alle anderen angeschlossenen
Peripheriegeräte aus�
2� Ziehen Sie den Netzstecker Ihres
Computers aus der Steckdose�
3� Berühren Sie das Metallgehäuse
oder den Rahmen des Computers,
umelekrostatischeAuadungenzu
vermeiden�
4� Entfernen Sie die Gehäuseabdeckung�
5� Entfernen Sie für die Xonar HDAV Slim-Karte die Metallklammer eines freien
PCI-Steckplatzes�
6� Stecken Sie die Xonar HDAV Slim-Karte vorsichtig in den PCI-Steckplatz�
Deutsch
Vergewissern Sie sich, dass die Xonar HDAV Slim-Karte richtig im Steckplatz sitzt�
7� Sichern Sie die Xonar HDAV Slim-Karte mit Schrauben oder der Metallklammer�
Verbinden einer eigenständigen Grakkarte mit einem HDMI-Anzeigegerät:
1. InstallierenSieaufIhremMotherboardeineeigenständigeGrakkarte.
2� Benutzen Sie das mitgelieferte DVI-auf-HDMI-Kabel, um den DVI-Ausgang
derGrakkartemitdemHDMI-EingangderXonarHDAVSlim-Kartezu
verbinden�
WennSieeineHDMI-Grakkartebenutzen,verbindenSieIhreGrakkartemit
der Xonar HDAV Slim-Karte mittels des mitgelieferten HDMI-Kabels�
Xonar HDAV Slim-Karte Grakkarte
HDMI-Eingang
DVI-Ausgang
DVI-auf-HDMI-Kabel
16
ASUS Xonar HDAV 1�3 Deluxe Slim - Schnellstartanleitung
1
2
3� Benutzen Sie ein Ende des HDMI-Kabels mit dem HDMI-Ausgang der Xonar
HDAV Slim-Karte und das andere Ende mit dem HDMI-Anzeigegerät�
• Vergewissern Sie sich, dass Sie das DVI-auf-HDMI-Kabel richtig
angeschlossen haben, um eine normale Videoübertragung zu
gewährleisten� Anderenfalls kann es vorkommen, dass auf dem HDMI-
Anzeigegerät kein Video zu sehen ist�
• DerHDMIAV-Ausgangarbeitetnur,wenndieQuell-Grakkarteunddie
Terminal-Anzeige ordnungsgemäß mit den Ein- und Ausgängen der Xonar
HDAV Slim-Karte verbunden sind�
Grakkarte
HDMI-Anzeigegerät
Xonar HDAV Slim-Karte
HDMI-
DVI-auf-HDMI-Kabel
Ausgang
HDMI-Kabel
4. Treiberinstallation
Deutsch
Installieren der Xonar HDAV Slim-Kartentreiber
• Vergewissern Sie sich, dass Sie vor der Installation der Xonar HDAV-
Treiber die Treiber der VGA-Karte installiert haben� Anderenfalls kann bei
der Treiberinstallation ein Fehler auftreten�
• Einige LCD-TVs mit HDMI-Eingängen unterstützen keine PC-
VideoauösungenundkönnenebenfallsdasAudio-Signalnichtempfangen,
esseidenn,folgendeVideoauösungensindeingestellt:480i/p(640x480,
720x480), 720p (1280x720) und 1080i/p (1920x1080)� Deshalb empfehlen
wir,dassSieIhreLCD-TVaufeinedieserAuösungeneinstellen.
• WennSieeineASUS-GrakkartemiterweitertenAnzeigetreiberinstalliert
haben, vergewissern Sie sich, dass Sie den treiber dafür entfernen,
bevor Sie die Xonar HDAV-Treiber installieren� Anderenfalls kann bei der
GamerOSD-Treiberinstallation ein Fehler auftreten�
1� Nachdem Sie die Xonar HDAV Slim-Karte installiert haben, schalten Sie den
®
Computer ein� Windows
erkennt automatisch Ihre HDAV-Karte und sucht
nach den Gerätetreibern� Klicken Sie auf Abbrechen, wenn Sie nach den
Treibern gefragt werden
2� Legen Sie die Support-CD in das optische Laufwerk ein� Wenn auf Ihrem
System Autorun aktiviert ist, startet die Installation automatisch� Anderenfalls
führen Sie das Programm setup.exe auf Ihrer Support-CD aus�
3� Folgen Sie den Bildschirmanweisungen, um die Installation fertigzustellen�
Die Version und der Inhalt der Treiber-CD kann ohne vorherige Ankündigung
geändert werden�
ASUS Xonar HDAV 1�3 Deluxe Slim - Schnellstartanleitung
17

Deutsch
18
ASUS Xonar HDAV 1�3 Deluxe Slim - Schnellstartanleitung
Xonar HDAV 1.3 Slim
Kartu AV
Panduan Ringkas
Italiano
