Asus Xonar DGX: instruction
Class: Professional equipment
Type:
Manual for Asus Xonar DGX
Table of contents

U7083
Xonar DGX
PCIE 5.1 & Headphone Amp Audio Card
Quick Start Guide
First Edition
Jan. 2012
Copyright © 2012 ASUSTeK Computer Inc.
All Rights Reserved
U7083_Xonar DGX_QSG.indb 1 1/9/12 6:42:03 PM
Table of content
English ....................................................................................... 1
Français ....................................................................................... 4
Deutsch ....................................................................................... 8
Italiano ..................................................................................... 12
Español ..................................................................................... 16
Português .................................................................................. 20
Pyccкий
.................................................................................... 24
Türkçe ..................................................................................... 28
U7083_Xonar_DGX_QSG_front page.i5 5 1/9/12 6:40:40 PM
1. Package contents
Check your ASUS Xonar DGX audio card package for the following items:
• ASUS Xonar DGX PCIE audio card
• LowProleBracketx1
• SupportCDx1
English
• QuickStartGuidex1
2. System requirements
To ensure a successful installation of the Xonar DGX card, your computer must
meet the following requirements:
• One PCIE 1.0 (or higher) compatible slot for the audio card
®
®
• Microsoft
Windows
7 (32/64bit) / Vista (32/64bit) / XP (32/64bit) / MCE2005
®
®
®
• Intel
Pentium
4 1.4 GHz or AMD
Athlon 1400 CPU or faster CPU
• 256MB(orabove)DRAMsystemmemory
• 60MBavailableHDDspacefordriverinstallationpackage
• CD-ROM drive (or DVD-ROM drive) for software installation
• High-quality headphones or powered analog speakers to enjoy the ultra-high
delitysoundofthecard
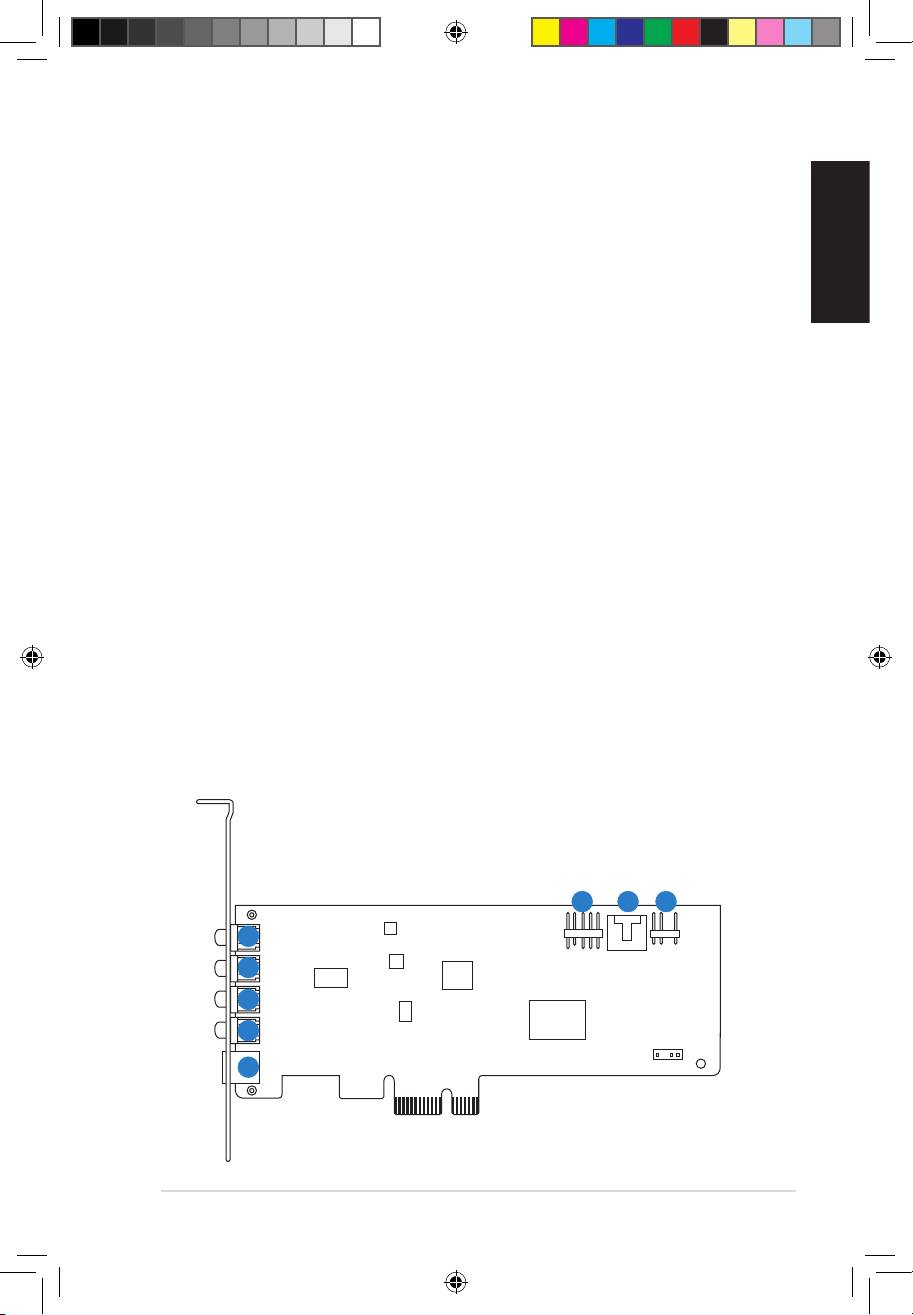
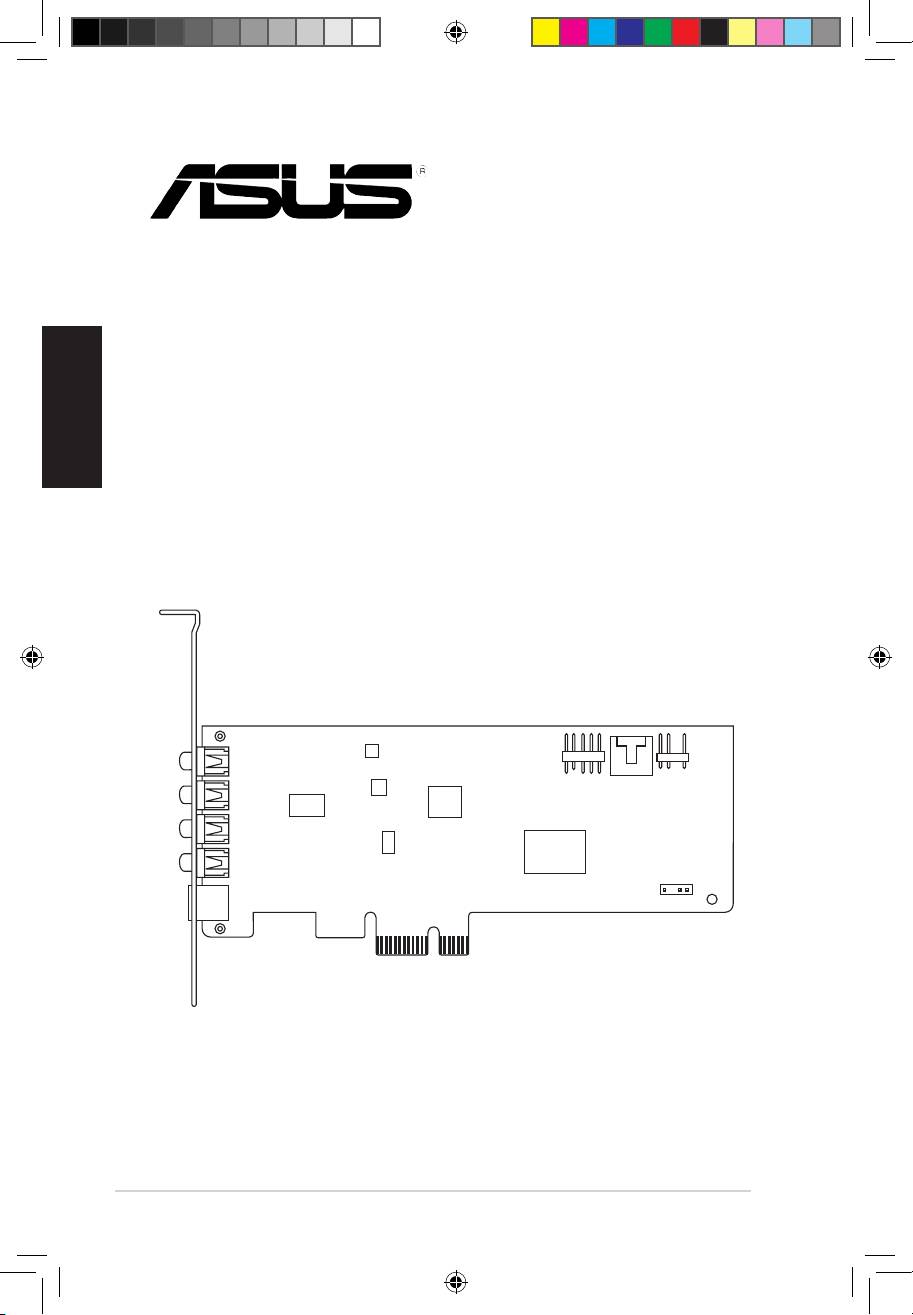
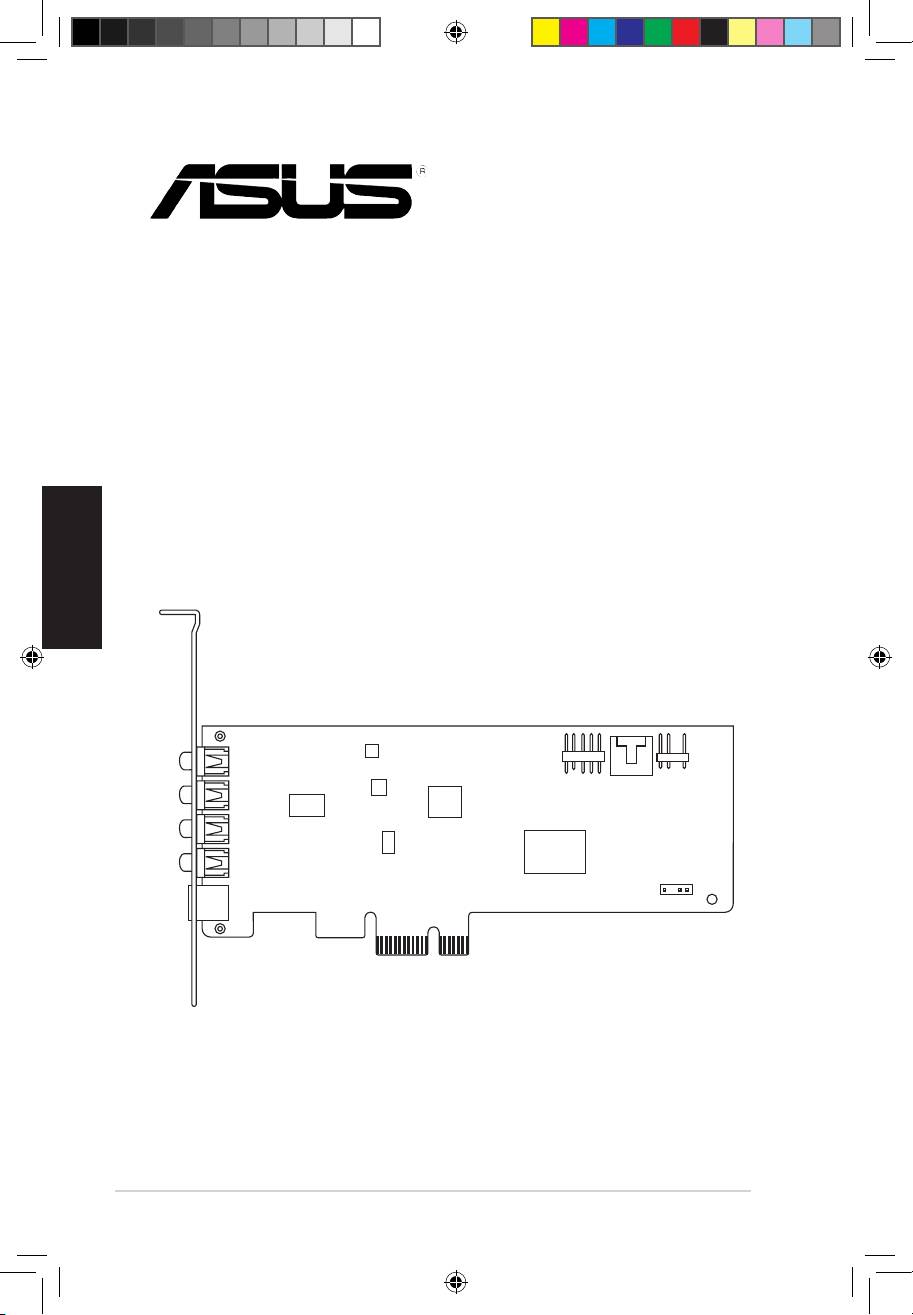
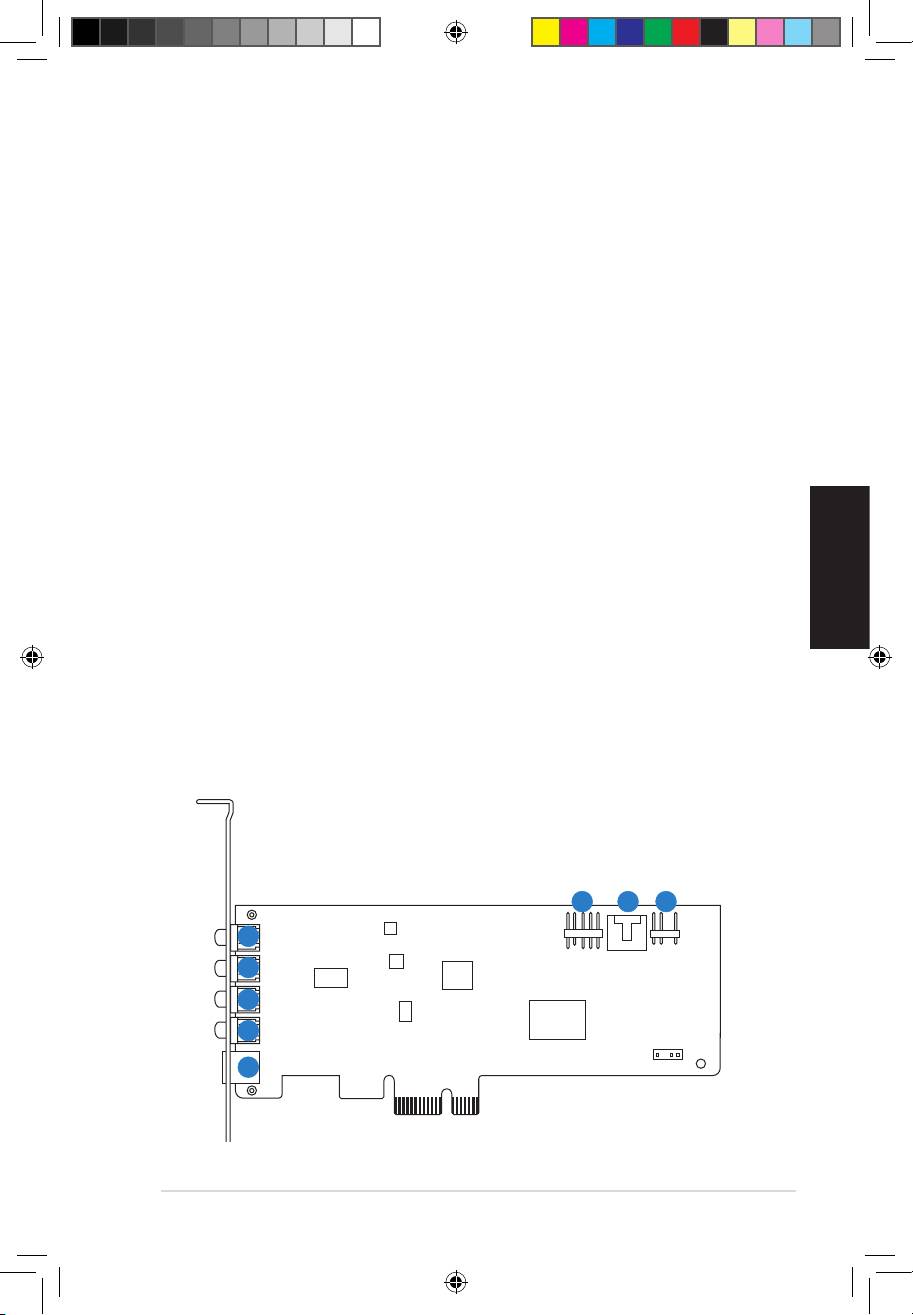
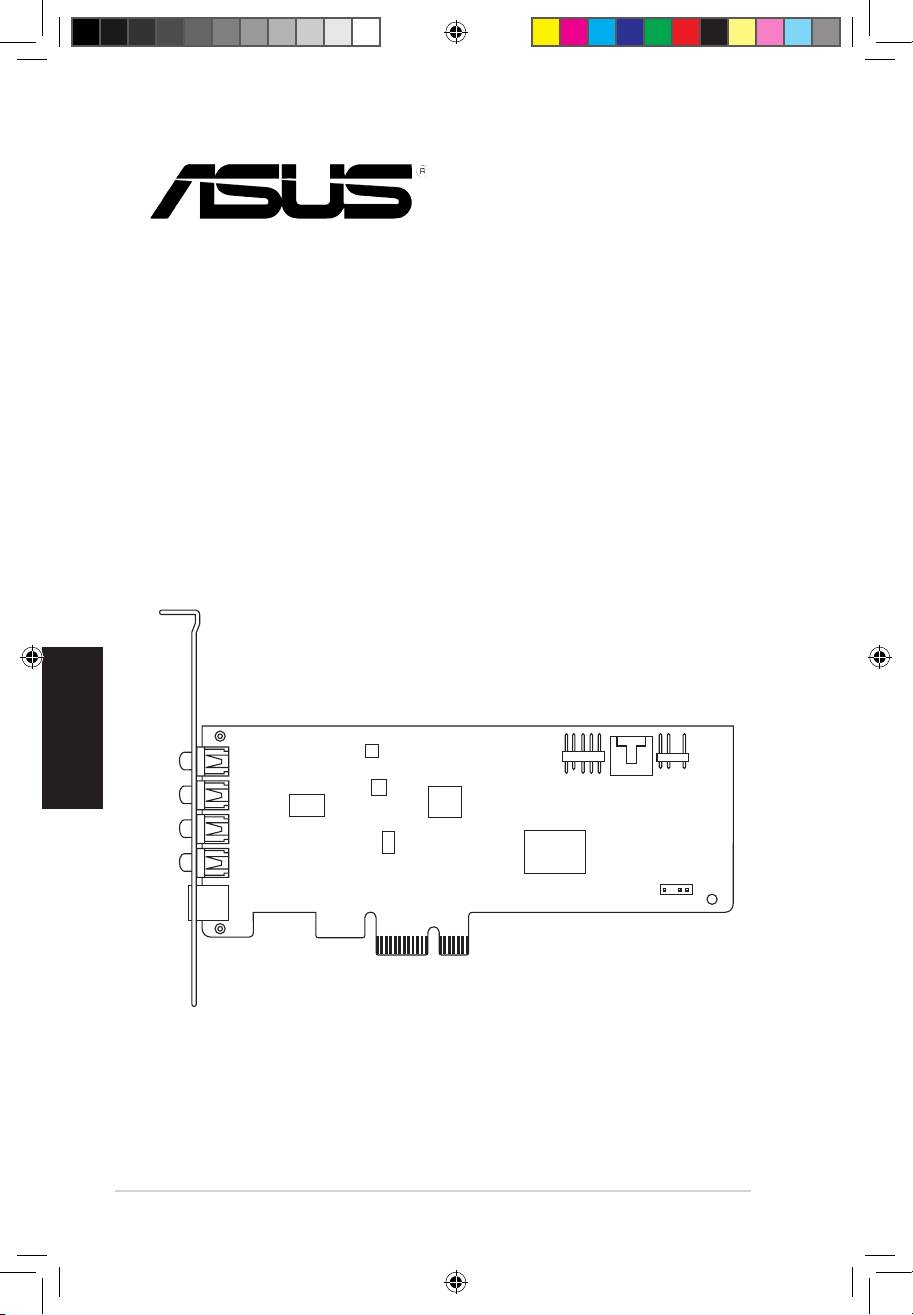
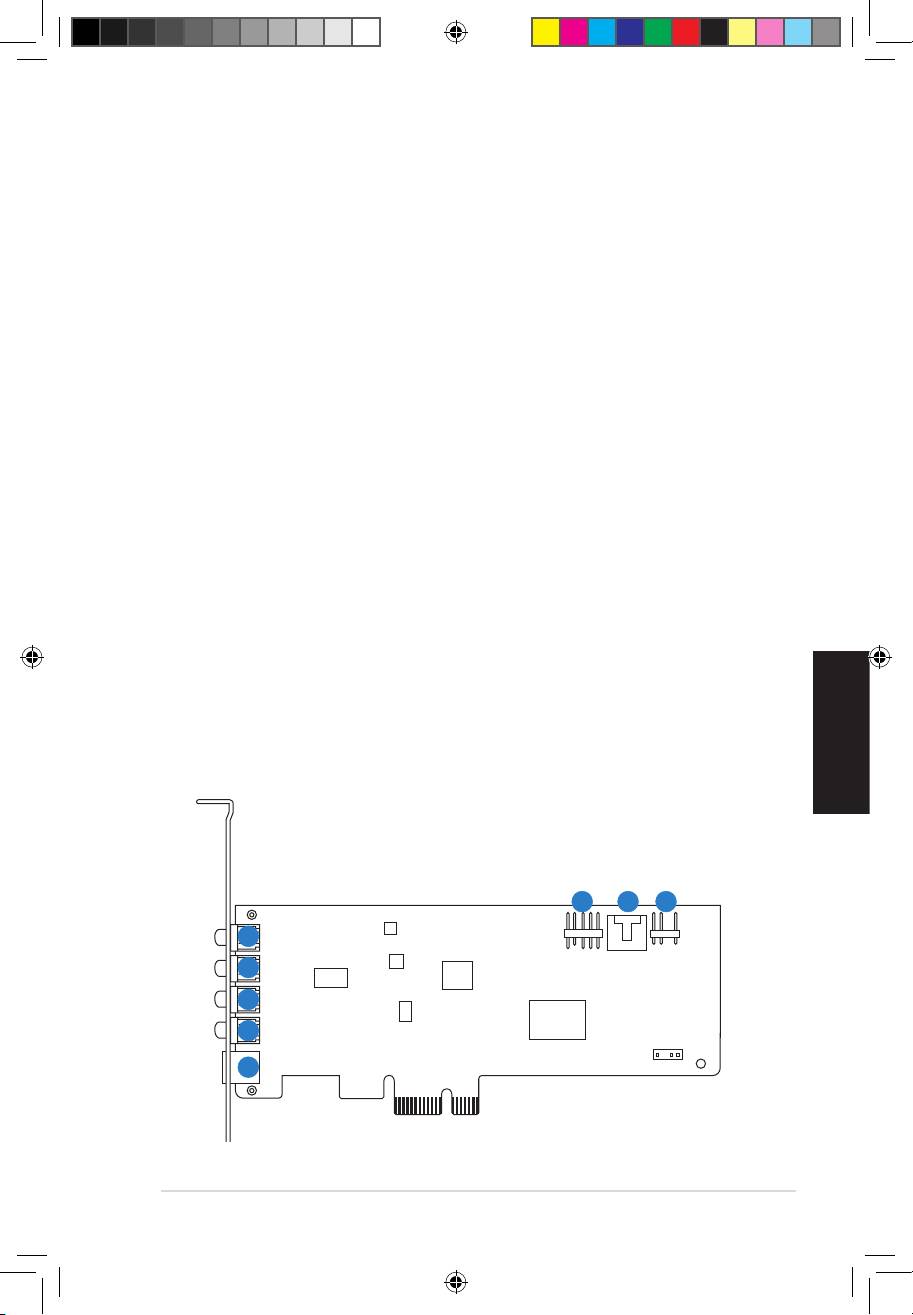
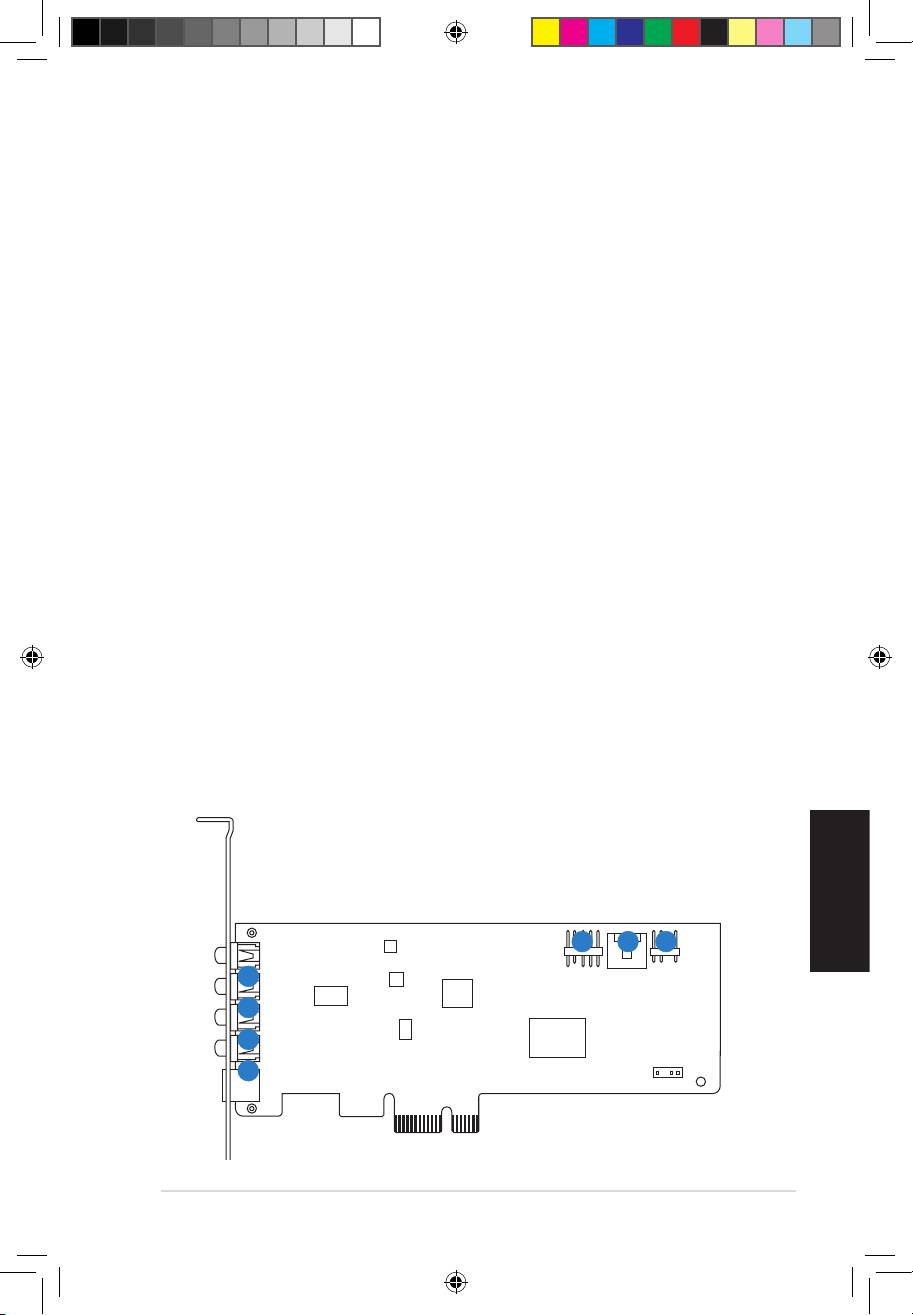
3. Hardware introduction
3.1 Xonar DGX card layout
6
7 8
1
2
3
4
5
ASUS Xonar DGX Quick Start Guide
1
U7083_Xonar DGX_QSG.indb 1 1/9/12 6:42:03 PM
English
2
ASUS Xonar DGX Quick Start Guide
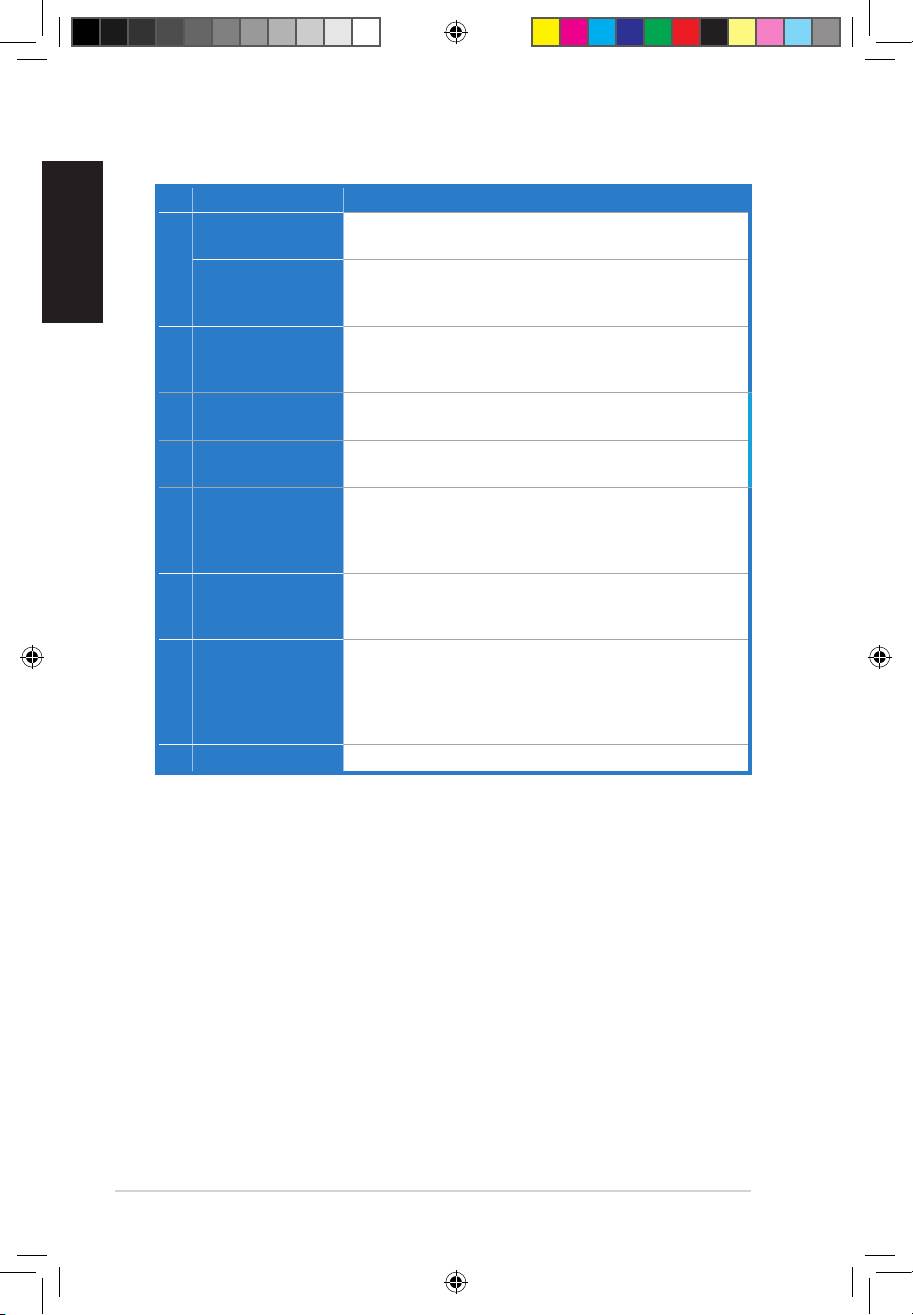
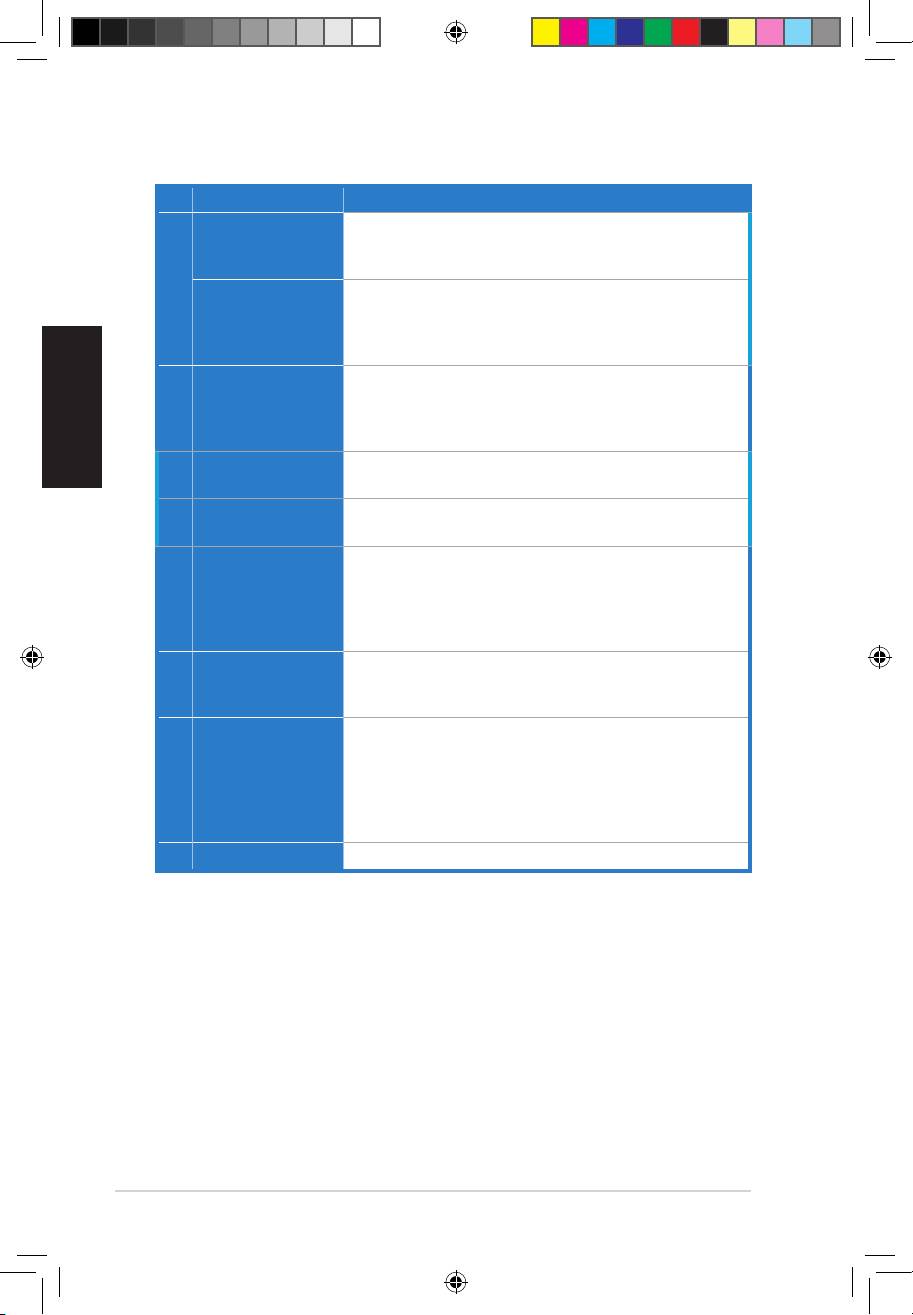
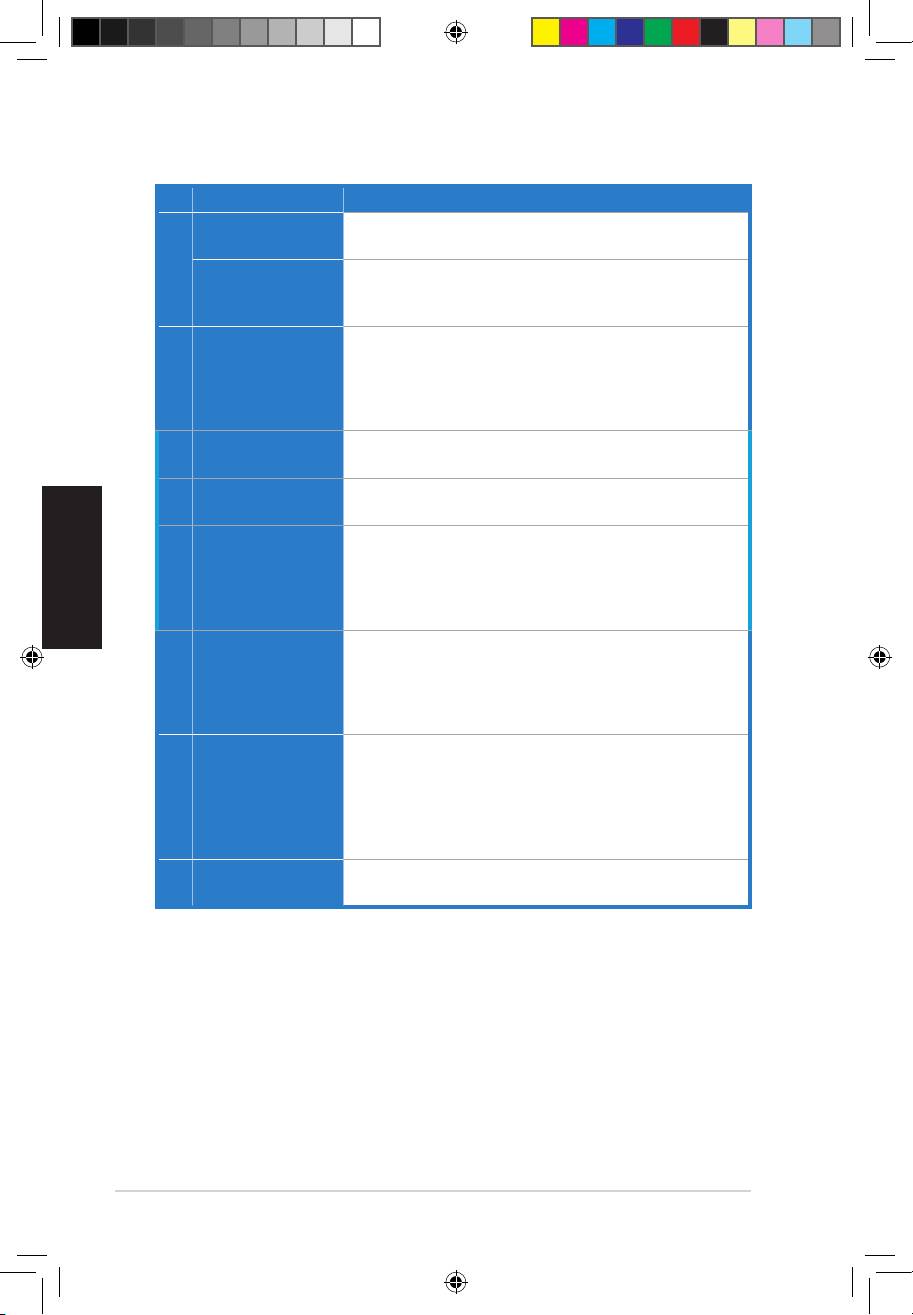
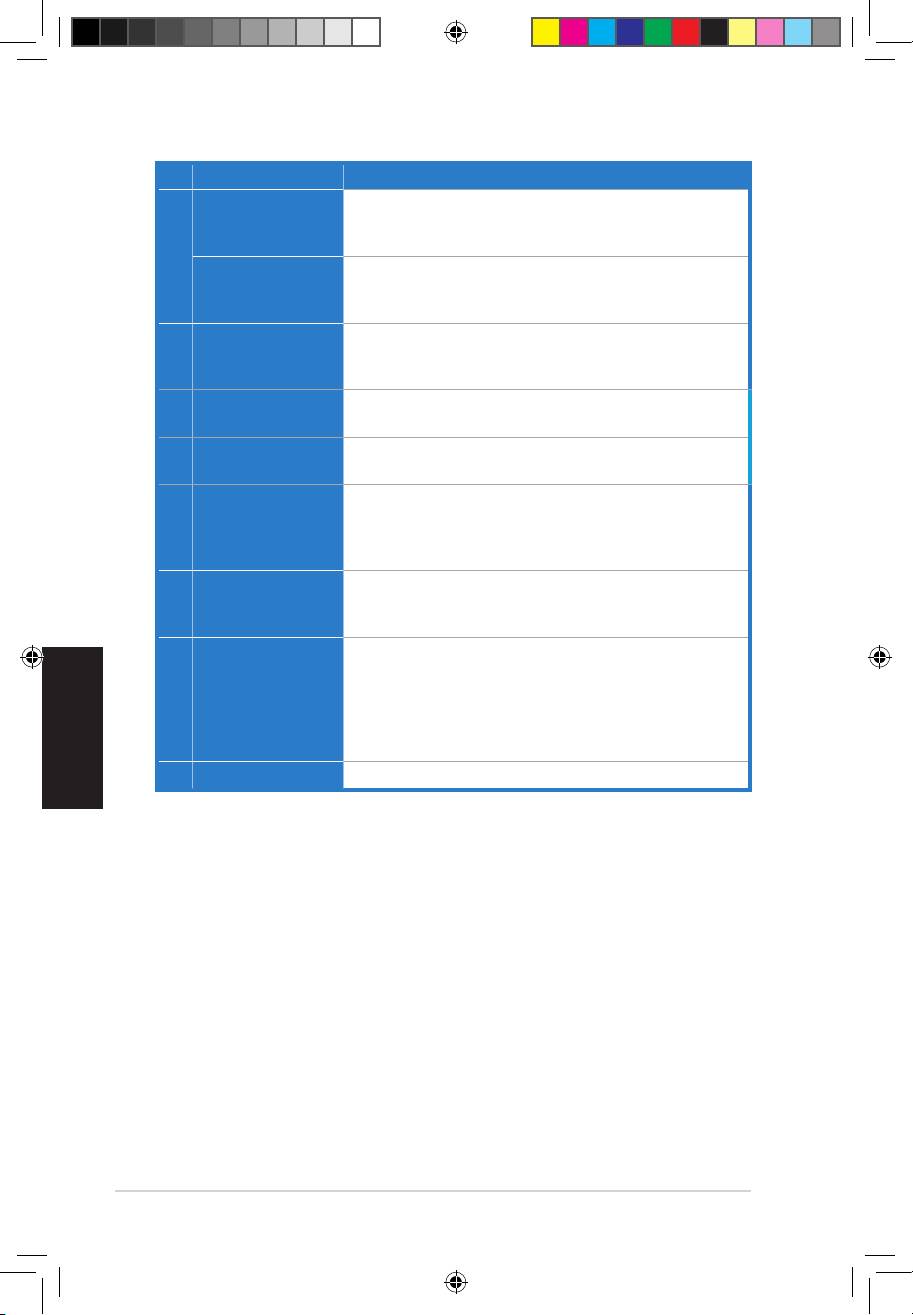
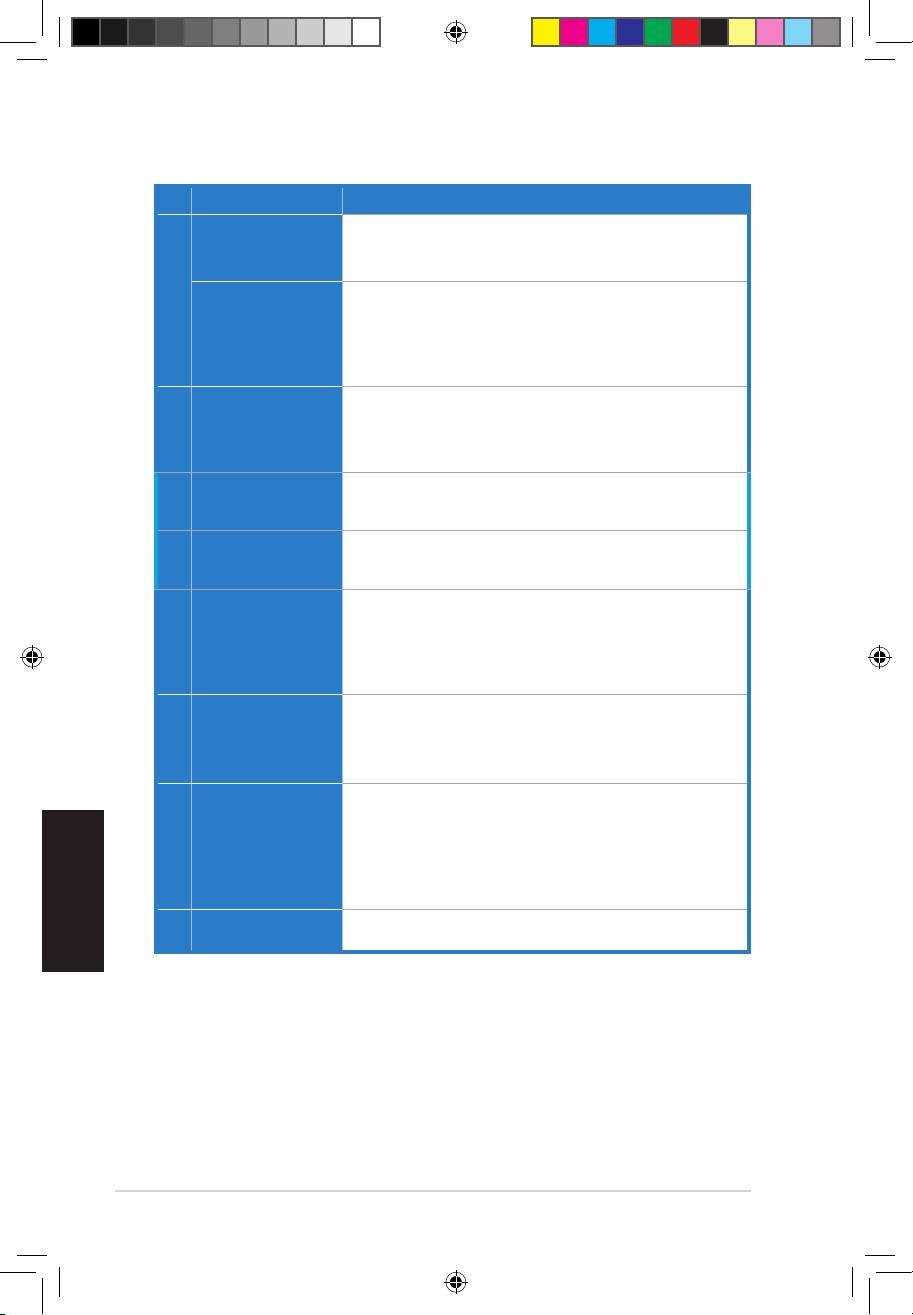
No Item Description
ConnectyourexternalPCmicrophonetothis3.5mmportfor
Microphone In port
voiceinput.Built-inhigh-qualityMicrophonepre-amplier.
1
Connect analog devices like MP3 players, CD players,
Line In port
music synthesizers and other line-level sound sources to this
3.5mm port for audio recording or processing.
Connect your headphones or 2/2.1 channel speakers to this
Headphone/Front
2
3.5mm port. For multi-channel speaker systems, connects to
Out port
the front left/right input on the powered speakers.
Side Surround Out
Connects to the surround channel input on 4/4.1/5.1 powered
3
port
analog speakers.
Center/Subwoofer
Connects to the center/subwoofer input on 5.1 powered
4
Out port
analog speakers.
OpticalTOSLINKdigitaloutputport.Connectstoexternal
digital decoder or digital speaker systems, Home Theater
5 S/PDIF Out port
systems, AV receivers for outputting digital audio including
PCM, DTS Digital, DTS, WMA-Pro, etc.
9-pinIntelAC’97/HDAfront-panelwhichsupportsaudio
Front panel audio
6
jack-detection and audio FP Headphone selection for Analog
header
Out on the Audio Center.
4-pin header. Usually connects to the Analog Audio output of
TV tuner card or other sound source inside your PC system.
7 Aux Input Header
(TomonitoryourTVtunercard’saudiofromthisAux-In,you
mustenablethe“monitor”functionforAux-InintheXonar
DGXAudioCenter’srecordingmixer.)
8 S/PDIF Out header
Connects to the supported graphics card with HDMI.
U7083_Xonar DGX_QSG.indb 2 1/9/12 6:42:04 PM
English
ASUS Xonar DGX Quick Start Guide
3
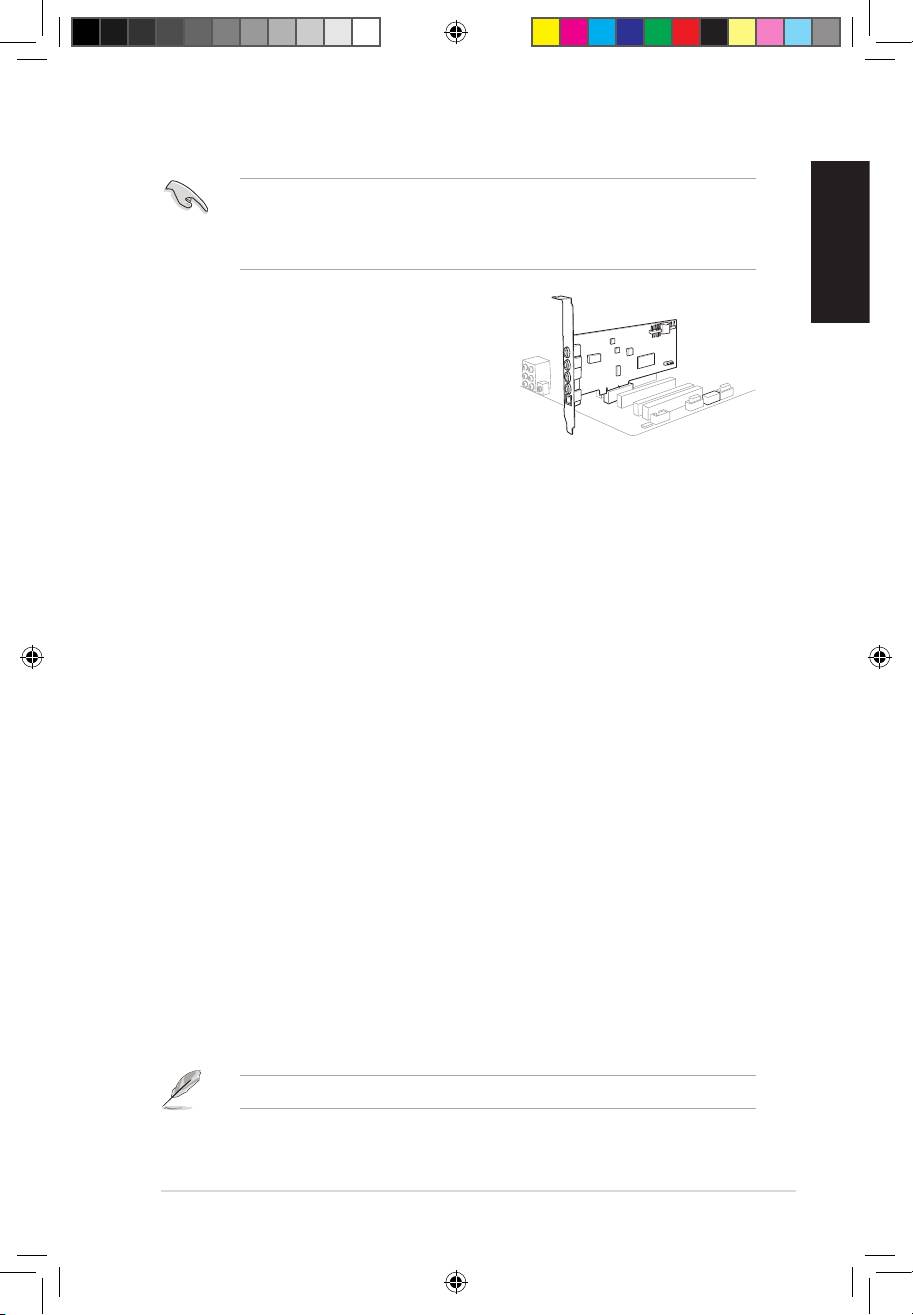
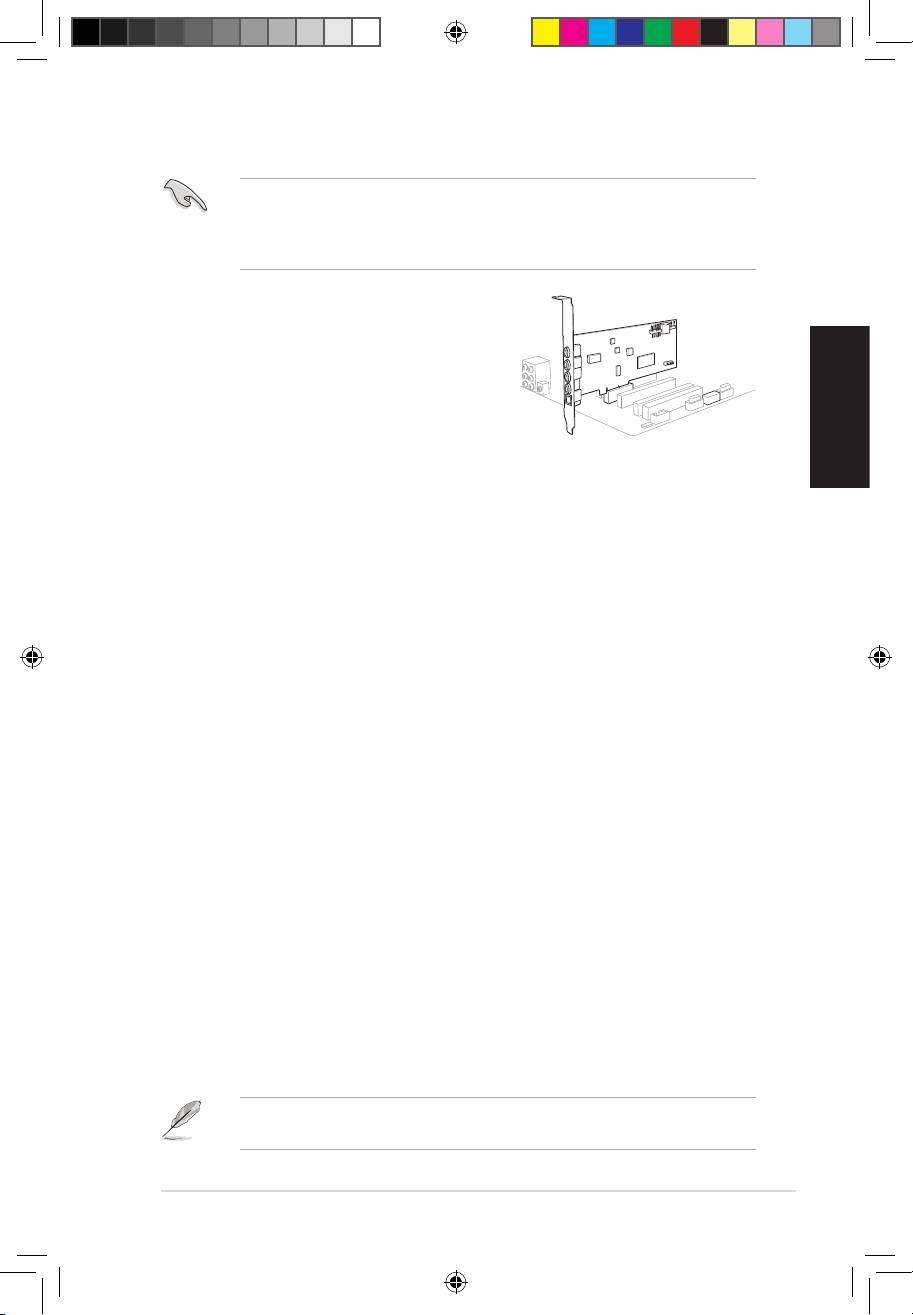
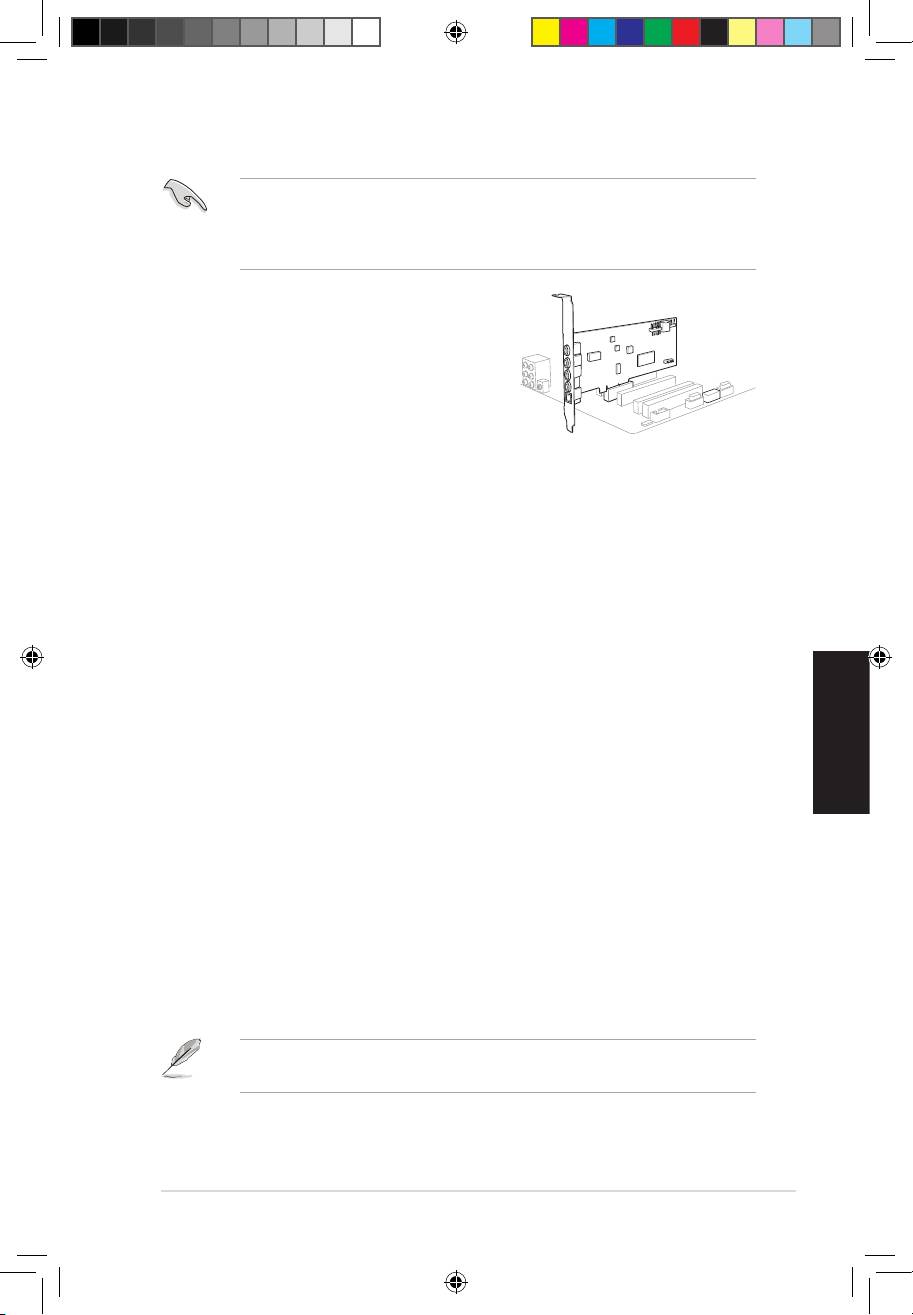
3.2 Card installation
Beforeyouproceedwiththefollowinginstallationsteps,it’srecommendedthat
youdisableyouronboardaudiodeviceinyourBIOSsettings,oruninstallany
otheraudiocardsonyourPC.(ForBIOSsettingoruninstallationofothersound
cards, refer to the user manuals of your motherboard and audio card.)
Installing the Xonar DGX card
1. Power OFF the computer, the monitor, and
all other peripheral devices connected to
your computer.
2. Unplug the computer power cord from your
computer and power outlet.
3. Touch the metal back or side panel of the
computer to avoid static electricity.
4. Remove the chassis cover.
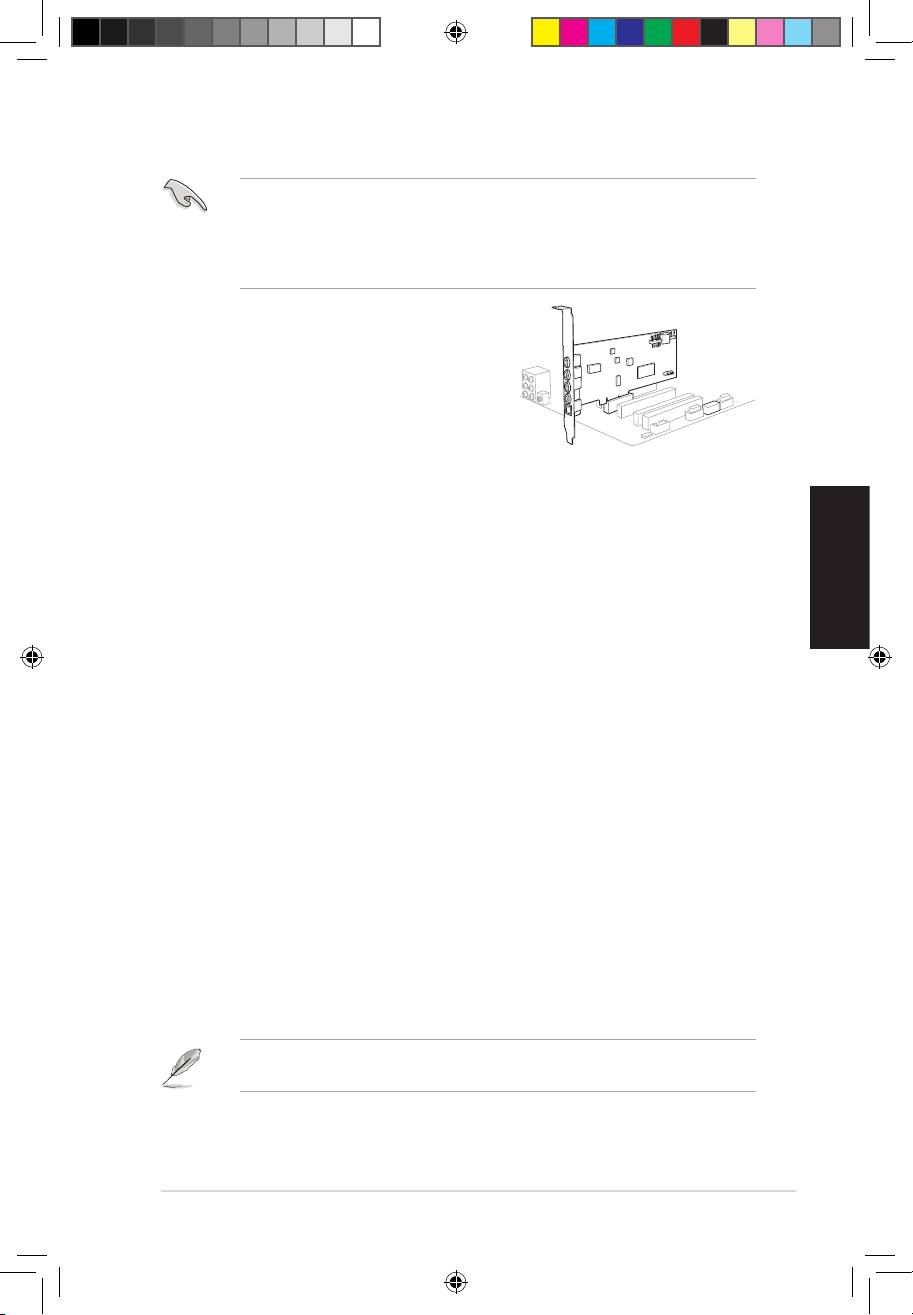
5. Remove the metal bracket from an available PCIE slot for the Xonar DGX
audio card.
6. Carefully insert the audio card into the PCIE slot. Ensure the audio card sits
properly in place.
7. Secure the audio card with screws and the metal bracket.
8. Put back the chassis cover.
9. Reconnect all cables.
10. Plug the power cord to the computer and to a power outlet.
11. Power ON the computer.
4. Driver installation
Installing the Xonar DGX card driver
1. After you have installed the Xonar DGX card, turn on your computer.
®
Windows
automatically detects the audio card and searches for device
drivers. When prompted for the drivers, click Cancel.
2. Insert the support CD into the optical drive. If Autorun is enabled in your
system, the setup starts automatically. If not, run setup.exe from your
support CD.
3. Followtheonscreeninstructionstonishtheinstallation.
The version and content of the support CD are subject to change without notice.
1
2
U7083_Xonar DGX_QSG.indb 3 1/9/12 6:42:04 PM
Français
4
ASUS Xonar DGX - Guide de démarrage rapide
Xonar DGX
Carte son PCIE 5.1 & ampli casque
Guide de démarrage rapide
Première édition
Janvier 2012
Copyright © 2012 ASUSTeK Computer Inc.
Tous droits réservés
U7083_Xonar DGX_QSG.indb 4 1/9/12 6:42:06 PM
Français
ASUS Xonar DGX - Guide de démarrage rapide
5
1. Contenu de la boîte
VériezquelaboîtedevotrecartesonASUSXonarDGXcontientbienleséléments
suivants :
• Carte son PCIE ASUS Xonar DGX
• Supportdemi-hauteurx1
• CD de support
• Guide de démarrage rapide
2. Pré-requis système
Avantd’installerlacartesonXonarDGX,assurez-vousquevotreordinateur
puissesatisfaireauxcritèressuivants:
• Un slot PCIE 1.0 (ou supérieur) pour la carte son
®
®
• Microsoft
Windows
7/ Vista (32/64bits) / XP (32/64bits) / MCE2005
®
®
• Un processeur Intel
Pentium
4 1.4GHz ou AMD Athlon 1400 ou supérieur
• Mémoire DRAM de 256 Mo (ou plus)
• 60Mod’espacedisquedisponiblepourl’installationdupilote
• UnlecteurdeCD-ROM(ouDVD-ROM)pourl’installationdeslogiciels
• Desécouteursdehautequalité,deshaut-parleursanalogiquespourproter
pleinement de la qualité audio délivrée par la carte son
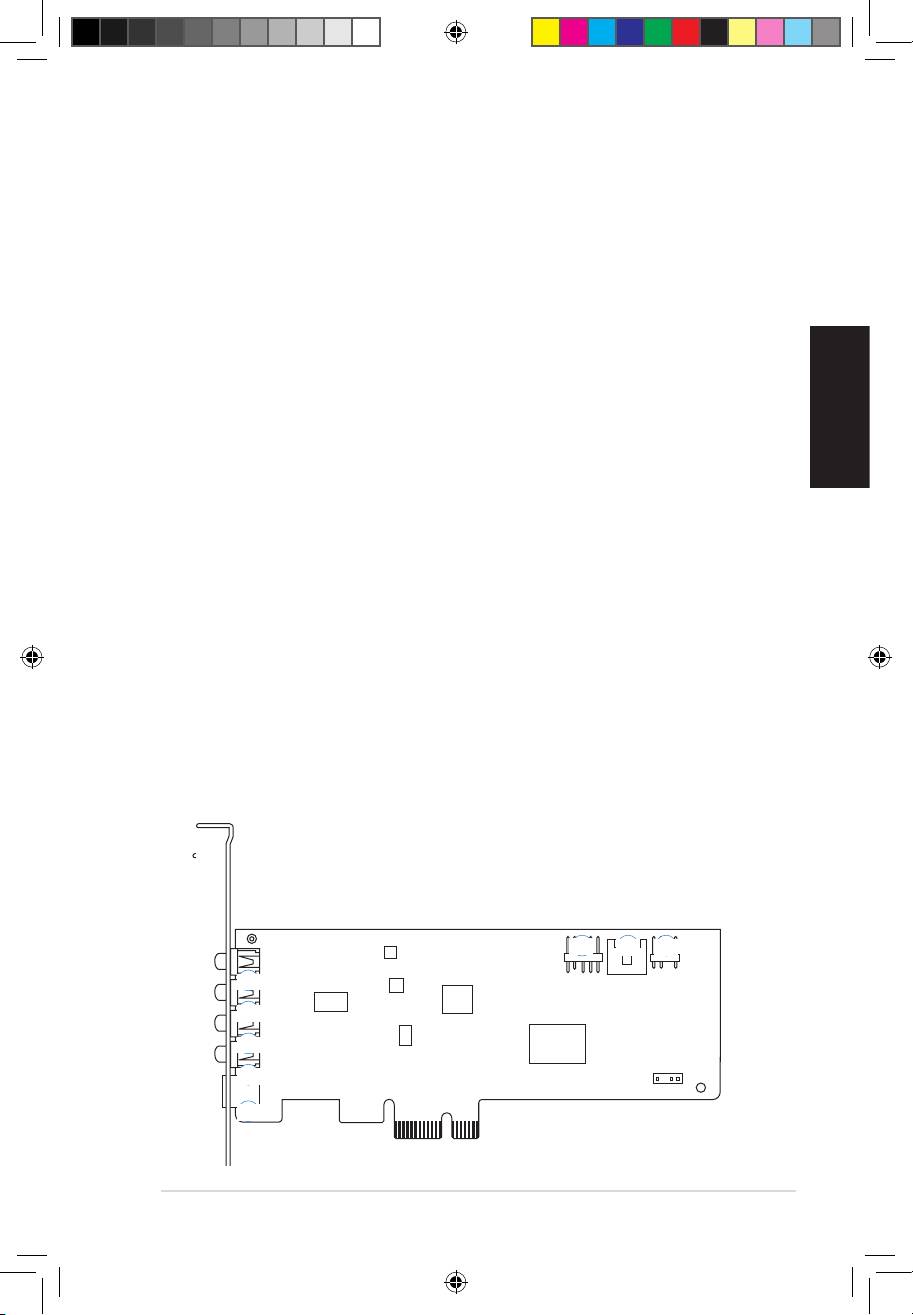
3. Introduction au matériel
3.1 Diagramme de la carte Xonar DGX
6
7 8
1
2
3
4
5
U7083_Xonar DGX_QSG.indb 5 1/9/12 6:42:07 PM
Français
6
ASUS Xonar DGX - Guide de démarrage rapide
N° Élément Description
Port d’entrée
ConnectezleportmicrophoneexternedevotrePCsurce
microphone
jack3.5mm.Intègreunpréamplicateurdemicrophonede
haute qualité.
1
Port d’entrée audio
Connectez des périphériques analogiques (lecteur MP3,
lecteur CD, etc) ou autres sources audio sur ce jack 3.5mm.
(Via un convertisseur numérique-analogique avec un rapport
signal/bruitde118dB)
2 Port casque/sortie de
Connectez le câble audio droit (rouge) de votre système de
signal avant
haut-parleurs 2/2.1 sur ce port. Pour les système de haut-
parleursmulti-canaux,seconnecteauportd’entréedesignal
avant droit/gauche.
3 Port de sortie
Seconnecteauportd’entréeSurrounddessystèmesde
Surround latéral
haut-parleurs analogiques alimentés 4/4.1/5.1.
4 Port de sortie centre/
Seconnecteauportd’entréecentre/caissondebassedes
caisson de basse
systèmes de haut-parleurs analogiques alimentés 5.1.
5 Port de sortie S/PDIF
Port de sortie numérique TOSLINK. Se connecte à un
décodeurnumériqueexterne,unhomecinéma,unsystème
de haut-parleurs numériques ou un récepteur pour la
transmissiond’unsignalaudionumériquesupportantles
technologies PCM, DTS Digital, DTS, WMA-Pro, etc.
6 En-tête audio pour
CompatibleIntelHDA/AC’97,supporteladétectiondes
panneau avant
ports audio et intègre une prise casque pour une sortie
(9 broches)
analogiquesurvotresystèmed’enceintes.
7 En-tête d’entrée
Se connecte généralement au port de sortie audio
auxiliaire
analogiqued’unecartetunerTVoutoutautresourceaudio
(4 broches)
interneduPC.(Poursurveillerlessignauxaudiodevotre
carte tuner TV depuis ce port, vous devrez activer la fonction
desurveillanceduport“Aux-In”àpartirdel’utilitaireaudio
Xonar DGX Audio Center.)
8 En-tête sortie S/PDIF
Se connecte à une carte graphique avec support HDMI.
U7083_Xonar DGX_QSG.indb 6 1/9/12 6:42:07 PM
Français
ASUS Xonar DGX - Guide de démarrage rapide
7
3.2 Installation de la carte
Avant de continuer, il est recommandé de désactiver le chipset audio embarqué
dansleBIOSoudedésinstallerlesautrescartesaudiodevotresystème.(Pour
lesoptionsduBIOSouladésinstallationd’autrescartesson,référez-vousaux
manuelsd’utilisationdelacartemèreetdelacarteaudio)
Installer la carte son Xonar DGX
1. Éteignezl’ordinateur,lemoniteurettous
les périphériques connectés au PC.
2. Débranchezlecordond’alimentationde
l’ordinateuretdelapriseélectrique.
3. Touchezl’arrièremétalliqueoulepanneau
latéralduchâssisdel’ordinateurpourvous
déchargerdel’électricitéstatique.
4. Retirez le panneau latéral du châssis.
5. Retirezlescachesmétalliquesd’unslotPCIEpourpouvoirinstallerlacarte
Xonar DGX.
6. Insérez délicatement la carte son sur le slot PCIE. Assurez-vous que la carte
est bien en place.
7. Sécurisezlacarteàl’aidedevisoudescachesmétalliques.
8. Replacez le panneau latéral du châssis.
9. Reconnectez tous les câbles.
10. Reliezlecordond’alimentationàl’ordinateuretàunepriseélectrique.
11. Allumezl’ordinateur.
4. Installation du pilote
Installer le pilote de la carte Xonar DGX
®
1. Une fois la carte son installée, allumez votre PC. Windows
détectera
automatiquement la carte son et lancera la recherche du pilote approprié.
Lorsquelafenêtred’installationdupiloteapparaît,cliquezsurAnnuler.
2. InsérezleCDdesupportdansvotrelecteuroptique.Sil’Exécution
automatiqueestactivée,leprocessusdecongurationdémarre
automatiquement.Sicen’estpaslecas,cliquezsurlechier
setup.exe
contenu dans le CD de support.
3. Suivezlesinstructionsàl’écranpourterminerl’installation.
LaversionetlecontenuduCDdesupportpeuventêtremodiéssansavis
préalable.
1
2
U7083_Xonar DGX_QSG.indb 7 1/9/12 6:42:08 PM
Deutsch
8
ASUS Xonar DGX-Schnellstartanleitung
Xonar DGX
PCIE 5.1 & Kopfhörer
Audio-Karte
Schnellstartanleitung
Erste Ausgabe
Januar 2012
Copyright © 2012 ASUSTeK Computer Inc.
Alle Rechte vorbehalten
U7083_Xonar DGX_QSG.indb 8 1/9/12 6:42:10 PM
Deutsch
ASUS Xonar DGX-Schnellstartanleitung
9
1. Verpackungsinhalt
Überprüfen Sie Ihre ASUS Xonar DGX Audio-Kartenverpackung auf folgenden Inhalt:
• ASUS Xonar DGX PCIE Audio-Karte
• 1xacheKlemme
• Support-CD
• Schnellstartanleitung
2. Systemanforderungen
Um eine erfolgreiche Installation der Xonar DGX-Karte sicherzustellen, muss Ihr
Computer folgende Anforderungen erfüllen:
• Ein PCIE 1.0 (oder höher) -kompatibler Steckplatz für die Audio-Karte
®
®
• Microsoft®Windows®7(32/64Bit)/Microsoft
Windows
Vista(32/64Bit)/XP
(32/64Bit)/MCE2005
®
®
®
• Intel
Pentium
4 1,4 GHz oder AMD
Athlon 1400-Prozessor oder höher
• 256MB(odermehr)DRAM-Systemspeicher
• 60MBfreierFestplattenspeicherfürdieTreiberinstallation
• CD-ROM-Laufwerk (oder DVD-ROM-Laufwerk) für die Software-Installation
• Hochwertige Kopfhörer oder aktive Analoglautsprecher, um den HiFi-Sound
der Karte zu genießen
3. Hardware-Erklärung
3.1 Xonar DGX-Kartenansicht
6
7 8
1
2
3
4
5
U7083_Xonar DGX_QSG.indb 9 1/9/12 6:42:11 PM
Deutsch
10
ASUS Xonar DGX-Schnellstartanleitung
Nr. Element Beschreibung
Mikrofoneingang
SchließenSieIhrexternesPC-MikrofonzurSpracheingabe
an diesem Anschluss an. Eingebauter Mikrofonvorverstärker.
1
Line In-Port
AnschlussfüranalogeGeräte,z.B.MP3-Player,CD-Player,
Musiksynthesizer und andere Line-Tonwiedergabegeräte, um
Tonaufnahmen oder Tonberechnung durchzuführen.
2 Kopfhörer-/Front-
Verbinden Sie Ihren Kopfhörer oder Ihre 2/2.1-Kanal-
Ausgang
Lautsprechermitdiesem3,5mm-Anschluss.Bei
Mehrkanalsystemen verbinden Sie diesen Ausgang mit
den linken/rechten Frontlautsprecheranschluss der aktiven
Lauftsprechers.
3 Seiten-Surround-
Anschluss für den Surround-Kanal-Eingang an aktiven
Ausgang
4/4.1/5.1-Analoglautsprechern.
4 Center/Subwoofer-
Anschluss für den Center/Subwoofer-Eingang an aktiven
Ausgang
5.1-Amaloglautsprechern.
5
S/PDIF-Ausgang
Optischer TOSLINK-Digitalausgang. Anschluss für einen
externenDigitaldekoderoder-Lautsprechersystem,
Heimkinosystem, AV-Receiver zur Ausgabe von digitalen
Audio, eingeschlossen PCM, DTS Digital, DTS, WMA-Pro,
usw.
6 Frontpanel-Blenden-
Intel HDA Frontpanel-konform und unterstützt HP-
Anschluss
Buchsenerkennungundschaltetautomatischdie
Audio-Ausgabe von den rückseitigen Anschlüssen zum
Frontpanel um. Unterstützt Frontpanel und Sound-Karten-
Mikrofoneingangsmixer.
7 Aux-
Normalerweise der Anschluss für den analogen Tonausgang
Eingangsanschluss
der TV-Tunerkarte oder anderen Tonausgabegeräten in
Ihrem PC-System. (Um den Ton Ihrer TV-Tunerkarte von
diesemAnschlusszuüberwachen,müssenSiefürAux-In
die Funktion „Überwachen“ im Xonar DGX Audio Center-
Aufnahme-Mixeraktivieren.)
8 S/PDIF-
VerbindetdenGrakkartenausgangmitderHDMI-
Ausgangsanschluss
Unterstützung
U7083_Xonar DGX_QSG.indb 10 1/9/12 6:42:11 PM
Deutsch
ASUS Xonar DGX-Schnellstartanleitung
11
3.2 Karte Installieren
BevorSiemitdenfolgendenInstallationsschrittenfortfahren,empfehlen
wirIhnen,dassSieIhrOnboard-Audio-GerätindenBIOS-Einstellungen
deaktivieren oder jede andere Audio-Karte in Ihrem PC deinstallieren. (Für die
BIOS-EinstellungenoderdieDeinstallationandererAudio-KartenbeziehenSie
sichbitteaufdieBenutzerhandbücherdesMotherboardsoderderAudio-Karte)
Installieren der Xonar DGX-Karte
1.
Schalten Sie den Computer, den
Monitor und alle anderen am Computer
angeschlossenen Peripheriegeräte aus.
2. Ziehen Sie das Netzkabel des Computers
aus der Steckdose heraus.
3. BerührenSiedasMetallgehäuseoderden
Metallrahmen,umstatischeAuadungenzuvermeiden.
4. Entfernen Sie die Gehäuseabdeckung.
5. Entfernen Sie die Metallklemme von einem freien PCIE-Steckplatz für die
Xonar DGX-Audio-Karte.
6. Stecken Sie die Karte vorsichtig in den PCIE-Steckplatz. Vergewissern Sie
sich, dass die Karte richtig im Steckplatz eingesteckt ist.
7. Sichern Sie die Karte mit Schrauben und der Metallklemme
.
8. BringenSiedieGehäuseabdeckungwiederan
.
9.
Schließen Sie alle Kabel wieder an.
10. Stecken Sie das Netzkabel in eine Steckdose.
11. Schalten Sie den Computer wieder ein
.
4. Treiberinstallation
Installieren der Xonar DGX-Kartentreiber
1. Nachdem Sie die Xonar DGX-Karte installiert haben, schalten Sie Ihren
®
Computer ein. Windows
erkennt die Audio-Karte automatisch und sucht
nach den Gerätetreibern. Wenn Sie nach den Treibern gefragt werden,
klicken Sie auf Abbrechen.
2. Legen Sie die Support-CD in das optische Laufwerk. Wenn Autorun in Ihren
Computer aktiviert ist, startet die Installation automatisch, wenn nicht, dann
führen Sie auf der Support-CD die Datei setup.exe aus.
3. FolgenSiedenBildschirmanweisungen,umdieInstallationabzuschließen.
Die Version und der Inhalt der Support-CD können ohne vorherige Ankündigung
geändert werden.
1
2
U7083_Xonar DGX_QSG.indb 11 1/9/12 6:42:12 PM
Italiano
12
ASUS Xonar DGX - Guida Rapida
Xonar DGX
Scheda Audio PCIE 5.1 con
AmplicatoreCufe
Guida Rapida
Prima Edizione
Gennaio 2012
Copyright © 2012 ASUSTeK Computer Inc.
Tutti i Diritti Riservati
U7083_Xonar DGX_QSG.indb 12 1/9/12 6:42:14 PM
Italiano
ASUS Xonar DGX - Guida Rapida
13
1. Contenuto della Confezione
Controllare che nella confezione della scheda audio Xonar DGX ASUS siano contenuti
i seguenti articoli:
• Scheda Audio Xonar DGX PCIE ASUS
• 1xStaffaaBassoProlo
• CD di Supporto
• Guida Rapida
2. Requisiti di Sistema
Per garantire una corretta installazione della scheda Xonar DGX, il computer deve
soddisfare i seguenti requisiti:
• Uno slot compatibile PCIE 2.2 (o superiore) per la scheda audio.
®
®
• Microsoft
Windows
7/ Vista (32/64bit) / XP (32/64bit) / MCE2005
®
®
®
• CPU Intel
Pentium
4 1.4 GHz o AMD
Athlon 1400 CPU più potente.
• MemoriadisistemaDRAMda256MB(osuperiore).
• SpazioliberosuHDDda60MBperilpacchettoinstallazionedriver.
• Drive CD-ROM (o DVD-ROM) per installazione software.
• Cufedialtaqualità,altoparlantianalogicialimentati,odecodicatoreDolby
Digital o DTS decoder, per una riproduzione audio ad altissima fedeltà.
3. Descrizione Hardware
3.1 Layout Scheda Xonar DGX
6
7 8
1
2
3
4
5
U7083_Xonar DGX_QSG.indb 13 1/9/12 6:42:14 PM
Italiano
14
ASUS Xonar DGX - Guida Rapida
No Item Descrizione
Collegare il microfono esterno del PC a questa porta da 3.5mm
Porta Ingresso
perl’ingressovocale.Pre-amplicatoreintegratodialtaqualità
Microfono
per microfono.
1
Collegare dispositivi analogici, come lettori MP3, lettori di CD,
Porta Linea d’
sintetizzatori musicali e altre sorgenti audio a livello di linea a
ingresso
questa porta da 3.5mm per registrazioni o elaborazioni audio
Collegarelecufeoaltoparlantia2/2.1canaliaquestaporta
Porta Uscita Cufe/
2
da3.5mm.Persistemidialtoparlantimulticanale,collegaall’
Frontale
ingresso di destra/sinistra e frontale su altoparlanti alimentati.
Porta Uscita Surround
Collegaall’ingressodelcanalesurroundsualtoparlanti
3
Laterale
analogici alimentati 4/4.1/5.1.
Porta Uscita Centro/
Collegal’ingressocentro/subwoofersualtoparlantianalogici
4
Subwoofer
alimentati 5.1.
PortauscitadigitaleotticaTOSLINK.Collegaadundecodicatore
digitale esterno o a impianti di altoparlanti digitali, sistemi Home
5 Porta Uscita S/PDIF
Theater,ricevitoriAVperl’uscitaaudiodigitale,fracuiPCM,
DTS Digital, DTS, WMA-Pro, etc.
PannellofrontaleIntelAC’97/HDAa9-pinconsupporto
Header audio pannello
6
rilevazionejackaudioeselezionecufeFPaudioperuscita
frontale
analogica sul Centro Audio.
Disolito,collegaall’uscitaAudioAnalogicadellascheda
disintonizzazioneTVoadaltrasorgenteaudioall’interno
delsistemadelPC(permonitorarel’audiodellaschedadi
7 Header Input Aux
sintonizzazioneTVdall’ingressoAudio,sideveattivarela
funzione“monitor”perAux-Innelmixerdaregistrazionedel
Centro Audio Xonar DGX).
8 Header S/PDIF Out
CollegaallaschedagracaconsupportoHDMI.
U7083_Xonar DGX_QSG.indb 14 1/9/12 6:42:14 PM
Italiano
ASUS Xonar DGX - Guida Rapida
15
3.2 Installazione della Scheda
Primadiiniziarel’installazione,siconsigliadidisattivareildispositivoaudiosulla
schedamadre,nelleimpostazionidelBIOS,odidisinstallaretuttelealtreschede
audiosulPC(PerleimpostazionidelBIOSoladisinstallazionedialtreschede
audio, consultare il manuale utente della scheda madre e della scheda audio).
Procedura di Installazione della Scheda
Xonar DGX
1. SPEGNERE computer, monitor e tutte le
altre periferiche collegate al computer.
2. Disinserire il cavo di alimentazione del
computer dal computer e dalla presa di
corrente.
3. Toccare il pannello laterale o posteriore in metallo del computer per evitare
elettricità statica.
4. Rimuovere la copertura del telaio.
5. Rimuovere la staffa metallica da uno slot libero PCIE per la scheda audio Xonar
DGX.
6. Inserire delicatamente la scheda audio nello slot PCIE. Assicurarsi che la scheda
audio sia correttamente installata.
7. Fissare la scheda audio con le viti e la staffa di metallo.
8. Rimontare la copertura del telaio.
9. Ricollegare tutti i cavi.
10. Inserire il cavo di alimentazione al computer e ad una presa a muro
11. ACCENDERE il computer.
4. Installazione Driver
Installazione Driver della Scheda Xonar DGX
®
1. Dopo aver installato la scheda Xonar DGX, accendere il computer. Windows
rileva automaticamente la scheda audio ed inizia la ricerca dei driver del
dispositivo. Alla richiesta dei driver, cliccare Cancel (Annulla).
2. InserireilCDdisupportonell’unitàottica.Senelsistemaèattivatalafunzione
diesecuzioneautomatica,l’installazionehainizioautomaticamente.Incaso
contrario, eseguire setup.exe dal CD di supporto.
3. Seguireleistruzionisulloschermopercompletarel’installazione.
La versione e il contenuto del CD di supporto sono soggetti a variazioni senza
obbligo di preavviso.
1
2
U7083_Xonar DGX_QSG.indb 15 1/9/12 6:42:16 PM

Español
16
ASUS Xonar DGX - Guía de inicio rápido
Xonar DGX
Tarjeta de sonido PCIE 5.1 y
Amplicadorauricular
Guía de instalación rápida
Primera Edición
Enero 2012
©
Copyright
2012 ASUSTeK Computer Inc.
Todos los derechos reservados
U7083_Xonar DGX_QSG.indb 16 1/9/12 6:42:17 PM
Español
ASUS Xonar DGX - Guía de inicio rápido
17
1. Contenido del paquete
Revise el paquete de la tarjeta de audio ASUS Xonar DGX para comprobar que
contiene los siguientes elementos:
• Tarjeta de Audio PCIE ASUS Xonar DGX
• SoportedeBajoPerlx1
• CD de soporte
x1
• Guía de inicio rápido
x1
2. Requisitos del sistema
Para garantizar la instalación correcta de la tarjeta Xonar DGX, su PC debe
cumplir los siguientes requisitos:
• Tener una ranura compatible con PCIE 1.0 (o superior) para la tarjeta de audio
®
®
• Microsoft
Windows
7/ Vista (32/64bit) / XP (32/64bit) / MCE2005
®
®
• Procesador Intel
Pentium
4 a 1,4 GHz o AMD Athlon 1400, o un procesador
más rápido
• MemoriadesistemaDRAMde256MBcomomínimo
• Espacioendiscodurode,almenos,60MBparaelpaquetedeinstalacióndel
controlador
• Unidad de CD-ROM (o DVD-ROM) para instalar el software
• Auricularesdemáximacalidadoaltavocesanalógicosconalimentaciónpara
disfrutardelsonidodeultraaltadelidaddelatarjeta
3. Introducción al hardware
3.1 Diseño de la tarjeta Xonar DGX
6
7 8
1
2
3
4
U7083_Xonar DGX_QSG.indb 17 1/9/12 6:42:18 PM
Español
18
ASUS Xonar DGX - Guía de inicio rápido
Nº Elemento Descripción
Puerto Entrada de
ConecteelmicrófonoexternodesuPCaestepuertode
micrófono
3,5mm para la entrada de voz. Preamplicadordemicrófono
de alta calidad integrado.
Puerto Entrada de
Conecte dispositivos analógicos como reproductores MP3,
1
línea
reproductores de CD, sintetizadores de música y otras
fuentes de sonido de nivel de línea a este puerto de 3,5 mm
para grabar o procesar audio. (A través del convertidor A-D
SNRde102dbydemuyaltadelidad)
2 Puerto para
Conecte sus auriculares o altavoces de canal 2/2.1 a este
Auriculares/ Salida
puerto de 3,5mm. Para los sistemas de altavoces multicanal,
Frontal
se conecta a la entrada frontal izquierda/derecha de los
altavoces que estén encendidos.
3 Puerto de Salida
Conecta a la entrada del canal de sonido envolvente en
Lateral de Sonido
altavoces analógicos con sistemas 4/4.1/5.1.
Envolvente
4 Puerto de Salida
Conecta a la entrada central/altavoz de graves en altavoces
Central/Altavoz de
analógicos con sistemas 5.1.
Graves
5 Puerto Salida S/PDIF
Puerto de salida digital óptico TOSLINK. Permite conectar
undescodicadordigitalexternoosistemasdealtavoces
digitales, sistemas de Cine en casa, receptores de AV para
enviar señales de audio digitales como PCM, Dolby Digital,
DTS, WMA-Pro, etc.
6 Base de conexiones
Panelfrontal con conector IntelAC’97 de9 clavijas / HDA
de audio del panel
que soporta detección de conector de sonido y selección de
frontal
Auricular con sonido FP para salida analógica en el Centro
de Audio.
7 Base de conexiones
Conector de 4 pines. Normalmente permite conectar la
de entrada auxiliar
salida Audio analógico de la tarjeta de sintonización de TV
u otra fuente de sonido de su PC. Para controlar el audio de
latarjetadesintonizacióndeTVdesdeestaentradaauxiliar,
debe habilitar la función “monitor” para dicha entrada en el
mezclador de grabación del centro de audio de Xonar DGX.
8 Conector de salida
SeconectaalatarjetagrácasoportadaconHDMI.
S/PDIF
U7083_Xonar DGX_QSG.indb 18 1/9/12 6:42:18 PM
- 1
- 2
