Asus ROG Xonar Phoebus: instruction
Class: Professional equipment
Type:
Manual for Asus ROG Xonar Phoebus
Table of contents
- English ............................................................................................... 1
- 1. Introduction 1.1 System requirements 1.2 Package contents
- No Item Description
- 2.1 Card Installation 2.1.1 Installing the Xonar Phoebus Card
- 2.1.2 Connecting the TV Tuner Card
- 3. Driver Installation 3.1 Installing the Xonar Phoebus Card Driver 3.2 Uninstalling or Reinstalling the Xonar Phoebus Card Driver
U7062
First Edition V1
Jan. 2012
Xonar Phoebus
PCI Express 7.1-Channel
Gaming Soundcard
Quick Start Guide
U7062_Xonar-Phoebus_QSG.indb 1 18.01.2012 16:12:15 Uhr
Table of content
English ............................................................................................... 1
Français ............................................................................................. 18
Deutsch ............................................................................................. 33
Italiano ............................................................................................. 48
Español ............................................................................................. 63
Português .......................................................................................... 78
Pyccкий
............................................................................................ 93
Türkçe ........................................................................................... 108
U7062_Xonar-Phoebus_QSG.indb 2 18.01.2012 16:12:15 Uhr
1. Introduction
1.1 System requirements
Before installing the Xonar Phoebus audio card, ensure that your computer must meet
the following requirements:
English
• One PCI Express 1.0 (or higher) compatible slot for the audio card
• 6-pin peripheral power cable connector from your computer’s power supply unit
(PSU)
• Microsoft® Windows® Vista / 7 (32/64bit) / XP (32/64bit) / MCE2005
®
®
• Intel
Pentium
4 1.4GHz or AMD Athlon 1400 CPU or faster CPU
• More than 256 MB system memory
• More than 60 MB available storage space for driver installation
• CD-ROM drive (or DVD-ROM drive) for software installation
• High-quality headphones, powered analog speakers, or a Dolby Digital decoder, to
enjoy the audio card’s high delity sound
1.2 Package contents
Check your ASUS Xonar Phoebus audio card package for the following items:
TM
• ASUS Xonar
Phoebus 7.1 Channel PCI Express Audio Card
• Phoebus Control Box
• Driver CD
• S/PDIF TOSLINK optical adapter x 1
• ATX 4P-to- 6P power cable x 1
• Quick Start Guide
ASUS Xonar Phoebus Quick Start Guide
3
U7062_Xonar-Phoebus_QSG.indb 3 18.01.2012 16:12:16 Uhr
English
4
ASUS Xonar Phoebus Quick Start Guide
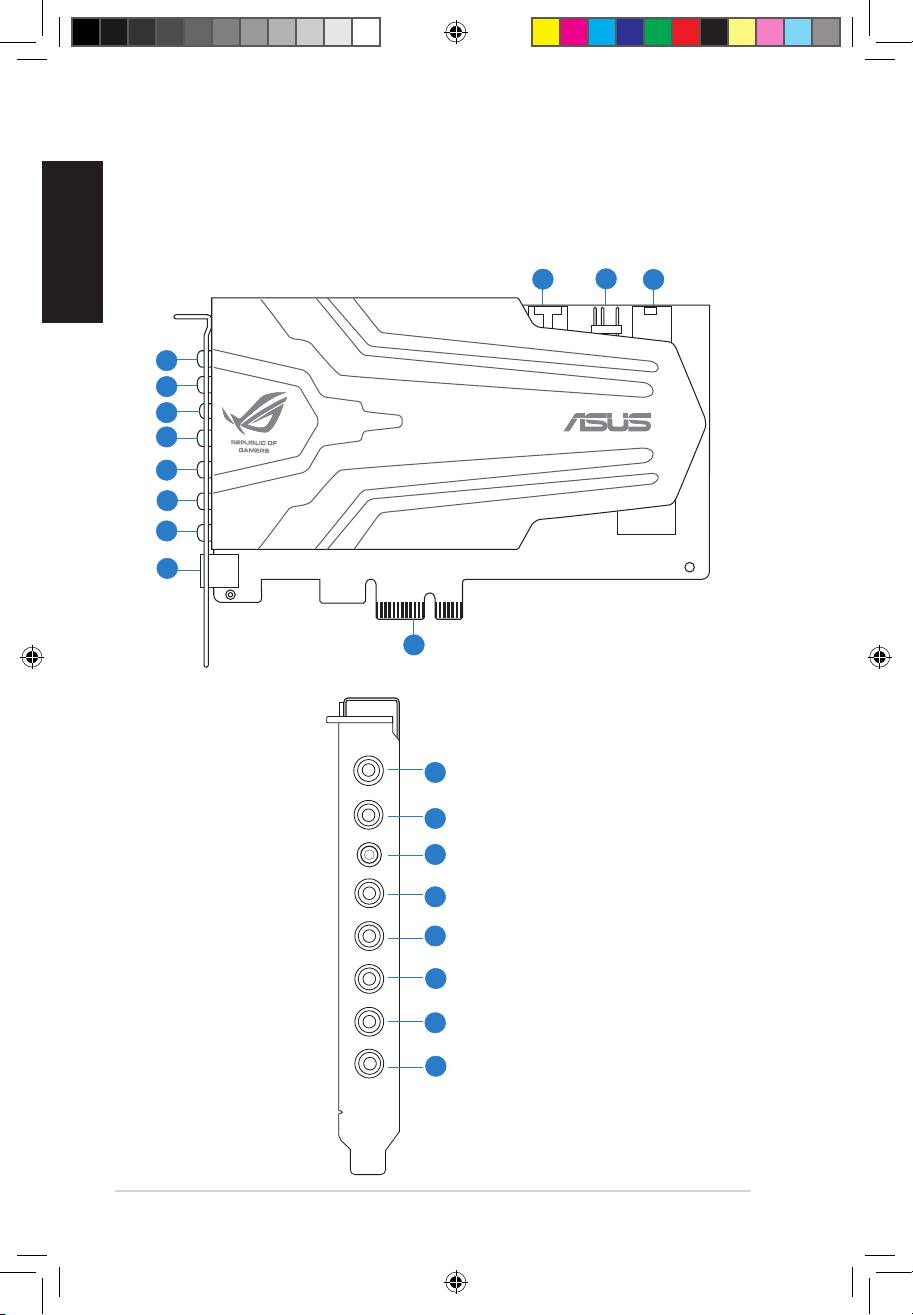
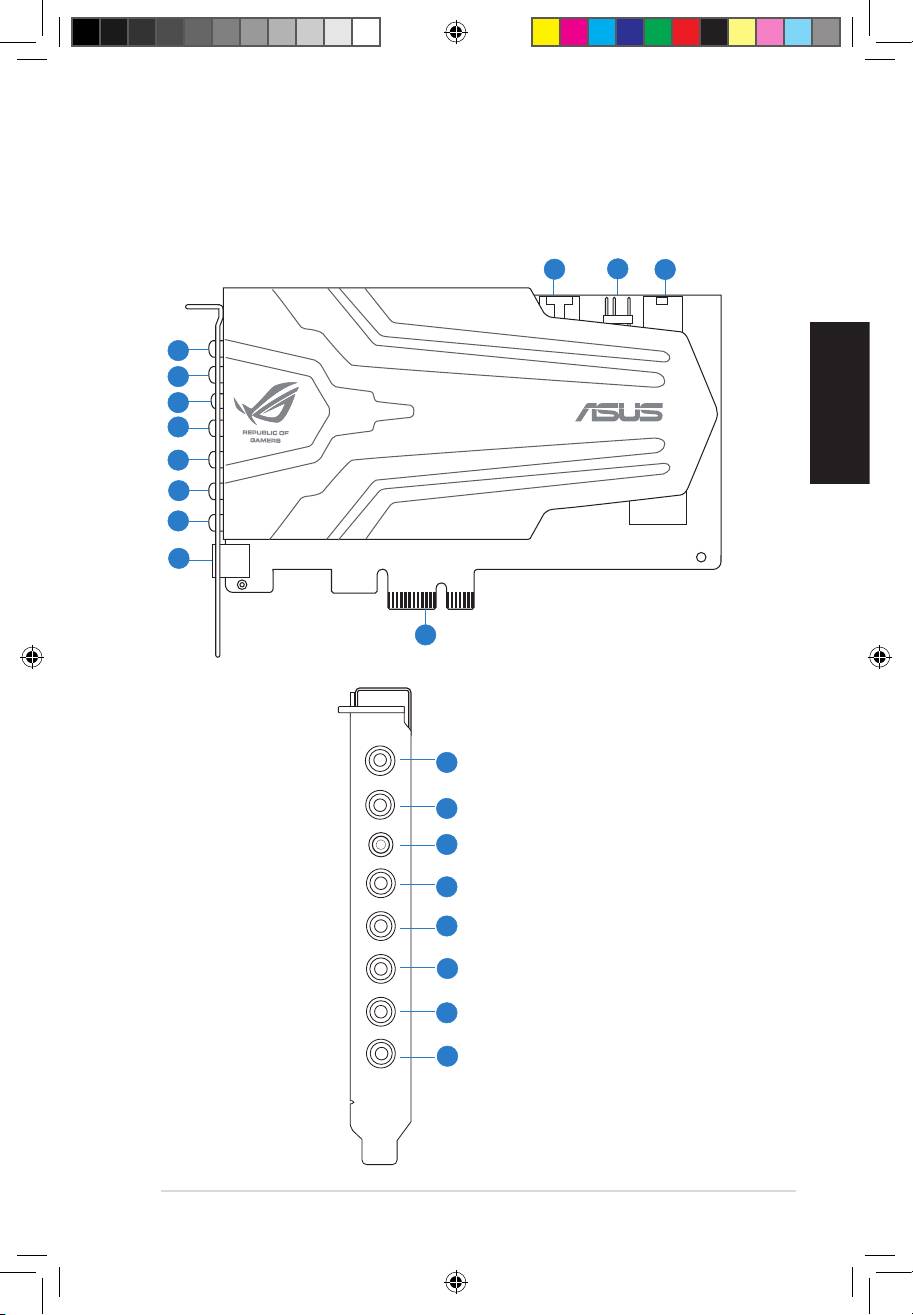
2. Hardware
2.1 Xonar Phoebus Audio Processing Card
Mic in
HP out
Box link
Line in
Front
Ctr / Sbw
Rear
Side /
SPDIF out
9
10
11
1
2
3
4
5
6
7
8
12
1
2
3
4
5
6
7
8
U7062_Xonar-Phoebus_QSG.indb 4 18.01.2012 16:12:18 Uhr
English
ASUS Xonar Phoebus Quick Start Guide
5
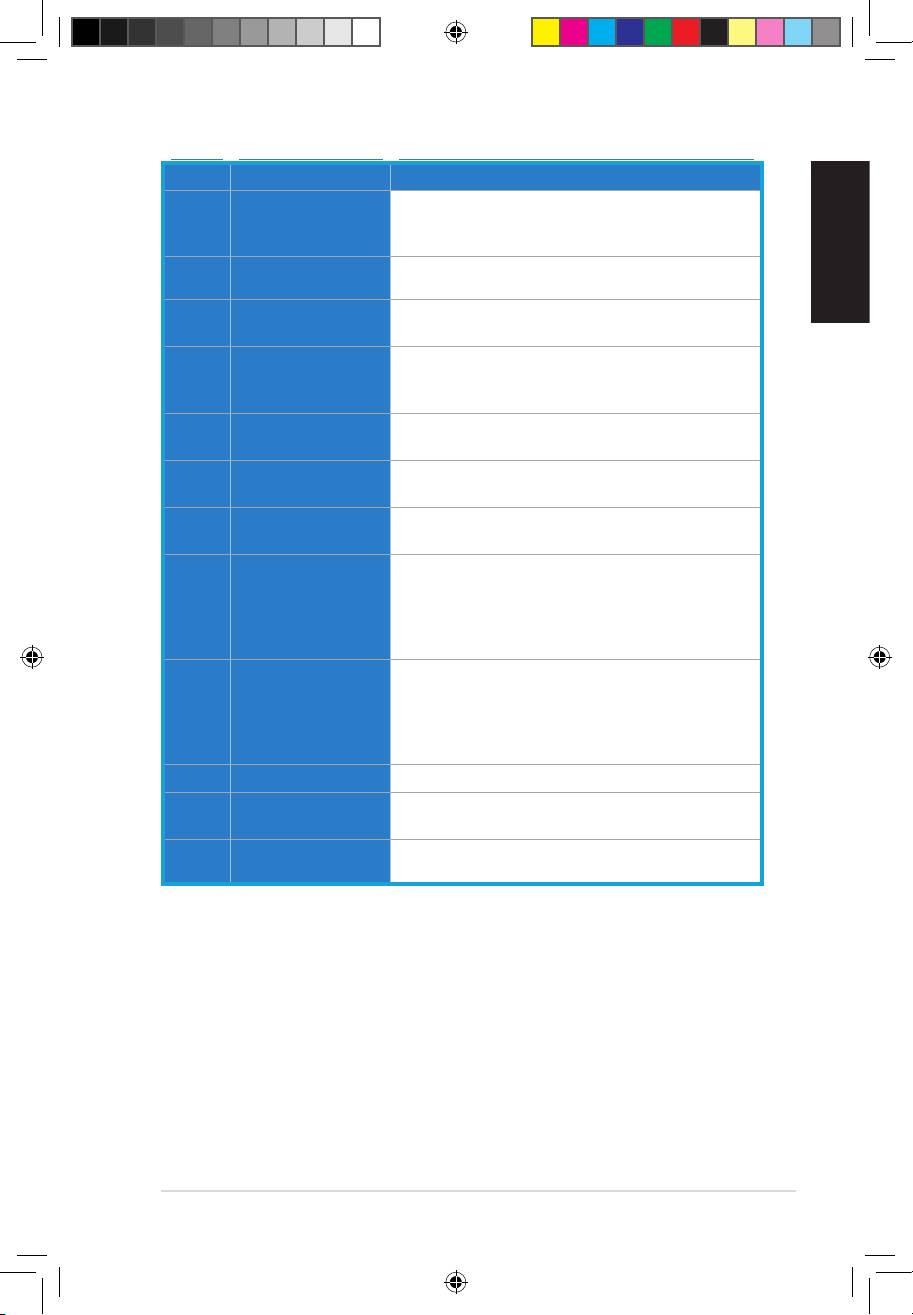
No Item Description
Connect your external PC microphone to this 3.5mm port
1 Microphone In port
for voice input. Built-in high-quality Microphone pre-
amplier.
Headphone Out
Connect your headphone to this port.
2
port
Connect the Xonar Phoebus Control Box to this 2.5mm
3 Box Link
port.
Connect analog devices like MP3 players, CD players, music
4 Line In port
synthesizers, and other line-level sound sources to this
3.5mm port for audio recording or processing.
For 2 channel speaker systems, connects to the front
5 Front Out port
left/right input on the powered speakers.
Center/Subwoofer
Connect to the center/subwoofer input on 5.1/7.1 powered
6
Out port
analog speakers.
Connect to the back surround input on 7.1 powered analog
7 Rear Out port
speakers.
Digital output port. Connect to an external digital decoder
or digital speaker systems, Home Theater systems, AV
S/PDIF Out/Side
8
receivers for outputting digital audio including PCM,
Out port
Dolby Digital, DTS, WMA-Pro, etc. Connect to the surround
channel input on 5.1 powered analog speakers.
4-pin header. Usually connects to the Analog Audio output
of TV tuner card or other sound source inside your PC
9 Aux Input Header
system. (To monitor your TV tuner card’s audio from this
Aux-In, you must enable the “monitor” function for Aux-In
in the Xonar Audio Center software’s recording mixer.)
10 S/PDIF Out Header
Connect to the graphics card with HDMI support.
Connect to the 6-pin power cable of your power supply
11 Power Connector
unit.
PCI Express Bus
Insert into the PCI Express slot on your motherboard.
12
Golden Fingers
U7062_Xonar-Phoebus_QSG.indb 5 18.01.2012 16:12:19 Uhr
English
6
ASUS Xonar Phoebus Quick Start Guide
2.1 Card Installation
Before you proceed with the following installation steps, it’s recommended that you
disable your onboard audio device in your BIOS settings, or uninstall any other sound
cards on your PC. (For BIOS setting or uninstallation of other sound cards, please refer
to the user manuals of your motherboard and sound card)
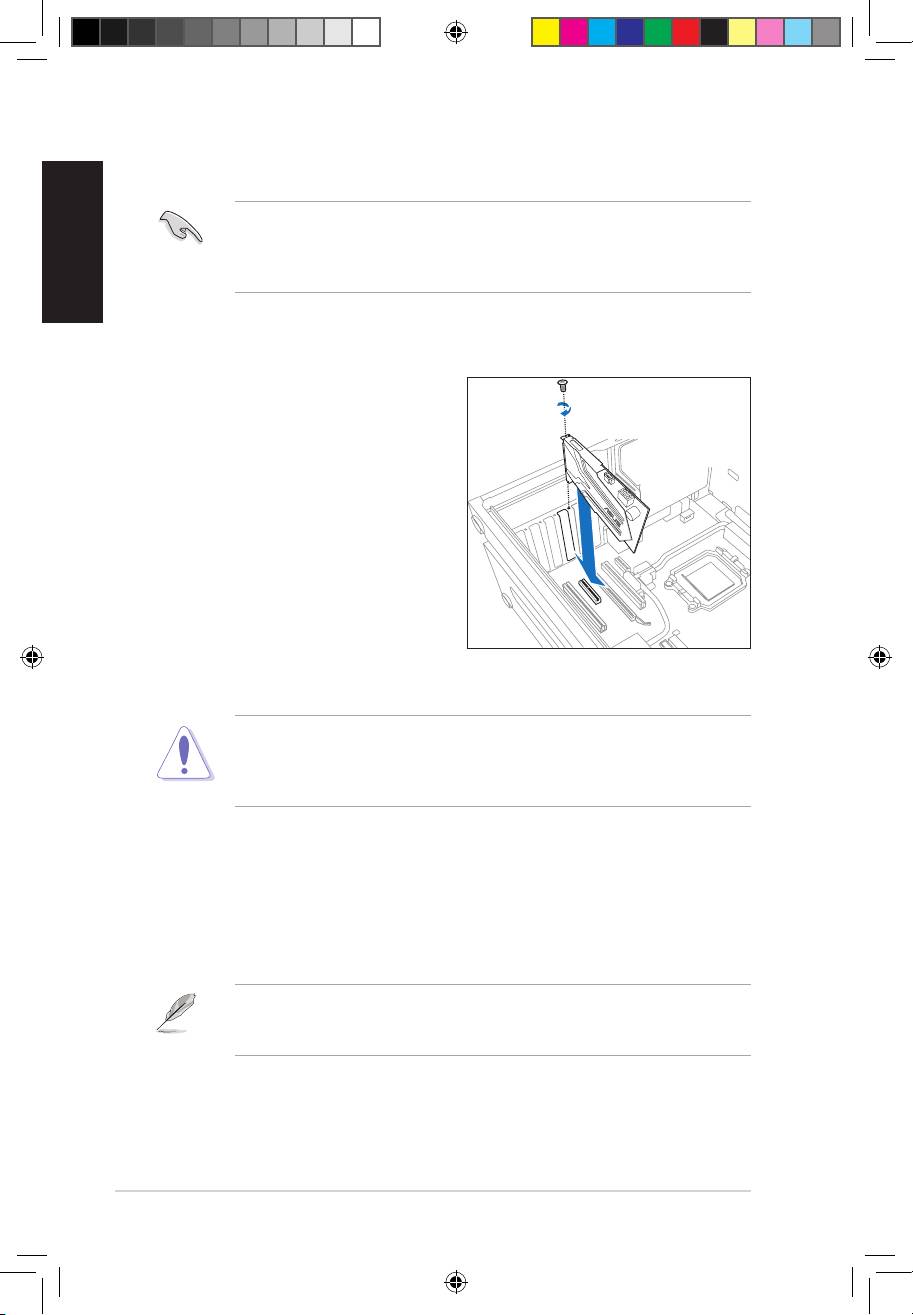
2.1.1 Installing the Xonar Phoebus Card
To install the Xonar Phoebus audio card:
1. Power OFF the computer, the monitor,
and all other peripheral devices
connected to your computer.
2. Unplug the computer power cord from
your computer and power outlet.
3. Touch the metal back or side panel of
the computer to avoid static electricity.
4. Remove the chassis cover.
5. Remove the metal bracket from
an available PCIE slot for the Xonar
Phoebus audio card.
6. Carefully insert the audio card into the PCIE slot. Ensure the audio card sits
properly in place.
Do not force the audio card into the slot. Make sure that the gold pins of the card’s
PCI Express connector are aligned with the motherboard’s PCI Express connector
before you insert the card into the PCI Express slot. If it does not t properly, gently
remove it and try again.
7. Secure the audio card with screws and the metal bracket.
8. Put back the chassis cover.
9. Reconnect all cables.
10. Plug the power cord to the computer and to a power outlet.
11. Power ON the computer.
The PCI Express high-quality audio card requires additional power from your
computer. If the power cable is not connected properly, the audio card will not work
at all.
U7062_Xonar-Phoebus_QSG.indb 6 18.01.2012 16:12:22 Uhr

English
ASUS Xonar Phoebus Quick Start Guide
7
2.1.2 Connecting the TV Tuner Card
If you have a traditional PCI or PCI Express TV tuner card on your computer, you may
need to connect it to the audio card to send the tuner card’s sound to your computer’s
speakers.
1. Secure the PCI/PCI Express TV tuner card and screw it into the back panel.
2. Connect the audio output header from the TV tuner card to the Aux-In header of
the audio card, as shown in the gure below.
For optimum TV audio quality, Xonar uses ADC recording to digitize the signal and
loops it back to DAC playback. Please select Aux-In as the recording source in the
Xonar Audio Center’s recording mixer and enable the monitoring button to pass this
signal to the audio output. Using this setup, you can even turn on sound eects such
as Pro-Logic IIx to expand the stereo TV audio to 5.1 or 7.1 channel surround sound.
TV audio on your PC will become even better than on your TV set!
U7062_Xonar-Phoebus_QSG.indb 7 18.01.2012 16:12:23 Uhr
English
8
ASUS Xonar Phoebus Quick Start Guide
3. Driver Installation
3.1 Installing the Xonar Phoebus Card Driver
To install the Xonar Phoebus card driver:
®
1. After you have installed the Xonar Phoebus card, turn on your computer. Windows
automatically detects the audio card and searches for device drivers. When
prompted for the audio drivers, click Cancel.
®
2. Insert the Support CD into the optical drive. If Windows
Autorun is enabled
in your system, the setup starts automatically. If not, run setup.exe from your
support CD.
3. Follow the onscreen instructions to nish the installation.
The version and content of the support CD are subject to change without notice.
3.2 Uninstalling or Reinstalling the Xonar Phoebus Card
Driver
3.2.1 Uninstalling the Xonar Phoebus Card Driver
To uninstall the Xonar Phoebus card driver:
1. Click Start -> Settings -> Control Panel.
2. Double-click the Add/Remove Programs icon.
3. Click the Change or Remove Programs button.
4. Select each program you would like to remove, and then click the Add/Remove
(or Change/Remove) button.
5. In the InstallShield Wizard dialog box, select the Remove option.
6. Restart your computer when prompted.
3.2.2 Reinstalling the Xonar Phoebus Card Driver
To reinstall the Xonar Phoebus card driver:
1. Before reinstalling any software, it’s recommended to uninstall the existing
software rst.
2. After nishing the uninstallation of the software, please follow the installation
process again to reinstall the same or updated software.
U7062_Xonar-Phoebus_QSG.indb 8 18.01.2012 16:12:23 Uhr

English
ASUS Xonar Phoebus Quick Start Guide
9
4. Connecting Speakers and Peripherals
4.1 Connecting Phoebus Box
4.1.1 Connecting Phoebus Box
No Item Description
1 Microphone In
Connect the microphone’s 3.5mm plug from the Phoebus
Port
Control Box into this Mic-In port for voice communication,
recording or karaoke.
2 Headphone Port
The headphone port has a built-in high-quality amplier
to drive headphones. Connect the Phoebus Control box
directly to this port.
3 Box Link Port
Connect Phoebus Control box directly to this port.
4.1.2 Connecting Phoebus Control Box with external headphone and
microphone
No Item Description
1 Headphone Port
Connect the headphone to the headphone port on the
Phoebus Control box.
2 Microphone In
Connect the microphone’s 3.5mm plug to the Mic-In port
Port
on the Phoebus Control Box.
Mic in
HP out
Box link
Line in
Front
Ctr / Sbw
Rear
Side /
SPDIF out
1
2
3
Headphone Out
Mic In
1
2
U7062_Xonar-Phoebus_QSG.indb 9 18.01.2012 16:12:26 Uhr
English
10
ASUS Xonar Phoebus Quick Start Guide
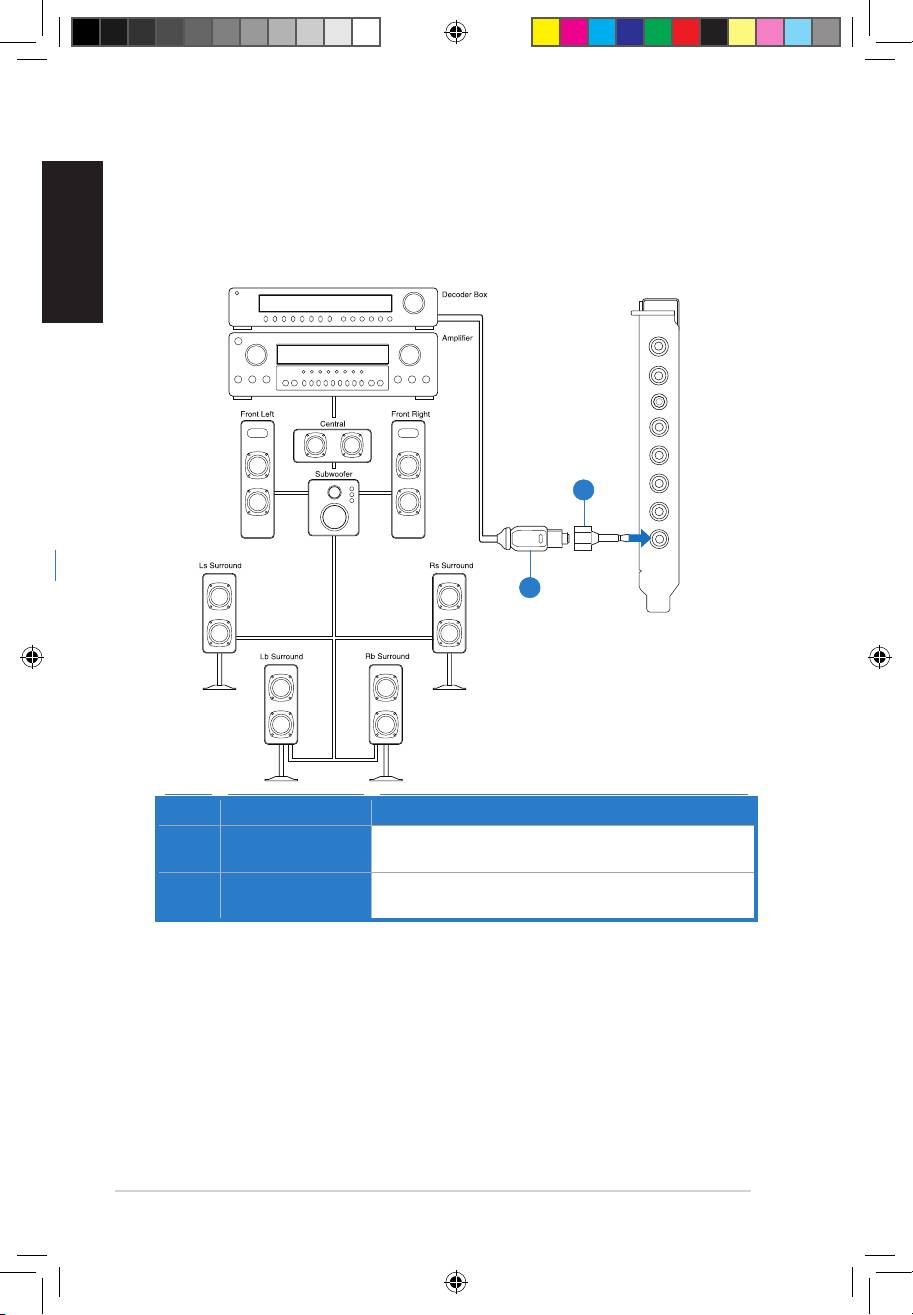
4.1.3 Connecting Digital Speaker Systems (Home Theater)
Xonar Phoebus makes playback through your home theater system possible, creating
an impressive surround sound experience. A single digital cable connection can carry
high-quality digital audio from any of your PC audio sources to any digital speakers or
AV Receivers.
No Item Description
1 Optical adapter
Plug the optical TOSLINK adapter into the S/PDIF-Out
connector.
2 Optical cable
Connect your decoder’s S/PDIF-In port to the optical adapter
with the TOSLINK optical cable
Mic in
HP out
Box link
Line in
Front
Ctr / Sbw
Rear
Side /
SPDIF out
1
2
U7062_Xonar-Phoebus_QSG.indb 10 18.01.2012 16:12:28 Uhr

English
ASUS Xonar Phoebus Quick Start Guide
11
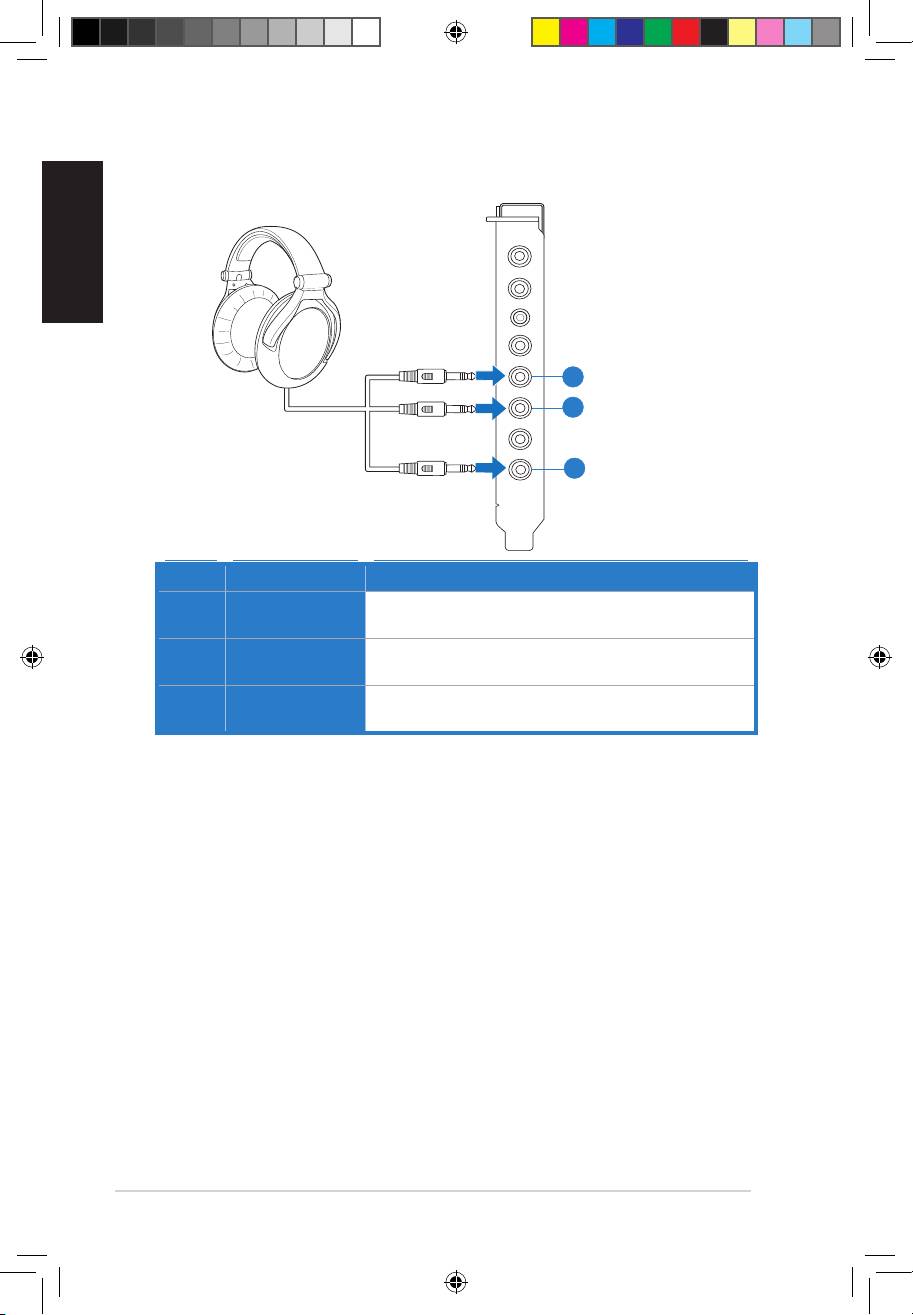
4.1.4 Connecting stereo headphones
Connecting stereo hadphones
Mic in
HP out
Box link
Line in
Front
Ctr / Sbw
Rear
Side /
SPDIF out
1
No Item Description
1 Headphone Out
The Headphone Out Port has a built-in high-quality
Port
amplier to drive headphones. Please connect your stereo
headphones directly to this jack.
U7062_Xonar-Phoebus_QSG.indb 11 18.01.2012 16:12:29 Uhr
English
12
ASUS Xonar Phoebus Quick Start Guide
Connecting 5.1 channel hadphones
No Item Description
1 Front Out
Connect the front-channel 3.5mm plug of your 5.1
headphones into this jack.
2 Side Surround
Connect the surround-channel 3.5mm plug of your 5.1
Out
headphone into this jack.
3 Center/
Connect the Center/Bass-channel 3.5mm plug of your 5.1
Subwoofer Out
headphone into this jack.
Mic in
HP out
Box link
Line in
Front
Ctr / Sbw
Rear
Side /
SPDIF out
1
3
2
U7062_Xonar-Phoebus_QSG.indb 12 18.01.2012 16:12:31 Uhr
English
ASUS Xonar Phoebus Quick Start Guide
13
4.1.5 Connecting analog speaker systems
Connecting analog power amplier
Mic in
HP out
Box link
Line in
Front
Ctr / Sbw
Rear
Side /
SPDIF out
1
3
2
No Item Description
1 Front Out
Connects to the “left front” and “right front” input ports of the
analog amplier with the mini-jack to RCA cable.
2 Side Surround
Connects to the “left surround” and “right surround” input ports
Out
of the analog amplier with the mini-jack to RCA cable.
3 Center/
Connects to the “Center” and “subwoofer” input ports of the
Subwoofer
analog amplier with the mini-jack to RCA cable.
U7062_Xonar-Phoebus_QSG.indb 13 18.01.2012 16:12:32 Uhr

English
14
ASUS Xonar Phoebus Quick Start Guide
Connecting 2 channel speakers
2 speakers
No Item Description
1 Front Out Port
Connect the 2 channel speaker set’s 3.5mm plug into this
Front Out jack.
Connecting 4 channel speakers
4 speakers
No Item Description
1 Front Out
Connects to the Front input port of the 4/4.1 speakers with
the mini-jack cable.
2 Side Surround
Connects to the Surround input port of the 4/4.1 speakers
Out
with the mini-jack cable.
Mic in
HP out
Box link
AUDIO
INPUTS
Line in
Front
Ctr / Sbw
Rear
Side /
SPDIF out
1
1
2
Mic in
HP out
Box link
AUDIO
AUDIO
INPUTS
INPUTS
Line in
Side
Front
Front
Ctr / Sbw
Rear
Side /
SPDIF out
U7062_Xonar-Phoebus_QSG.indb 14 18.01.2012 16:12:34 Uhr
English
ASUS Xonar Phoebus Quick Start Guide
15
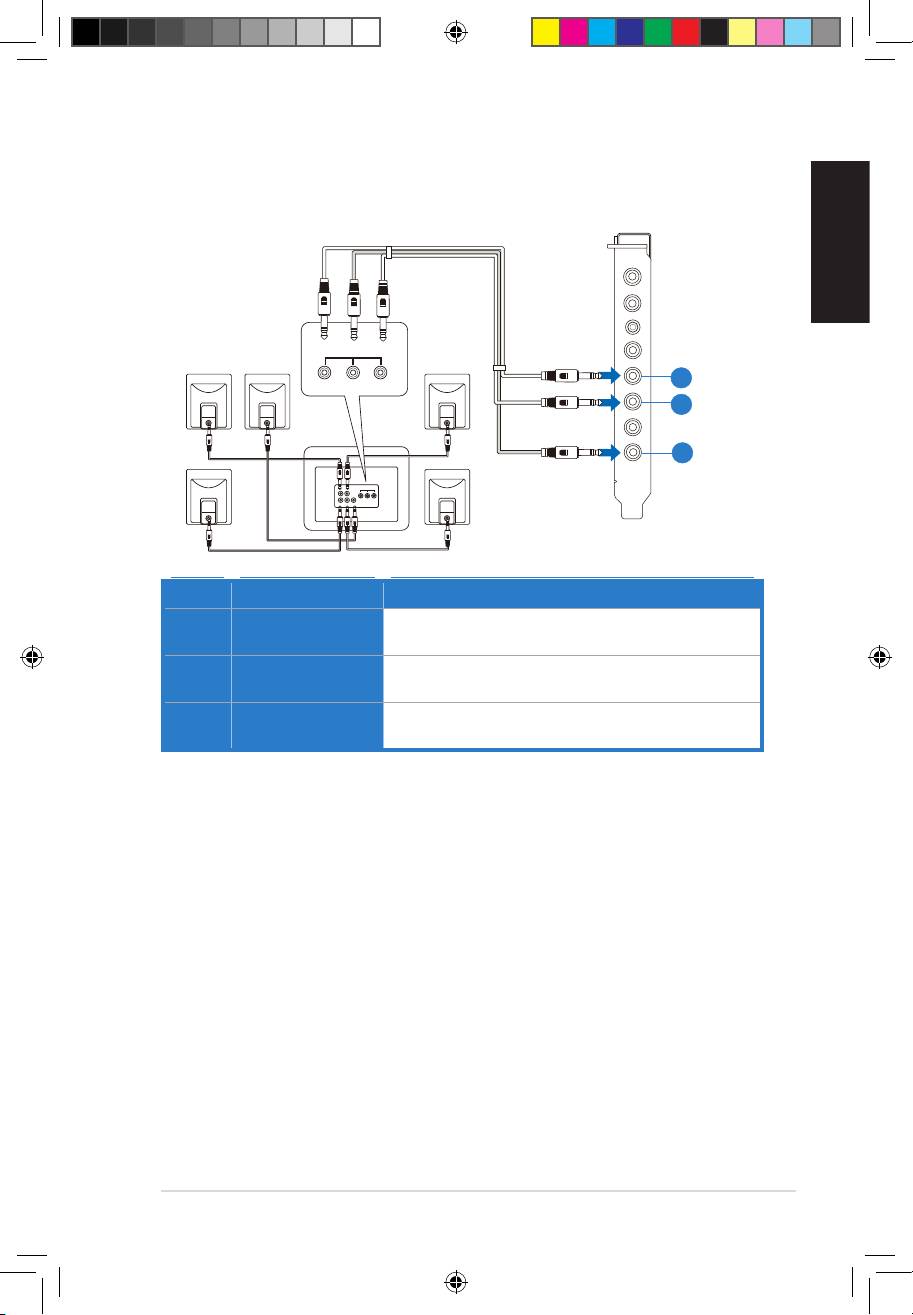
Connecting 5.1 channel speakers
5.1 speakers
Mic in
HP out
Box link
AUDIO
INPUTS
Line in
Front
Side
Center/
Subwoofer
Front
Ctr / Sbw
Rear
Side /
SPDIF out
1
3
2
No Item Description
1 Front Out
Connects to the Front input port of the 5.1 speakers with the
mini-jack cable.
2 Side Surround
Connects to the Surround input port of the 5.1 speakers with
Out
the mini-jack cable.
3 Center/
Connects to the Center/Subwoofer input port of the 5.1
Subwoofer
speakers with the mini-jack cable.
U7062_Xonar-Phoebus_QSG.indb 15 18.01.2012 16:12:35 Uhr

English
16
ASUS Xonar Phoebus Quick Start Guide
Connecting 7.1 channel speakers
7.1 speakers
Rear
Front
Mic in
AUDIO
AUDIO
INPUTS
INPUTS
Side
Center/
HP out
Subwoofer
Box link
Line in
Front
Ctr / Sbw
Rear
Side /
SPDIF out
1
3
4
2
No Item Description
1 Front Out
Connects to the Front input port of the 7.1 speakers with
the mini-jack cable.
2 Side Surround
Connects to the Surround input port of the 7.1 speakers
Out
with the mini-jack cable.
3 Center/
Connects to the Center/Subwoofer input port of the 7.1
Subwoofer
speakers with the mini-jack cable.
4 Back Surround
Connects to the Back Surround input port of the 7.1
Out
speakers with the mini-jack cable.
U7062_Xonar-Phoebus_QSG.indb 16 18.01.2012 16:12:37 Uhr

English
ASUS Xonar Phoebus Quick Start Guide
17
4.1.6 Connecting Microphone
1
1
2
1
Mic in
HP out
2
Box link
Side /
SPDIF out
Ctr / Sbw
Line in
Front
Rear
No Item Description
1 Microphone In
Connect the microphone’s 3.5mm plug into this Mic-In port
Port
for voice communication, recording, or karaoke.
2 Headphone Port
The headphone port has a built-in high-quality amplier to
drive headphones. Connect your stereo headphones directly
to this jack.
4.1.7 Connecting Line-In audio sources
Mic in
HP out
Box link
CD Player
Line in
Front
Ctr / Sbw
Rear
Side /
SPDIF out
MP3 Player
1
No Item Description
1 Line In Port
Connect the 3.5mm plug of the CD/MP3 Player or any other
Line level analog audio sources into this Line-In jack for sound
recording.
U7062_Xonar-Phoebus_QSG.indb 17 18.01.2012 16:12:40 Uhr
Français
Français
18
Guide de démarrage rapide pour carte son ASUS Xonar Phoebus
Français
Français
1. Introduction
1.1 Pré-requis système
Avant d’installer la carte son Xonar Phoebus, assurez-vous que votre ordinateur puisse Xonar Phoebus, assurez-vous que votre ordinateur puisseassurez-vous que votre ordinateur puisse
satisfaire aux critères suivants :
• Un slot PCIE 1.0 (ou supérieur) pour la carte sonUn slot PCIE 1.0 (ou supérieur) pour la carte son
• Une prise d’alimentation 6 broches reliée au bloc d’alimentationUne prise d’alimentation 6 broches reliée au bloc d’alimentation
• Microsoft® Windows® Vista / 7 (32/64bit) / XP (32/64bit) / MCE2005
®
®
• Intel
Pentium
4 1.4GHz or AMD Athlon 1400 CPU or faster CPU
• > 256 Mo de mémoire vive> 256 Mo de mémoire vive
• > 60 Mo d’espace disque disponible pour l’installation des pilotes
• CD-ROM drive (or DVD-ROM drive) for software installation
• Des écouteurs de haute qualité, des haut-parleurs analogiques alimentés, ou unDes écouteurs de haute qualité, des haut-parleurs analogiques alimentés, ou un
décodeur Dolby Digital pour proter pleinement de la qualité audio délivrée par la
carte son
1.2 Contenu de la boîte
Vériez que la boîte de votre carte son ASUS Xonar Phoebus contient bien les éléments ASUS Xonar Phoebus contient bien les élémentscontient bien les éléments
suivants :
TM
• Carte son PCIE ASUS XonarCarte son PCIE ASUS XonarASUS Xonar
Phoebus
• Boîtier de contrôle Phoebus
• CD de supportCD de support
• Adaptateur TOSLINK S/PDIF optique x 1Adaptateur TOSLINK S/PDIF optique x 1
• Câble d’alimentation ATX 4 à 6 broches x 1
• Guide de démarrage rapide x 1Guide de démarrage rapide x 1
U7062_Xonar-Phoebus_QSG.indb 18 18.01.2012 16:12:40 Uhr
Guide de démarrage rapide pour carte son ASUS Xonar Phoebus
19
Français
Français
Français
Français
2. Matériel
2.1 Diagramme de la carte son Xonar Phoebus
Mic in
HP out
Box link
Line in
Front
Ctr / Sbw
Rear
Side /
SPDIF out
9
10
11
1
2
3
4
5
6
7
8
12
1
2
3
4
5
6
7
8
U7062_Xonar-Phoebus_QSG.indb 19 18.01.2012 16:12:42 Uhr
Français
Français
20
Guide de démarrage rapide pour carte son ASUS Xonar Phoebus
Français
Français
N° Élément Description
Port d’entrée
Connectez le port microphone externe de votre PC sur ce
1
microphone
port 3.5mm. Intègre un préamplicateur de microphone de
haute qualité.
2 Prise casque
Connectez votre casque audio sur ce port.
Connectez le boîtier de contrôle Xonar Phoebus sur ce port
3 Lien boîtier
de 2.5mm.
Connectez des périphériques analogiques (lecteur MP3,
4 Port d’entrée audio
lecteur CD, etc) ou autres sources audio sur ce port 3.5mm.
Sortie de signal
Connectez le câble audio droit (rouge) de votre système de
5
avant
haut-parleurs 2/2.1 sur ce port.
Port de sortie
Se connecte au port d’entrée centre/caisson de basse
6
centre/caisson de
des systèmes de haut-parleurs analogiques alimentés
basse
5.1/6.1/7.1.
Port de sortie
Se connecte au port d’entrée Surround arrière des systèmes
7
arrière
de haut-parleurs analogiques alimentés 6.1/7.1
Port de sortie numérique TOSLINK. Se connecte à un
décodeur numérique externe, un home cinéma, un
système de haut-parleurs numériques ou un récepteur
S/PDIF Out/SortieSortie
pour la transmission d’un signal audio numérique
8
latérale
supportant les technologies PCM, Dolby Digital, DTS,
WMA-Pro, etc.
Se connecte au port d’entrée Surround des systèmes de
haut-parleurs analogiques alimentés 4/4.1/5.1/6.1/7.1.
En-tête d’entrée
Se connecte généralement au port de sortie audio
auxiliaire
analogique d’une carte tuner TV ou tout autre source
audio interne du PC. (Pour surveiller les signaux audio de
9
votre carte tuner TV depuis ce port, vous devrez activer
la fonction de surveillance du port “Aux-In” à partir de
l’utilitaire audio Xonar Audio Center.)
En-tête sortie
Se connecte à une carte graphique avec support HDMI.
10
S/PDIF
Connecteur
Se connecte à l’un des câbles 6 broches du bloc
11
d’alimentation
d’alimentation.
Connecteurs dorés
Connectent la carte son au slot PCI Express de la carte
12
PCI Express
mère.
U7062_Xonar-Phoebus_QSG.indb 20 18.01.2012 16:12:43 Uhr
 P2-P5945G")