Asus WL-130: instruction
Class: Household, kitchen appliances, electronics and equipment
Type:
Manual for Asus WL-130
Table of contents

®
English
Wireless Local Area Network Card
WL-130b
(For 802.11b Wireless Networks)
Quick Start Guide

Quick Start Guide
System Requirements
English
To begin using the ASUS WLAN Card, you must have the following
minimum requirements:
• Windows XP/2000/ME/98SE
• Standard 32-bit PCI Slot
• 32MB system memory or larger
• 300MHz processor or higher
• CD-ROM Drive
The Product Package
When you receive the ASUS WLAN Card package, it should contain the
following items:
• ASUS WLAN PCI Card
• ASUS WLAN Card Quick Start Guide
• ASUS WLAN Card User’s Manual
• CD-ROM Disc (Drivers, Utilities, Documentation)
If any of the above items are not included or damaged, contact your
local dealer for instructions.
2 ASUS WLAN Card
Quick Start Guide
Installing the ASUS WLAN Card Driver
1. Have an experienced person install the ASUS WLAN Card into a free PCI slot. Replace your
chassis door, panels, screws, and cables when completed.
English
2. Turn ON your computer and enter Windows.
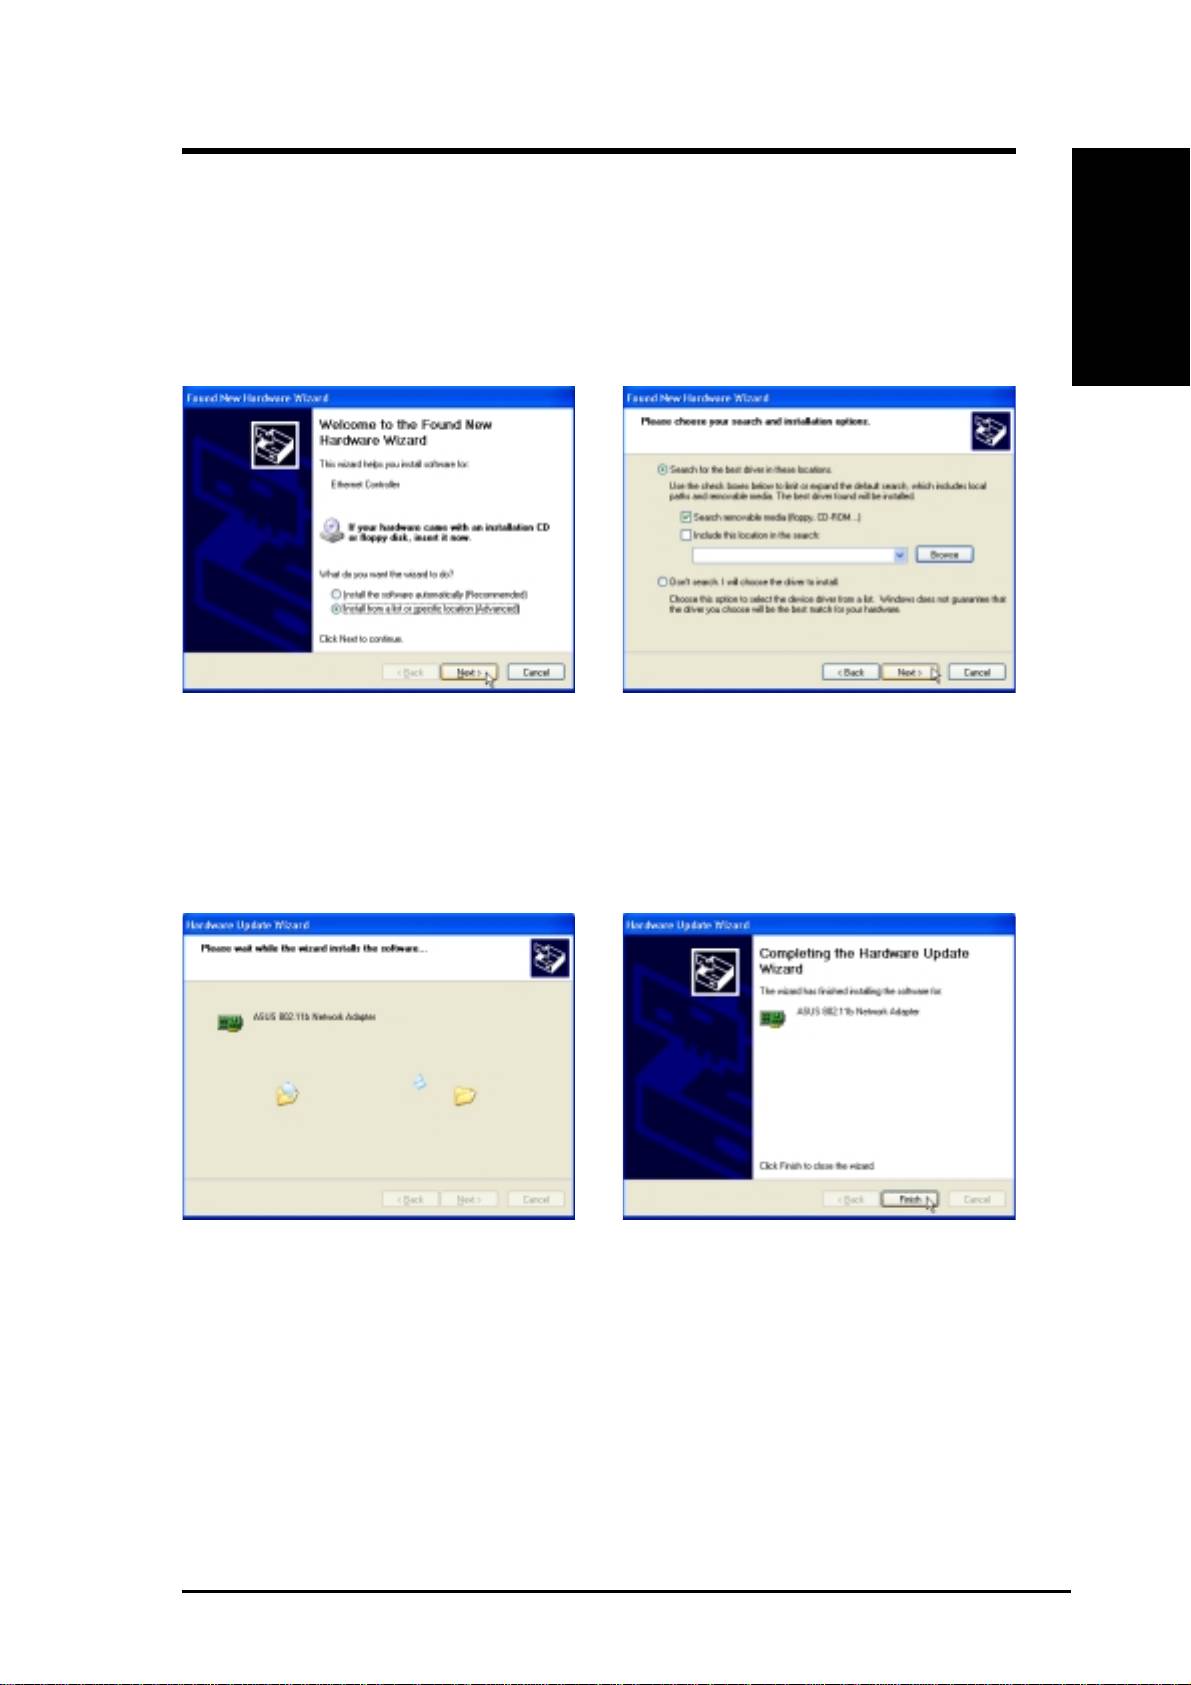
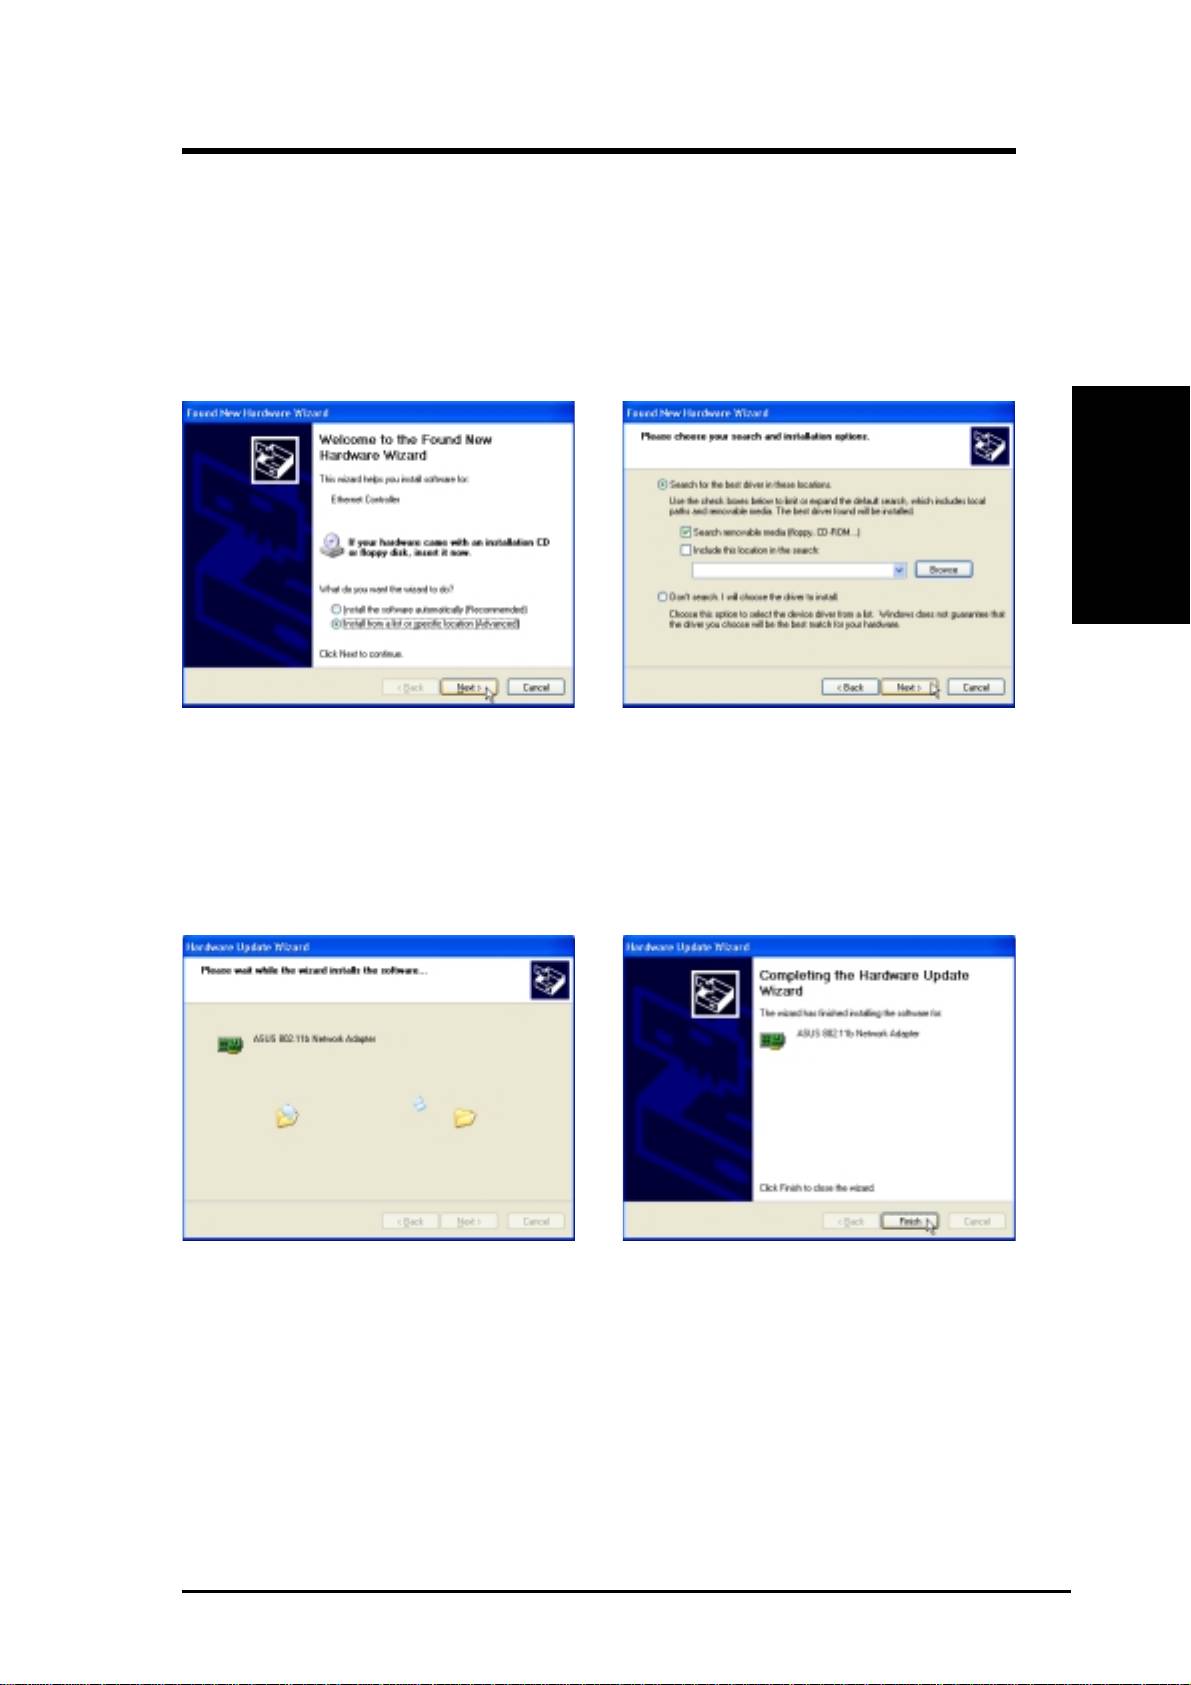
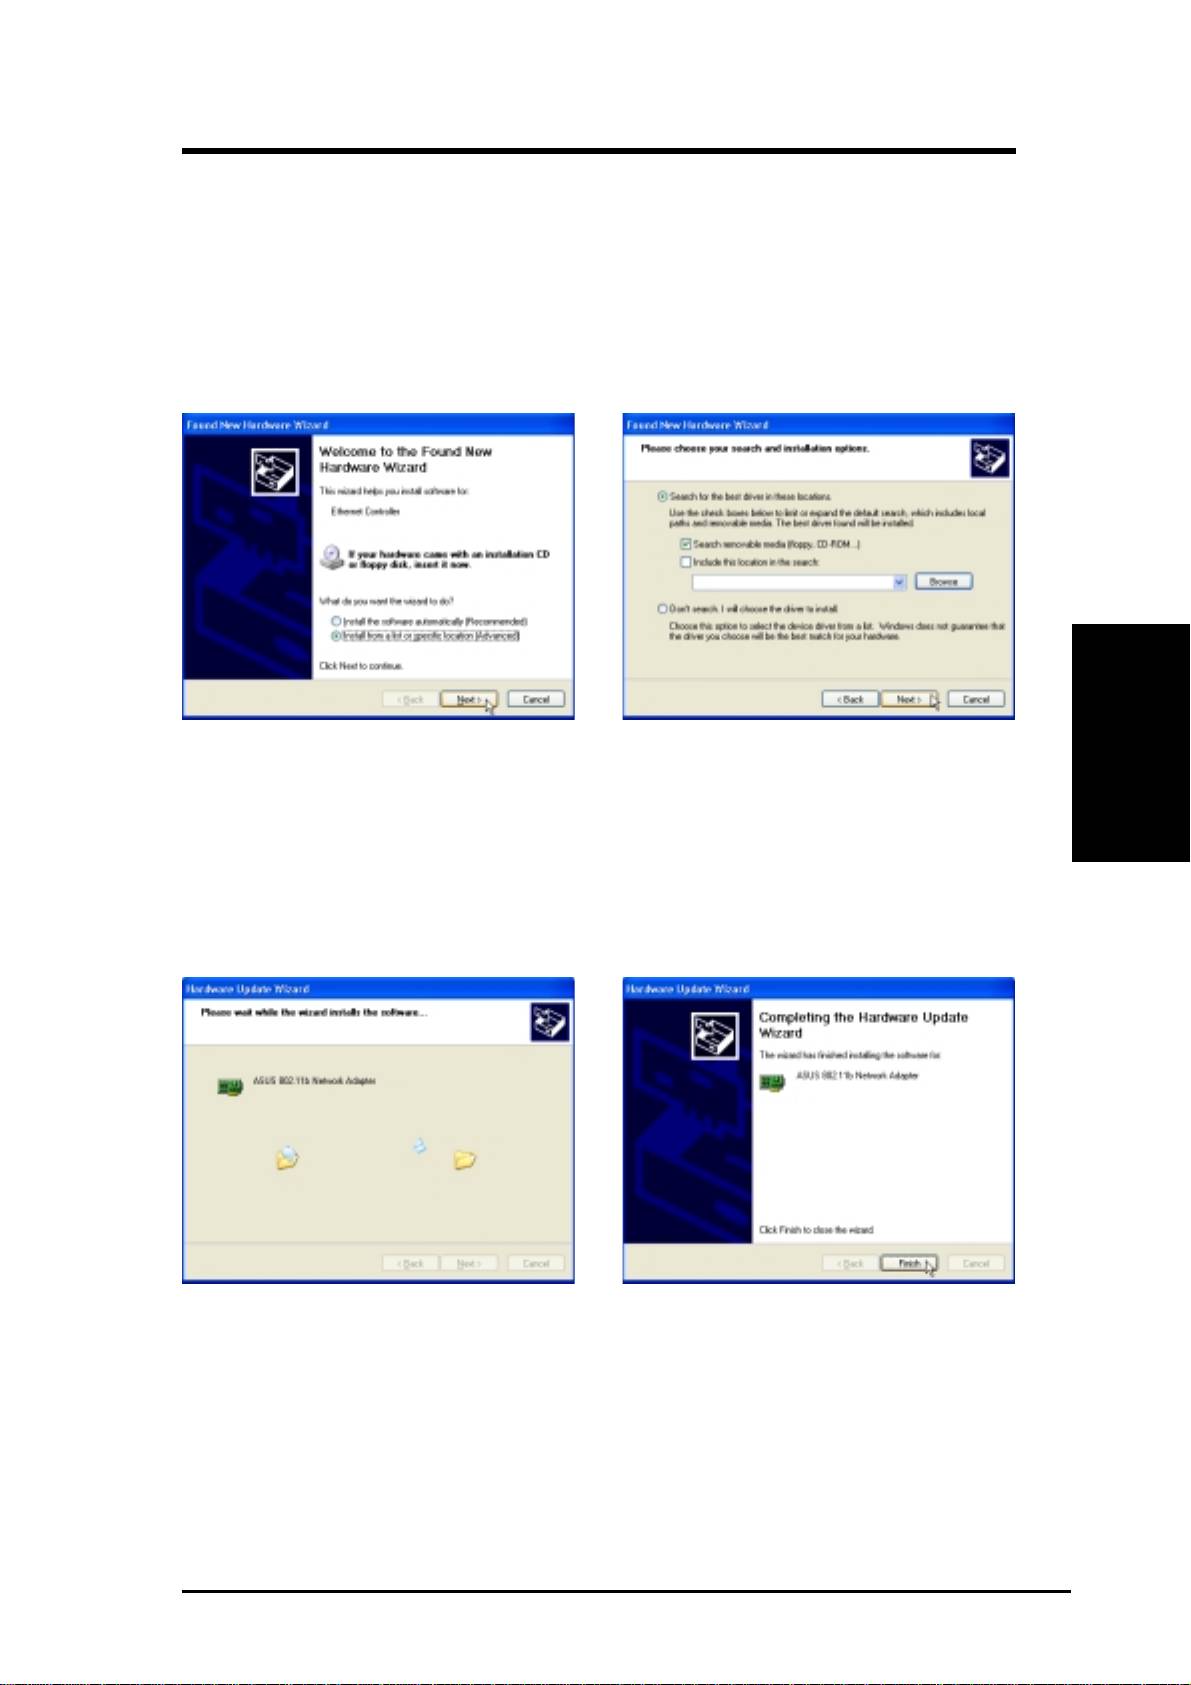
3. Windows will automatically detect the ASUS
4. Insert the support CD that came with your
WLAN Card once it is inserted into the PCI
ASUS WLAN Card.
slot, then the “Add New Hardware Wizard”
5. Select “Search for the best driver in”... and
dialog will appear. Click Next.
“Search removable media...”, then click
Next.
6. Wait while Windows XP creates a restore
7. Click Finish when installation has
point for you system files in case you
complete. Restart your computer if
need to restore your current system.
prompted.
ASUS WLAN Card 3
Quick Start Guide
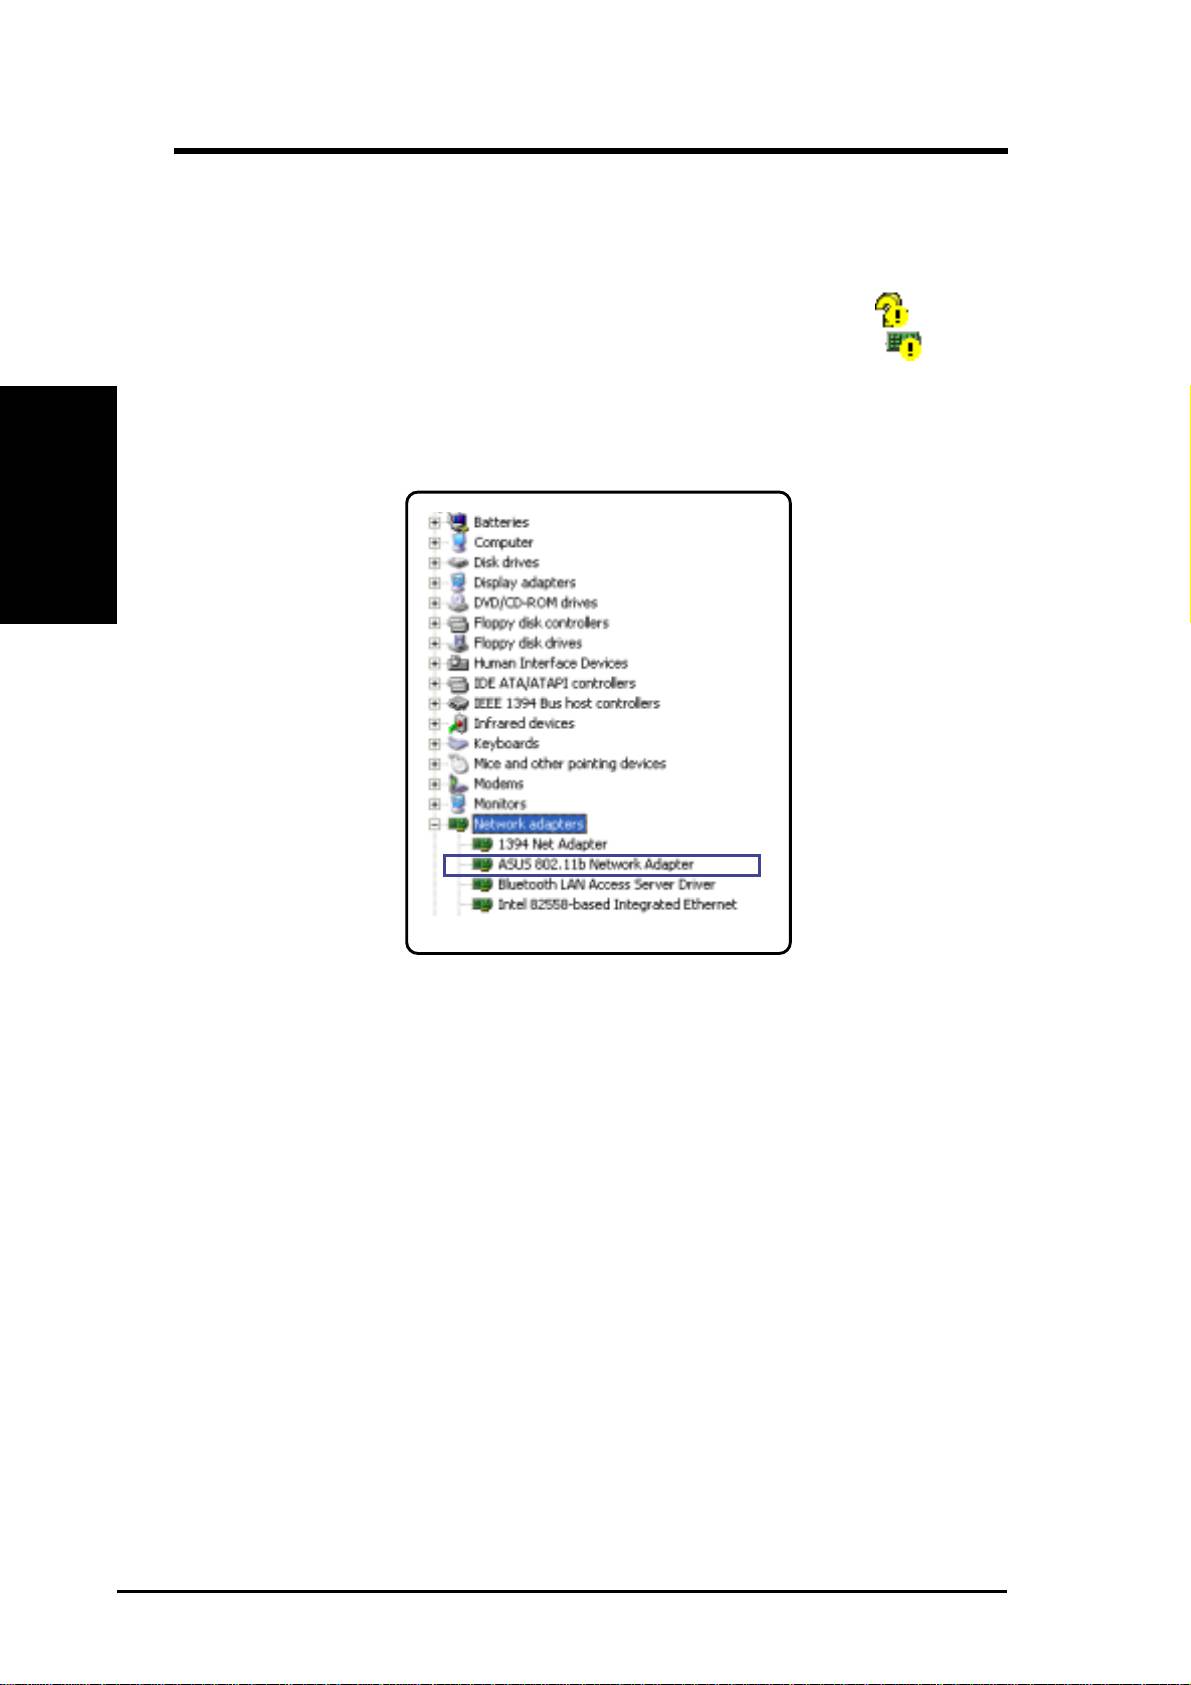
Verifying Drivers
English
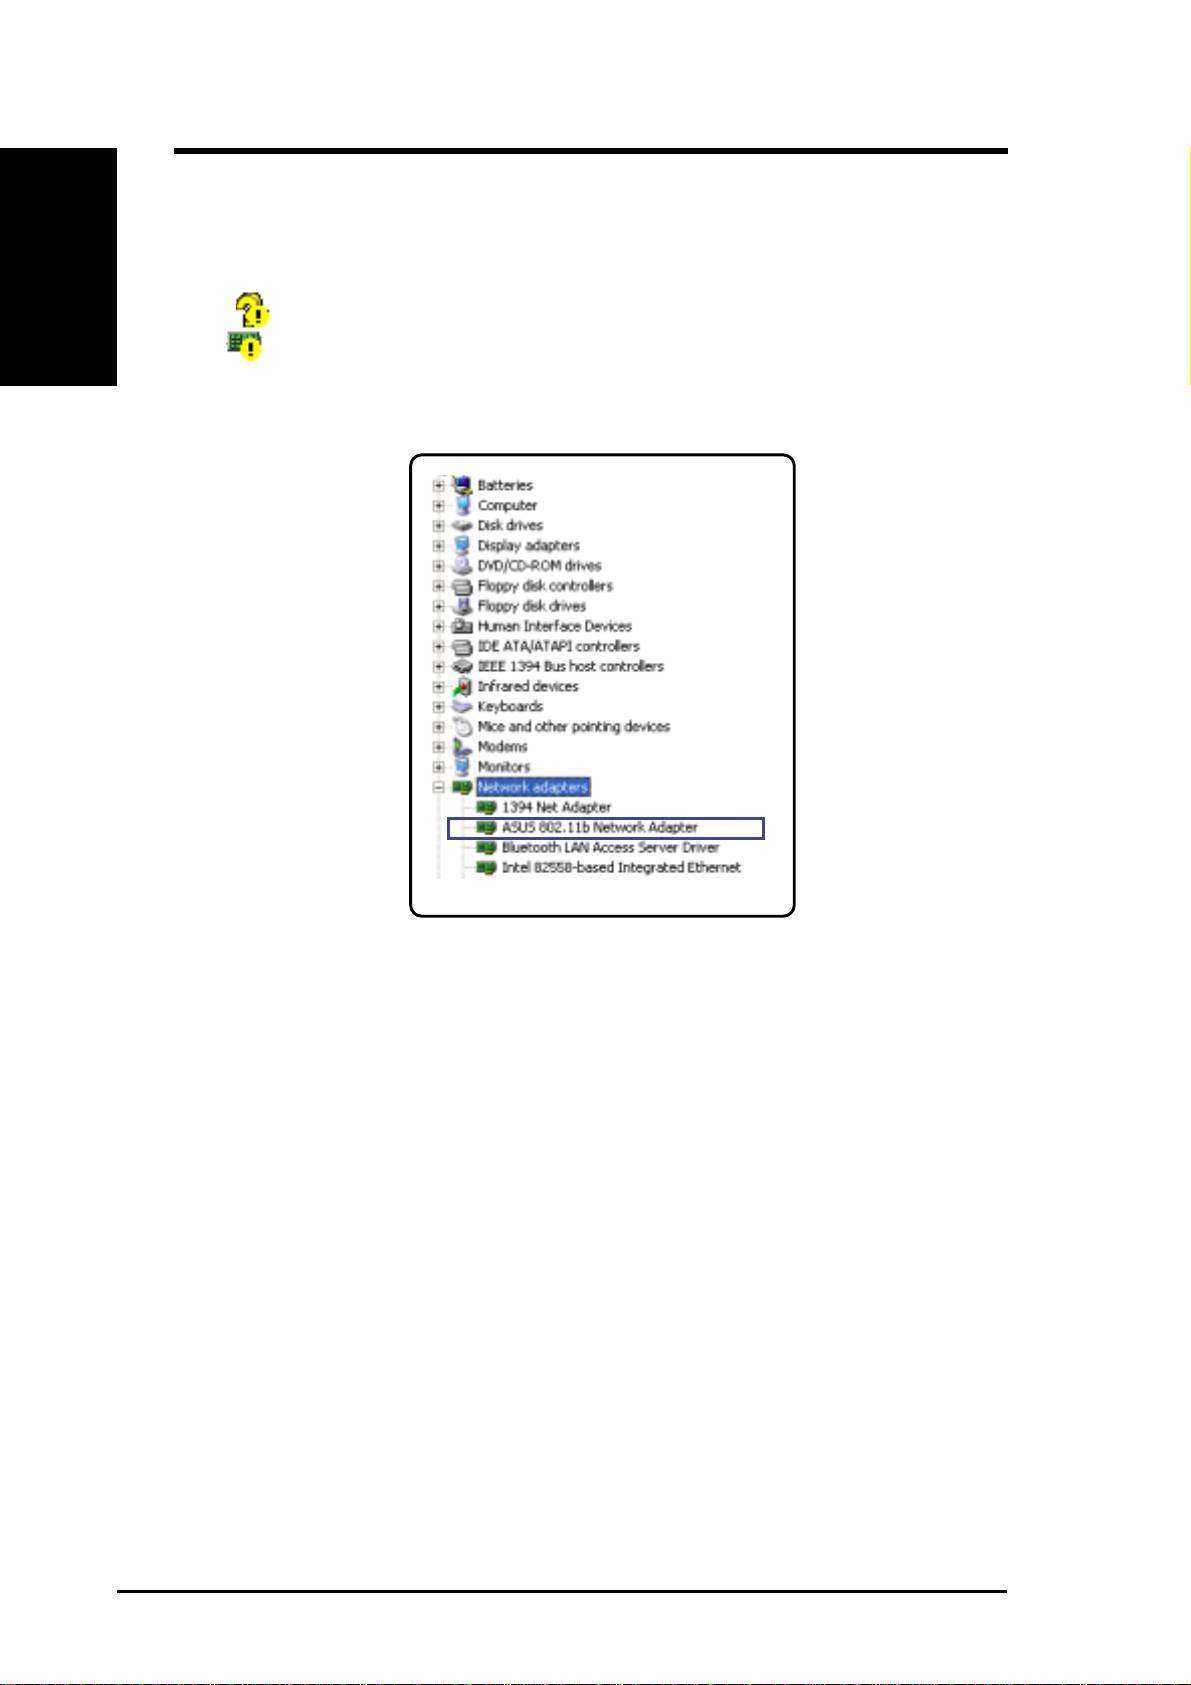
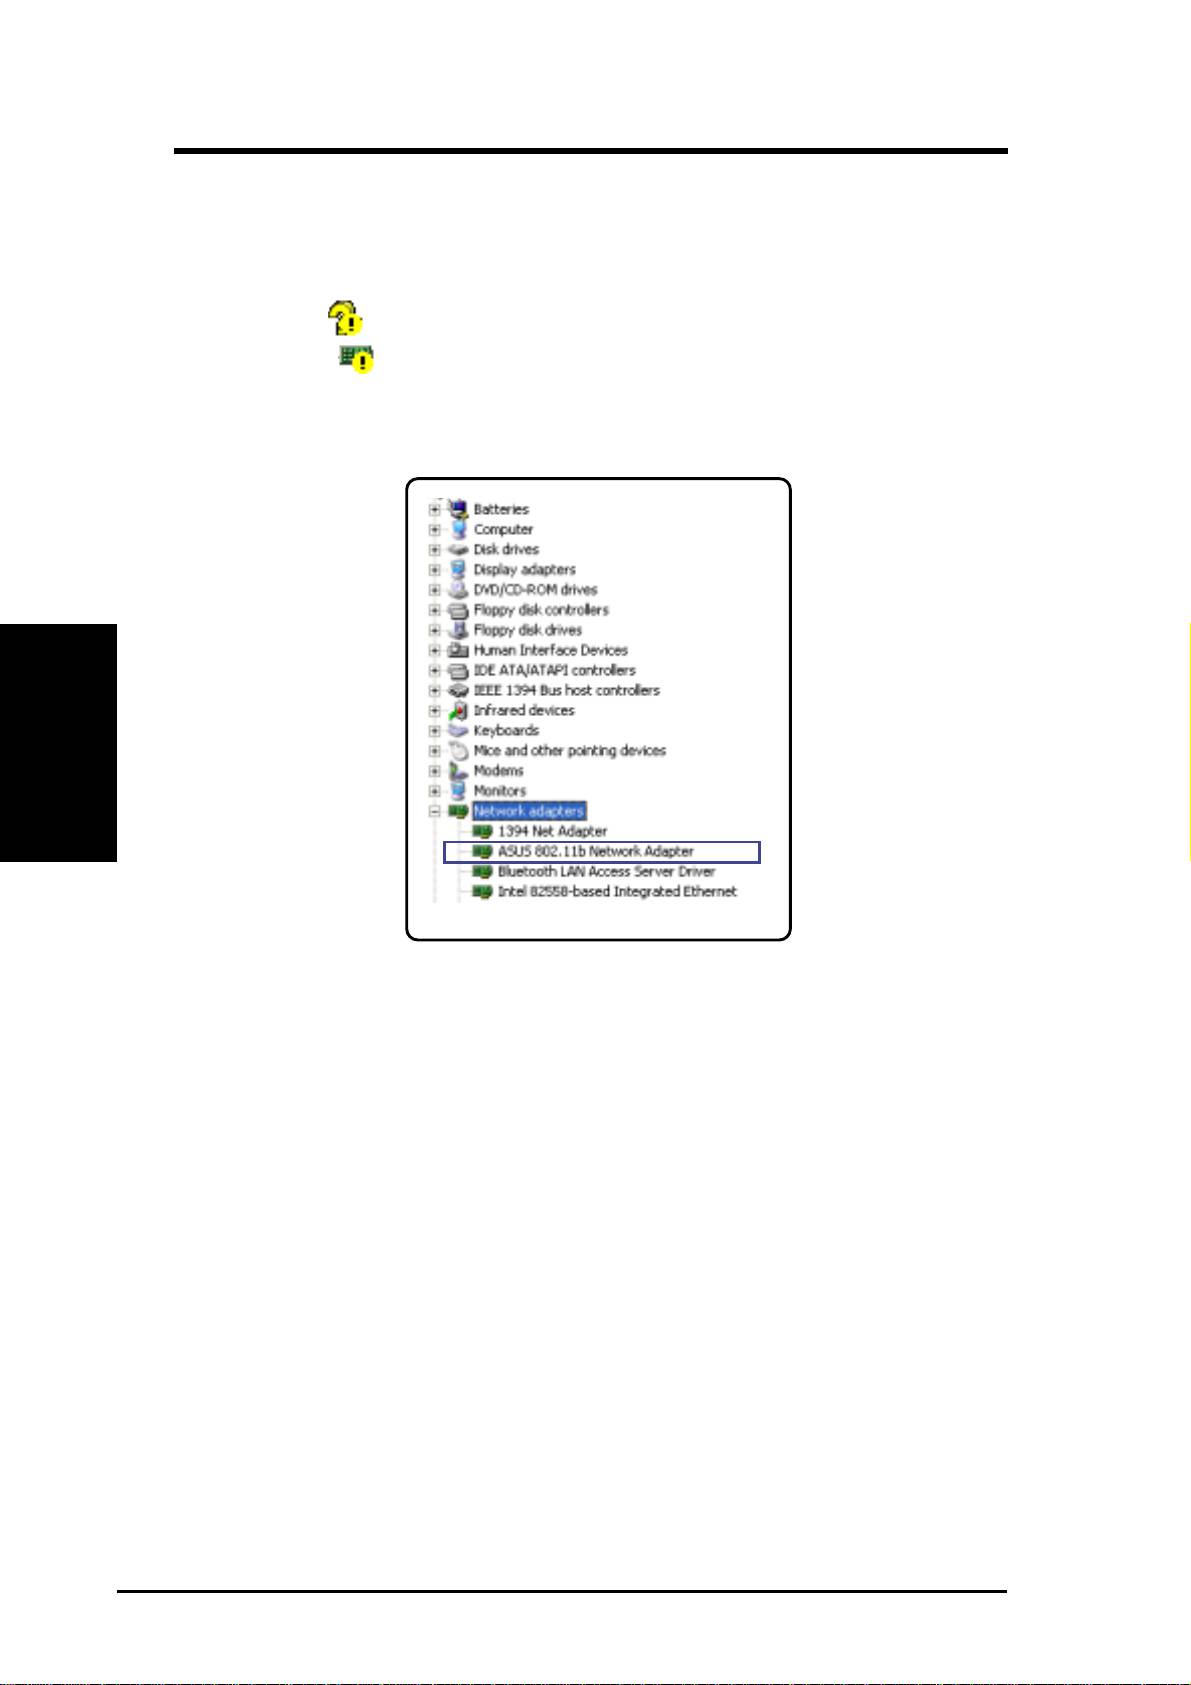
You can verify the ASUS WLAN Card driver in Device Manager. (Access
Device Manager from Start | Control Panel | System | Hardware). A question
mark means that no driver has been installed. An exclamation mark over a
card means that the driver is incorrect. Verify that you are using the correct
product and driver CD. Try repeating the installation and contact customer
support if necessary.
4 ASUS WLAN Card
Quick Start Guide
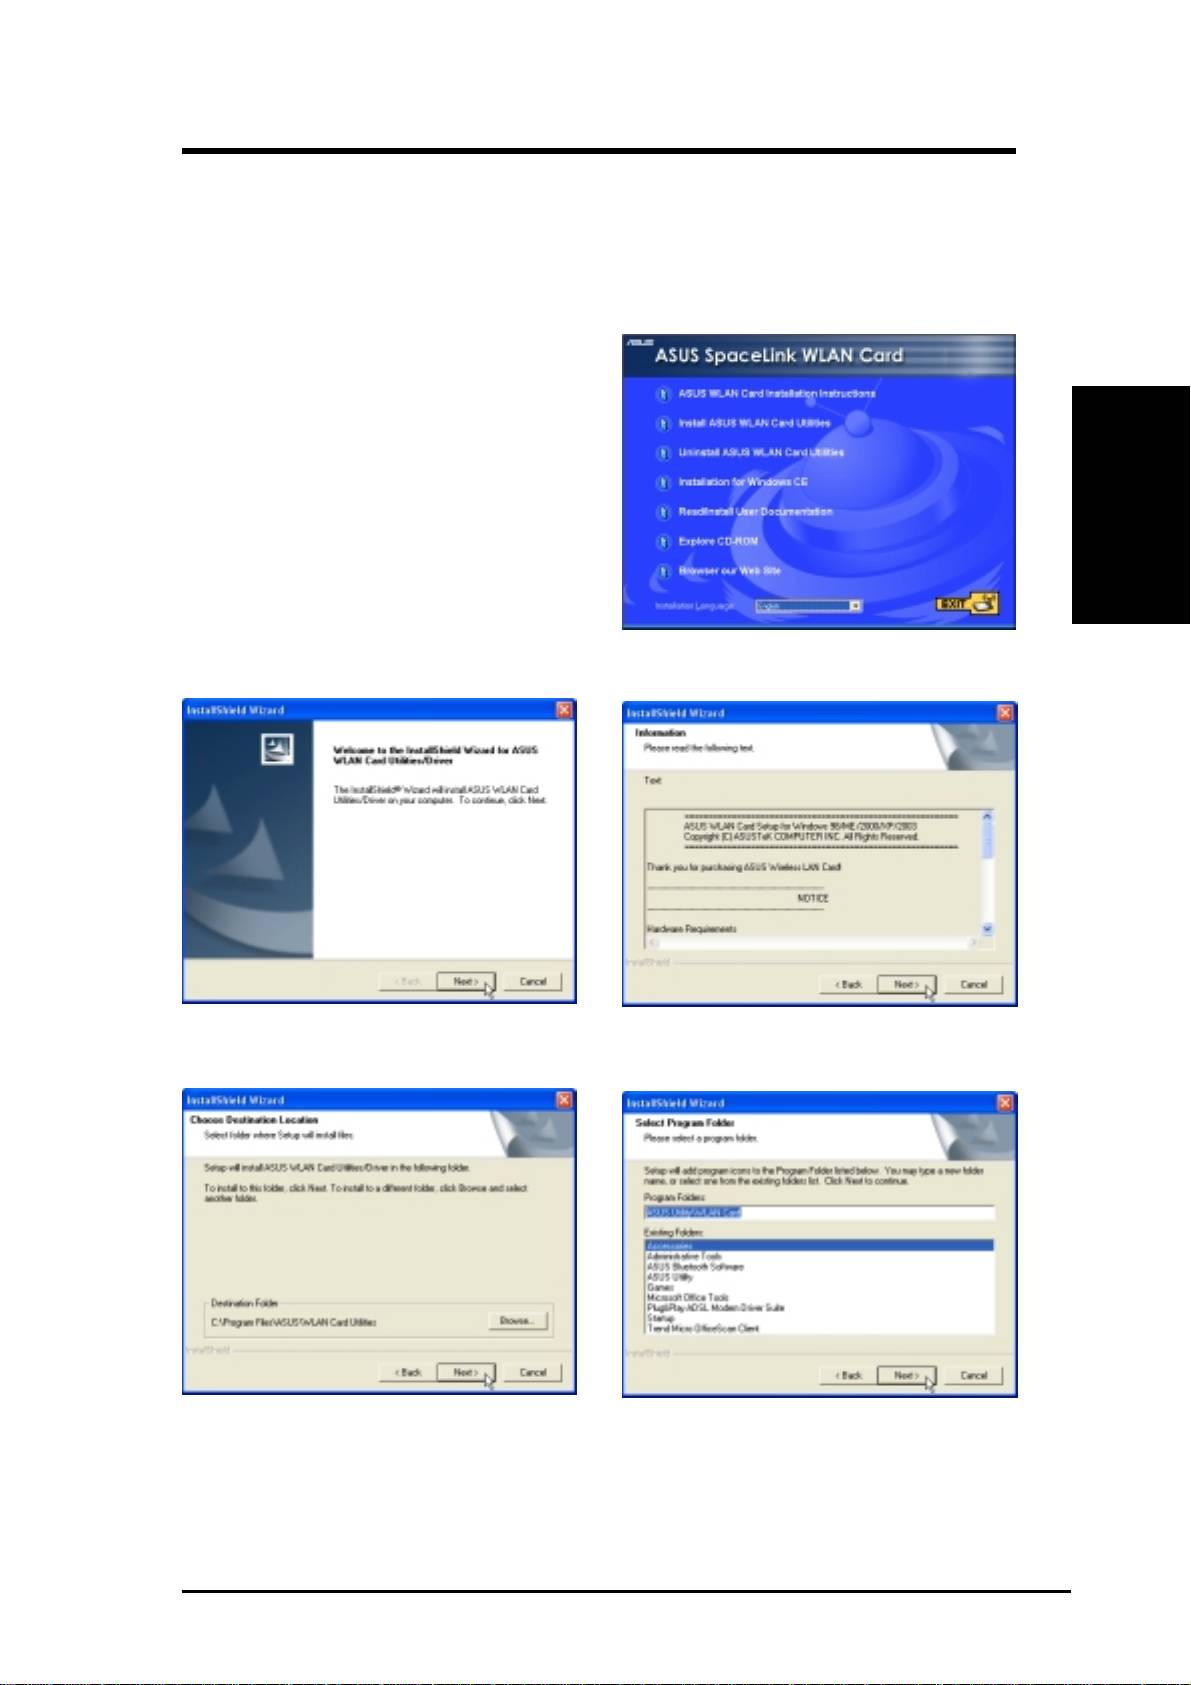
Installing the ASUS WLAN Card Utilities
After you have installed the ASUS WLAN Card driver, you can install the
WLAN Adapter utilities as shown below.
English
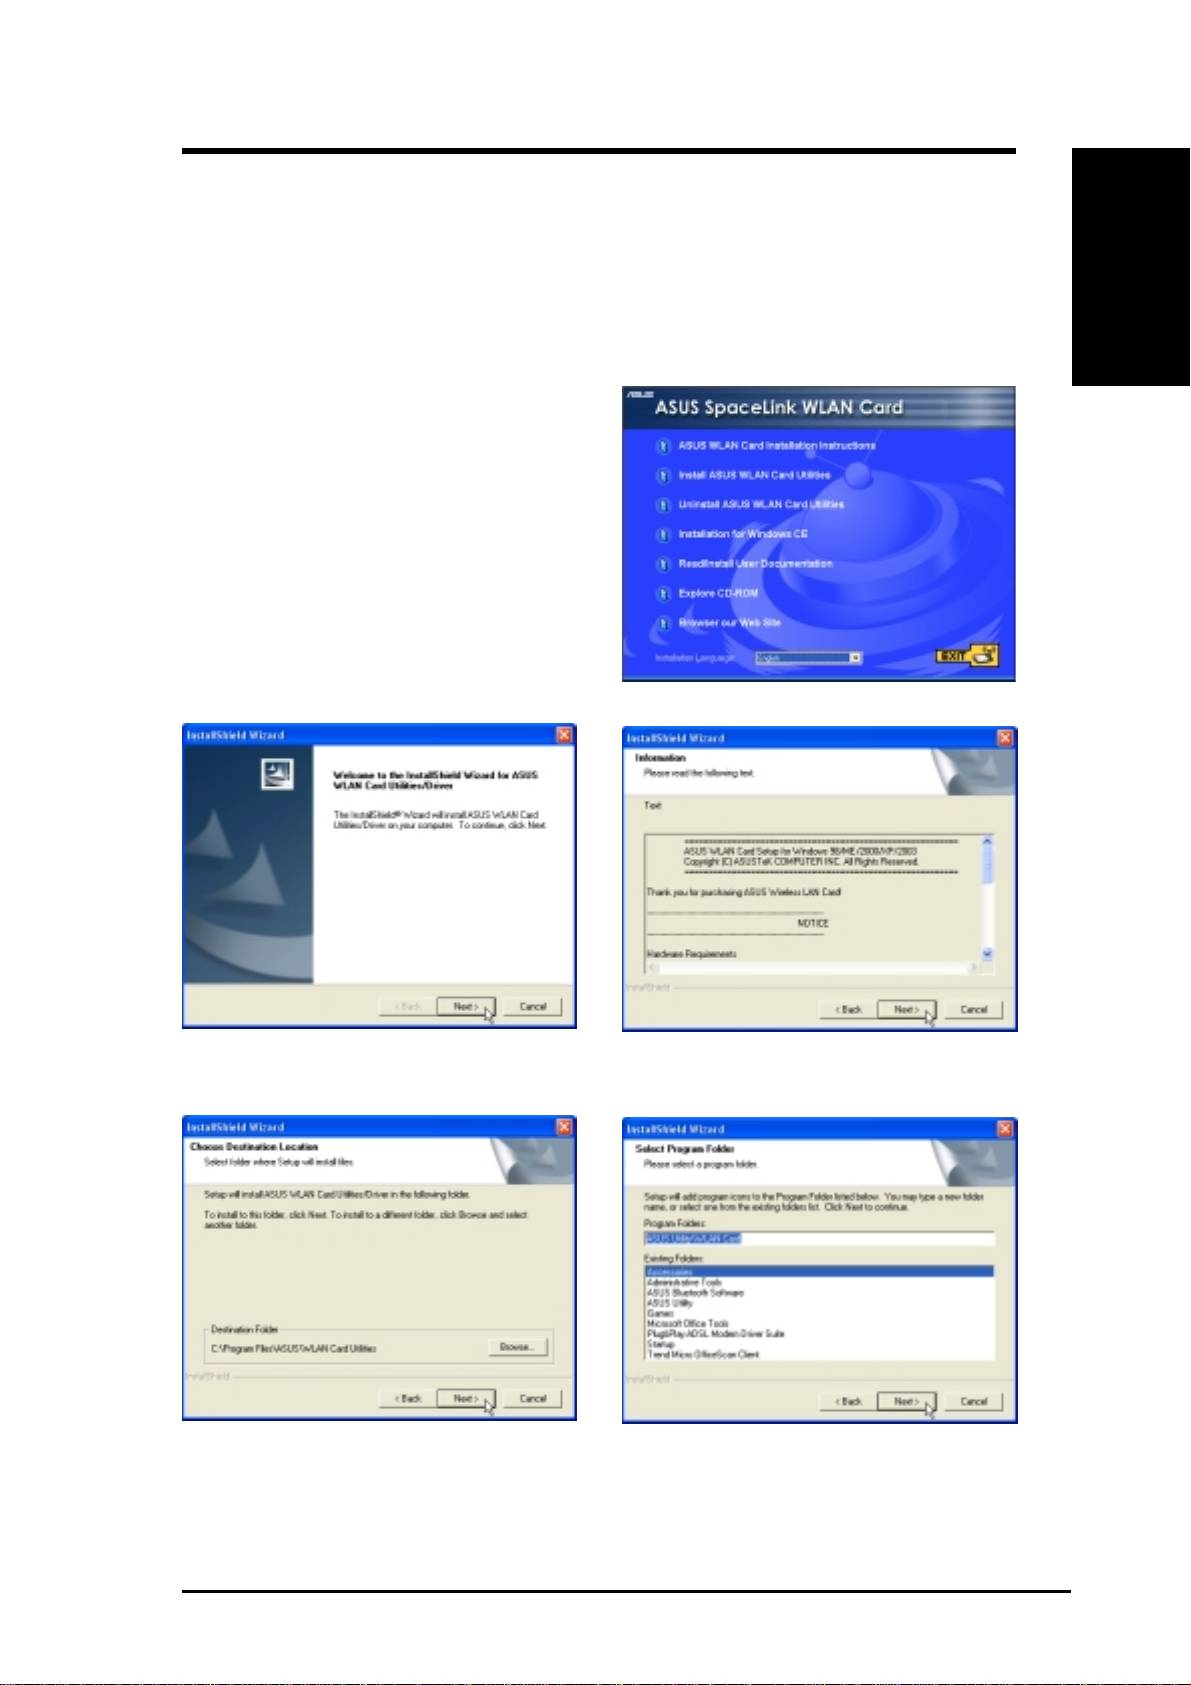
1. Insert the ASUS WLAN Card support CD
and an autorun menu will appear. If your
autorun is disabled, double click
SETUP.EXE in the root directory of the
support CD.
2. From the autorun menu, select your
language and click Install ASUS WLAN
Card Utilities.
3. Click Next on the Welcome screen.
4. Click Next after reading the Information.
5. Click Next to use the default Destination
6. Click Next to place icons in the default
Folder or click Browse to select another
program folder or type another folder
folder.
name.
ASUS WLAN Card 5
Quick Start Guide
Installing the ASUS WLAN Card Utilities (Cont.)
English
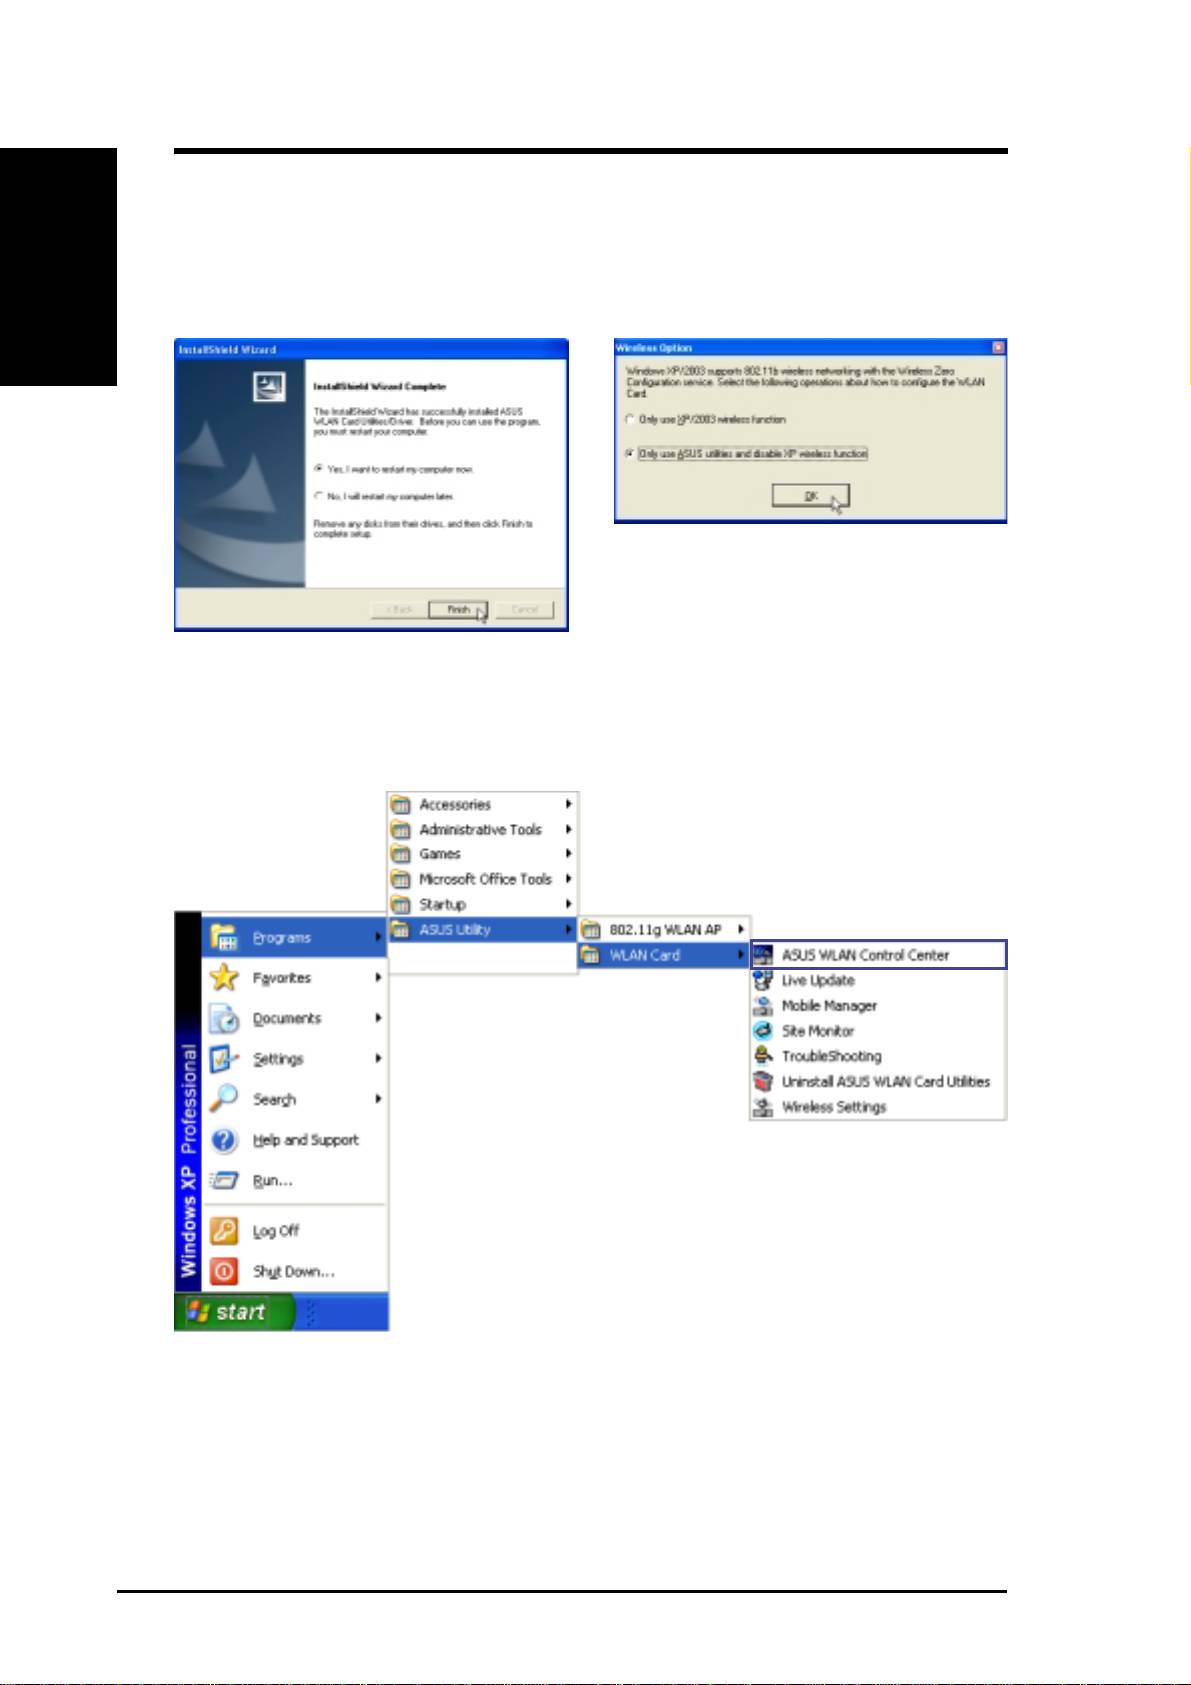
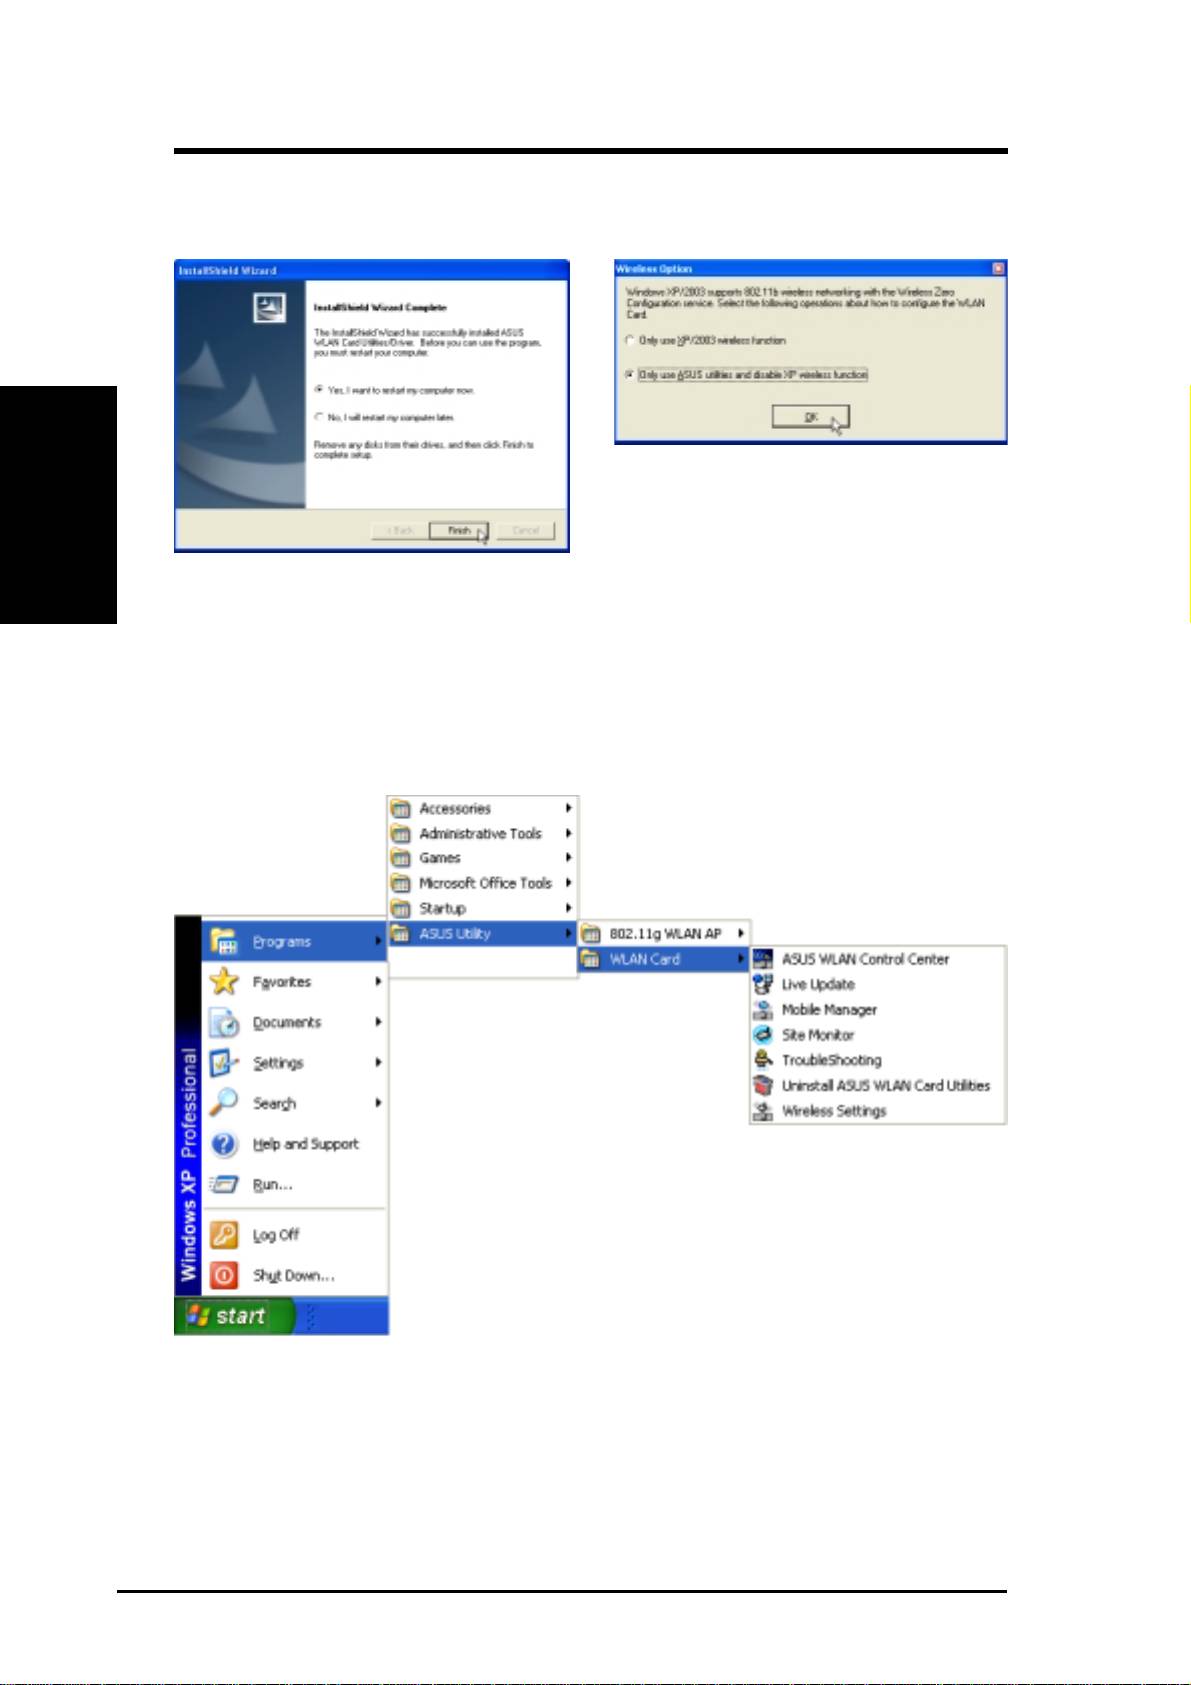
7. When Setup is complete, click Finish to exit
8. When the program is launched for the first
the installation wizard.
time, you will be asked which function to
use. Select to use ASUS utilities for more
functions.
By default, the “ASUS WLAN Control
Center” is set to launch with Windows.
If necessary, you can launch it manu-
ally from the Windows Start Menu.
Several shortcuts will be created
which can be accessed through Start.
(“Classic Start menu” is shown here.)
6 ASUS WLAN Card
Quick Start Guide
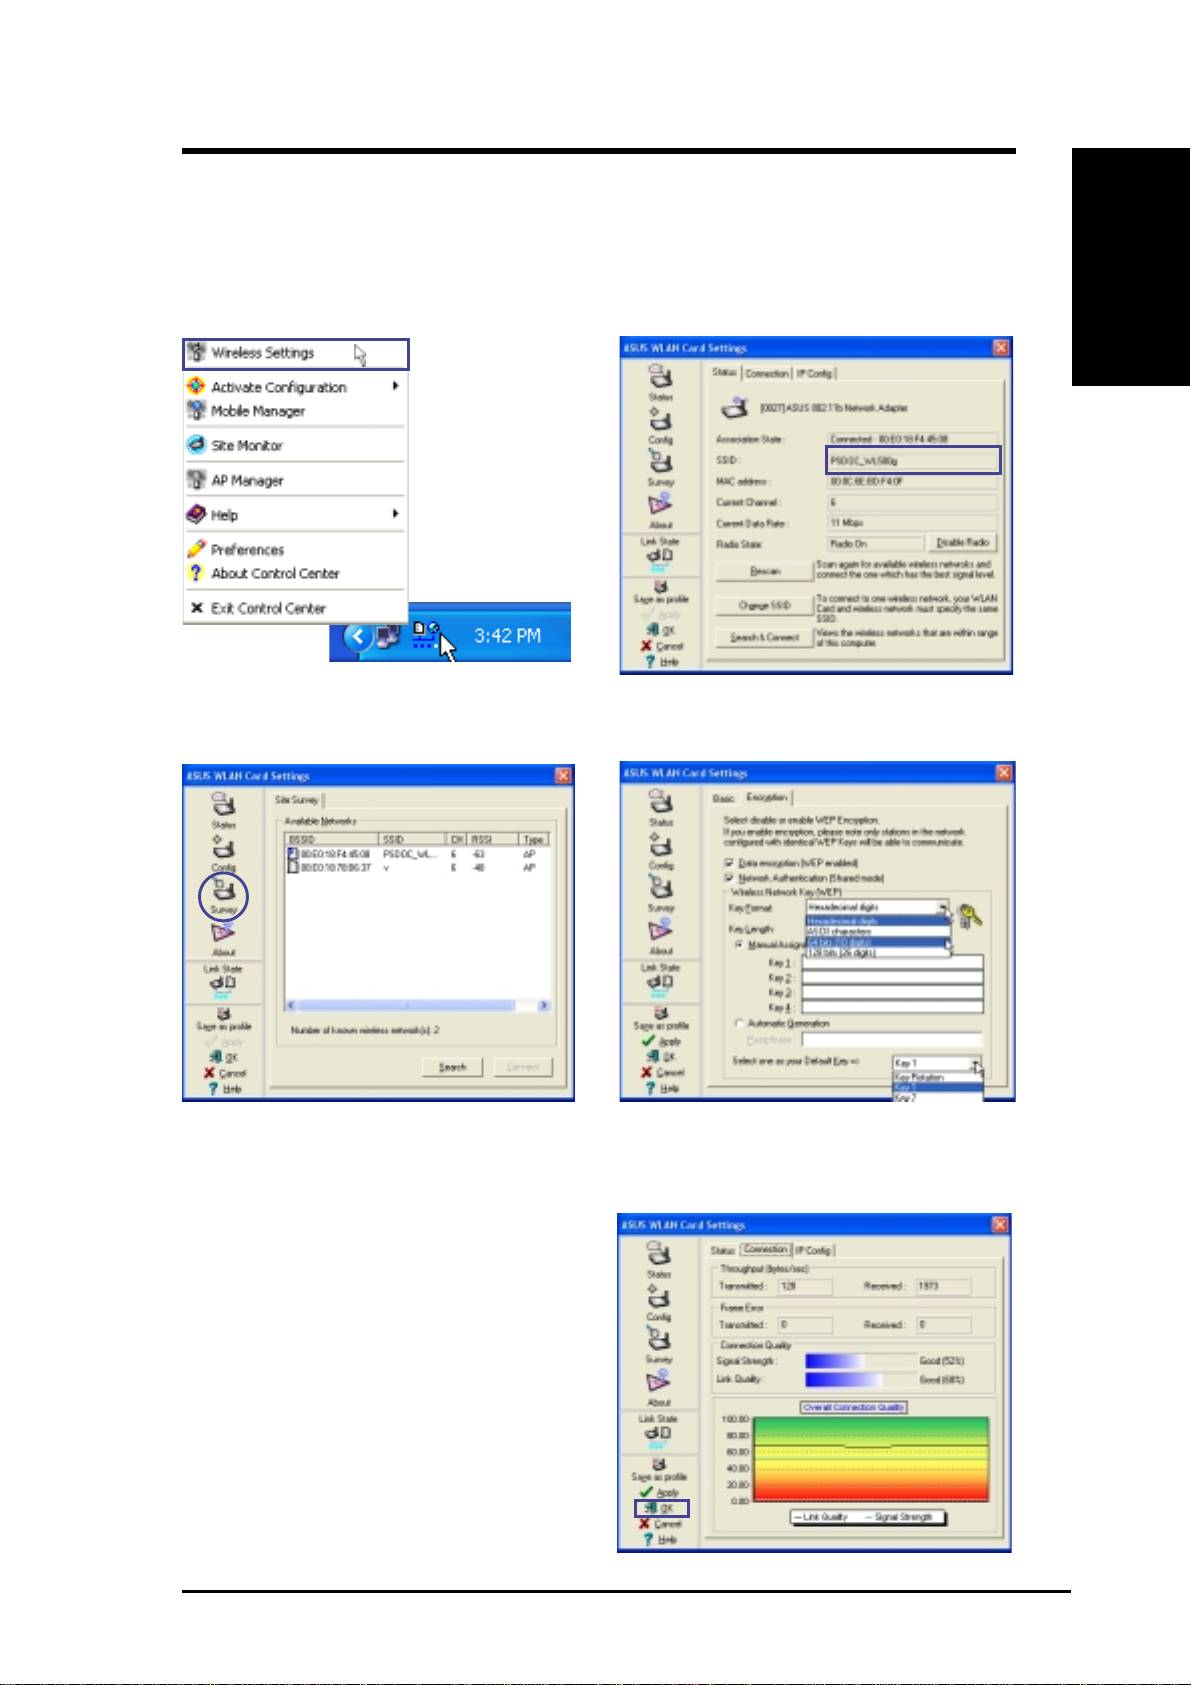
ASUS WLAN Utility Quick Start
After installing the ASUS WLAN driver and utility, you may need to make
some settings before being able to use your wireless connection.
English
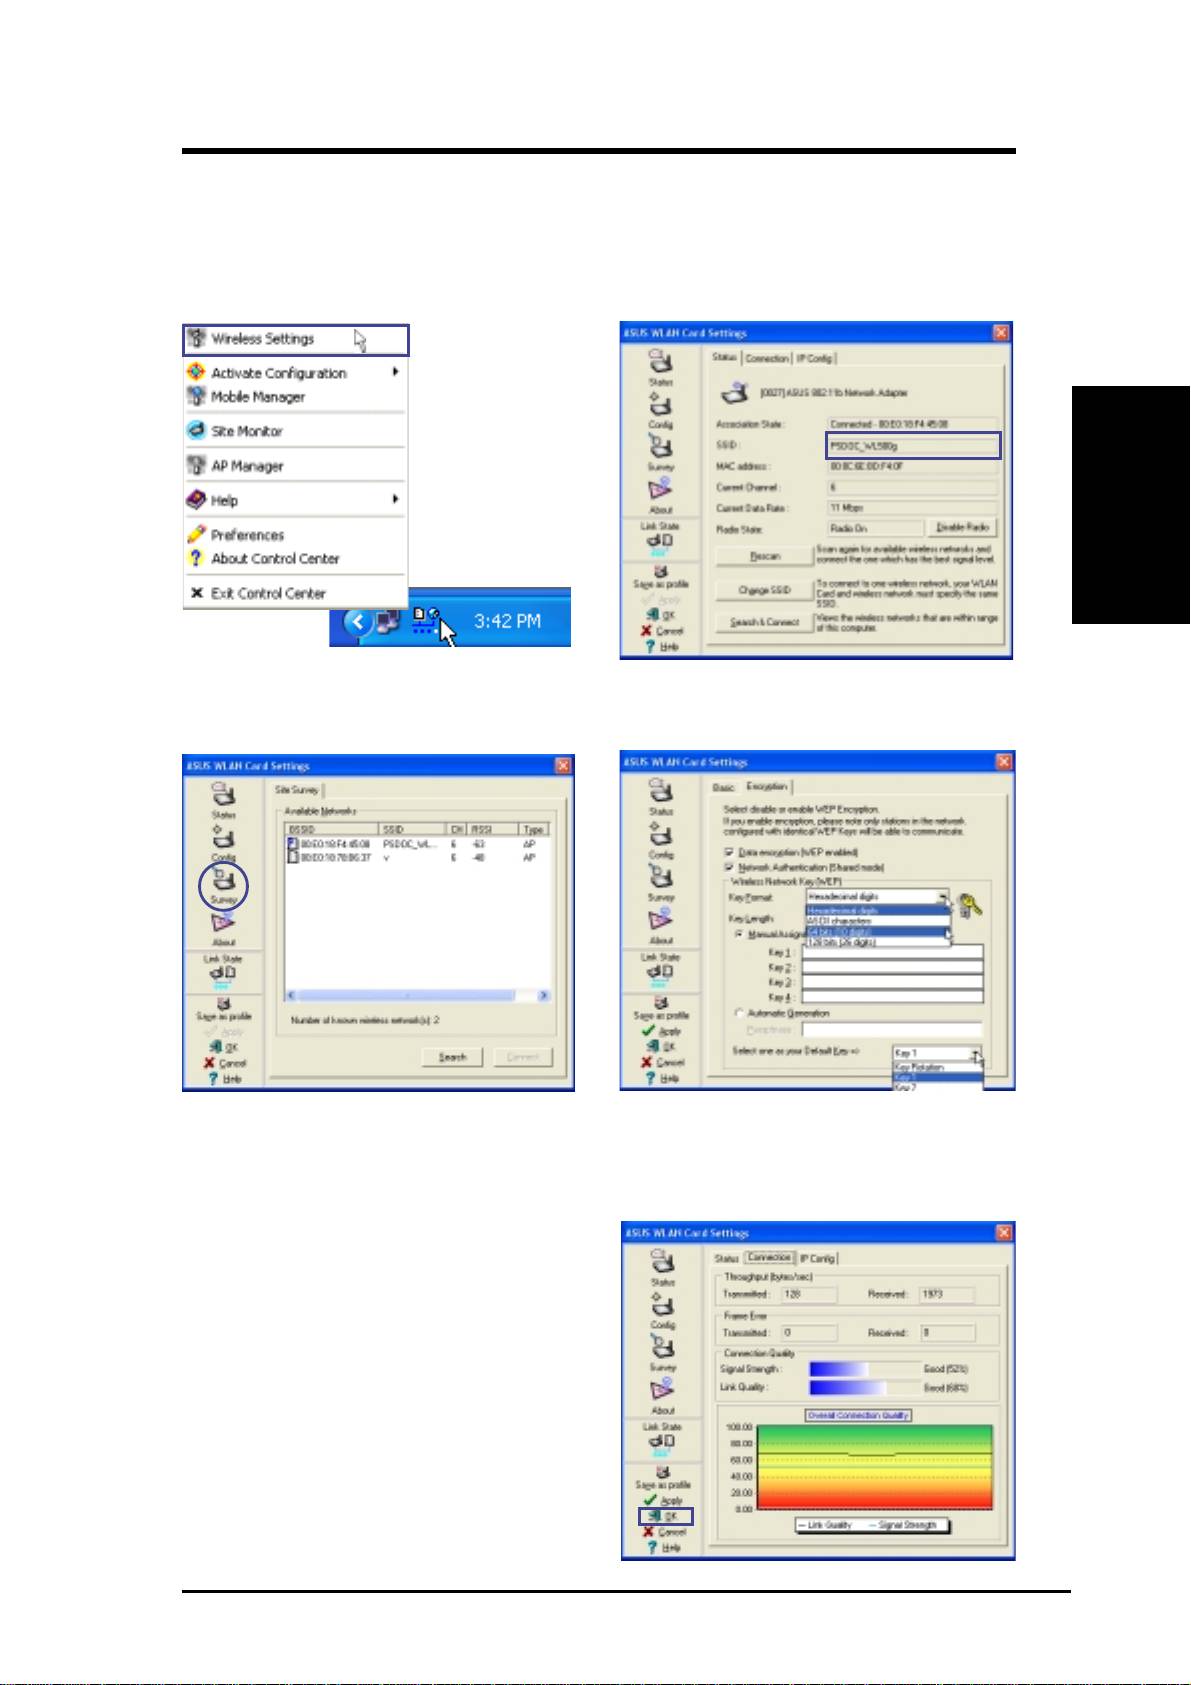
1. Right-click the ASUS WLAN icon and se-
2. Set the Network Name (SSID) to the same
lect “Wireless Settings”
name as the SSID set in your access point.
3. Use “Site Survey” if you don’t know the
4. Encryption settings must also match those
name of your access point(s).
set in the access point. Talk with your net-
work administrator if necessary.
5. You can also see the connection quality on
the “Connection” page. Click OK to exit the
utility.
6. Click Apply to save your settings and check
the “Status” page to see the “Association
State”. It should show “Connected -
xx:xx:xx:xx:xx:xx”.
ASUS WLAN Card 7

Quick Start Guide
Reading the ASUS WLAN Status Indicators
English
The ASUS WLAN card consists of one LED that indicates the status of the
ASUS WLAN Card.
OFF: No wireless activity.
Blinking: Transmitting or receiving wireless data.
Orientating the Antenna
The ASUS WLAN Card has one external antenna. It is recommended that you
adjust the external antenna straight up for maximum range and higher link
quality.
8 ASUS WLAN Card

®
Carte Wireless LAN
WL-130b
(Pour Réseau Sans Fil 802.11b)
Français
Guide d’installation rapide

Guide d’installation rapide
Configuration requise
Pour commencer à utiliser la carte ASUS WLAN, vous devez avoir au
minimum la configuration suivante:
• Windows XP/2000/ME/98SE
• Slot PCI 32-bit Standard
• 32Mo de mémoire système ou plus
Français
• Processeur de 300MHz ou plus
• Lecteur de CD-ROM
Contenu de la boîte
La boîte de la carte ASUS WLAN doit contenir les éléments suivants:
• Carte PCI WLAN ASUS
• Guide de démarrage rapide de la carte ASUS WLAN
• Manuel de l’utilisateur de la carte ASUS WLAN
• CD-ROM (Pilotes, Utilitaires, Documentation)
S’il manquait n’importe lequel de ces éléments ou si l’un d’eux était
endommagé, veuillez contacter votre revendeur local.
2 Carte ASUS WLAN
Guide d’installation rapide
Installer le pilote de la carte ASUS WLAN
1. Consultez une personne expérimentée pour installer la Carte WLAN ASUS dans un slot PCI
disponible. Refixez le boîtier, les panneaux, les vis de votre châssis et reconnectez les câbles
une fois l’installation terminée.
2. Allumez votre ordinateur et entrez sous Windows.
Français
3. Windows détectera automatiquement la
4. Insérez le CD technique livré avec votre
Carte WLAN ASUS une fois qu’elle sera
carte ASUS WLAN.
insérée dans le slot PCI, ensuite la boîte
5. Sélectionnez “Chercher le meilleur pilote
de dialogue “Assistant d’Ajout de Nouveau
dans”... et “Recherche sur un disque
Matériel” apparaîtra. Cliquez sur Suivant.
amovible...”, puis cliquez sur Suivant.
6. Attendez pendant que Windows XP crée
7. Cliquez sur Terminer lorsque l’installation
un point de restauration pour vos fichiers
est achevée. Redémarrez votre
système au cas où vous deviez restaurer
ordinateur si vous y êtes invité.
votre système actuel.
Carte ASUS WLAN 3
Guide d’installation rapide
Vérifier les pilotes
Vous pouvez vérifier le pilote de la carte ASUS WLAN dans le Gestionnaire
de périphériques. (Vous pouvez y accéder depuis Démarrer| Panneau de
configuration| Système| Matériel). Un point d’interrogation signifie
qu’aucun pilote n’a été installé. Un point d’exclamation sur une carte signifie
que le pilote est incorrect. Vérifiez que vous utilisez les produits et CD de
pilote adéquats. Essayez de réitérer l’installation et contactez l’assistance
Français
technique si nécessaire.
4 Carte ASUS WLAN
Guide d’installation rapide
Installer les utilitaires de la carte ASUS WLAN
Après avoir installé le pilote de la Carte WLAN ASUS, vous pourrez installer
les utilitaires de la carte WLAN comme indiqué ci-dessous.
1. Insérez le CD technique de la carte ASUS
WLAN et un menu autorun apparaît. Si votre
autorun est désactivé, double cliquez sur
SETUP.EXE dans le répertoire racine du CD
technique.
2. A partir du menu autorun, sélectionnez votre
langue et cliquez sur Install ASUS WLAN
Card Utilities.
Français
3. Cliquez sur Suivant sur l’écran de
4. Cliquez sur Suivant après avoir lu les
bienvenue.
informations.
5. Cliquez sur Suivant pour utiliser le
6. Cliquez sur Suivant pour placer les
dossier de destination par défaut ou
icônes dans le répertoire du programme
cliquez sur Parcourir pour sélectionner un
par défaut ou saisissez le nom d’un autre
autre dossier.
répertoire.
Carte ASUS WLAN 5
Guide d’installation rapide
Installer les utilitaires de la carte WLAN (suite)
Français
7. Lorsque l’installation est terminée, cliquez
8. Lorsque le programme est exécuté pour la
sur Terminer pour quitter l’assistant
première fois, il vous demandera quelle
d’installation.
fonction utiliser. Choisissez d’utiliser les
utilitaires ASUS afin d’accéder à plus de
fonctions.
Par défaut, le “Centre de contrôle
ASUS WLAN” est réglé pour se
lancer avec Windows. Si nécessaire,
vous pouvez le lancer manuellement
Plusieurs raccourcis sont créés. Vous
à partir du menu Démarrer de
pouvez y accéder via le menu
Windows.
Démarrer.
6 Carte ASUS WLAN
Guide d’installation rapide
Démarrage rapide des utilitaires ASUS WLAN
Après avoir installé le pilote et les utilitaires de la carte ASUS WLAN, vous devez
effectuer quelques réglages avant de pouvoir utiliser les connexions sans fil.
Français
1. Cliquez du bouton droit sur l’icône ASUS
2. Pour le paramètre Network Name (SSID),
WLAN et sélectionnez “Wireless Settings”
choisissez le même nom que le SSID
réglé dans votre point d’accès sans fil.
3. Utilisez “Site Survey” si vous ne
4. Les paramètres de cryptage doivent
connaissez pas le nom de votre point
également correspondre à ceux de votre
d’accès.
point d’accès. Informez-vous auprès de
votre administrateur réseau si nécessaire.
5. Vous pouvez aussi voir la qualité de la
connexion sur la page “Connection”.
Cliquez sur OK pour quitter l’utilitaire.
6. Cliquez sur Appliquer pour enregistrer vos
paramètres et vérifiez la page “Status” pour
voir “Association State”. Il doit afficher “Con-
nected - xx:xx:xx:xx:xx:xx”.
Carte ASUS WLAN 7

Guide d’installation rapide
Lire les indicateurs d’état de la carte WLAN ASUS
La carte WLAN ASUS est composée d’une LED indiquant l’état de la Carte
WLAN ASUS.
OFF: Pas d’activité sans fil.
Clignote: Reçoit ou transmet des données sans fil.
Français
Orienter l’Antenne
La Carte WLAN ASUS dispose d’une antenne externe. Il vous est recommandé
de régler l’antenne externe verticalement afin d’obtenir un rayonnement
maximum et une meilleure qualité de liaison.
8 Carte ASUS WLAN

®
Wireless Local Area Netzwerk Karte
WL-130b
(Für 802.11b Wireless Netzwerke)
Deutsch
Schnellstartanleitung

Schnellstartanleitung
Systemvoraussetzungen
Um die ASUS WLAN Karte zu verwenden, muss Ihr System die folgenden
Voraussetzungen erfüllen:
• Windows XP/2000/ME/98SE
• Standard 32 bit PCI Steckplatz
• 32MB Arbeitsspeicher oder höher
• 300MHz Prozessor oder höher
• CD-ROM-Laufwerk
Verpackungsinhalt
Die ASUS WLAN Karten-Verpackung sollte die folgenden Artikel enthalten:
Deutsch
• ASUS WLAN Karte
• ASUS WLAN Karte Kurzanleitung
• ASUS WLAN Karte Benutzerhandbuch
• CD-ROM Disk (Treiber, Hilfsprogramm, Dokumentation)
Sollte einer oder mehrere der o.g. Artikel fehlen oder beschädigt
sein, wenden Sie sich bitte an Ihren Händler.
2 ASUS WLAN Karte
Schnellstartanleitung
ASUS WLAN Kartentreiber installieren
1. Lassen Sie die ASUS WLAN PCI Karte am besten von einem Fachmann in einen freien
PCI-Steckplatz Ihres PCs einsetzen. Achten Sie darauf, dass nach dem Einbau alle Deckel,
Abdeckungen, Schrauben und Kabel wieder ordnungsgemäß angebracht werden.
2. Schalten Sie Ihren Computer ein und starten Sie Windows.
3. Nach dem Einbau der ASUS WLAN PCI
4. Legen Sie die mitgelieferte CD ein.
Karte in Ihren PC, wird Windows beim
Deutsch
5. Wählen Sie “Nach einem passenden
ersten Starten automatisch das neue
Treiber für dieses Gerät suchen” und
Gerät ASUS WLAN Karte erkennen und
“Wechsellaufwerke durchsuchen” und
den “Neue Hardware hinzufügen”
klicken Sie auf Weiter.
Assistenten starten. Klicken Sie auf
Weiter.
6. Warten Sie bis Windows XP einen
7. Klicken Sie Fertig stellen wenn die
Wiederherstellungspunkt für Ihr System
Installation beendet ist. Starten Sie Ihren
erstellt.
Computer neu, wenn sie dazu
aufgefordert werden.
ASUS WLAN Karte 3
Schnellstartanleitung
Treiber überprüfen
Sie können den ASUS WLAN Kartentreiber im Geräte-Manager überprüfen. (Öffnen
Sie den Geräte-Manager über Start | Einstellungen | Systemsteuerung | Hardware). Ein
Fragezeichen
wird angezeigt wenn kein Treiber installiert wurde. Ein
Ausrufezeichen
markiert einen falschen Treiber. Prüfen Sie, dass das richtige
Produkt und Treiber verwendet wurden. Wiederholen Sie die Installation und, wenn
nötig, wenden Sie sich and den Kundendienst.
Deutsch
4 ASUS WLAN Karte
