Asus MK221H: instruction
Class: Computer equipment, hardware, accessories
Type: Monitor
Manual for Asus MK221H
Table of contents
English
MK221 Series
LCD Monitor
Quick Start Guide
MIC ARRAY
MENU

Safety information
• Before setting up the monitor, carefully read all the documentation that came
English
with the package.
• Topreventreorshockhazard,neverexposethemonitortorainormoisture.
• The monitor should be operated only from the type of power source indicated
on the label. If you are not sure of the type of power supplied to your home,
consult your dealer or local power company.
• Use the appropriate power plug which complies with your local power standard.
• To ensure satisfactory operation, use the monitor only with UL listed computers
whichhaveappropriateconguredreceptaclesmarkedbetween100-240VAC.
• Ifyouencountertechnicalproblemswiththemonitor,contactaqualiedservice
technician or your retailer.
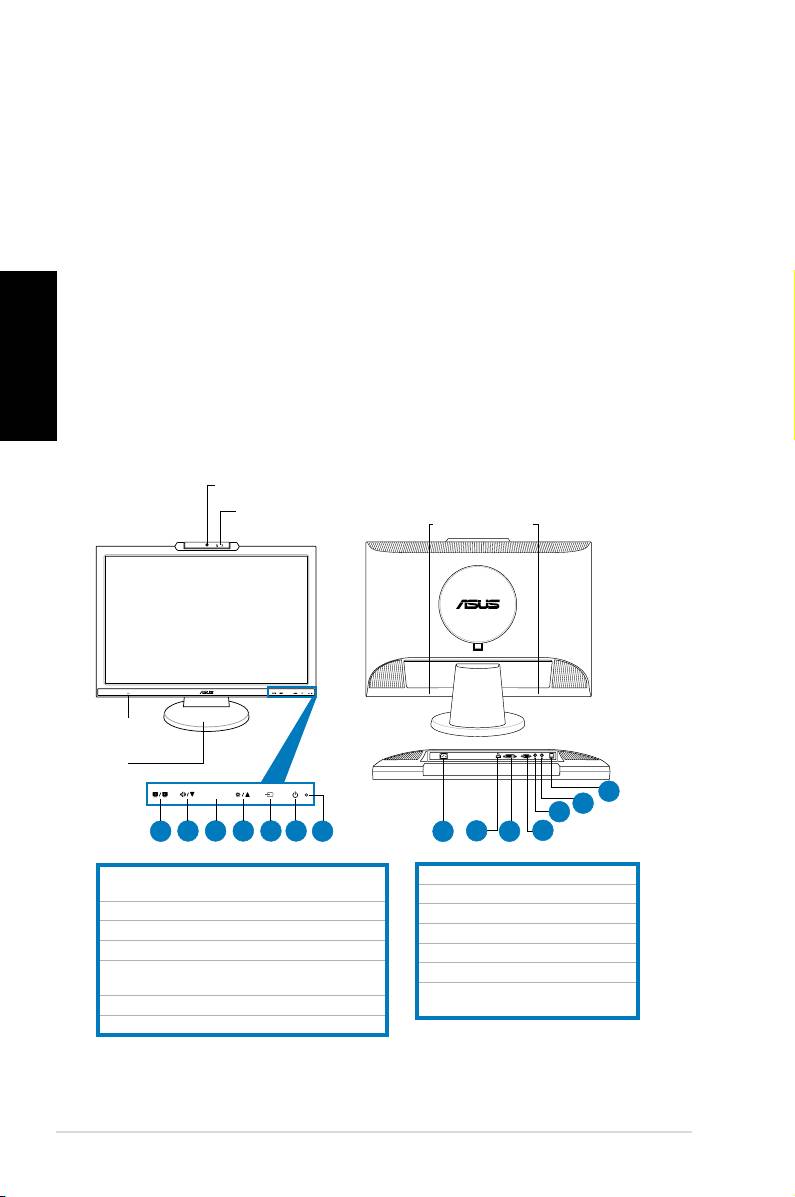
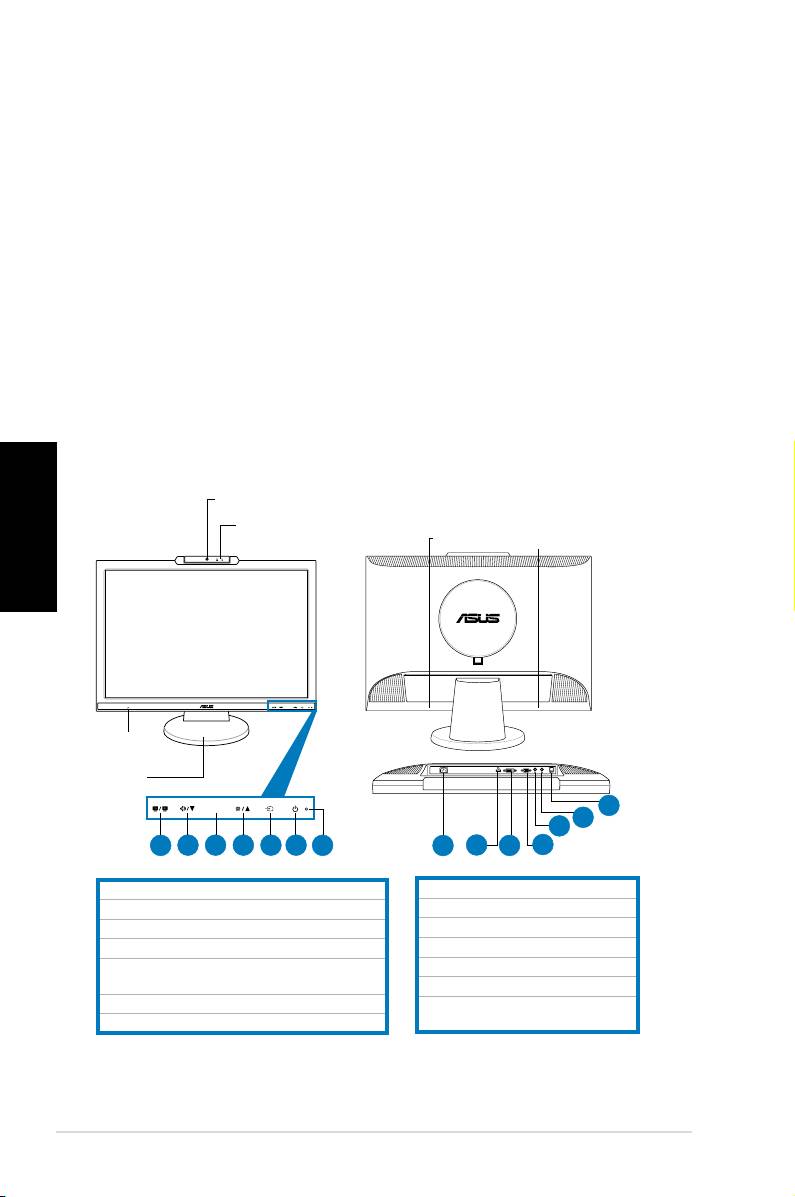
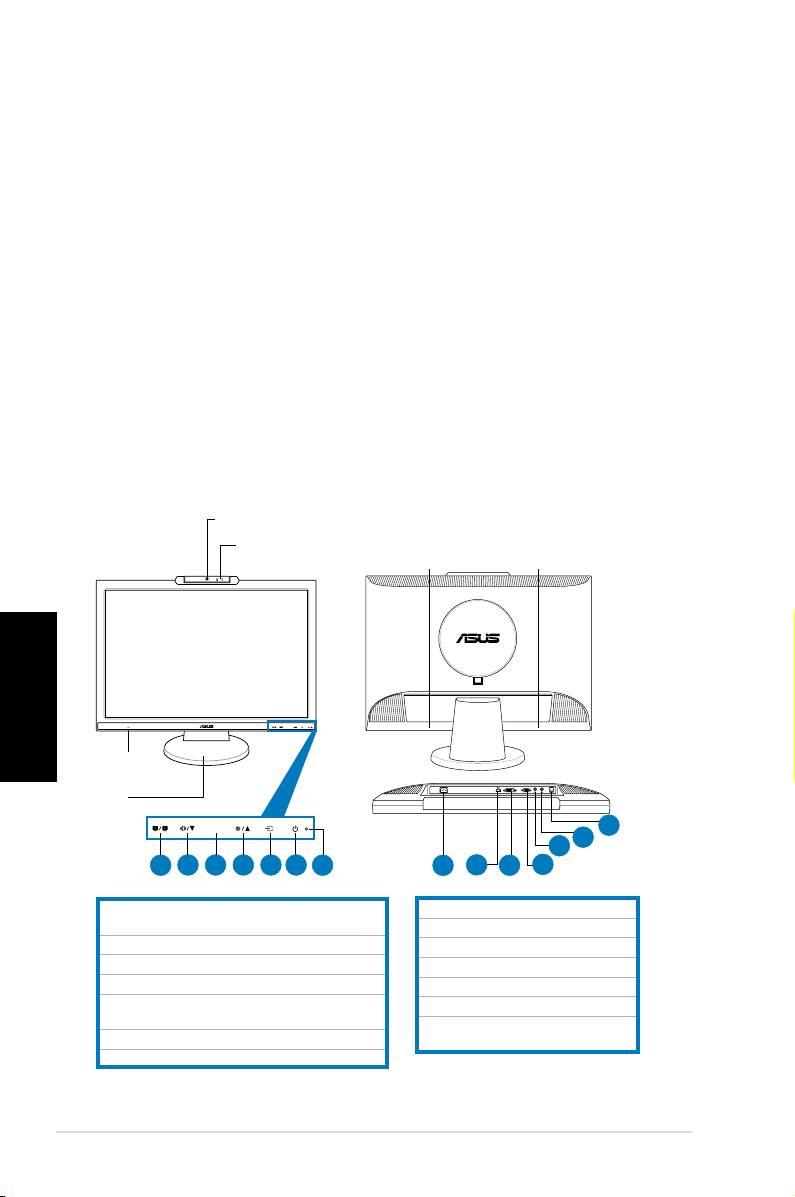
Monitor introduction
Front view Rear view
1.3 megapixel webcam
1.SPLENDID™*/Auto-adjust**/ExitMENUbutton
8.AC-inport
2.Volumehotkey/Decreasebutton
9.HDMIport(MK221Honly)
3.MENU/Enter/Selectionbutton
10.DVIport(MK221Honly)
4.Brightnesshotkey/Increasebutton
11.VGAport
5.Inputselectswitchbutton(MK221H)
12.Audiooutport
Auto-adjustbutton(MK221S)
13.Audioinport
6.Powerbutton
14.USB2.0port(upstream,for
7.LEDindicator
webcamandmicrophones)
* Hotkey for 5 video preset mode selection.
** Adjusts the image automatically by pressing the button for 2–3 seconds (MK221H only).
2 Quick Start Guide
MIC ARRAY
MENU
MEN U
Mic Array
Stereo speakers
(microphone x2)
(2Wx2)
Headphone
jack
Base
14
13
12
1
2 3 4 5 6
7
8
9
10
11
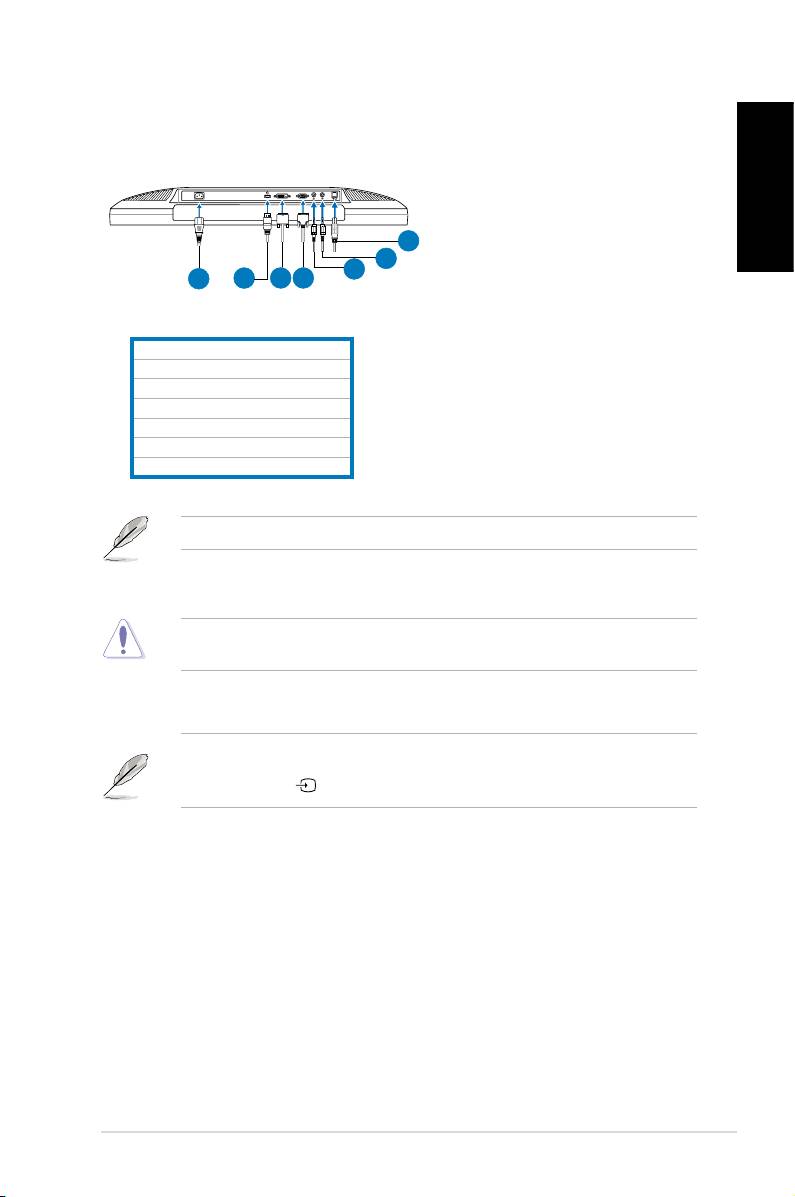
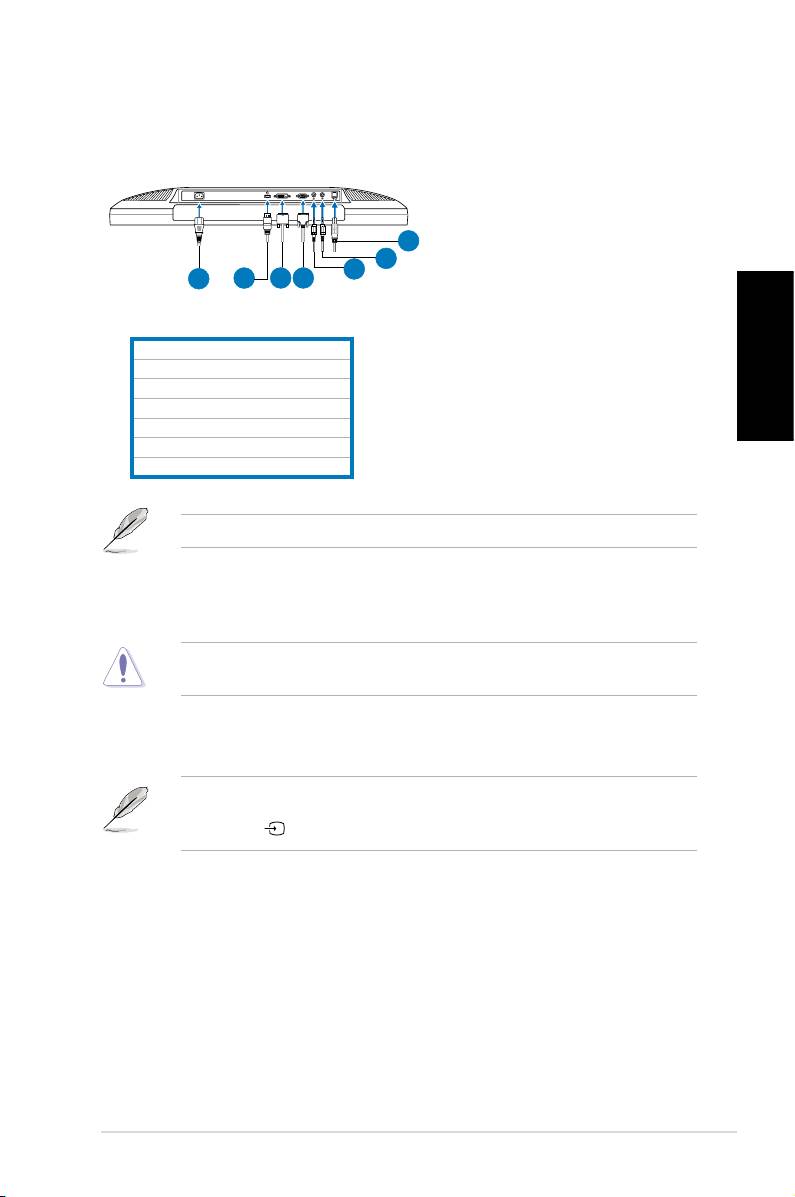
Connecting the cables
Connectthecablesasshown:
English
7
6
5
1
2
3
4
1.Powercord
2.HDMIsignalcable(MK221Honly)
3.DVIsignalcable(MK221Honly)
4.VGAsignal cablesignal cablecable
5.Audio-outcable
6.Audio-incable
7.USB2.0cable
TheHDMIcableandaudio-outcablearepurchasedseparately.
•
To connect the power cord:
connect one end of the power cord
securelytothemonitor’sACinputport,theotherendtoapoweroutlet.
Beforeyouconnectthecables,ensurethatyourPCisswitchedofforthepower
cord is unpluged from the wall socket.
•
To connect the signal cables
:connectoneendofthesignalcable(s)to
the monitor, the other end to your computer or any other video device.
WhentheHDMI,DVI,andVGAcablesareconnectedsimultaneously,youcan
switch the input source from the
Input Select
itemoftheOSDfunctions,orby
using the hotkey onthefrontpanel(MK221Honly).
••
To connect the audio cable
:connecttheaudiocablefromthemonitor’s
audio-inporttothecomputer'saudio-outport.
•
To connect to speakers:
Connectanaudio-outcablefromtheaudio-out
portoftheLCDmonitortotheaudio-inportofyourspeakers.
3 Quick Start Guide
Built-in webcam with Mic Array support
Thebuilt-in1.3megapixelwebcamwitharraymicrophones(MicArraysupport)
allowsyoutotakepictures,haveavideoconference,orrecordaudio-videoclips.
English
WhilechattingwithfriendsviaInternet-basedcommunicationtools,youcandirectly
show your vivid image and clear voice with this device.
System requirements
®
• ApersonalcomputerwithPentium
III800MHzorhigherprocessor
®
®
• Microsoft
Windows
Vista/XPServicePack2operatingsystems
• Minimum200MBfreeharddiskspacetoruntheprogram
• 128MBofRAMorabove
• Adisplaycardsupporting16-bithighcolormode
• MakesurethatthebundledUSB2.0cableisconnectedtoboththeLCD
monitorandyourPC.Otherwise,thewebcamwillnotbeactivated.
®
• MakesurethatyouhaveinstalledtheWindows
Vista/XPServicePack2
or later versions before using the device.
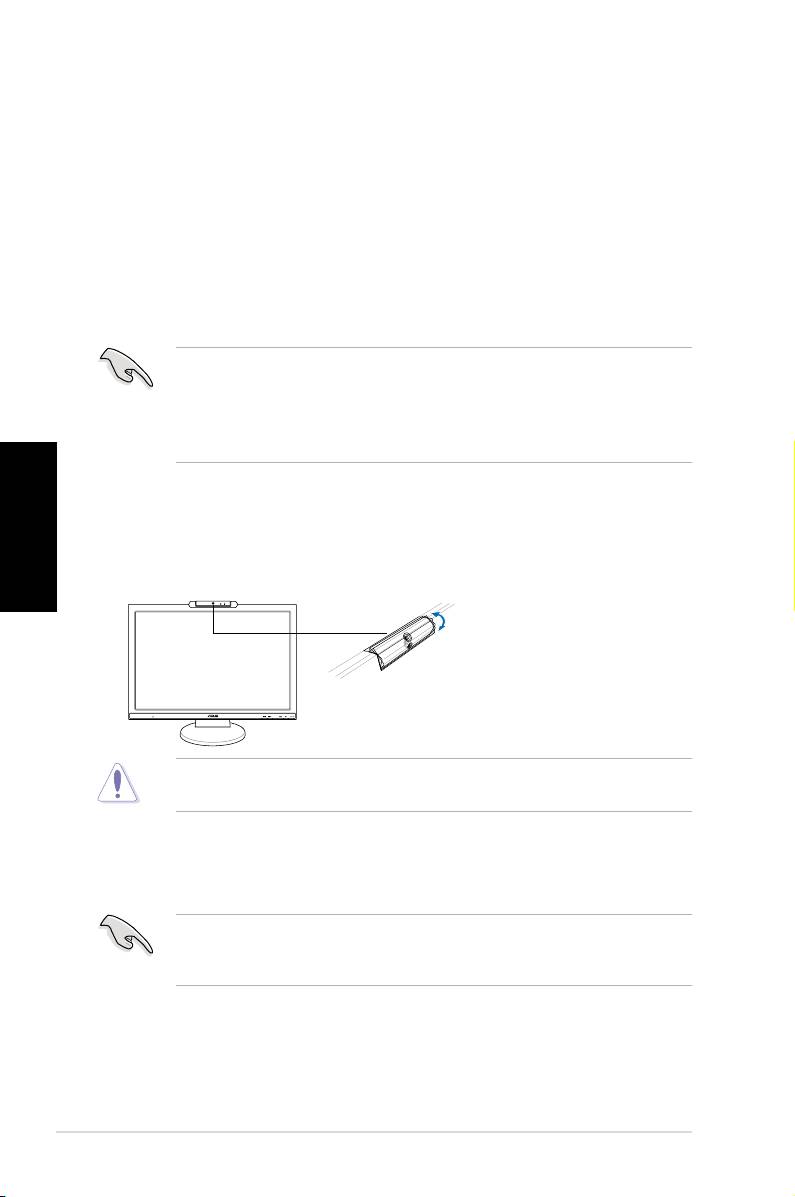
Using the device
• ThedevicetransmitsimagesandsoundtoyourPCthroughtheUSB2.0port.
Therefore,makesurethatthebundledUSB2.0cableisconnectedtoboththe
LCDmonitorandyourPCbeforeyouusethedevice.
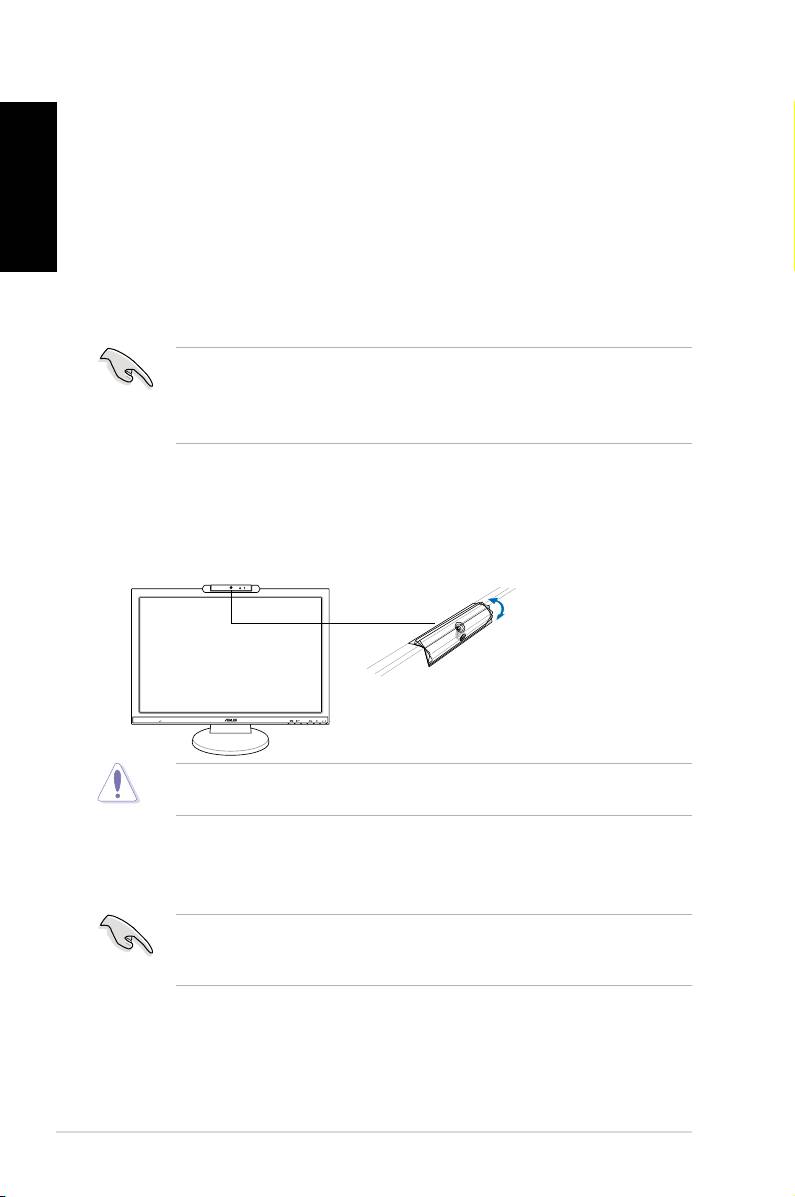
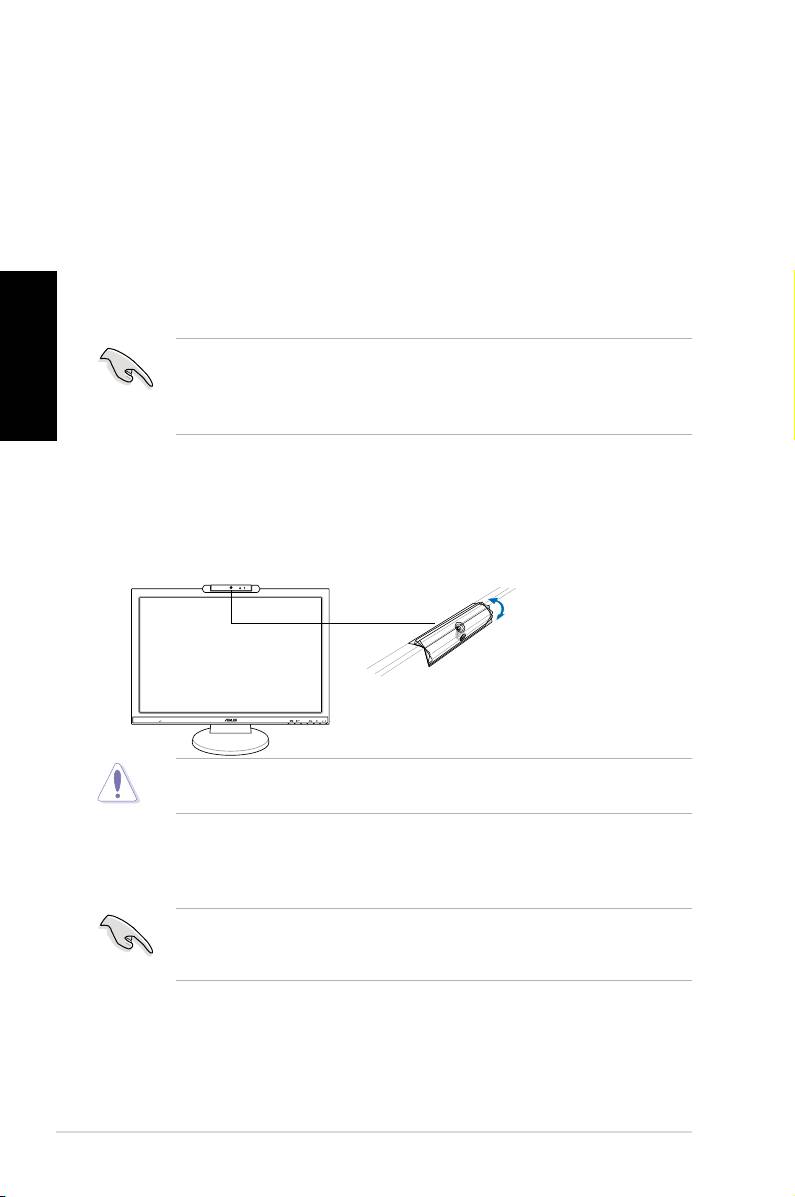
• Thewebcamisadjustableupwardanddownwardasshown.
Donotturnthewebcamupwardordownwardover30
˚
; doing so might damage
the webcam.
4 Quick Start Guide
MIC ARRAY
MENU
-30˚–30˚
LifeFrame 2 software
ASUSMK221providestheeasy-to-useLifeFrame2softwarethatcanworkwith
the webcam, allowing users to create their own photos or video clips.
®
®
• LifeFrame2onlysupportsMicrosoft
Windows
Vista/XPServicePack2
operating systems.
• TheLifeFrame2softwareisbundledinthesupportCD.
Installation instructions
1. Closeallotherapplications.
2. InsertthesupportCDintotheopticaldriveandruntheLifeFrame2
program.
3. Followtheon-screeninstructionstocompletetheinstallation

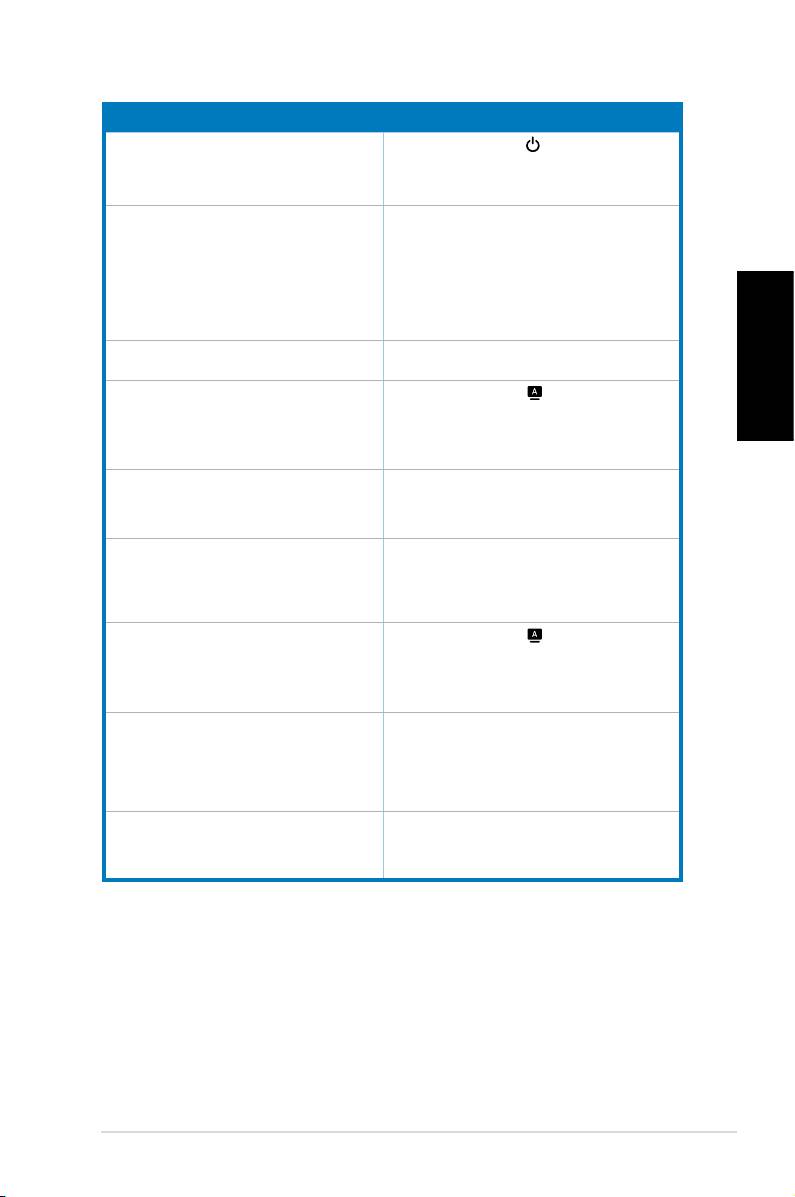
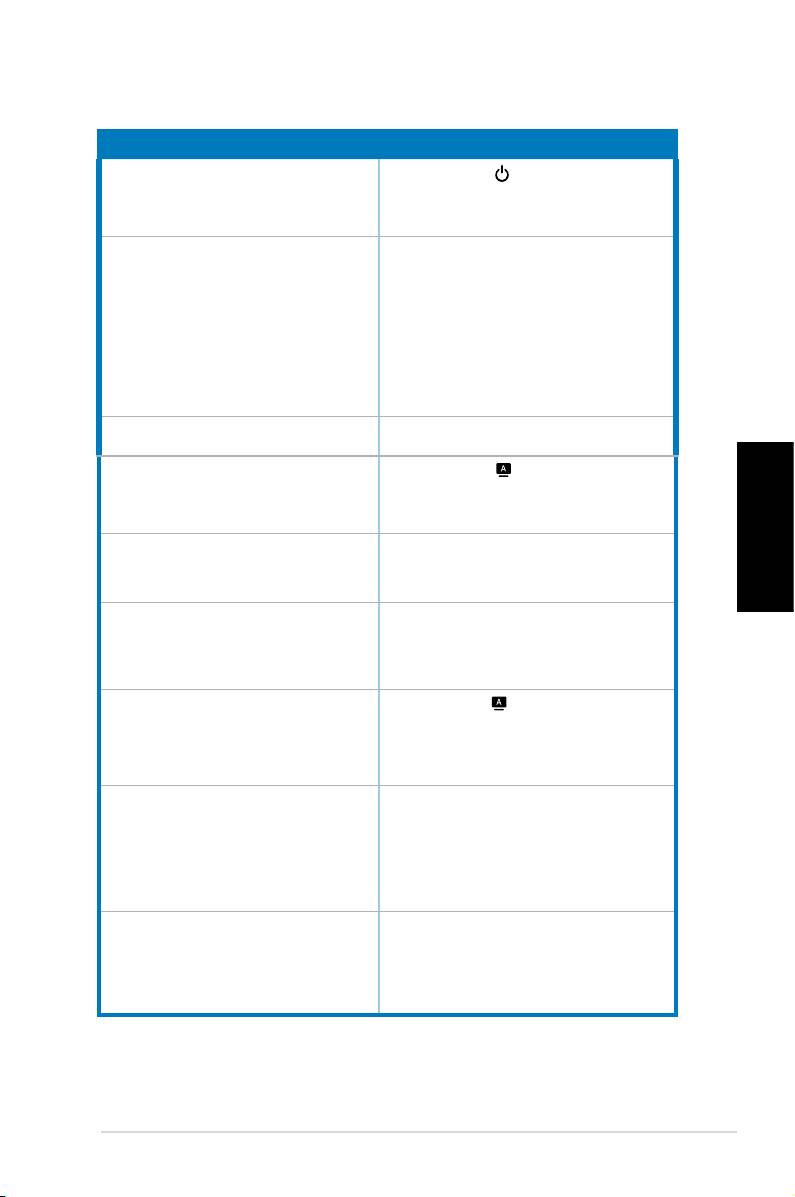
Troubleshooting (FAQ)
Problem Possible Solution
PowerLEDisnotON
•Pressthe button to check if the monitor is in
theONmode.
•Checkifthepowercordisproperlyconnectedto
the monitor and the power outlet.
ThepowerLEDlightsamberandthereisno
•Checkifthemonitorandthecomputerareinthe
English
screen image
ONmode.
•Makesurethesignalcableisproperlyconnected
the monitor and the computer.
• Inspect the signal cable and make sure none of
the pins are bent.
•Connectthecomputerwithanotheravailable
monitor to check if the computer is
properly working.
Screen image is too light or dark •AdjusttheContrastandBrightnesssettingsvia
OSD.
Screenimageisnotcenteredorsizedproperly •Pressthe buttonfor2–3secondsto
automaticallyadjusttheimage(VGAinputonly).
•AdjusttheH-PositionorV-Positionsettingsvia
OSD(VGAinputonly).
Screen image bounces or a wave pattern is
•Makesurethesignalcableisproperly
present in the image
connected to the monitor and the computer.
•Moveawayelectricaldevicesthatmaycause
electrical interference.
Screen image has color defects (white does not
• Inspect the signal cable and make sure that
lookwhite)
none of the pins are bent.
•Perform
All Reset
viaOSD.
•AdjusttheR/G/Bcolorsettingsorselectthe
ColorTemperatureviaOSD.
Screenimageisblurryorfuzzy •Pressthe buttonfor2–3secondsto
automaticallyadjusttheimage(VGAinputonly).
•AdjustthePhaseandClocksettingsviaOSD
(VGAinputonly).
Nosoundorsoundislow •Ensurethatthseaudiocableisproperly
connected to the monitor and the computer
•Adjustthevolumesettingsofbothyour
monitor and computer.
•Ensurethatthecomputersoundcarddriver
is properly installed and activated.
Webcam or array microphone is not working •MakesurethatyouhaveconnectedtheUSB2.0
cablesecurelytoboththeLCDmonitorandyour
computer.
®
®
•MakesurethatyouusetheMicrosoft
Windows
Vista/XPServicePack2operatingsystems.
5 Quick Start Guide
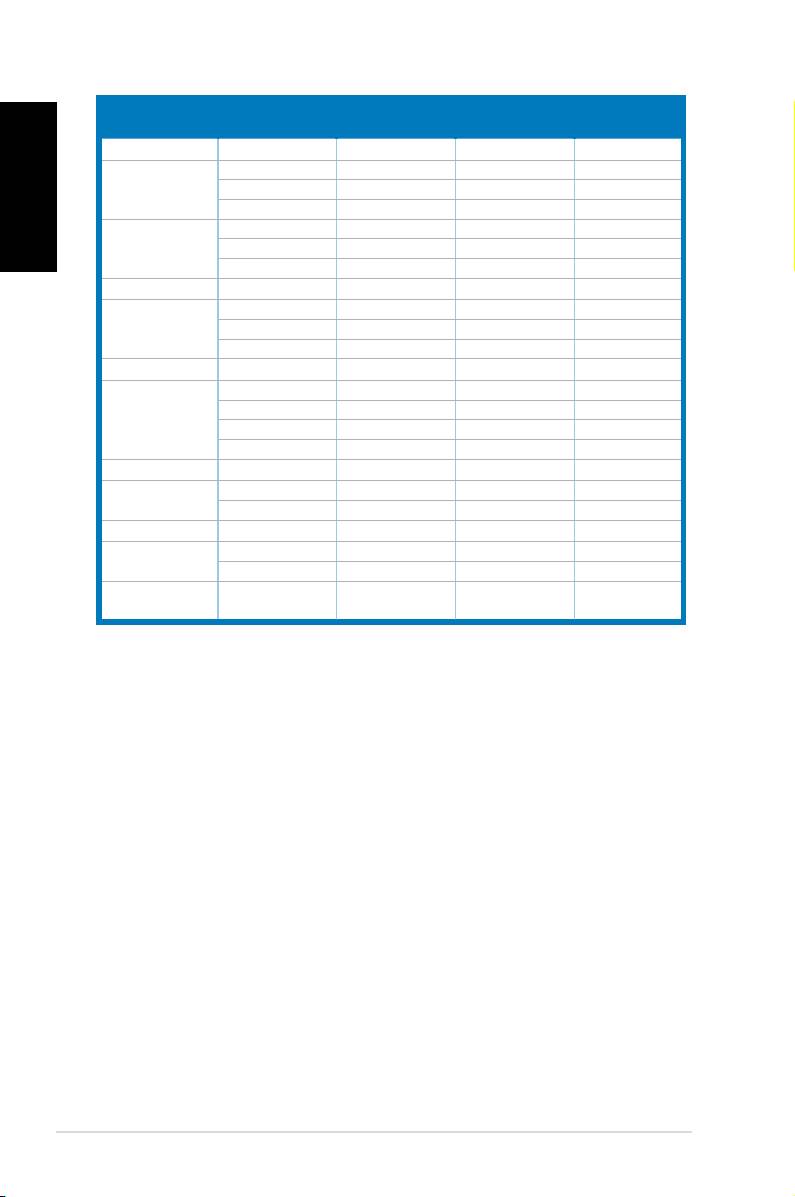
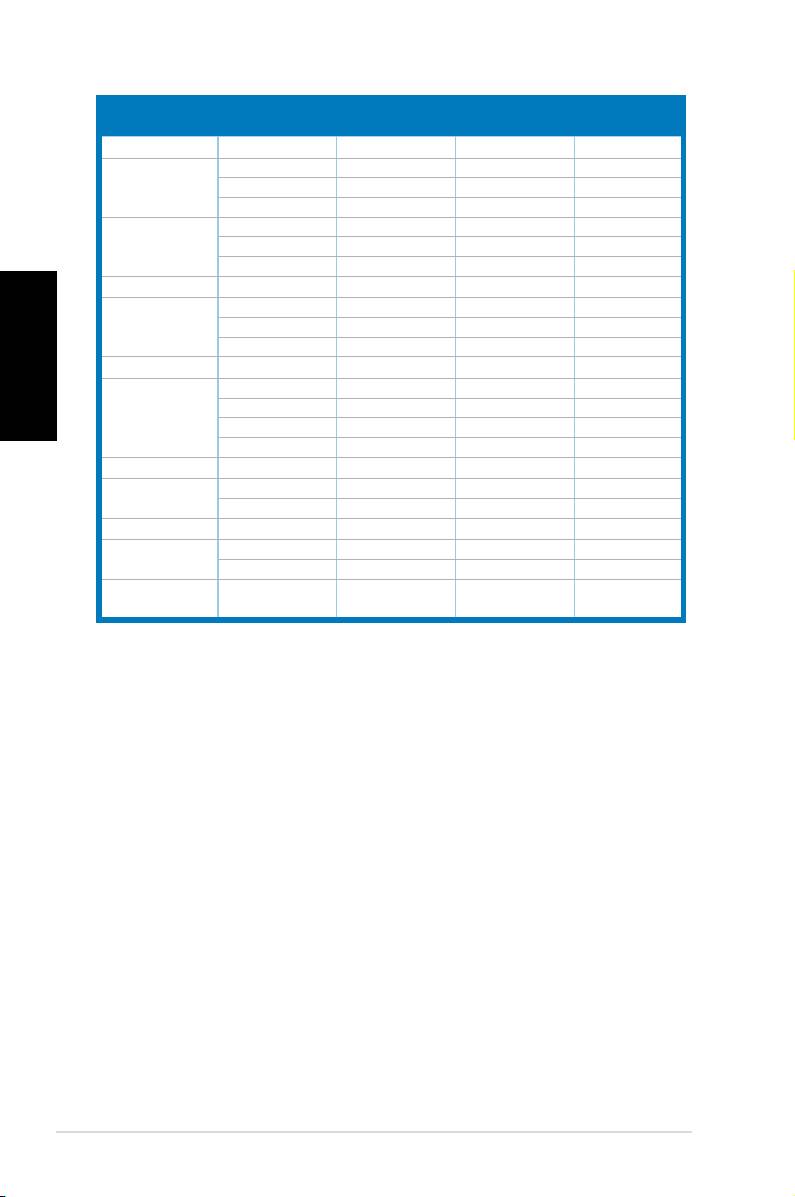
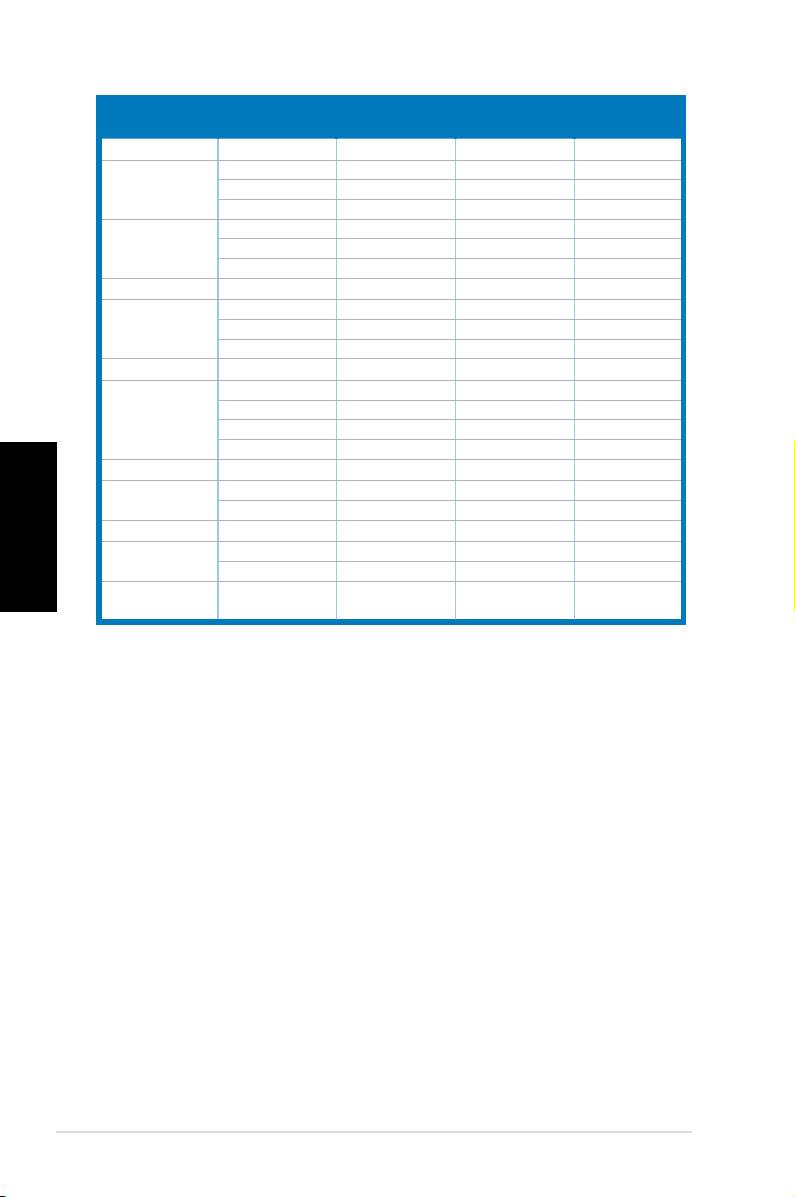
Supported operating modes
Resolution
Vertical
Horizontal
Standard
Pixel
Frequency
Frequency
Frequency
English
DOS
720x400 70Hz 31.47KHz 28.32MHz
VGA
640x480 60Hz 31.47KHz 25.18MHz
640x480 72Hz 37.90KHz 31.50MHz
640x480 75Hz 37.50KHz 31.50MHz
SVGA
800x600
56Hz 35.16KHz
36.00MHz
800x600 60Hz 37.90KHz 40.00MHz
800x600 75Hz 46.90KHz 49.50MHz
WVGA
848x480 60Hz 31.02KHz 33.75MHz
XGA
1024x768 60Hz 48.40KHz 65.00MHz
1024x768 70Hz 56.50KHz 75.00MHz
1024x768
75Hz
60.02KHz 78.75MHz
XGA+
1152x864 75Hz 67.50KHz 108.00MHz
WXGA
1280x800 60Hz 49.62KHz 83.375MHz
1280x720 60Hz 44.69KHz 74.375MHz
1280x768 60Hz 47.78KHz 79.50MHz
1280x768 75Hz 60.29KHz 102.25MHz
QVGA
1280x960 60Hz 60.00KHz 108.00MHz
SXGA
1280x1024 60Hz 64.00KHz 108.00MHz
1280x1024 75Hz 80.00KHz 135.00MHz
WXGA
1360x768 60Hz 47.71KHz 85.50MHz
WXGA+
1440x900 60Hz 55.94KHz 106.00MHz
1440x900 75Hz 70.64KHz 136.75MHz
WSXGA+
1680x1050 60Hz 65.29KHz 146.25MHz
(Primary)
* Modes not listed in the table may not be supported. For optimal resolution, we recommend that
you choose a mode listed in the table above.
* This monitor supports full HD (480i/p, 576i/p, 720p, 1080i/p) video contents from game consoles,
DVD players and other consumer video devices.
6 Quick Start Guide
Séries MK221
Français
Moniteur LCD
Guide de démarrage
rapide
MIC ARRAY
MENU
Informations sur la sécurité
• Avantdecongurerlemoniteur,assurez-vousd’avoirlutouteladocumentation
incluse dans le paquet.
• Pouréviterlesrisquesd’incendieetdechocélectrique,n’exposezpaslemoniteur
à la pluie ou à l’humidité.
• Le moniteur ne doit être utilisé qu’avec le type de source d’alimentation indiqué sur
l’étiquette à l’arrière. Si vous n’êtes pas sûr du type d’alimentation électrique dont vous
disposez,contactezvotrerevendeurouvotrefournisseurenélectricitélocal.
• Utilisezuneprisecompatibleaveclesstandardsélectriquesdevotrerégion.
Français
• Pour assurer un fonctionnement correct, n’utilisez le moniteur qu’avec des
ordinateurscertiésUL,etfonctionnantentre110-240V.
• Sivousrencontrezunproblèmetechniqueavecvotremoniteur,contactezun
technicienqualiéouvotrerevendeur.
Introduction au moniteur
Vue avant Vue arrière
Webcam 1.3 mégapixels
1.CapteurSPLENDID™*/Ajustementauto**/
8. PortAC-in
BoutonquitterMENU
9.PortHDMI(MK221Huniquement)
2.Raccourcivolume/Boutondesélectionbas
10.PortDVI(MK221Huniquement)
3.MENU/Entrée/Boutondesélection
11.PortVGA
4.Raccourciluminosité/BoutondesélectionHaut
12.Portdesortieaudio
5.Boutondesélectiond'entrée(MK221H)
13.Portd’entréeaudio
Boutond'ajustementautomatique(MK221S)
14.PortUSB2.0(amont, pour
6. Bouton d’alimentation
webcam et microphones)
7. IndicateurLED
* Raccourci clavier pour la sélection de 5 modes audio pré dénis.
** Permet d’ajuster automatiquement l’image en touchant le bouton pendant 2-3 sec (MK221H
uniquement).
8 Guide de démarrage rapide
MIC ARRAY
MENU
MEN U
Microphone Array
Haut-parleurs
(microphone x2)
stéréo (2x2W)
Prise
casque
Base
14
13
12
1
2 3 4 5 6
7
8
9
10
11
Connecter les câbles
Pourconnecterlescâbles:
7
6
5
1
2
3
4
1.Cordond’alimentation
2. CâbleHDMI(MK221Huniquement)
3. CâbleDVI(MK221Huniquement)
Français
4.CâbleVGA
5. Câbledesortieaudio
6. Câbled’entréeaudio
7. CâbleUSB2.0
LescâblesHDMIetdesortieaudiosontvendusséparément.
•
Pour connecter le cordon d’alimentation
:connectezuneextrémitédu
cordond’alimentationauportAC-indumoniteur,etl’autreextrémitéà
une source électrique.
Avantdeconnecterlescâbles,assurez-vousquevotrePCestéteintouquele
cordon d’alimentation est débranché.
•
Pour connecter les câbles de signaux
:connectezuneextrémité
ducâbledesignalaumoniteur,puisl’autreextrémitéàvotreordinateur
ou équipement vidéo.
LorsquelescâblesVGAetDVIsonttousdeuxconnectés,vouspouvezchoisir
d’utiliserlemodeVGAouDVIcommesourcevidéodepuislemenuOSD,ouvia
le raccourci dupanneauavant.(MK221H uniquement).MK221H uniquement).uniquement).
••
Pour connecter le câble audio
:connectezuneextrémitéducâble
audioauportd’entréeaudiodumoniteur,etl’autreextrémitéauportde
sortie audio de l’ordinateur.
•
Pour connecter des haut-parleurs externes:
Connectezuncâblede
sortie audio entre le port de sortie audio du moniteur et le port d’entrée
audiodevoshaut-parleurs.
9 Guide de démarrage rapide
Webcam intégrée avec support microphone Array
Lacaméraembarquéede1.3mégapixelsintégrantdesmicrophonesArray(support
demicroArray)vouspermetdeprendredesphotos,fairedelavisioconférence,créer
des vidéos; mais aussi de discuter avec vos amis via des services de messagerie
instantanée sur Internet, et ainsi de vous montrer tel que vous êtes.
Conguration requise
®
• UnordinateuravecunprocesseurPentium
III800MHzousupérieur
®
®
• Systèmed’exploitationMicrosoft
Windows
Vista/XPSP2
• 200Mod’espacedisquelibrepourl’installationduprogramme
• 128Moouplusdemémoirevive
Français
• Unecartegraphiquesupportantl’afchagedescouleurs16-bits
• Assurez-vousquelecâbleUSB2.0fourniestconnectéaumoniteurLCDet
auPC.Sinon,lawebcamnepourrapasfonctionner.
®
• Assurez-vousd'utiliserWindows
Vista/XPSP2ouversionsultérieure
avantd'utilisercepériphérique.
Utiliser le périphérique
• LedispositiftransmetdesimagesetdusonversvotrePCvialeportUSB2.0.
Pourcela,assurez-vousquelecâbleUSB2.0fourniestconnectéaumoniteur
LCDetauPC.
• Vouspouvezajusterlawebcamenlafaisantpivoterversl’avantoul’arrière.
Nefaitespaspivoterlawebcamversl’avantoul’arrièredansunanglesupérieur
à30˚; ceci pourrait l’endommager.
10 Guide de démarrage rapide
MIC ARRAY
MENU
-30˚–30˚
Logiciel LifeFrame 2
ASUSMK221estaccompagnéedulogicielconvivialLifeFrame2permettantaux
utilisateurs de créer leurs propres photos et clips vidéos.
®
• LifeFrame2nesupportequelessystèmesd’exploitationMicrosoft
®
Windows
Vista/XPSP2.
• LelogicielLifeFrame2estcontenudansleCDdesupport.
Instructions d'installation
1. Fermeztouteslesapplicationsencoursd’exécution.
2. InsérezleCDdesupportdansvotrelecteuroptiqueetlancezle
programmeLifeFrame2.
3. Suivezlesinstructionsapparaissantàl’écranpourterminerl’installation.
Dépannage (FAQ) (FAQ)
Problème Solution possible
Le voyant d’alimentation ne s’allume pas
•Appuyezsurlebouton pourvérierquele
moniteur est bien sous tension.
•Vériezsilecordond’alimentationestbien
connecté au moniteur et à une prise électrique.
Le voyant d’alimentation s’allume en ambré et
•VériezquelePCetlemoniteursontbiensous
aucune image n’apparaît à l’écran
tension.
•Assurez-vousquelecâbledesignalutiliséest
bienconnectéaumoniteuretauPC.
•Inspectezlecâbledesignalutilisépourvous
assurer qu’aucune des broches ne sont pliées.
•Connectez,sipossible,lePCàunautremoniteur
pourvérierqueleproblèmeneprovientpasduPC.
L’image est trop claire ou trop sombre •Ajustezlesréglagesdecontrasteetdeluminosité
viaOSD.
L’image n’est pas correctement centrée ou de
•Appuyezsurlebouton pendant2-3secondes
Français
mauvaise taille
pourajusterautomatiquementl’image.(Entrée
VGAuniquement).
•Ajustezlapositionhorizontaleouverticalevia
OSD.(EntréeVGAuniquement).
L’image saute et des vaguelettes apparaissent
•Assurez-vousquelecâbledesignalutiliséest
à l’écran
bienconnectéaumoniteuretauPC.
•Déplaceztoutpériphériqueélectriquepouvant
causer des interférences électriques.
Les couleurs apparaissant à l’écran sont
•Inspectezlecâbledesignalutilisépourvous
anormales (les blancs n’apparaissent pas
assurer qu’aucune des broches ne sont pliées.
blanc)
•EffectuezuneréinitialisationviaOSD.
•Ajustezlesréglagesdescouleursousélectionnez
unetempératuredecouleurviaOSD.
L’image est trouble ou brouillée
•Appuyezsurlebouton pendant2-3secondes
pourajusterautomatiquementl’image.(Entrée
VGAuniquement).
•AjustezlesparamètresdePhaseetdeFréquence
viaOSD.(EntréeVGAuniquement).
Assurez-vousquelecâbleaudioestcorrectement
Pasdesonousontropbas •
connectéaumoniteuretauPC.
AjustezlesréglagesduvolumeduPCetdu
•
moniteur.
•Assurez-vousquelespilotesdelacartesondu
PCsontbieninstallésetactivés.
LaWebcamoulemicrophoneArrayne
•Assurez-vousd’avoirconnectélecâbleUSB2.0
fonctionne pas
fourni au moniteur et à votre ordinateur.
®
®
•Assurez-vousd’utiliserMicrosoft
Windows
Vista/XPSP2.
11 Guide de démarrage rapide
Modes de fonctionnement supportés
Fréquence
Fréquence
Standard
Résolution
Pixel
verticale
horizontale
DOS
720x400 70Hz 31.47KHz 28.32MHz
VGA
640x480 60Hz 31.47KHz 25.18MHz
640x480 72Hz 37.90KHz 31.50MHz
640x480 75Hz 37.50KHz 31.50MHz
SVGA
800x600
56Hz 35.16KHz
36.00MHz
800x600 60Hz 37.90KHz 40.00MHz
800x600 75Hz 46.90KHz 49.50MHz
WVGA
848x480 60Hz 31.02KHz 33.75MHz
Français
XGA
1024x768 60Hz 48.40KHz 65.00MHz
1024x768 70Hz 56.50KHz 75.00MHz
1024x768
75Hz 60.02KHz
78.75MHz
XGA+
1152x864 75Hz 67.50KHz 108.00MHz
WXGA
1280x800 60Hz 49.62KHz 83.375MHz
1280x720 60Hz 44.69KHz 74.375MHz
1280x768 60Hz 47.78KHz 79.50MHz
1280x768 75Hz 60.29KHz 102.25MHz
QVGA
1280x960 60Hz 60.00KHz 108.00MHz
SXGA
1280x1024 60Hz 64.00KHz 108.00MHz
1280x1024 75Hz 80.00KHz 135.00MHz
WXGA
1360x768 60Hz 47.71KHz 85.50MHz
WXGA+
1440x900 60Hz 55.94KHz 106.00MHz
1440x900 75Hz 70.64KHz 136.75MHz
WSXGA+
1680x1050 60Hz 65.29KHz 146.25MHz
(Primary)
* Les modes non listés dans ce tableau peuvent ne pas être supportés. Pour une résolution optimale,
il est recommandé de sélectionner un mode listé dans le tableau.
* Ce moniteur supporte le contenu vidéo Full HD (480i/p, 576i/p, 720p, 1080i/p) diffusé par les consoles
de jeux vidéo, les lecteurs de DVD ou tout autre bien de consommation vidéo.
12 Guide de démarrage rapide

LCD-Monitor
der MK221 Serie
Deutsch
Schnellstarthilfe
MIC ARRAY
MENU
Sicherheitsinformationen
• Bevor Sie den Monitor installieren, lesen Sie sorgfältig alle mitgelieferten
Informationen.
• UmFeuer-undStromschlagrisikenzuvermindern,setzenSiedenMonitorniemals
RegenoderFeuchtigkeitaus.
• DerMonitorsolltenurmitderaufdemAufkleberbezeichnetenSpannungbetrieben
werden.SindSiesichüberdieSpannungdervonIhnenbenutztenSteckdose
nichtsicher,erkundigenSiesichbeiIhremEnergieversorgungsunternehmenvor
Ort.
• Verwenden Sie Stromstecker, die mit den Stromstandards Ihrer Region
übereinstimmen.
• UmeinensicherenBetriebzugewährleisten,verwendenSiedenMonitornurin
VerbindungmitComputern,diedemUL-Standardentsprechenundüberkorrekt
eingestellteAnschlüssemiteinerSpannungvon100-240V~verfügen.
• SolltentechnischeProblememitdemProduktauftreten,kontaktierenSieden
qualiziertenKundendienstoderIhreVerkaufsstelle.
Monitoreinführung
Vorderansicht Rückansicht
Deutsch
1,3 Megapixel-Webcam
1.SPLENDID™*/Auto-adjust**/ExitMENU-Taste
8.AC-Eingang
2.Lautstärke/Kleiner-Taste
9.HDMI-Anschluss(nurMK221H)
3.MENU/Enter/Auswahltaste
10.DVI-Anschluss(nurMK221H)
4.Helligkeit-/Größer-Taste
11.VGA-Anschluss
5.Eingangsauswahlschalter(MK221H)
12.Audio-Ausgang
AutomatischeEinstellung(MK221S)
13.Audio-Eingang
6.Netzschalter
14.USB2.0port(upstream,for
7.LED-Anzeige
webcamandmicrophones)
* Hotkey für die Auswahl von 5 Videovoreinstellungsmodi.
** Bild wird nach 2-3 Sekunden langem Drücken automatisch eingestellt (nur MK221H).
14
Schnellstarthilfe
MIC ARRAY
MENU
MEN U
Mic Array
Stereolautsprecher
(Mikrofon x2)
(2Wx2)
Kopfhörer-
buchse
Ständer
14
13
12
1
2 3 4 5 6
7
8
9
10
11

Anschließen der Kabel
SchließenSiedieKabelfolgendermaßenan:
7
6
5
1
2
3
4
1.Netzkabel
2.HDMI-Signalkabel(nurMK221H)
3.DVI-Signalkabel(nurMK221H)
4.VGA-Signalkabel
5.Audio-Ausgangskabel
6.Audio-Eingangskabel
7.USB2.0-Kabel
DieHDMI-KabelunddasAudio-Ausgangskabelmüssenseparaterworben
werden.
Deutsch
•
So schließen Sie das Netzkabel an
:VerbindenSiedaseineEndedes
AudiokabelsmitdemStromeingangdesMonitorsunddasanderemiteiner
Steckdose.
VergewissernSiesich,dassderPCausgeschaltetistunddassdasStromkabel
nichtindieSteckdoseeingestecktist,bevorSiedieKabelanschließen.
•
So schließen Sie die Signalkabel an
:VerbindenSieeinEndedes
SignalkabelsmitdemMonitorundschließenSiedasandereEndenanIhren
PCodereinanderesVideogerätan.
WenngleichzeitigdieHDMI-,DVI-undVGA-Kabelangeschlossensind,können
SieüberdasElement
Input Select
derOSD-FunktionoderdenHotkey auf
derVorderseite(nuramMK221H)zwischendenEingangsquellenhinundher
schalten.
•
So schließen Sie das Audiokabel an
:VerbindenSiedaseineEndedes
AudiokabelsmitdemAudio-EingangdesMonitorsunddasandereEndemit
demAudio-AusgangIhresComputers.
•
So schließen Sie die Lautsprecher an:
VerbindenSiedenAudio-Ausgang
desMonitorsübereinAudio-AusgangskabelmitdemAudio-Eingangder
Lautsprecher.
Schnellstarthilfe
15
Integrierte Webcam mit Mic Array-Unterstützung
Dieintegrierte1,3Megapixel-WebcammitArray-Mikrofonen(MicArray-
Unterstützung)ermöglichtesIhnen,Bilderaufzunehmen,Videokonferenzen
abzuhaltenundAudio-Video-Clipsaufzuzeichnen.BeimChattenmitFreundenüber
dasInternetkönnenSienunlivemitBildundTondabeisein.
Systemanforderungen
®
• PCmitPentium
III800MHzoderhöheremProzessor
®
®
• Microsoft
Windows
Vista/XPServicePack2Betriebssystem
• Mindestens200MBfreierFestplattenspeicherzumAusführendesProgramms
• Mindestens128MBRAM
• AnzeigekartemitUnterstützungfür16-BitHighColor-Modus
• VergewissernSiesich,dassdasmitgelieferteUSB2.0-Kabelsowohlan
denLCD-MonitoralsauchdenPCangeschlossenist.Andernfallswirddie
Webcam nicht aktiviert.
• VergewissernSiesichvordererstenBenutzungdesGeräts,dass
®
Windows
Vista/XPServicePack2oderneuereVersioneninstalliertsind.
Deutsch
Benutzen des Geräts
• DieWebcamüberträgtBildundTonüberdenUSB2.0-AnschlusszuIhremPC,
darummussdasmitgelieferteUSB2.0-KabelmitMonitorundPCverbunden
sein,bevorSiedieWebcamnutzenkönnen.
• DieWebcamkann,wiehiergezeigt,nachobenoderuntengedrehtwerden.
DrehenSiedieWebcamnichtüber30ºnachobenoderunten;siekönntesonst
Schaden nehmen.
16
Schnellstarthilfe
MIC ARRAY
MENU
-30˚–30˚
LifeFrame 2-Software
ASUSMK221bietetdieeinfachzubedienendeLifeFrame2-Software,mitder
BenutzerüberdieWebcamBilderoderVideoclipsaufnehmenkönnen.
®
®
• LifeFrame2unterstütztnurMicrosoft
Windows
Vista/XPServicePack
2-Betriebssysteme.
• DieLifeFrame2-SoftwareistaufdermitgeliefertenSupport-CDenthalten.
Installationsanweisungen
1. SchließenSieallegeöffnetenAnwendungen.
2. LegenSiedieSupport-CDinsoptischeLaufwerkundöffnenSiedas
LifeFrame2-Programm.
3. FolgenSiedenBildschirmanweisungen,umdieInstallationzubeenden.
Problembehandlung (Häug gestellte
Fragen)
Problem Mögliche Lösung
Power-LEDleuchtetnicht
• Berühren Sie den -Schalter,umzuüberprüfen,
obderMonitoreingeschaltetist.
• PrüfenSie,obdasNetzkabelkorrektmitdem
MonitorundderStromquelleverbundenist.
DiePower-LEDleuchtetorange,undder
• PrüfenSie,obderMonitorundderComputer
Bildschirmzeigtnichtsan
eingeschaltet sind.
• Stellen Sie sicher, dass das Signalkabel korrekt
mitdemMonitorunddemComputerverbunden
ist.
• PrüfenSie,obdiePoledesSignalkabels
verbogen sind.
• VerbindenSiedenComputermiteinemanderen
verfügbarenMonitor,umzuprüfen,obdie
Computereinstellungenkorrektsind.
DieAnzeigeistzuhelloderzudunkel • StellenSieKontrastundHelligkeitüberdasOSD
ein.
DieAnzeigeistnichtmittig,oderkorrekt
• Berühren Sie den -SchalterfürzweiSekunden,
proportioniert
umdieAnzeigeautomatischzujustieren.
• VerändernSiedieH-PositionoderV-Position-
EinstellungenüberdasOSD.
DieAnzeigewackeltoderzeigtein
• Stellen Sie sicher, dass das Signalkabel korrekt mit
Wellenmuster an
demMonitorunddemComputerverbundenist.
Deutsch
• EntfernenSieelektrischeGeräte,dieInterferenzen
hervorrufenkönnten.
DieAnzeigeistdefekt(weißwirdnichtalsweiß
• PrüfenSie,obdiePoledesSignalkabelsverbogen
angezeigt)
sind
• FührenSieeinResetüberdasOSDaus.
• VerändernSie die R/G/B-Farbeinstellungen oder
stellenSiedieFarbtemperaturüberdasOSDein.
DieAnzeigeistverschwommen
• DrückenSieden -SchalterfürzweiSekunden,
umdieAnzeigeautomatischzujustieren(nur
VGA-Ausgang)
• VerändernSiePhasen-undTakteinstellungen
überdasOSD(nurVGA-Ausgang)
KeinTon,oderTonzuleise
• StellenSiesicher,dassdasAudiokabelkorrekt
mitdemMonitorunddemComputerverbunden
ist.
• VerändernSiedieLautstärkeneinstellungan
IhremComputerunddemMonitor.
• Stellen Sie sicher, dass der Soundkartentreiber
IhresComputersinstalliertundaktiviertist.
WebcamoderArray-Mikrofonfunktionierennicht • StellenSiesicher,dassdieUSB-Steckerkorrekt
anLCD-MonitorundComputerangeschlossen
sind.
®
• VergewissernSiesich,dassSieMicrosoft
®
Windows
Vista/XPmitServicePack2
benutzen.
Schnellstarthilfe
17
Unterstützte Betriebsmodi
Anzeige-
Vertikale
Horizontale
Standard
Pixel
auflösung
Frequenz
Frequenz
DOS
720x400 70Hz 31.47KHz 28.32MHz
VGA
640x480 60Hz 31.47KHz 25.18MHz
640x480 72Hz 37.90KHz 31.50MHz
640x480 75Hz 37.50KHz 31.50MHz
SVGA
800x600
56Hz 35.16KHz
36.00MHz
800x600 60Hz 37.90KHz 40.00MHz
800x600 75Hz 46.90KHz 49.50MHz
WVGA
848x480 60Hz 31.02KHz 33.75MHz
XGA
1024x768 60Hz 48.40KHz 65.00MHz
1024x768 70Hz 56.50KHz 75.00MHz
1024x768
75Hz
60.02KHz 78.75MHz
XGA+
1152x864 75Hz 67.50KHz 108.00MHz
WXGA
1280x800 60Hz 49.62KHz 83.375MHz
1280x720 60Hz 44.69KHz 74.375MHz
1280x768 60Hz 47.78KHz 79.50MHz
1280x768 75Hz 60.29KHz 102.25MHz
QVGA
1280x960 60Hz 60.00KHz 108.00MHz
Deutsch
SXGA
1280x1024 60Hz 64.00KHz 108.00MHz
1280x1024 75Hz 80.00KHz 135.00MHz
WXGA
1360x768 60Hz 47.71KHz 85.50MHz
WXGA+
1440x900 60Hz 55.94KHz 106.00MHz
1440x900 75Hz 70.64KHz 136.75MHz
WSXGA+
1680x1050 60Hz 65.29KHz 146.25MHz
(Primary)
* Nicht in der Tabelle aufgeführte Modi werden wahrscheinlich nicht unterstützt. Für optimale
Auösung wird empfohlen, einen Modus aus der obigen Tabelle auszuwählen.
* Dieser Monitor unterstützt HD (480i/p, 576i/p, 720p, 1080i/p) Videoinhalte von Spielkonsolen,
DVD-Spielern und anderen Videogeräten.
18
Schnellstarthilfe
Monitor LCD
Serie MK221
Guida Rapida
Italiano
MIC ARRAY
MENU
Informazioni in materia di Sicurezza
• Primadiinstallareilmonitor,leggereattentamentel’interadocumentazionefornita
conlaconfezione.
• Perevitareilrischiod’incendioodiscosseelettriche,nonesporremaiilmonitor
a pioggia o umidità.
• Ilmonitorsidovrebbefarfunzionaresoltantoconiltipodialimentazioneindicato
sull’ etichetta. In caso di incertezza sul tipo di alimentazione della propria
abitazione,consultareilfornitoreolasocietàelettricalocale.
• Utilizzarelaspinacorretta,conformeaglistandardelettricilocali.
• Per assicurare un correttofunzionamento, utilizzare il monitor soltanto con
computermarchiatiUL,conricettacoliconguratifra100e240VAC.
• Se si riscontrano problemi tecnici con il monitor, contattare un tecnico abilitato
perl’assistenzaoilrivenditore.
Descrizione del Monitor
Vista Frontale Vista Posteriore
Webcam da 1.3 megapixel
Italiano
1. PulsanteSPLENDID™*/Auto-regolazione**/
8.PortaAC-in
UscitaMENU
9. PortaHDMI(soloperMK221H)
2.HotkeyVolume/Pulsante-(Riduzione)
10.PortaDVI(soloperMK221H)
3.PulsanteMENU/Invio/Selezione
11.PortaVGA
4.HotkeyLuminosità/Pulsante+(Aumento)
12.PortaAudioout
5.PulsanteSelezioneInput(MK221H)
13.PortaAudioin
PulsantediAuto-regolazione(MK221S)
14.PortaUSB2.0(upstream,per
6. PulsantediAccensione
webcameraemicrofoni)
7.IndicatoreLED
* Tasto rapido per la selezione delle 5 modalità video preimpostate.
** Regolazione automatica dell’ immagine mediante pressione del pulsante per 2–3 secondi (solo
per MK221H ).
20 GuidaRapida
MIC ARRAY
MENU
MEN U
Mic Array
Altoparlanti Stereo
(microfono x2)
(2Wx2)
Jack Cufe
Base
14
13
12
1
2 3 4 5 6
7
8
9
10
11
