Asus USB-N11: instruction
Class: Household, kitchen appliances, electronics and equipment
Type:
Manual for Asus USB-N11
Table of contents

注意事項
當您購買本產品後,為保障購買人權益,請於購買後壹個月內務必上網填寫
完整個人資料及產品資訊並完成註冊手續。
1.請您先透過網路註冊加入華碩會員,再進行產品登錄之作業 ( 網址:
http://member.asus.com)。
2.妥善保留購買當時之發票或是發票憑證 ( 影本亦可 ) 經銷商之售貨單據
( 加蓋經銷商店章始生效力 ),於機台故障送修時出示 , 始享有保固服務
之權益;若不慎遺失相關證明單據且於購買華碩無線網路產品壹個月內,
未上網進行註冊,本公司將以華碩「出貨日」為保固啟始日期。
3.無論在任何情況下,您都不可以自行拆解修理本機 , 這將導致本機的保
固作廢。
註冊步驟
註冊網址:http://member.asus.com
步驟 1:加入會員 ( 如已是會員,請跳到步驟 5,直接”登入會員”可註
冊新購買的產品)
步驟 2:個人資料填寫完成後按”同意並且繼續”
步驟 3:註冊系統將會發送啟用帳號的”確認碼”認證信件
步驟 4:請依據確認碼信件指示進行帳號認證,以確保您會員權益
步驟 5:選擇產品註冊,填寫完整的產品資訊即可完成註冊
Q3739_USB-N11.indb 1 6/11/08 3:25:30 PM
Declaration of Conformity
We, Manufacturer/Importer
(full address)
ASUS COMPUTER GmbH
HARKORT STR. 25
40880 RATINGEN, BRD. GERMANY
declare that the product
( description of the apparatus, system, installation to which it refers)
Wireless N USB adapter
USB-N11
is in conformity with
(reference to the specification under which conformity is declared)
in accordance with 2004/108/EC-EMC Directive and 1995/5 EC-R &TTE Directive
EN 55022: 2006
EN 300328
Electromagnetic compatibility and Radio Limits and methods of measurement
spectrum Matters (ERM); wideband of radio disturbance characteristics of
transmission equipment operating in information technology equipment
the 2.4GHz ISM band and using spread
spectrum modulation techniques; Part 1:
EN 55024:1998+A1:2001+A2:2003
technical characteristics and test conditions Information Technology
Part2: Harmonized EN covering essential equipment-Immunity
requirements under article 3.2 of the R&TTE characteristics-Limits and methods of
measurement
EN 300386
Electromagnetic compatibility and Radio
EN 50360/
the limitation of exposure of
spectrum Matters (ERM);Telecommunication
EN 50361
the general public to electromagneticnetwork
equipment; Electromagnetic fields (0 Hz to 300 GHz) International
Compatibility (EMC) requirements Commission on Non-Ionising
Radiation Protection (1998), Guidelines for
EN 301489
Electromagnetic compatibility and Radio limiting exposure in time-varying electric,
spectrum Matters (ERM); Electromagnetic magnetic, and electromagnetic fields
compatibility(EMC) standard for radio
equipment and services; Part 17: Specific
EN 61000-3-2 :2000+A2:2005
conditions for wideband data and Disturbances in supply systems caused
HIPERLAN equipment
EN 61000-3-3:1995+A1:2001
Disturbances in supply systems caused
EN50371
This generic standard applies to low power electronic
and electrical apparatus for which no dedicated product
-or product family standard regarding human exposure
to electromagnetic fields applies. The frequency range
EN 55013
Limits and methods of measurement
covered is 10MHZ to 300GHZ. of radio disturbance characteristics of
The object of this standard is to demonstrate the broadcast receivers and associated
Compliance of such apparatus with the basic restrictions equipment
One exposure of the general public to electric, magnetic
and electromagnetic fields and contact current.
EN 55020
Immunity from radio interference of
broadcast receivers and associated
EN 301893
Broadband Radio Access Networks (BRAN); equipment
5 GHz high performance RLAN;
Harmonized EN covering essential requirements
CE marking
(EC conformity marking)
The manufacturer also declares the conformity of above mentioned product
with the actual required safety standards in accordance with LVD 2006/95 EC
EN 60065
Safety requirements for mains operated
EN 60950-1
Safety for information technology equipment
electronic and related apparatus for including electrical business equipment
household and similar general use
EN 60335
Safety of household and similar
EN 50091-1
General and Safety requirements for
electrical appliances uninterruptible power systems (UPS)
Manufacturer/Importer
(Stamp)
Date : May. 5, 2008
Q3739_USB-N11.indb 2 6/11/08 3:25:31 PM
Index
1 English .............................................................................................. 1
2 Български ............................................................................................6
3 Česky .................................................................................................9
4 Nederlands ......................................................................................12
5 Eesti .................................................................................................15
6 Suomi ...............................................................................................18
7 Français ...........................................................................................21
8 Deutsch ............................................................................................24
9 Ελληνικά ..........................................................................................27
10 Magyar .............................................................................................30
11 Italiano .............................................................................................33
12 Latviski ............................................................................................36
13 Lietuvių ............................................................................................39
14 Polski ...............................................................................................42
15 Português ........................................................................................45
16 Română ............................................................................................48
17 Pусский ..............................................................................................51
18 Slovensky ........................................................................................54
19 Español ............................................................................................57
20 Türkçe ..............................................................................................60
21 Українська .........................................................................................63
22 繁體中文 ...........................................................................................66
23 ...........................................................................................69
24 Bahasa Indonesia ...........................................................................72
25 한국어 ...............................................................................................75
26 ไทย ...................................................................................................78
Q3739_USB-N11.indb 1 6/11/08 3:25:32 PM

QuickStartGuide
Installation Procedures
Important: Install the WLAN Adapter utilities CD before inserting the
WLANAdapterintoyourcomputer.
English
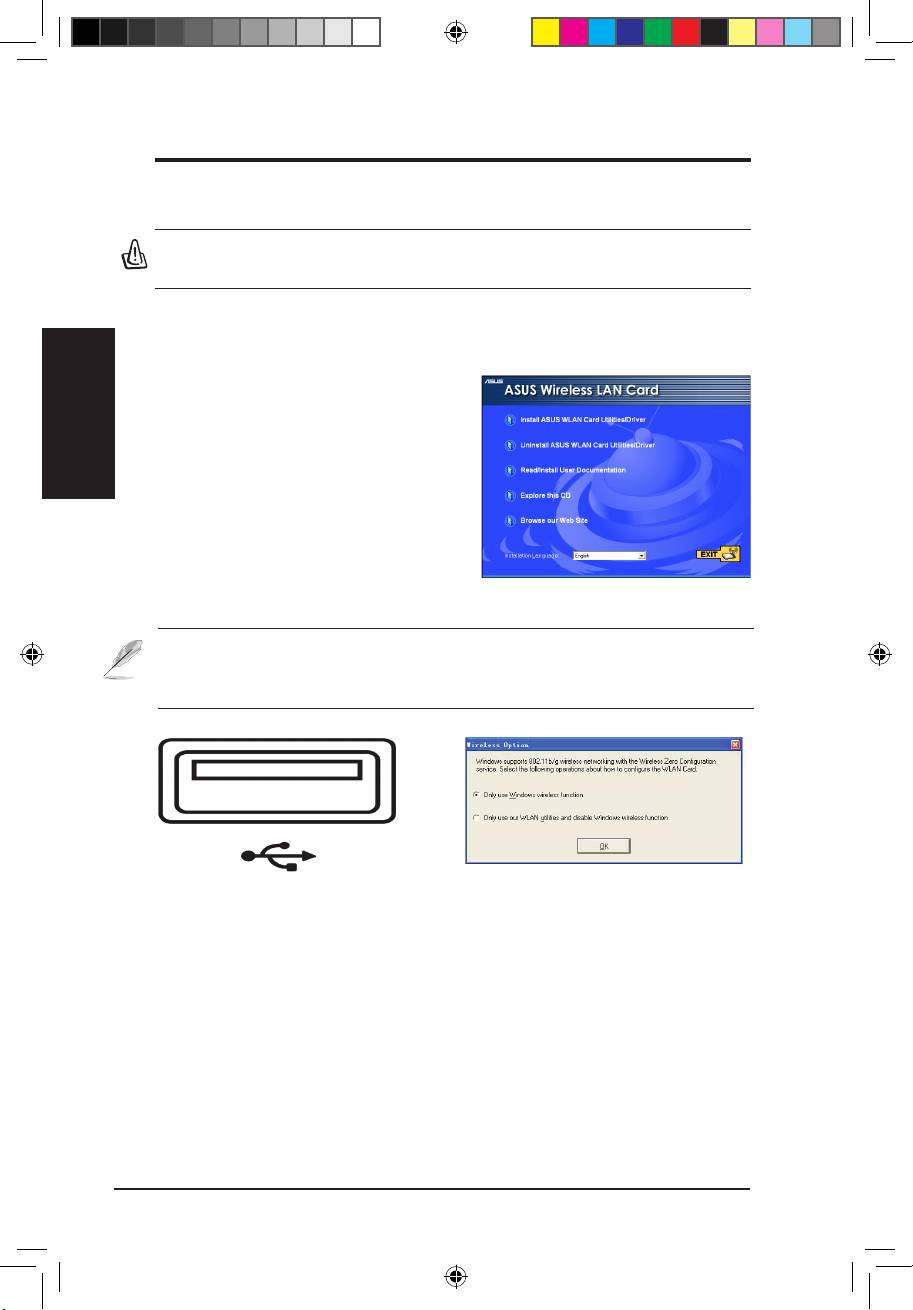
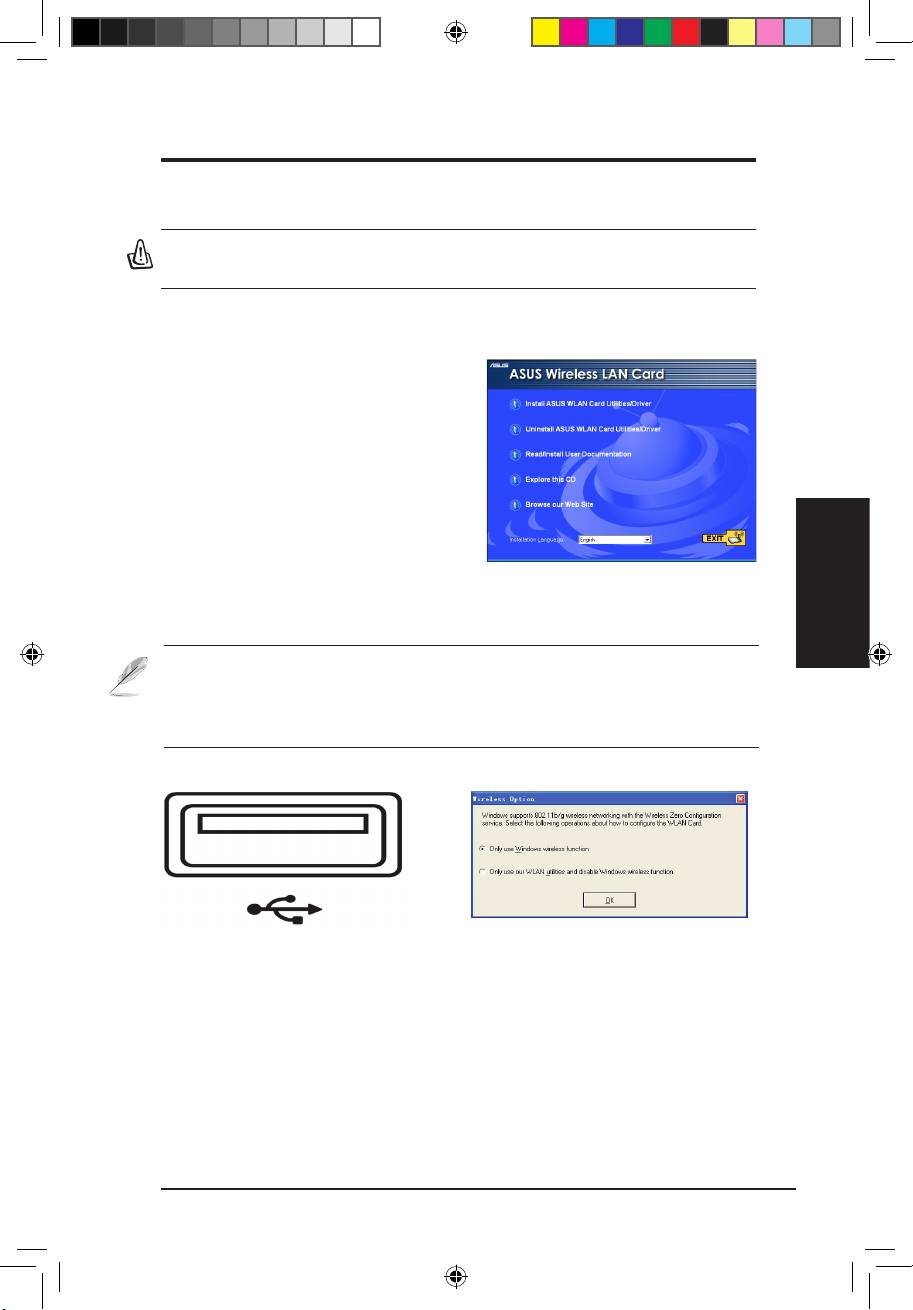
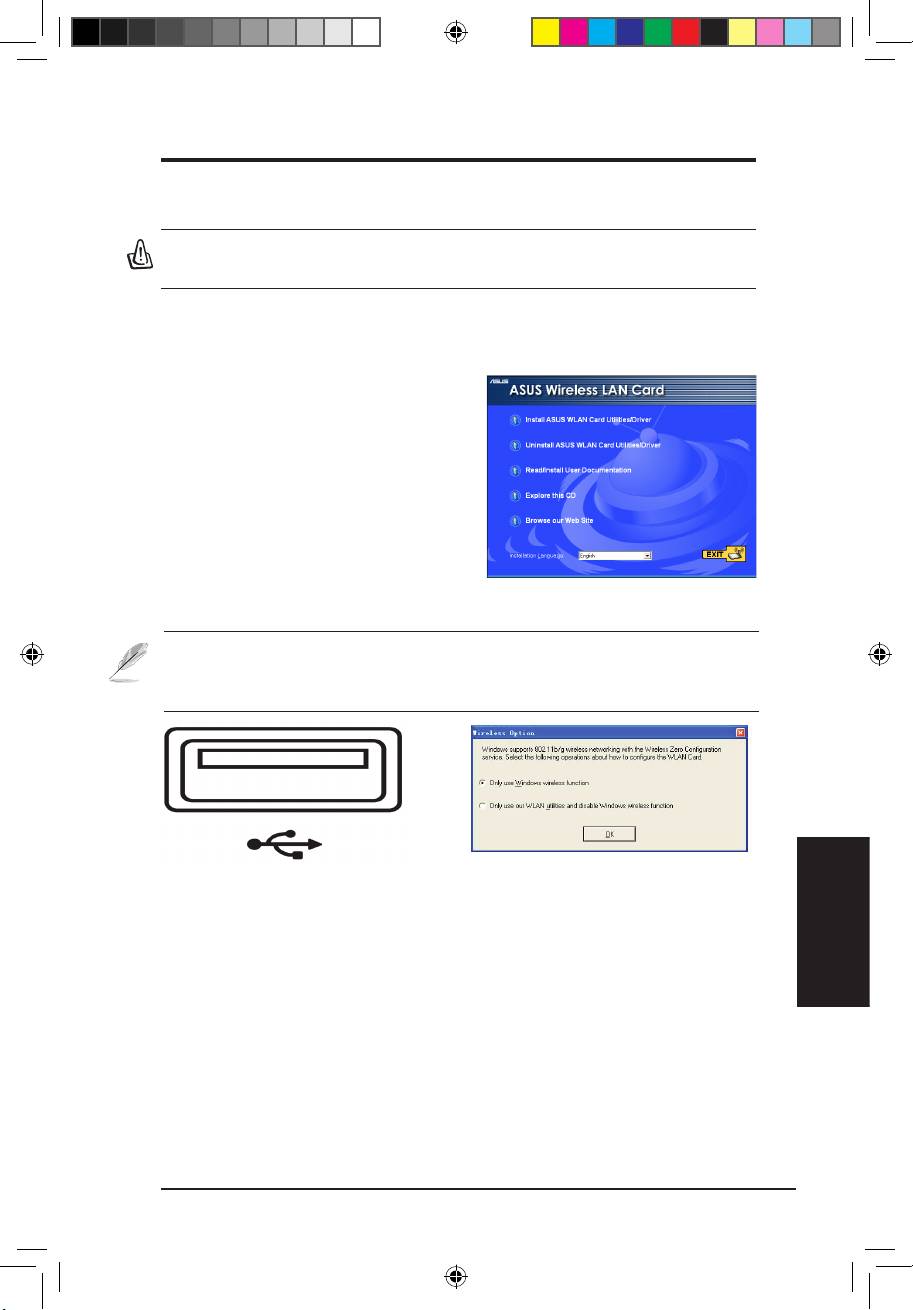
Installing the WLAN utilities and driver
Follow these instructions to install the
WLAN Adapter utilities and driver. Insert
the support CD into your optical drive.
If autorun is enabled in your computer,
the CD automatically displays the utilitymatically displays the utility
menu. Click
Install ASUS WLAN Card
Utilities/Driver
. If autorun is disabled,
double-click SETUP.EXE in the root
directory of the CD.
Note:ForMacuser,pleaseclickExplorethisCDtodownloadMacdriver
andutility.ThenfollowtheinstructionstoinstalltheWLANutilitiesand
driver.
Insert the WLAN Adapter into your
Windows XP users: When the program is
computer’s USB port using the correct
launched for the rst time (during Windows
orientation. Windows will automatically
restart), you are asked to choose one utility
detect and congure the WLAN Adapter
to congure the WLAN Adapter. Select "Only
using the utilities and drivers installed in the
use Windows wireless function".
previous steps.
ASUS WLAN Adapter 1
Q3739_USB-N11.indb 1 6/11/08 3:25:37 PM

QuickStartGuide
English
2 ASUS WLAN Adapter
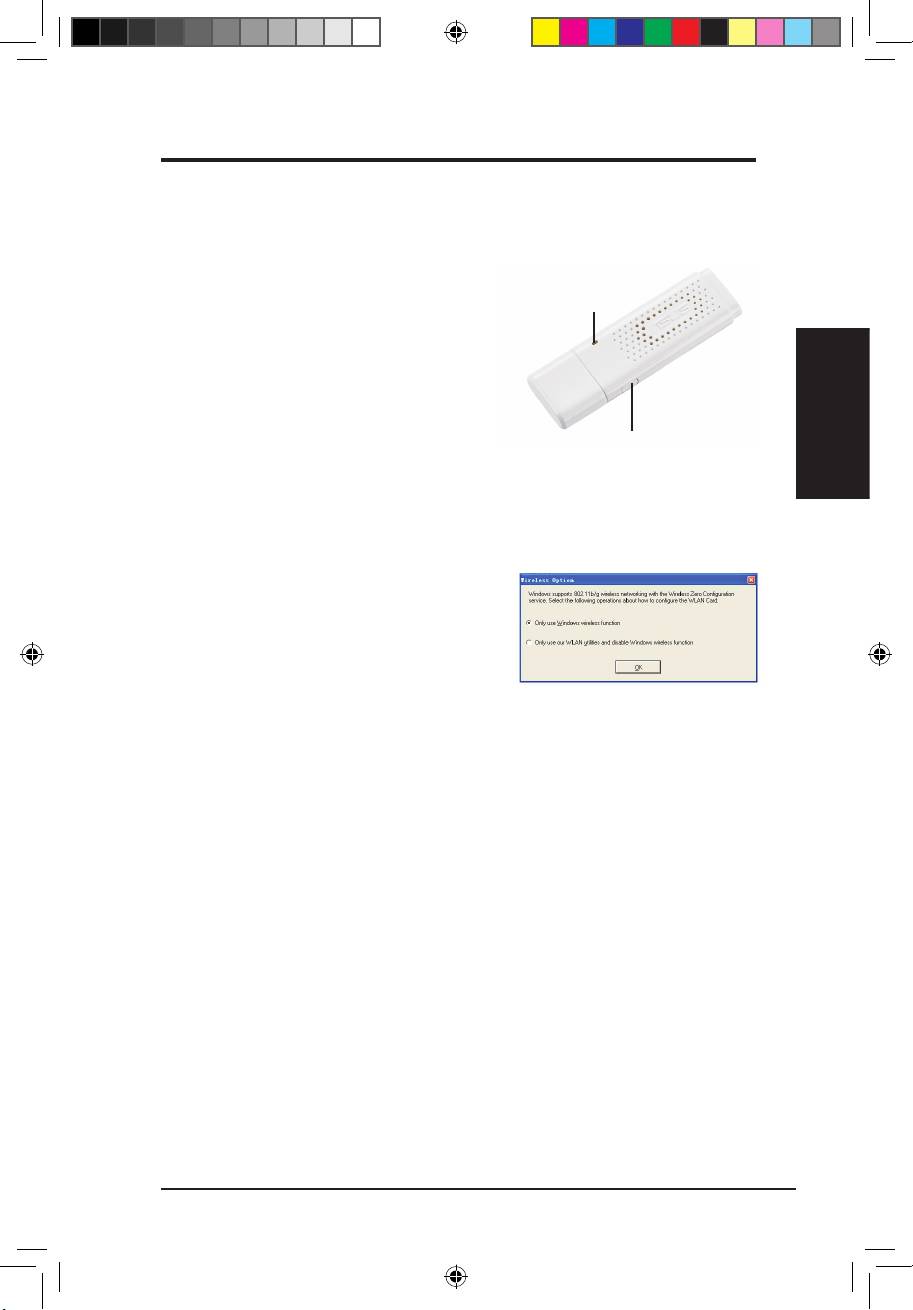
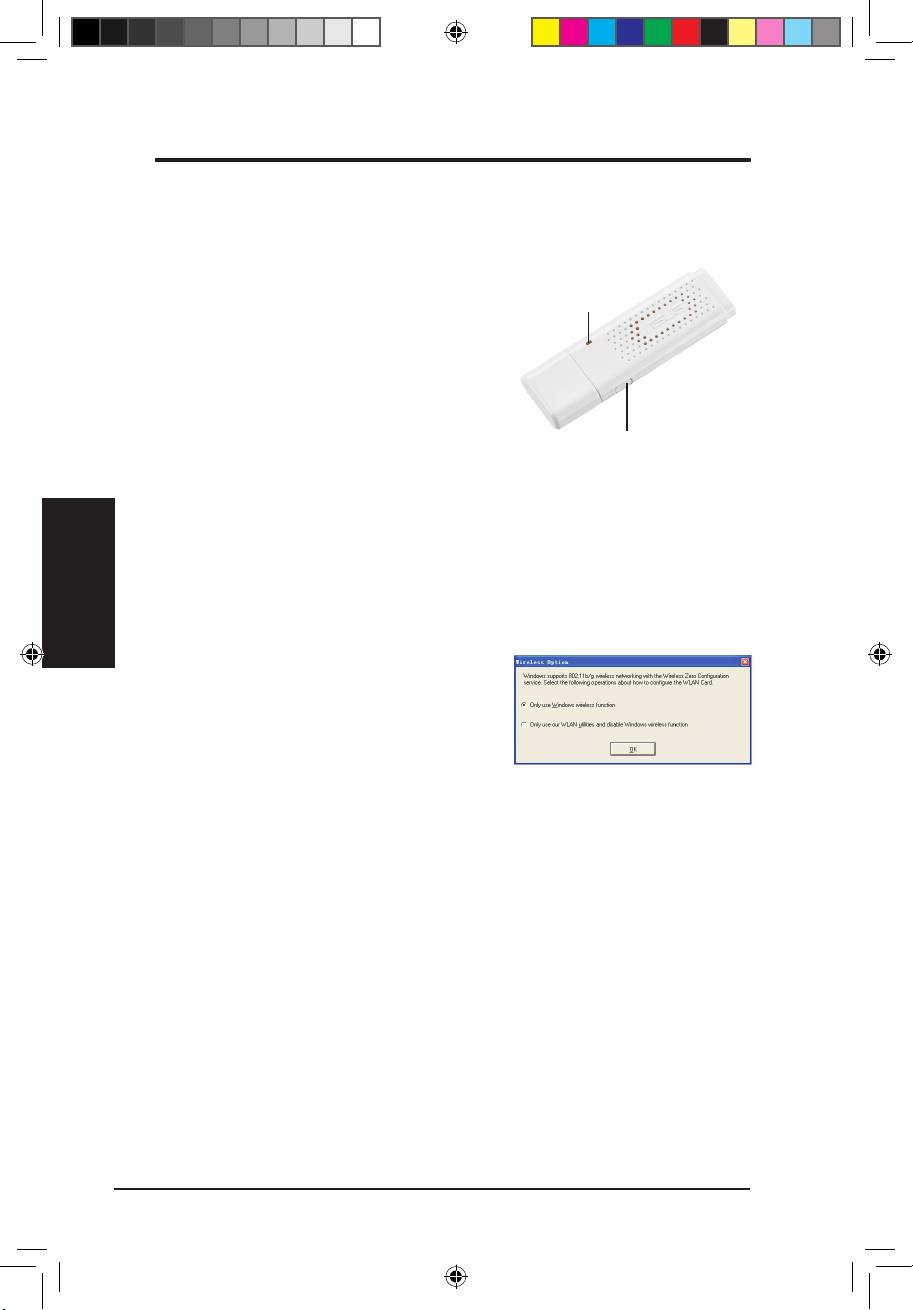
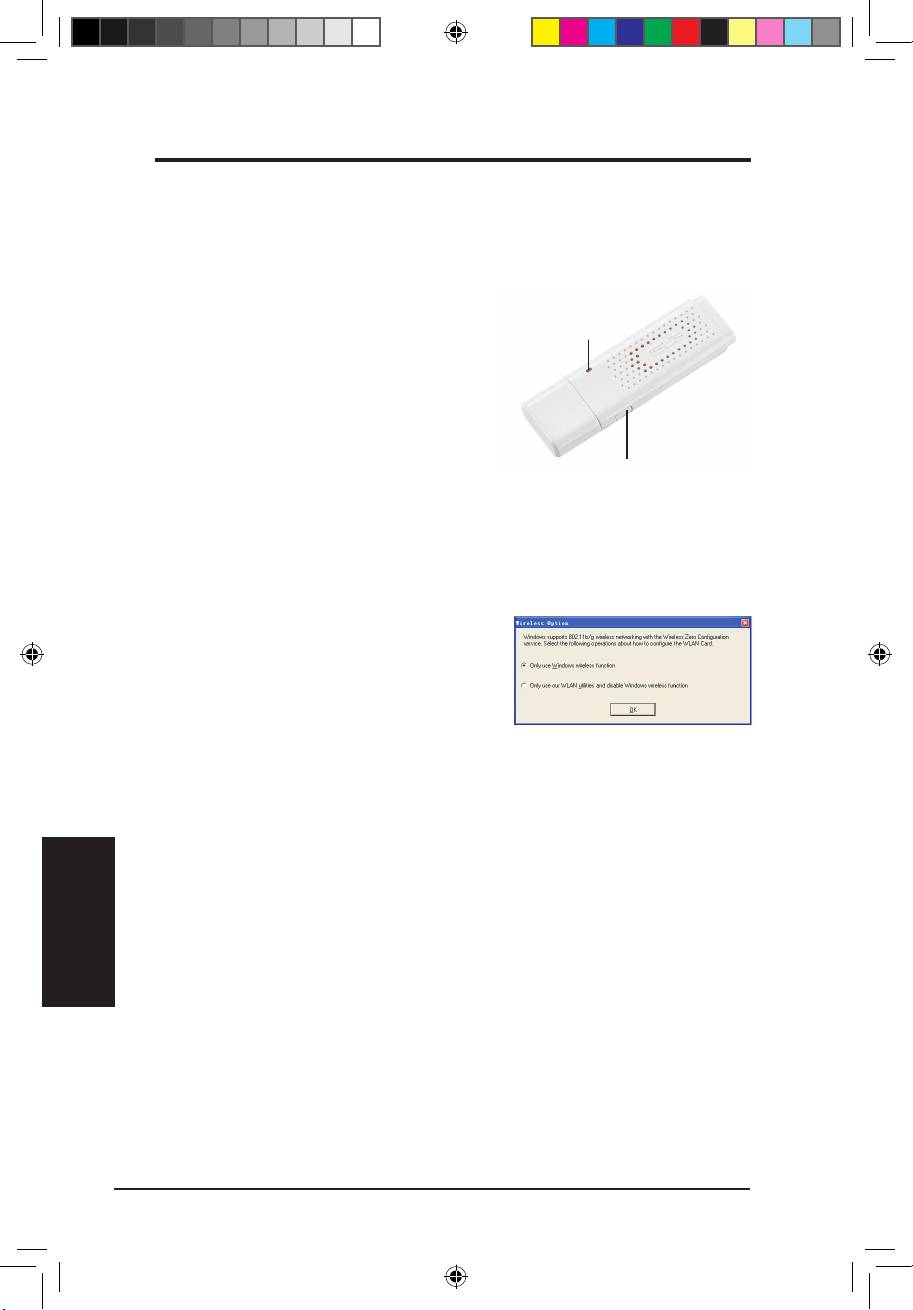
Reading the WLAN status indicators
The device comes with one LED to indicate the status of the WLAN Adapter,
and one button for WiFi protected setup (WPS).
LED
LED
ON:
Connected to wireless device.
Blinking:
Transmitting data; the
blinking speed indicates the link speed.
OFF:
Adapter is disabled.
Button
Button
WPS Push Button:
Enable WPS Push Button mode.
®
Windows
XP Wireless Options
The wireless options window shown below
®
is only available for Windows
XP. It appears
when you run the Control Center utility at the
rst time. Select the utility you want to use for
conguring your WLAN Adapter.
®
OnlyuseWindowswirelessfunction–
Only use Windows
XP Wireless
Zero Conguration service to congure the WLAN Adapter.
OnlyuseourWLANutilitiesanddisableXPwirelessfunction
–
Only use ASUS WLAN utilities to congure the WLAN Adapter.
Q3739_USB-N11.indb 2 6/11/08 3:25:39 PM
QuickStartGuide
English
ASUS WLAN Adapter 3
®
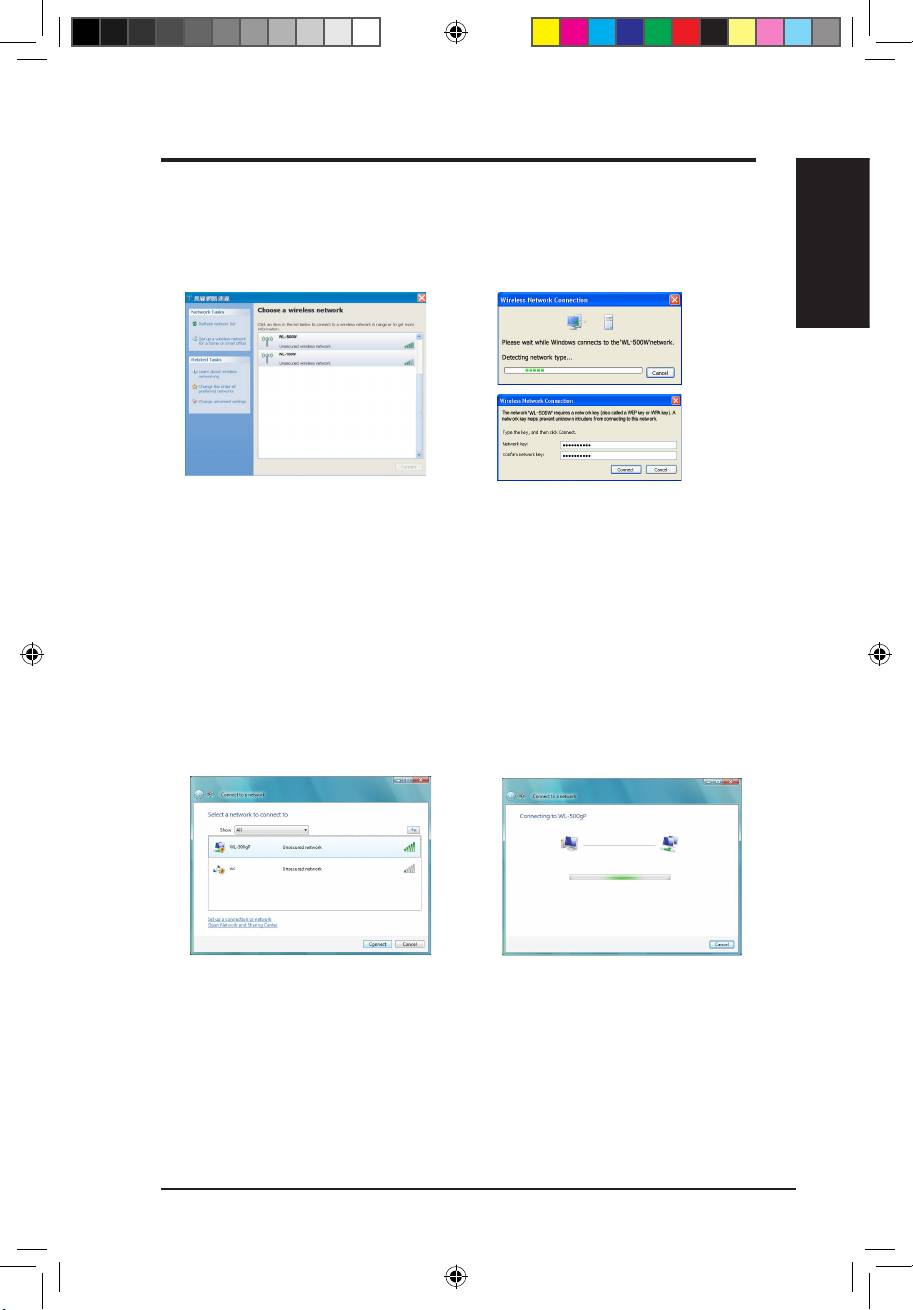
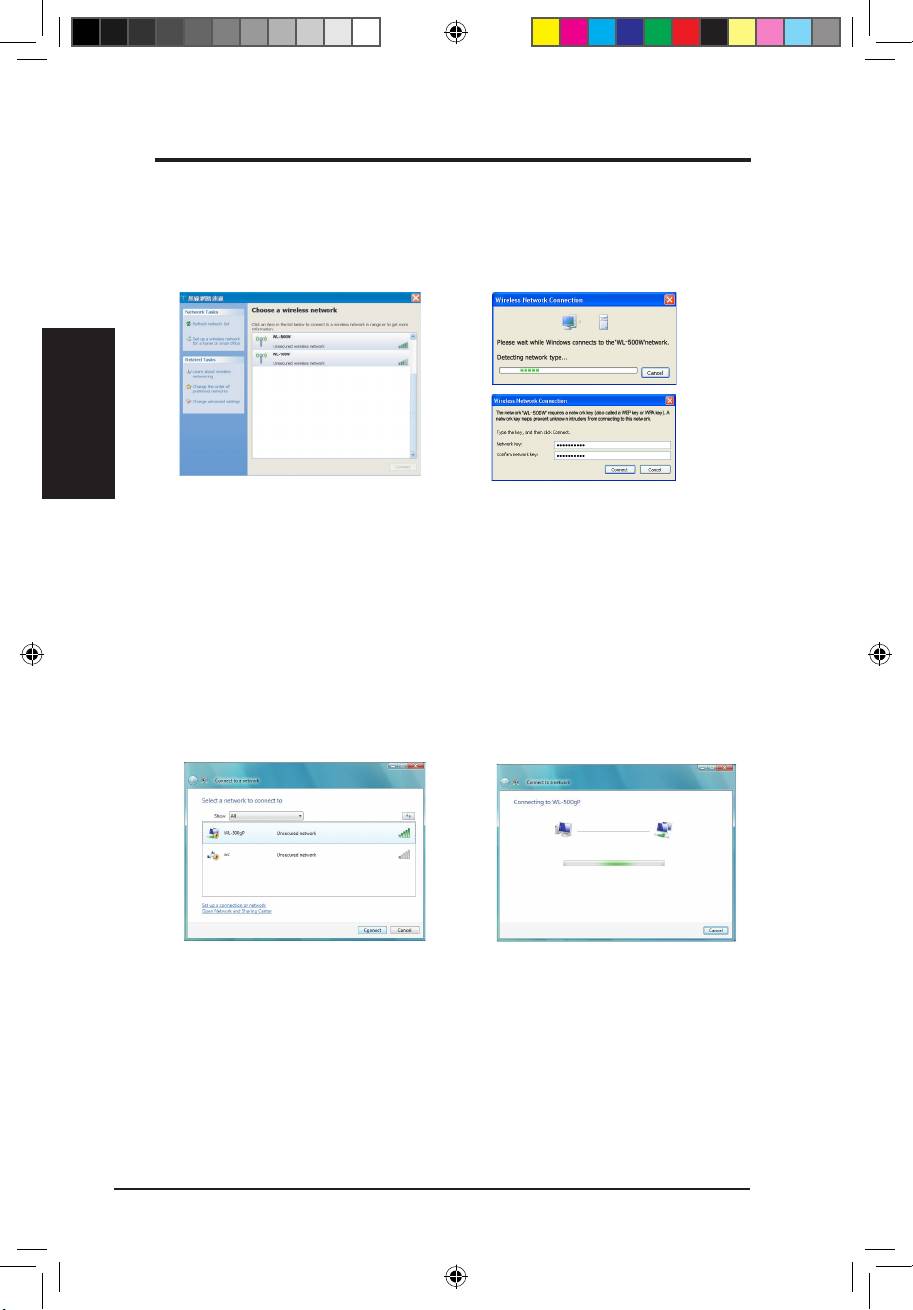
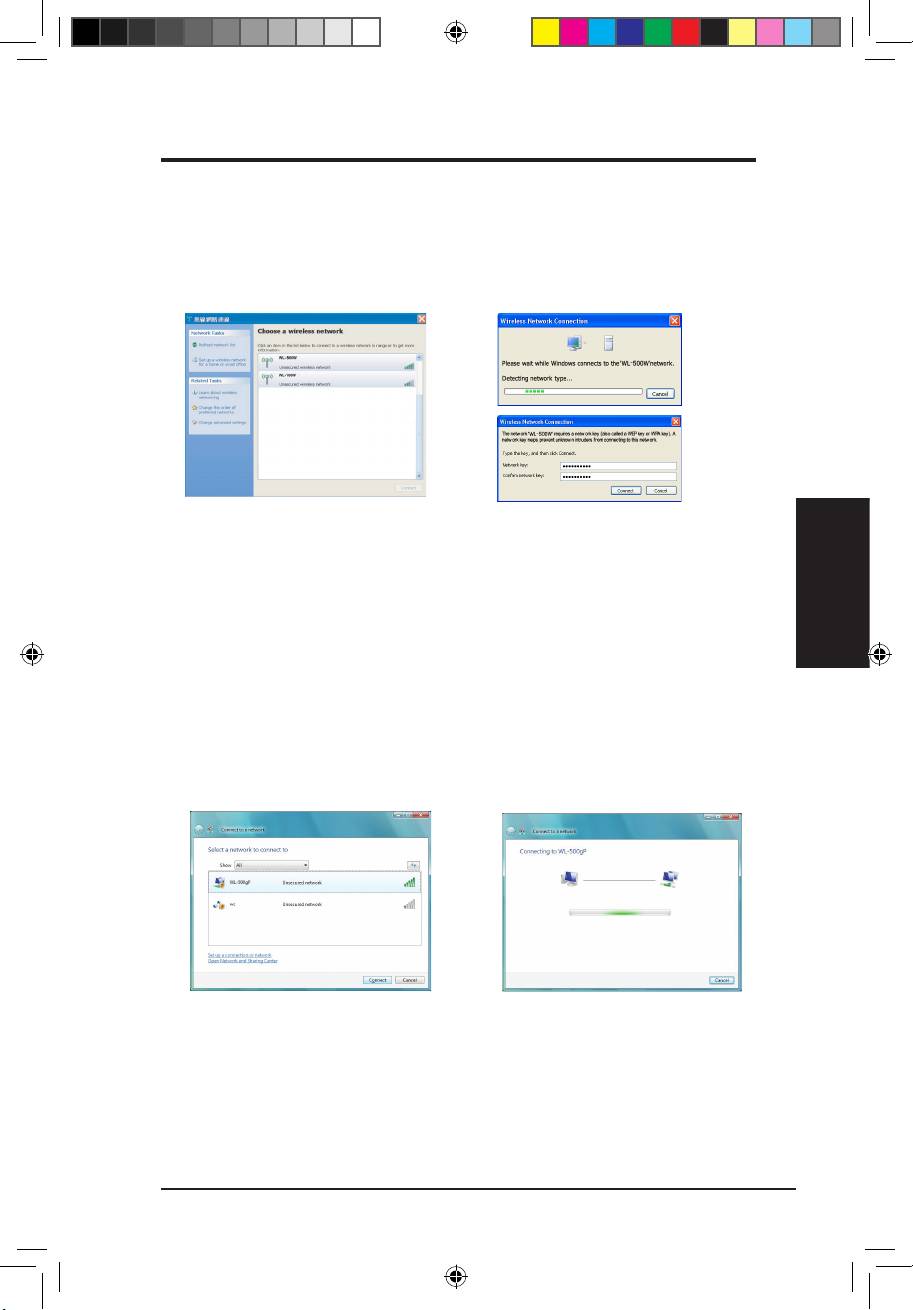
ConguringwithWindows
WirelessZeroCongurationservice
®
If you want to congure your WLAN Adapter via Windows
Wireless Zero
Conguration (WZC) service, follow the instruction below to make the settings.
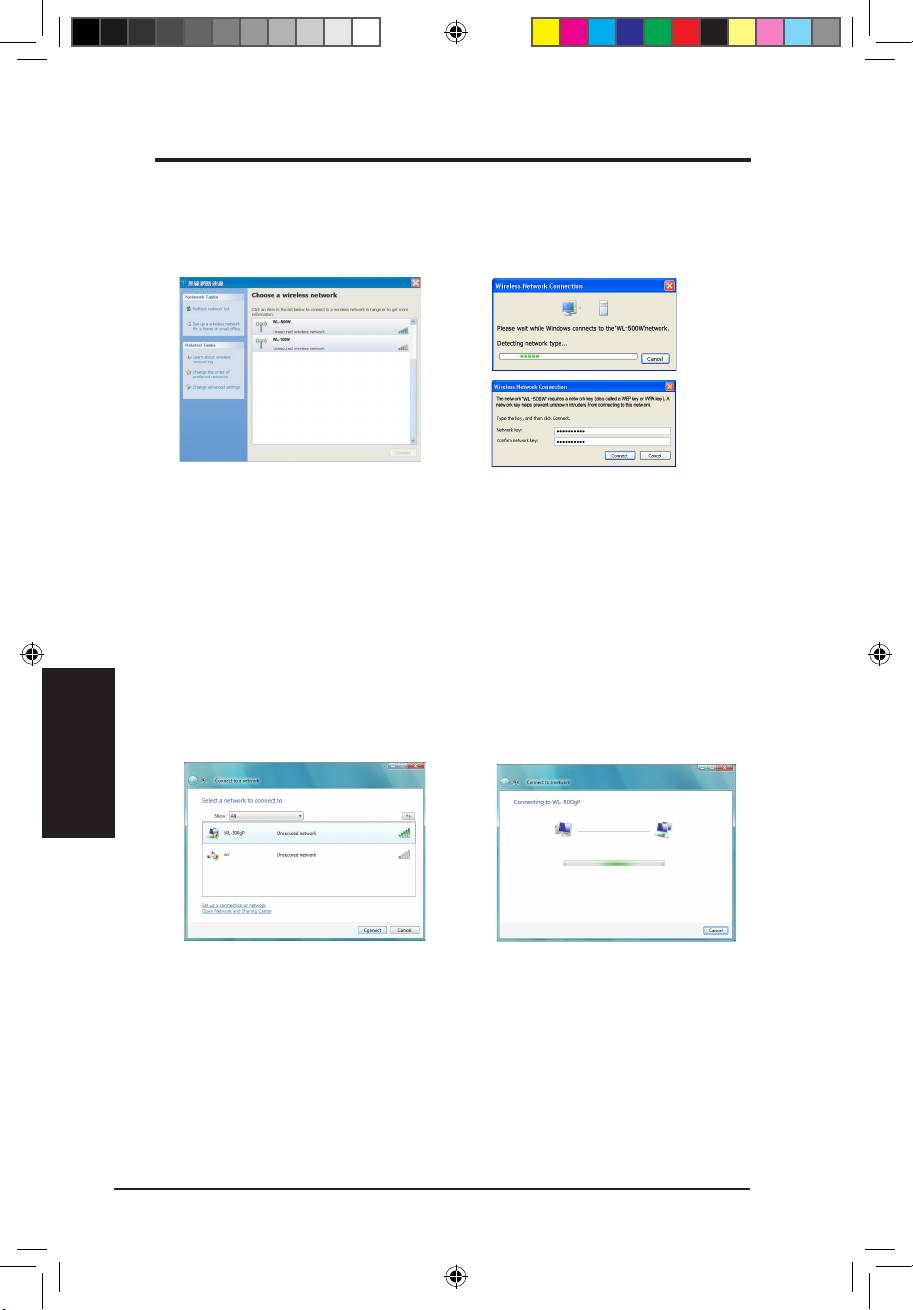
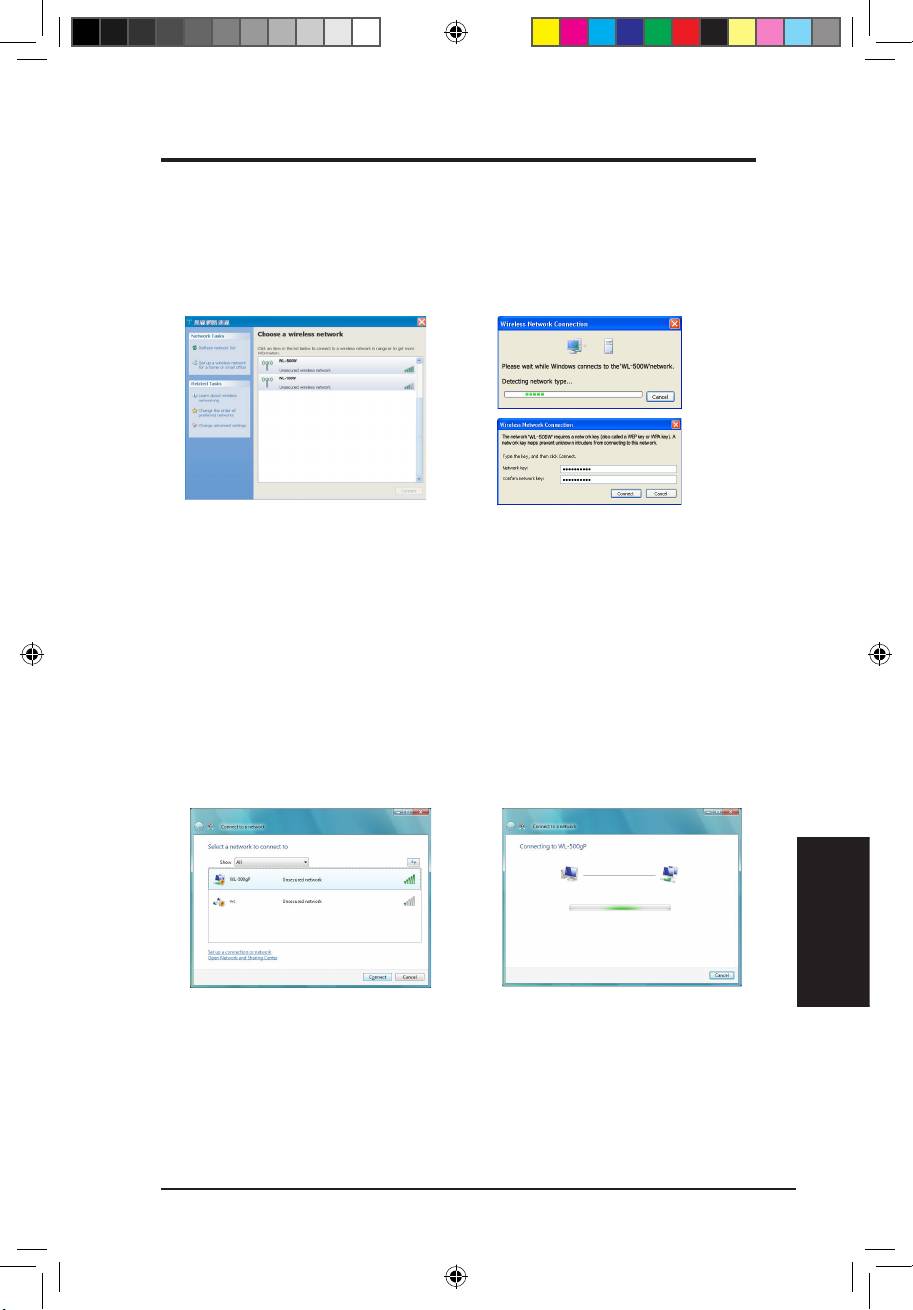
1. Double-click the wireless network
2. A window prompts out asking
icon on the task bar at the right
you for the key if you have set
bottom corner of the desktop to
up encryption on your wireless
view available networks.Select the
router, input the keys and click
AP and click
Connect
.
Connect
. The connection is
complete.
®
Windows
Vista Wireless Options
®
If you want to congure your WLAN Adapter via Windows
Wireless Client
service, follow the instruction below to make the settings.
1. Right-click the network icon on
2. A window prompts out asking
the task bar at the right bottom
you for the key if you have set
corner of the desktop. Then
up encryption on your wireless
select
Connecttoanetwork
to
router, input the keys and click
view available networks. Select
Connect
. The connection is
the AP and click
Connect
.
complete.
Q3739_USB-N11.indb 3 6/11/08 3:25:42 PM
QuickStartGuide
English
4 ASUS WLAN Adapter
FCC Warning Statement
This device complies with Part 15 of the FCC Rules. Operation is subject to the following two
conditions:
(1) this device may not cause harmful interference, and
(2) this device must accept any interference received, including interference that may cause
undesired operation.
This equipment has been tested and found to comply with the limits for a class B digital
device, pursuant to part 15 of the FCC Rules. These limits are designed to provide reasonable
protection against harmful interference in a residential installation.
This equipment generates, uses and can radiate radio frequency energy and, if not installed
and used in accordance with the instructions, may cause harmful interference to radio
communications. However, there is no guarantee that interference will not occur in a particular
installation. If this equipment does cause harmful interference to radio or television reception,
which can be determined by turning the equipment off and on, the user is encouraged to try to
correct the interference by one or more of the following measures:
- Reorient or relocate the receiving antenna.
- Increase the separation between the equipment and receiver.
- Connect the equipment into an outlet on a circuit different from that to which the receiver is
connected.
- Consult the dealer or an experienced radio/TV technician for help.
CAUTION:
Any changes or modications not expressly approved by the party responsible for compliance
could void the user’s authority to operate the equipment.
Prohibition of Co-location
This device and its antenna(s) must not be co-located or operating in conjunction with any other
antenna or transmitter
SafetyInformation
To maintain compliance with FCC’s RF exposure guidelines, this equipment should be installed
and operated with minimum distance 20cm between the radiator and your body. Use on the
supplied antenna.
DeclarationofConformityforR&TTEdirective1999/5/EC
Essential requirements – Article 3
Protection requirements for health and safety – Article 3.1a
Testing for electric safety according to EN 60950-1 has been conducted. These are considered
relevant and sufcient.
Protection requirements for electromagnetic compatibility – Article 3.1b
Testing for electromagnetic compatibility according to EN 301 489-1 and EN 301 489-17 has been
conducted. These are considered relevant and sufcient.
Effective use of the radio spectrum – Article 3.2
Testing for radio test suites according to EN 300 328- 2 has been conducted. These are considered
relevant and sufcient.
Q3739_USB-N11.indb 4 6/11/08 3:25:43 PM
QuickStartGuide
English
ASUS WLAN Adapter 5
CEMarkWarning
This is a Class B product, in a domestic environment, this product may cause radio interference, in
which case the user may be required to take adequate measures.
Operation Channels
Ch1~11 for N. America, Ch1~14 Japan, Ch1~13 Europe (ETSI)
Q3739_USB-N11.indb 5 6/11/08 3:25:44 PM
Кратко упътване за бърз старт
Български
6
ASUS WLAN адаптера
Инсталация
Важно: Поставете диска с инструментите на WLAN адаптера преди да свържете
WLAN адаптера с компютъра.
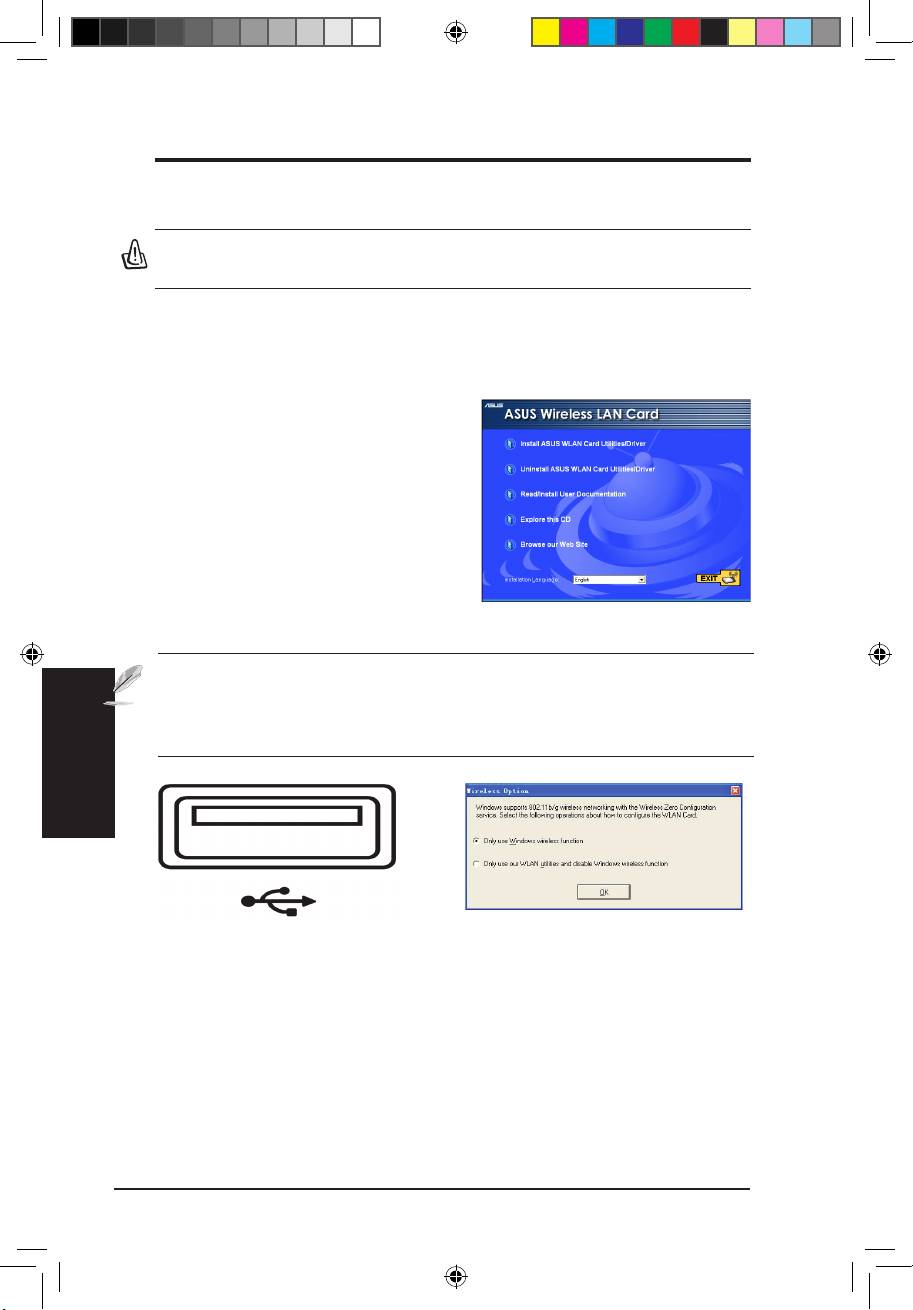
Инсталиране на WLAN инструменти и драйвер
Следвайте тези инструкции, за да инсталирате
инструментите и драйвера за WLAN адаптера.
Поставете диска с драйверите в четящото
устройство. Ако функцията autorun е активна,
дискът ще се зареди автоматично и ще видите
менюто с инструменти. Натиснете Install ASUS
WLAN Card Utilities/Driver. Ако функцията
autorun е деактивирана, натиснете с мишката
два пъти върху SETUP.EXE в главната
директория на диска.
Забележка: За потребители използващи Mac, моля натиснете Explore this CD, за
да свалите драйверите и инструментите за Mac. Следвайте тези инструкции, за да
инсталирате инструментите и драйвера за WLAN.
Поставете WLAN адаптера в USB порта
Потребители с Windows XP: Когато
на компютъра като внимавате посоката
стартирате програмата за пръв път (по
да е правилна. Windows автоматично ще
време на рестартиране на Windows), ще
открие и конфигурира WLAN адаптера като
имате възможност да изберете един
използва инструментите от предишните
инструмент, за да конфигурирате WLAN
стъпки.
адаптера. Изберете “Only use Windows
wireless function”.
Q3739_USB-N11.indb 6 6/11/08 3:25:47 PM
Кратко упътване за бърз старт
Български
ASUS WLAN адаптера
7
Разчитане на индикаторите за статус на WLAN
Устройството се предлага с един LED индикатор, който показва статуса на WLAN
адаптера и бутон за безопасна настройка на WiFi Protected Setup (WPS).
LED индикатор
LED
ВКЛЮЧЕН: Свързан с безжичното устройство.
Премигване: Предаване на данни,скоростта на
мигане показва скоростта на връзката.
ИЗКЛЮЧЕН: Адаптерът е деактивиран.
Бутон
Бутон
WPS бутон: Активира режим WPS.
®
Опции за безжична връзка в Windows
XP
Алтернативите посочени по-долу са налични
®
единствено за Windows
XP. Появяват се
единствено, когато стартирате инструмента Control
Center за пръв път. Изберете инструмента, който
желаете да използвате за конфигуриране на
WLAN адаптера.
Only use Windows wireless function (Използвайте само безжичната функция на
®
Windows) – Използвайте единствено услугата Windows
XP Wireless Zero Configuration
при конфигуриране на WLAN адаптера.
Only use our WLAN utilities and disable XP wireless function (Използвайте само нашите
WLAN инструменти и деактивирайте безжичната функция в XP) – Използвайте само
инструментите ASUS WLAN за конфигуриране на WLAN адаптера.
Q3739_USB-N11.indb 7 6/11/08 3:25:48 PM
Кратко упътване за бърз старт
®
Конфигуриране с помощта на услугата Windows
Wireless Zero Configuration
®
Ако искате да конфигурирате Вашия WLAN адаптер с помощта на услугата Windows
Wireless Zero Configuration (WZC), следвайте инструкциите по-долу.
Български
1. Натиснете иконата за безжични мрежи
2. Появява се прозорец, където трябва
намираща се на в долния десен ъгъл на
да въведете ключ, ако връзката
лентата с инструменти два пъти, за да
Ви е криптирана. Въведете ключа
видите наличните мрежи. Изберете AP
и натиснете Connect. Връзката е
и натиснете Connect.
създадена.
®
Опции за безжична връзка в Windows
Vista
®
Ако искате да конфигурирате Вашия WLAN адаптер с помощта на услугата Windows
Wireless Client, следвайте инструкциите по-долу.
1. С десния бутон на мишката
2. Появява се прозорец, където трябва
натиснете долния десен ъгъл на
да въведете ключ, ако връзката
лентата с инструменти. След това
Ви е криптирана. Въведете ключа
изберете Connect to a network,
и натиснете Connect. Връзката е
за да видите наличните мрежи.
създадена.
Изберете AP и натиснете Connect.
8
ASUS WLAN адаптера
Q3739_USB-N11.indb 8 6/11/08 3:25:51 PM
Stručnápříručka
Pokynyproinstalaci
Důležité:PředvloženímadaptéruWLANdopočítačenainstalujtenástroje
adaptéru WLAN.
InstalacenástrojůaovladačeadaptéruWLAN
Při instalaci nástrojů a ovladače adaptéru
WLAN postupujte podle následujících
pokynů. Vložte podpůrný disk CD
do optické jednotky. Je-li v počítači
aktivovaná funkce automatického
spouštění, automaticky se zobrazí
nabídka nástrojů na disku CD. Klepněte
na položku Install ASUS WLAN Card
Utilities/Driver (Instalovat nástroje/
ovladač adaptéru WLAN ASUS). Pokud
v počítači není aktivována funkce
automatického spouštění, poklepejte na
soubor SETUP.EXE v kořenovém adresáři disku CD.
Česky
Poznámka:UživateléoperačníhosystémuMacmohoustáhnoutovladača
nástrojMacklepnutímnapoložkuExplorethisCD(Prozkoumattentodisk
CD).PřiinstalacinástrojůaovladačeadaptéruWLANpotompostupujte
podlenásledujícíchpokynů.
Zasuňte adaptér WLAN do portu USB
Uživatelé operačního systému Windows
počítače ve správné orientaci. Operační
XP: Při prvním spuštění programu (během
systém Windows automaticky rozpozná
restartování operačního systému Windows)
adaptér WLAN a nakonguruje jej pomocí
budete vyzváni, abyste zvolili jeden nástroj
nástrojů a ovladačů nainstalovaných v
pro kongurování adaptéru WLAN. Vyberte
předchozích krocích.
možnost „Only use Windows wireless
function" (Použít pouze funkci bezdrátového
připojení systému Windows).
Adaptér WLAN ASUS 9
Q3739_USB-N11.indb 9 6/11/08 3:25:54 PM
Stručnápříručka
Česky
10 Adaptér WLAN ASUS
PopisstavovýchindikátorůWLAN
Toto zařízení je vybaveno jedním indikátorem LED, který ukazuje stav
adaptéru WLAN, a jedním tlačítkem pro režim WiFi Protected Setup (WPS).
IndikátorLED
Indikátor LED
SVÍTÍ:
Připojeno k bezdrátovému zařízení.
Bliká:
Přenášení dat; blikání ukazuje
rychlost spojení.
NESVÍTÍ:
Adaptér je deaktivován.
Tlačítko
Tlačítko
TlačítkoWPS:
Aktivuje režim tlačítka WPS.
Možnostipřipojeníkbezdrátovésítisystému
®
Windows
XP
Okno možností připojení k bezdrátové
síti uvedené níže je k dispozici pouze pro
®
operační systém Windows
XP. Zobrazí se
při prvním spuštění nástroje Control Center.
Vyberte nástroj, který chcete použít pro
kongurování adaptéru WLAN.
OnlyuseWindowswirelessfunction(Použítpouzefunkcibezdrátového
připojenísystémuWindows)– Ke konguraci adaptéru WLAN bude použita
pouze služba Automatické kongurace bezdrátových zařízení systému
®
Windows
XP.
OnlyuseourWLANutilitiesanddisableWindowswirelessfunction
(PoužítpouzenástrojeWLANadeaktivovatfunkcibezdrátovéhopřipojení
systémuWindows)–Ke konguraci adaptéru WLAN budou použity pouze
nástroje ASUS WLAN.
Q3739_USB-N11.indb 10 6/11/08 3:25:56 PM
Stručnápříručka
Česky
Adaptér WLAN ASUS 11
KongurovánípomocíslužbyAutomatickékongurace
®
bezdrátovýchzařízenísystémuWindows
Chcete-li adaptér WLAN kongurovat pomocí služby Automatické kongurace
®
bezdrátových zařízení systému Windows
(WZC), postupujte podle
následujících pokynů.
1. Poklepáním na ikonu
2. Zobrazí se okno s výzvou
bezdrátové sítě na hlavním
k zadání klíče (pokud
panelu zobrazte dostupné
jste nastavili šifrování na
bezdrátovém směrovači).
sítě. Vyberte přístupový bod a
Zadejte klíče a klepněte na
klepněte na tlačítko
Connect
tlačítko
Connect
(Připojit).
(Připojit).
Spojení je dokončeno.
Možnostipřipojeníkbezdrátovésítisystému
®
Windows
Vista
®
Chcete-li adaptér WLAN kongurovat pomocí služby Windows
Wireless
Client, při nastavení postupujte podle následujících pokynů.
1. Klepněte pravým tlačítkem
2. Zobrazí se okno s výzvou
myši na ikonu sítě na hlavním
k zadání klíče (pokud
panelu v pravém dolním
jste nastavili šifrování na
bezdrátovém směrovači).
rohu pracovní plochy. Potom
Zadejte klíče a klepněte na
výběrem položky
Connect
tlačítko Connect(Připojit).
toanetwork(Připojitksíti)
Spojení je dokončeno.
zobrazte dostupné sítě. Vyberte
přístupový bod a klepněte na
tlačítko
Connect(Připojit).
Q3739_USB-N11.indb 11 6/11/08 3:25:59 PM
Snelle startgids
Nederlands
12 ASUS WLAN-adapter
Installatieprocedures
Belangrijk:installeerdehulpprogramma’svandeWLAN-adaptervoordat
udeWLAN-adapteraansluitopuwcomputer.
Installatievandehulpprogramma’senhet
stuurprogramma voor de WLAN-adapter
Volg deze instructies om de
hulpprogramma’s en het
stuurprogramma van de WLAN-adapter
te installeren.Plaats de meegeleverde cd
in de cd-speler. Is uw computer ingesteld
om de cd automatisch te starten, dan
verschijnt het menu automatisch.
Klik op Install ASUS WLAN Card
Utilities/Drive. Verschijnt het menu niet,
dubbelklik dan in de hoofdmap van de cd
op SETUP.EXE op de cd.
Opmerking:VoorMac-gebruikers:klikopdezecdopExplore(Verkennen)
omhetMac-stuurprogrammaen-hulpprogrammatedownloaden.Volg
daarnadeinstructiesomdeWLAN-hulpprogramma’senhetWLAN
stuurprogrammate installeren.
Plaats de WLAN-adapter in de juiste
Gebruikers van Windows XP: Wanneer het
richting in de USB-poort van uw
programma voor het eerst gestart wordt
computer. Windows zal de WLAN-adapter
(na het herstarten van Windows), wordt u
automatisch detecteren en congureren
gevraagd een hulpprogramma te kiezen
met behulp van de hulpprogramma’s en het
voor de conguratie van de WLAN-adapter.
stuurprogramma die u in de vorige stappen
Selecteer de optie “Only use Windows
hebt geïnstalleerd.
wireless function” (Alleen de draadloze
functie van Windows gebruiken).
Q3739_USB-N11.indb 12 6/11/08 3:26:03 PM

Snelle startgids
Nederlands
ASUS WLAN-adapter 13
DebetekenisvandeWLAN-statusindicatoren
Het apparaat is voorzien van een LED om de status van de WLAN-adapter
aan te geven en een knop voor WPS (WiFi Protected Setup = WiFi-
beveiligde instelling)
LED
LED
AAN:
aangesloten op het draadloze
apparaat.
Knipperend:
bezig met verzenden van
gegevens. De knippersnelheid geeft de
verbindingssnelheid aan.
Knop
UIT:
adapter uitgeschakeld.
Knop
WPS-drukknop:
de WPS-drukknopmodus inschakelen.
®
Windows
XP draadloze opties
Het venster met draadloze opties, hieronder
®
getoond, is alleen beschikbaar in Windows
XP. Het verschijnt als u het Control Center voor
het eerst start. Selecteer het hulpprogramma
dat u wilt gebruiken voor de conguratie van
uw WLAN-adapter.
OnlyuseWindowswirelessfunction(Alleen de draadloze functie van
Windowsgebruiken)–
Gebruik alleen de Wireless Zero Conguration-service
®
van Windows
XP om de WLAN-adapter te congureren.
OnlyuseourWLANutilitiesanddisableWindowswirelessfunction
(AlleenonzeWLAN-hulpprogramma’sgebruikenendedraadlozeXP-
functie deactiveren)–
Gebruik alleen de WLAN-hulpprogramma’s van ASUS
om de WLAN-adapter te congureren.
Q3739_USB-N11.indb 13 6/11/08 3:26:04 PM
Snelle startgids
®
CongurerenmetWindows
WirelessZeroCongurationservice
Als u uw WLAN-adapter wilt congureren via de Wireless Zero
®
Conguration-service (WZC) van Windows
, ga dan als volgt te werk.
1. Dubbelklik op het draadloze
2. Er verschijnt een venster dat
netwerkpictogram op de
u vraagt om de sleutel als u
taakbalk om de beschikbare
de draadloze router voorzien
netwerken te zien. Selecteer
hebt van encryptie. Geef de
het AP en klik op
Connect
sleutels op en klik op
Connect
(Verbinden)
.
(Verbinden)
. De verbinding is
tot stand gekomen.
®
DraadlozeoptiesWindows
Vista
Nederlands
Als u uw WLAN-adapter wilt congureren via de draadloze clientservice van
®
Windows
volgt u de onderstaande instructies om de instellingen op te geven.
1. Klik met de rechtermuisknop
2. Er verschijnt een venster dat u
op het netwerkpictogram in
vraagt om de sleutel als u de
de hoek rechtsonder op de
draadloze router voorzien hebt
taakbalk van het bureaublad.
van encryptie. Geef de sleutels
Selecteer vervolgens
Connect
op en klik op
Connect(Verbin-
toanetwork(Verbinden
den)
. De verbinding is tot stand
meteennetwerk)
om de
gekomen.
beschikbare netwerken weer te
geven. Selecteer het AP en klik
op
Connect(Verbinden)
.
14 ASUS WLAN-adapter
Q3739_USB-N11.indb 14 6/11/08 3:26:08 PM
Lühijuhend
Installitoimingud
Oluline: Installige traadita võrguadapteri utiliitidega CD enne traadita
võrguadapteri sisestamist oma arvutisse.
WLANutiliitidejadraiveriinstallimine
Järgige neid juhiseid traadita
võrguadapteri ja draiveri installimiseks.
Sisestage optilisse draivi tugi-CD. Kui
funktsioon autorun on arvutis lubatud,
kuvab CD automaatselt utiliitide menüü.
Klõpsake käsku
Install ASUS WLAN
CardUtilities/Driver(InstalliASUS
WLANkaardiutiliidid/draiver)
. Kui
funktsioon autorun on keelatud, siis
klõpsake faili SETUP.EXE juurkataloogis CD-l.
Märkus:Mac:klõpsakekäskuExplorethisCD(UurisedaCD-d),etlaadida
allaMacidraiverjautiliit.Seejäreljärgigejuhiseidtraaditavõrguadapteri
utiliitidejadraiveriinstallimiseks.
Sisestage traadita võrguadapter arvuti
Windows XP: Kui programm käivitatakse
USB porti, veendudes, et selle suund on
esimest korda (Windowsi taaskäivitamisel),
õige. Windows tuvastab ja kongureerib
palutakse teil valida üks utiliit traadita
Eesti
automaatselt traadita võrguadapteri,
võrguadapteri kongureerimiseks. Valige
kasutades eelmistes sammudes installitud
määrang “Only use Windows wireless
utiliite ja draivereid.
function” (Kasutage ainult Windowsi WiFi-
funktsiooni)
ASUS WLAN Adapter 15
Q3739_USB-N11.indb 15 6/11/08 3:26:11 PM
Lühijuhend
Eesti
16 ASUS WLAN Adapter
WLANolekuindikaatoritelugemine
See seade on varustatud LED indikaatoriga, mis näitab traadita
võrguadapteri olekut, ja nupuga WPS (WiFi-kaitstud häälestus).
LEDindikaator
LED indikaator
SEES:
ühendus traadita seadmega.
Vilkuv:
andmete edastamisel osutab
vilkumiskiirus ühenduskiirusele.
OFF(VÄLJAS):
võrguadapter on
keelatud.
Nupp
Nupp
WPS surunupp:
lubab režiimi WPS Push Button (WPS surunupp).
®
Windows
XP traadita suvandid
Allpool toodud traadita suvandite aken on
®
saadaval ainult Windows
XP-s. See ilmub
siis, kui te esmakordselt käivitate rakenduse
Control Center (Juhtkeskus). Valige utiliit,
mida soovite kasutada traadita võrguadapteri
kongureerimiseks.
KasutageainultWindowsitraaditafunktsiooni(OnlyuseWindows
wirelessfunction)–
Kasutage traadita võrguadapteri kongureerimiseks ainult
®
®
teenust Windows
XP Wireless Zero Conguration (Windows
XP traadita
nullkonguratsioon).
KasutageainultWLANutiliitejakeelakeXPtraaditafunktsioon(Onlyuse
ourWLANutilitiesanddisableWindowswirelessfunction)–
Kasutage
ainult ASUS WLAN utiliite, et kongureerida traadita võrguadapterit.
Q3739_USB-N11.indb 16 6/11/08 3:26:13 PM
Lühijuhend
Eesti
ASUS WLAN Adapter 17
®
KongureerimineteenusegaWindows
Wireless Zero
®
Conguration(Windows
traaditanullkonguratsioon)
®
Kui soovite kongureerida traadita võrguadapterit teenuse Windows
Wireless
Zero Conguration (Windows XP traadita nullkonguratsioon – WZC) kaudu,
siis järgige sätete tegemisel alltoodud juhiseid.
1. Topeltklõpsake traadita võrgu
2. Avaneb aken, mis palub
ikooni tegumiribal töölaua
sisestada võtme, mille te
parempoolses alanurgas kõigi
määrasite traadita ruuteri
saadavalolevate võrkude
häälestamisel; sisestage võti ja
kuvamiseks. Valige AP ja
klõpsake käsku
Connect(Loo
klõpsake käsku
Connect(Loo
ühendus)
. Ühenduse loomine
ühendus)
.
on lõpule viidud.
®
Windows
Vista traadita suvandid
®
Kui soovite kongureerida traadita võrguadapterit teenuse Windows
Wireless Client (Windowsi traadita klient) kaudu, siis järgige sätete
häälestamiseks alltoodud juhiseid.
1. Paremklõpsake võrgu ikooni
2. Avaneb aken, mis palub
tegumiribal töölaua parempoolses
sisestada võtme, mille te
alanurgas. Seejärel valige käsk
määrasite traadita ruuteri
Connecttoanetwork(Loo
häälestamisel; sisestage võti ja
ühendus võrguga)
, et kuvada
klõpsake käsku
Connect(Loo
saadavalolevad võrgud. Valige AP
ühendus)
. Ühenduse loomine
ja klõpsake käsku
Connect(Loo
on lõpule viidud.
ühendus)
.
Q3739_USB-N11.indb 17 6/11/08 3:26:15 PM
