Asus WL-HDD2.5: instruction
Class: Computer Accessories
Type:
Manual for Asus WL-HDD2.5
Table of contents
- Contents
¨
WL-HDD2.5
English
Contents
Getting Started With Your WL-HDD2.5 .......................................... 2
Benefits of the WL-HDD2.5....................................................... 2
Before Installing ........................................................................ 2
System Requirements.................................................................... 3
Power Requirements...................................................................... 3
Package List................................................................................... 3
Setting up the WL-HDD2.5............................................................. 4
Installing a Hard Drive............................................................... 4
Making the Connections ........................................................... 5
Accessing the Configuration Web Page ................................... 6
Formatting a New Hard Disk Drive ........................................... 7
Status Indicators ....................................................................... 8
Setting up a File and FTP Servers ................................................. 9
Adding Users ............................................................................ 9
Adding Shares and Applying Permissions .............................. 10
Sharing Files ............................................................................11
Enabling Access to the Hard Disk Drive....................................... 12
Using the Auto-Copy Function ..................................................... 13
Auto-Copy Function ................................................................ 13
Shutting Down the WL-HDD2.5 ................................................... 14
ASUS 802.11g WL-HDD2.5 1

Getting Started With Your WL-HDD2.5
English
Thank you for purchasing the ASUS WL-HDD2.5. This device is a wireless
local area network (WLAN) hard disk drive with additional Access Point
(AP) functionality which can be adapted for wired environments for data
storage.
By utilizing the Access Point functionality of the ASUS WL-HDD2.5, PC
users are able to stay connected to the network anywhere throughout a
building without being bound by LAN cables.
Benefits of the WL-HDD2.5
Access Point (AP)
When hooked up to a LAN using a network cable, the WL-HDD2.5 becomes
an AP for wireless devices such as PDAs, to gain access to the Internet.
Network Storage
Whether the ASUS WL-HDD2.5 is set up as an AP or not, it has an additional
advantage in that it provides network storage with its hard disk drive, enabling
you to share information and storage capacity through a WLAN.
Auto-Copy
The ASUS WL-HDD2.5 also supports automatic copying of files from a
flash memory disk to the hard disk drive.
Before Installing
Warning: The ASUS WL-HDD2.5 is not hot-swappable. Make sure that it is turned
OFF and not connected to the power outlet when installing a hard disk drive.
Note: It is the responsibility of the installer and users of the ASUS WL-HDD2.5 to
ensure that the antenna is operated at least 20 cm (8 inch) from any person.
2 ASUS 802.11g WL-HDD2.5

System Requirements
To begin using the ASUS WL-HDD2.5, your system must have the following
minimum requirements:
English
• An Ethernet (10BaseT or 10/100BaseT) adapter for wired clients
• At least one 802.11g (54Mbps) or one 802.11b (11Mbps) wireless
adapter for wireless mobile clients
• TCP/IP and an Internet browser
• Recommended OS: Windows 2000 or Windows XP
Power Requirements
The ASUS WL-HDD2.5 requires power from an external power supply.
Your package ships with a 5V, 2A power adapter. Use only the power adapter
provided for safe operation.
Package List
Your package contains the following items:
• ASUS WL-HDD2.5
• 2.4 GHz dipole antenna
• Power adapter (5 Volts DC, 2 Amp)
• RJ-45 Ethernet cable (straight-through)
• Quick start guide
• Support CD (utilities and user’s manual)
ASUS 802.11g WL-HDD2.5 3
Setting up the WL-HDD2.5
English
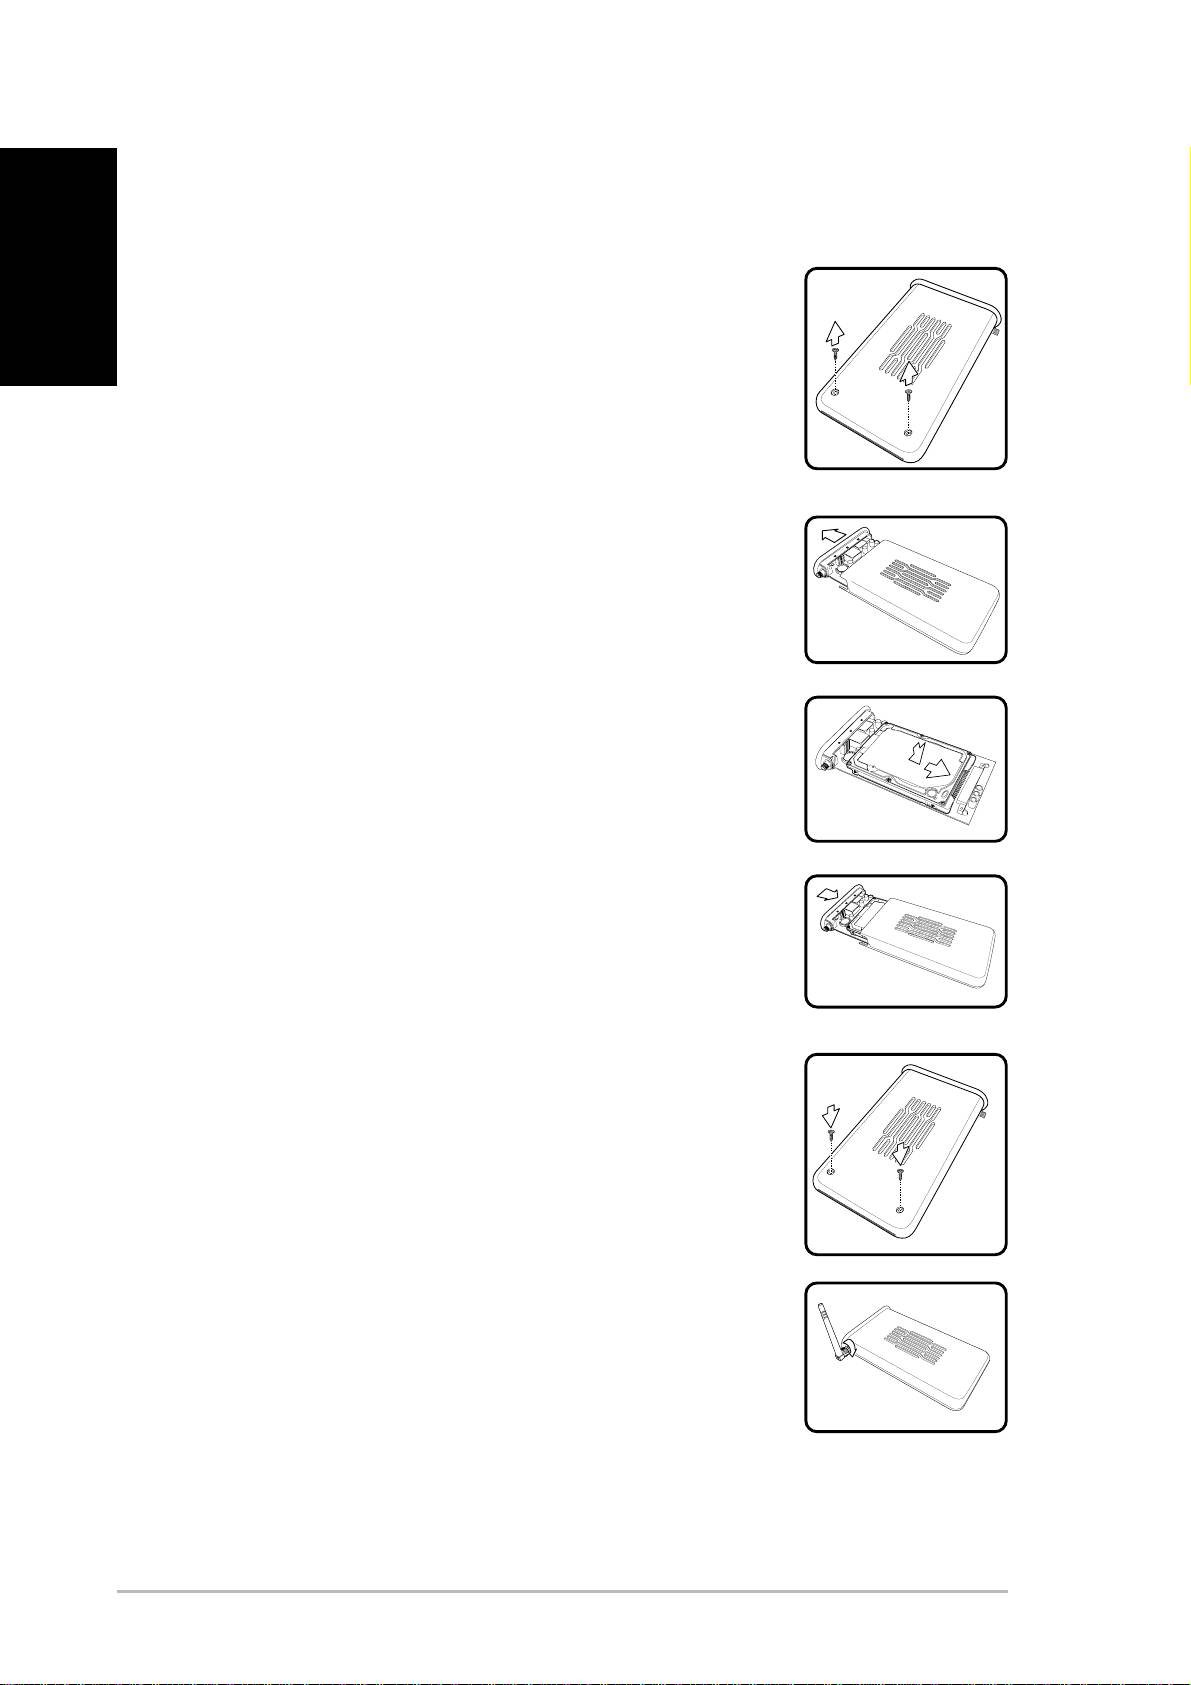
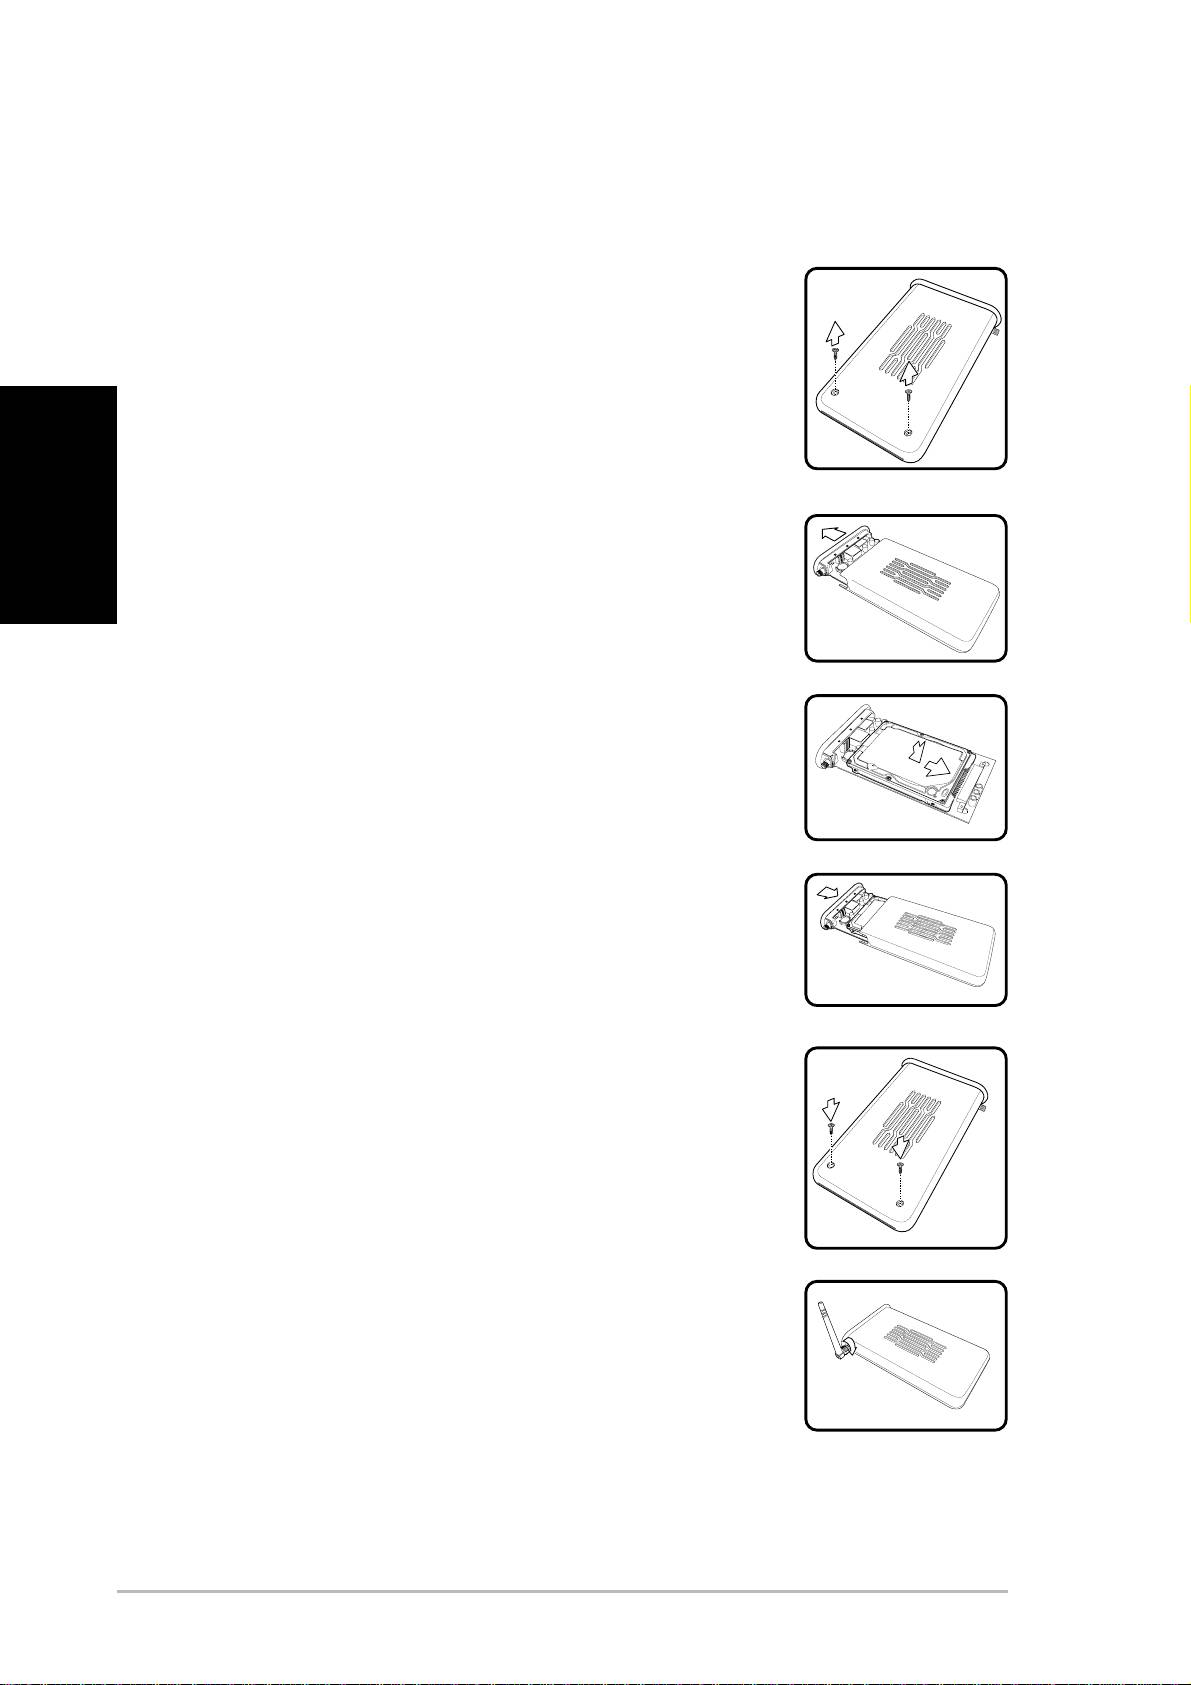
Installing a Hard Drive
Follow these steps to insert the hard disk and assemble
the device before using it.
1. Remove the screws from the bottom.
2. Remove the internal circuit board by pulling
the front panel cover in the direction of the
arrow.
3. Insert the hard drive into the slot. Make sure
that the hard drive connecting pins and the
connector are properly aligned.
4. Replace the front panel cover if required and
insert the circuit board back inside the casing.
5. Replace the screws.
6. Attach the external antenna for improved
performance.
4 ASUS 802.11g WL-HDD2.5
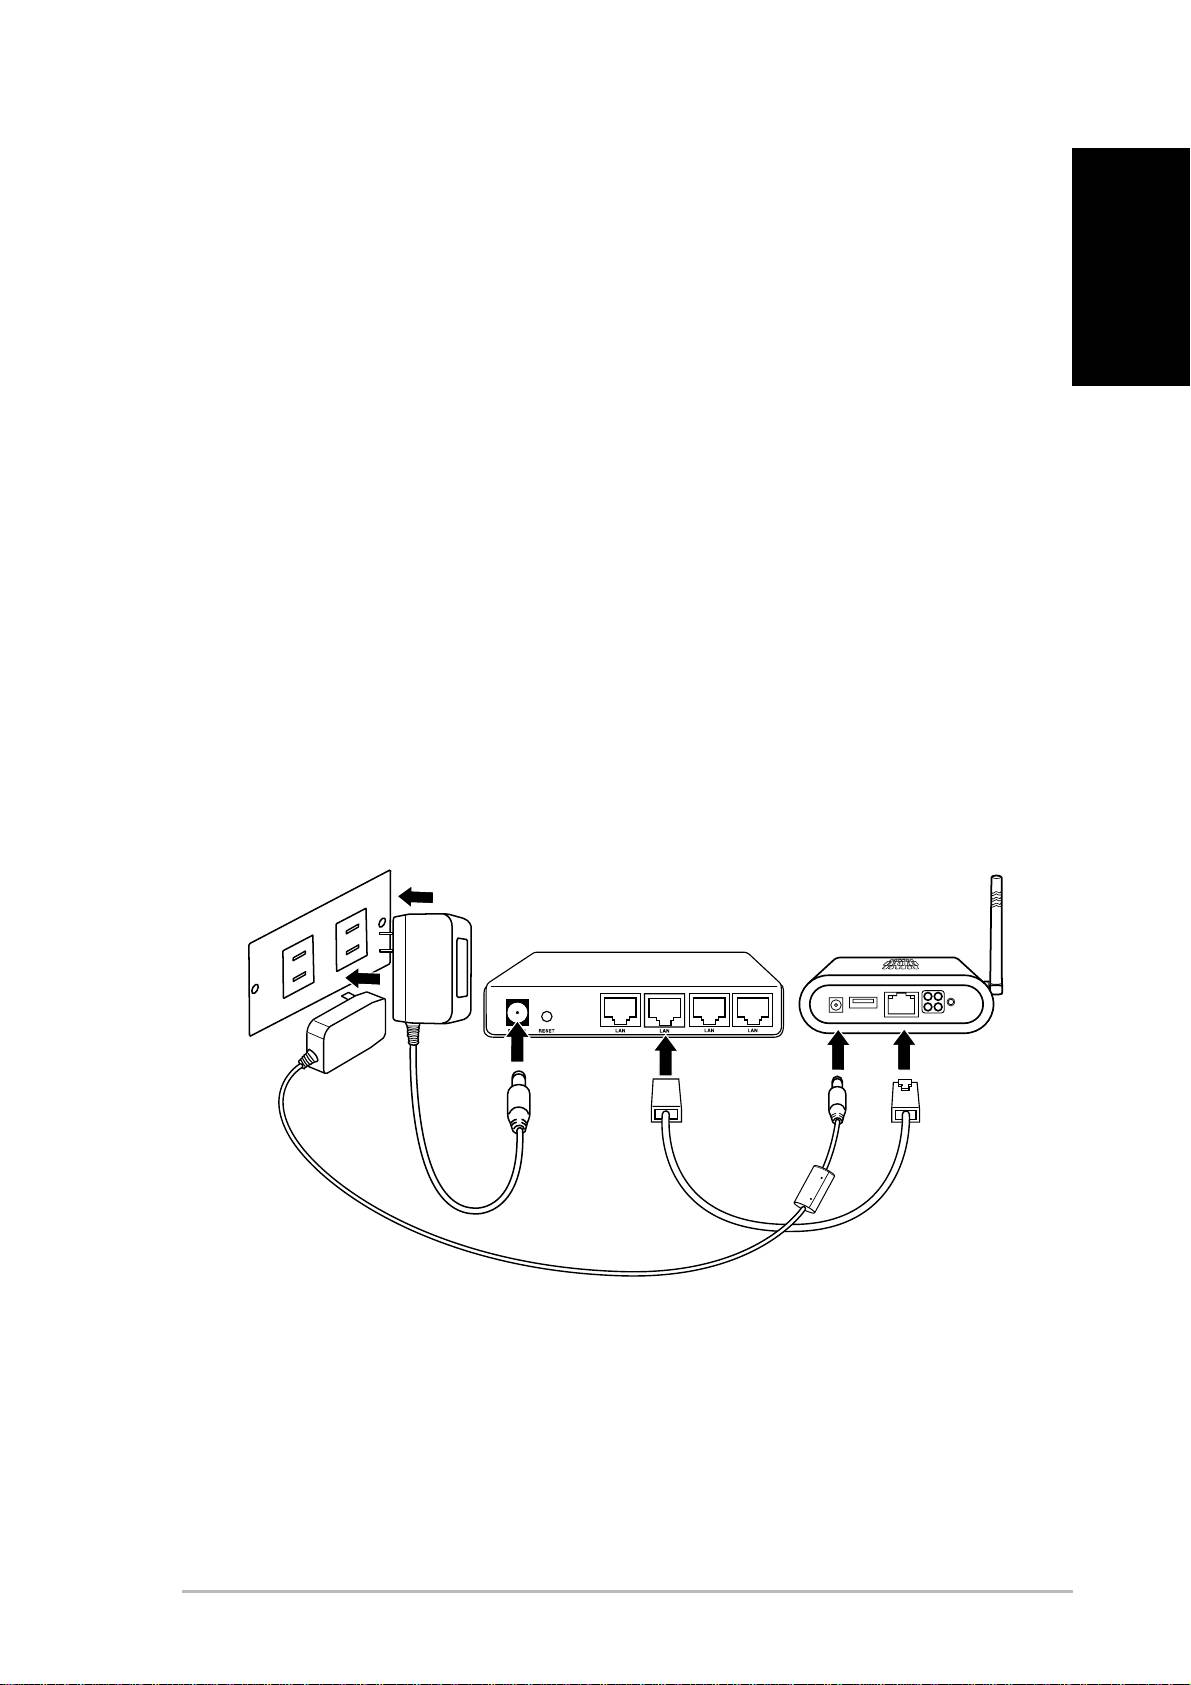
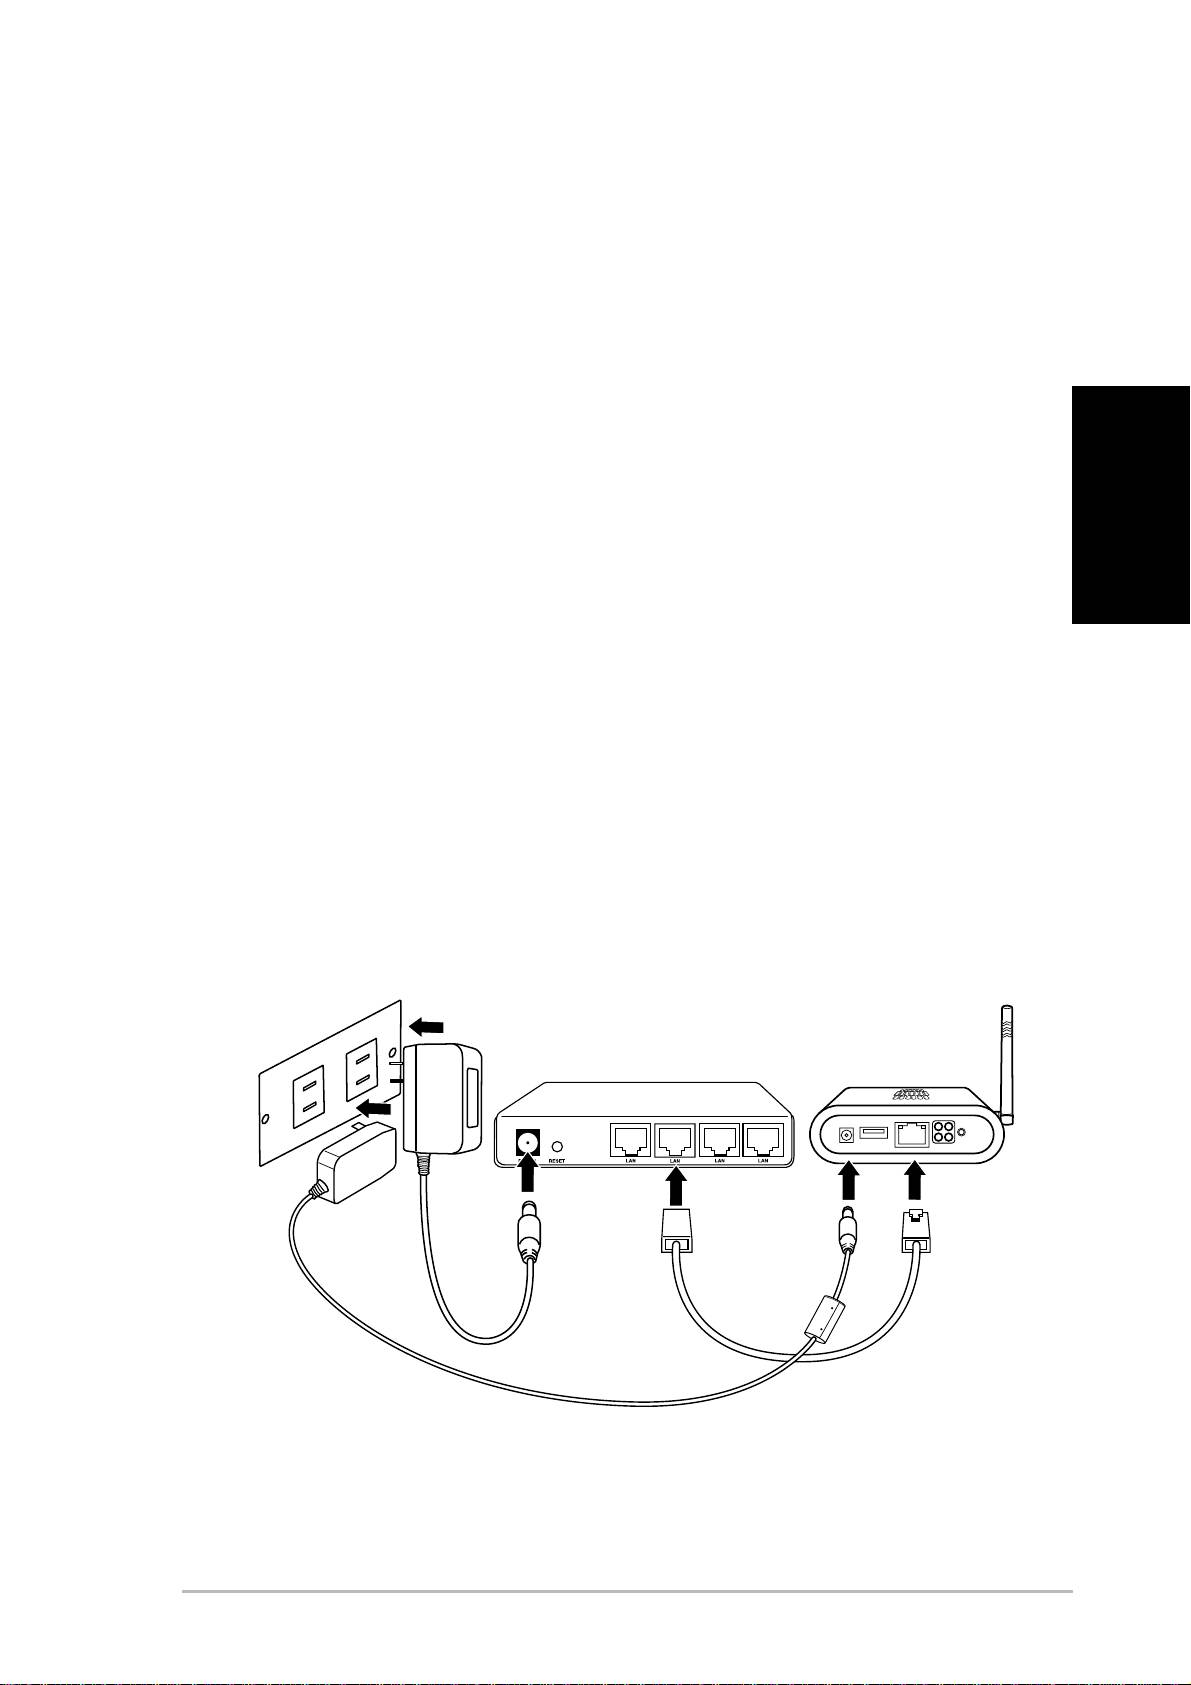
Making the Connections
In order to use the ASUS WL-HDD2.5 as an AP, it has to be connected to a
cable modem, network hub, or some other form of Internet access device.
1. Attach one end of an RJ-45 Ethernet cable to the ASUS WL-
English
HDD2.5.
2. Attach the other end to the RJ-45 port of a switch, hub, router,
patch panel, or some other form of network connection device.
3. Attach one end of the AC power adapter to the power jack on
the ASUS WL-HDD2.5.
4. Attach the other end to a power outlet.
5. Attach the network connection device’s AC power adapter in the
same way as the AC power adapter for the ASUS WL-HDD2.5.
Refer to your device’s user manual for more information.
W
a
ll
s
o
cke
t
S
wi
t
c
h
WL
-
HDD
2
.
5
ASUS 802.11g WL-HDD2.5 5
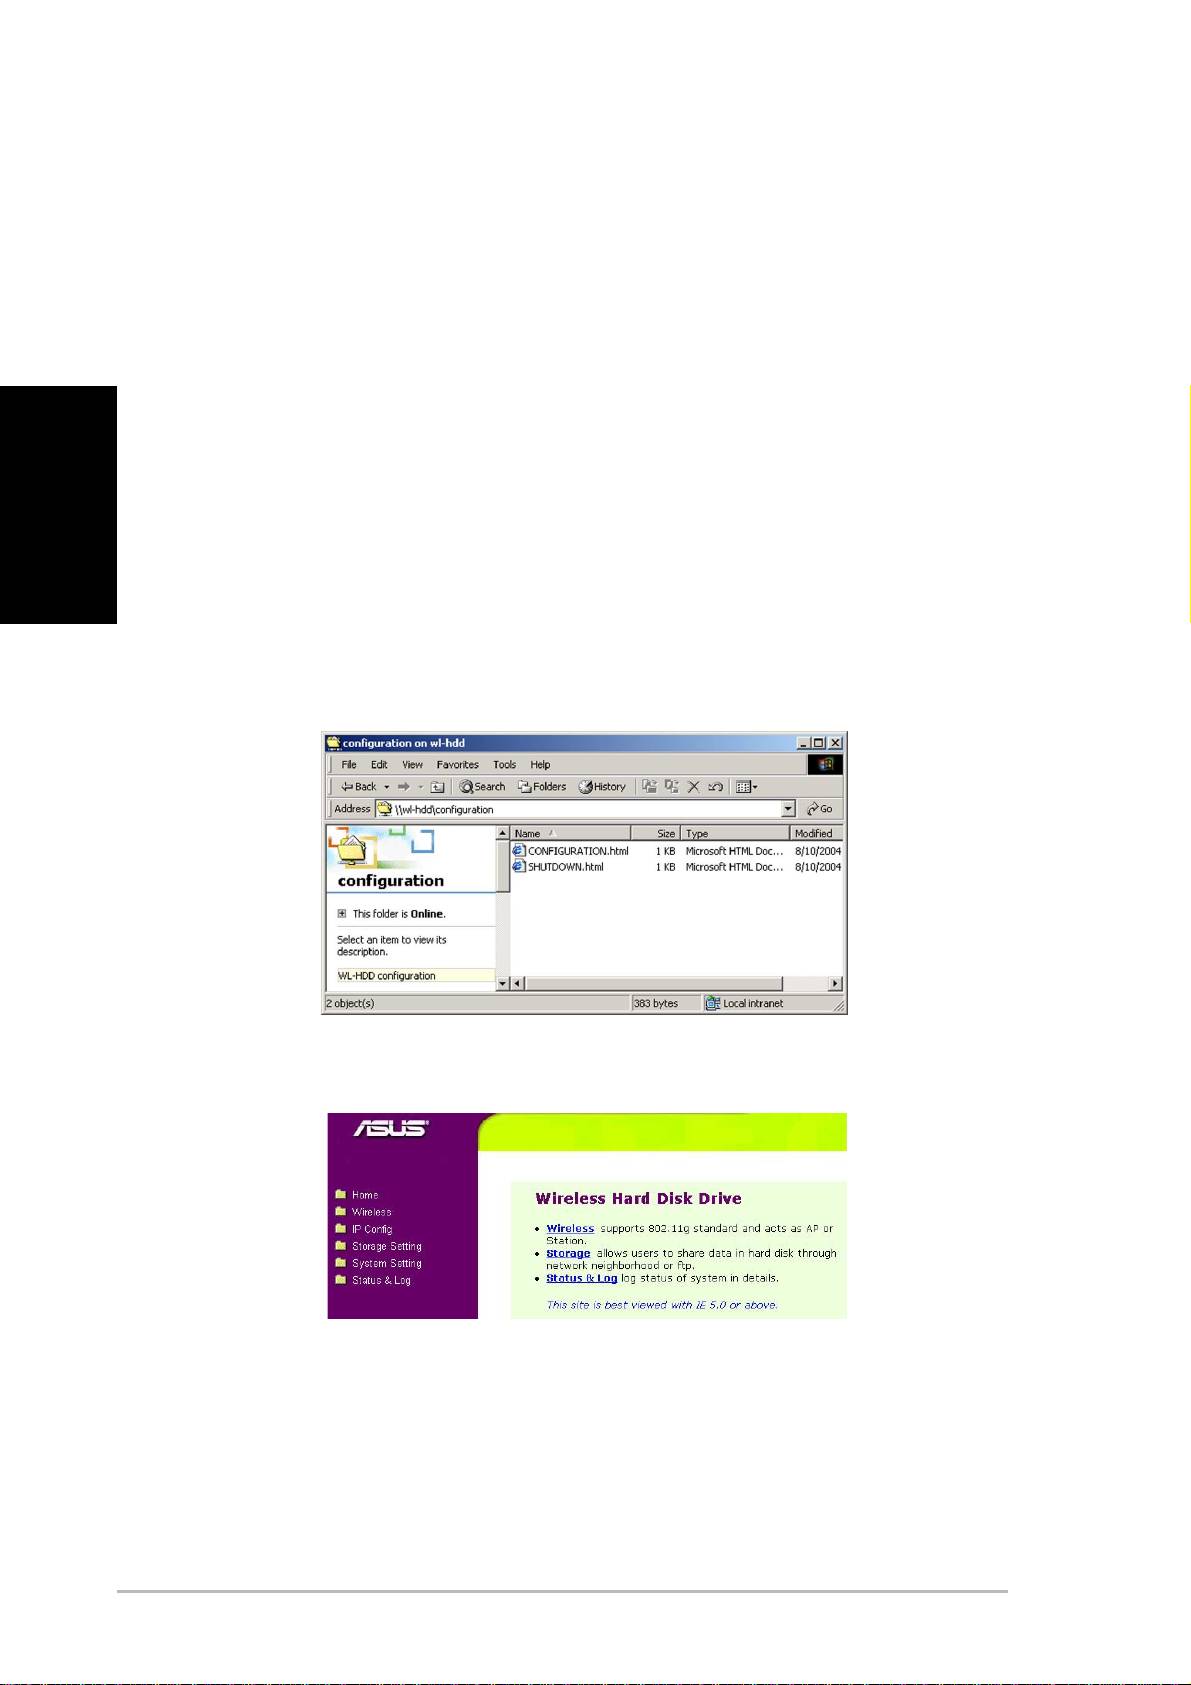
Accessing the Configuration Web Page
English
To access the Configuration web page of the ASUS WL-HDD2.5 from a
wireless client do the following:
1. Connect to the WL-HDD through a wireless client using the
default SSID, “WL-HDD”. See your wireless client’s user manual
for instructions on how to do this.
2. See “Enabling Other Users to Access the Hard Disk Drive” on
page 12 on how to view the contents of the ASUS WL-HDD2.5.
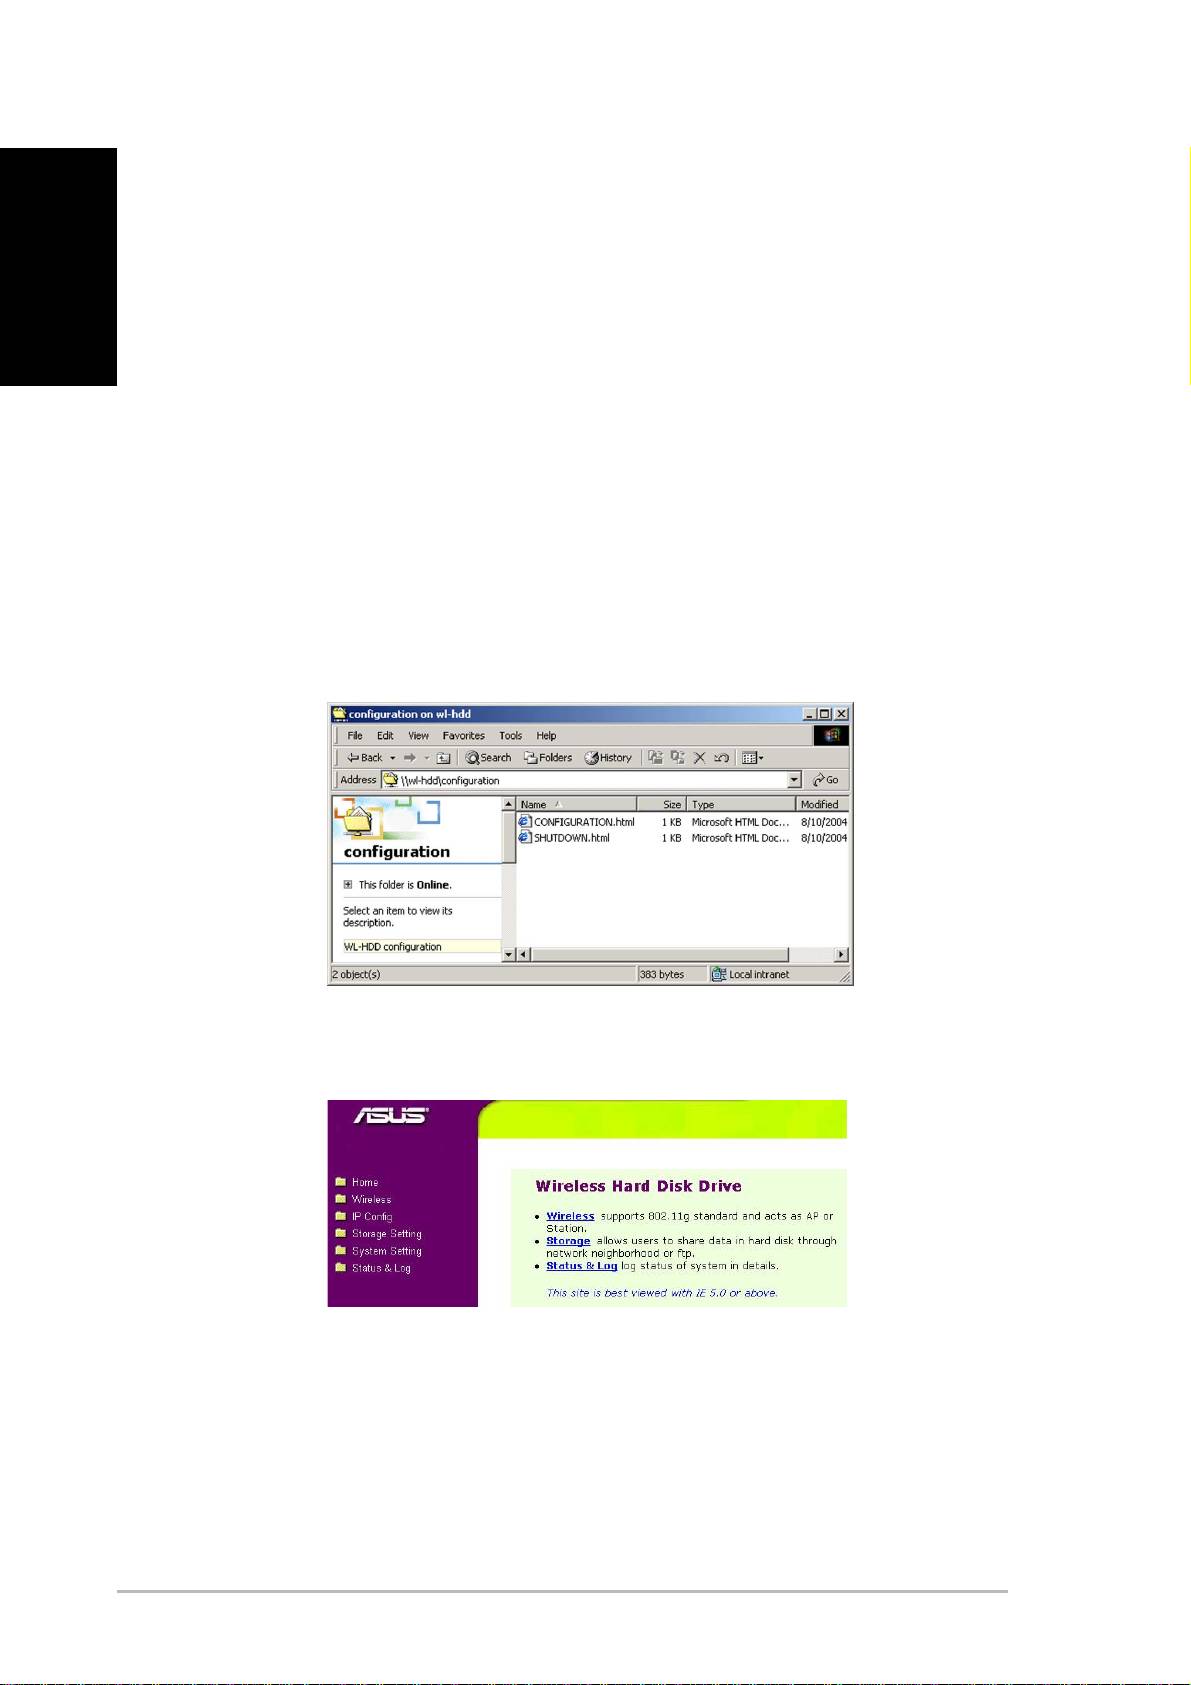
The hard disk drive shows the configuration folder. If the hard
disk drive has been formatted, the partitions (part1, part2, etc.)
otherwise only the configuration folder is shown.
3. Enter the configuration folder to access the configuration web
page.
4. Double-click the configuration.html file to enter the Configuration
web page.
The default IP settings of the ASUS WL-HDD2.5 are:
• IP address 192.168.1.220
• Subnet Mask 255.255.255.0
6 ASUS 802.11g WL-HDD2.5
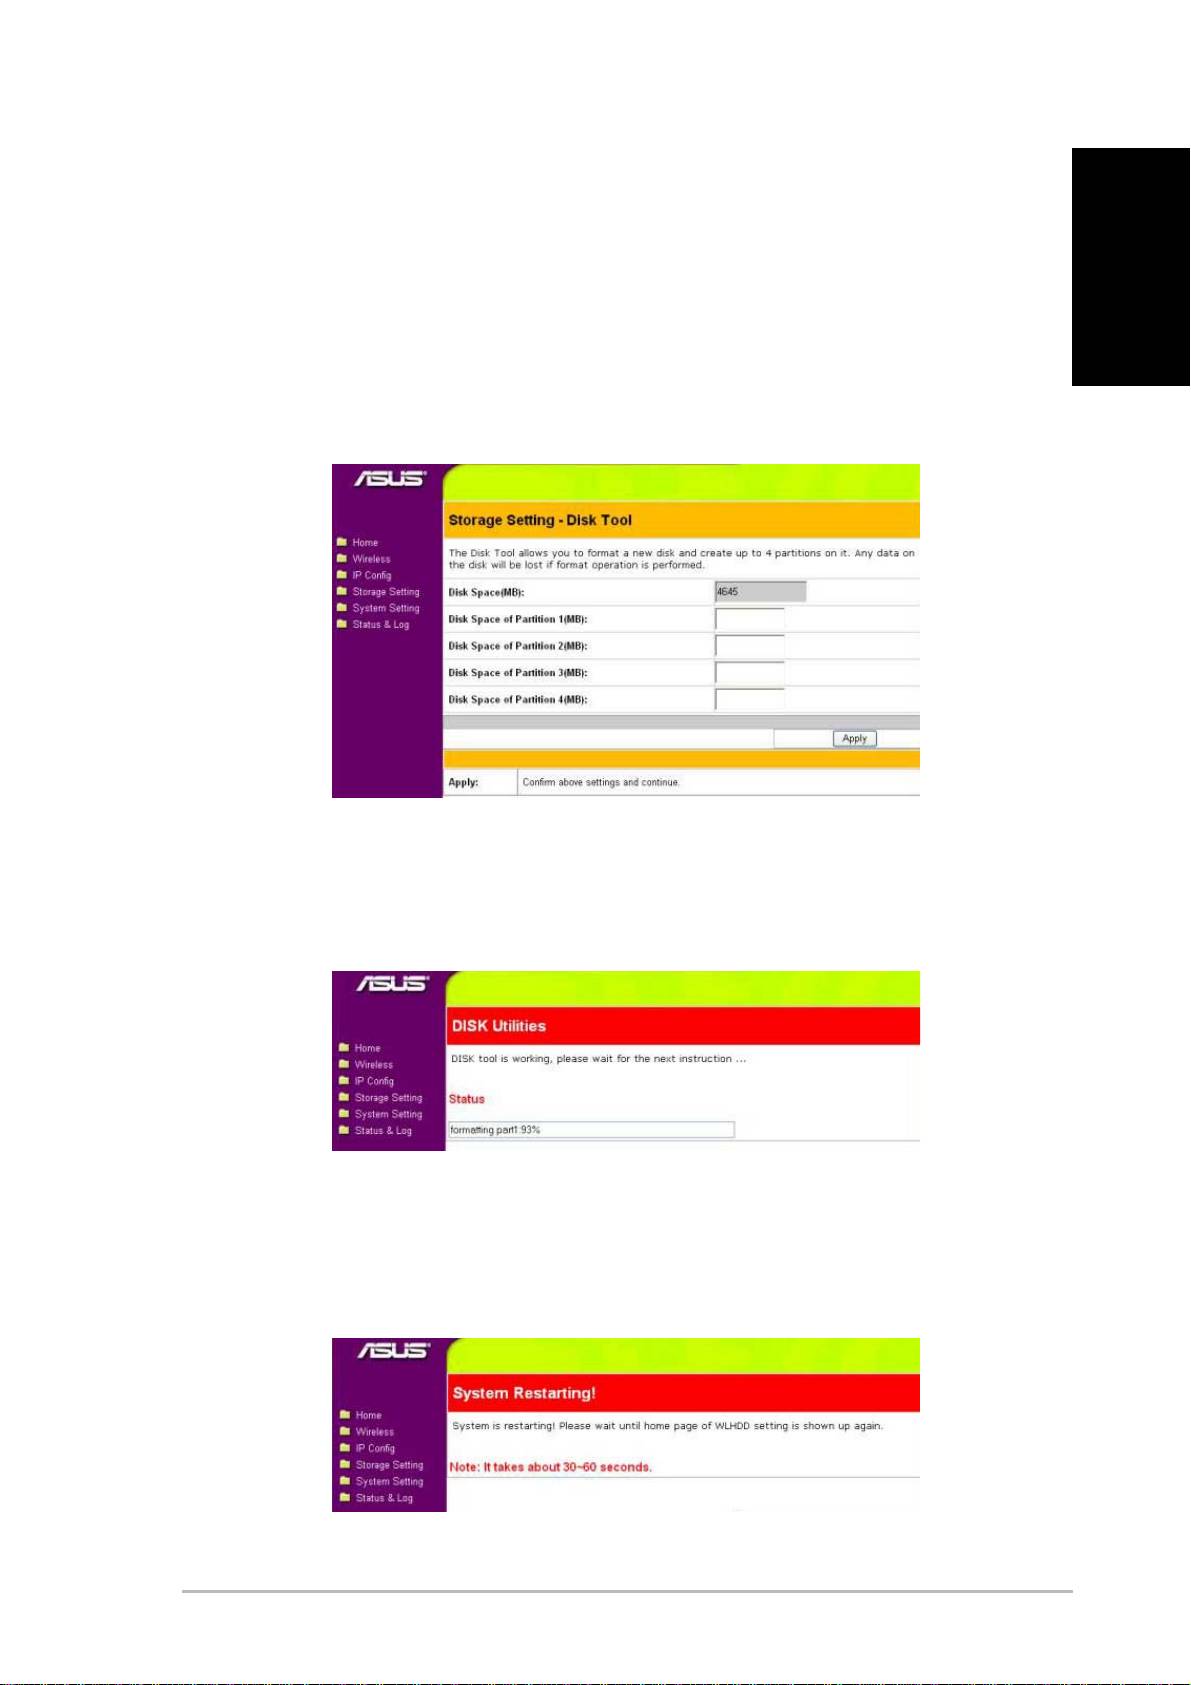
Formatting a New Hard Disk Drive
1. When the ASUS WL-HDD2.5 is turned on, the pre-scan function
detects the unformatted disk and prompts you to start formatting.
Click OK.
English
2. The Disk Tool from the Storage Setting menu opens in your
browser. This tool formats the hard disk and creates up to four
(4) partitions. Specify the size of the partitions in megabytes and
click Apply to start formatting.
3. A message is displayed on the screen to warn you that formatting
will erase all data on the disk. Click OK to continue. Formatting
of the hard disk begins and the browser window displays the
formatting status.
4. Once formatting is complete, click Save&Restart to restart the
system. The browser window displays the status while the ASUS
WL-HDD2.5 restarts. Wait till the screen is refreshed before using
the system.
ASUS 802.11g WL-HDD2.5 7
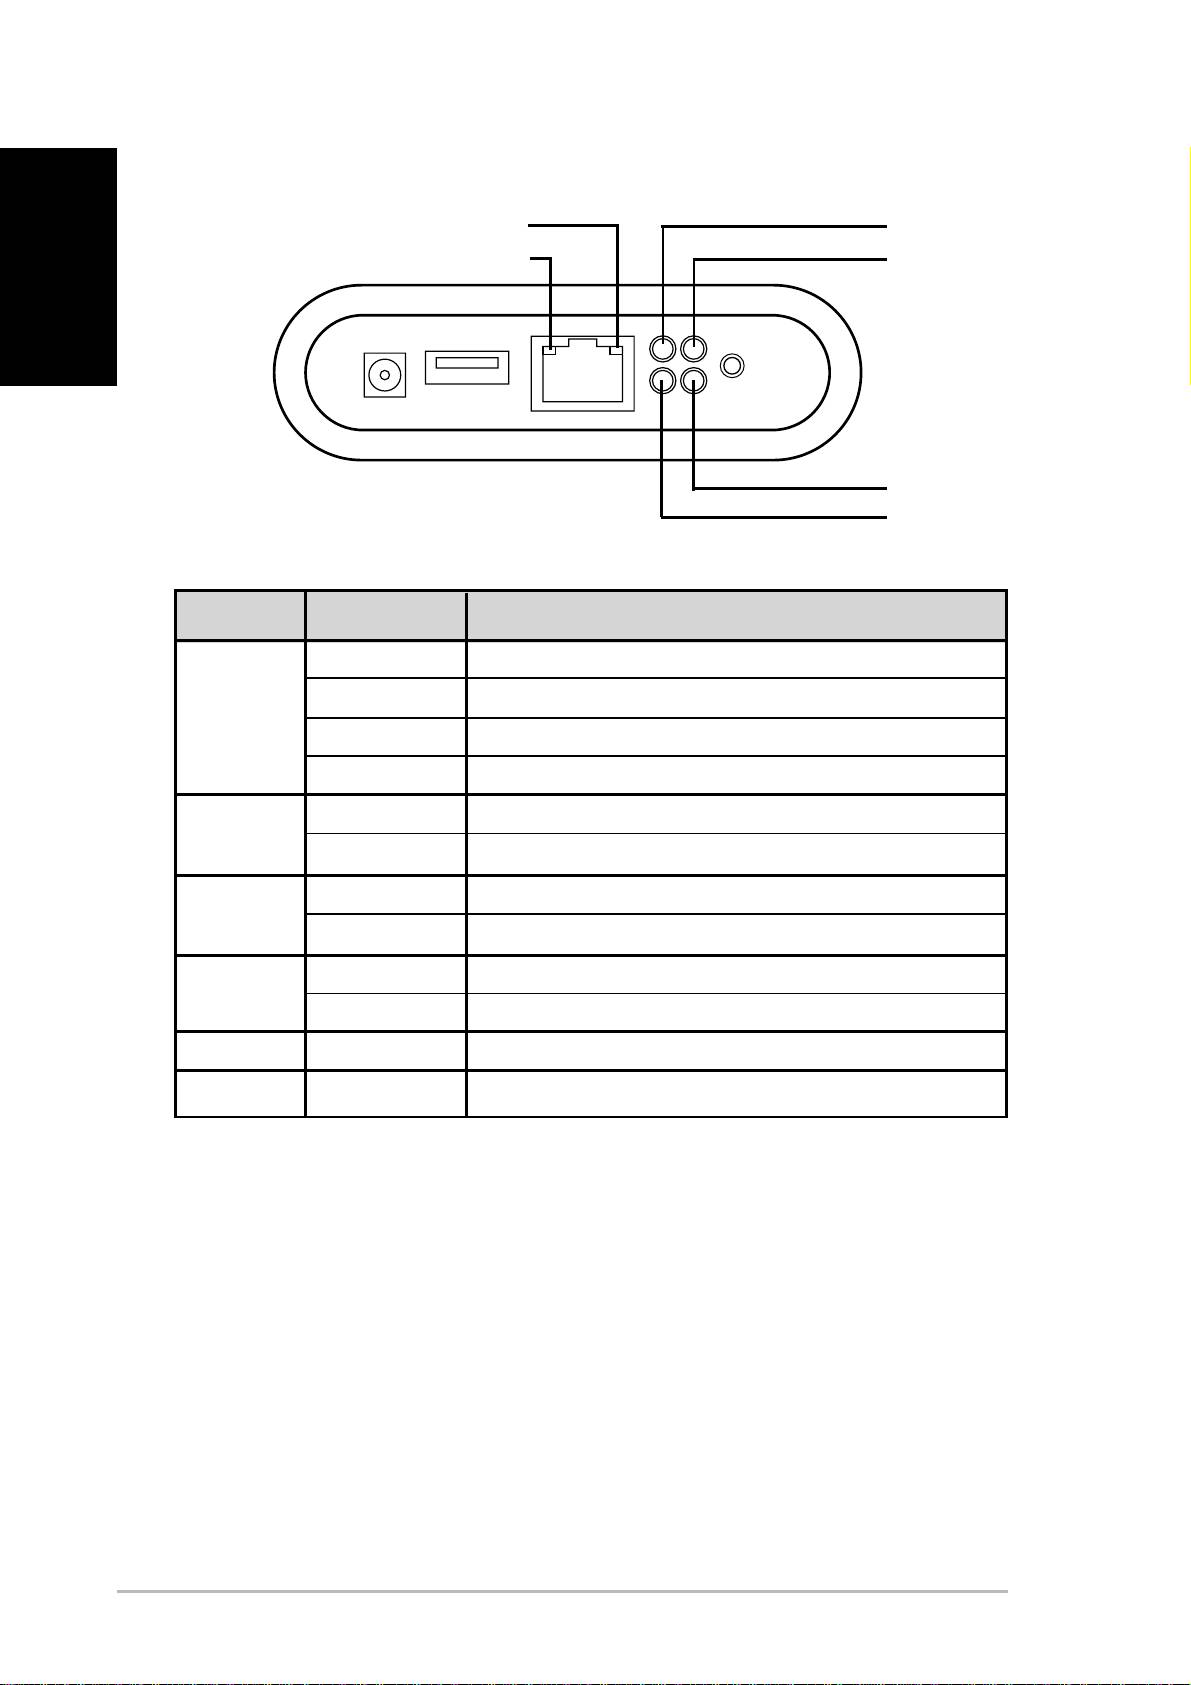
Status Indicators
English
10Mb/s
USB
100Mb/s
POWER
WLAN
HDD
Indicator Status Indication
USB Off No USB device found
Blinking (fast) Copying from the USB device to the hard disk drive
Blinking (slow) Partition 1 of the hard disk drive is full
On USB device found
HDD Off Normal state
Blinking Hard disk drive is being accessed
WLAN On Normal state
Blinking Wireless packets are being transmitted or received
POWER On Power adapter is plugged in and the device is powered on
Blinking (slow) File system on the hard disk drive is inconsistent
10Mb/s Blinking Data is being transferred with a speed of 10Mbps.
100Mb/s Blinking Data is being transferred with a Speed of 100Mbps.
8 ASUS 802.11g WL-HDD2.5
Setting up a File and FTP Servers
By default, data on the ASUS WL-HDD2.5 is shared, enabling anyone with
a remote client to access it without a username or password. You can access
the ASUS WL-HDD2.5 by searching for the computer name “WL-HDD”.
English
Refer to “Enabling Other Users to Access the Hard Disk Drive” for more
details. You can also use an FTP client to connect to the FTP Server on the
ASUS WL-HDD2.5. To connect using FTP, use an anonymous login without
a password. You can also add users and set their access rights as follows.
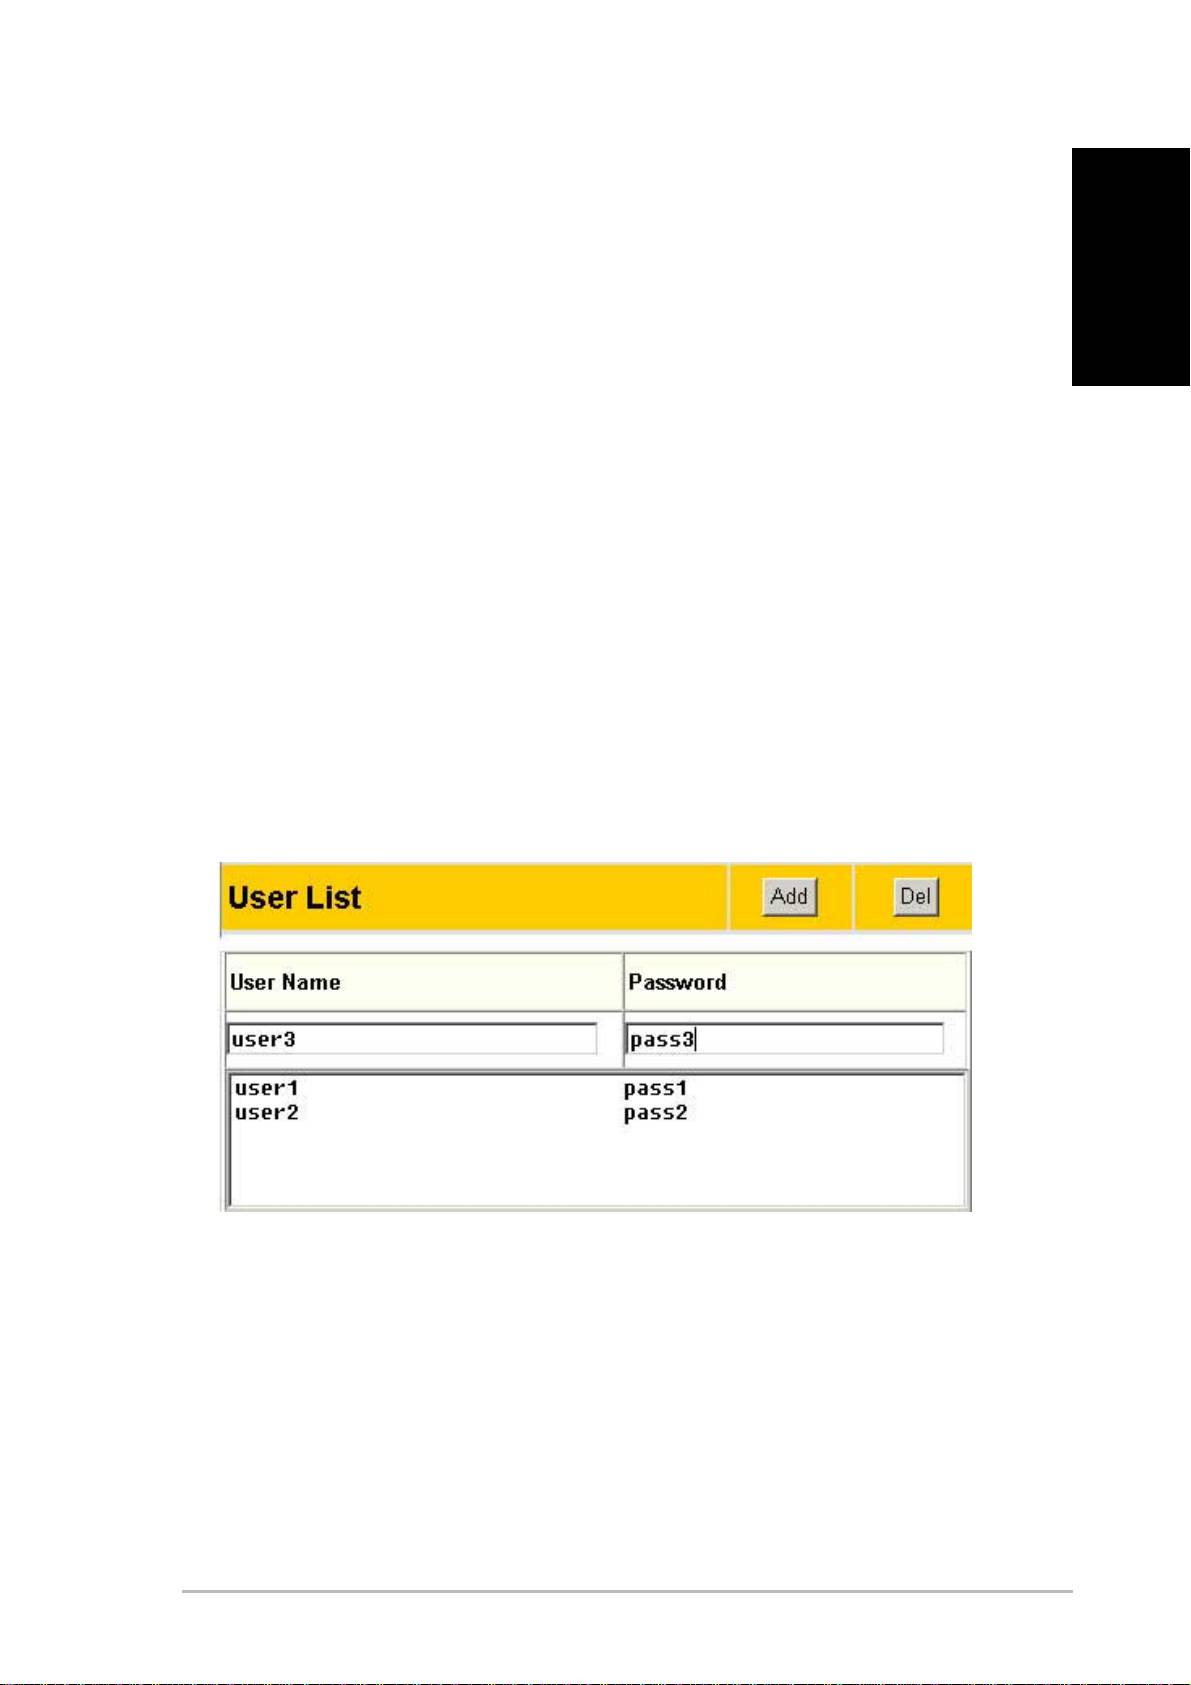
Adding Users
The user list is a list of people who are allowed access to the ASUS WL-
HDD2.5.
1. Access the “ASUS WL-HDD2.5 Web Manager” page as
described in “Accessing the Configuration Web Page” on page
7 and click Settings.
2. Under the “User List” on the “Storage Setting - Shared Nodes”
page, type a “User Name” and “Password” and click Add.
ASUS 802.11g WL-HDD2.5 9

Adding Shares and Applying Permissions
English
The shared nodes list is a list of all the folders and partitions on the ASUS
WL-HDD2.5 showing permissions for each node.
1. Under the “Shared Nodes List” on the “Storage Setting - Shared
Nodes” page, select a folder or partition from the “Folders and
Partitions” drop-down box.
2. Type a name for the “Shared Name” field.
3. Click the “Shared” and / or “Write” check boxes to enable the
folder or partition to be shared between users.
4. Click Add to add the folder or partition to the shared nodes list.
5. Select a folder or partition from the list and click Edit to modify
permissions for the user in user list.
6. In the “Access Right” screen, modify user permissions as required
and click Apply to set the new access rights for the folder.
7. After adding users and setting up the access rights, select “Apply
rules in shared node list” from the “Network Neighborhood Mode”
list to apply the permissions.
8. Use the “FTP mode” to determine which folder to log into when
users log into the ASUS WL-HDD2.5 using an FTP client.
9. Click Finish to save the changes and restart the system.
10 ASUS 802.11g WL-HDD2.5
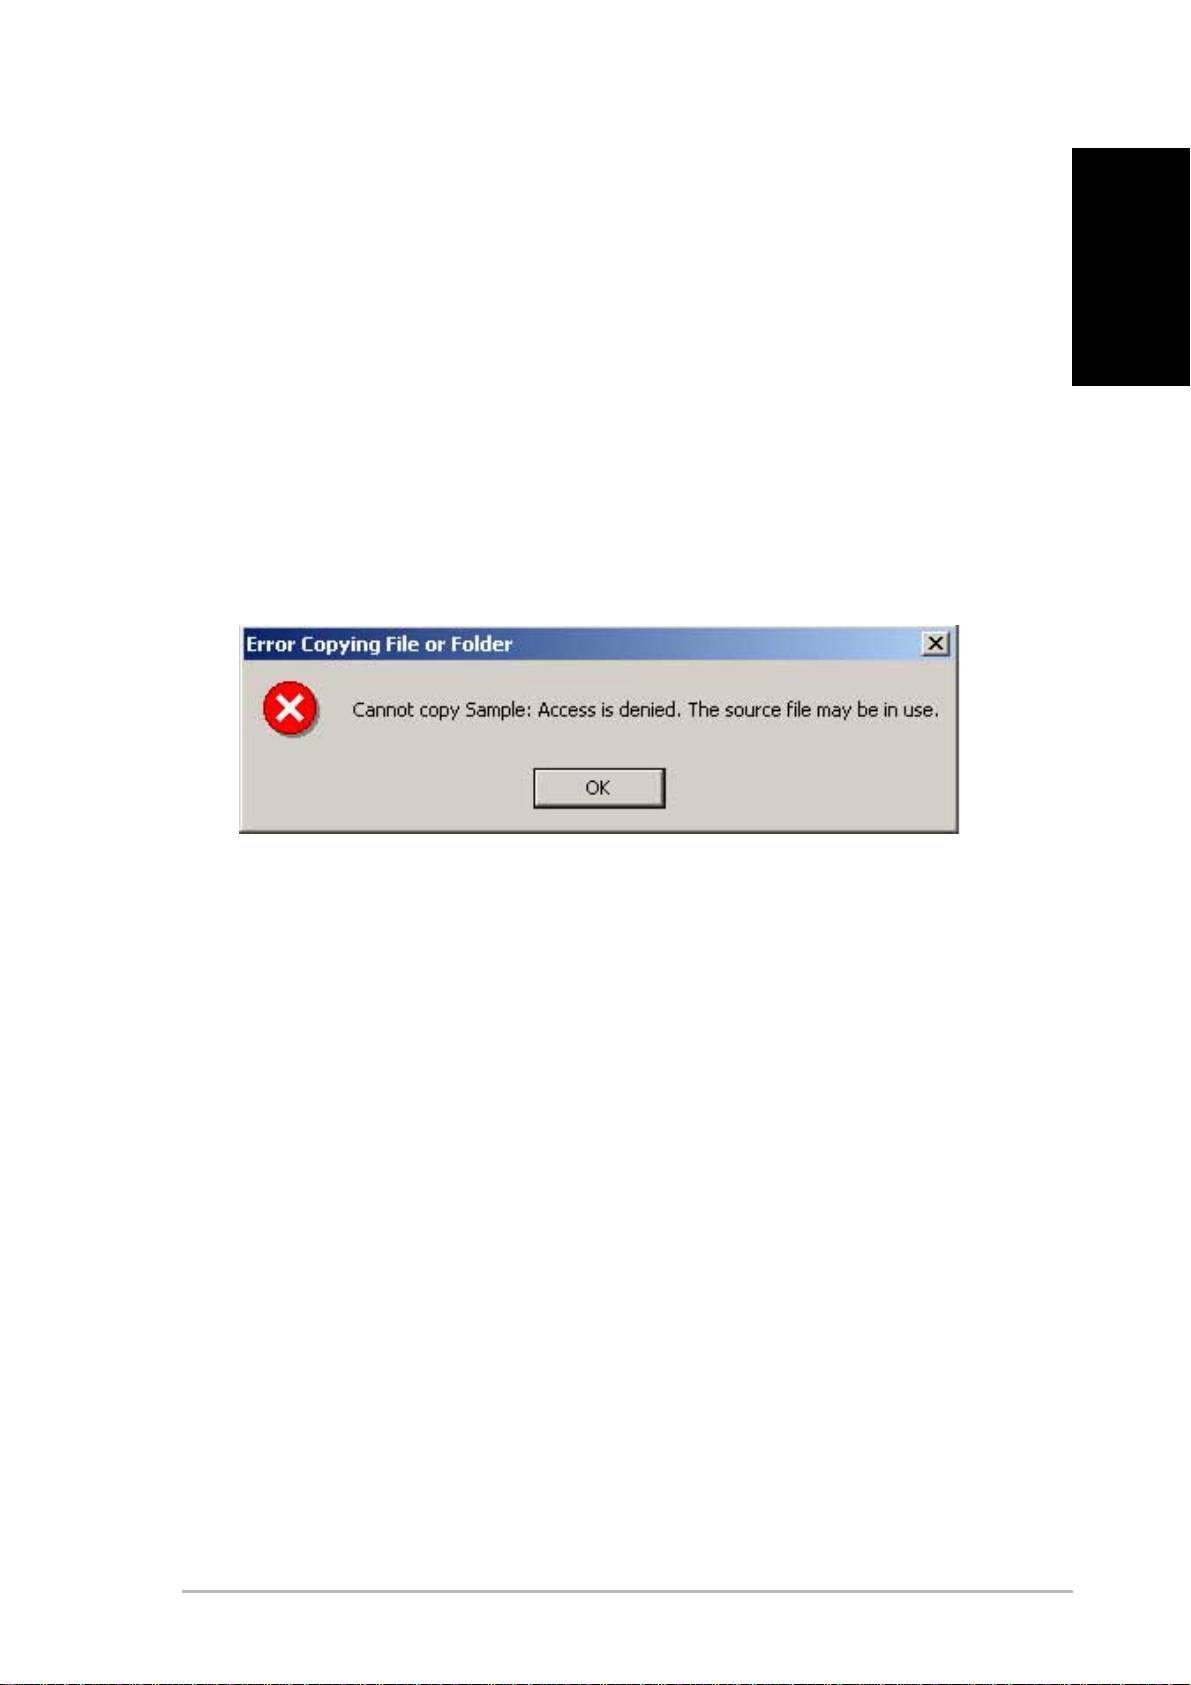
Sharing Files
The ASUS WL-HDD2.5 is primarily designed to help you share data, music,
video, or other files over the wireless LAN.
1. Connect to the wireless network through your wireless client and
English
access the ASUS WL-HDD2.5.
2. Type a valid user name and password to access the data.
3. If you want to copy any data to the hard drive, the destination
folder or partition must be write-enabled. If the write permissions
are not set and you try to copy data to a folder, the following
error message will be displayed.
ASUS 802.11g WL-HDD2.5 11
Enabling Access to the Hard Disk Drive
English
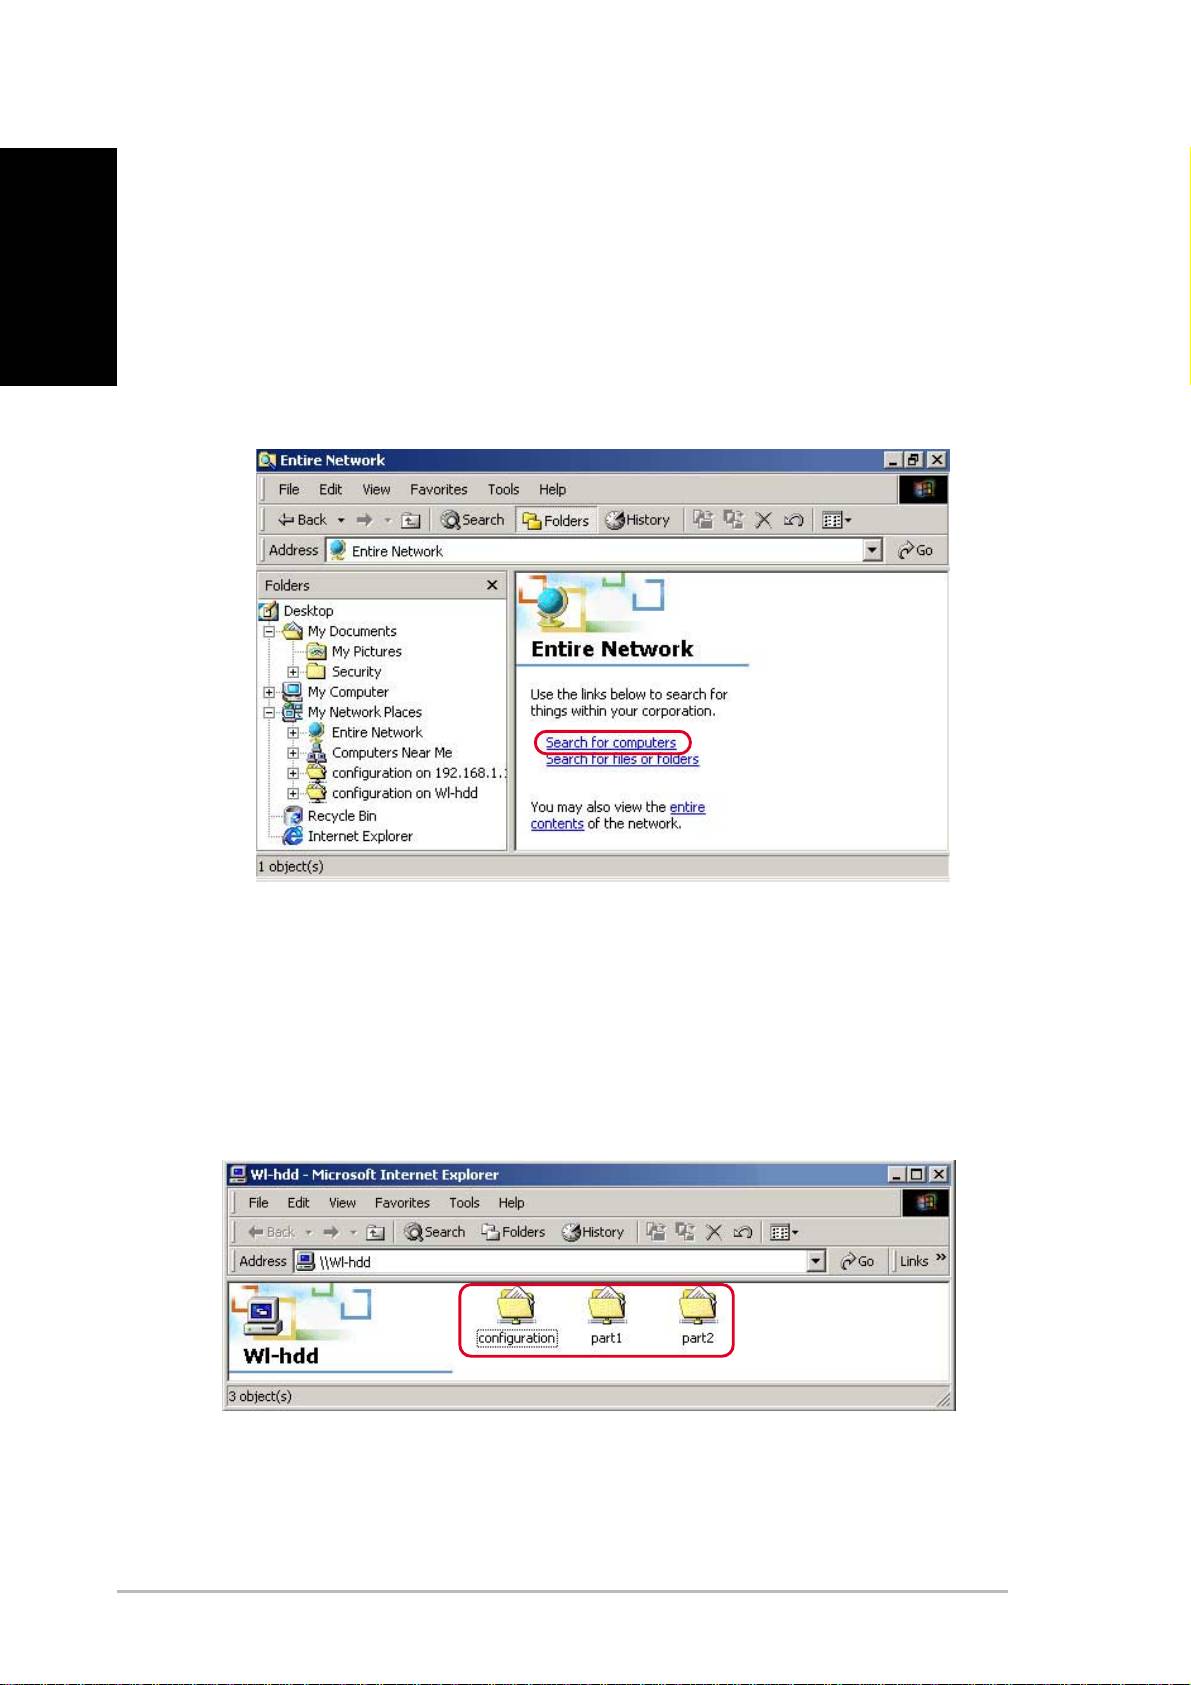
The easiest method to locate the hard disk from the network is to search for
all computers on the network and then locate the hard drive as follows:
1. Open Windows Explorer, click the My Network Places icon then
double-click Entire Network.
2. Click Search for computers to start searching for the ASUS WL-
HDD2.5.
3. The search window opens. Type the device name or SSID (WL-
HDD) in the search field. Then click Search Now.
4. The search results pane shows the Wl-hdd icon. Double-click
this icon to view the contents of the hard disk drive.
The hard disk drive shows the configuration folder and the partitions (part1,
part2, etc.) that are available.
Refer to the user manual on how to access the hard disk drive using other
methods.
12 ASUS 802.11g WL-HDD2.5
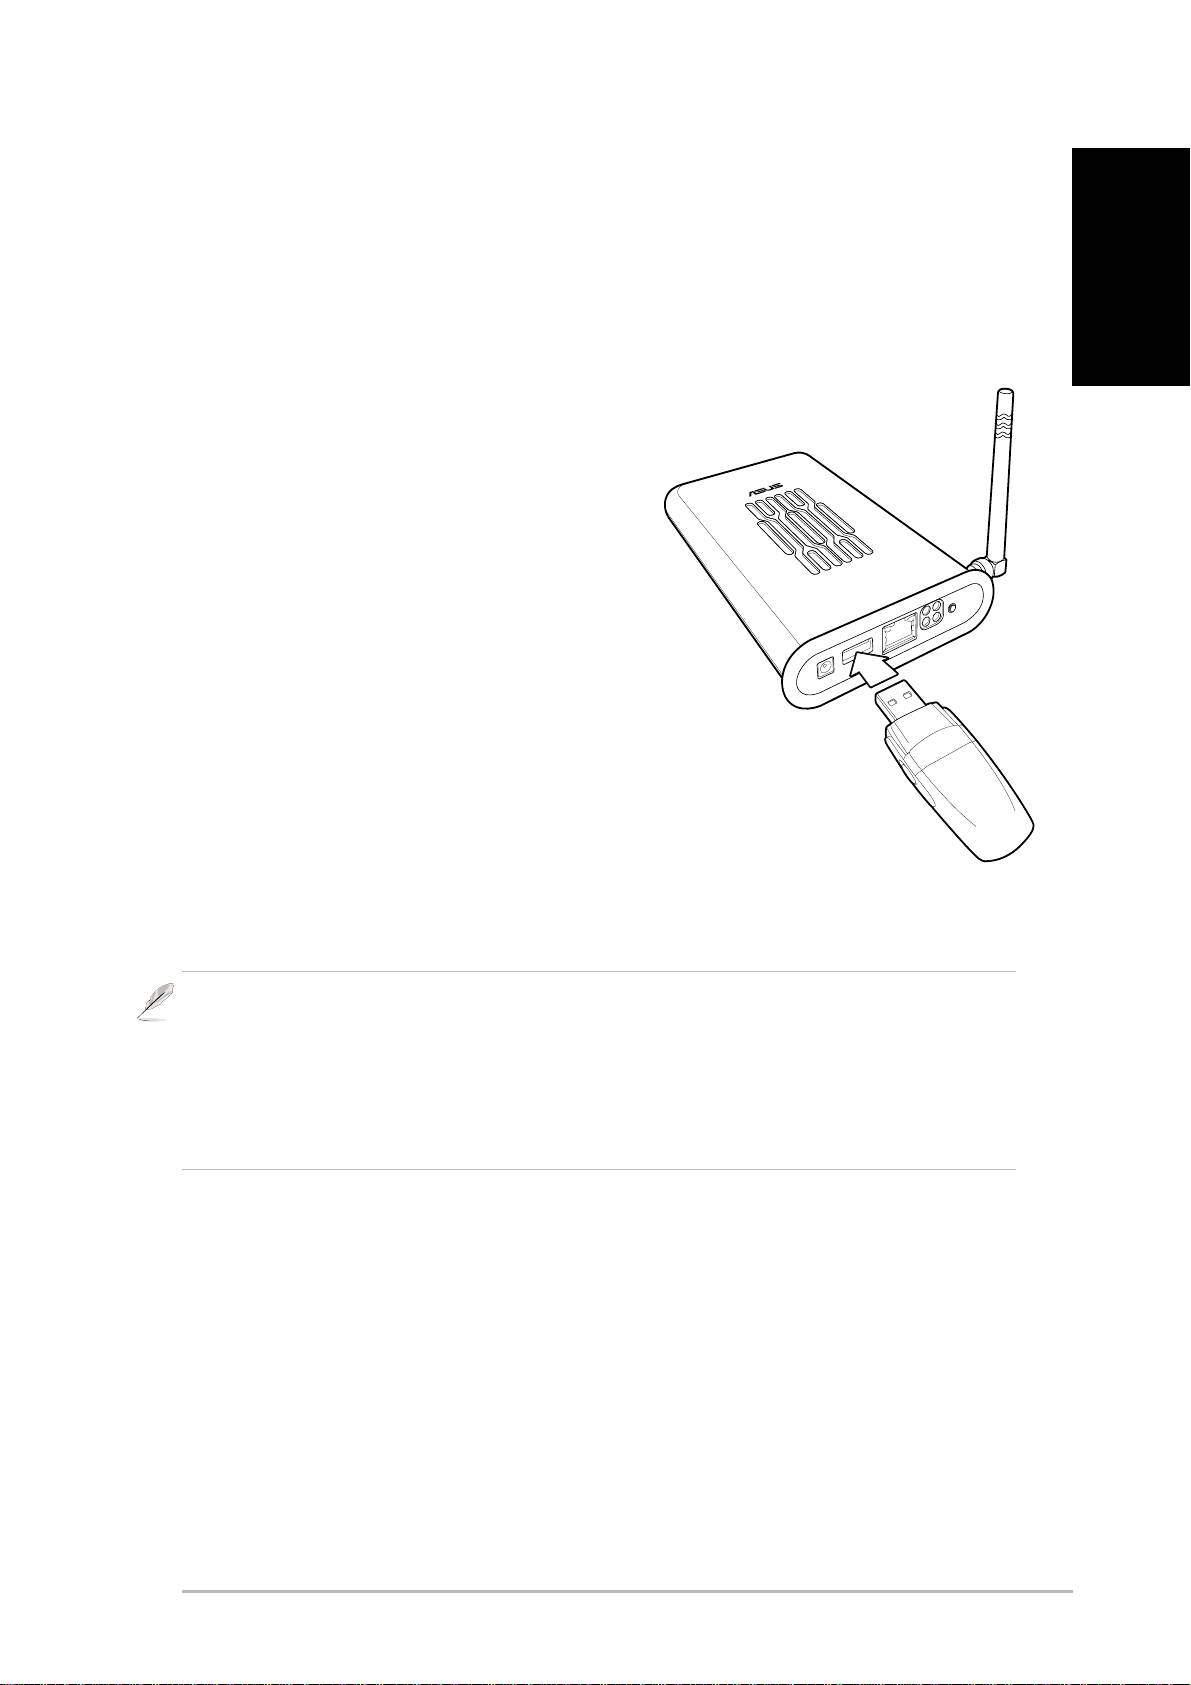
Using the Auto-Copy Function
The ASUS WL-HDD2.5 supports USB flash disks or external flash memory
cards through a USB connection to enable you to transfer data. The device
copies data automatically from the flash memory to the hard disk drive
English
when inserted into the USB slot.
Auto-Copy Function
To transfer data automatically from the
flash memory, connect the USB flash
memory disk to the USB port of the ASUS
WL-HDD2.5. Alternatively, to transfer the
contents of other types of flash memory cards
such as CF, SD, MMC, and so on, insert the
card into an external card reader (not supplied)
and connect it to the USB port using a USB cable.
The device copies the contents of the memory disk
automatically to the hard disk. The USB light blinks while
copying data.
The data from the USB flash memory is copied to a folder named
USBpartxxx, where xxx is a number from 001 to 999 indicating the
order in which the data was transferred.
Note: When copying data automatically from a flash disk, the first partition – part1
– is used first. All data is copied as long as there is free space on the first partition.
Note: If you remove the flash disk from the ASUS WL-HDD2.5 and insert it again,
the data is copied again to the hard disk in a new folder with the folder name
incremented by 1.
ASUS 802.11g WL-HDD2.5 13
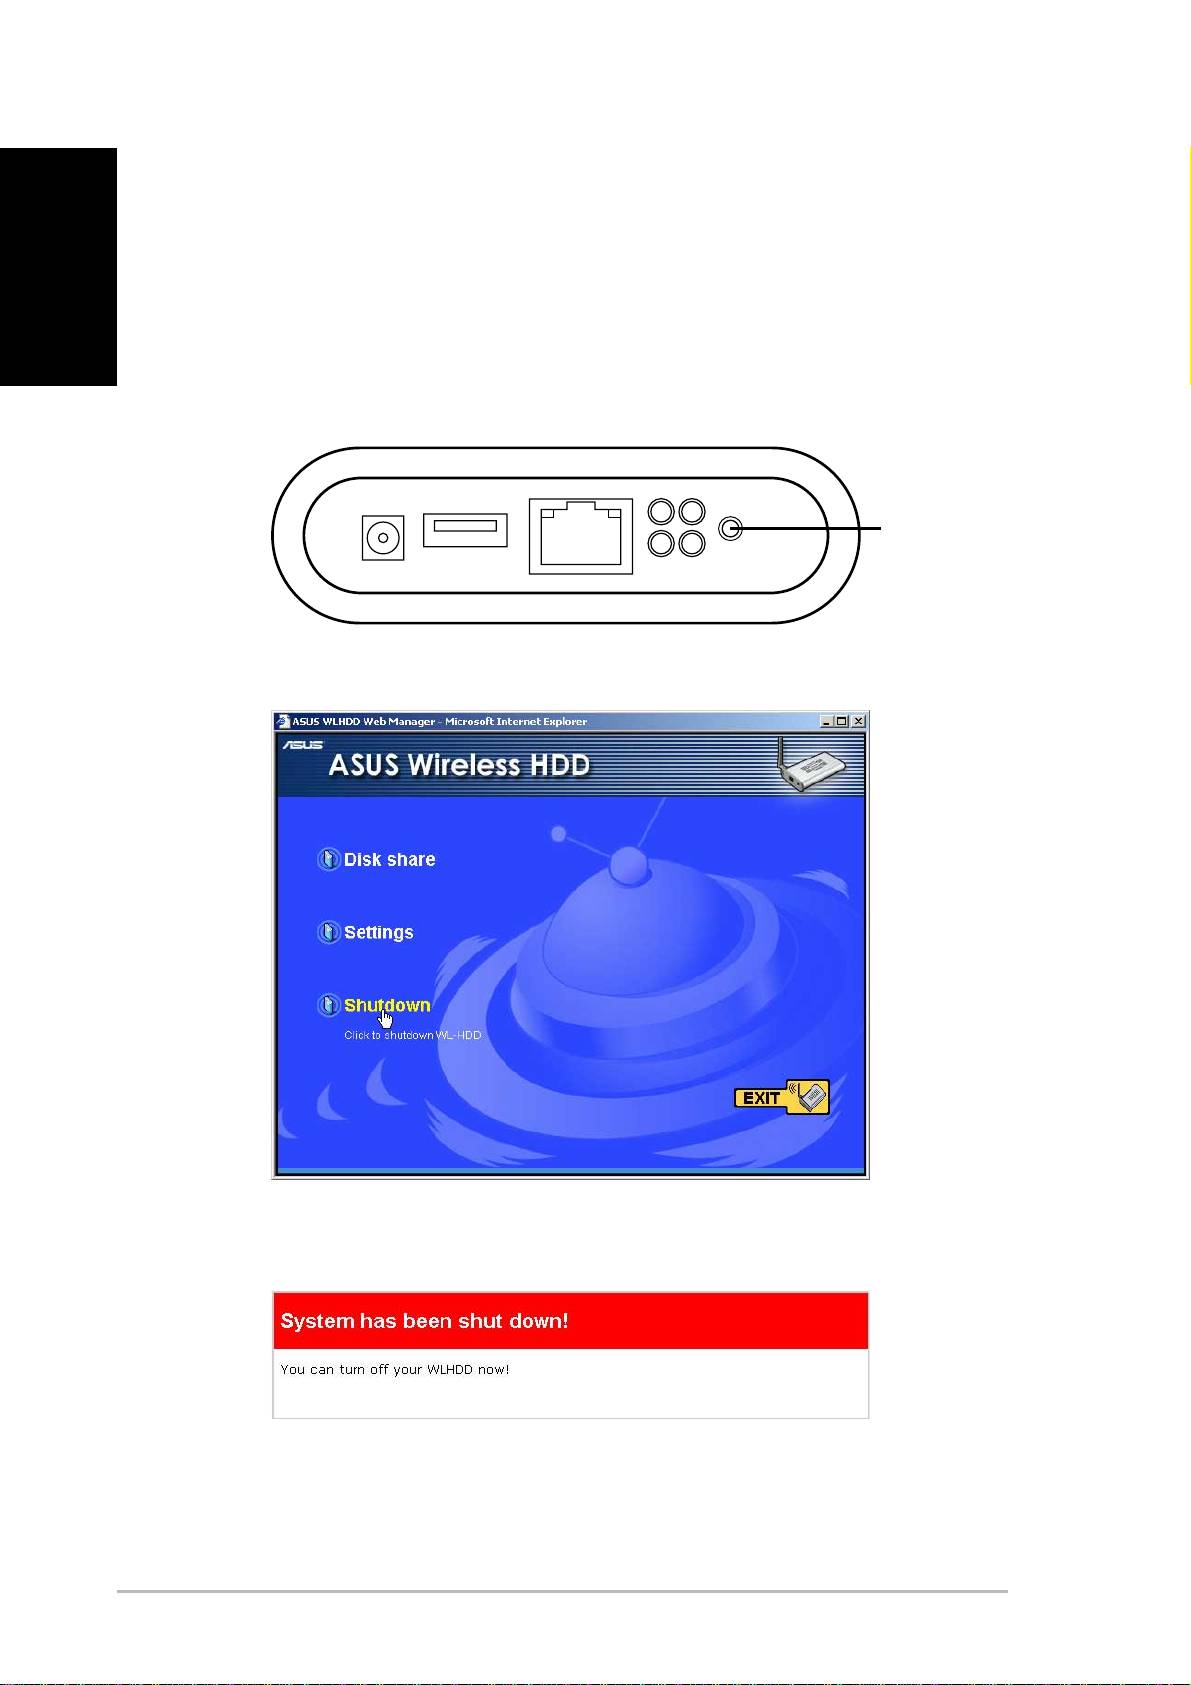
Shutting Down the WL-HDD2.5
English
Use the Web Manager tool to shut down the ASUS WL-HDD2.5 after using
it to prevent damage to the hard disk and loss of data. To shut down the
system, do one of the following:
• Press the shutdown button for 5 seconds on the unit. Hold it
down for 20 seconds to reset it to default settings.
Shutdown/
Rest Button
• or Click Shutdown in the Web Manager window.
The device shuts down and the following message is displayed.
Once the system has shut down, disconnect the power cord.
14 ASUS 802.11g WL-HDD2.5

WL-HDD2.5
Table des Matières
Bien débuter avec votre WL-HDD2.5............................................. 2
Les avantages du WL-HDD2.5 ................................................. 2
Français
Avant l’installation ..................................................................... 2
Configuration requise ..................................................................... 3
Alimentation requise....................................................................... 3
Contenu du paquet......................................................................... 3
Configurer le WL-HDD2.5 .............................................................. 4
Installer un disque dur............................................................... 4
Effectuer les connexions ........................................................... 5
Accéder à la page de configuration web................................... 6
Formater un nouveau disque dur.............................................. 7
Témoins d’état .......................................................................... 8
Configurer un serveur de fichiers et un serveur FTP ..................... 9
Ajouter des utilisateurs.............................................................. 9
Ajouter des partages et Appliquer des Autorisations .............. 10
Partager des fichiers ................................................................11
Autoriser les accès au disque dur ................................................ 12
Utiliser la fonction Copie-Auto...................................................... 13
Fonction Copie-Auto ............................................................... 13
Eteindre le WL-HDD2.5................................................................ 14
ASUS 802.11g WL-HDD2.5
1

Bien débuter avec votre WL-HDD2.5
Merci d’avoir acheté ce WL-HDD2.5 ASUS. Cet appareil est un disque dur
pour réseau local sans-fil (WLAN) équipé d’une fonction complémentaire
de Point d’Accès (AP) qui peut être adapté au stockage de données en
environnements câblés.
En utilisant la fonctionnalité de Point d’Accès du WL-HDD2.5 ASUS, les
utilisateurs de PC ont la possibilité de rester connectés au réseau quel que
Français
soit leur emplacement dans un bâtiment, sans avoir à y être relié par des
câbles réseau.
Les avantages du WL-HDD2.5
Point d’Accès (AP)
Lorsqu’il est connecté à un réseau LAN en utilisant un câble réseau, le WL-
HDD2.5 se transforme en point d'accès pour les périphériques sans-fil,
permettant ainsi d’accéder à Internet.
Stockage Réseau
Que le WL-HDD2.5 ASUS soit configuré en AP ou non, il possède un
avantage décisif: il peut devenir une solution de stockage réseau grâce à
son disque dur; ce qui permet de partager facilement des informations et
une capacité de stockage sur le réseau sans fil.
Copie Auto
Le WL-HDD2.5 ASUS supporte également la copie automatique de fichiers
d'une mémoire flash vers le disque dur.
Avant l’installation
Avertissement: Le WL-HDD2.5 n’est pas compatible avec le hot-swap (échange
à chaud). Assurez-vous qu’il est éteint et NON connecté à la prise électrique
murale lors de l’installation d’un disque dur.
Remarque: Il est de la responsabilité de l’installateur et des utilisateurs de s’assurer
que l’antenne du WL-HDD2.5 ASUS est placée à une distance d’au moins 20 cm
d’une personne pendant son fonctionnement.
2
ASUS 802.11g WL-HDD2.5

Configuration requise
Pour commencer à utiliser le WL-HDD2.5 ASUS, votre système doit
respecter la configuration minimum suivante :
• Une carte Ethernet (10BaseT ou 10/100BaseT) pour les clients
câblés
• Au moins une carte réseau sans-fil 802.11g (54Mbps) ou 802.11b
(11Mbps) pour les clients mobiles sans-fil
• Le protocole TCP/IP et un navigateur Internet
• Systèmes exploitation recommandés : Windows 2000 ou
Windows XP
Français
Alimentation requise
Le WL-HDD2.5 ASUS nécessite une source d’alimentation externe. Votre
paquet comporte un adaptateur d’alimentation 5V, 2A. Utilisez uniquement
l’adaptateur fourni pour un fonctionnement sûr.
Contenu du paquet
Votre paquet contient les éléments suivants :
• WL-HDD2.5 ASUS
• Antenne dipôle 2.4 GHz
• Adaptateur Secteur (5 Volts DC, 2 Amp)
• Câble Ethernet RJ-45 (droit)
• Guide de Démarrage Rapide
• CD Support (utilitaires et manuel utilisateur)
ASUS 802.11g WL-HDD2.5
3
Configurer le WL-HDD2.5
Installer un disque dur
Suivez ces étapes pour insérer le disque dur et
assembler l’appareil avant de l’utiliser.
1. Retirez les vis du dessous.
Français
2. Retirez la carte de circuits interne en tirant le
couvercle du panneau avant dans la direction
de la flèche.
3. Insérez le disque dur dans le slot. Assurez-
vous que les broches de connexion du disque
dur et le connecteur sont correctement
alignées.
4. Replacez le couvercle de panneau avant si
nécessaire et replacez la carte de circuits
dans le boîtier.
5. Remettez les vis.
6. Branchez l’antenne externe pour améliorer
les performances.
4
ASUS 802.11g WL-HDD2.5
Effectuer les connexions
Pour pouvoir utiliser le WL-HDD2.5 ASUS comme un point d'accès, il doit
être connecté à un modem câble, un hub réseau ou un autre type de
périphérique d’accès Internet.
1. Fixez une extrémité d’un câble Ethernet RJ-45 au WL-HDD2.5
ASUS.
2. Reliez l’autre extrémité au port RJ-45 d’un switch, d’un hub, d’un
routeur, d'un tableau de connexions ou d’une autre sorte
d’appareil de connexion réseau.
Français
3. Reliez une extrémité de l’adaptateur d’alimentation à la prise
d’alimentation sur le WL-HDD2.5 ASUS.
4. Fixez l’autre extrémité à une prise d’alimentation murale.
5. Reliez l’adaptateur d’alimentation du périphérique de connexion
réseau de la même manière que l’adaptateur d’alimentation du
WL-HDD2.5 ASUS. Veuillez vous référer au manuel de votre
appareil pour obtenir plus d’informations.
Prise Murale
W
a
ll
s
o
cke
t
S
wi
t
c
h
WL
-
HDD
2
.
5
ASUS 802.11g WL-HDD2.5
5
Accéder à la page de configuration web
Pour accéder à la page de configuration Web de votre WL-HDD2.5 ASUS
depuis un client sans-fil, veuillez :
1. Vous connecter au WL-HDD par l’intermédiaire d’un client sans-
fil en utilisant le SSID par défaut, “WL-HDD”. Consultez le manuel
de votre client sans-fil pour savoir comment faire.
2. Consulter la section “Autoriser d’autres utilisateurs à accéder
Français
au Disque Dur” en page 12 pour savoir comment visualiser le
contenu du WL-HDD2.5 ASUS.
Le disque dur affiche le dossier de configuration. Si le disque
dur a été formaté, les partitions (part1, part2, etc...) seront
affichées, dans le cas contraire, seul le dossier de configuration
sera affiché.
3. Accéder au dossier de configuration pour consulter la page web
de configuration.
4. Double-cliquer sur le fichier configuration.html pour accéder à la
page web de configuration.
Les paramètres IP par défaut du WL-HDD2.5 ASUS sont :
• Adresse IP 192.168.1.220
• Masque de Sous-Réseau 255.255.255.0
6
ASUS 802.11g WL-HDD2.5
