Asus RT-N53: instruction
Class: Computer equipment, hardware, accessories
Type:

Manual for Asus RT-N53
Table of contents

Quick Start Guide
®
RT-N53
Dual-band Wireless-N Router
U6781 / Second Edition / January 2012
NOTE: For more details, refer to the user manual included in
the support CD.
English ...............................................................................................................................................3
Français .............................................................................................................................................11
Deutsch .............................................................................................................................................19
Italiano ..............................................................................................................................................27
Русский .............................................................................................................................................35
Български ........................................................................................................................................ 43
Čeština ...............................................................................................................................................51
Dansk .................................................................................................................................................59
Nederlands ......................................................................................................................................67
Eesti ....................................................................................................................................................75
Suomi .................................................................................................................................................83
Ελληνικά ............................................................................................................................................91
Magyar ..............................................................................................................................................99
Latviski ..............................................................................................................................................107
Lietuvių .............................................................................................................................................115
Norsk ..................................................................................................................................................123
Polski ..................................................................................................................................................131
Português .........................................................................................................................................139
Română .............................................................................................................................................147
Español ..............................................................................................................................................155
Svenska .............................................................................................................................................163
Slovensky..........................................................................................................................................171
Українська ....................................................................................................................................... 179
Türkçe ................................................................................................................................................187
2
English
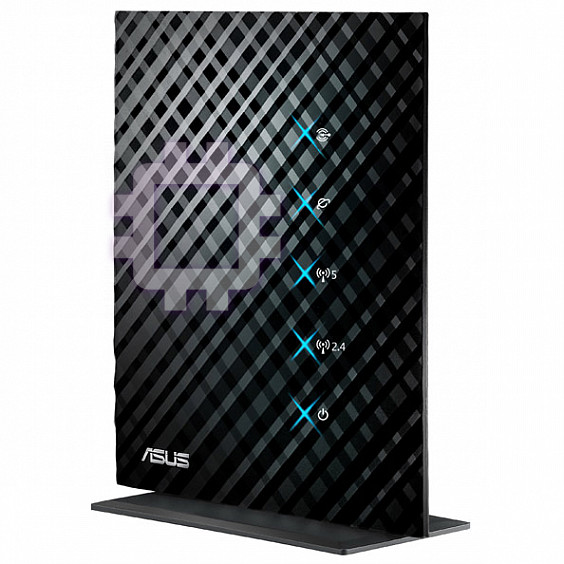
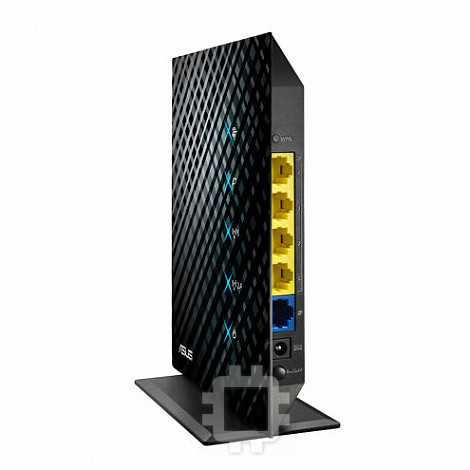
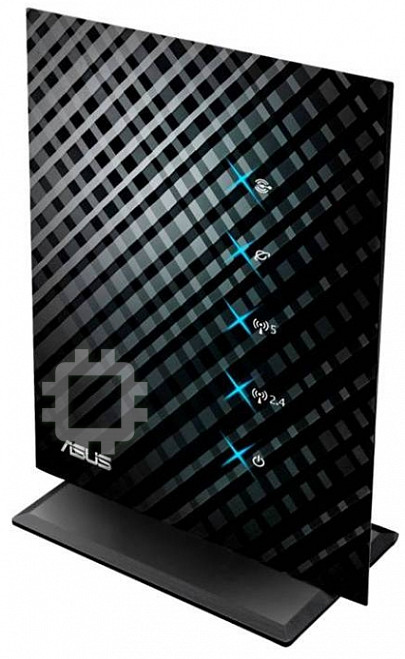
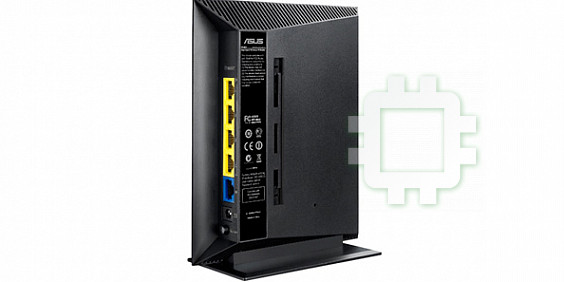
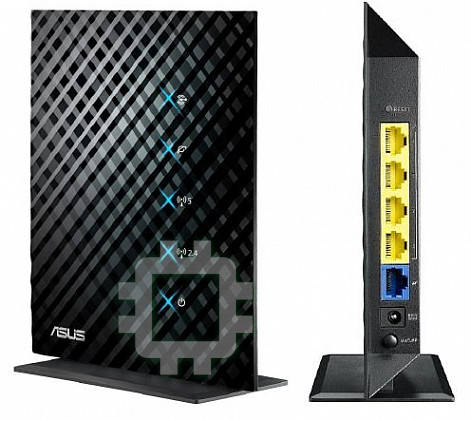
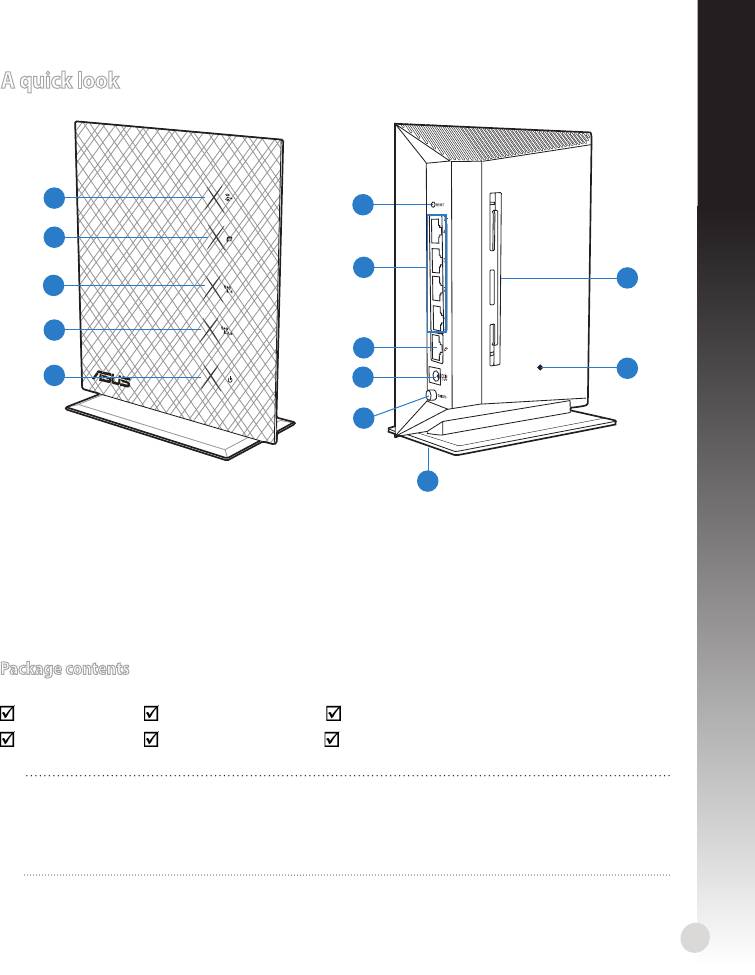
A quick look
1
6
2
7
13
3
4
8
12
5
9
10
11
1)
LAN LED 6) WPS button 10) Power switch
2) WAN LED
7) LAN 1 ~ 4 ports 11) Stand
3)
5GHz LED
WAN (Internet)
12) Reset button
8)
port
4)
2.4GHz LED 13) Wall mounting holes
5) Power LED 9) Power (DC-In) port
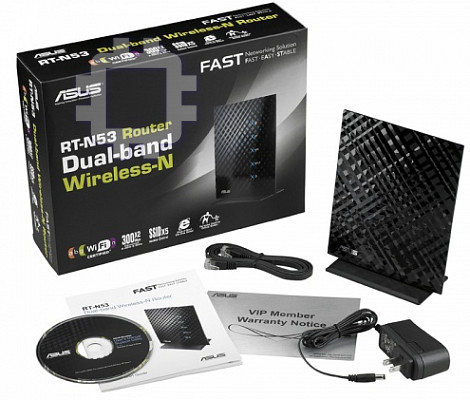
Package contents
RT-N53 Network cable Support CD (User Manual/utility software)
AC adapter Quick Start Guide Warranty card
NOTES:
• If any of the items is damaged or missing, contact your retailer.
• For more details, refer to the user manual included in the support CD.
3

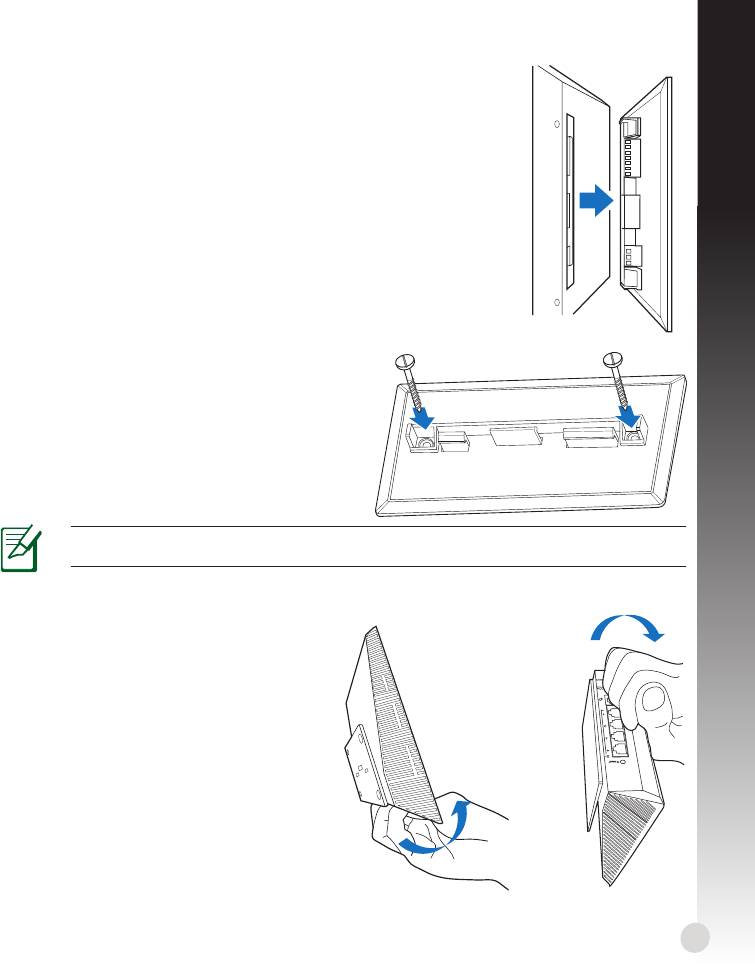
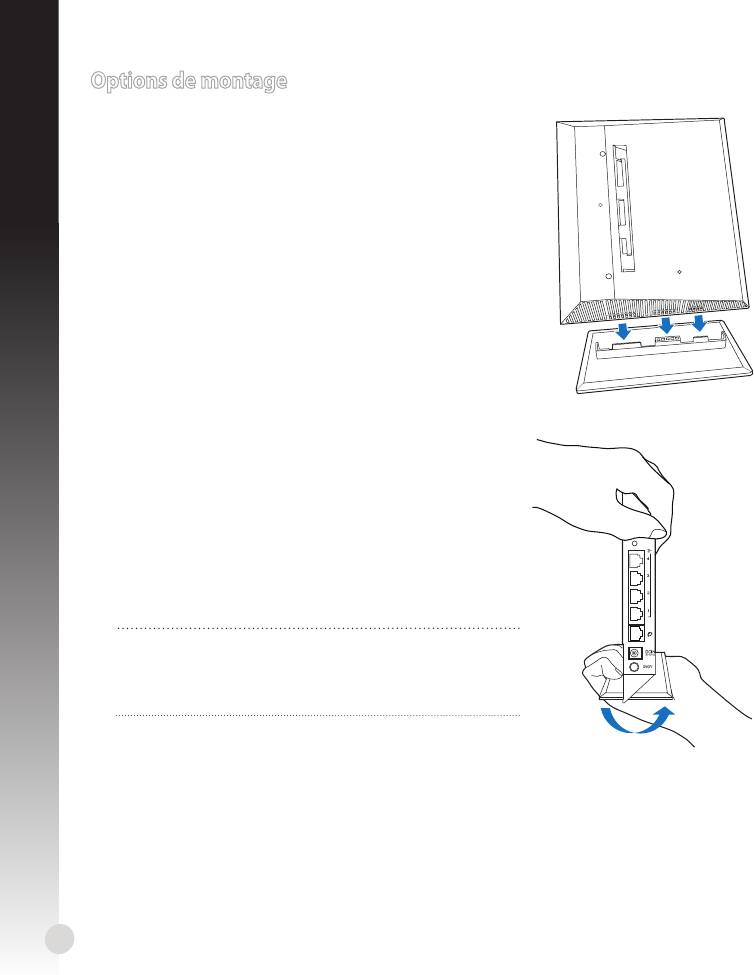
Mounting options
Mounting to the stand
1. Locate the mounting holes at the bottom of the
English
wireless router.
2. Align and insert the stand’s mounting hooks to the
wireless router’s mounting holes.
Dismount from the stand
1. Hold the wireless router with one hand on the upside
and the other hand under the stand, ensuring that the
I/O ports facing you.
2. Follow the direction of the arrow shown below to apply
force and remove the stand.
NOTE:
It's normal if you hear squeaking while dismounting the RT-N53 from the stand.
4
WPS
English
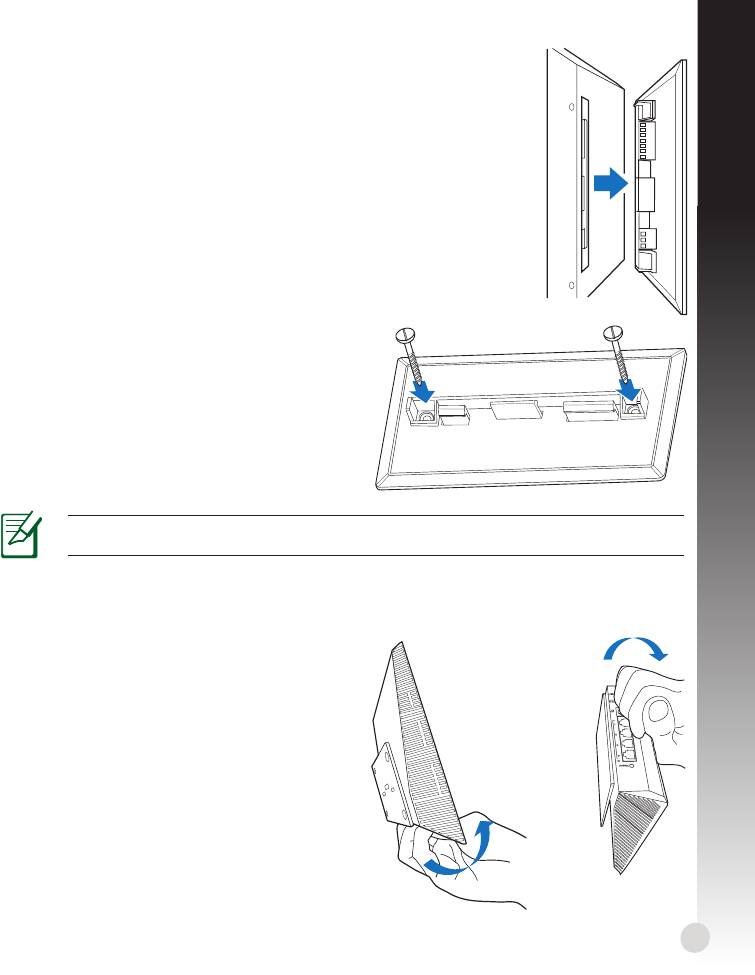
Mounting on the wall
1. Locate the two holes on the stand and secure the stand to the
wall with screws.
2. Locate the mounting holes at the back of the wireless router.
3. Align and insert the stand’s mounting hooks to the wireless router’
s mounting holes.
How to secure the stand (bracket) to the wall
1. Mark two upper holes on the wall.
2. Locate the two holes on the stand and secure
the stand to the wall with screws.
3. Locate the mounting hole at the back of the
wireless router.
4. Align and insert the stand's mounting hook to
the wireless router's mounting hole.
NOTE! The screws are purchased separately..
Dismount from the wall
1. Hold the edge of the front cover (near
the I/O ports).
2. Follow the direction of the arrow shown
below to apply force and dismount the
RT-N53.
or
5
English
6
Modem
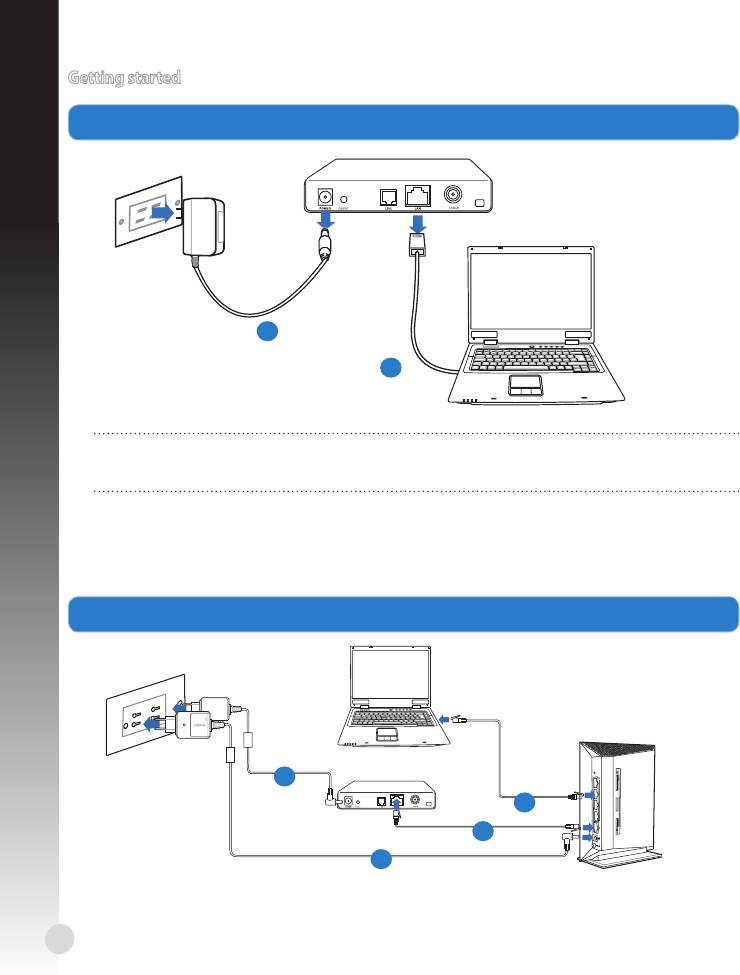
Getting started
1. Unplug and disconnect the wires/cables from your existing modem setup.
a
b
WARNING! Ensure that your cable/ADSL modem has been turned o for at least two
minutes.
a: Unplug the AC adapter from the power outlet and disconnect it from your cable/ADSL
modem.
b: Disconnect the network cable from your cable/ADSL modem.
2. Set up your wireless environment.
W
P
S
Mo
d
em
d
b
c
a
English
a: Insert your wireless router’s AC adapter to the DC-In port and plug it to a power outlet.
b: Using the network cable, connect your computer to your wireless router’s LAN port.
IMPORTANT! Ensure that the WAN and LAN LEDs are blinking.
c: Using another network cable, connect your modem to your wireless router’s WAN
port.
d: Insert your modem’s AC adapter to the DC-In port and plug it to a power outlet.
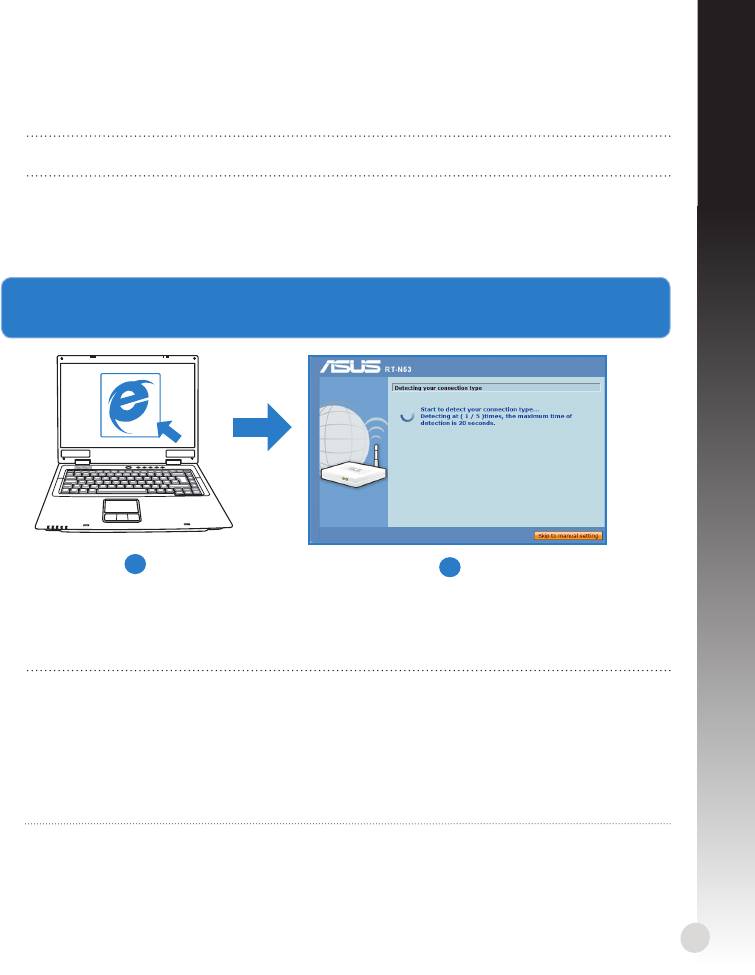
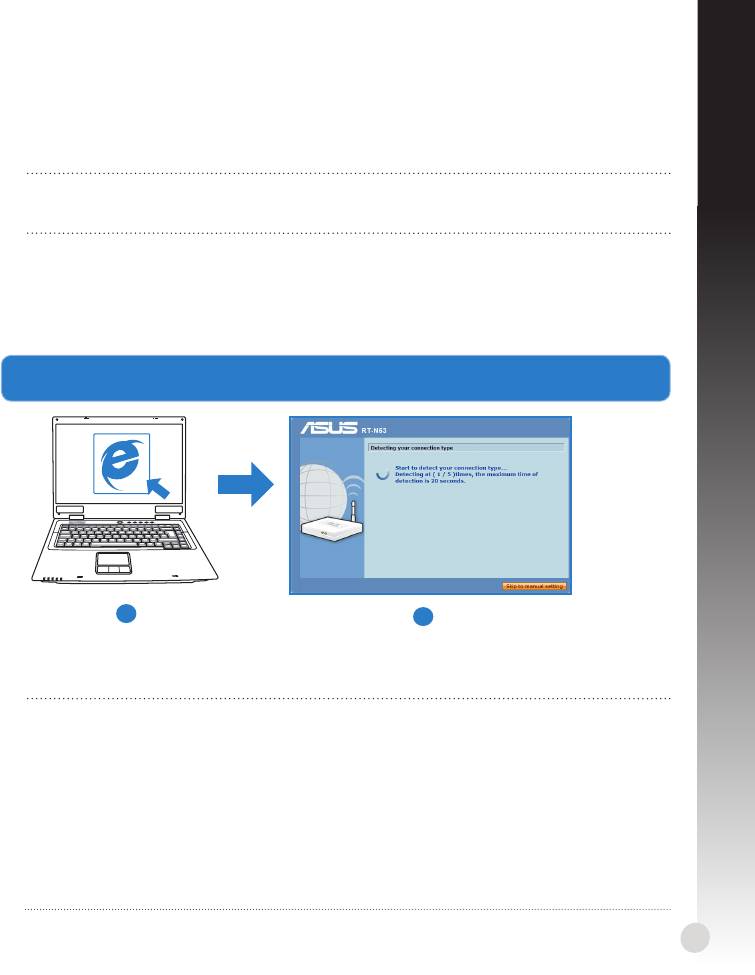
3. Launch the web browser and follow the web graphics user interface (web GUI)
instructions.
a
b
a: Launch your web browser such as Internet Explorer, Google Chrome, or Firefox.
b: Follow the Quick Internet Setup (QIS) steps.
NOTES:
• If your wireless router’s web GUI does not launch, key in http://192.168.1.1 in your
web browser, and log in using the default username: admin and password: admin.
• Disable the proxy settings, dial-up connection, and set your TCP/IP settings to
automatically obtain an IP address. For more details, refer to the
Troubleshooting
section or use the Setup Wizard in the support CD for auto-diagnosis.
7
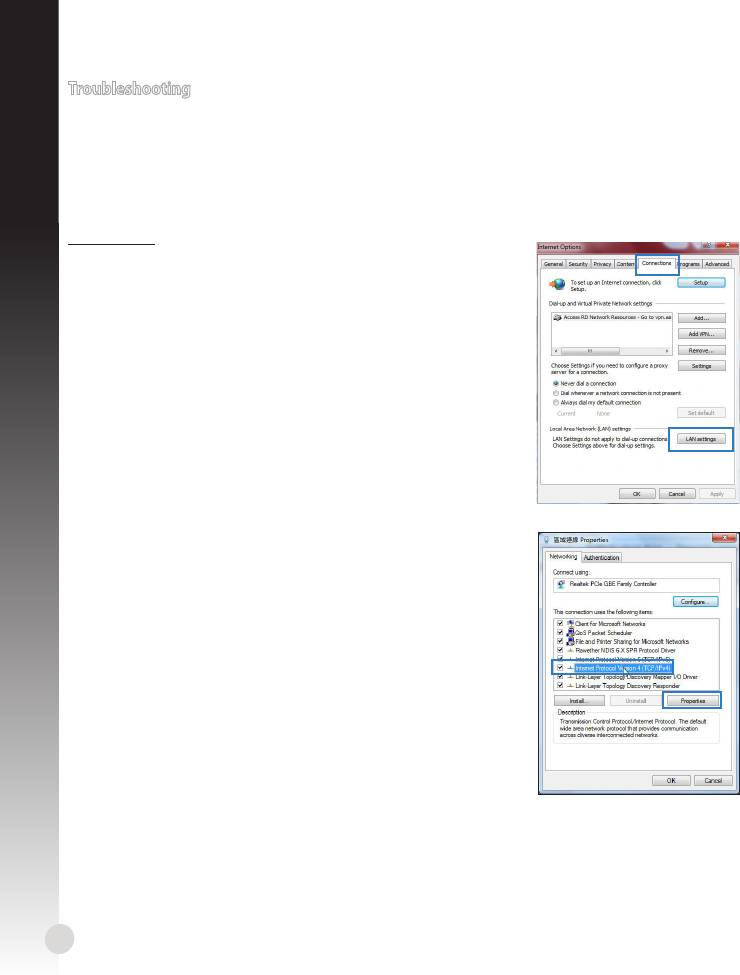
Troubleshooting
I cannot access the web GUI to congure the wireless router settings.
English
• Close all running web browsers and launch again.
• Follow the steps below to congure your computer settings based on its operating
system.
Windows 7
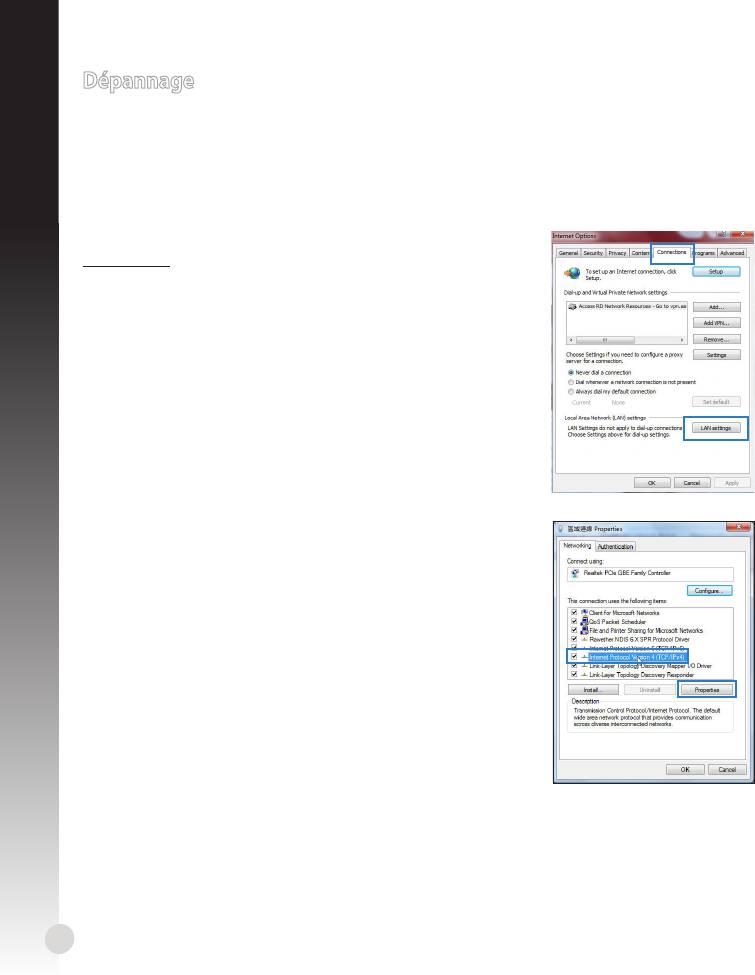
A. Disable the proxy server, if enabled.
1. Click Start > Internet Explorer to launch the web
browser.
2. Click Tools > Internet options > Connections tab > LAN
settings.
3. From the Local Area Network (LAN) Settings screen,
untick Use a proxy server for your LAN.
4. Click OK when done.
B. Set the TCP/IP settings to automatically obtain an IP
address.
1. Click Start > Control Panel > Network and Internet >
Network and Sharing Center > Manage network con-
nections.
2. Select Internet Protocol Version 4 (TCP/IPv4), then
click Properties.
3. Tick Obtain an IP address automatically.
4. Click OK when done.
8
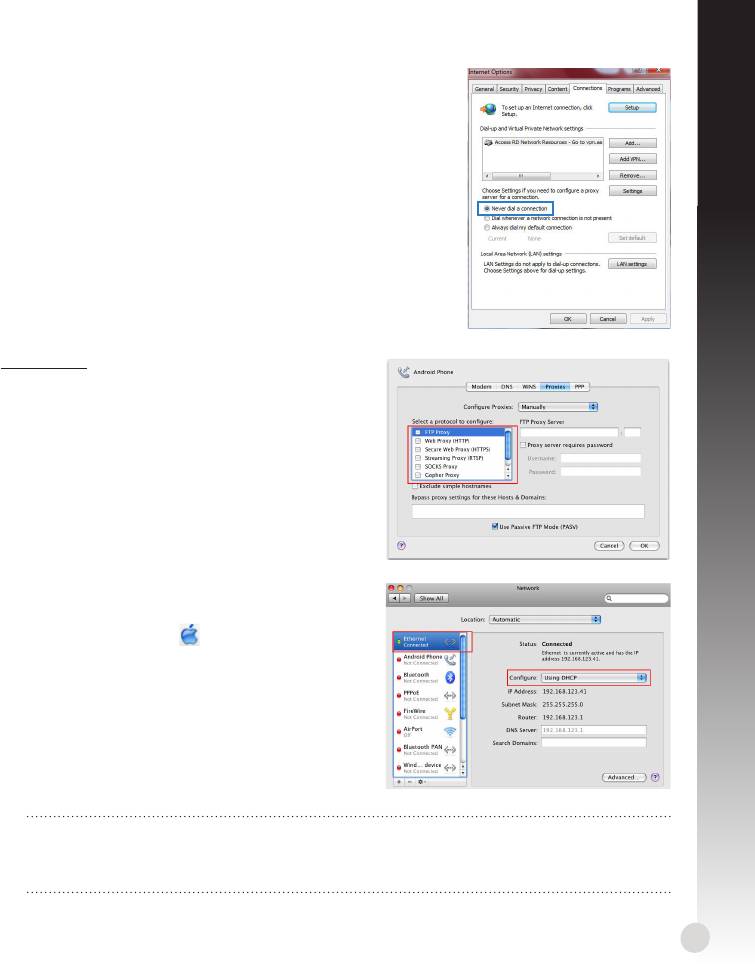
English
C. Disable the dial-up connection, if enabled.
1. Click Start > Internet Explorer to launch the browser.
2. Click Tools > Internet options > Connections tab.
3. Tick Never dial a connection.
4. Click OK when done.
Mac 10.5.8
A. Disable the proxy server, if enabled.
1. From the menu bar, click Safari >
Preferences... > Advanced tab.
2. Click Change Settings... in the Proxies eld.
3. From the list of protocols, deselect FTP Proxy
and Web Proxy (HTTP).
4. Click OK when done.
B. Set the TCP/IP settings to automatically
obtain an IP address.
1. Click the Apple icon > System Preferences
> Network.
2. Select Ethernet and select Using DHCP in the
Congure eld.
3. Click Apply when done.
NOTE: Refer to your operating system’s help and support feature for details on con-
guring your computer’s TCP/IP settings and disabling the proxy server settings or the
dial-up connection.
9
Q2: My wireless connection speed is only 145 Mbps.
• Check if your network card or your computer’s built-in wireless feature has a 300 Mbps
connection capability.
English
• By default, Wi-Fi certied n products are congured to operate using 20 MHz chan-
nels. To change the channel bandwidth from 20 MHz to 20/40 MHz and maximize the
wireless throughput, go to Advanced Setting > Wireless > General in your wireless
router’s web GUI.
Q3: Network name or security keys are forgotten.
• Try setting up the wired connection and congure the the encryption settings again.
• Press the Reset button for more than ve seconds to reset or restore the system to its
factory default settings.
• Factory default settings:
User name / Password:
IP address:
SSID: ASUS
admin / admin
192.168.1.1
Q4: Where can I nd more information about the wireless router?
• User Manual in the support CD
• Online FAQ site: http://support.asus.com/faq
• Technical Support site: http://support-org.asus.com/
• Customer Hotline: Refer to the Support Hotline in this Quick Start Guide
IMPORTANT! Write down the information for your wireless settings and keep this in a
secure location.
2.4GHz Wireless Settings
Network Name (SSID):
Security Key:
5GHz Wireless Settings
Network Name (SSID):
Security Key:
Router Settings
Username:
Password:
10

Français
Aperçu rapide
1
6
2
7
13
3
4
8
12
5
9
10
11
1)
LED réseau local 6) Bouton WPS 10) Interrupteur d’alimentation
Ports réseau local
2)
LED réseau étendu 7)
11) Socle
1 ~ 4
3)
5GHz LED
Port réseau étendu
12) Bouton de réinitialisation
8)
(Internet)
4)
2.4GHz LED 13) Fentes pour xtion murale
LED d’alimenta-
Port d’alimenta-
5)
9)
tion
tion (CC)
Contenu de la boîte
RT-N53 Câble réseau CD de support CD (manuel + utilitaires)
Adaptateur secteur Guide de démarrage rapide Carte de garantie
REMARQUE : Contactez votre revendeur si l’un des éléments est manquant
ou endommagé.
11
Options de montage
Monter le socle
1. Localisez les fentes de montages localisées desous le
routeur sans l.
2. Alignez et insérez les crochets du socle sur les fentes
de montage du routeur sans l.
Désengager le routeur de son socle
1. Prenez la partie supérieure du routeur sans l dans
une main et le socle dans votre autre main, en vous
assurant que les ports de connexion soient face à vous.
2. Suivez la direction de la èche ci-contre pour
désengager le routeur sans l de son socle.
REMARQUE :
Un léger "clic" peut se faire entendre lorsque le
routeur sans l est désengagé du socle.
12
WPS
Français
Français
Fixation murale
1. Localisez les deux ouverture du socle et
sécuriez-l au mur à l'aide de vis.
2. Localisez les fentes de montages localisées
desous le routeur sans l.
3. Alignez et insérez les crochets du socle sur
les fentes de montage du routeur sans l.
Comment sécuriser le socle au mur
1. Percez deux ouvertures sur le mur.
2. Localisez les deux ouverture du socle et
sécuriez-l au mur à l'aide de vis.
3. Localisez les fentes de montages localisées
desous le routeur sans l.
4. Alignez et insérez les crochets du socle sur
les fentes de montage du routeur sans l.
Remarque : Les vis sont vendues séparément.
Désengager le routeur sans l du mur
1. Prenez en main l'extrémité de la façade
du routeur (à roximité des ports de
connexion).
2. Suivez la direction de la èche ci-contre
pour désengager le routeur sans l du mur.
ou
13

Mise en route
1. Déconnectez tous les câbles de votre conguration modem actuelle.
Français
VERTISSEMENT ! Assurez-vous que votre modem câble/ADSL est éteint depuis au
moins 2 minutes.
a: Débranchez l’adaptateur secteur de la prise électrique et du modem câble/ADSL.
b: Déconnectez le câble réseau du modem câble/ADSL.
2. Congurez votre environnement réseau sans l.
14
Modem
a
b
W
P
S
Mo
d
em
d
b
c
a
Français
a : Reliez une extrémité de l’adaptateur secteur au port d’alimentation du routeur et
l’autre extrémité à une prise électrique.
b : À l’aide d’un câble réseau, connectez votre ordinateur au port réseau local (LAN) du
routeur sans l .
IMPORTANT ! Vériez que les LED (voyants lumineux) de réseau étendu et de réseau
local clignotent.
c : À l’aide d’un autre câble réseau, connectez votre modem au port réseau étendu
(WAN) du routeur sans l .
d : Reliez une extrémité de l’adaptateur secteur au port d’alimentation du modem et
l’autre extrémité à une prise électrique.
3. Congurez vos paramètres de réseau sans l via le gestionnaire de conguration Web.
a
b
a : Ouvrez votre navigateur Internet (ex : Internet Explorer, Google Chrome ou Firefox).
b : Suivez les instructions de conguration Internet rapide.
REMARQUES::
• Si le Gestionnaire de conguration Web ne s’ache pas lors de l’exécution de votreSi le Gestionnaire de conguration Web ne s’ache pas lors de l’exécution de votre
navigateur Internet, entrez http://192.168.1.1 dans la barre d’adresse de votre
explorateur Web, et connectez-vous à l’aide du nom d’utilisateur admin et du mot
de passe admin.
• Désactivez votre serveur proxy et la numérotation de votre connexion à distance (siDésactivez votre serveur proxy et la numérotation de votre connexion à distance (si
disponibles), puis congurez vos paramètres TCP/IP de sorte à obtenir une adresse
IP automatiquement. Pour plus de détails, consultez la section
Dépannage
ou
utilisez l’Assistant de conguration contenu dans le CD de support pour obtenir un
diagnostic de connexion.
15
Dépannage
Q1 : Je ne parviens pas à accéder au Gestionnaire de conguration Web pour régler les
paramètres sans l du routeur.
Français
• Redémarrez votre explorateur Internet.
• Suivez les étapes suivantes pour congurer votre ordinateur en fonction du système d’
exploitation utilisé.
Windows 7
A. Désactivez le serveur proxy si celui-ci est activé.
1. Cliquez sur Démarrer > Internet Explorer pour lancer le
navigateur.
2. Cliquez sur Outils > Options Internet > onglet
Connexions > Paramètres réseau.
3. À partir de l’écran Paramètres du réseau local, décochez
l’option Utiliser un serveur proxy pour votre réseau
local.
4. Cliquez sur OK une fois terminé.
B. Congurez les paramètres TCP/IP pour l’obtention
automatique d’une adresse IP.
1. Cliquez sur Démarrer > Panneau de conguration
> Réseau et Internet > Centre réseau et partage >
Gérer les connexions réseau.
2. Sélectionnez Protocole Internet version 4 (TCP/IPv4),
puis cliquez sur Propriétés.
3. Cochez l’option Obtenir une adresse IP automatique-
ment.
4. Cliquez sur OK une fois terminé.
16

Français
C. Désactivez la numérotation de votre connexion à
distance.
1. Cliquez sur Démarrer > Internet Explorer pour lancer le
navigateur.
2. Cliquez sur Outils > Options Internet > onglet
Connexions.
3. Cochez l’option Ne jamais établir de connexion.
4. Cliquez sur OK une fois terminé.
Mac 10.5.8
A. Désactivez le serveur proxy si celui-ci est
activé.
1. Dans la barre des menus, cliquez sur Safari >
Préférences... > onglet Avancées.
2. Cliquez sur Modier les réglages... dans le
champ Proxies.
3. Dans la liste des protocoles, décochez les
options Proxy FTP et Proxy web sécurisé
(HTTPS).
4. Cliquez sur OK une fois terminé.
B. Congurez les paramètres TCP/IP pour l’ob-
tention automatique d’une adresse IP.
1. Cliquez sur la Pomme > Préférences Sys-
tème > Réseau.
2. Sélectionnez Ethernet puis Via DHCP dans le
champ Congurer.
3. Cliquez sur Appliquer une fois terminé.
REMARQUE : Consultez l’Aide de votre système d’exploitation pour plus de détails sur
la conguration des paramètres TCP/IP de votre ordinateur ainsi que sur la désactiva-
tion du serveur proxy et de la numérotation de connexion.
17

Q2 : La vitesse de ma connexion sans l n’atteint que 145 Mbps.
• Vériez que la carte réseau sans l de votre ordinateur supporte une vitesse de
connexion de 300 Mbps.
• Par défaut, les produits Wi-Fi certiés avec le standard sans l “n” sont congurés
de sorte à fonctionner sur les canaux de fréquence de 20 MHz. Pour modier le
Français
canal de 20 MHz à 20/40 MHz et ainsi maximiser le débit sans l, allez dans le menu
Paramètres avancés > Sans l > Général du Gestionnaire de conguration de votre
routeur.
Q3 : J’ai oublié le nom ou la clé de sécurité du réseau sans l.
• Établissez une connexion laire au routeur et recongurez les paramètres de sécurité
sans l.
• Appuyez sur le bouton de réinitialisation pendant plus de 5 secondes pour réinitialiser
ou restaurer les paramètres par défaut du routeur.
• Paramètres par défaut :
Nom d’utilisateur /
Adresse IP :
SSID: ASUS
Mot de passe :
192.168.1.1
admin / admin
Q4 : Où puis-je obtenir plus d’informations sur le routeur sans l ?
• Manuel d’utilisation contenu dans le CD de support
• FAQ en ligne : http://support.asus.com/faq
• Site de support technique : http://support-org.asus.com/
• Hotline : consultez le Guide additionnel accompagnant votre routeur pour obtenir le
numéro de téléphone approprié à votre pays/région
IMPORTANT ! Notez les informations relatives à vos paramètres de connexion sans l
et gardez-les dans un endroit sûr.
Paramètres sans l 2.4GHz
Nom du réseau (SSID) :
Clé de sécurité :
Paramètres sans l 5GHz
Nom du réseau (SSID) :
Clé de sécurité :
Paramètres du routeur
Nom d’utilisateur :
Mot de passe :
18

Deutsch
Übersicht
1
6
2
7
13
3
4
8
12
5
9
10
11
1)
LAN LED 6) WPS-Taste 10) Stromschalter
2) WAN LED
7) LAN-Anschlüsse 1 ~ 4 11) Standhalterung
3)
5GHz LED
12) Reset-Taste
WAN-Anschluss
8)
Wandbefestigungsö-
(Internet)
4)
2.4GHz LED 13)
nungen
5) Strom LED 9) Stromanschluss (DC-In)
Packungsinhalt
RT-N53 Netzwerkkabel Support-CD (Handbuch/Anwendungen)
Netzteil Schnellstarthilfe Garantiekarte
HINWEIS: Sollten Artikel beschädigt oder nicht vorhanden sein, wenden Sie sich an
Ihren Händler.
19

Aufbau
Standhalterung anbringen
1. Finden Sie die zwei Befestigungsönungen auf der
unterseite des drahtlosen Routers.
2. Verbinden und befestigen Sie die zwei Befestigungs-
haken auf der Halterung mit den Befestigungsö-
nungen des Routers.
Standhalterung entfernen
1. Halten Sie den drahtlosen Router mit einer Hand auf der
Oberseite und mit der anderen Hand an der Halterung
fest, sodass die E/A-Anschlüsse zu Ihnen zeigen.
2. Drücken Sie die Halterung in die Pfeilrichtung, wie auf
der rechten Seite abgebildet, und entfernen Sie die
Halterung vom Router.
HINWEIS:
Beim Entfernen der Standhalterung ist es normal, wenn Quietschgeräusche auf-
treten.
20
WPS


