Asus RT-N53: инструкция
Раздел: Компьютерная техника, комплектующие, аксессуары
Тип: Приемник Wi-Fi

Характеристики, спецификации
Инструкция к Приемнику Wi-Fi Asus RT-N53

Quick Start Guide
®
RT-N53
Dual-band Wireless-N Router

U6781 / Second Edition / January 2012
NOTE: For more details, refer to the user manual included in
the support CD.
English ...............................................................................................................................................3
Français .............................................................................................................................................11
Deutsch .............................................................................................................................................19
Italiano ..............................................................................................................................................27
Русский .............................................................................................................................................35
Български ........................................................................................................................................ 43
Čeština ...............................................................................................................................................51
Dansk .................................................................................................................................................59
Nederlands ......................................................................................................................................67
Eesti ....................................................................................................................................................75
Suomi .................................................................................................................................................83
Ελληνικά ............................................................................................................................................91
Magyar ..............................................................................................................................................99
Latviski ..............................................................................................................................................107
Lietuvių .............................................................................................................................................115
Norsk ..................................................................................................................................................123
Polski ..................................................................................................................................................131
Português .........................................................................................................................................139
Română .............................................................................................................................................147
Español ..............................................................................................................................................155
Svenska .............................................................................................................................................163
Slovensky..........................................................................................................................................171
Українська ....................................................................................................................................... 179
Türkçe ................................................................................................................................................187
2
English
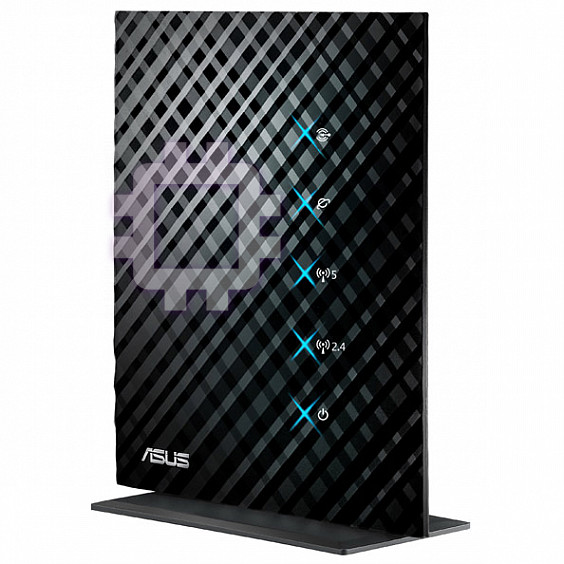
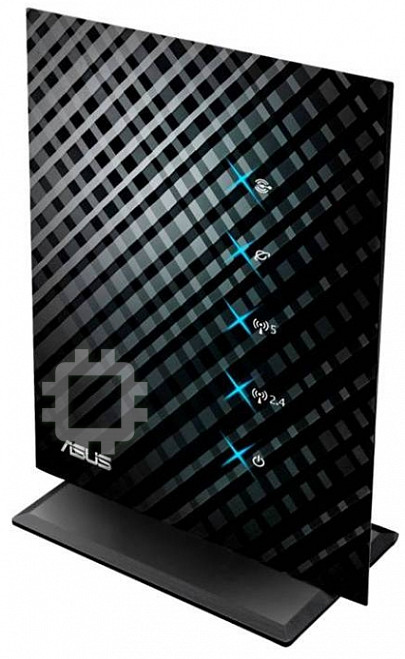
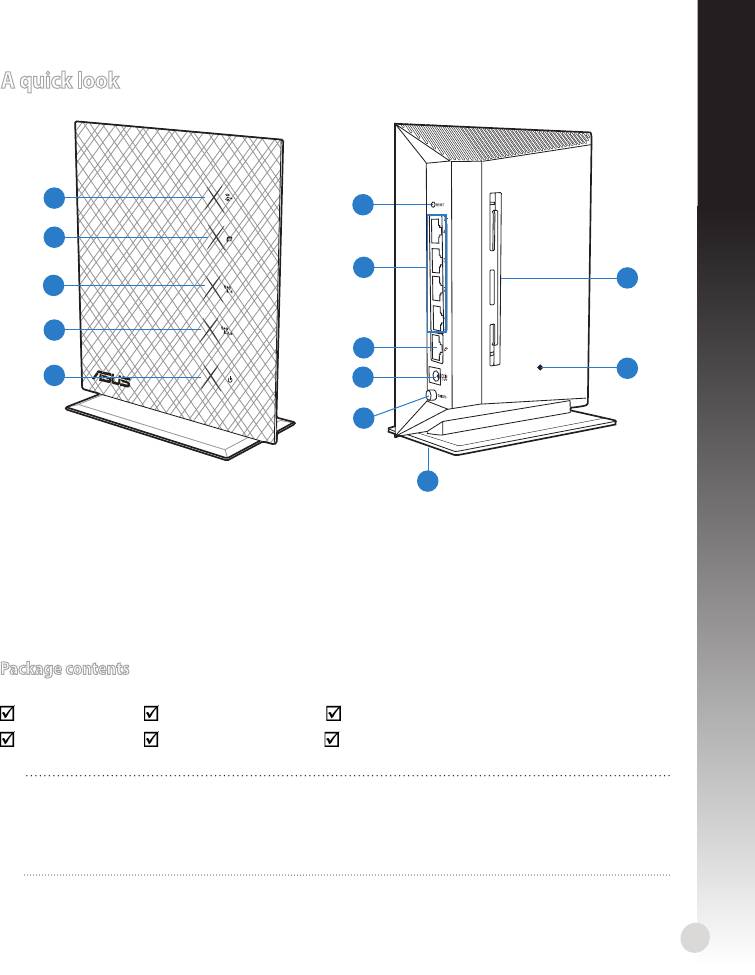
A quick look
1
6
2
7
13
3
4
8
12
5
9
10
11
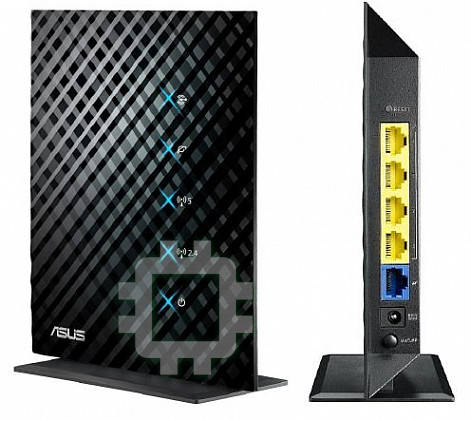
1)
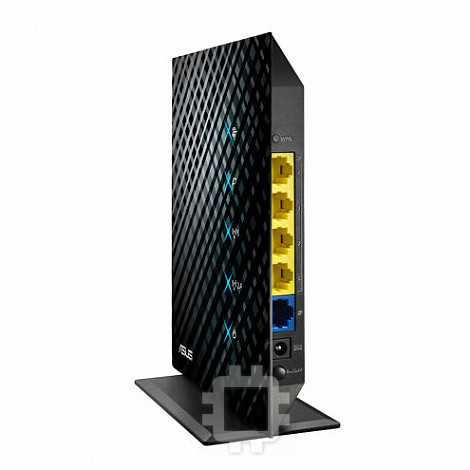
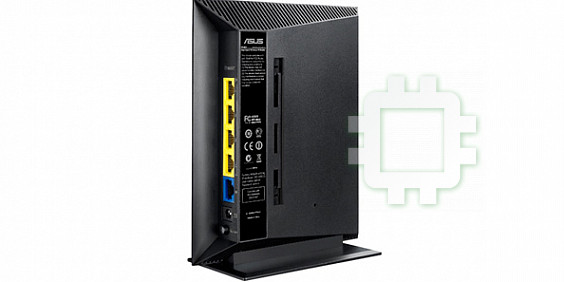
LAN LED 6) WPS button 10) Power switch
2) WAN LED
7) LAN 1 ~ 4 ports 11) Stand
3)
5GHz LED
WAN (Internet)
12) Reset button
8)
port
4)
2.4GHz LED 13) Wall mounting holes
5) Power LED 9) Power (DC-In) port
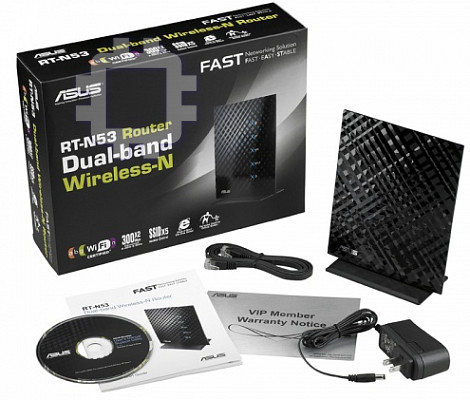
Package contents
RT-N53 Network cable Support CD (User Manual/utility software)
AC adapter Quick Start Guide Warranty card
NOTES:
• If any of the items is damaged or missing, contact your retailer.
• For more details, refer to the user manual included in the support CD.
3

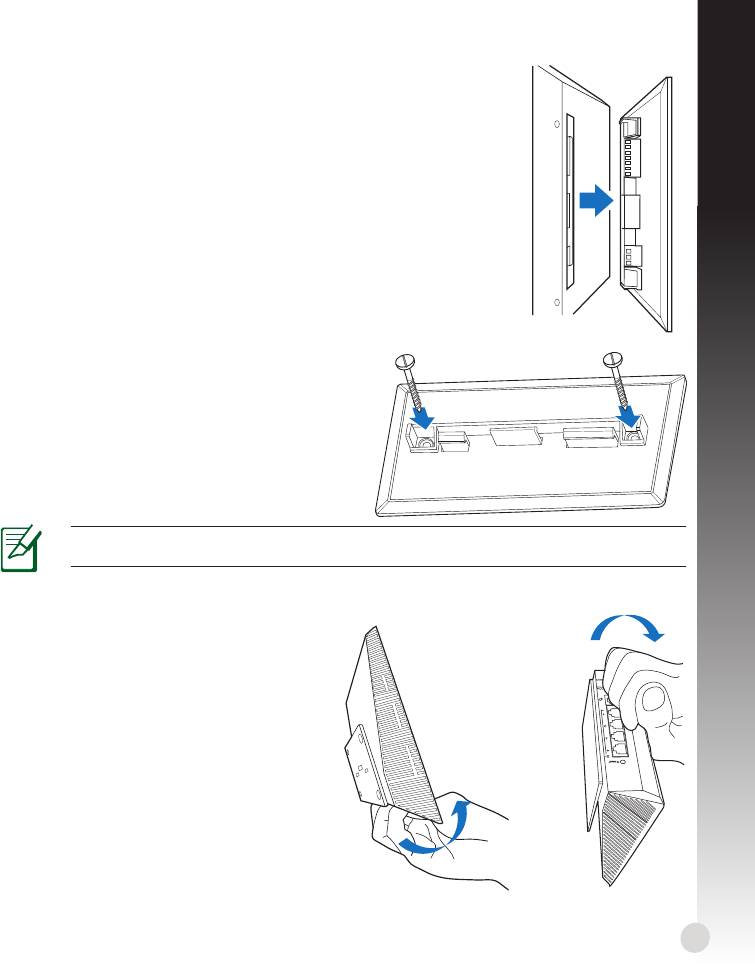
Mounting options
Mounting to the stand
1. Locate the mounting holes at the bottom of the
English
wireless router.
2. Align and insert the stand’s mounting hooks to the
wireless router’s mounting holes.
Dismount from the stand
1. Hold the wireless router with one hand on the upside
and the other hand under the stand, ensuring that the
I/O ports facing you.
2. Follow the direction of the arrow shown below to apply
force and remove the stand.
NOTE:
It's normal if you hear squeaking while dismounting the RT-N53 from the stand.
4
WPS
English
Mounting on the wall
1. Locate the two holes on the stand and secure the stand to the
wall with screws.
2. Locate the mounting holes at the back of the wireless router.
3. Align and insert the stand’s mounting hooks to the wireless router’
s mounting holes.
How to secure the stand (bracket) to the wall
1. Mark two upper holes on the wall.
2. Locate the two holes on the stand and secure
the stand to the wall with screws.
3. Locate the mounting hole at the back of the
wireless router.
4. Align and insert the stand's mounting hook to
the wireless router's mounting hole.
NOTE! The screws are purchased separately..
Dismount from the wall
1. Hold the edge of the front cover (near
the I/O ports).
2. Follow the direction of the arrow shown
below to apply force and dismount the
RT-N53.
or
5
English
6
Modem
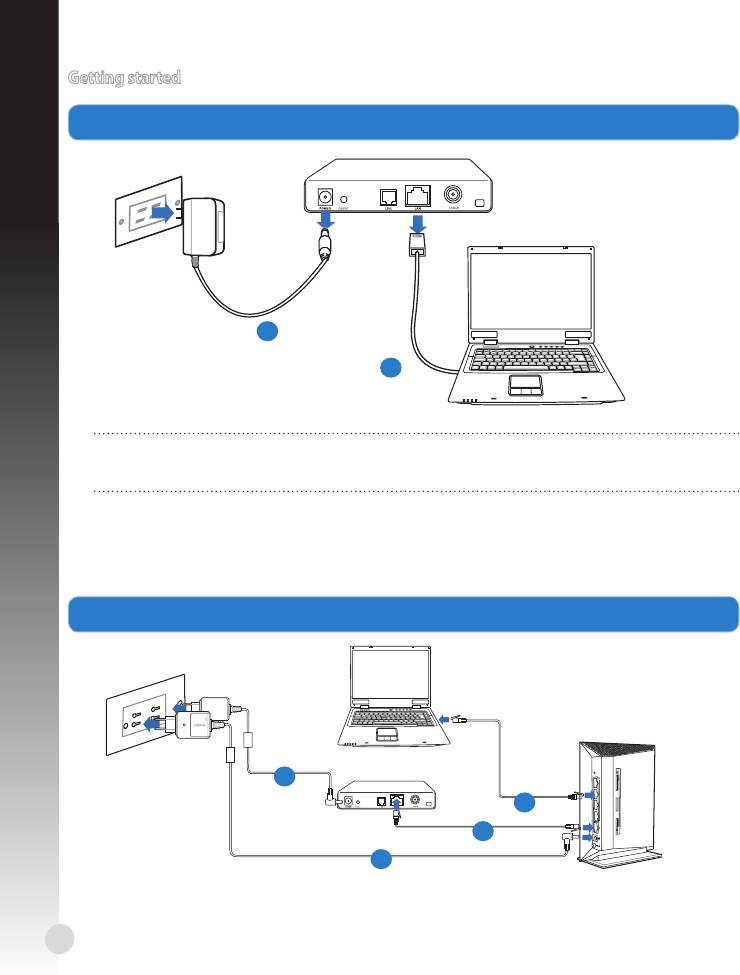
Getting started
1. Unplug and disconnect the wires/cables from your existing modem setup.
a
b
WARNING! Ensure that your cable/ADSL modem has been turned o for at least two
minutes.
a: Unplug the AC adapter from the power outlet and disconnect it from your cable/ADSL
modem.
b: Disconnect the network cable from your cable/ADSL modem.
2. Set up your wireless environment.
W
P
S
Mo
d
em
d
b
c
a
English
a: Insert your wireless router’s AC adapter to the DC-In port and plug it to a power outlet.
b: Using the network cable, connect your computer to your wireless router’s LAN port.
IMPORTANT! Ensure that the WAN and LAN LEDs are blinking.
c: Using another network cable, connect your modem to your wireless router’s WAN
port.
d: Insert your modem’s AC adapter to the DC-In port and plug it to a power outlet.
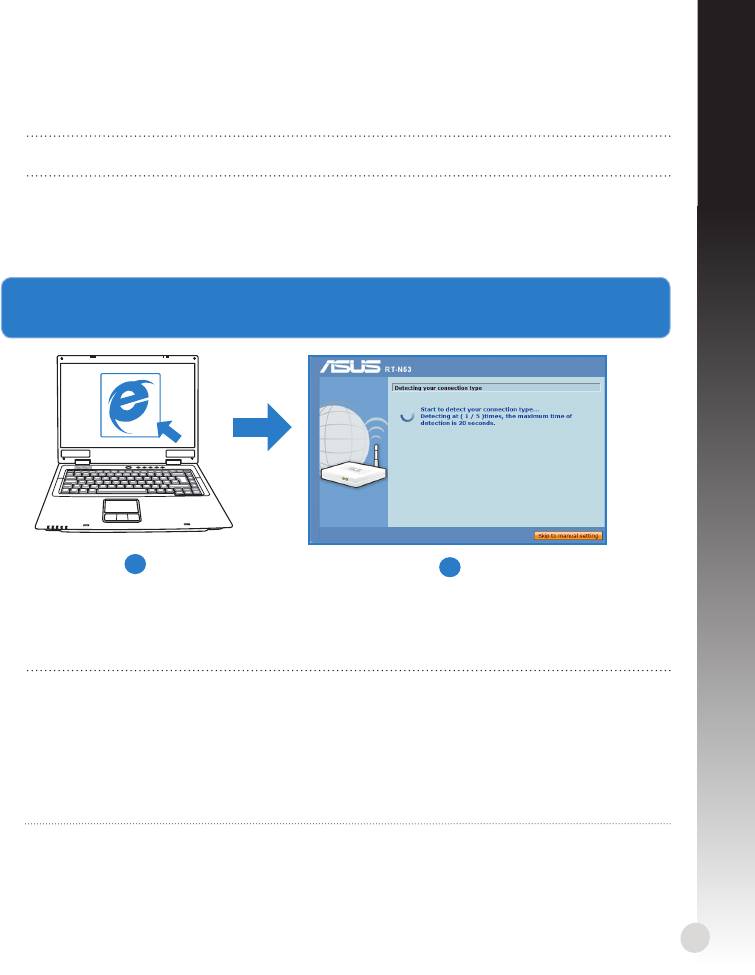
3. Launch the web browser and follow the web graphics user interface (web GUI)
instructions.
a
b
a: Launch your web browser such as Internet Explorer, Google Chrome, or Firefox.
b: Follow the Quick Internet Setup (QIS) steps.
NOTES:
• If your wireless router’s web GUI does not launch, key in http://192.168.1.1 in your
web browser, and log in using the default username: admin and password: admin.
• Disable the proxy settings, dial-up connection, and set your TCP/IP settings to
automatically obtain an IP address. For more details, refer to the
Troubleshooting
section or use the Setup Wizard in the support CD for auto-diagnosis.
7
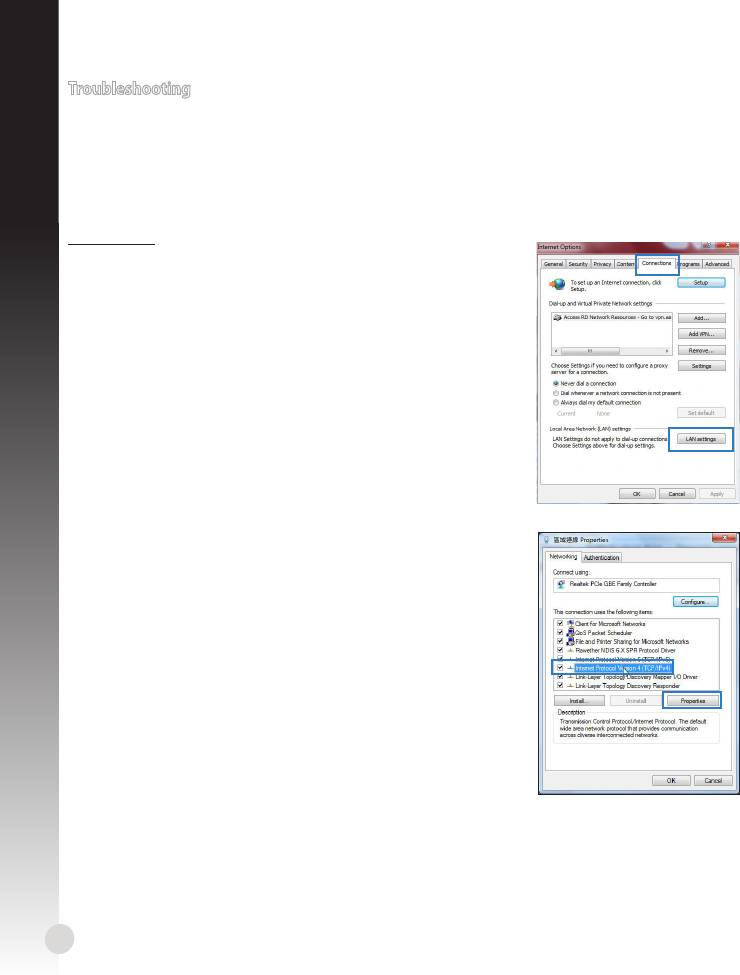
Troubleshooting
I cannot access the web GUI to congure the wireless router settings.
English
• Close all running web browsers and launch again.
• Follow the steps below to congure your computer settings based on its operating
system.
Windows 7
A. Disable the proxy server, if enabled.
1. Click Start > Internet Explorer to launch the web
browser.
2. Click Tools > Internet options > Connections tab > LAN
settings.
3. From the Local Area Network (LAN) Settings screen,
untick Use a proxy server for your LAN.
4. Click OK when done.
B. Set the TCP/IP settings to automatically obtain an IP
address.
1. Click Start > Control Panel > Network and Internet >
Network and Sharing Center > Manage network con-
nections.
2. Select Internet Protocol Version 4 (TCP/IPv4), then
click Properties.
3. Tick Obtain an IP address automatically.
4. Click OK when done.
8
English
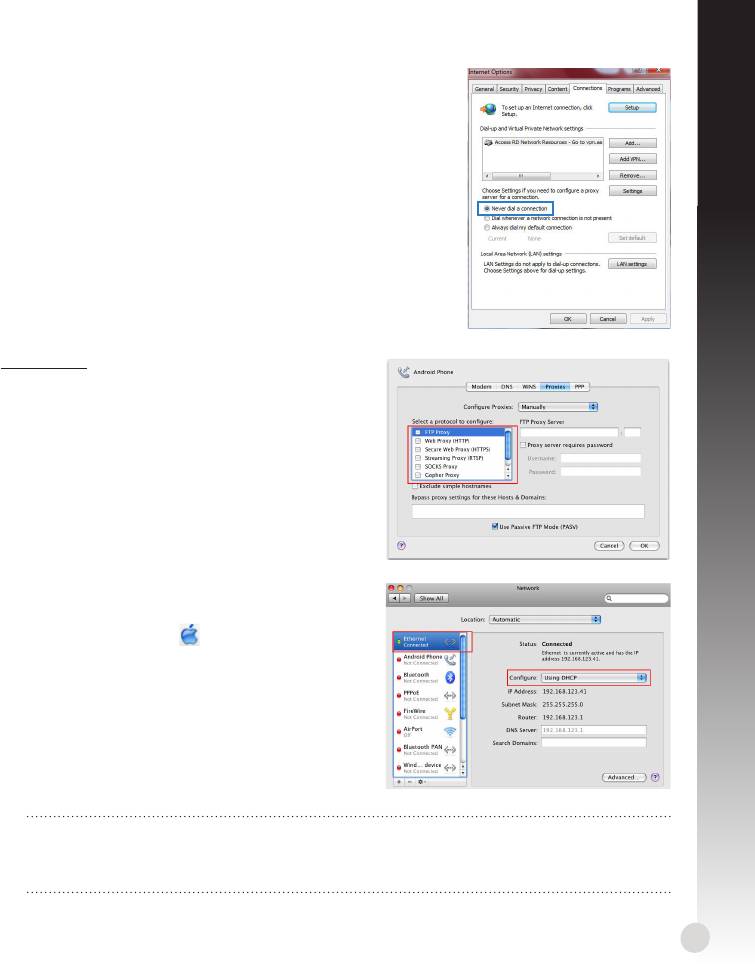
C. Disable the dial-up connection, if enabled.
1. Click Start > Internet Explorer to launch the browser.
2. Click Tools > Internet options > Connections tab.
3. Tick Never dial a connection.
4. Click OK when done.
Mac 10.5.8
A. Disable the proxy server, if enabled.
1. From the menu bar, click Safari >
Preferences... > Advanced tab.
2. Click Change Settings... in the Proxies eld.
3. From the list of protocols, deselect FTP Proxy
and Web Proxy (HTTP).
4. Click OK when done.
B. Set the TCP/IP settings to automatically
obtain an IP address.
1. Click the Apple icon > System Preferences
> Network.
2. Select Ethernet and select Using DHCP in the
Congure eld.
3. Click Apply when done.
NOTE: Refer to your operating system’s help and support feature for details on con-
guring your computer’s TCP/IP settings and disabling the proxy server settings or the
dial-up connection.
9
Q2: My wireless connection speed is only 145 Mbps.
• Check if your network card or your computer’s built-in wireless feature has a 300 Mbps
connection capability.
English
• By default, Wi-Fi certied n products are congured to operate using 20 MHz chan-
nels. To change the channel bandwidth from 20 MHz to 20/40 MHz and maximize the
wireless throughput, go to Advanced Setting > Wireless > General in your wireless
router’s web GUI.
Q3: Network name or security keys are forgotten.
• Try setting up the wired connection and congure the the encryption settings again.
• Press the Reset button for more than ve seconds to reset or restore the system to its
factory default settings.
• Factory default settings:
User name / Password:
IP address:
SSID: ASUS
admin / admin
192.168.1.1
Q4: Where can I nd more information about the wireless router?
• User Manual in the support CD
• Online FAQ site: http://support.asus.com/faq
• Technical Support site: http://support-org.asus.com/
• Customer Hotline: Refer to the Support Hotline in this Quick Start Guide
IMPORTANT! Write down the information for your wireless settings and keep this in a
secure location.
2.4GHz Wireless Settings
Network Name (SSID):
Security Key:
5GHz Wireless Settings
Network Name (SSID):
Security Key:
Router Settings
Username:
Password:
10
Оглавление
- English
- English
- Français
- Français
- Français
- Français
- Français
- Deutsch
- Deutsch
- Deutsch
- Italiano
- Italiano
- Italiano
- Italiano
- Русский
- Русский
- Русский
- Русский
- български
- български
- български
- български
- Čeština
- Čeština
- Čeština
- Čeština
- Dansk
- Dansk
- Dansk
- Dansk
- Nederlands
- Nederlands
- Nederlands
- Eesti
- Eesti
- Eesti
- Eesti
- Suomi
- Suomi
- Suomi
- Suomi
- Ελληνικά
- Ελληνικά
- Ελληνικά
- Magyar
- Magyar
- Magyar
- Magyar
- Latvisk
- Latvisk
- Latvisk
- Latvisk
- Lietuvių
- Lietuvių
- Lietuvių
- Lietuvių
- Norsk
- Norsk
- Norsk
- Polski
- Polski
- Polski
- Polski
- Português
- Português
- Português
- Română
- Română
- Română
- Română
- Español
- Español
- Español
- Español
- Svenska
- Svenska
- Svenska
- Slovensky
- Slovensky
- Slovensky
- Slovensky
- Українська
- Українська
- Українська
- Українська
- Türkçe


