Asus PW201: инструкция
Раздел: Компьютерная техника, комплектующие, аксессуары
Тип: Монитор
Инструкция к Монитору Asus PW201
PW201
LCD Monitor

PW201
LCD Monitor

Table of content
ASUS contact information ........................................................... ii
English...........................................................................................1
Français.........................................................................................9
Deutsch ..................................................................................... 17
Italiano........................................................................................25
Español........................................................................................33
Pyccкий
......................................................................................41
Nederlands..................................................................................49
.......................................................................................57
.......................................................................................65
..........................................................................................73
..........................................................................................81
Português....................................................................................89
Türkçe.........................................................................................97
.........................................................................................105
...........................................................................................113
Quick Start Guide Quick Start Guide
Quick Start Guide Quick Start Guide
Quick Start Guide
ii
ii
i

ASUS contact information
ASUSTeK COMPUTER INC.ASUSTeK COMPUTER INC.
ASUSTeK COMPUTER INC.ASUSTeK COMPUTER INC.
ASUSTeK COMPUTER INC.
Address 15 Li-Te Road, Peitou, Taipei, Taiwan 11259
Telephone +886-2-2894-3447
Fax +886-2-2894-7798
E-mail info@asus.com.tw
Web site www.asus.com.tw
ASUS COMPUTER INTERNATIONAL (America)ASUS COMPUTER INTERNATIONAL (America)
ASUS COMPUTER INTERNATIONAL (America)ASUS COMPUTER INTERNATIONAL (America)
ASUS COMPUTER INTERNATIONAL (America)
Address 44370 Nobel Drive, Fremont, CA 94538, USA
Fax +1-510-608-4555
E-mail tmd1@asus.com
Web site usa.asus.com
Technical Support
Telephone
(General) +1-502-995-0883
(Notebook) +1-510-739-3777
Support fax +1-502-933-8713
Online support http://vip.asus.com/eservice/techserv.aspx
ASUS COMPUTER GmbH (Germany and Austria)ASUS COMPUTER GmbH (Germany and Austria)
ASUS COMPUTER GmbH (Germany and Austria)ASUS COMPUTER GmbH (Germany and Austria)
ASUS COMPUTER GmbH (Germany and Austria)
Address Harkort Str. 25, D-40880 Ratingen, Germany
Telephone +49-2102-95990
Fax +49-2102-959911
Online contact www.asuscom.de/sales
Technical Support
Telephone +49-2102-95990
Fax +49-2102-959911
Online support www.asuscom.de/support
Web site www.asuscom.de/news
iiii
iiii
ii
Quick Start Guide Quick Start Guide
Quick Start Guide Quick Start Guide
Quick Start Guide
English
PW201
LCD Monitor
Quick Start Guide
Safety information
• Before setting up the monitor, carefully read all the documentation that
English
came with the package.
• To prevent fire or shock hazard, never expose the monitor to rain or
moisture.
• The monitor should be operated only from the type of power source
indicated on the label. If you are not sure of the type of power supplied
to your home, consult your dealer or local power company.
• Use the appropriate power plug which complies with your local power
standard.
• To ensure satisfactory operation, use the monitor only with UL listed
computers which have appropriate configured receptacles marked
between 100-240V AC.
• If you encounter technical problems with the monitor, contact a qualified
service technician or your retailer.
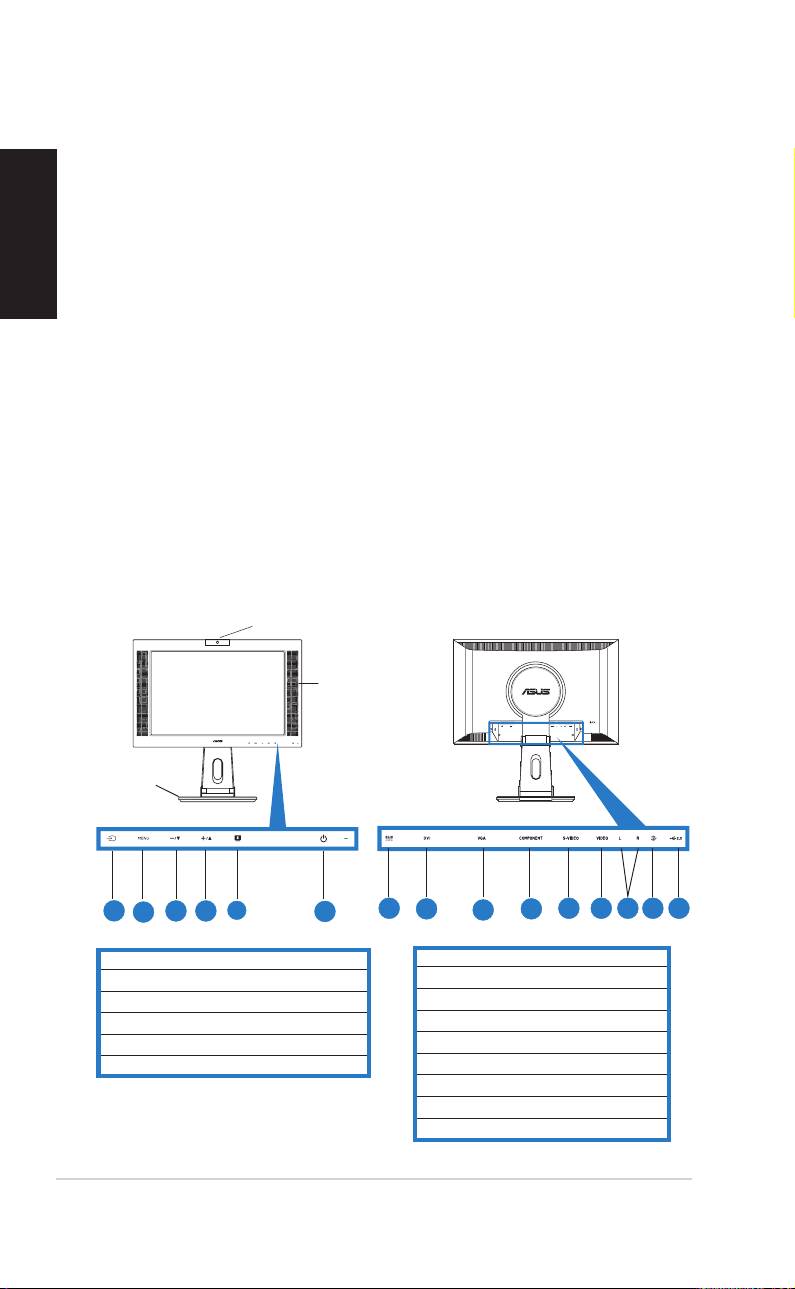
Monitor introduction
Front viewFront view
Front viewFront view
Front view
Rear viewRear view
Rear viewRear view
Rear view
WebcamWebcam
WebcamWebcam
Webcam
Stereo Stereo
Stereo Stereo
Stereo
speakers speakers
speakers speakers
speakers
Stand Stand
Stand Stand
Stand
11
11
1
33
33
3
44
44
22
4
2
44
44
4
55
55
5
66
66
6
77
77
7
88
88
22
8
99
99
9
1010
1010
10
1111
1111
11
1212
1212
12
1313
1313
13
1414
1414
14
1515
1515
15
11
11
1
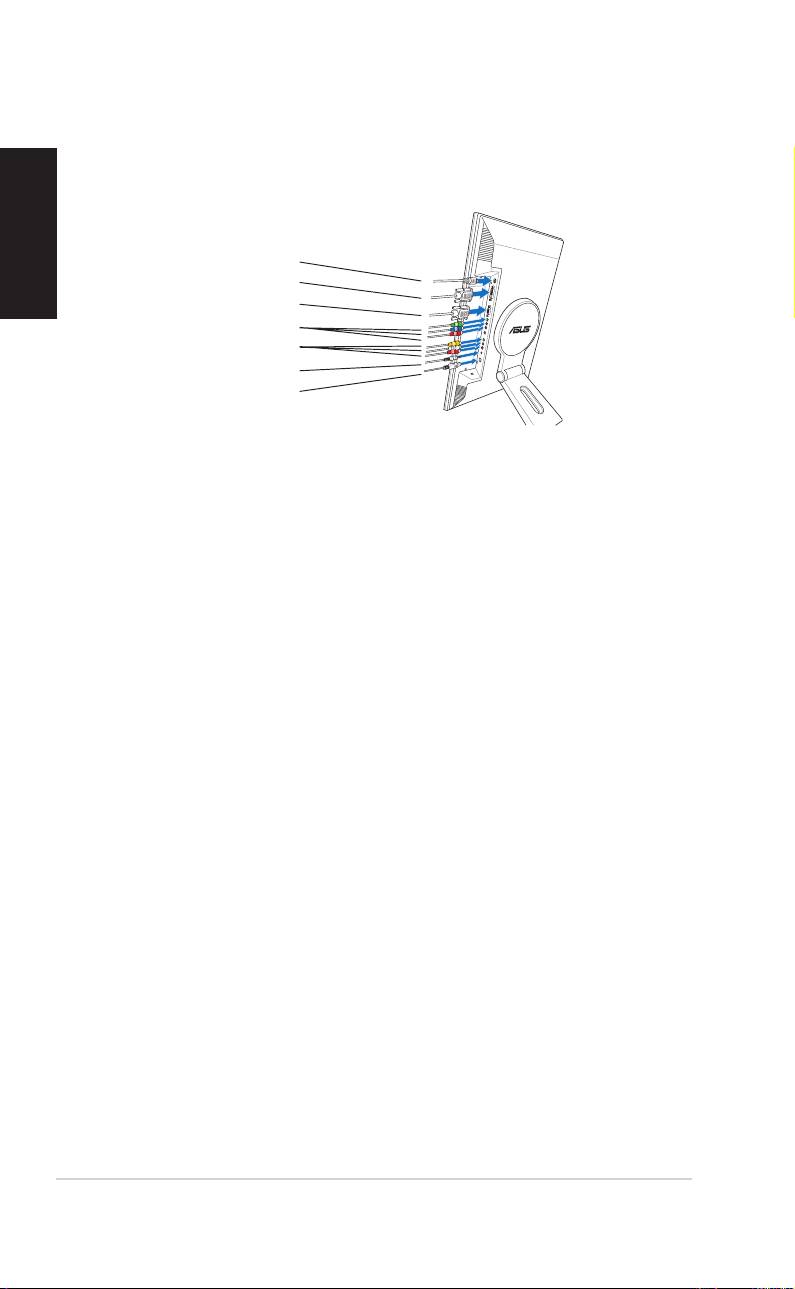
1. Input source sensor
7. DC-in port
2. MENU sensor
8. DVI port
3. Decrease sensor/Volume hotkey
9. VGA port
4. Increase sensor/Brightness hotkey
10. Component input port (YPbPr)
5. SPLENDID™ mode hotkey/Exit MENU
11. S-Video port
6. Power sensor/indicator
12. Video port (Composite)
13. L/R Audio ports
14. PC Line-in port
15. USB port
22
22
2
Quick Start Guide Quick Start Guide
Quick Start Guide Quick Start Guide
Quick Start Guide
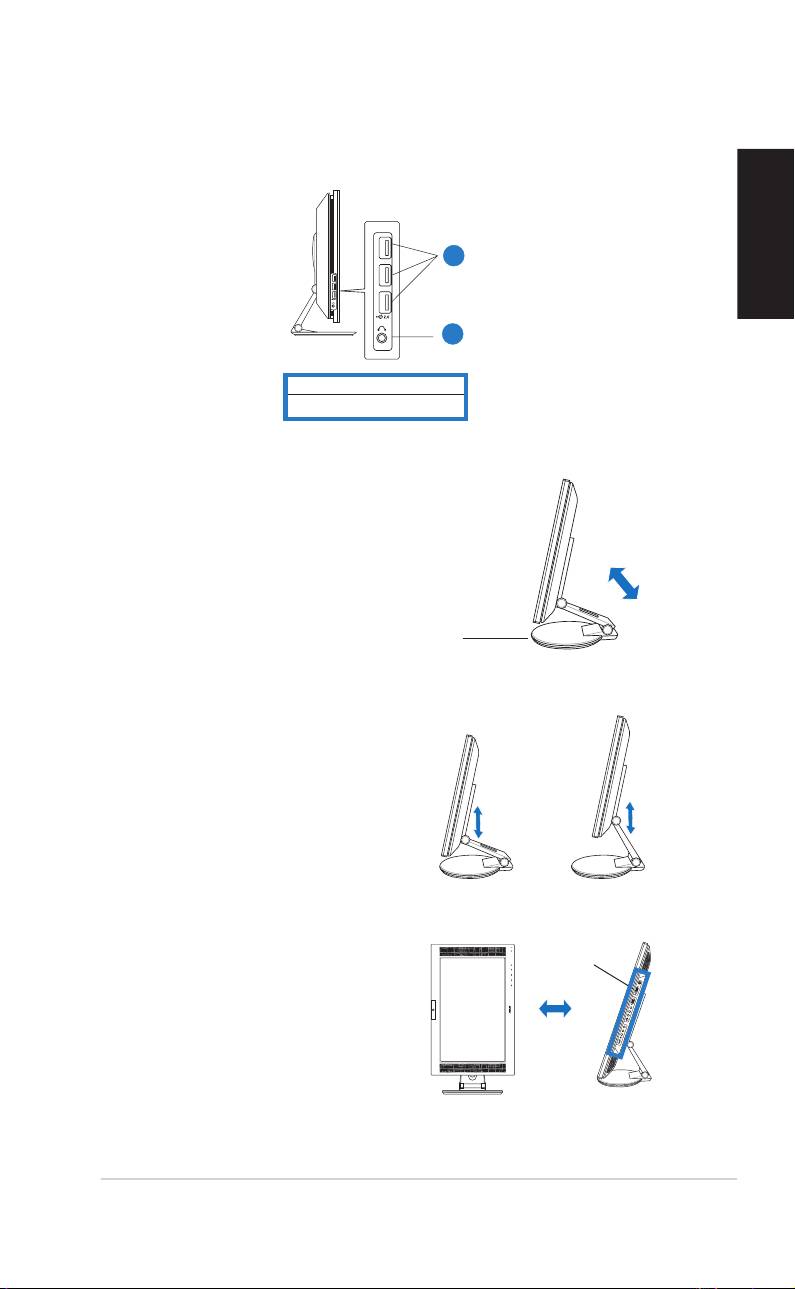
Side viewSide view
Side viewSide view
Side view
1
11
11
English
22
22
2
1. USB 2.0 ports
2. Headphone port
Unfolding the monitor
The monitor is folded in the
package. To unfold the
monitor, hold the stand
with one hand and carefully
tilt the monitor forward
with the other hand.
Stand
Connecting the cables
To connect the cables:
1. Adjust the monitor
to your desired
height and tilt.
2. Turn the monitor
Input ports
90º counterclockwise
so you can clearly see
the ports at the
bottom of the rear
panel.
Front view Side view
Quick Start Guide Quick Start Guide
Quick Start Guide Quick Start Guide
Quick Start Guide
33
33
3
3. Connect the cables as shown. Refer to the succeeding sections for
English
detailed instructions.
Power adapter
DVI cable
VGA cable
Component cable
RCA cable
PC Audio cable
USB 2.0 cable
Connecting a computer equipped with a VGA/DVI portConnecting a computer equipped with a VGA/DVI port
Connecting a computer equipped with a VGA/DVI portConnecting a computer equipped with a VGA/DVI port
Connecting a computer equipped with a VGA/DVI port
1. Plug the VGA, audio, and USB connectors of the supplied
3-in-1 cable to the LCD monitor’s VGA, Line-in, and USB ports
respectively.
2. Connect the other ends of the supplied 3-in-1 cable to your
computer’s VGA, Line-out, and USB ports respectively.
3. Tighten the two screws to secure the VGA connector.
4. Connect one end of the supplied DVI cable to the LCD monitor,
then connect the other end to your computer’s DVI port.
Connecting a video equipment with Video (composite) orConnecting a video equipment with Video (composite) or
Connecting a video equipment with Video (composite) orConnecting a video equipment with Video (composite) or
Connecting a video equipment with Video (composite) or
S-Video output ports such as a VCR, V8, or DVS-Video output ports such as a VCR, V8, or DV
S-Video output ports such as a VCR, V8, or DVS-Video output ports such as a VCR, V8, or DV
S-Video output ports such as a VCR, V8, or DV
1. Connect one end of the supplied RCA cable to the video and L/R
Audio ports of the LCD monitor, then connect the other end to
the video and Audio ports of your video equipment.
2. Connect one end of the S-Video cable to the LCD monitor’s S-
Video port, then connect the other end to the S-Video port of
your video equipment.
3. Plug the red and white connectors of the supplied RCA cable to
the LCD monitor’s L/R Audio ports, then connect the other end to
the Audio ports of your video equipment.
Connecting a video equipment with component outputConnecting a video equipment with component output
Connecting a video equipment with component outputConnecting a video equipment with component output
Connecting a video equipment with component output
ports, such as a DVD player or a satellite set-top boxports, such as a DVD player or a satellite set-top box
ports, such as a DVD player or a satellite set-top boxports, such as a DVD player or a satellite set-top box
ports, such as a DVD player or a satellite set-top box
1. Connect one end of the component cable to the
component ports of the LCD monitor, then connect the other end
to the component output ports of your video equipment.
2. Plug the red and white connectors of the supplied RCA cable to
the LCD monitor’s L/R Audio ports, then connect the other end to
the Audio Line-out ports of your video equipment.
44
44
4
Quick Start Guide Quick Start Guide
Quick Start Guide Quick Start Guide
Quick Start Guide
Connecting the power adapterConnecting the power adapter
Connecting the power adapterConnecting the power adapter
Connecting the power adapter
1. Connect the adapter cord securely to the monitor’s DC-in port.
2. Connect the power cord to the adapter port with the other end to
English
a power outlet.
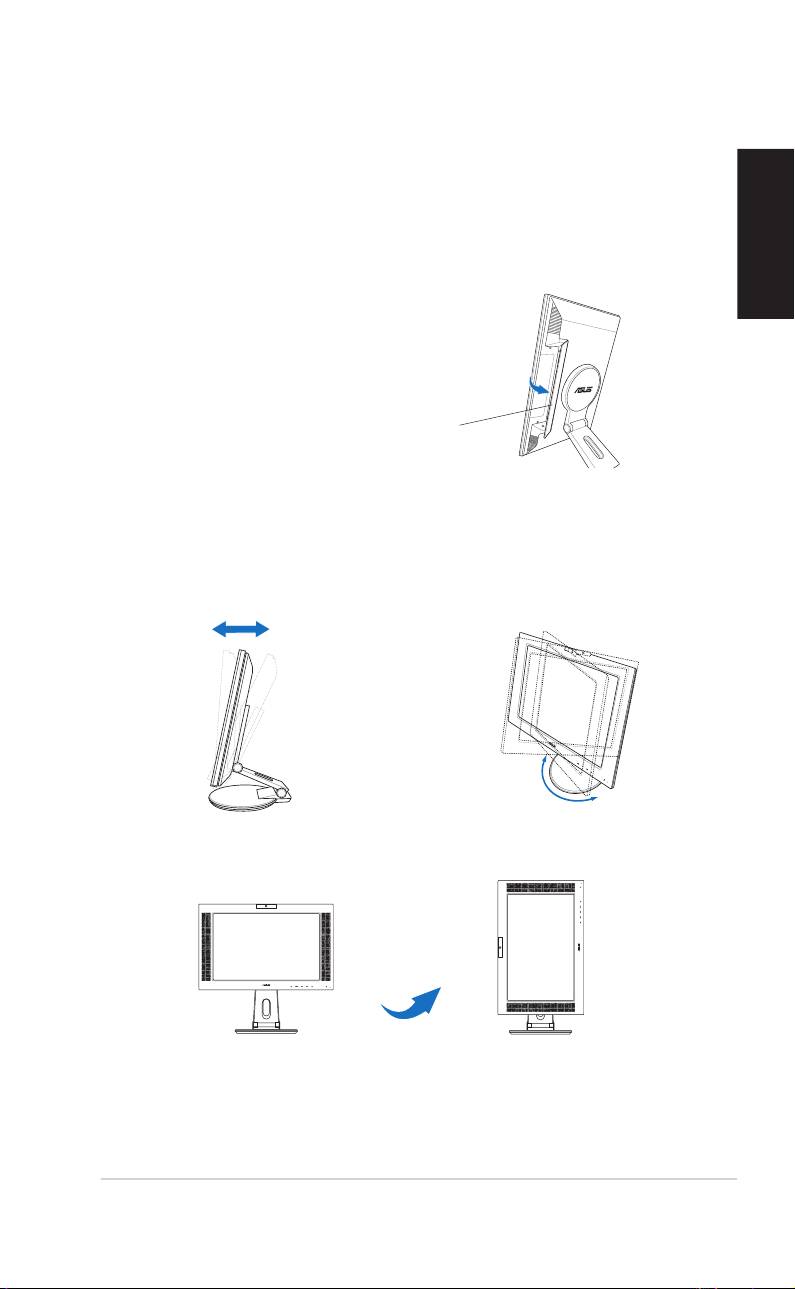
4. Close the rear connector cover.
Align the cover to the three slots
near the ports and close the cover
carefully. A click indicates that the
cover has been closed successfully.
Rear connector cover
Adjusting the monitor
• You can adjust the monitor’s
• The stand allows you to turn the
from -5º to 25º.
monitor left/right up to 120º.
-5º~25º
120º
• You can also turn the monitor
90º counterclockwise.
90º
Quick Start Guide Quick Start Guide
Quick Start Guide Quick Start Guide
Quick Start Guide
55
55
5
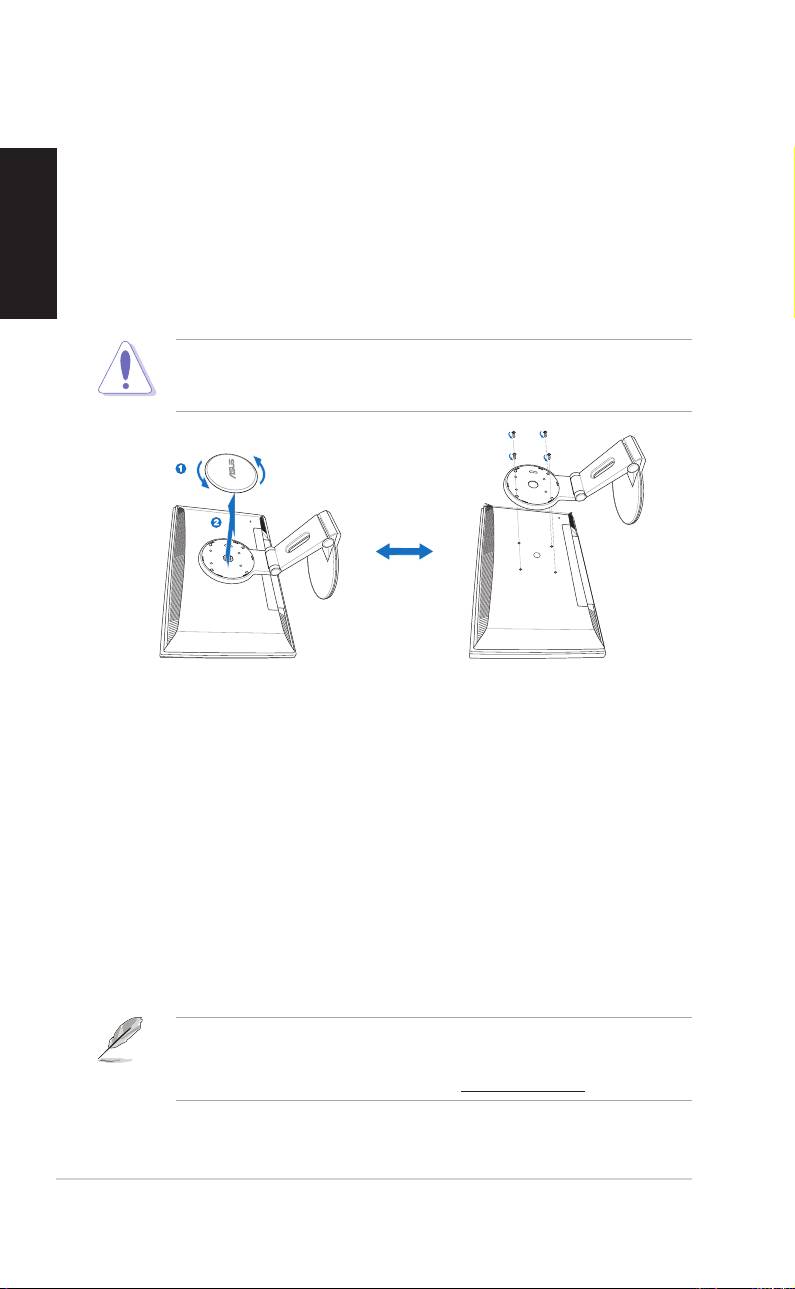
Detaching the stand (for VESA wall mount)
To detach the stand:
English
1. Turn the VESA cover counterclockwise to open it.
2. Remove the VESA cover from the stand.
3. Use a screwdriver to remove the four screws on the stand of the
monitor.
CAUTION! CAUTION!
CAUTION! CAUTION!
CAUTION! Have the front of the monitor face down to make the
detachment safer and easier. We recommend that you cover the surface
with soft cloth to prevent damage to the monitor.
®
Pivot
Pro Software
Installation instructions:Installation instructions:
Installation instructions:Installation instructions:
Installation instructions:
1. Close all other applications first.
2. Make sure your graphics card manufacturer’s (native)
®
drivers are installed before you install the Pivot
Pro
software.
3. Insert the support CD into the optical drive and run the
START_PIVOT program.
After the installation, you can set up hotkeys for different rotation degrees
by pressing the right mouse button -- enter Properties -- Settings --
Advanced -- Pivot Software -- Hotkeys.
®
• This software only supports Windows
98SE, ME, NT 4.0, 2000, and
XP operating systems.
• For more information or help, go to www.portrait.com.
66
66
6
Quick Start Guide Quick Start Guide
Quick Start Guide Quick Start Guide
Quick Start Guide
Built-in webcam introduction
This built-in webcam allows you to take photos and make videos; while
talking to friends via Internet-based communication tools, you can use the
webcam to show your vivid image.
HardwareHardware
HardwareHardware
Hardware
English
• The 1.3 megapixel webcam transmits images to your PC through the USB
ports. Make sure that you have connected the USB plugs of the supplied
3-in-1 cable before you use the webcam.
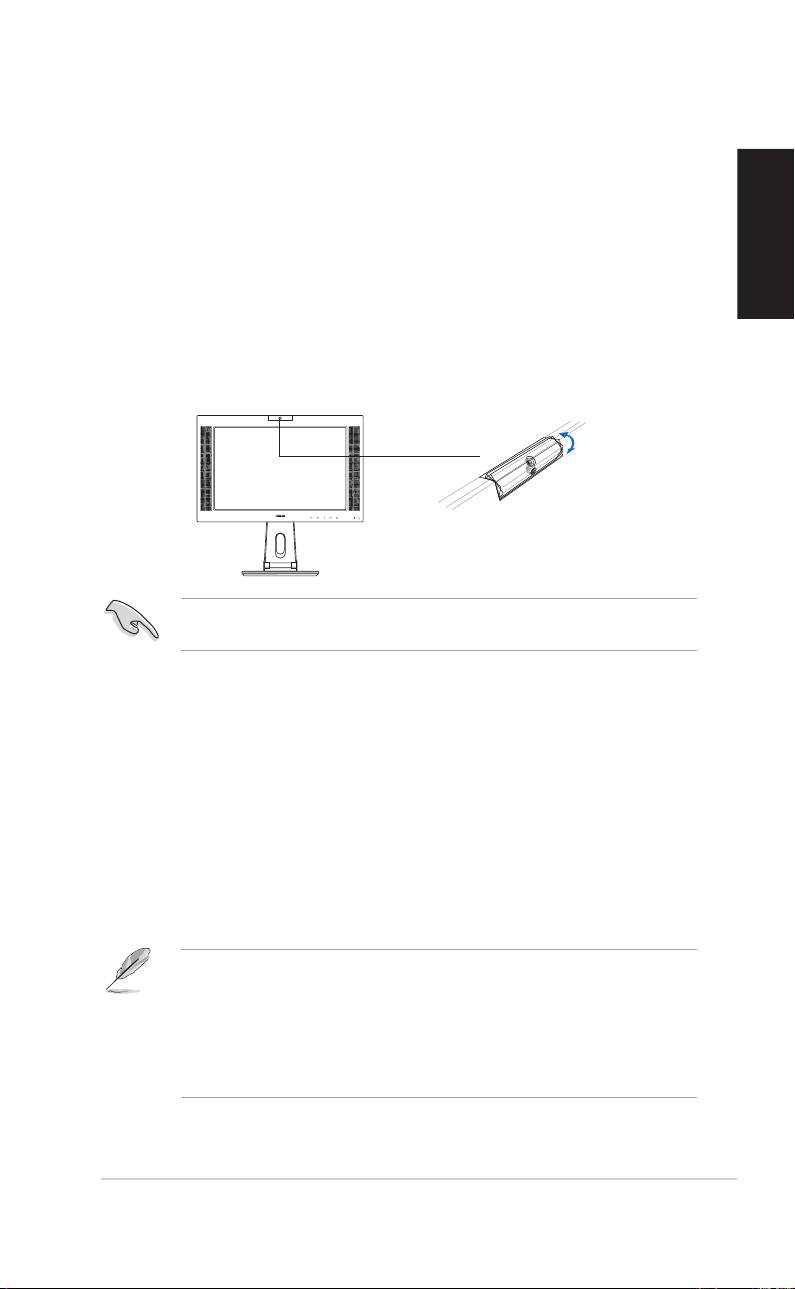
• The webcam is adjustable upward and downward as shown.
-30º ~ 30º
Do not turn the webcam upward or downward over 30º; doing so might
damage the webcam.
SoftwareSoftware
SoftwareSoftware
Software
To install the webcam driver:To install the webcam driver:
To install the webcam driver:To install the webcam driver:
To install the webcam driver:
1. Close all other applications first.
2. Insert the support CD into the optical drive and run the
ASUS USB2.0 WebcamASUS USB2.0 Webcam
ASUS USB2.0 WebcamASUS USB2.0 Webcam
ASUS USB2.0 Webcam program.
The default webcam resolution is 640 x 480. If you want to change the
default resolution to meet different kinds of application programs, go to
C:\WINDOWS\ASUS USB2.0 WebcamC:\WINDOWS\ASUS USB2.0 Webcam
C:\WINDOWS\ASUS USB2.0 WebcamC:\WINDOWS\ASUS USB2.0 Webcam
C:\WINDOWS\ASUS USB2.0 Webcam and activate the program
named LifeCam to modify the settings based on your needs.
• The webcam captured video format is VGA (640 x 480) mode in
order to increase the transmission efficiency via all kinds of Internet
commmunication tools.
• Before using the webcam, you need to install the webcam driver into
your PC.
®
• The webcam driver only supports Microsoft
Windows 2000/XP
®
operating system with Microsoft
Direct X.
Quick Start Guide Quick Start Guide
Quick Start Guide Quick Start Guide
Quick Start Guide
77
77
7
LifeFrame software
English
Introduction and installation instructionsIntroduction and installation instructions
Introduction and installation instructionsIntroduction and installation instructions
Introduction and installation instructions
To capture snapshots or video clips, ASUS PW201provides an
easy-to-use LifeFrame that can work with the built-in webcam, allowing
users to create their own photos or video clips.
®
®
• LifeFrame only supports Microsoft
Windows
2000/XP operating
systems.
• Before starting to use this software, install LifeFrame into your PC.
• The LifeFrame software is bundled in the PW201 support CD.
System requirements are as follows:System requirements are as follows:
System requirements are as follows:System requirements are as follows:
System requirements are as follows:
®
1. A personal computer with Pentium
III 800 MHz or higher
processor
®
®
2. Microsoft
Windows
2000/XP operating systems
3. Minimum 200 MB free hard disk space to run the program
4. 128 MB of RAM or above
5. A display card supporting 16-bit high color mode
Installation instructions:Installation instructions:
Installation instructions:Installation instructions:
Installation instructions:
1. Close all other applications.
2. Insert the support CD into the optical drive and run the
LifeFrame program.
3. Follow the on-screen instructions to complete the installation
Make sure that you connect the USB plug of the supplied 3-in-1 cable to
the USB port at the back of the LCD monitor; otherwise, the built-in
webcam and LifeFrame will not be activated.
88
88
8
Quick Start Guide Quick Start Guide
Quick Start Guide Quick Start Guide
Quick Start Guide
PW201
Moniteur LCD
Français
Guide de démarrage rapide
9
Informations sur la sécurité
• Avant de configurer le moniteur, assurez-vous dʼavoir lu toute la
documentation incluse dans le paquet.
• Pour éviter les risques dʼincendie et de choc électrique, nʼexposez pas
le moniteur à la pluie ou à lʼhumidité.
• Le moniteur ne doit être utilisé quʼavec le type de source dʼalimentation
indiqué sur lʼétiquette à lʼarrière. Si vous nʼêtes pas sûr du type
dʼalimentation électrique dont vous disposez, contactez votre
revendeur ou votre fournisseur en électricité local.
Français
• Utilisez la prise dʼalimentation compatible avec les standars électriques
de votre région.
• Pour assurer un fonctionnement correct, nʼutilisez le moniteur quʼavec
des ordinateurs certifiés UL, et fonctionnant entre 110-240V.
• Si vous rencontrez un problème technique avec votre moniteur,
contactez un technicien qualifié ou votre revendeur.
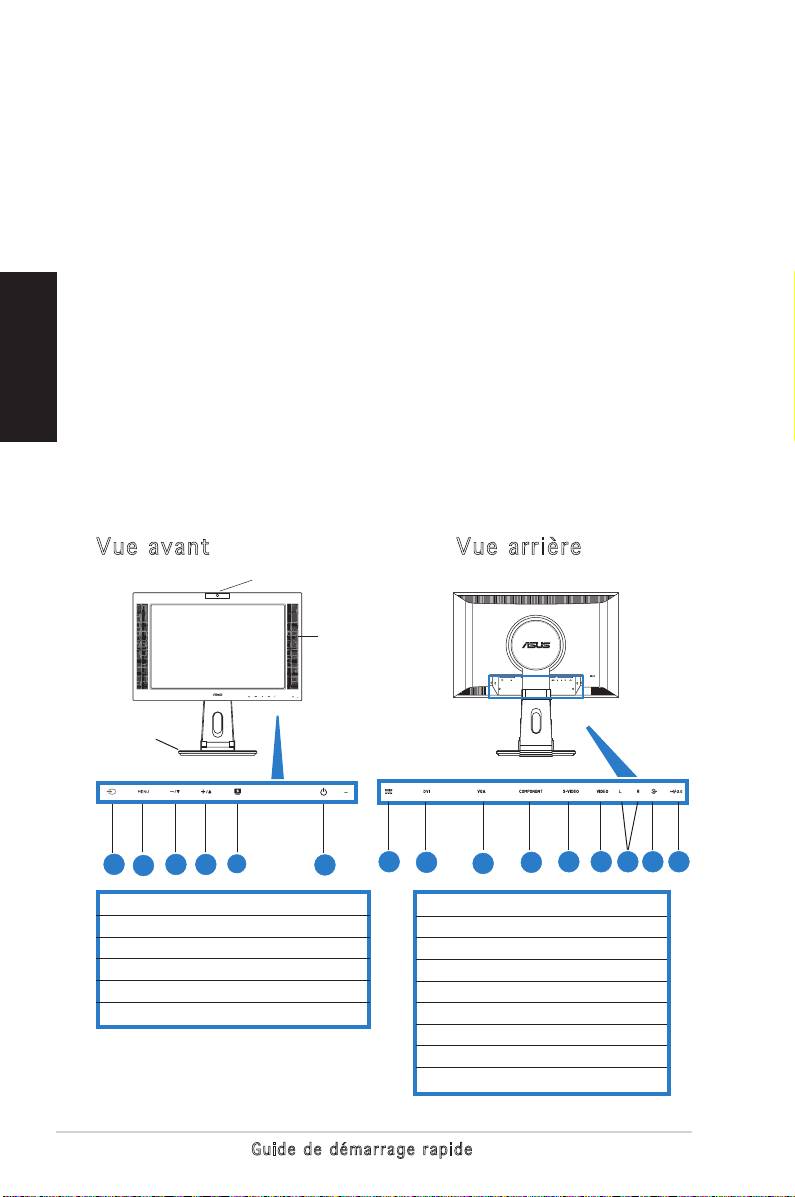
Introduction au moniteur
Vue avant Vue arrière
Caméra
Haut-parleurs
Socle
1
2
3
4
4
5
6
7 8 10 12 13 14 15
9
11
1
1. Capteur de source dʼentrée
7. Port DC-in
2. Capteur MENU
8. Port DVI
3. Sélection/Raccourci volume
9. Port VGA
4. Sélection/Raccourci luminosité
10. Port dʼentrée composante (YPbPr)
5. Raccourci SPLENDID™/Quitter Menu
11. Port S-Vidéo
6. Capteur/Indicateur dʼalimentation
12. Port Vidéo (Composite)
13. Ports audio L/R
14. Port PC Line-in
15. Port USB
10
Guide de dé mar rag e r api de
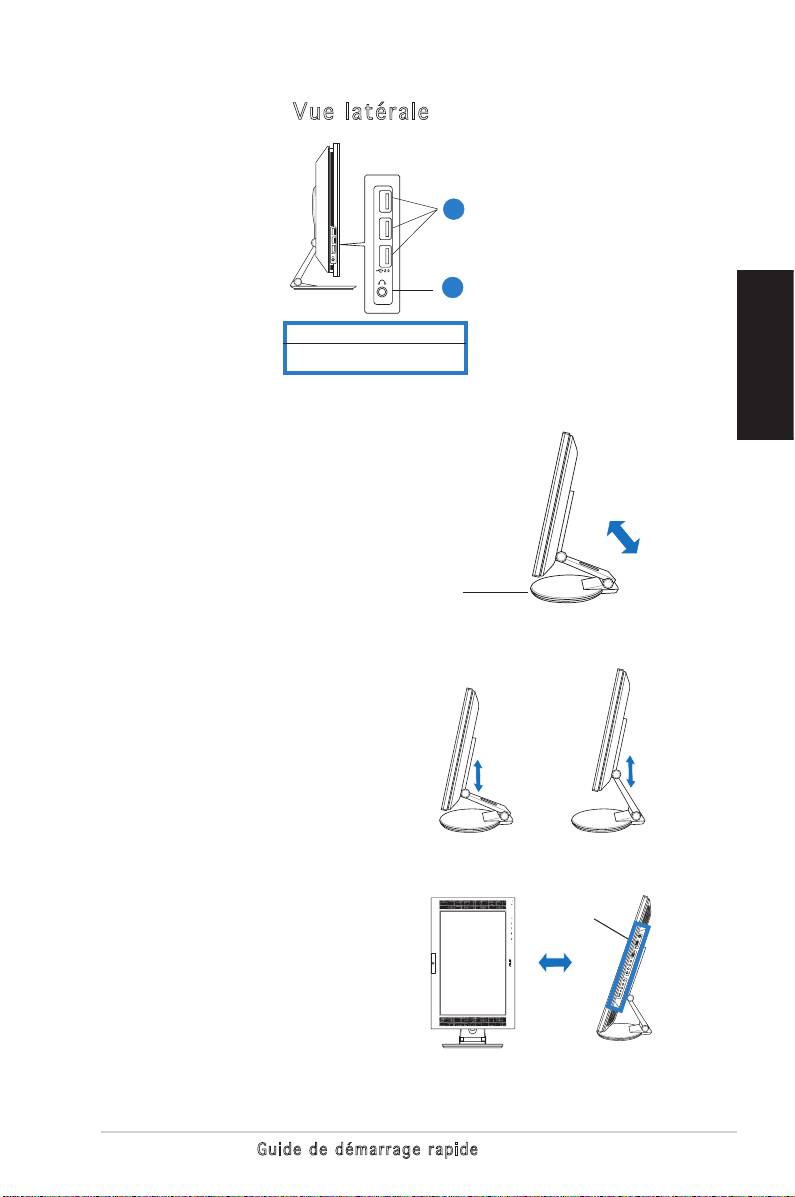
Vue latérale
1
2
1. Ports USB 2.0
2. Port casque
Français
Déballer le moniteur
Le moniteur est emballé
dans la boîte. Pour le
déballer, maintenez le socle
avec une main tout en
lʼinclinant légèrement vers
lʼavant avec lʼautre main.
Socle
Connecter les câbles
Pour connecter les
câbles:
1. Ajustez le moniteur
à la hauteur et à
lʼinclinaison désirée.
Ports
2. Tournez le moniteur à
dʼentrée
90º dans le sens
inverse des aiguilles
dʼune montre afin de
bien visualiser les ports
situés sous le panneau
arrière.
Vue avant Vue latérale
11 Gu ide de dé mar rag e r api de
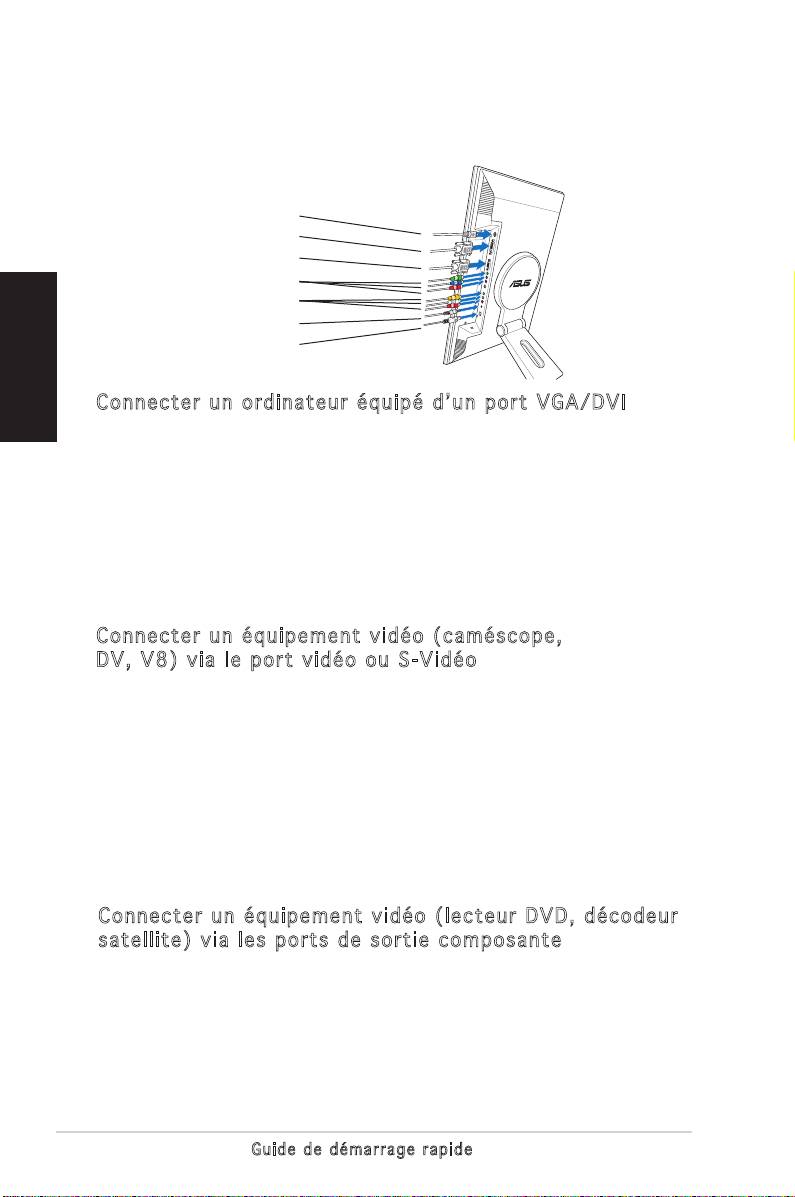
3. Connectez les câbles comme indiqué ci-dessous. Référez-vous aux
sections suivantes pour les instructions détaillées.
Adaptateur secteur
Câble DVI
Câble VGA
Câble composante
Câble RCA
Français
Câble audio PC
Câble USB 2.0
Connecter un ordinateur équipé dʼun port VGA/DVI
1. Connecter les câbles VGA, audio, et USB du câble 3-en-1 aux
connecteurs VGA, Line-in, et USB du moniteur LCD.
2. Connectez les autres extrémités du câble 3-en-1 aux ports VGA,
Line-out, et USB de votre ordinateur.
3. Serrez les deux vis pour sécuriser le connecteur VGA.
4. Connectez une extrémité du câble DVI fourni au moniteur LCD,
puis connectez lʼautre extrémité au port DVI de votre ordinateur.
Connecter un équipement vidéo (caméscope,
DV, V8) via le port vidéo ou S-Vidéo
1. Connectez une extrémité du câble RCA fourni aux ports vidéo et
audio du moniteur LCD, puis connectez lʼautre extrémité aux ports
audio/vidéo de votre équipement.
2. Connectez une extrémité du câble S-Vidéo au port S-Vidéo du
moniteur, puis connectez lʼautre extrémité au port S-Vidéo de
votre équipement.
3. Branchez les connecteurs rouge et blanc du câble RCA aux ports
audio L/R de votre moniteur, puis connectez lʼautre extrémité aux
portx audio de votre équipement.
Connecter un équipement vidéo (lecteur DVD, décodeur
satellite) via les ports de sortie composante
1. Connectez une extrémité du câble composante aux ports
composantes du moniteur LCD, puis connectez lʼautre extrémité
aux ports de sortie composante de votre équipement vidéo.
2. Branchez les connecteurs rouge et blanc du câble RCA aux ports
audio L/R de votre moniteur, puis connectez lʼautre extrémité aux
portx audio de votre équipement.
12
Gu ide de dé mar rag e r api de
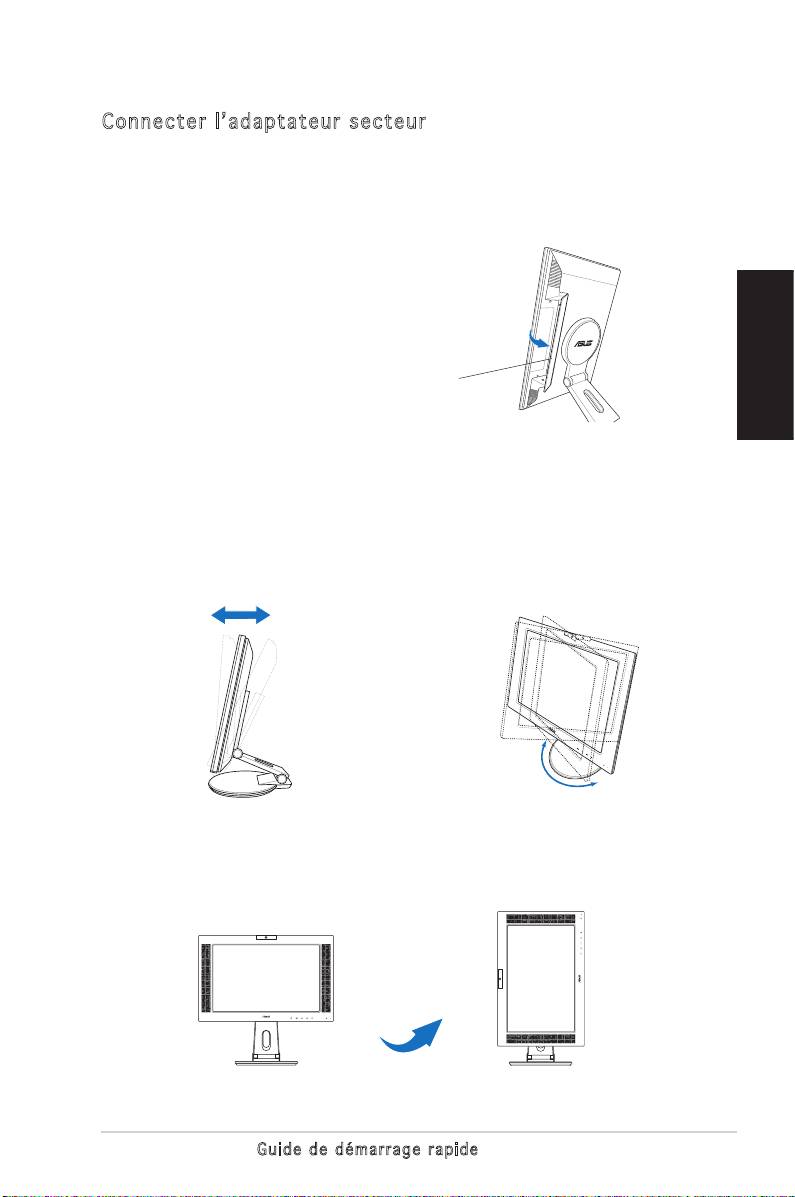
Connecter lʼadaptateur secteur
1. Connectez le cordon de lʼadaptateur au port DC-in du moniteur.
2. Connectez le cordon dʼalimentation à lʼadaptateur secteur, et
lʼautre extrémité à une prise élecrique.
4. Fermez le couvercle de protection des
connecteurs. Alignez le couvercle sur
les trois ouvertures près des ports puis
fermez-le délicatement. Un léger cliquetis
indique que le couvercle a bien été fermé.
Couvercle des connecteurs arrières
Français
Ajuster le moniteur
• Vous pouvez ajuster
• Le socle vous permet de tourner
lʼinclinaison du moniteur de -5º
le moniteur vers la gauche ou la
à 25º.
droite jusquʼà un angle de 120º.
-5º~25º
120º
• Vous pouvez aussi faire pivoter
le moniteur de 90º dans le
sens inverse des aiguilles dʼune
montre.
90º
13 Gu ide de dé mar rag e r api de

Detacher le socle (pour fixation murale VESA)
Pour détacher le socle:
1. Tournez le couvercle VESA vers la gauche pour lʼouvrir.
2. Retirez le couvercle VESA du socle.
3. Utilisez un tournevis pour retirer les quatre vis sur le socle du
moniteur.
ATTENTION ! Pour simplifier et rendre la manipulation plus sûre, inclinez
Français
le moniteur face vers le bas. il est recommandé de couvrir la surface
avec un tissu doux pour éviter dʼendommager le moniteur.
®
Logiciel Pivot
Pro
• Instructions dʼinstallation:
1. Fermez toutes les applications en cours dʼéxecution.
2. Assurez-vous que les pilote de votre carte graphique sont bien
®
installés avant dʼinstaller Pivot
Pro.
3. Insérez le CD de support dans votre lecteur optique et éxecuter
le programme START_PIVOT.
Après lʼinstallation, vous pouvez créer plusieurs raccourcis clavier pour
différents degrés de rotation en faisant un clic droit sur le bureau de
Windows, puis en cliquant sur -->Propriétés -->Paramètres -->Avancé --
>Pivot Software -->Hotkeys.
®
• Ce logiciel ne supporte que les systèmes dʼexploitation Windows
98SE, ME, NT 4.0, 2000, et XP.
• Pour plus dʼinformations ou de lʼaide, veuillez visiter www.portrait.
com.
14
Gu ide de dé mar rag e r api de
Introduction de la caméra embarquée
La caméra embarquée vous permet de prendre des photos et créer des
vidéos; mais aussi de discuter avec vos amis via des services de messagerie
instantanée sur Internet, et ainsi de vous montrer tel que vous êtes.
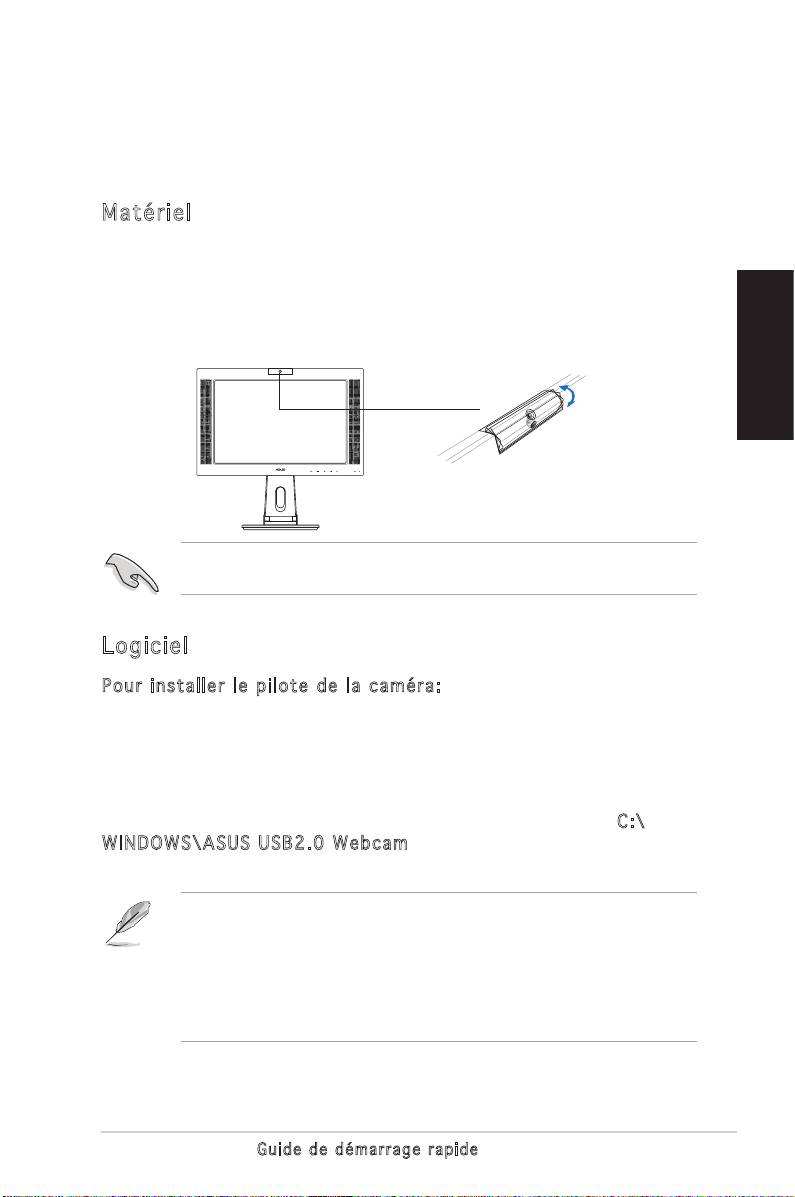
Matériel
• La caméra de 1.3 mégapixels transmets les images vers votre PC via les
ports USB. Assurez-vous dʼavoir connecté le connecteur USB du câble
3-en-1 fourni avant dʼutiliser la caméra.
• Lʼangle de la caméra est ajustable comme illustré ci-dessous.
-30º ~ 30º
Français
Ne tournez pas la caméra vers le haut ou le bas dans un angle supérieur
à 30º, vous pourriez endommager la caméra.
Logiciel
Pour installer le pilote de la caméra:
1. Fermez toutes les applications en cours dʼéxecution.
2. Insérez le CD de support dans votre lecteur optique et éxecuter
le programme ASUS USB2.0 Webcam.
La résolution par défaut de la caméra est 640 x 480. Si vous souhaitez
changer la résolution par défaut de la caméra, localisez le dossier C:\
WINDOWS\ASUS USB2.0 Webcam et exécutez le programme appellé
LifeCam pour modifier les réglages selon vos besoins.
• Le mode de capture de la caméra est VGA (640 x 480) afin
dʼaugmenter la qualité de transmission via un panel dʼutilitaires de
communication Internet.
• Avant dʼutiliser la caméra, il est nécessaire dʼinstaller les pilotes sur
votre PC.
®
• Les pilotes de la caméra ne sont supportés que par Microsoft
®
Windows 2000/XP avec Microsoft
Direct X.
15 Gu ide de dé mar rag e r api de
Logiciel LifeFrame
Introduction et instructions dʼinstallation
Pour capturer des photos ou des clips vidéo, le PW201dʼASUS intègre
le logiciel LifeFrame, simple dʼutilisation, et pouvant fonctionner avec
la caméra embarquée, permettant aux utilisateurs de créer leur propres
photos et clips vidéo.
Français
®
• LifeFrame ne supporte que les systèmes dʼexploitation Microsoft
®
Windows
2000/XP.
• Avant dʼutiliser ce logiciel, veuillez lʼinstaller sur votre PC.
• Le logiciel LifeFrame est contenu dans le CD de support
accompagnant le PW201.
Configuration requise:
®
1. Un PC avec un processeur Pentium
III 800 MHz ou supérieur
®
®
2. Microsoft
Windows
2000/XP
3. Un minimum de 200 Mo dʼespace disque disponible
4. Un minimum de 128 Mo de RAM
5. Une carte graphique supportant une qualité de couleur de 16-bits
Instructions dʼinstallation :
1. Fermez toutes les applications en cours dʼéxecution.
2. Insérez le CD de support dans votre lecteur optique et éxecuter
le programme LifeFrame.
3. Suivez les instructions apparaissant à lʼécran pour terminer
lʼinstallation.
Assurez-vous de connecter le connecteur USB, du câble 3-en-1
fournii, au port USB situé à lʼarrière du moniteur LCD; sinon, la caméra
embarquée et le logiciel LifeFrame ne pourront être activés.
16
Gu ide de dé mar rag e r api de
