Asus GigaX1116B: инструкция
Раздел: Сети, связь, телекоммуникации, интернет, безопасность
Тип:
Инструкция к Asus GigaX1116B

Content
English .............................................................................. 1
Français ............................................................................ 9
Español ...........................................................................17
Deutsch ..........................................................................25
Русский ...........................................................................33
Italiano ............................................................................41
Türkçe .............................................................................49
Nederlands .....................................................................57
简体中文
..........................................................................65
한국어
..............................................................................73
日本語
..............................................................................81
繁體中文
..........................................................................89

English
GigaX1116B
GigaX1124B
Quick Start Guide
Copyright © 2006 ASUSTeK COMPUTER INC. All Rights Reserved.
1

Introduction
Thank you for purchasing the ASUS GigaX1116B/1124B rack mountable
switch! The GigaX1116B/1124B provides non-blocking, wire-speed
English
performance to meet your intensive network demands. It features auto-sensing,
and auto MDI/MDIX Ethernet ports for simple connectivity and enhance your
network performance with ow control and QoS ability.
Features
• 16/24 10/100/1000 Mbps RJ-45 ports
• Plug and play with your networks – auto MDI/MDIX, and auto-sensing for
speed and duplex mode on all ports
• Place on a at surface, or mounts on a rack
• Flow control (802.3x in full-duplex mode) schemes to support zero loss
under temporary network congestion
• Backpressure support for 10/100 Mbps half duplex.
• Support Jumbo frames of up to 9K bytes.
• 10K MAC addresses with automatic address learning and aging.
• Up to 1Gbps for all ports in full-duplex mode
• Easy to read LEDs providing �uick overview of link status, activities, speedproviding �uick overview of link status, activities, speed
and duplex mode on all ports
Package contents
Before installing the GigaX1116B/ GigaX1124B switch, check your package for
the following items.
• ASUS GigaX1116B or GigaX1124B Switch
• AC Power cord x 1
• Quick Start Guide
• Mounting kit containing 2 brackets and 6 screws.
NOTE
. Contact your retailer if any of the items is damaged or missing.
2 Quick Start Guide

Technical specications
Physical Dimensions
43.5mm(H) X 444 mm(W) X 200mm(D)
Environmental Ranges
English
Operating temperature 0ºC ~ 40ºC (32ºF to 104ºF)
Storage temperature -40ºC ~ 70ºC (-40ºF to 158ºF)
Operating humidity 5% to 95%
Storage humidity 5% to 95%
Operating altitude: up to 15,000ft (3,000m)
Storage altitude: up to 40,000 ft (12,000m)
Power
Input 90V ~ 240V AC/50-60Hz
Power Consumption 50 Watts
Certication
FCC Class A, CE, CCC
Quick Start Guide 3
Hardware
Front panel
English
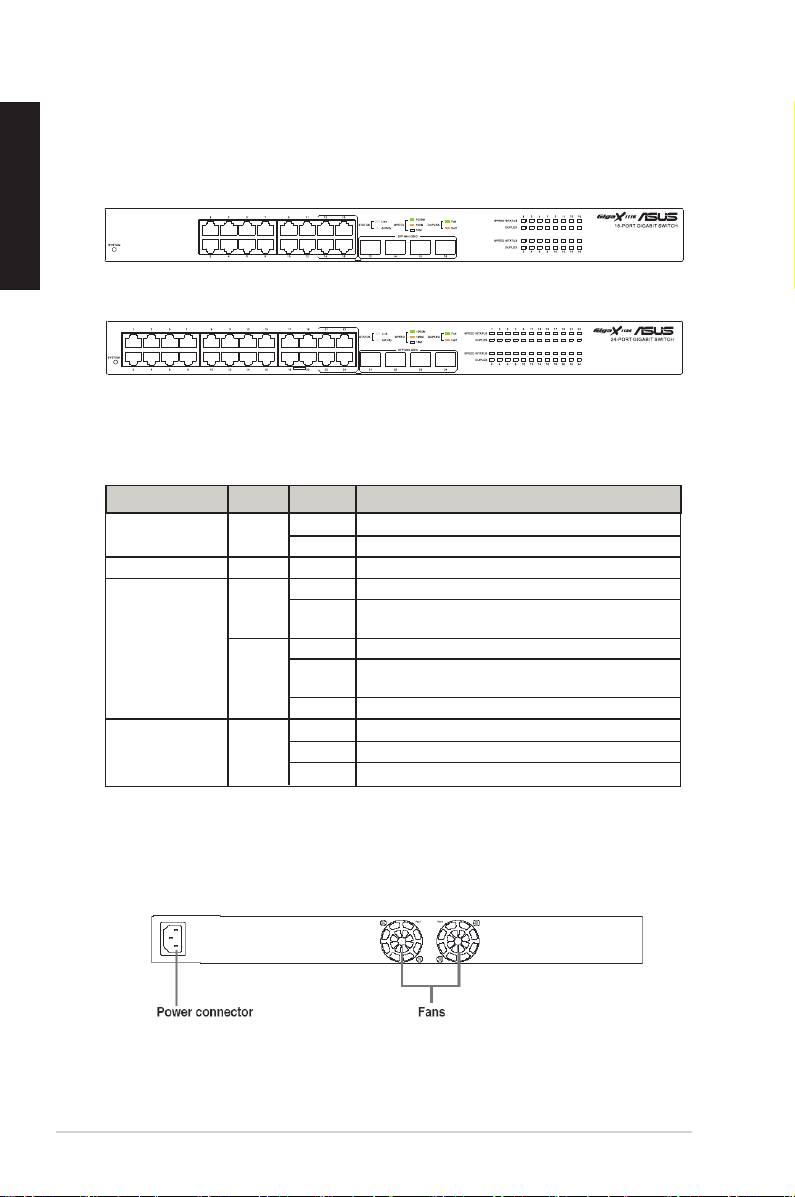
The front panels of GigaX1116B and GigaX1124B include LED indicators that
show the working condition of the switch.
Figure 1. Front panel (GigaX1116B)
Figure 2. Front panel (GigaX1124B)
Table 1 LED indicators
Label Color Status Description
SYSTEM Green On Unit is powered on and in normal operation.
Off Unit is powered off.
1 – 16/24 This number identies the port number.
STATUS/SPEED Green On Port is enabled for1000Mbps
Blinking Receiving or transmitting packets on this port for
1000Mbps
Amber On Port is enabled for10/100 Mbps
Blinking Receiving or transmitting packets on this port for
10/100Mbps
Off Link down
DUPLEX Green On Switch is operating in full-duplex mode.
Blinking Collision happens
Off Switch is operating in half-duplex mode
Rear panel
The rear panel of GigaX1116B/GigaX1124B contains two fans and a power
connector.
Figure 3. Rear panel (GigaX1116B/ GigaX 1124B)
4 Quick Start Guide
B
B
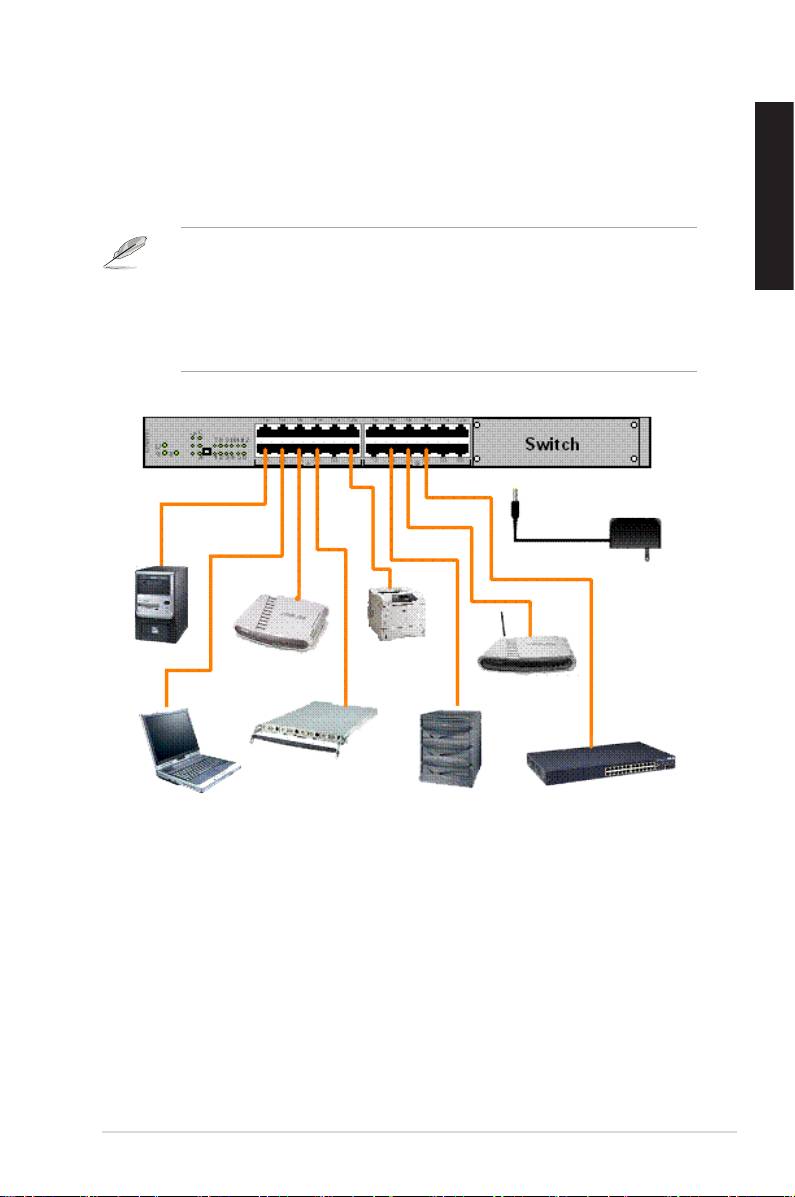
Connecting network devices
To connect network devices to the GigaX1116B or GigaX1124B switch:
1. Connect one end of the Ethernet cable to an Ethernet port on the switch
rear panel. Connect the other end to the Ethernet port of the network
device. Repeat this step to connect additional network devices.
English
NOTES
• Use Category 5 straight-through Ethernet cables for wiring so as to
ensure connection speed between the switch and the network devices.
• You can use either corssover or straight-through cable to connect other
network devices such as bridges, switches, hubs and PCs.
AC Adapter
Desktop
Printer
Router
Server
Wireless
AP
Server
Notebook
NAS
Switch/Hub
Figure 4. Network Device Connctions
2. Plug one end of the power cable to the power connector on the switch rear
panel, then plug the other end to a power outlet.
3. The Power LED indicator and the LAN LED indicators of active Ethernet
ports light up when the switch is powered on, and active nodes are
connected to the LAN ports. Refer to the front panel illustrations and LED
table in page 4 for the meaning of LED indicators.
Quick Start Guide 5

Placement Options
Flat Surface Placement
English
You may place GigaX1116B/1124B on any at surface. Make sure the place
meets the operation environment specication and the UTP Category 5 cable
length is within 100 meters (328 feet).
Install the switch on a at surface that can support the weight of the switches
and their accessories. Attach four rubber pads on the marked location on the
bottom of the switch.
Rack Mount Instructions
On each side of the switch, there are three screw holes and two post holes
for the mounting bracket. After screwing the mounting brackets to the switch,
put the switch into a 19-inch rack and fix it with the rack mounting screws
(purchased separately).
6 Quick Start Guide

Troubleshooting
This section provides solutions to some common problems which you may
encounter when installing or using the ASUS GigaX1116B or GigaX1124B
switch. Contact the ASUS technical support if problem still exists after you have
performed the troubleshooting solutions.
English
Problem Solution
The POWER LED does not light
Check if the power cable is properly
up.
connected to the switch and to an
power outlet.
The LAN LED does not light up
• Check if the Ethernet cable is
even after a network device is
properly connected to the switch
connected to the port
and to the network device.
• Make sure the switch and your
network device are powered ON.
• Check if the Ethernet cable meet
your network re�uirements. To
connect gigabit switch port, you
need Category 5 cable to get
gigabit transfer speed.
The Collision/DUPLEX LED
• Check if the UTP Category 5
keeps blinking.
cable is in a good condition.
• Check if the cable length is within
100m(328 feet).
Quick Start Guide 7

Glossary
10BASE-T
10 Mbps Ethernet over twisted pair cable (Category 3).
English
100BASE-T
100 Mbps Ethernet over twisted pair cable (Category 5)
1000BASE-T
1000 Mbps Ethernet over twisted pair cable (Category 5)
Auto MDI/MDIX
Allows network connections using either straight or crossAllows network connections using either straight or cross
cable.
Ethernet
The most commonly installed computer network technology,
usually using twisted pair wiring. Ethernet data rates are 10
Mbps, 100 Mbps, and 1000 Mbps.
Mbps
Abbreviation for Megabits per second, or one million bits per
second. Network data rates are often expressed in Mbps.
network
A group of computers that are connected together to
communicate with each other and share resources, such as
software, les, etc. A network can be small, such as a LAN,
or very large, such as the Internet.
8 Quick Start Guide
