Asus Xonar Xense: инструкция
Раздел: Профоборудование
Тип: Аппарат
Инструкция к Аппарату Asus Xonar Xense

U5378
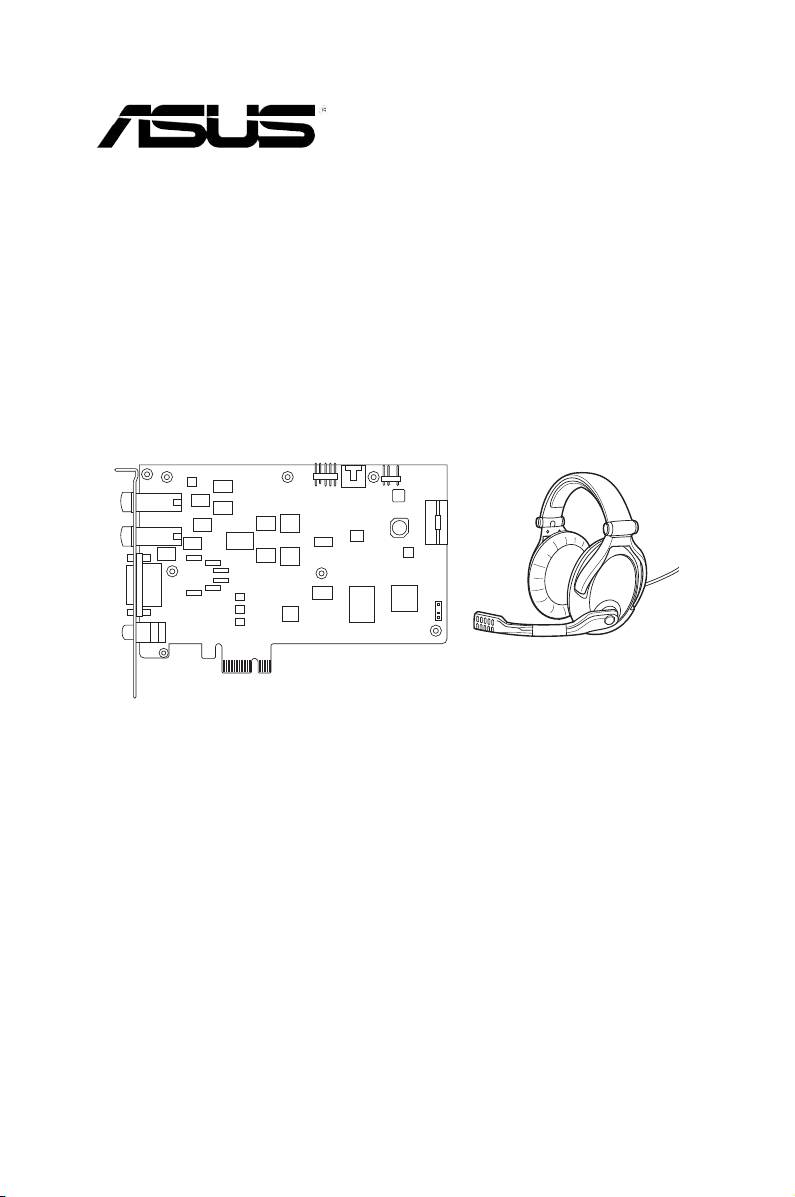
Xonar Xense
Premium Gaming Audio Set
Quick Start Guide

Package contents
• Xonar™ Xense Premium Gaming Audio Card x 1
English
• Sennheiser PC350-Xense Gaming Headset x 1
• 6.3mm to 3.5mm adapter x 1
• Audio splitter cable x 1
• Driver CD x 1
• S/PDIF TOSLINK optical adapters x 1
• Quick Start Guide x 1
If any of the above items is damaged or missing, contact your retailer.
System requirements
• One PCI Express 1.0 (or higher) compatible slot for the audio card
• Oneavailable4-pinperipheralpowercableconnectorfromthecomputer’s
power supply unit
®
®
• Microsoft
Windows
Vista/Win 7(32/64bit)/XP(32/64bit)/MCE2005
®
®
• Intel
Pentium
4 1.4GHz or AMD Athlon 1400 CPU or faster CPU
• >256 MB DRAM system memory
• >60 MB available HDD space for driver installation package
• CD-ROM drive (or DVD-ROM drive) for software installation
• High-quality headphones, powered analog speakers, or a Dolby Digital
decoder,toenjoytheultra-highdelitysoundsofthecard
2
ASUS Xonar Xense Quick Start Guide
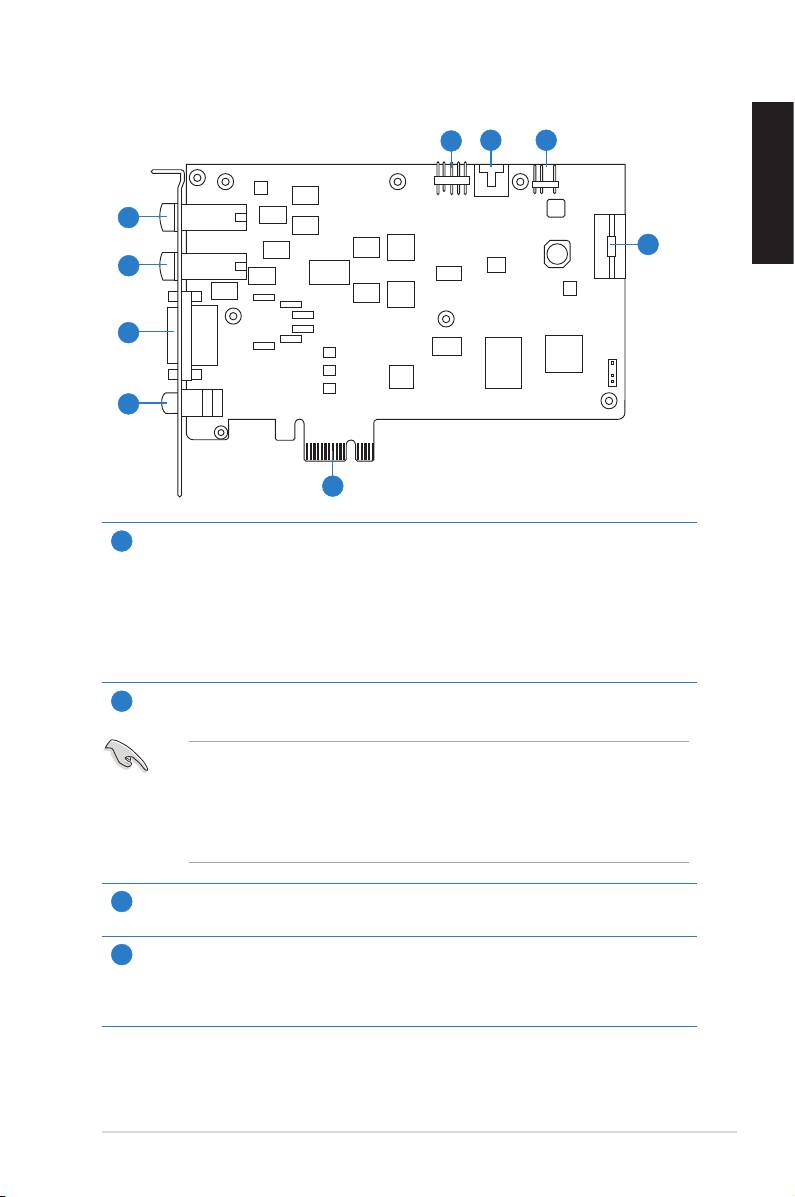
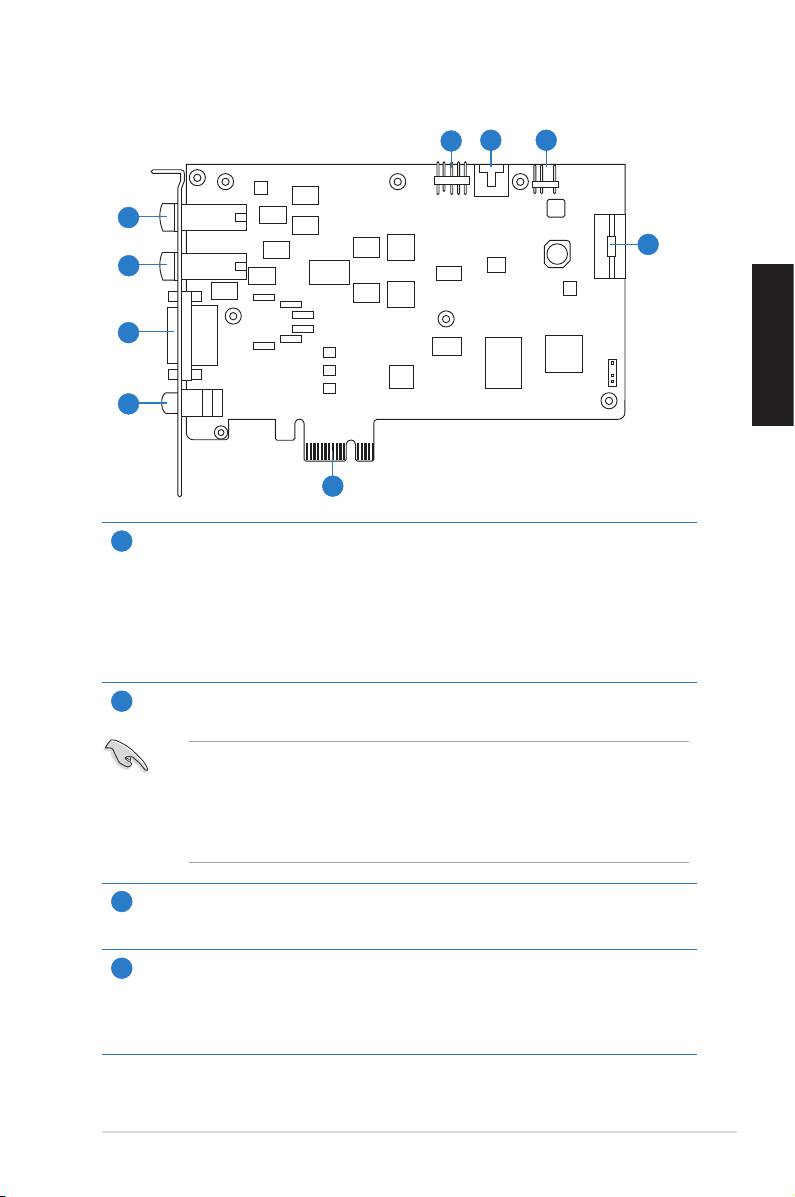
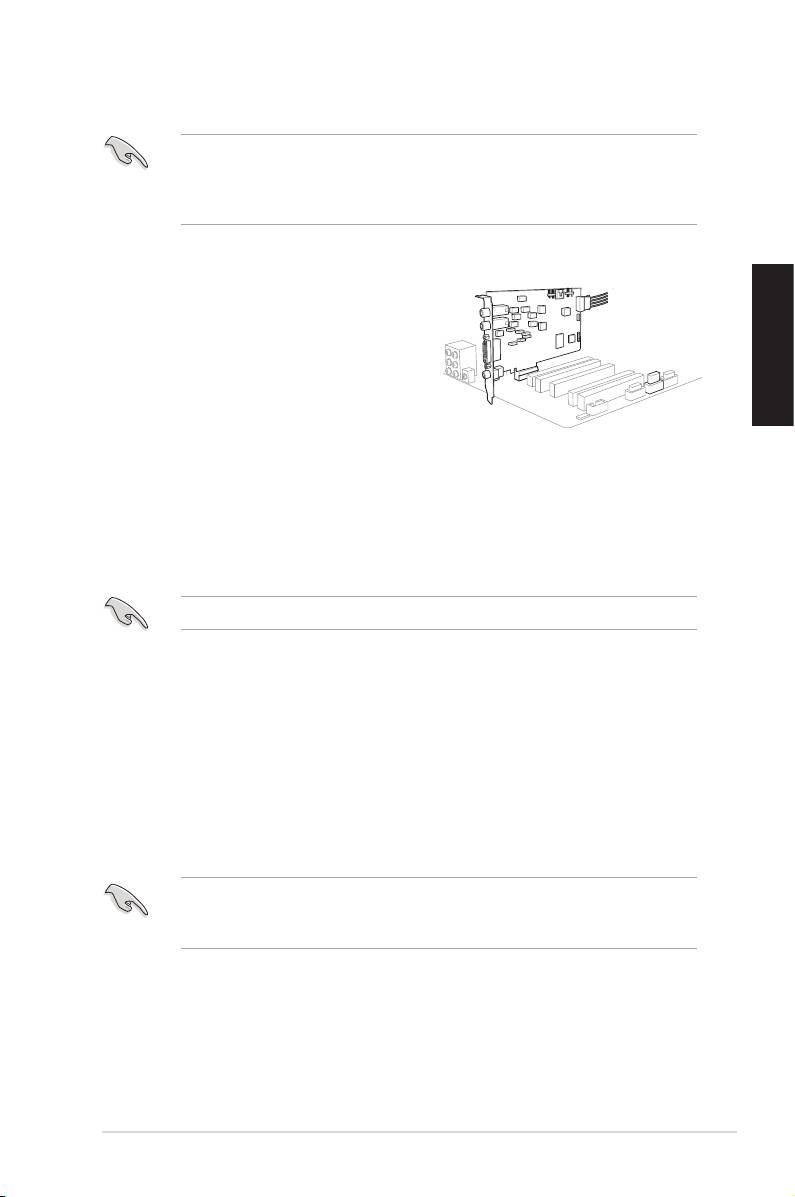
Hardware introduction
Audio card layout
5
6 7
1
English
8
2
3
4
9
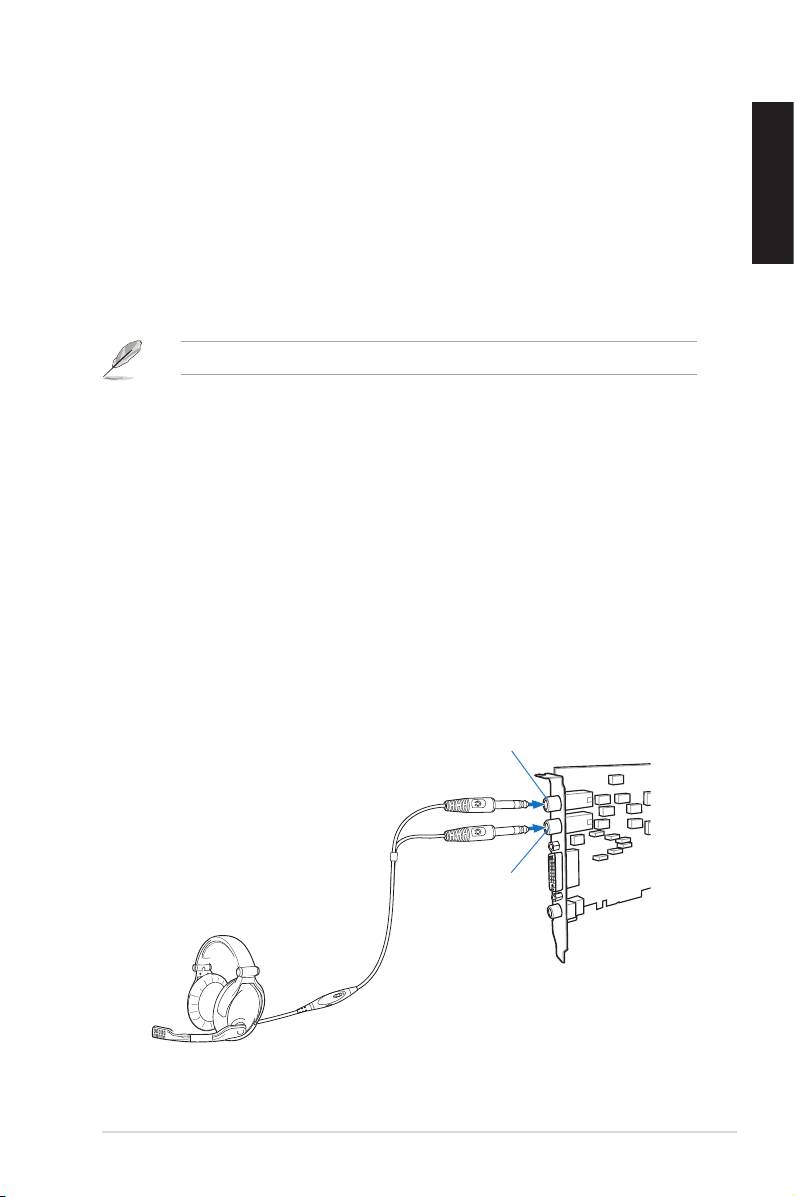
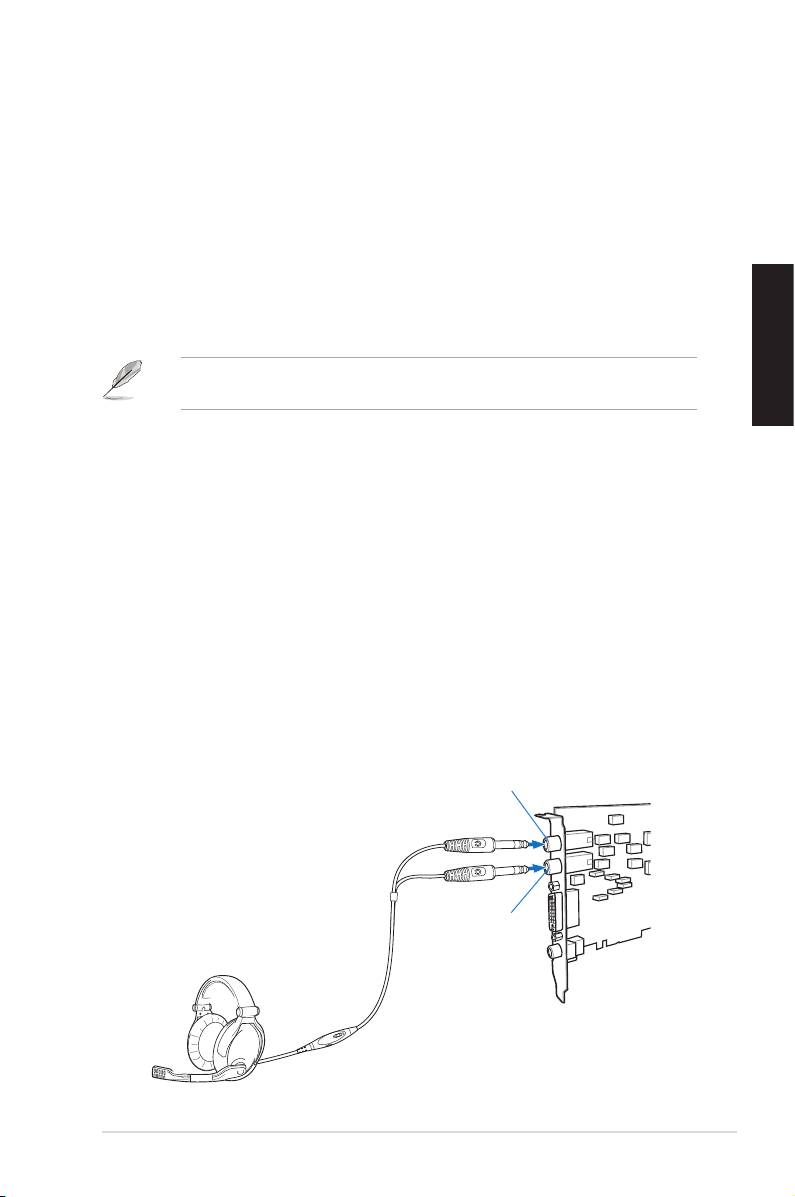
Microphone In port
1
Connectyourheadset’smicrophonecabletothisportforvoiceinput.Ithasabuilt-
inhigh-qualityMicrophonepre-amplier.
Line In port
ThroughanUltra-highdelity118dBSNRA-Dconverter,connectanalogdevices
like MP3 players, CD players, music synthesizers, and other line-level sound
sources to this 6.3mm port for audio recording or processing.
Headphone Out port
2
Connectyourheadset’soutcabletothisport.
• DO NOT connect your speakers to the headphone out port. The possible
high driving power may cause damage to your speakers.
• Before connecting your headphone, adjust the headphone impedance
settings in the Xonar Xense Audio Center to match your headphone
impedance. This is to prevent damage to your headphone.
7.1 ch Speaker Output
3
Connects to your speakers via 7.1 channel audio splitter cable.
S/PDIF Out port
4
Coaxial and optical TOSLINK combo digital output port. Connect to external digital
decoder or digital speaker systems, Home Theater systems, AV receivers for
outputting digital audio including PCM, Dolby Digital, DTS, and WMA-Pro.
ASUS Xonar Xense Quick Start Guide
3
Front panel audio header
5
Connect one end of the front panel audio cable to the front panel audio header on
the audio card, with the other end to the chassis-mounted front panel audio I/O
English
module.
Aux Input Header
6
This 4-pin header usually connects to the Analog Audio output of the TV tuner card
orothersoundsourceinsideyourcomputer.TomonitoryourTVtunercard’saudio
from this Aux-In, you must enable the “monitor” function for Aux-In in the Xonar
XenseAudioCenter‘srecordingmixer.
S/PDIF Header
7
Connects to supported graphics card.
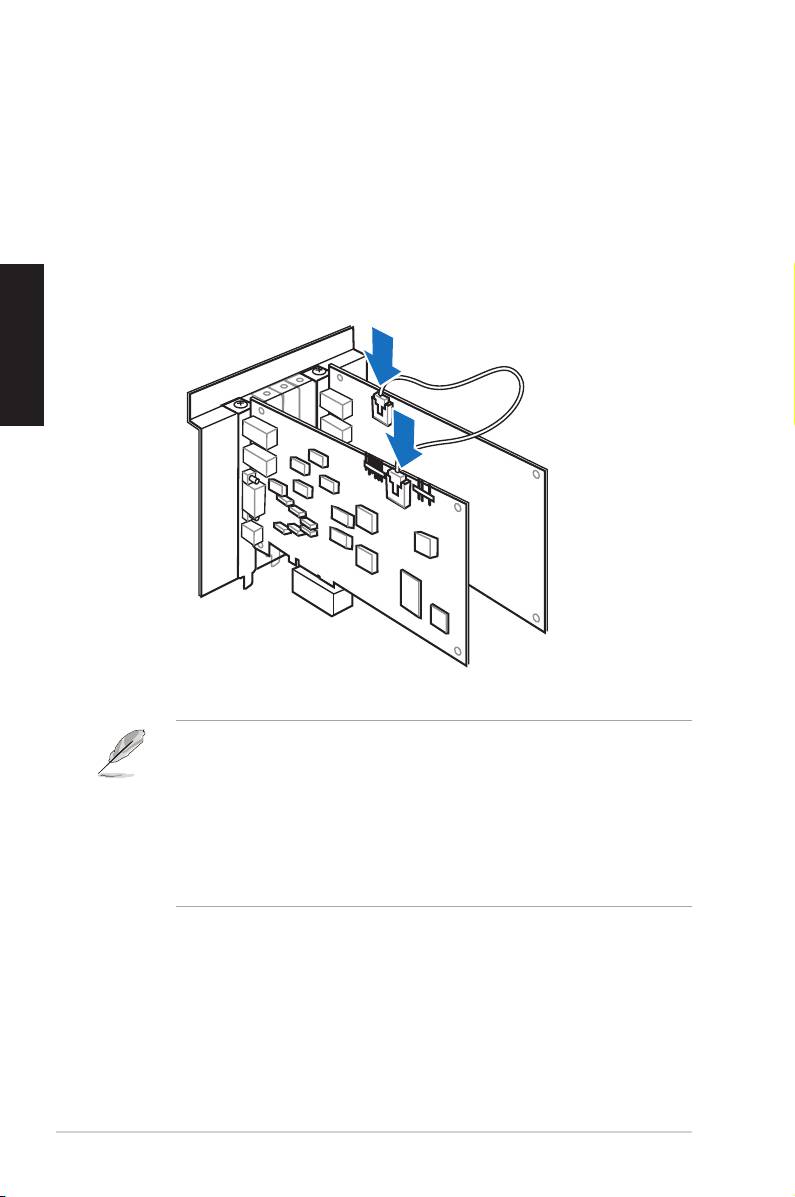
Power connector
8
Connects to the power cable of your power supply unit.
PCI Bus golden ngers
9
Connects to the PCI Express slot on your motherboard.
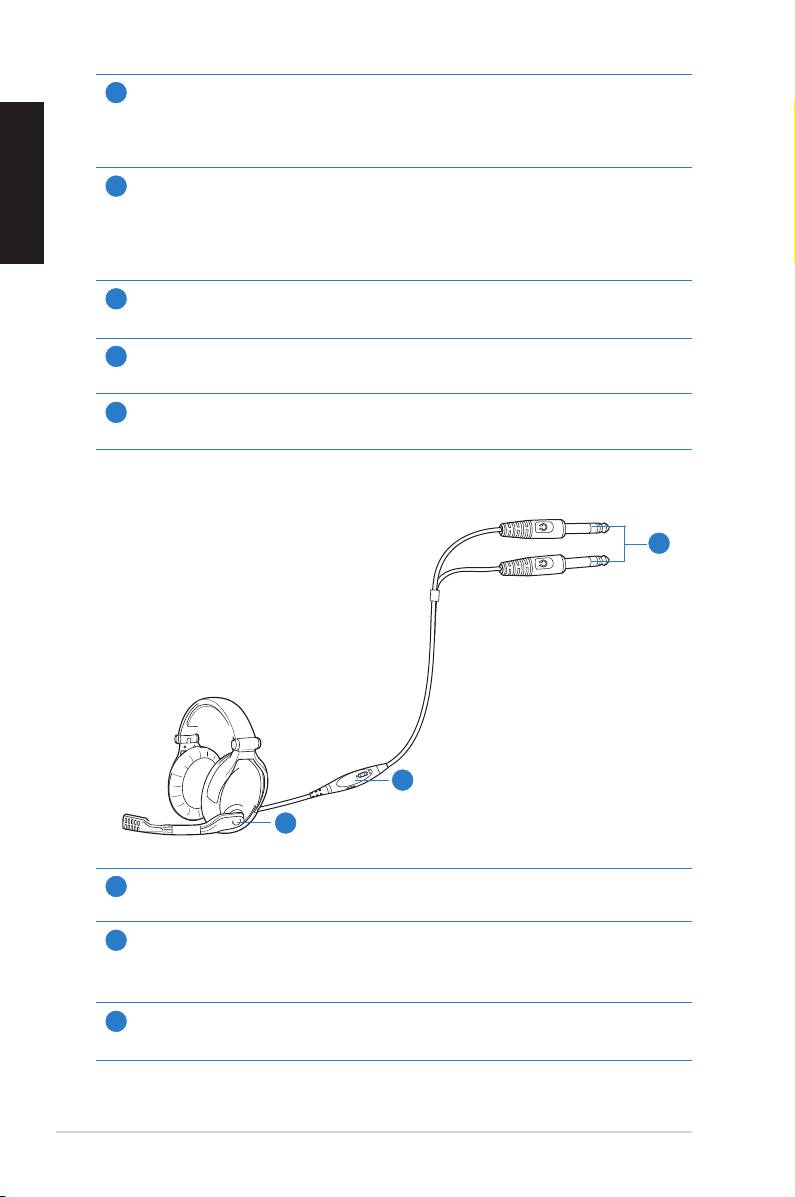
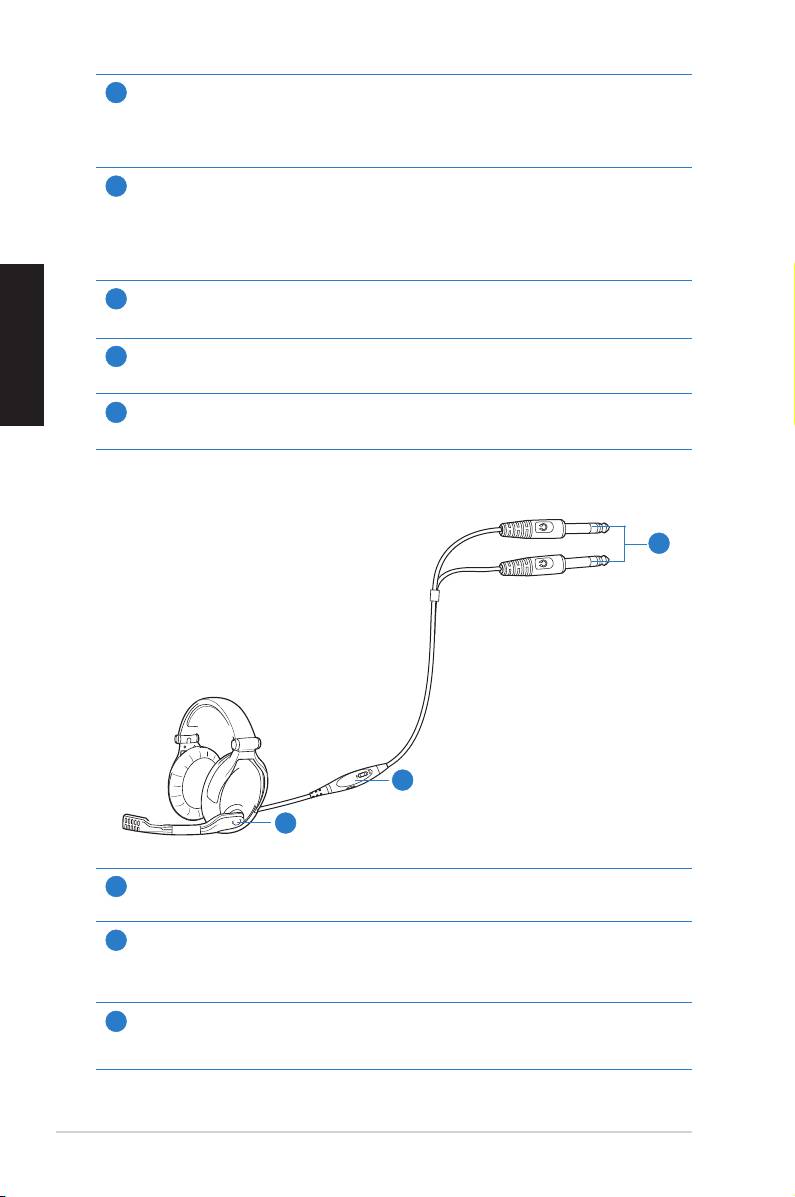
Gaming headset
3
2
1
Microphone boom arm
1
Allowsyoutomoveyourheadset’smicrophonecomfortablyclosetoyourmouth.
Volume control and mute box
2
Allowsyoutoincrease/decreasethevolumeofyourheadset’saudiooutputandto
put it on mute mode.
6.3mm connectors
3
Connectsyourheadsettotheaudiocard’sMicIn/Line-InandHeadphoneOutports.
4
ASUS Xonar Xense Quick Start Guide
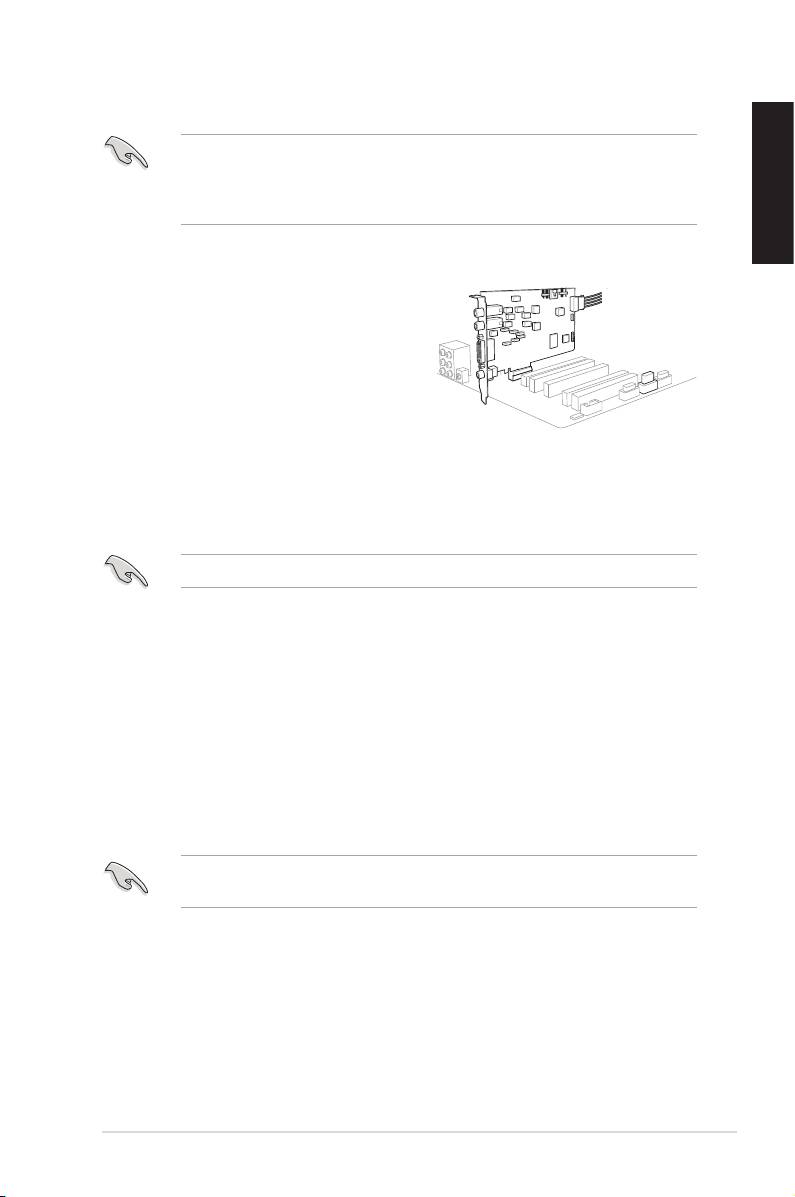
Installing the audio card
Before you install the audio card, disable your onboard audio device in your
BIOS settings, or uninstall any other audio cards on your computer. For BIOS
setting or uninstallation of other sound cards, refer to the user manuals of your
motherboard and audio card.
English
To install the audio card:
1. Turn off your computer and disconnect
all peripherals connected to it.
2. Unplugthecomputer’spowercord
from the power outlet.
3. Touch the metal back or side panel of
the computer to avoid static electricity.
4. Remove the chassis cover.
5. Remove the metal bracket of a PCI Express slot.
6. Carefully insert the audio card into the PCI Express slot. Ensure that the
audio card sits properly in place.
DO NOT force the audio card into the slot.
7. Secure the audio card with the screw you removed from the PCI Express
slot’smetalbracket.
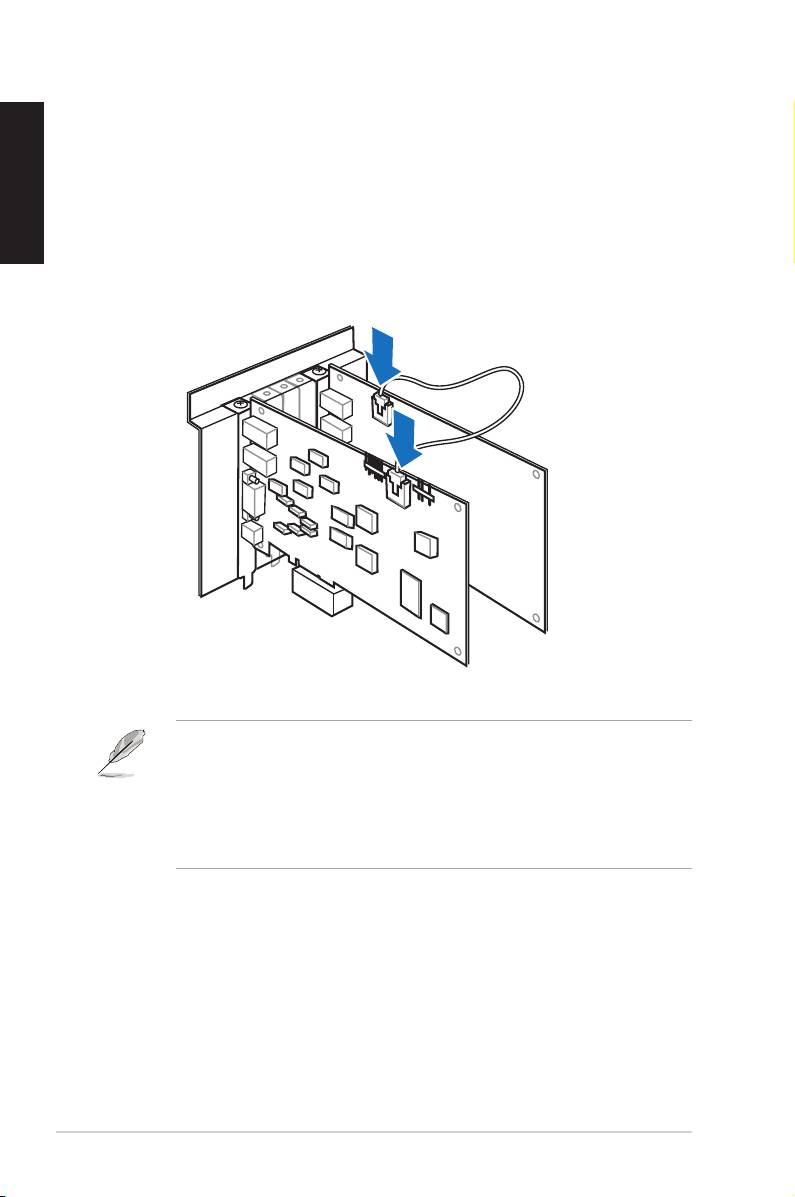
8. Connect the power cable of your power supply unit to the power connector of
the audio card.
9. Replace the chassis cover.
10. Reconnect all peripherals to your computer.
11. Plug the power cord to a power outlet.
12. Power ON the computer.
The PCI high-quality audio card requires additional power from your computer.
If the power cable is not connected properly, the audio card will not work at all.
ASUS Xonar Xense Quick Start Guide
5
2
Connecting to a TV tuner card
If you have a traditional PCI/PCI Expresss TV tuner card on your computer, you
English
mayneedtoconnectittotheaudiocardtosendthetunercard’ssoundtoyourPC
speakers.
To connect to a TV tuner card:
1. Secure the PCI/PCI Express TV tuner card into the rear panel with a screw.
2. Connect the audio output header from the TV tuner card to the Aux-In header
of the audio card.
For optimum TV audio quality, Xonar uses ADC recording to digitize the signal
and loops it back to DAC playback. Select Aux-In as the recording source in
theXonarAudioCenter’srecordingmixerandenablethemonitoringbutton
to pass this signal to the audio output. Using this setup, you can even turn on
sound effects such as Pro-Logic IIx to expand the stereo TV audio to 5.1 or
7.1 channel surround sound. This gives you a better TV audio quality on your
computer compared to that on your TV.
6
ASUS Xonar Xense Quick Start Guide
Installing the audio card driver
To install the audio card driver:
®
1. After you have installed the audio card, turn on your computer. Windows
automatically detects the audio card and searches for device drivers. When
prompted for the drivers, click Cancel.
English
2. Insert the support CD into the optical drive. If Autorun is enabled in your
system, the setup starts automatically. If not, run setup.exe from your
support CD.
3. Followtheonscreeninstructionstonishtheinstallation.
The contents of the support CD are subject to change without notice.
To uninstall the audio card driver:
®
1. From the Windows
desktop, click Start > Control Panel.
2 Double-click Add or Remove Programs.
3. Click Change or Remove Programs.
4. Select the audio card driver.
5. Click Remove to uninstall the audio card driver. If you are prompted, restart
your computer.
Connecting speakers and peripherals
Connecting the gaming headset
Mic In/ Line-In port
Headphone Out port
ASUS Xonar Xense Quick Start Guide
7
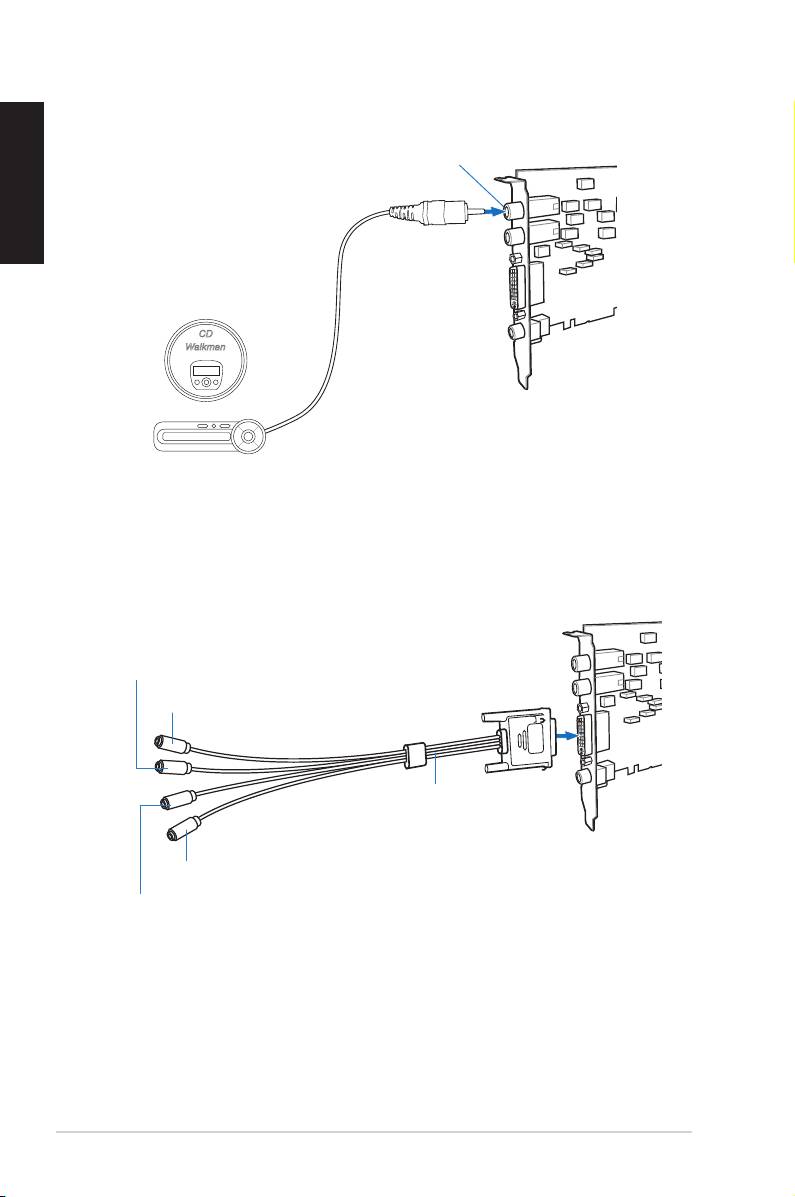
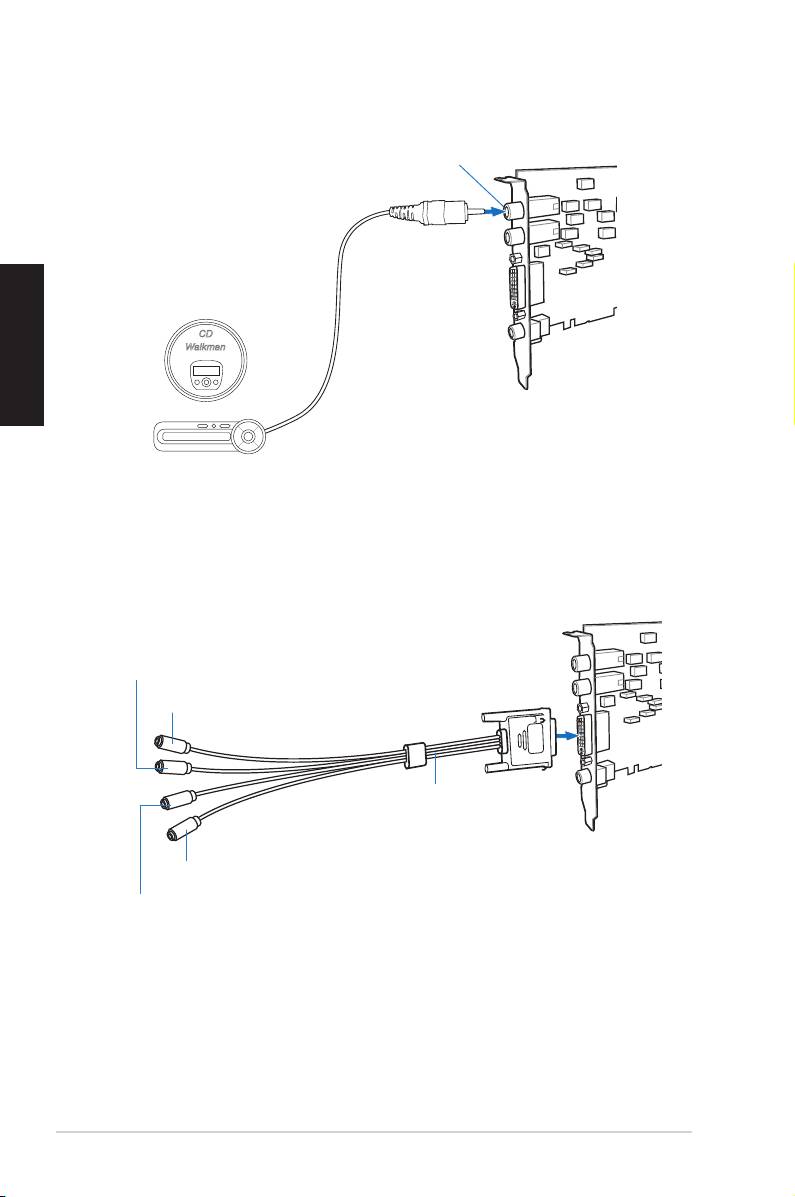
Connecting Line-in audio sources
English
Mic In/ Line-In port
CD Player
MP3 Player
Connecting analog speaker systems
Surround Sound (Black)
Front Speaker Out (Lime)
Audio Splitter Cable
(included)
Side Speakers Out (Grey)
Center/Subwoofer (Orange)
8
ASUS Xonar Xense Quick Start Guide

Notices
REACH
Complying with the REACH (Registration, Evaluation, Authorisation, and
Restriction of Chemicals) regulatory framework, we published the chemical
substances in our products at ASUS REACH website at http://green.asus.com/
English
english/REACH.htm.
Federal Communications Commission Statement
This device complies with Part 15 of the FCC Rules. Operation is subject to the
following two conditions:
• This device may not cause harmful interference.
• This device must accept any interference received including interference that
may cause undesired operation.
This equipment has been tested and found to comply with the limits for a
Class B digital device, pursuant to Part 15 of the FCC Rules. These limits are
designed to provide reasonable protection against harmful interference in a
residential installation. This equipment generates, uses and can radiate radio
frequencyenergyand,ifnotinstalledandusedinaccordancewithmanufacturer’s
instructions, may cause harmful interference to radio communications. However,
there is no guarantee that interference will not occur in a particular installation. If
this equipment does cause harmful interference to radio or television reception,
which can be determined by turning the equipment off and on, the user is
encouraged to try to correct the interference by one or more of the following
measures:
• Reorient or relocate the receiving antenna.
• Increase the separation between the equipment and receiver.
• Connect the equipment to an outlet on a circuit different from that to which the
receiver is connected.
• Consult the dealer or an experienced radio/TV technician for help.
Caution:Anychangesormodicationsnotexpresslyapprovedbytheparty
responsibleforcompliancecouldvoidtheuser’sauthoritytooperatethe
equipment.
Canadian Department of Communications Statement
This digital apparatus does not exceed the Class B limits for radio noise emissions
from digital apparatus set out in the Radio Interference Regulations of the
Canadian Department of Communications.
This class B digital apparatus complies with Canadian ICES-003.
ASUS Xonar Xense Quick Start Guide
9

Prohibition of Co-location
English
This device and its antenna(s) must not be co-located or operating in conjunction
with any other antenna or transmitter
Important:
Radiation Exposure Statement
This equipment complies with FCC radiation exposure limits set forth for
anuncontrolledenvironment.Endusersmustfollowthespecicoperating
instructions for satisfying RF exposure compliance. To maintain compliance with
FCC RF exposure compliance requirements, please follow operation instuction
as documented in this manual.
Safety Information
TomaintaincompliancewithFCC’sRFexposureguidelines,thisequipmentshould
be installed and operated with minimum distance 20cm between the radiator and
your body. Use on the supplied antenna.
Declaration of Conformity for R&TTE directive 1999/5/EC
Essential requirements – Article 3
Protection requirements for health and safety – Article 3.1a
Testing for electric safety according to EN 60950-1 has been conducted. These are
consideredrelevantandsufcient.
Protection requirements for electromagnetic compatibility – Article 3.1b
Testing for electromagnetic compatibility according to EN 301 489-1 and EN 301
489-17hasbeenconducted.Theseareconsideredrelevantandsufcient.
Effective use of the radio spectrum – Article 3.2
Testing for radio test suites according to EN 300 328- 2 has been conducted.
Theseareconsideredrelevantandsufcient.
CE Mark Warning
This is a Class B product, in a domestic environment, this product may cause radio
interference, in which case the user may be required to take adequate measures.
10
ASUS Xonar Xense Quick Start Guide
Xonar Xense
Set audio premium pour gamers
Guide de démarrage rapide

Contenu de la boîte
• Carte son Xonar™ Xense x 1
• Casque audio Sennheiser PC350-Xense x 1
• Adaptateur audio 6.3mm > 3.5mm x 1
• Câble de séparation audio x 1
• CD des pilotes x 1
• Adaptateur TOSLINK S/PDIF optique x 1
• Guide de démarrage rapide x 1
Français
Sil’undesélémentsci-dessusestendommagéoumanquant,contactezvotre
revendeur.
Pré-requis système
• Un slot PCI Express 1.0 (ou supérieur) pour la carte son
• Uneprised’alimentation4broches
®
®
• Microsoft
Windows
Vista/Win 7(32/64bit)/XP(32/64bit)/MCE2005
®
®
• Processeur Intel
Pentium
4 1.4GHz ou AMD Athlon 1400 ou supérieur
• > 256 Mo de mémoire vive
• >60Mod’espacedisquedisponiblepourl’installationdespilotes
• LecteurdeCD-ROM(ouDVD-ROM)pourl’installationdulogiciel
• Des écouteurs de haute qualité, des haut-parleurs analogiques alimentés, ou
undécodeurDolbyDigitalpourproterpleinementdelaqualitéaudiodélivrée
par la carte son
12
ASUS Xonar Xense - Guide de démarrage rapide
Introduction au matériel
Diagramme de la carte son
5
6 7
1
8
2
3
Français
4
9
Port d’entrée microphone
1
Connectez le câble dédié au microphone de votre casque audio sur ce port. Intègre
unpréamplicateurdemicrophonedehautequalité.
Port d’entrée audio
Connectez des périphériques analogiques (lecteur MP3, lecteur CD, etc) ou autres
sources audio sur ce jack 6.3mm. (Via un convertisseur numérique-analogique
avec un rapport signal / bruit de 118 dB)
Port de sortie casque
2
Connectez le câble audio de votre casque sur ce port.
• NE PAS connecter de haut-parleurs sur ce port. Le faire peut
endommager vos haut-parleurs.
• Pouréviterd’endommagervotrecasqueaudio,avanttouteconnexion,
ajustezlesparamètresd’impédancedesécouteursàpartirdel’utilitaire
audio Xonar Xense.
Sortie 7.1
3
Permet de connecter votre système de haut-parleur via un câble de séparation
audio.
Port de sortie S/PDIF
4
PortdesortienumériqueTOSLINK(Optique+Coaxial).Seconnecteàun
décodeur numérique externe, un home cinéma, un système de haut-parleurs
numériquesouunrécepteurpourlatransmissiond’unsignalaudionumérique
supportant les technologies PCM, Dolby Digital, DTS, WMA-Pro.
ASUS Xonar Xense - Guide de démarrage rapide
13
En-tête audio pour panneau avant
5
ConnectezuneextrémitéducâbleaudiodupanneauavantdevotrePCàl’en-tête
audiopourpanneauavantdelacarteson,puisl’autreextrémitéaumoduled’E/S
du panneau avant du châssis.
En-tête d’entrée auxiliaire
6
Seconnectegénéralementauportdesortieaudioanalogiqued’unecartetuner
TV ou tout autre source audio interne du PC. (Pour surveiller les signaux audio de
votre carte tuner TV depuis ce port, vous devrez activer la fonction de surveillance
duport“Aux-In”àpartirdel’utilitaireaudioXonarXenseAudioCenter).
En-tête S/PDIF
Français
7
Seconnecteàunecartegraphiquecompatible.
Connecteur d’alimentation
8
Seconnecteàl’undescâblesdublocd’alimentation.
Connecteurs dorés
9
Coonectent la carte son au slot PCI Express de la carte mère.
Casque de jeu
3
2
1
Microphone directionnel
1
Déplacezl’angledumicrophoneprèsdevotrebouche.
Contrôle du volume et mise en sourdine
2
Permetd’augmenteroubaisserlevolumedesortieducasqueaudiooude
désactiver le son.
Connecteur 6.3mm
3
Connecte le casque aux ports Mic In (Entrée micro)/Line-In (Entrée audio) et
Headphone Out (Sortie micro) de la carte son.
14
ASUS Xonar Xense - Guide de démarrage rapide
Installer la carte son
Avant de continuer, il est recommandé de désactiver le chipset audio embarqué
dans le BIOS ou de désinstaller les autres cartes audio de votre système. (Pour
lesoptionsduBIOSouladésinstallationd’autrescartesson,référez-vousaux
manuelsd’utilisationdelacartemèreetdelacarteaudio)
Pour installer la carte son :
1. �teignez l’ordinateur, le moniteur et tous�teignezl’ordinateur,lemoniteurettous
les périphériques connectés au PC.
2. Débranchez le cordon d’alimentation deDébranchezlecordond’alimentationde
l’ordinateuretdelapriseélectrique.
Français
3. Touchez l’arrière métallique ouTouchezl’arrièremétalliqueou
le panneau latéral du châssis de
l’ordinateurpourvousdéchargerde
l’électricitéstatique.
4. Retirez le panneau latéral du châssis.Retirez le panneau latéral du châssis.
5. Retirez le cache métallique d’un slot PCI Express x1.Retirezlecachemétalliqued’unslotPCIExpressx1.
6. Insérez délicatement la carte son sur le slot PCI Express x1. Assurez-vousInsérez délicatement la carte son sur le slot PCI Express x1. Assurez-vous
que la carte est bien en place.
NE PAS forcer la carte son sur le slot PCI Express.
7. Sécurisez la carte à l’aide de la vis retirée du cache métallique.Sécurisezlacarteàl’aidedelavisretiréeducachemétallique.
8. Connectez un câble d’alimentation ATX 4 broches au connecteurConnectezuncâbled’alimentationATX4brochesauconnecteur
d’alimentationdelacarte.
9. Replacez le panneau latéral du châssis.Replacez le panneau latéral du châssis.
10. Reconnectez tous les câbles.Reconnectez tous les câbles.
11. Reliez le cordon d’alimentation à l’ordinateur et à une prise électrique.Reliezlecordond’alimentationàl’ordinateuretàunepriseélectrique.
12. Allumez l’ordinateur.Allumezl’ordinateur.
LacartesonPCIExpressnécessited’êtrealimentéepourpouvoirfonctionner
correctement.Assurez-vousd’avoirreliéuncâbled’alimentationàlacarteavant
del’utiliser.
ASUS Xonar Xense - Guide de démarrage rapide
15
2
Connexion à une carte tuner TV
Si vous possédez une carte tuner TV PCI/PCI Expresss sur votre ordinateur, vous
devrezlaconnecteràlacartesonpourqueleuxaudiopuisseêtreenvoyévers
votre système de haut-parleurs.
Pour connecter une carte tuner TV :
1. SécurisezlacartetunerTVPCI/PCIExpressauchâssisàl’aided’unevis.
2. Connectezl’en-têtedesortieaudiodelacartetunerTVàl’en-têted’entrée
auxiliaire de la carte son.
Français
Pourunequalitéd’afchageoptimale,lacartesonXonarutiliseleprocédé
d’enregistrementADCpournumériserlesignaletleconvertirenlectureDAC.
Sélectionnez Aux-In(entréeauxiliaire)commesourced’enregistrementdans
l’utilitaireaudioXonarAudioCenteretactivezlafonctiondesurveillancepour
quelesignalsoitacheminéverslasortieaudio.Grâceàcetteconguration,
vouspouvezmêmeactivercertainseffetssonorescommelatechnologiePro-
Logic IIx permettant de convertir un signal TV stéréo classique en son surround
5.1 ou 7.1. Ce procédé offre une meilleure qualité audio sur votre ordinateur
que sur votre téléviseur.
16
ASUS Xonar Xense - Guide de démarrage rapide
Installation du pilote de la carte son
Pour installer le pilote de la carte son :
®
1. Une fois la carte son installée, allumez votre PC. Windows
détectera
automatiquement la carte son et lancera la recherche du pilote approprié.
Lorsquelafenêtred’installationdupiloteapparaît,cliquezsurAnnuler.
2. InsérezleCDdesupportdansvotrelecteuroptique.Sil’Exécution
automatiqueestactivée,leprocessusdecongurationdémarre
automatiquement.Sicen’estpaslecas,cliquezsurlechiersetup.exe
contenu dans le CD de support.
3. Suivezlesinstructionsàl’écranpourterminerl’installation.
LaversionetlecontenuduCDdesupportpeuventêtremodiéssansavis
Français
préalable.
Désinstaller le pilote de la carte son :
®
1. Dans le Bureau de Windows
, cliquez sur Démarrer > Panneau de
conguration.
2 Double-cliquez sur Ajout/Suppression de programmes.
3. Cliquez sur Modier ou supprimer des programmes.
4. Sélectionnez le pilote audio.
5. Cliquez sur Supprimer pour désinstaller le pilote de la carte son. Si
nécessaire,redémarrezl’ordinateur.
Connexion de haut-parleurs et de périphériques
Connecter le casque de jeu
Port Entrée micro/Entrée audio
Port Sortie casque
ASUS Xonar Xense - Guide de démarrage rapide
17
Connecter une source audio via le port d’entrée audio
Port Entrée micro/Entrée audio
Français
Baladeur CD
Lecteur MP3
Connecter un système de haut-parleurs
Son surround (noir)
Sortie haut-parleurs avants (vert)
Câble de séparation
audio
(inclus)
Sortie haut-parleurs latéraux (gris)
Centre/Caisson de basse (orange)
18
ASUS Xonar Xense - Guide de démarrage rapide

Notes
REACH
En accord avec le cadre réglementaire REACH (Enregistrement, Evaluation,
Autorisation, et Restriction des produits chimiques), nous publions la liste des
substances chimiques contenues dans nos produits sur le site ASUS REACH :
http://green.asus.com/english/REACH.htm.
Rapport de la Commission Fédérale des Communications
Cedispositifestconformeàl’alinéa15desrèglesétabliesparlaFCC.L'opération
est sujette aux 2 conditions suivantes:
•Cedispositifnepeutcauserd'interférencenuisible,et
Français
•Cedispositifsedoitd'acceptertouteinterférencereçue,incluanttoute
interférence pouvant causer des résultats indésirables.
Cetéquipementaététestéets'estavéréêtreconformeauxlimitesétabliespour
undispositifnumériquedeclasseB,conformémentàl'alinéa15desrèglesdela
FCC.Ceslimitessontconçuespourassureruneprotectionraisonnablecontre
l’interférencenuisibleàuneinstallationréseau.Cetéquipementgénère,utiliseet
peutirradierdel'énergieàfréquenceradioet,sinoninstalléetutiliséselonles
instructions du fabricant, peut causer une interférence nocive aux communications
radio.Cependant,iln'estpasexcluqu'uneinterférenceseproduiselorsd'une
installation particulière. Si cet équipement cause une interférence nuisible au
signalradiooutélévisé,cequipeut-êtredéterminéparl'arrêtpuisleréamorçage
decelui-ci,l'utilisateurestencouragéàessayerdecorrigerl'interférenceen
s'aidantd'uneouplusieursdesmesuressuivantes:
•Réorientezoureplacezl'antennederéception.
•Augmentezl'espacedeséparationentrel'équipementetlerécepteur.
•Reliezl’équipementàunesortiesuruncircuitdifférentdeceluiauquelle
récepteur est relié.
•Consultezlerevendeurouuntechnicienexpérimentéradio/TVpourdel’aide.
ATTENTION:Leschangementsoulesmodicationsapportésàcetteunité
n'étantpasexpressémentapprouvésparlapartieresponsabledelaconformité
pourraientannulerl’autoritédel’utilisateuràmanipulercetéquipement.
Rapport du Département Canadien des Communications
Cet appareil numérique ne dépasse pas les limites de classe B en terme
d'émissionsdenuisancessonore,parradio,pardesappareilsnumériques,etce
conformémentauxrégulationsd’interférenceparradioétabliesparledépartement
canadien des communications.
CetappareilnumériquedelaclasseBestconformeàlanormecanadienneICES-
003.
ASUS Xonar Xense - Guide de démarrage rapide
19

Interdiction de Colocalisation
Cetappareilnedoitpasêtrecolocaliséouopéréconjointementavecd’autres
antennes ou émetteurs.
Important :
Avertissement d'exposition aux ondes radio
Cetéquipementaététestéets'estavéréêtreconformeauxlimitesétablies
parlaFCCentermesd’expositionauxradiationsdansunenvironnementnon
contrôlé.Anderesterenconformitéaveccesexigences,éviteztoutcontact
Français
directavecl’antennependantlatransmission.L’utilisateurdoitsuivreles
instructionsdefonctionnementdecemanueld’utilisation.
Informations relatives à la sécurité
AndesatisfaireauxdirectivesdelaFCCconcernantl’expositionauxradiations,
ceéquipementdoitêtreinstalléetopéréàunedistanceminimumde[20cm]entre
leradiateuretvotrecorps.N’utilisezquel’antennefournie.
Déclaration de Conformité (Directive R&TTE 1999/5/EC
Conditions essentielles – Article 3
Conditions de protection pour la santé et la sûreté – Article 3.1a
Test de la sécurité électrique en conformité avec EN 60950-1.
Conditions de protection pour la compatibilité électromagnétique – Article 3.1b
Test de la compatibilité électromagnétique dans EN 301 489-1 et EN 301 489-17.
Utilisationefcaceduspectredesradiofréquences–Article3.2
Tests radio en accord avec EN 300 328- 2.
Avertissement marque CE
Ceci est un produit de classe B ; dans un environnement domestique, ce produit
peutcauserdesinterférencesradio,auquelcasl’utilisateurpourraêtreamenéà
prendre les mesure adéquates.
20
ASUS Xonar Xense - Guide de démarrage rapide
