ASRock Fatal1ty Z68 Professional Gen3: инструкция
Раздел: Компьютерная техника, комплектующие, аксессуары
Тип: Материнская Плата
Инструкция к Материнской Плате ASRock Fatal1ty Z68 Professional Gen3
1
Fatal1ty Z68 Professional Gen3 Series Motherboard
Who knew that at age 19, I would be a World Champion PC gamer. When I was 13, I
actually played competitive billiards in professional tournaments and won four or five
games off guys who played at the highest level. I actually thought of making a career
of it, but at that young age situations change rapidly. Because I’ve been blessed with
great hand-eye coordination and a grasp of mathematics (an important element in video
gaming) I gravitated to that activity.
GOING PRO
I started professional gaming in 1999 when I entered the CPL (Cyberathlete Professional
League) tournament in Dallas and won $4,000 for coming in third place. Emerging as one
of the top players in the United States, a company interested in sponsoring me
fl
ew me
to Sweden to compete against the top 12 players in the world. I won 18 straight games,
lost none, and took
fi
rst place, becoming the number one ranked Quake III player in the
world in the process. Two months later I followed that success by traveling to Dallas
and defending my title as the world’s best Quake III player, winning the $40,000 grand
prize. From there I entered competitions all over the world, including Singapore, Korea,
Germany, Australia, Holland and Brazil in addition to Los Angeles, New York and St.
Louis.
WINNING STREAK
I was excited to showcase my true gaming skills when defending my title as CPL
Champion of the year at the CPL Winter 2001 because I would be competing in a totally
different first person shooter (fps) game, Alien vs. Predator II. I won that competition
and walked away with a new car. The next year I won the same title playing Unreal
Tournament 2003, becoming the only three-time CPL champion of the year. And I did it
playing a different game each year, something no one else has ever done and a feat of
which I am extremely proud.
At QuakeCon 2002, I faced off against my rival ZeRo4 in one of the most highly
anticipated matches of the year, winning in a 14 to (-1) killer victory. Competing at
Quakecon 2004, I became the World’s 1st Doom3 Champion by defeating Daler in a
series of very challenging matches and earning $25,000 for the victory.
Since then Fatal1ty has traveled the globe to compete against the best in the world,
winning prizes and acclaim, including the 2005 CPL World Tour Championship in New
York City for a $150,000
fi
rst place triumph. In August 2007, Johnathan was awarded the
fi
rst ever Lifetime Achievement Award in the four year history of the eSports-Award for
“showing exceptional sportsmanship, taking part in shaping eSports into what it is today
and for being the prime representative of this young sport. He has become the
fi
gurehead
for eSports worldwide”.
Fatal1ty Story
English
2
Fatal1ty Z68 Professional Gen3 Series Motherboard
LIVIN’ LARGE
Since my
fi
rst big tournament wins, I have been a “Professional Cyberathlete”, traveling
the world and livin’ large with lots of International media coverage on outlets such as
MTV, ESPN and a 60 Minutes segment on CBS to name only a few. It's unreal - it's crazy.
I’m living a dream by playing video games for a living. I’ve always been athletic and
took sports like hockey and football very seriously, working out and training hard. This
discipline helps me become a better gamer and my drive to be the best has opened the
doors necessary to become a professional.
A DREAM
Now, another dream is being realized – building the ultimate gaming computer, made
up of the best parts under my own brand. Quality hardware makes a huge difference in
competitions…a couple more frames per second and everything gets really nice. It’s all
about getting the computer processing faster and allowing more
fl
uid movement around
the maps.
My vision for Fatal1ty hardware is to allow gamers to focus on the game without worrying
about their equipment, something I’ve preached since I began competing. I don’t want to
worry about my equipment. I want to be there – over and done with - so I can focus on the
game. I want it to be the fastest and most stable computer equipment on the face of the
planet, so quality is what Fatal1ty Brand products represent.
Johnathan “Fatal1ty” Wendel
The Fatal1ty name, Fatal1ty logos and the Fatal1ty likeness are registered trademarks of
Fatal1ty, Inc., and are used under license. © 2011 Fatal1ty, Inc. All rights reserved. All other
trademarks are the property of their respective owners.
English
3
Fatal1ty Z68 Professional Gen3 Series Motherboard
Copyright Notice:
No part of this installation guide may be reproduced, transcribed, transmitted, or trans-
lated in any language, in any form or by any means, except duplication of documentation
by the purchaser for backup purpose, without written consent of ASRock Inc.
Products and corporate names appearing in this guide may or may not be registered
trademarks or copyrights of their respective companies, and are used only for identi
fi
ca-
tion or explanation and to the owners’ bene
fi
t, without intent to infringe.
Disclaimer:
Speci
fi
cations and information contained in this guide are furnished for informational use
only and subject to change without notice, and should not be constructed as a commit-
ment by ASRock. ASRock assumes no responsibility for any errors or omissions that may
appear in this guide.
With respect to the contents of this guide, ASRock does not provide warranty of any kind,
either expressed or implied, including but not limited to the implied warranties or condi-
tions of merchantability or
fi
tness for a particular purpose. In no event shall ASRock, its
directors, of
fi
cers, employees, or agents be liable for any indirect, special, incidental, or
consequential damages (including damages for loss of pro
fi
ts, loss of business, loss of
data, interruption of business and the like), even if ASRock has been advised of the pos-
sibility of such damages arising from any defect or error in the guide or product.
This device complies with Part 15 of the FCC Rules. Operation is subject to the following
two conditions:
(1) this device may not cause harmful interference, and
(2) this device must accept any interference received, including interference that
may cause undesired operation.
CALIFORNIA, USA ONLY
The Lithium battery adopted on this motherboard contains Perchlorate, a toxic substance
controlled in Perchlorate Best Management Practices (BMP) regulations passed by the
California Legislature. When you discard the Lithium battery in California, USA, please
follow the related regulations in advance.
“Perchlorate Material-special handling may apply, see
www.dtsc.ca.gov/hazardouswaste/perchlorate”
ASRock Website: http://www.asrock.com
Published June 2011
Copyright
©
2011 ASRock INC. All rights reserved.
English
4
Fatal1ty Z68 Professional Gen3 Series Motherboard
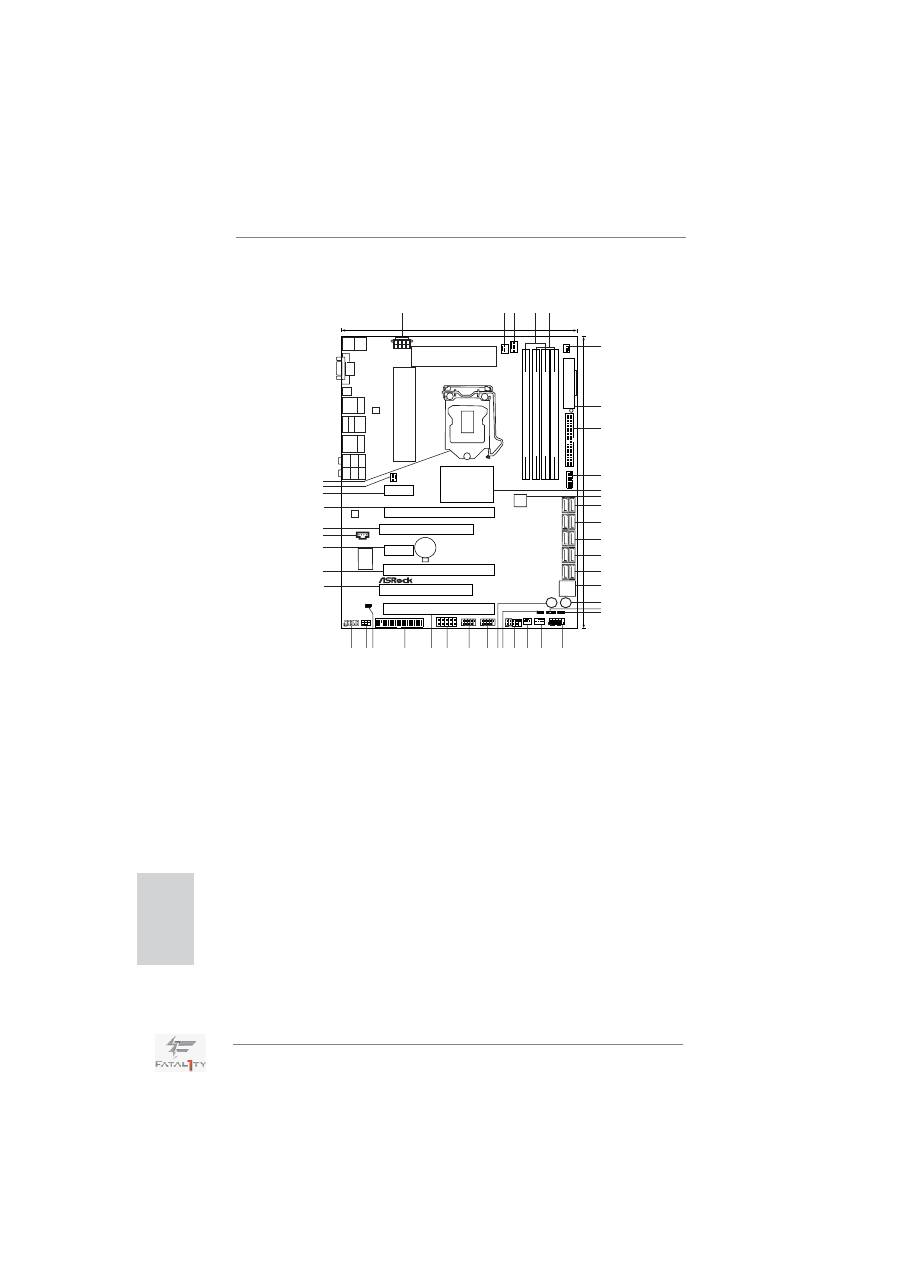
Motherboard Layout
English
24.4cm (9.6 in)
30.5cm
(12.0
in)
ATX12V1
CPU_FAN1
CPU_FAN2
CHA_FAN3
A
T
XPWR1
IDE1
USB3_4_5
SA
T
A
2_4_5
SA
T
A
2_2_3
SA
T
A
3_0_1
SA
T
A
3_A1_A2
SA
T
A
3_A3_A4
Dr.
Debug
PWRBTN
RSTBTN
HDLED RESET
PLED PWRBTN
PANEL1
CHA_FAN2
1
CHA_FAN1
FRONT_1394
1
USB8_9
1
USB6_7
1
COM1
1
FLOPPY1
IR1
1
1
HD_AUDIO1
1
HDMI_SPDIF1
CD1
PCI1
PCI2
PCIE5
PCIE4
PCIE1
PCIE3
PCIE2
PWR_FAN1
CMOS
Battery
CLRCMOS1
AUDIO
CODEC
PS2
Keyboard
USB
2.0
T:
U
S
B
0
B:
USB1
VGA1
HDMI1
HDMI2
Clr
CMOS
To
p
:
RJ-45
USB
3.0
T
: USB0
B:
USB1
USB
2.0
T
: USB2
B:
USB3
IEEE
1394
eSA
T
A_1
To
p
:
RJ-45
USB
3.0
T:
U
S
B
2
B:
USB3
T
op:
SIDE
SPK
Center:
REAR
SPK
T
op:
LINE
IN
Center:
FRONT
Bottom:
Optical
SPDIF
Bottom:
MIC
IN
SPEAKER1
PLED1
1
1
1
Intel
Z68
FATAL1TY
DDR3
2133
RoHS
USB 3.0
X
FAST USB
Z68 P
ROFESSIONAL GEN3
Designed
in
T
a
ipei
Super
I/O
SATA3 6Gb/s
1394a
Front USB 3.0
ErP/EuP Ready
HDMI 1.4a
DX10.1
LAN
PHY
64Mb
BIOS
DDR3_A1
(64
bit,
240-pin
module)
DDR3_A2
(64
bit,
240-pin
module)
DDR3_B1
(64
bit,
240-pin
module)
DDR3_B2
(64
bit,
240-pin
module)
1
2 3
4
5
6
7
8
9
10
11
12
13
14
16
15
17
18
19
20
21
24
22
23
25
26
27
28
29
30
31
32
33
34
35
36
37
38
39
40
41
42
43
1
ATX 12V Power Connector (ATX12V1)
23
Chassis Fan Connector (CHA_FAN2)
2
CPU Fan Connector (CPU_FAN2)
24
Front Panel IEEE 1394 Header
3
CPU Fan Connector (CPU_FAN1)
(FRONT_1394, Red)
4
2 x 240-pin DDR3 DIMM Slots
25
Clear CMOS Jumper (CLRCMOS1)
(Dual Channel: DDR3_A1, DDR3_B1, Red)
26
Power Switch (PWRBTN)
5
2 x 240-pin DDR3 DIMM Slots
27
USB 2.0 Header (USB8_9, Black)
(Dual Channel: DDR3_A2, DDR3_B2, Black)
28
USB 2.0 Header (USB6_7, Black)
6
Chassis Fan Connector (CHA_FAN3)
29
COM Port Header (COM1)
7
ATX Power Connector (ATXPWR1)
30
PCI Express 2.0 x16 Slot (PCIE5, Red)
8
Primary IDE Connector (IDE1, Black)
31
Floppy Connector (FLOPPY1)
9
USB 3.0 Header (USB3_4_5, Black)
32
HDMI_SPDIF Header (HDMI_SPDIF1, Black)
10
Intel Z68 Chipset
33
Infrared Module Header (IR1)
11
64Mb SPI Flash
34
Front Panel Audio Header
12
SATA2 Connector (SATA2_4_5, Black)
(HD_AUDIO1, Black)
13
SATA2 Connector (SATA2_2_3, Black)
35
PCI Slot (PCI2)
14
SATA3 Connector (SATA3_0_1, Red)
36
PCI Express 3.0 x16 Slot (PCIE4, Red)
15
SATA3 Connector (SATA3_A1_A2, Red)
37
PCI Express 2.0 x1 Slot (PCIE3, Black)
16
SATA3 Connector (SATA3_A3_A4, Red)
38
Internal Audio Connector: CD1 (Black)
17
Dr. Debug
39
PCI Slot (PCI1)
18
Reset Switch (RSTBTN)
40
PCI Express 3.0 x16 Slot (PCIE2, Red)
19
Chassis Speaker Header (SPEAKER 1, Black) 41
PCI Express 2.0 x1 Slot (PCIE1, Black)
20
Power LED Header (PLED1)
42
Power Fan Connector (PWR_FAN1)
21
System Panel Header (PANEL1, Black)
43
1155-Pin CPU Socket
22
Chassis Fan Connector (CHA_FAN1)
5
Fatal1ty Z68 Professional Gen3 Series Motherboard
English
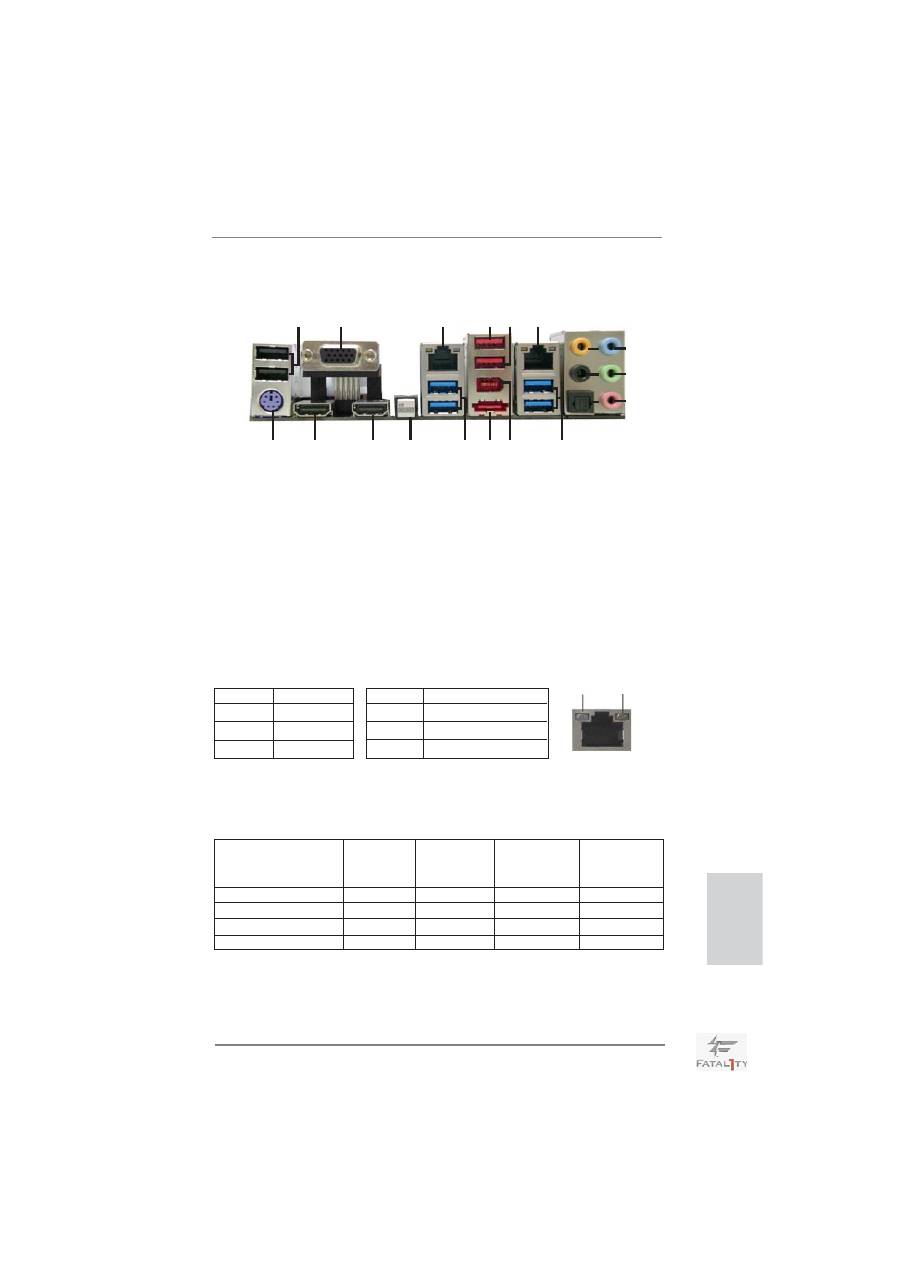
I/O Panel
* There are two LED next to the LAN port. Please refer to the table below for the LAN port LED
indications.
LAN Port LED Indications
Activity/Link LED
SPEED LED
Status Description Status Description
Off No Link Off 10Mbps connection
Blinking Data Activity Orange 100Mbps connection
On Link
Green 1Gbps connection
ACT/LINK
LED
SPEED
LED
LAN Port
5
7
8
9
10
11
12
13
4
1
2
3
14
15
16
17
18
19
6
20
**
If you use 2-channel speaker, please connect the speaker’s plug into “Front Speaker Jack”.
See the table below for connection details in accordance with the type of speaker you use.
TABLE for Audio Output Connection
Audio Output Channels Front Speaker Rear Speaker
Central / Bass
Line In or
(No. 11)
(No. 8)
(No. 7) Side Speaker
(No. 10)
2
V
-- -- --
4 V
V
--
--
6
V
V V --
8
V
V V V
1
USB 2.0 Ports (USB01) ** 11 Front Speaker (Lime)
2
VGA/D-Sub Port
12 Microphone (Pink)
* 3
LAN RJ-45 Port
13 USB 3.0 Ports (USB23)
4
Fatal1ty Mouse Port (USB2)
14 IEEE 1394 Port (IEEE 1394)
5
USB 2.0 Port (USB3) *** 15 eSATA3 Connector
* 6
LAN RJ-45 Port
16 USB 3.0 Ports (USB01)
7
Central / Bass (Orange)
17 Clear CMOS Switch (CLRCBTN)
8
Rear Speaker (Black) **** 18 VGA/HDMI Port (HDMI2)
9
Optical SPDIF Out Port **** 19 VGA/HDMI Port (HDMI1)
10
Line In (Light Blue)
20 PS/2 Keyboard Port (Purple)
6
Fatal1ty Z68 Professional Gen3 Series Motherboard
To enable Multi-Streaming function, you need to connect a front panel audio cable to the front
panel audio header. After restarting your computer, you will
fi
nd “Mixer” tool on your system.
Please select “Mixer ToolBox” , click “Enable playback multi-streaming”, and click
“ok”. Choose “2CH”, “4CH”, “6CH”, or “8CH” and then you are allowed to select “Realtek HDA
Primary output” to use Rear Speaker, Central/Bass, and Front Speaker, or select “Realtek
HDA Audio 2nd output” to use front panel audio.
*** eSATA3 connector supports SATA Gen3 in cable 1M.
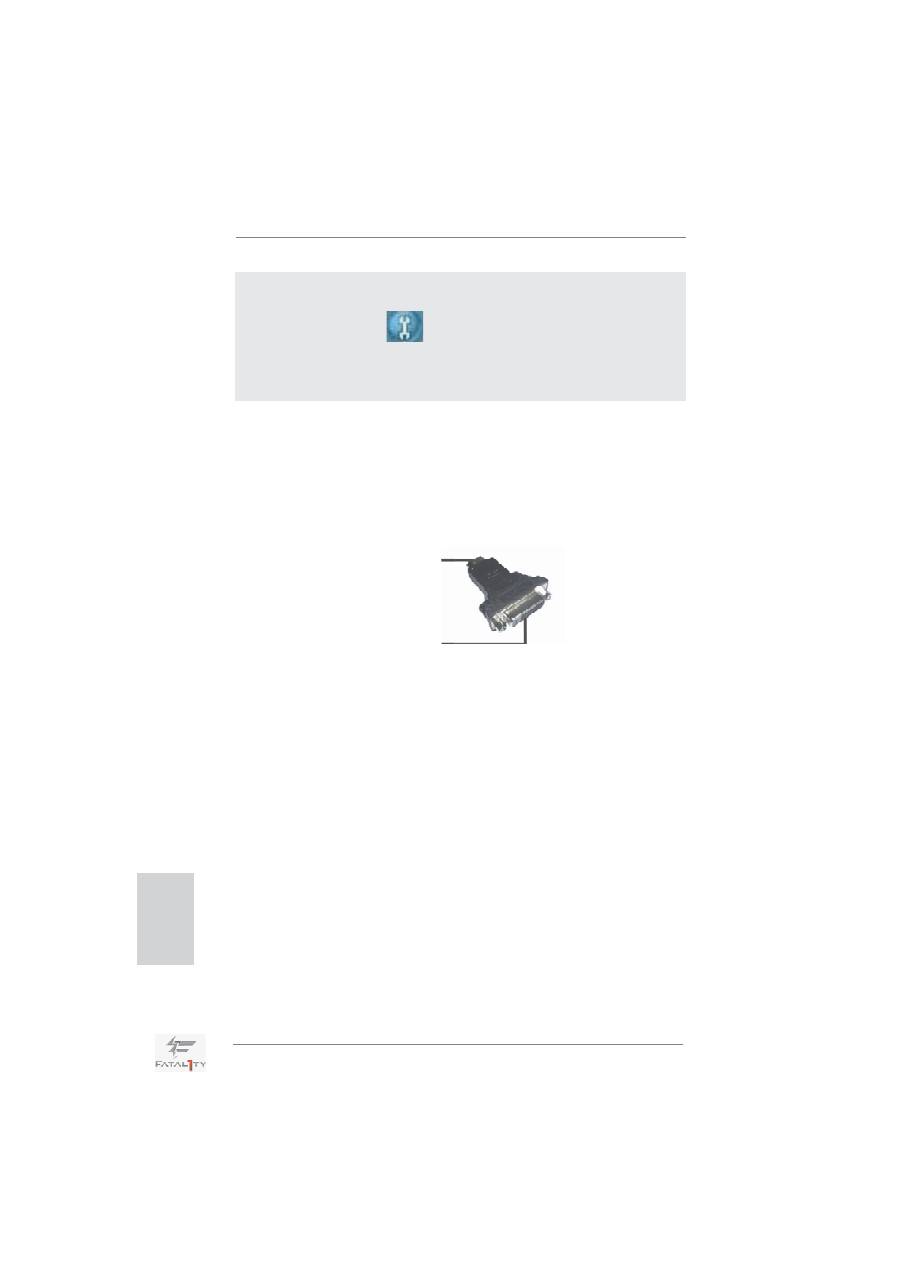
**** HDMI is backwards compatible with DVI. VGA/HDMI port can function similarly as DVI port
by applying the bundled HDMI to DVI adapter. Please connect the HDMI to DVI adapter to
the VGA/HDMI port on the I/O panel and then connect the DVI-D monitor cable to the VGA/
DVI-D connector on the adpater.
For PS/2 Keyboard users, it is recommended to apply the adapter on HDMI2. If HDMI1 is
connected to the adapter, please use USB Keyboard and do not use the PS/2 Keyboard
port. For the other users, apply it either on HDMI1 or HDMI2.
HDMI to DVI adapter
HDMI connector
DVI connector
English
Оглавление
- Motherboard Layout
- I/O Panel
- 1. Introduction
- 2. Installation
- 3. BIOS Information
- 1. Einführung
- 2. Installation
- 3. BIOS-Information
- 1. Introduction
- 2. Installation
- 3. Informations sur le BIOS
- 1. Introduzione
- 2. Installazione
- 3. Informazioni sul BIOS
- 1. Introducción
- 2. Instalación
- 3. BIOS Información
- 1. Введение
- 2. Установка
- 3.
- 1. Giri ş
- 2. Takma
- 3. BIOS Bilgileri
- 1. 제품소개
- 2. 설치하기
- 3. 시스템 바이오스 정보
- 1. 主板簡介
- 2. 主板安裝
- 3. BIOS 信息
- 1. 主機板簡介
- 2. 主機板安裝
- 3. BIOS 訊息
- Installing OS on a HDD Larger Than 2TB
- Note
