Asus WL-530g: инструкция
Раздел: Профоборудование
Тип: Аппарат
Инструкция к Аппарату Asus WL-530g

®
English
Pocket Wireless Router
(
WL-530g
for 802.11g/b wireless clients)
Quick Setup Guide
Quick Setup
Installation Procedure
English
Follow these steps to install the ASUS Wireless Router.
1. Determine the best location for the ASUS Wireless Router. Keep in mind
the following considerations:
• The length of the Ethernet cable that connects the ASUS Wireless
Router to the network must not exceed 100 meters.
• Try to place the ASUS Wireless Router on a flat, sturdy surface as
far from the ground as possible, such as on top of a desk or book-
case, keeping clear of obstructions and away from direct sunlight.
• Try to centrally locate the ASUS Wireless Router so that it will pro-
vide coverage to all of the wireless mobile devices in the area. Orien-
tating the antenna vertically should provide the best reception.
• Use only the power supply that came with this unit. Other power
supplies may fit but the voltage and power may not be compatible.
2. Wall mounting or vertical standing is also possible.
Warning: It is the responsibility of the installer and users of the
ASUS Wireless Router to guarantee that the antenna is operated at
least 20 centimeters from any person. This is necessary to insure
that the product is operated in accordance with the RF Guidelines
for Human Exposure which have been adopted by the Federal Com-
munications Commission.
4. LAN Connection: Attach one end of an RJ-45 Ethernet cable to the ASUS
Wireless Router’s LAN port (any one of the four) and attach the other end
to the RJ-45 Ethernet cable to your desktop computer.
5. Power Connection: The ASUS Wireless Router requires power from an
external power supply. The ASUS Wireless Router ships with a UL listed,
Class 2 power supply. Attach one end of the DC power adapter to the back
of the ASUS Wireless Router and the other end to a power outlet.
The Power LED on the front of the ASUS Wireless Router will light up
when the unit is powered ON. In addition, the green LAN or WAN LEDs
will turn ON to indicate that the ASUS Wireless Router has a physical
Ethernet network connection.
2 ASUS Pocket Wireless Router

Quick Setup
Software Configuration
Configuring the ASUS Wireless Router
English
The ASUS Wireless Router can be configured to meet various usage
scenarios. Some of the factory default settings may suit your usage; however,
others may need changing. Prior to using the ASUS Wireless Router, you
must check the basic settings to guarantee it will work in your environment.
Configuring the ASUS Wireless Router is done through a web browser.
You need a Notebook PC or desktop PC connected to the ASUS Wireless
Router (either directly or through a hub) and running a web browser as a
configuration terminal. The connection can be wired or wireless. For the
wireless connection, you need an IEEE 802.11g/b compatible device, e.g.
ASUS WLAN Card, installed in your Notebook PC. You should also disable
WEP and set the SSID to “default” for your wireless LAN device. If you
want to configure the ASUS Wireless Router or want to access the Internet
through the ASUS Wireless Router, TCP/IP settings must be correct.
Normally, the TCP/IP setting should be on the IP subnet of the ASUS
Wireless Router.
Note: Before rebooting your computer, the ASUS Wireless Router
should be switched ON and in ready state.
Connecting to the ASUS Wireless Router
Wired Connection
One RJ-45 cable is supplied with the ASUS Wireless Router. Auto crossover
function is designed into the ASUS Wireless Router so you can use either a
straight-through or a crossover Ethernet cable. Plug one end of the cable
into the WAN port on the rear of the ASUS Wireless Router and the other
end into the Ethernet port of your ADSL or Cable modem.
Wireless-Connection
Refer to your wireless adapter user’s manual on associating with the ASUS
Wireless Router. The default SSID of the ASUS Wireless Router is “default”
(lower case), encryption is disabled and open system authentication is used.
ASUS Pocket Wireless Router 3
Quick Setup
Setting IP address for Wired or Wireless Connection
English
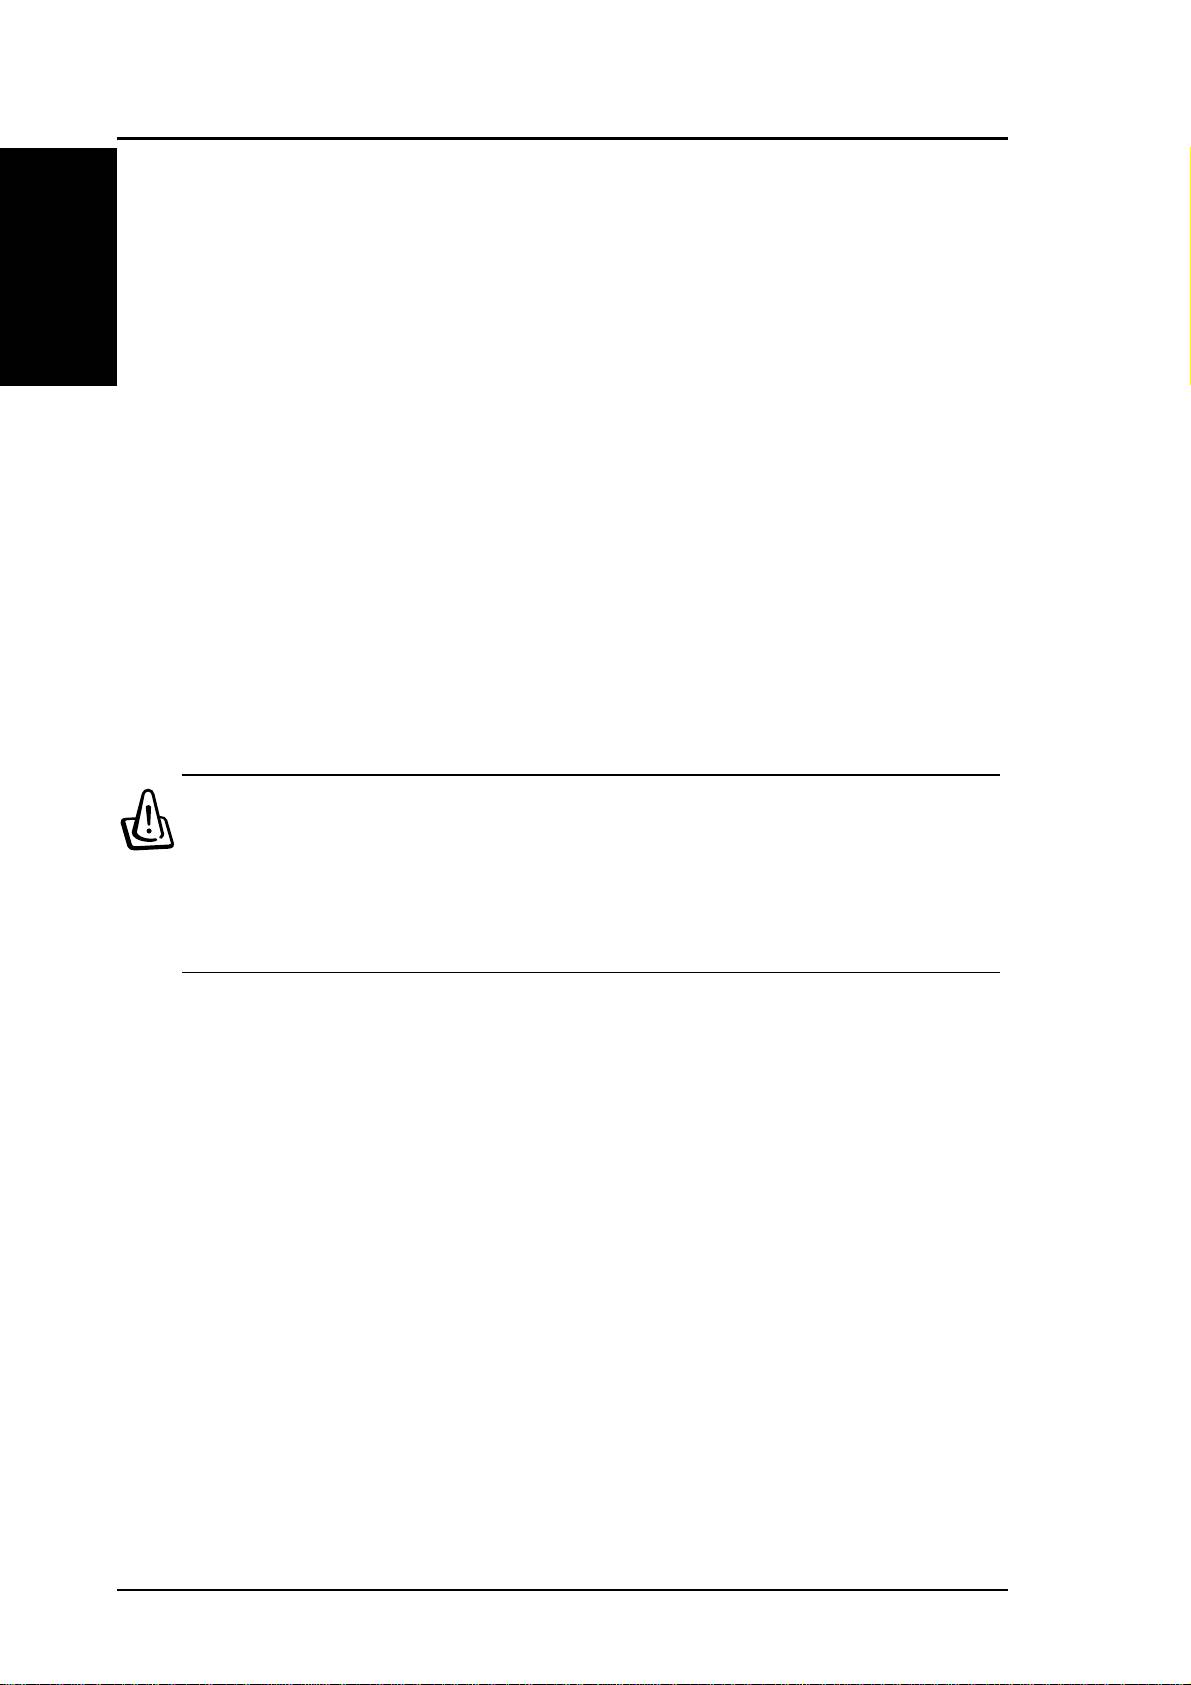
Get IP Automatically
The ASUS Wireless Router
incorporates a DHCP server so the
easiest method is to set your PC to get
its IP address automatically and reboot
your computer. So the correct IP
address, gateway, DNS (Domain
Name System Server) can be obtained
from the ASUS Wireless Router.
Note: The Wireless Router will act
as a router and provide IP ad-
dress only when the physical
connection of WAN port exists.
You must connect the WAN port
on the ASUS Wireless Router
with the Ethernet port on your ADSL or Cable modem with a net-
work cable. Before rebooting your PC, the ASUS Wireless Router
should be switched ON and in the ready state.
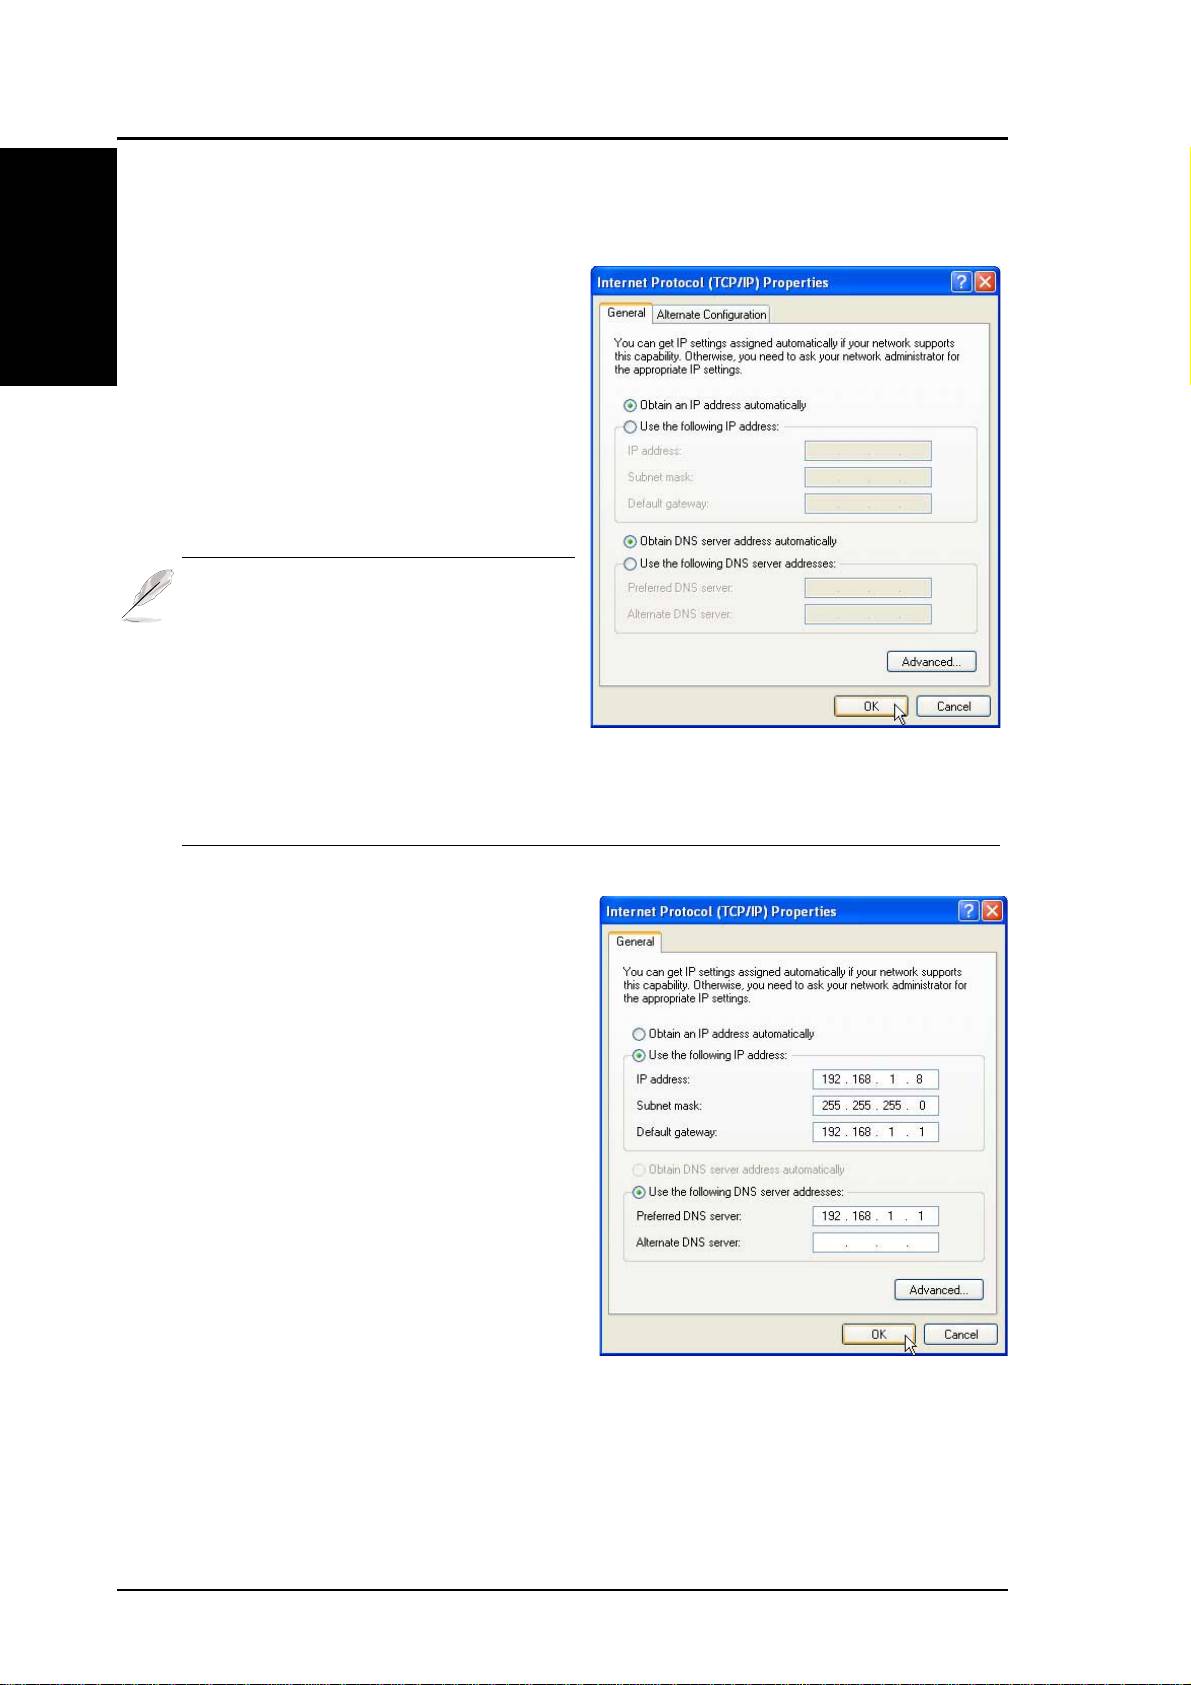
Setting IP Manually
If you want to set your IP address
manually, the following default
settings of the ASUS Wireless Router
should be known:
• IP address 192.168.1.1
• Subnet Mask 255.255.255.0.
If you set your computer’s IP
manually, it needs to be on the same
segment. For example:
• IP address 192.168.1.xxx (xxx can
be any number between 2 and 254
that is not used by another device)
• Subnet Mask 255.255.255.0 (same as the ASUS Wireless Router)
• Gateway 192.168.1.1 (this is the ASUS Wireless Router)
• DNS 192.168.1.1 (ASUS Wireless Router IP address or your own).
4 ASUS Pocket Wireless Router
Quick Setup
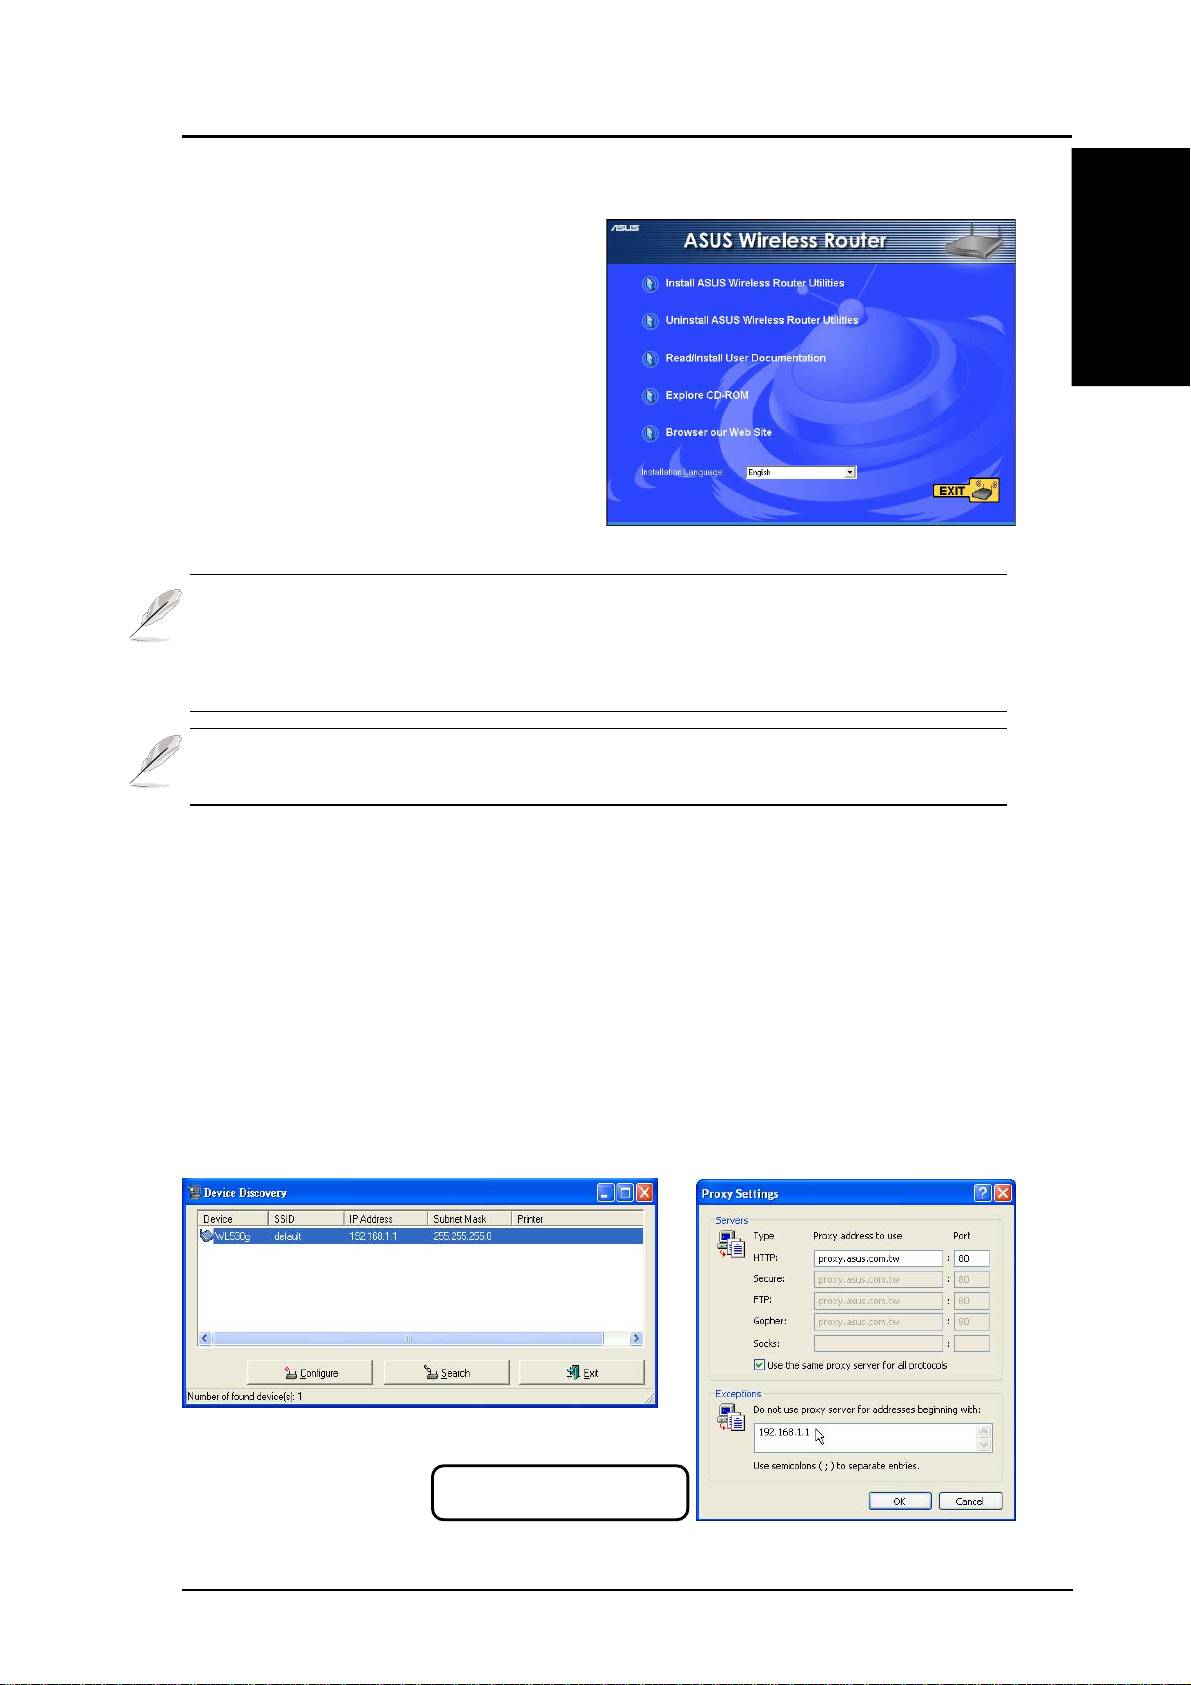
Installing the ASUS Wireless Router Utilities
Follow these steps to install the ASUS
Wireless Router Utilities in Microsoft
Windows. Insert the support CD
English
provided with the ASUS Wireless
Router and the menu will appear.
(Double-click setup.exe if your autorun
has been disabled.)
Note: By default, the Wireless Router will act as a router and pro-
vide an IP address only when a physical connection on the WAN
port exists. You must connect the Wireless Router’s WAN port with
your ADSL or Cable modem using a network cable.
Note: Before rebooting your PC, the ASUS Wireless Router should
be switched ON and in the ready state.
Using the Wireless Router for the First Time
1. ASUS Wireless Router Utilities
Run Device Discovery from “ASUS Utility” in Windows Start Programs.
2. Connect to the ASUS WLAN Web Manager
Run the ASUS WLAN Device Discovery from the Start menu and click
Config when the device is found.
Add 192.168.1.1 in the Exceptions
box if you are using a proxy server.
ASUS Pocket Wireless Router 5
Quick Setup
If your computer’s IP is not on the same subnet as the ASUS Wireless Router
(192.168.1.X), you will be asked to change it. The IP address can be any number
English
from 2 to 254 that is not used by another device. Gateway is not required.
Note: Using a proxy server for your LAN requires that you set an
exception for the ASUS Wireless Router or else connection will fail.
Enter Address or Name Manually
You can also open your PC’s web browser and enter the name or the default
IP address of the ASUS Wireless Router:
WL530g
http://my.router or http://my.WL530g or http://192.168.1.1
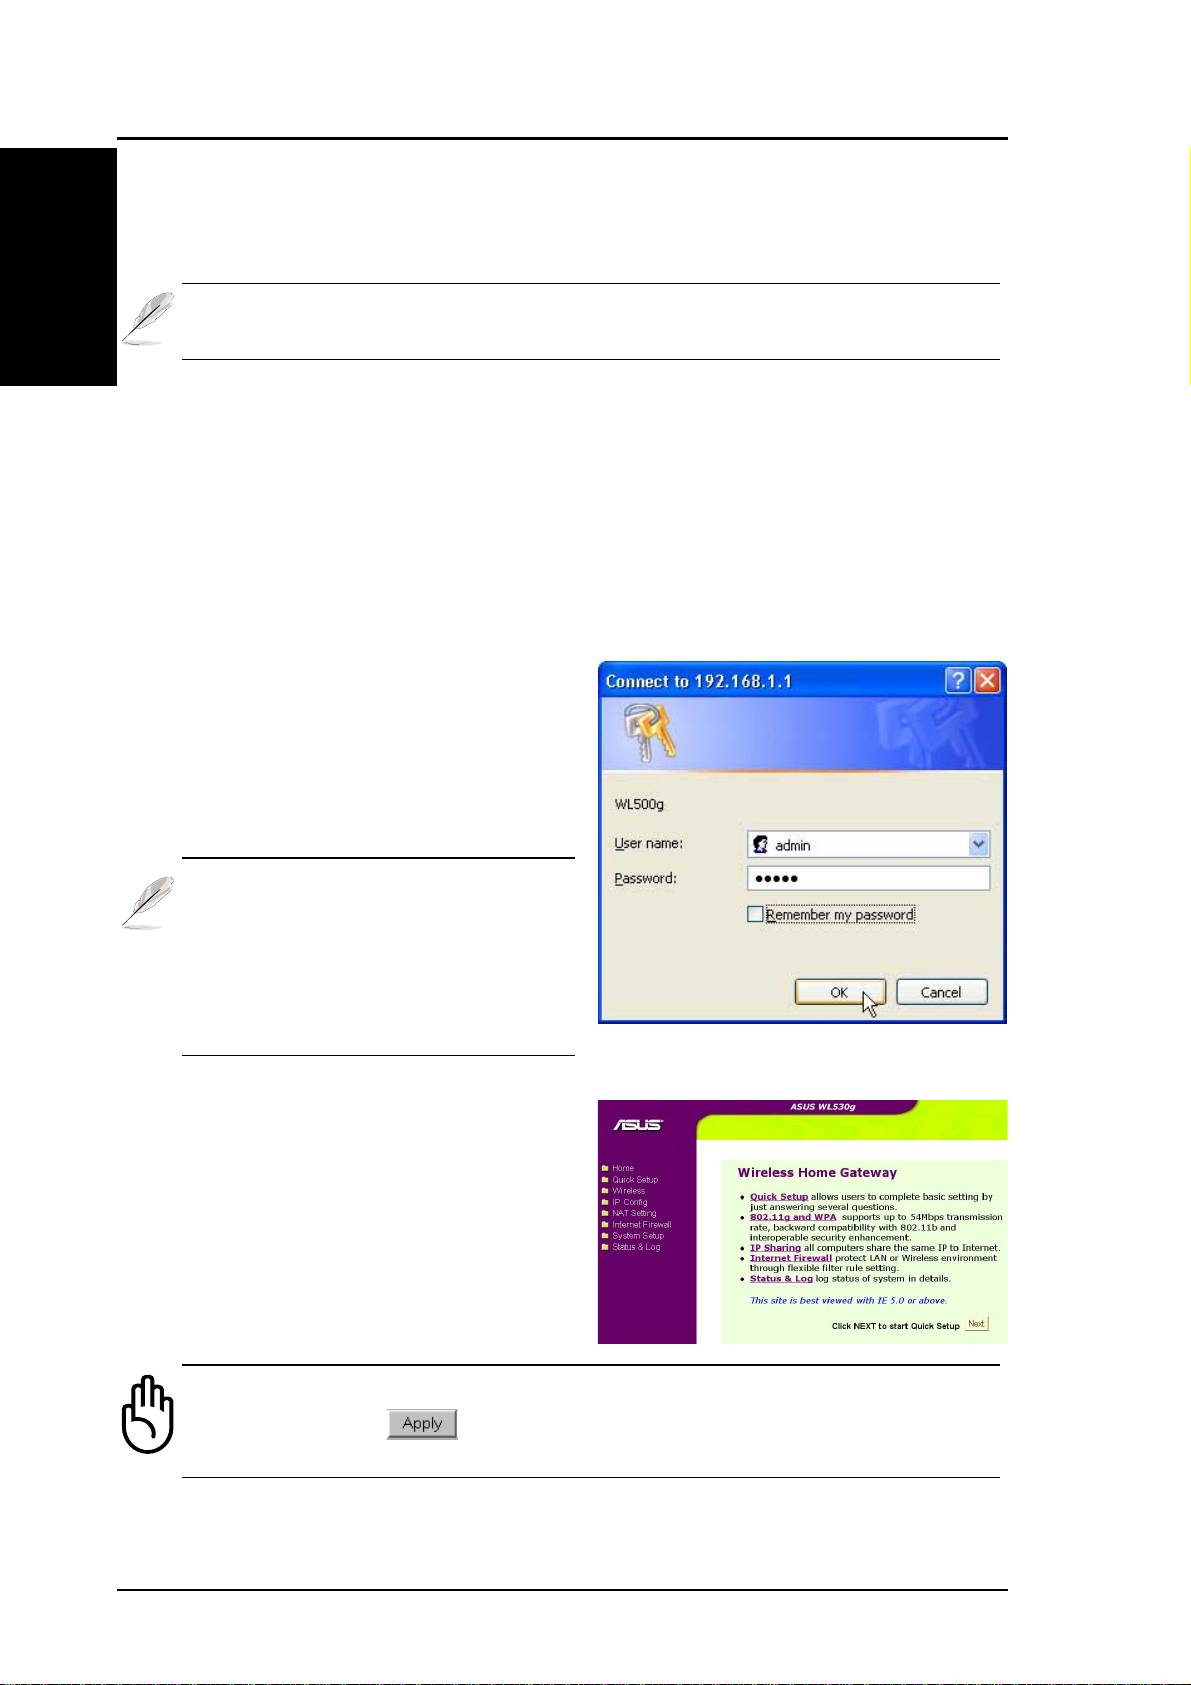
User Name & Password
Once connected, a window will ask
for the User name and Password in
order to log in. The factory default
values are “admin” and “admin”.
Note: If you cannot find any the
ASUS Wireless Routers due to
a problem in the IP settings,
push and hold the “Restore”
button over five seconds to re-
store factory default settings.
Home Page
After logging in, you will see the
ASUS Wireless Router home page.
Important: After entering information on any page, click the
“Apply” button
. If you click any other link, you will be di-
rected to another page and lose your new settings.
6 ASUS Pocket Wireless Router
Quick Setup
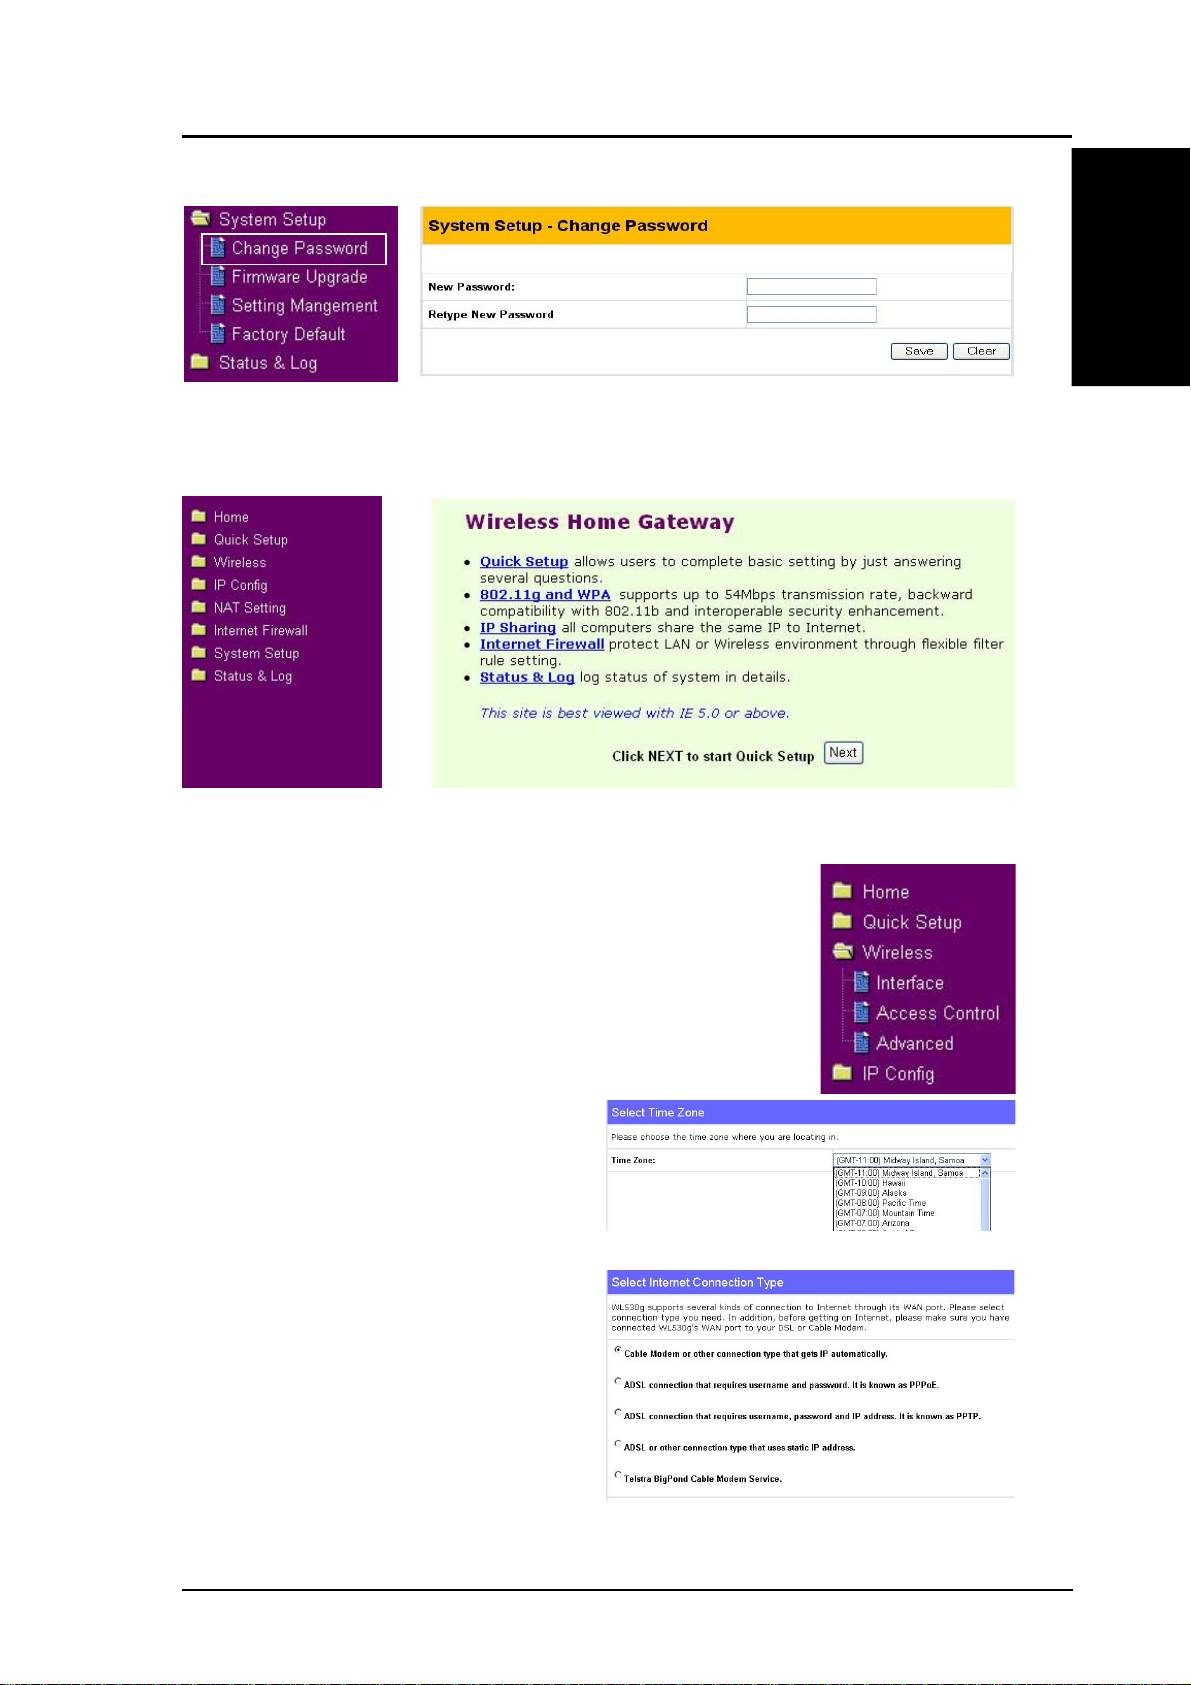
3. Set your own password
English
4. Use Quick Install
Quick Setup
To start quick setup, click Next to enter the “Quick
Setup” page. Follow the instructions to setup the ASUS
Wireless Router.
Select your time zone or the closest
region. Click Next to continue.
Select the connection type. Click
Next to continue.
ASUS Pocket Wireless Router 7
Quick Setup
Quick Setup (Cont.)
English
Select “No” to enter the information
manually. “Yes” will disable the field.
Click Next to continue.
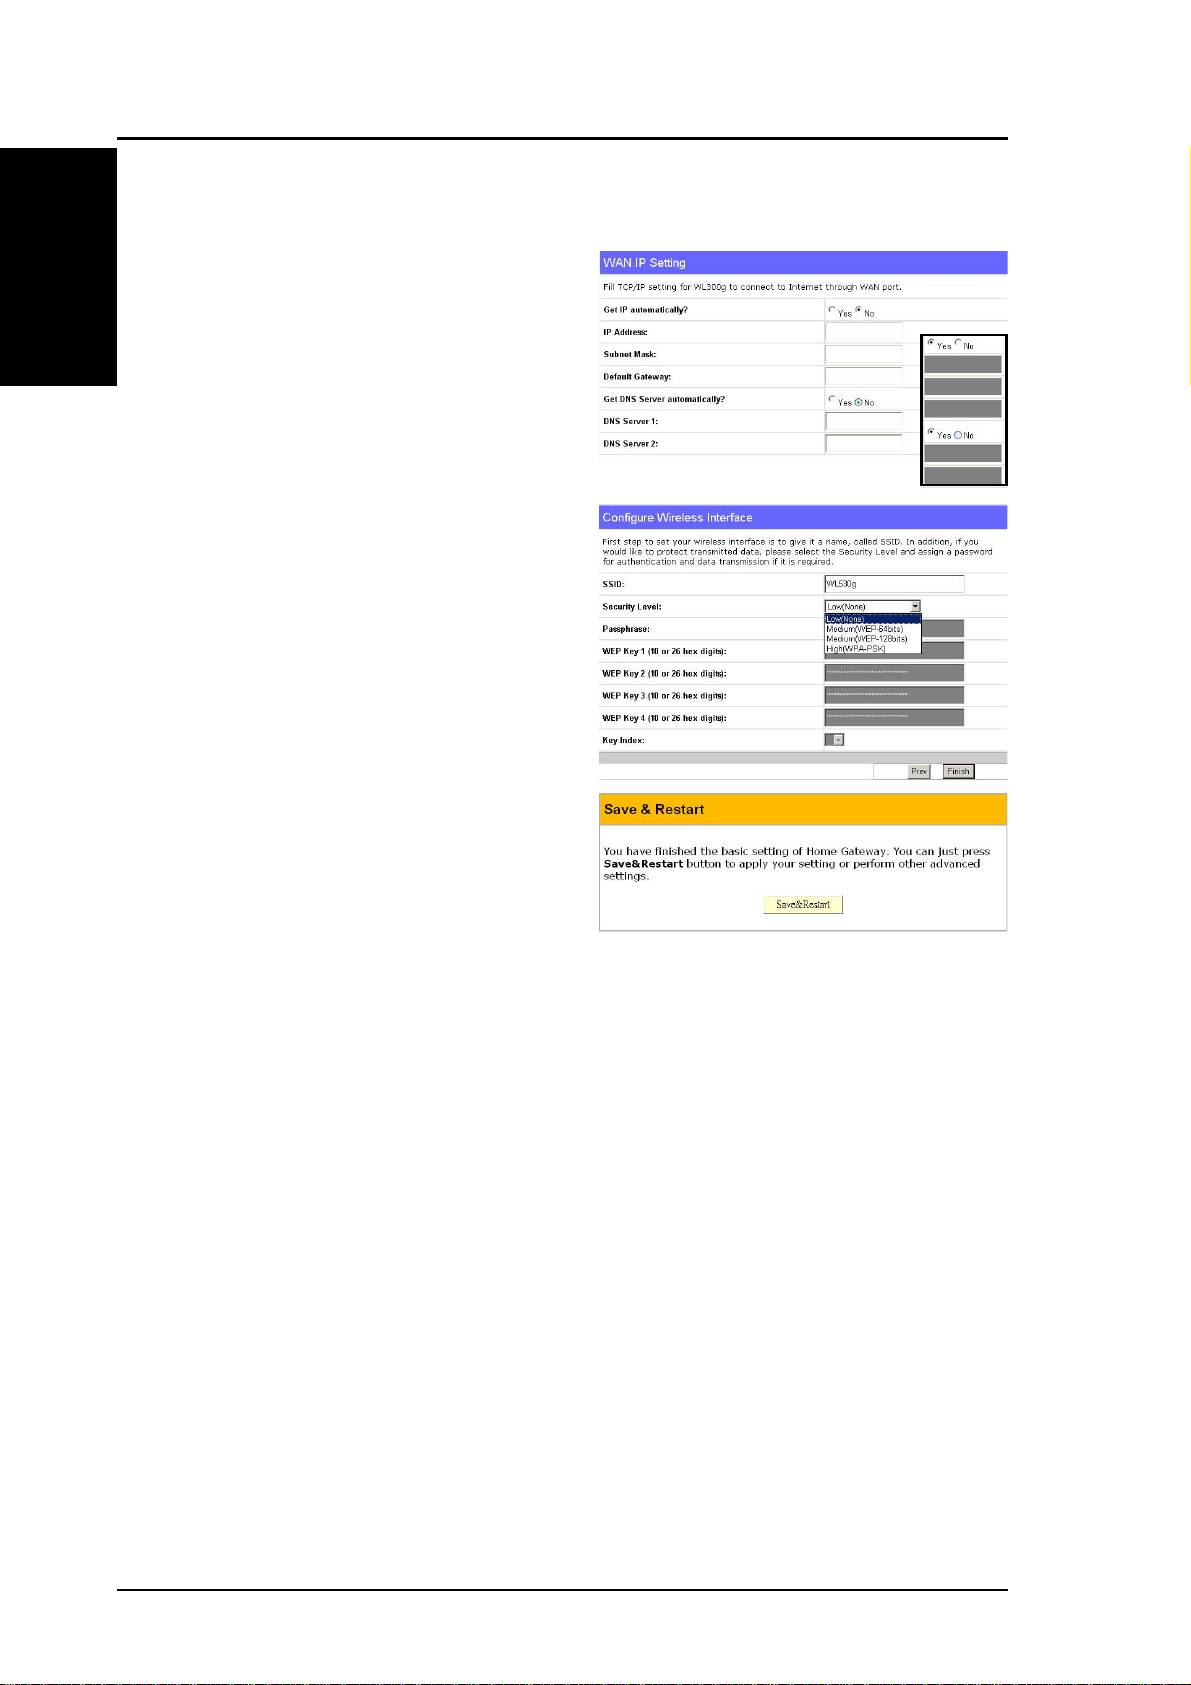
To set up your wireless interface, you
must first give it an SSID (Service
Set Identifier). The SSID is a unique
identifier attached to packets sent
over WLANs. This identifier
emulates a password when a wireless
device attempts communication on
the WLAN. Because an SSID
distinguishes WLANs from each
other, access points and wireless
devices trying to connect to a WLAN
must use the same SSID.
Also, if you want to protect
transmitted data, select a middle or high Security Level.
Medium : allows only those users with the same WEP key to connect to
this access point and to transmit data using 64bits or 128bits WEP key
encryption.
High: allows only those users with the same WPA pre-shared key to connect
to this access point and to transmit data using TKIP encryption.
Click Finish to continue. You are prompted to save the settings. Click
Save&Restart to save the settings to the ASUS Wireless Router and enable
the new settings.
8 ASUS Pocket Wireless Router
Quick Setup
Authentication and Security
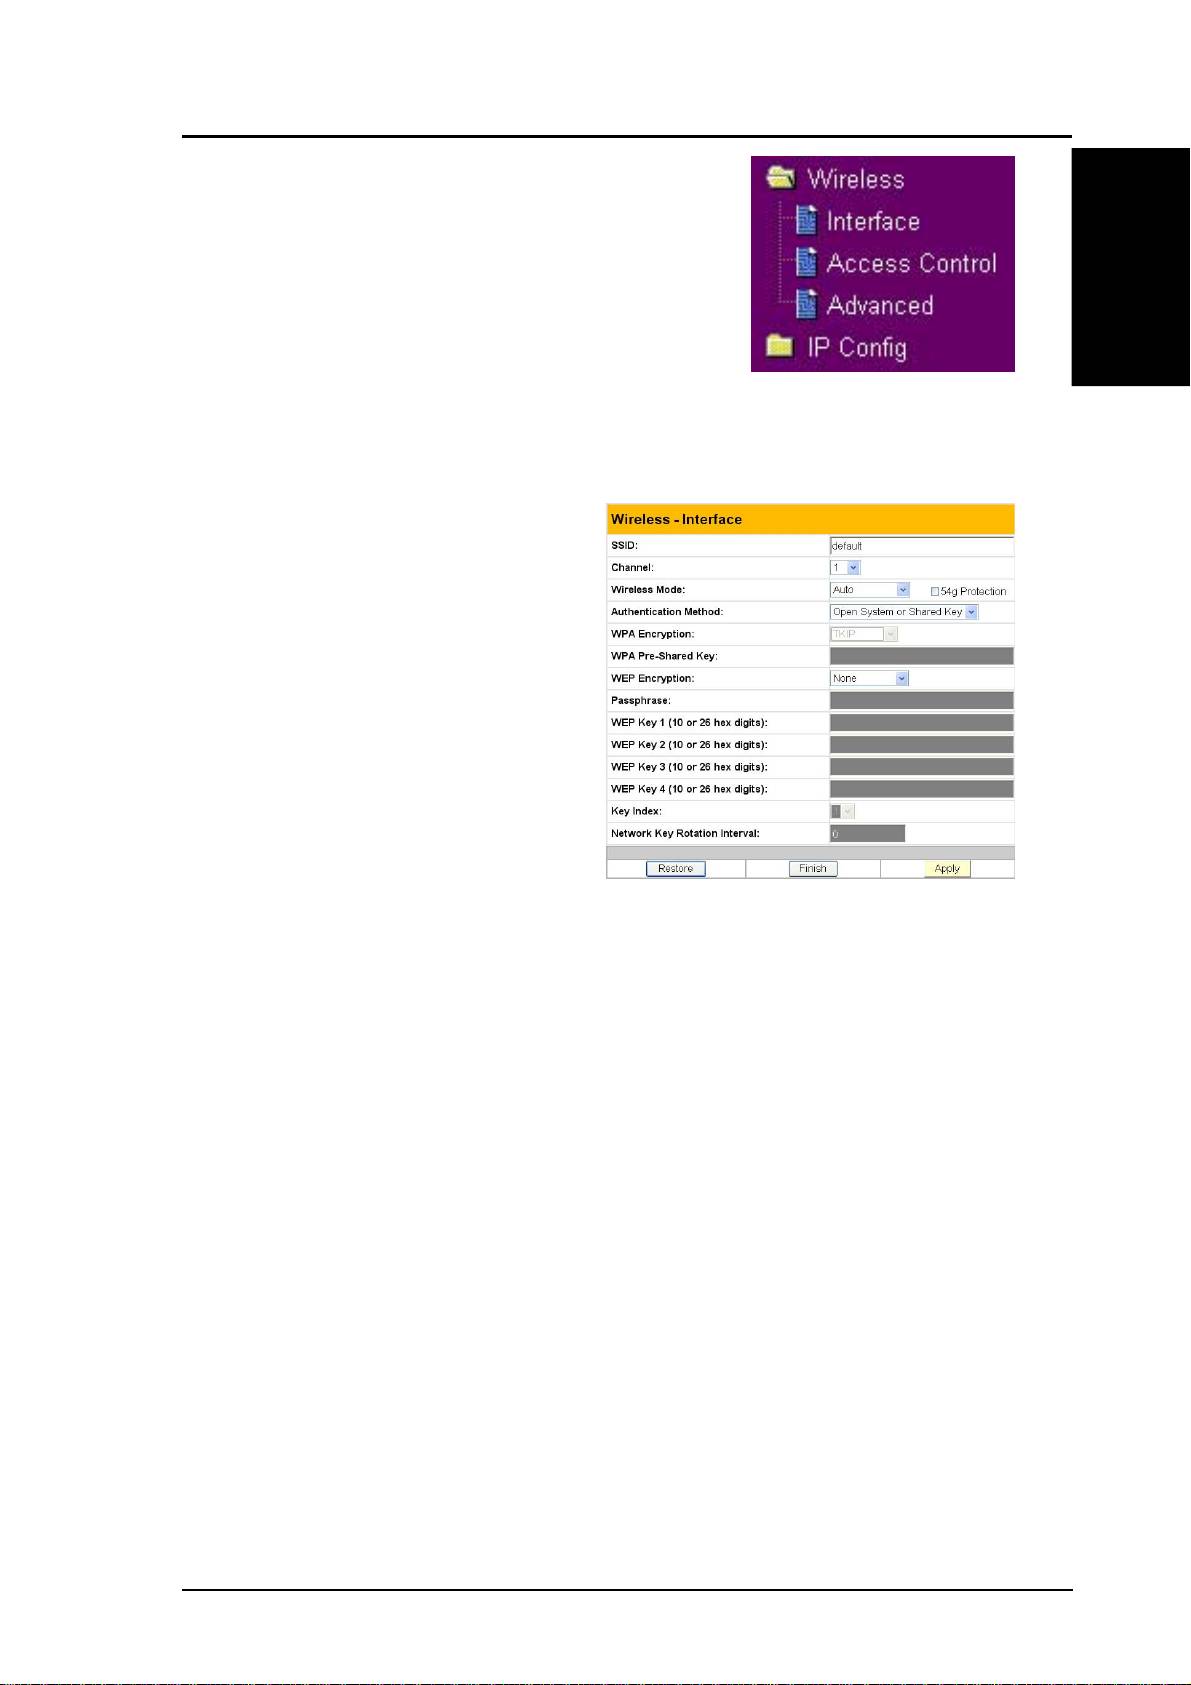
Click Wireless on the menu to reveal a submenu.
This field enables you to set different
English
authentication methods which determine
different encryption schemes. If all your clients
support WPA, using “WPA-PSK” is
recommended for better security.
WPA Encryption
When “WPA-PSK” authentication
method is used, the newly proposed
TKIP (Temporal Key Integrity
Protocol) encryption schemes are
applied.
TKIP: TKIP uses an encryption
algorithm, which is more stringent
than the WEP algorithm and also uses
existing WLAN calculation facilities
to perform encryption operations.
TKIP verifies the security
configuration after the encryption keys are determined.
WPA Pre-Shared Key
Selecting “TKIP” in the WPA Encryption, this field is used as a password
to begin the encryption process. Note: 8 to 63 characters are required.
ASUS Pocket Wireless Router 9

Quick Setup
English
10 ASUS Pocket Wireless Router
®
Routeur sans fil de poche
(
WL-530g
pour clients 802.11g/b)
Français
