Asus WL-600G: instruction
Class: Networks, communications, telecommunications, internet, security
Type:
Manual for Asus WL-600G
Table of contents
- 1. English ...........................................................................1

Index
1. English ...........................................................................1
2.
Български
.......................................................................
27
3. Nederlands ...................................................................53
4. Eesti .............................................................................
79
5. Suomi .........................................................................
105
6. Français .....................................................................
131
7. Ελληνικά ..................................................................
157
8. Magyar .......................................................................183
9. Italiano ........................................................................209
10. Polski ..........................................................................235
11. Português ...................................................................261
12. Română ......................................................................
287
13.
Русский
........................................................................
313
14. Slovensky ...................................................................339
15. Español ......................................................................365
16. Українська ................................................................
391
English
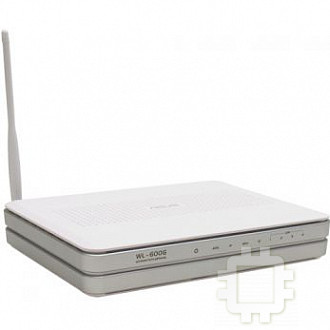
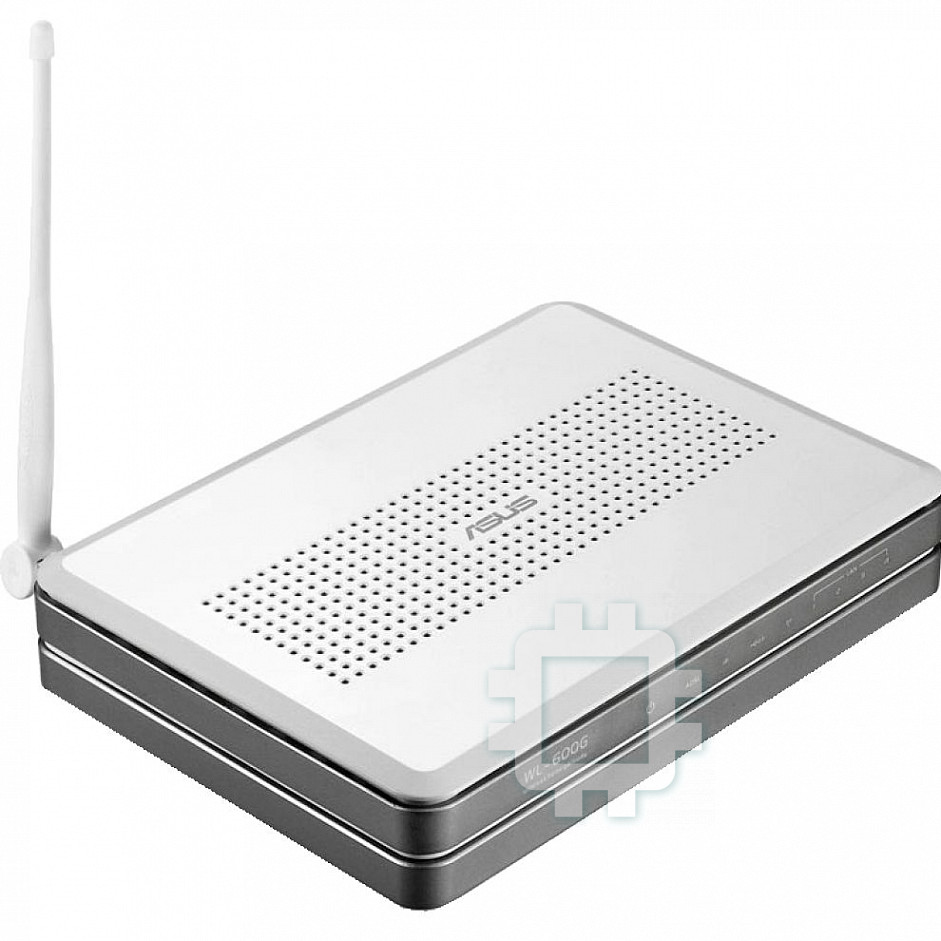
All-in-1 Wireless ADSL2/2+ Home Gateway
WL-600g
Quick Start Guide
1
®

English
Manufacturer Contact Information
ASUSTeK COMPUTER INC. (Asia-Pacic)
Company address: 15 Li-Te Road, Beitou, Taipei 11259
General (tel): +886-2-2894-3447 Web site address: www.asus.com.tw
General (fax): +886-2-2894-7798 General email: info@asus.com.tw
ASUS COMPUTER INTERNATIONAL (America)
Company address: 44370 Nobel Drive, Fremont, CA 94538, USA
General (fax): +1-510-608-4555 Web site address: usa.asus.com
Technical support
General support: +1-502-995-0883 Support (fax): +1-502-933-8713
Online support: http://vip.asus.com/eservice/techserv.aspx
ASUS COMPUTER GmbH (Germany & Austria)
Company address: Harkort Str. 25, D-40880 Ratingen, Germany
General (tel): +49-2102-95990 Web site address: www.asus.com.de
General (fax): +49-2102-959911 Online contact: www.asus.com.de/sales
Technical support
Components: +49-2102-95990 Online support: www.asus.com.de/support
Notebook: +49-2102-959910 Support (fax): +49-2102-959911
2
WL-600g All-in-1 Wireless ADSL2/2+ Home Gateway Quick Start Guide
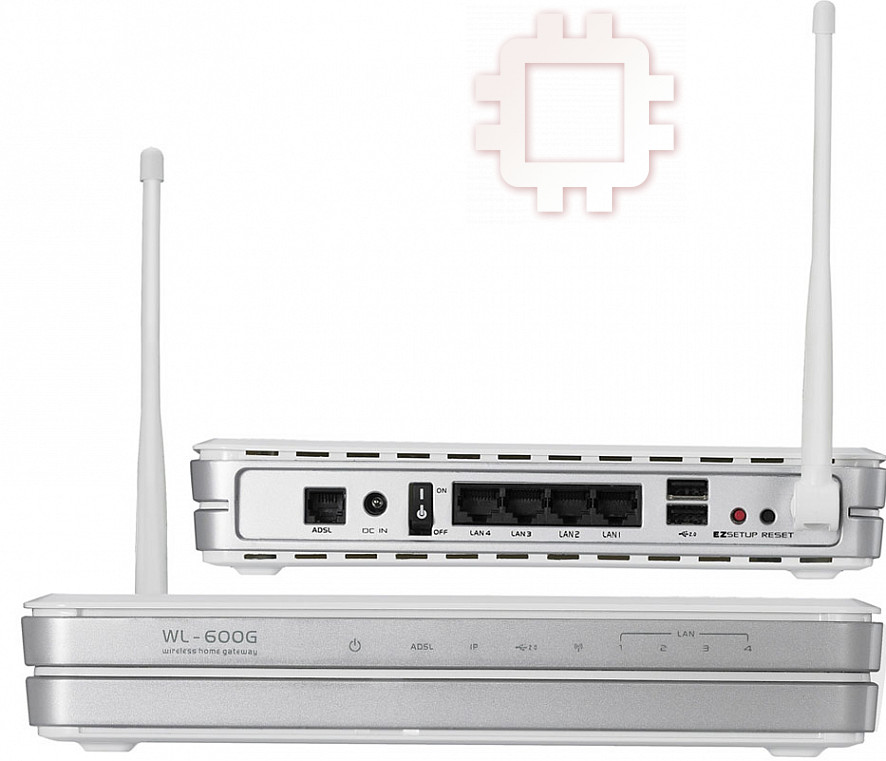
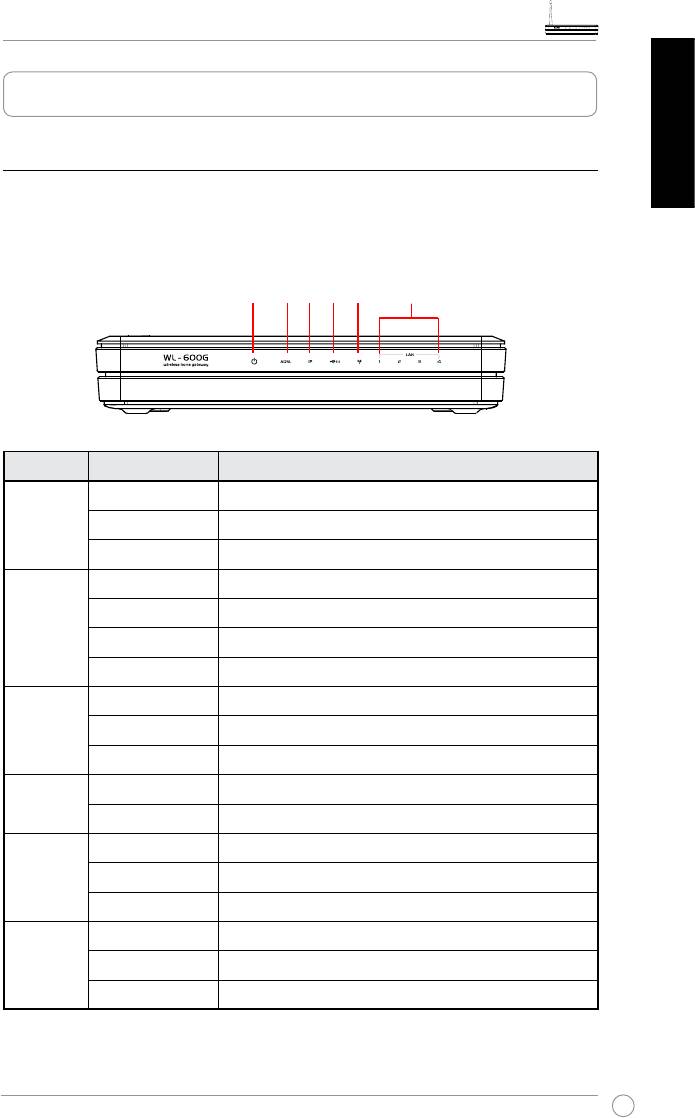
Hardware Overview
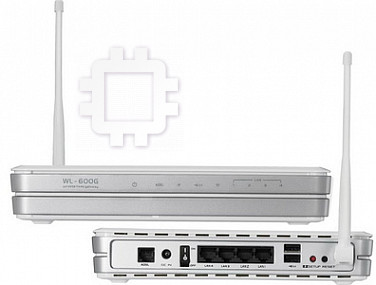
Front panel
English
The WL-600g Wireless ADSL2/2+ Home Gateway front panel contains LED indicators
which shows the status of WL-600g.
PWR ADSL IP USB AIR LAN
Label Activity Description
P W R
ON Power ON
(Power)
OFF No power
Blink Restoring to factory default
ADSL ON (Green) ADSL link up
Blink (Green) ADSL training
ON (Red) ADSL link down
OFF ADSL is down
IP ON (Green) ADSL is up and the link is PPP
ON (Red) ADSL is up, but the link is not PPP
OFF ADSL is down
USB 2.0
ON USB device detected
OFF No USB device detected
AIR ON Wireless LAN ready
Blink Transmiting or receiving data through wireless
OFF No power or wireless LAN not ready
LAN 1-4
ON Physically connected to an Ethernet device
Blink Transmitting or receiving data through Ethernet cable
OFF No power or no physical connection
3
WL-600g All-in-1 Wireless ADSL2/2+ Home Gateway Quick Start Guide
English
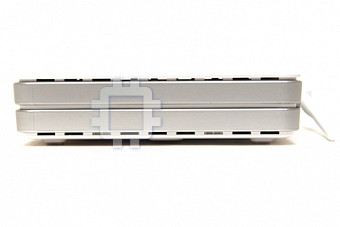
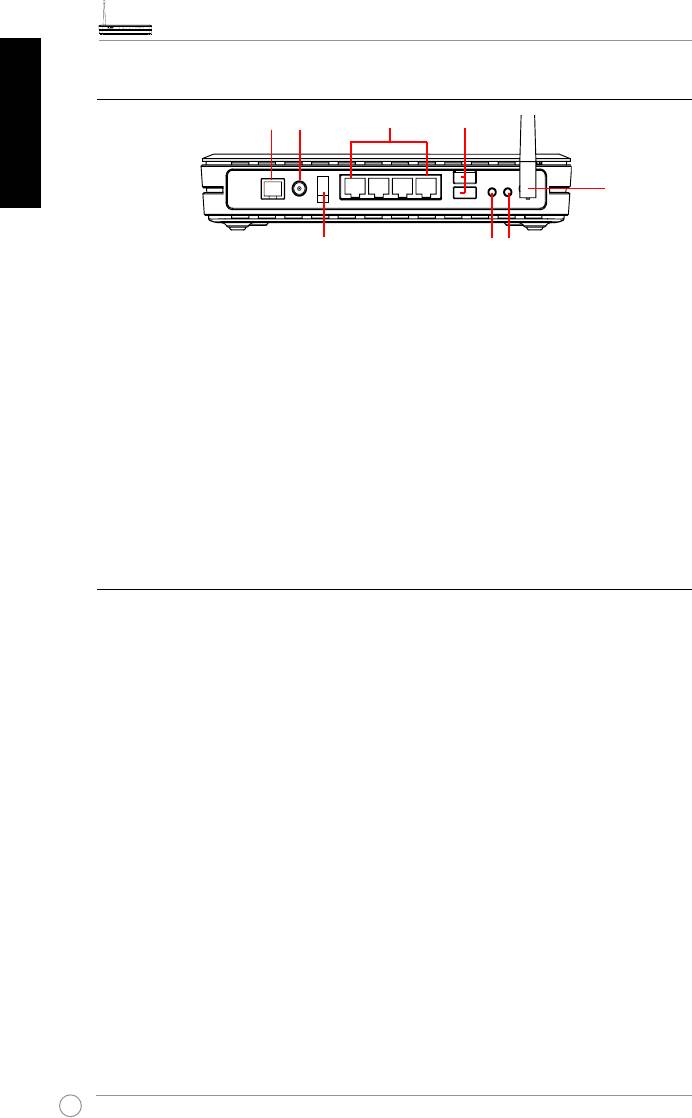
Rear panel
PWRADSL
LAN
USB 2.0
Antenna
Power switch
EZSetup
Reset
Viewed from left to right, the rear panel of WL-600g contains the following elements:
• ADSL port
• Power connector
• Power switch
• Four Local Area Network (LAN) ports
• USB 2.0 ports
• EZSetup button
• Reset button
• SMA antenna connector
Product features
The WL-600g Wireless ADSL 2/ 2+ Home Gateway provides the following features:
• Built-in ADSL modem
• Built-in firewall
• IEEE802.11g standard-based wireless network, backward compatible with
802.11b devices
• Easy-to-use Web-based configuration interface: Quick Setup for ADSL connection,
wireless, and security configuration
• Extensive routing protocol support: RIP v1, v2
• Content-based filter
• EZSetup™ utility for ADSL connection, wireless network and security quick setup
4
WL-600g All-in-1 Wireless ADSL2/2+ Home Gateway Quick Start Guide
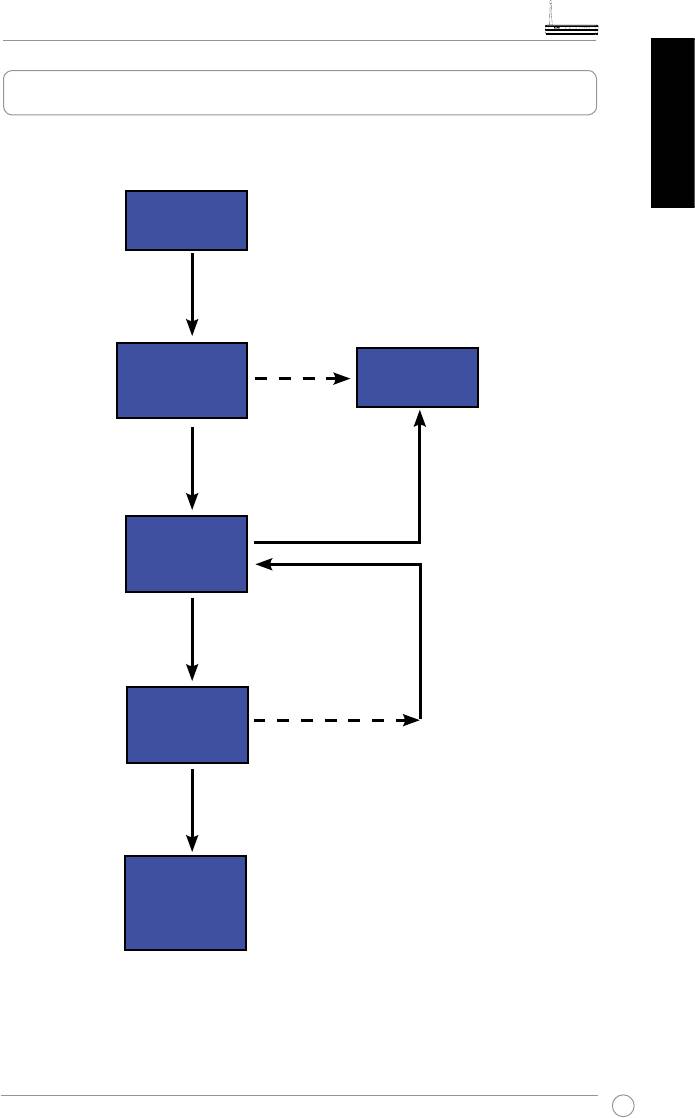
Setup Process Overview
English
Hardware
Refer to the hardware diagram
setup
on page 4.
Check OK. Login to 192.168.1.1 to
congure your WL-600g.
Quick Setup -
Manual
ADSL connection
setup
auto-detection
Connection not
detected OR
connection type
Connection detected and
shown is not
connection type is correct.
correct.
Change ADSL settings.
ADSL setup nished.
Quick Setup-
Wireless setup
Change wireless
settings.
Quick Setup-
Check not OK.
Summary page
Check OK
Quick Setup
nished!
WL-600g is
ready to use.
5
WL-600g All-in-1 Wireless ADSL2/2+ Home Gateway Quick Start Guide
English
Hardware Setup
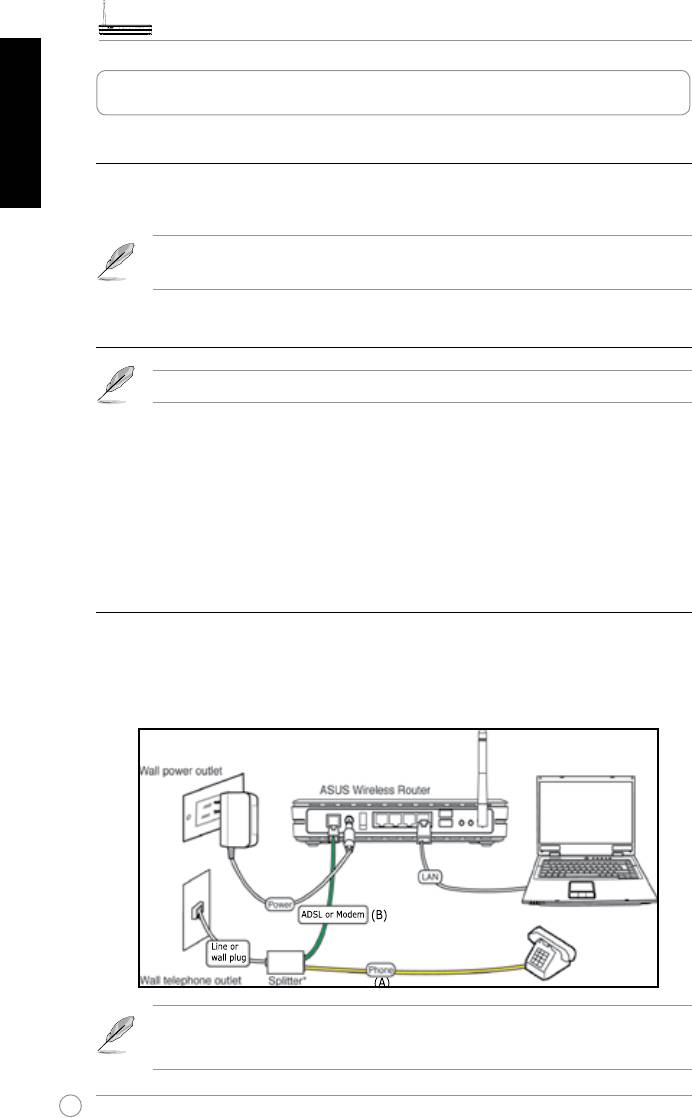
Connecting ADSL splitter to your phone outlet
Insert the Line connector or the plug of the supplied splitter into the phone outlet and
connect your telephone set to the phone port of the splitter (A).
The format of the connector on the supplied splitter (line or plug) may differ
by region.
Connecting the splitter to WL-600g
Incorrect splitter connection can block your ADSL service.
a. Turn off your computer.
b. Connect the ADSL port of WL-600g to the ADSL or modem port on the splitter (B),
c. Connect the power adapter to the power port on WL-600g's rear panel and to a
power outlet. Make sure the power LED indicator is ON after turning on the router. If
the ADSL link LED is solid green, it means ADSL link is established.
Connecting your computer to WL-600g via Ethernet
a. Use the supplied Ethernet cable (RJ45) to connect your computer to one of the LAN
ports of WL-600g.
b. Turn on your computer.
Splitter *: The name or the location of the ports on the supplied splitter may
vary by region.
6
WL-600g All-in-1 Wireless ADSL2/2+ Home Gateway Quick Start Guide
Quick Setup
Quick setup
English
Before you start
With Quick setup, you need to set up ADSL link rst then wireless setup. Depending on
your ISP's requirements, you may need to acquire some of the information listed below
to set up Internet connection on WL-600g.
• Virtual Path Identifier (VPI)
• Virtual Channel Identifier (VCI)
• Host name
• ISP logiin username and password
• ISP Domain Name System (DNS) server address
• Static IP address (For static IP subscribers)
Login to the WL-600g conguration page
1. Input
192.168.1.1
into the URL of your Web browser and press
Enter
.
2. A login window appears for user name and password. The default username is
admin
, password is
admin
(in lower case).
3. After logging in, you can see the WL-600g conguration page.
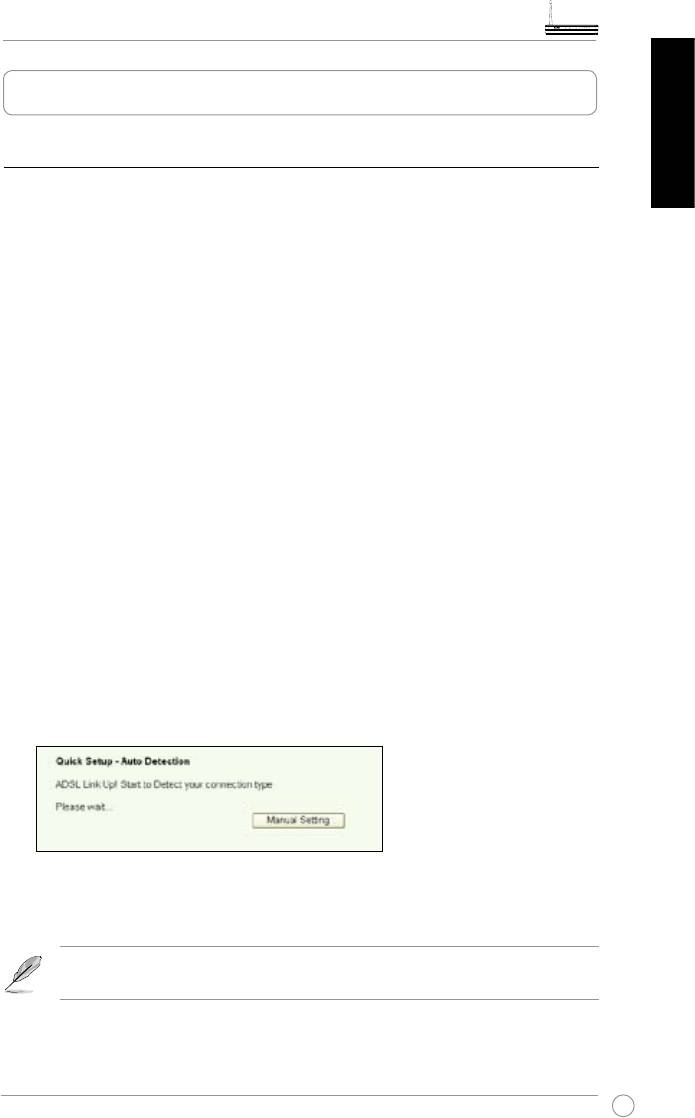
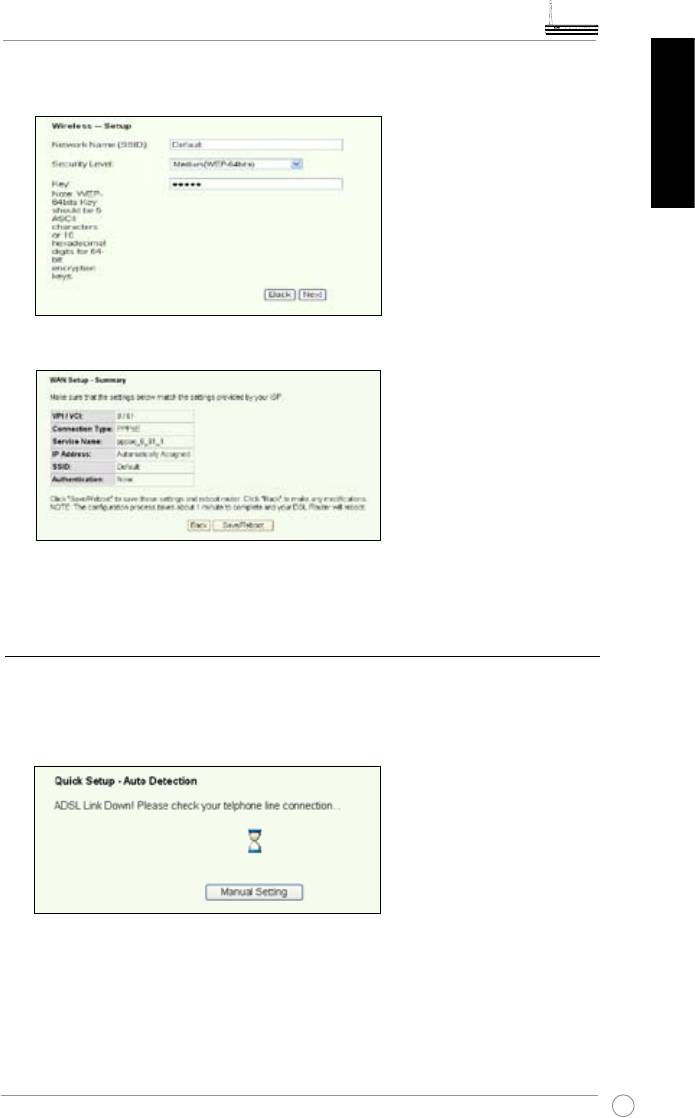
ADSL setup
1. By default, the Quick Setup page pops up. The Quick Setup Wizard automatically
detects your ADSL connection type.
2. If ADSL connection is detected, the next page shows your ADSL connection type
(PPPoE/PPPoA or MER).
If your ADSL connection is not detected, click
Manual Setting
to manually
set up WL-600g. Refer to Page 9-11 for manual setting instructions.
7
WL-600g All-in-1 Wireless ADSL2/2+ Home Gateway Quick Start Guide
English
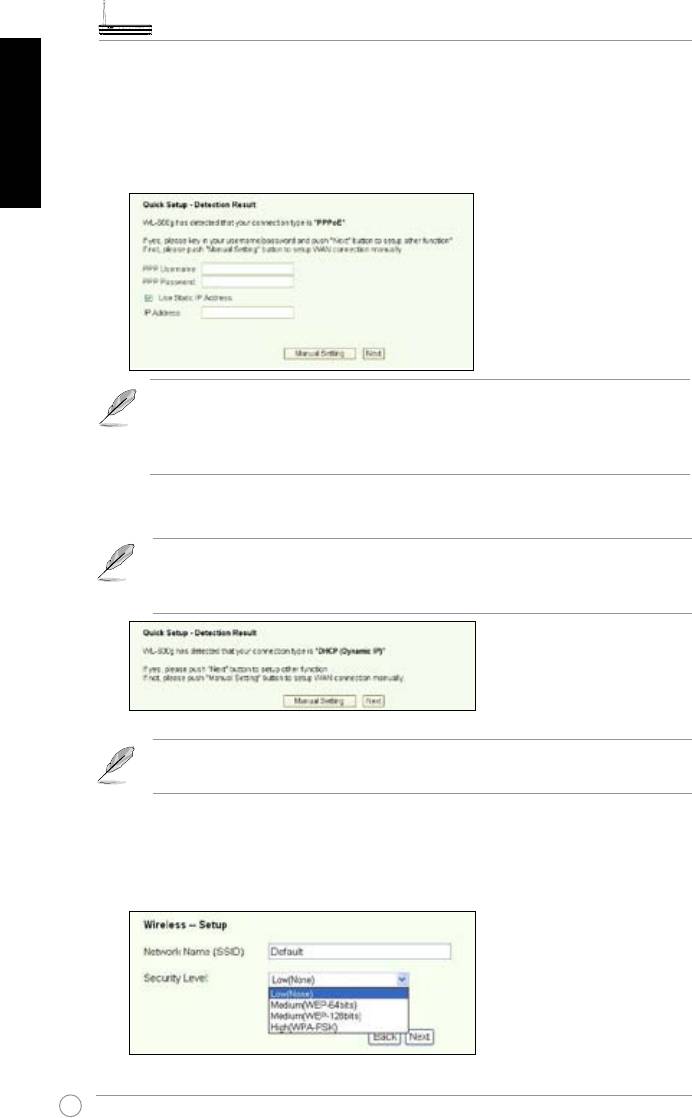
-- If it shows your connection type is PPPoE or PPPoA
For dynamic IP users, input your username and password then click Next.
For static IP users, check Use Static IP Address and input your IP address,
then click
Next.
If your actual connection is not PPPoE or PPPoA, click Manual Setting to
manually set up WL-600g. Refer to Page 9-11 for manual setting instruc-
tions.
-- If it shows your connection type is “MER”(DHCP)
Click Next if your connection type is MER (DHCP).
If your actual connection is not MER(DHCP), click
Manual Setting
to manually set up WL-600g. Refer to Page 9-11 for manual setting
instructions.
Your ADSL connection setup is nished here. Please continue for wireless
setup.
Wireless setup
1. Choose
security level
. For detailed security descriptions, refer to Page 21-22 in
the user manual on your support CD.
8
WL-600g All-in-1 Wireless ADSL2/2+ Home Gateway Quick Start Guide
2. Input a key in the
Key
eld. The number of digit for the key depends on the security
level you choose.
English
3. The summary page then shows up. If the information displayed is correct, click
Save/Reboot
to nish the setup. Otherwise, click
Back
to modify the settings.
4. Setup is completed. Wait for about 50 seconds to reboot. The Web page will refresh
to show the device information after reboot.
Manual Setup
If you encounter difculty when conguring ADSL connection with Quick Setup, click
Manual Setting to manually set up the ADSL connection.
9

WL-600g All-in-1 Wireless ADSL2/2+ Home Gateway Quick Start Guide
English
ADSL Setup
1. Select your
Country
and
ISP
, then click
Next
.
2. If your country and ISP are not on the list, select
Not list
and key in your VPI and
VCI then click
Next
. You may ask your ISP for VPI/VCI values.
3. Select your connection type and click
Next
. You can get connection type from your
ISP.
10
WL-600g All-in-1 Wireless ADSL2/2+ Home Gateway Quick Start Guide
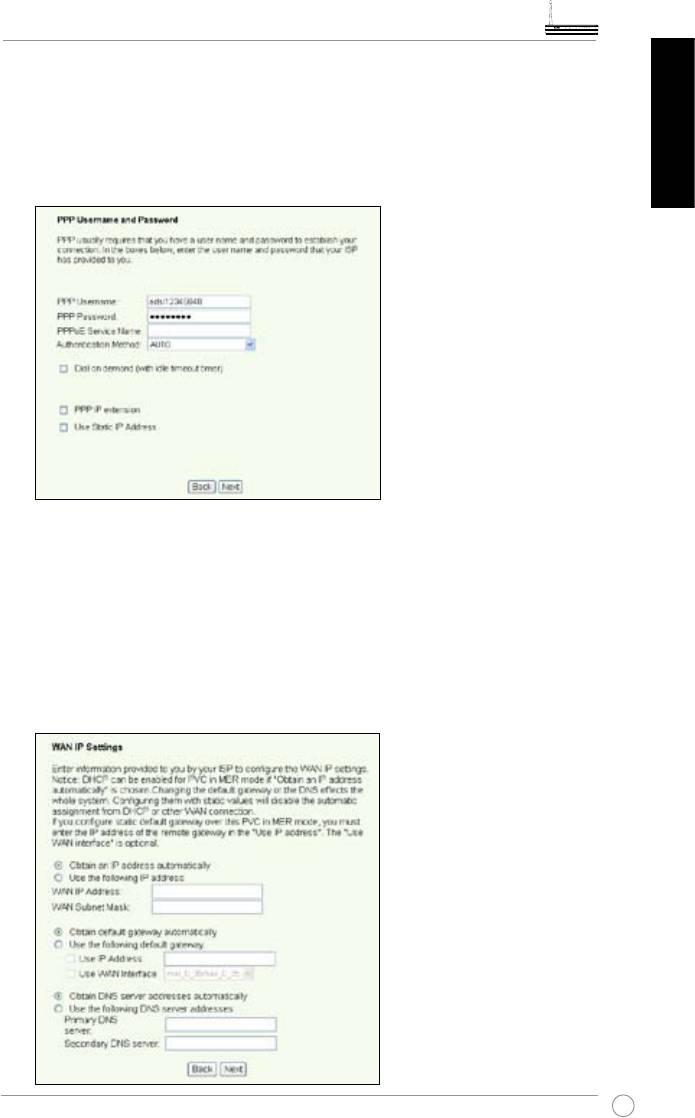
-- If your connection type is PPPoA or PPPoE
For dynamic IP users, input your PPP username, password, and service name
then click Next.
English
For static IP users, check Use Static IP Address then key in your IP address,
then click
Next.
-- If your connection type is MER
For
dynamic IP
users, check
Obtain an IP address automatically
,
Obtain default gateway automatically
, and
Obtain DNS server address
automatically
, then click
Next
.
For
static IP
users, check
Use the following IP Address
,
Use the following
default gateway
, and
Use the following DNS server address
then input the
addresses in corresponding elds.
11
WL-600g All-in-1 Wireless ADSL2/2+ Home Gateway Quick Start Guide
English
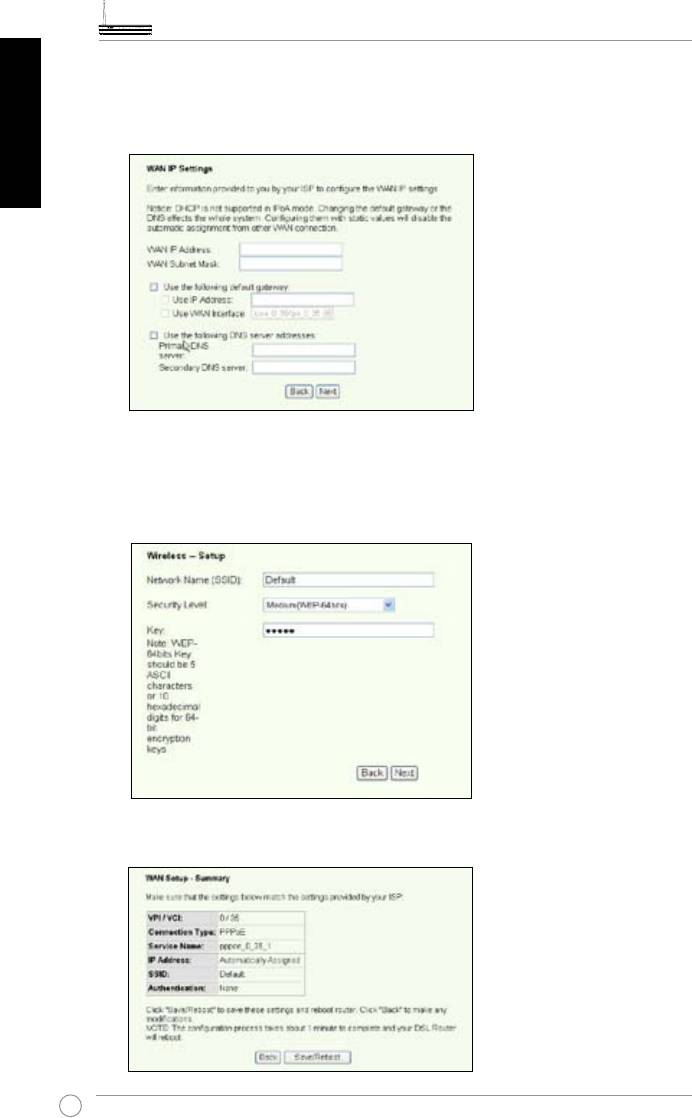
-- If your connection type is IPoA
Static IP user only. Input the WAN IP address assigned by your ISP, then click
Next.
Wireless Setup
1. Designate an SSID (network name) for WL-600g. Choose the security level then
input a key. The number of digit of your key depends on the security level you
choose. Refer to the note on the web page. When nished, click
Next
.
2. This page provides a summary of WL-600g WAN and wirelss conguration. Click
Save/Reboot
to save and activate your conguration.
12
WL-600g All-in-1 Wireless ADSL2/2+ Home Gateway Quick Start Guide
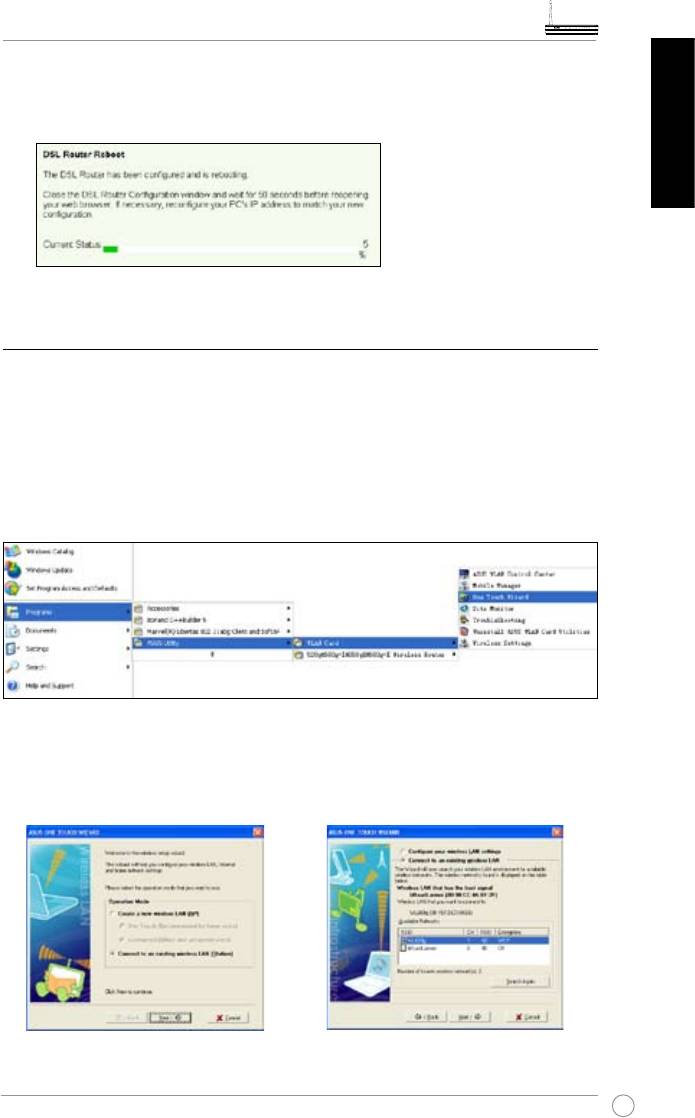
3. Setup is completed. WL-600g reboots in about 50 seconds. The green bar shows
the current rebooting status. After reboot, the web page will automatically refresh to
display the settings.
English
Connecting to WL-600g from ASUS WLAN Card
Conguring ASUS WLAN Card with One Touch Wizard™
We recommend you use ASUS WLAN card (WL-100gD, WL-100gE, WL-107g,
WL-167g, WL169gE) for better wireless connection. If you have installed ASUS wireless
card together with its utilities and drives on your PC, click
Start -> All Programs ->
ASUS Utility-> WLAN Card -> One Touch Wizard
to launch the One Touch Wizard
utility.
1. Select Connect to an existing wireless
2. One Touch Wizard searches and displays
LAN (Station) radio button and click
the available APs in the Available
Next to continue.
Networks list. Select WL-600g and press
Next to continue.
13
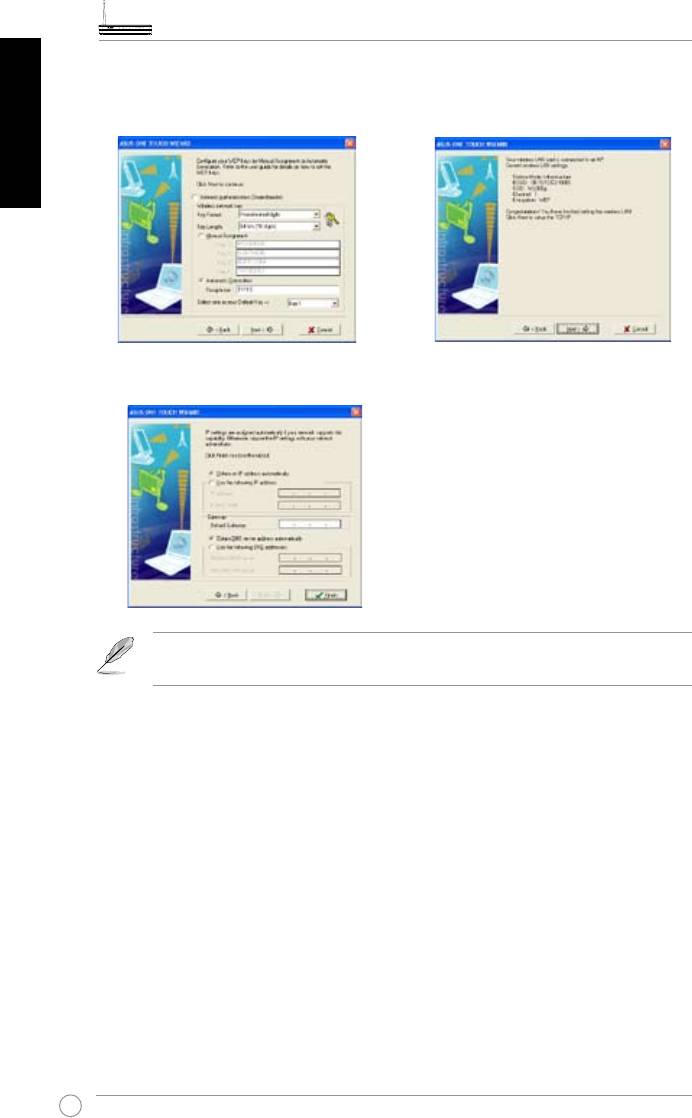
WL-600g All-in-1 Wireless ADSL2/2+ Home Gateway Quick Start Guide
English
3. Set the authentication and encryption of
4. It takes several seconds for the wireless
your WLAN card the same with those at
card to associate with WL-600g. Press
WL-600g. Click Next to continue.
Next to setup TCP/IP.
5. Setup the IP address of the WLAN Card according to your network condition. After the
setup is complete, click Finish to exit the One Touch Wizard.
The setup screens and steps are for reference only and may be different
from actual products.
14
WL-600g All-in-1 Wireless ADSL2/2+ Home Gateway Quick Start Guide
®
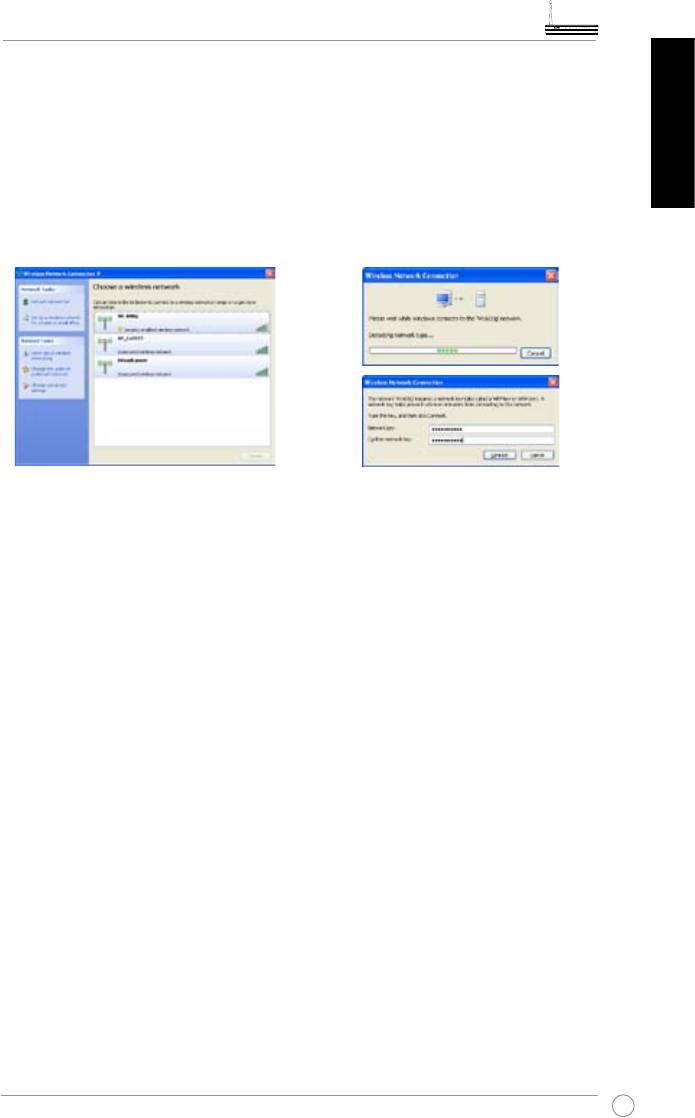
Conguring WLAN card with Windows
WZC service
®
You can also use Windows
Wireless Zero Conguration service to set up the wireless
connection with WL-600g.
English
1. Double-click the wireless network
2. Input the key you have set on the
icon on the task bar to view available
WL-600g and click
Connect
. The
networks. Select your wireless router
connection is completed within
and click
Connect
.
several seconds.
15
WL-600g All-in-1 Wireless ADSL2/2+ Home Gateway Quick Start Guide
English
USB application
WL-600g offers two USB2.0 ports for setting up FTP server and sharing USB printer.
FTP server function
Before setup, you need to prepare a USB disk for FTP storage.
If the format of your external hard disk is
NTFS
, the FTP server can only be
readable. Uploading les on the FTP server is not allowed. Besides, only
Anonymous User can login. Super User can not login under NTFS FTP
server.
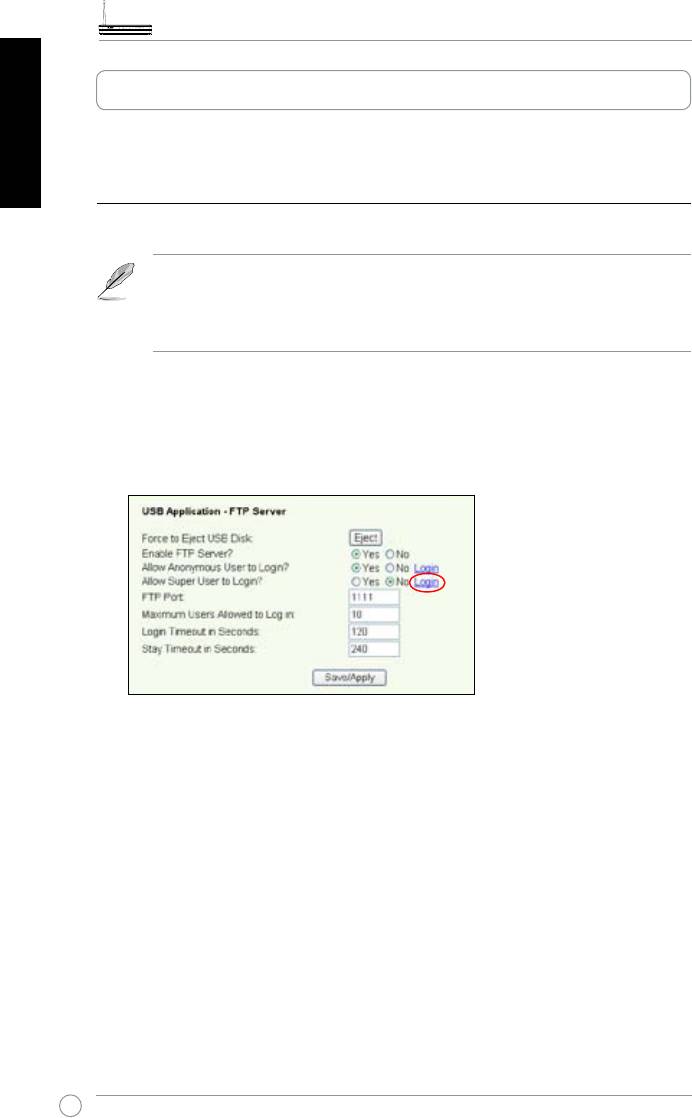
Setting up FTP server
To setup FTP server:
1. Plug your USB storage into the USB2.0 port on the WL-600g rear panel. Then click
USB Application -> FTP Server
in the left side menu to open the conguration page.
2. Set
Enable FTP Server
to
Yes
.
3.
Allow Anonymous User to Login
: If you want to allow anonymous user to access
your FTP site, select
Yes
; if you want to protect your data from unauthenticated
user, select
No
.
4.
Allow Super User to Login
: Select
Yes
to allow super user to access the FTP
server.
5.
FTP Port
: Set up the port number of the FTP server. For example, if the port number
is set to 1111, you can access the FTP server by typing
ftp://192.168.1.1:1111
into the
address box of your Web browser (192.168.1.1 is the default IP address of WL-600g).
6.
Maximum User Allowed to Login:
set up the maximum login user according to
your working environment.
7.
Login Timeout in Seconds:
When login times out, the login trail is terminated.
8.
Stay Timeout in Seconds:
Timeout value for inactive connection.
9.
Press
Save/Apply
to save and activate the settings.
16
WL-600g All-in-1 Wireless ADSL2/2+ Home Gateway Quick Start Guide
If you use web access for Super User Login (as the red circle marks), please
set
Maximum Users Allowed to Log in
to more than 1 or the message
"server is busy" will pop up.
English
Setting up FTP account
You can set up 12 accounts for your FTP site.
1. Click
USB Application -> FTP Server -> User List
in the left side menu to open the
conguration page. Click
Add
to create new FTP account.
2. Dene the
Username
,
Password
for the new account. Setup the
Max. Login
to
restrict the access request. Dene the access right to the account.
3. Click
Apply
to save the new account.
4. Click
Save
to save and activate the settings.
Setting up FTP security
You can deny access request from certain IP address by setting up
Banned IP List
.
1. Click
USB Application -> FTP Server -> Banned IP List
in the left side menu to
open the conguration page. Click
Add
to create a new rule.
2. Input the IP address of the banned host and click
Apply
to save the banned IP. The
banned IP must be static.
3. Click
Save
to save and activate the settings.
Your FTP site is ready. Type
ftp://192.168.1.1(:port number)
into the address box of
your Web browser and press
Enter
. When prompted for login, input the username and
password you have set up for FTP account and login.
17
WL-600g All-in-1 Wireless ADSL2/2+ Home Gateway Quick Start Guide
English
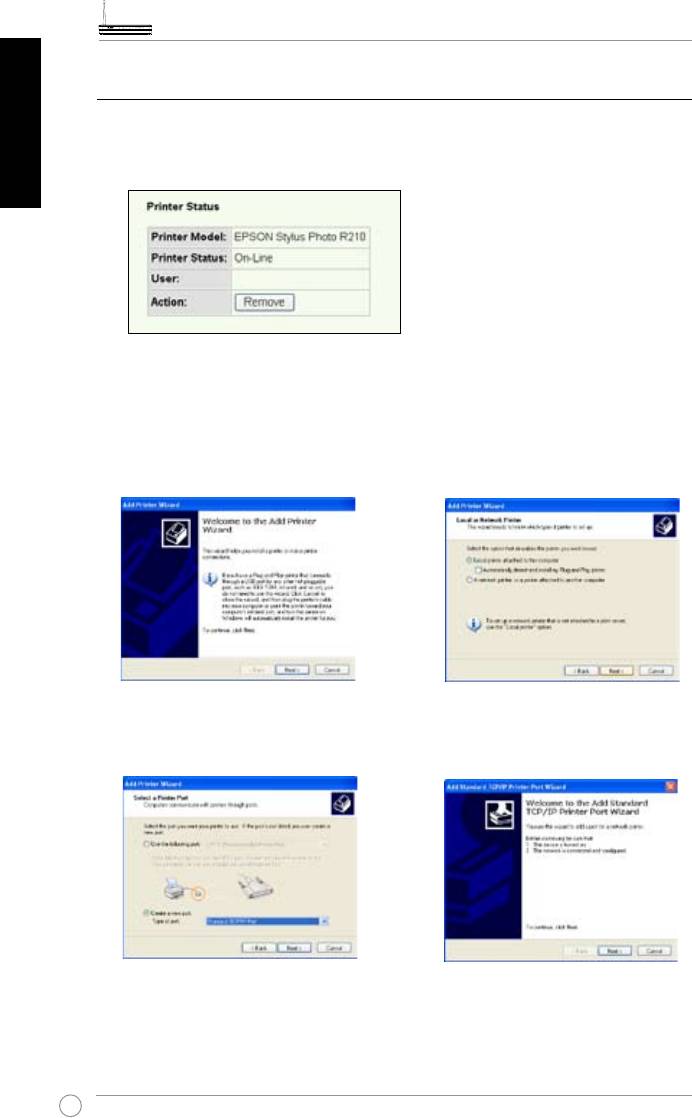
Sharing USB printer
You can plug your USB printer to the USB2.0 port of WL-600g to share it within your
LAN. After you plug a printer to the USB port, you can see the status of printer by
clicking
USB Application -> Printer Status
.
Setting up printer client under Windows XP
Follow the steps below to install network printer on your clients.
1. Run Add Printer Wizard from
Start
2. Select
Local printer attached to
-> Printers and Faxes -> Add a
this computer
and click
Next
.
printer
.
3. Select
Create a new port
and set
4. Click
Next
to setup TCP/IP port for
Type of port to
Standard TCP/IP
accessing the network printer.
Port
, then click
Next
.
18
WL-600g All-in-1 Wireless ADSL2/2+ Home Gateway Quick Start Guide
5. Input the IP address of WL-600g in
6. Select
Custom
and click
Settings.
the
Printer Name of IP Address
eld and click
Next
.
English
7. Set
Protocol
to
LPR
and type
8. Press
Next
to nish standard TCP/
LPRServer
in
Queue Name
field.
IP port setting.
Click
Next
to continue.
9. Press
Finish
to complete the
10. Install printer driver from the vendor-
settings and return to Add Printer
model list. If your printer is not in
Wizard.
the list, click
Have Disk
to manually
assign the location of driver.
19


