Asus VW192C: instruction
Class: Computer equipment, hardware, accessories
Type: Monitor
Manual for Asus VW192C
Table of contents

iiiii
Q u i c k S t a r t G u i d e
Q u i c k S t a r t G u i d e
Q u i c k S t a r t G u i d e
Q u i c k S t a r t G u i d e
Q u i c k S t a r t G u i d e
Table of content
ASUS contact information ........................................................... ii
English...........................................................................................1
Français.........................................................................................5
Deutsch ....................................................................................... 9
Italiano........................................................................................13
Español........................................................................................17
Pyccкий
......................................................................................21
Nederlands..................................................................................25
.......................................................................................29
.......................................................................................33
..........................................................................................37
..........................................................................................41
Português
..
..................................................................................45
Türkçe.........................................................................................49
...........................................................................................53
.............................................................................................57
Dansk...........................................................................................61
Suomi...........................................................................................65
Norsk............................................................................................69
Svenska........................................................................................73
Polski............................................................................................77
..........................................................................................81

i i
i i
i i
i i
i i
Q u i c k S t a r t G u i d e
Q u i c k S t a r t G u i d e
Q u i c k S t a r t G u i d e
Q u i c k S t a r t G u i d e
Q u i c k S t a r t G u i d e
ASUS contact information
ASUSTeK COMPUTER INC.
ASUSTeK COMPUTER INC.
ASUSTeK COMPUTER INC.
ASUSTeK COMPUTER INC.
ASUSTeK COMPUTER INC.
Address
15 Li-Te Road, Peitou, Taipei, Taiwan 11259
Telephone
+886-2-2894-3447
Fax
+886-2-2894-7798
info@asus.com.tw
Web site
www.asus.com.tw
ASUS COMPUTER INTERNATIONAL (America)
ASUS COMPUTER INTERNATIONAL (America)
ASUS COMPUTER INTERNATIONAL (America)
ASUS COMPUTER INTERNATIONAL (America)
ASUS COMPUTER INTERNATIONAL (America)
Address
44370 Nobel Drive, Fremont, CA 94538, USA
Fax
+1-510-608-4555
tmd1@asus.com
Web site
usa.asus.com
Technical Support
Telephone
(General)
+1-502-995-0883
(Notebook)
+1-510-739-3777
Support fax
+1-502-933-8713
Online support
http://vip.asus.com/eservice/techserv.aspx
ASUS COMPUTER GmbH (Germany and Austria)
ASUS COMPUTER GmbH (Germany and Austria)
ASUS COMPUTER GmbH (Germany and Austria)
ASUS COMPUTER GmbH (Germany and Austria)
ASUS COMPUTER GmbH (Germany and Austria)
Address
Harkort Str. 25, D-40880 Ratingen, Germany
Telephone
+49-2102-95990
Fax
+49-2102-959911
Online contact
www.asuscom.de/sales
Technical Support
Telephone
+49-2102-95990
Fax
+49-2102-959911
Online support
www.asuscom.de/support
Web site
www.asuscom.de/news
English
VW192 Series
LCD Monitor
Quick Start Guide
2
2
2
2
2
Q u i c k S t a r t G u i d e
Q u i c k S t a r t G u i d e
Q u i c k S t a r t G u i d e
Q u i c k S t a r t G u i d e
Q u i c k S t a r t G u i d e
English
Safety information
• Before setting up the monitor, carefully read all the documentation that
came with the package.
• To prevent fire or shock hazard, never expose the monitor to rain or
moisture.
• The monitor should be operated only from the type of power source
indicated on the label. If you are not sure of the type of power supplied
to your home, consult your dealer or local power company.
• Use the appropriate power plug which complies with your local power
standard.
• To ensure satisfactory operation, use the monitor only with UL listed
computers which have appropriate configured receptacles marked
between 100-240V AC.
• If you encounter technical problems with the monitor, contact a qualified
service technician or your retailer.
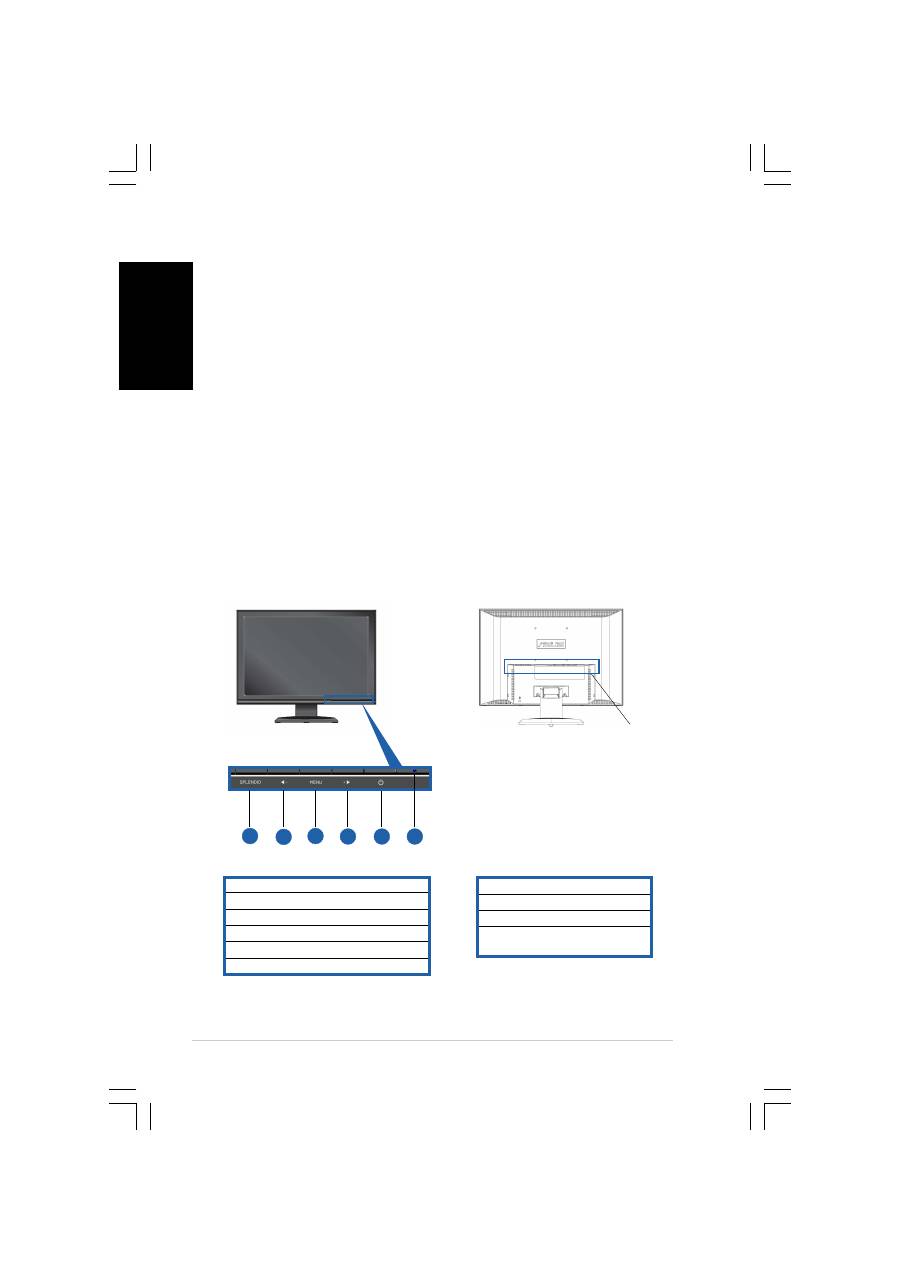
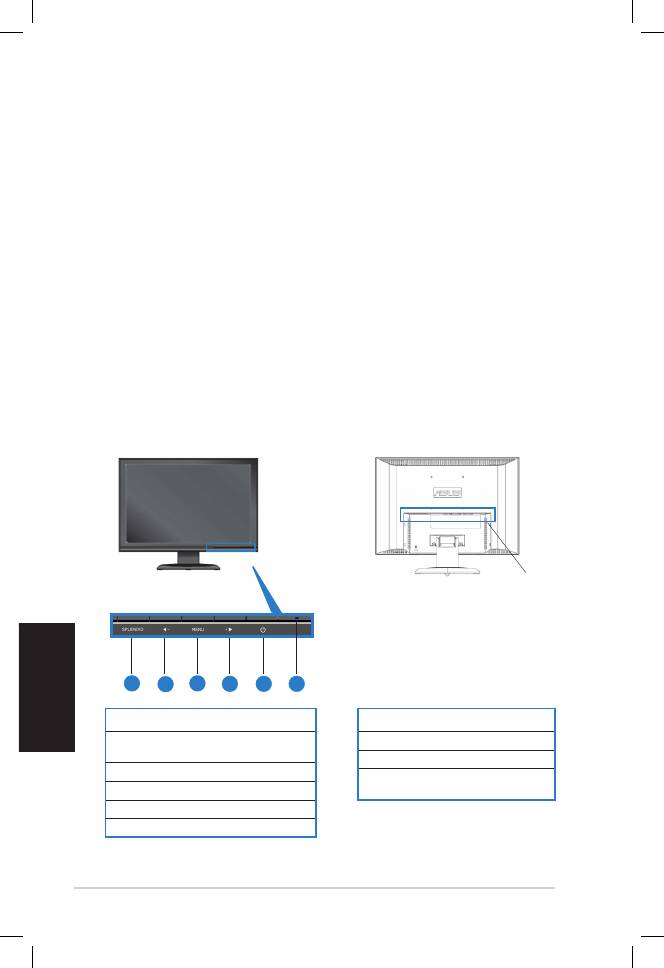
Monitor introduction
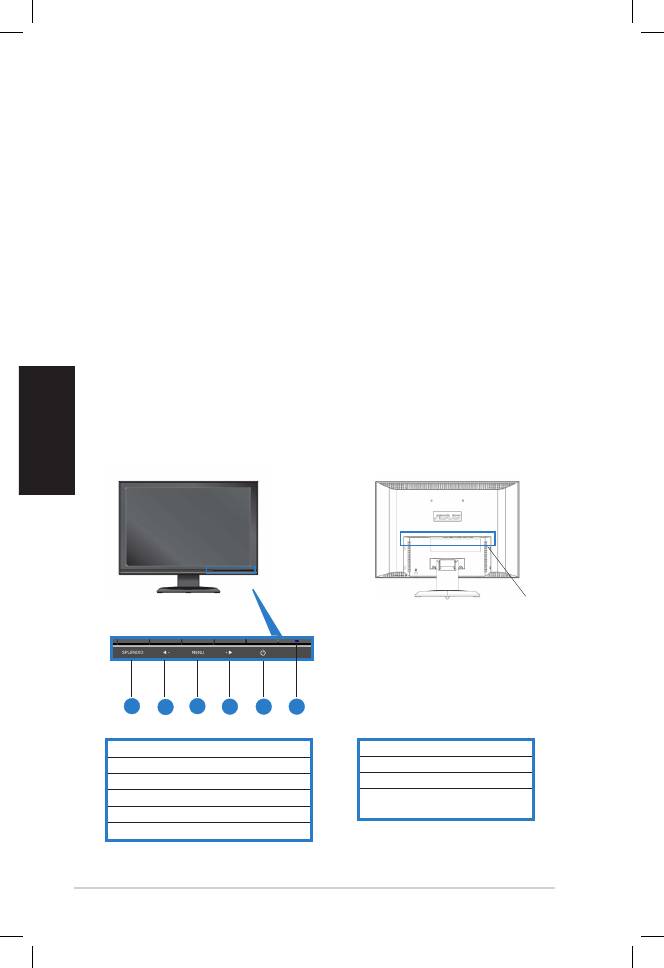
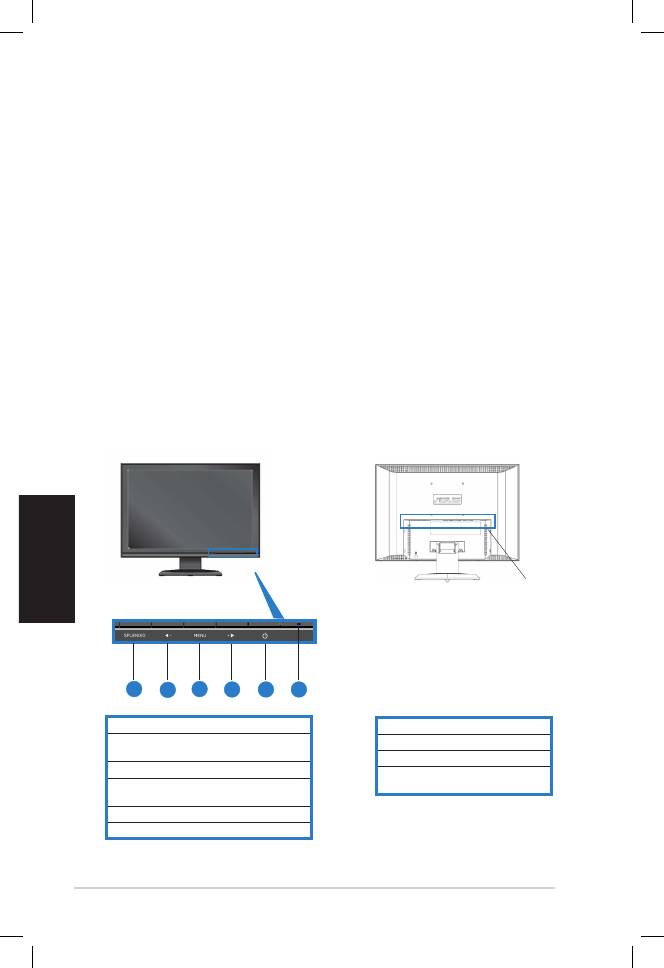
Front view
Front view
Front view
Front view
Front view
Rear view
Rear view
Rear view
Rear view
Rear view
1. SPLENDID™ mode hotkey
2. Decrease button/Volume hotkey
3. MENU button
4. Increase button/Brightness hotkey
5. Power button
6. Power indicator
2
2
2
2
2
1
1
1
1
1
1
1
1
1
1
1. AC-in port
2. DVI port (VW192T only)
3. VGA port
4. Audio-in port (VW192T/
VW192S only)
R e a r
R e a r
R e a r
R e a r
R e a r
connectors
connectors
connectors
connectors
connectors
(From left to right)
1
1
1
1
1
5
5
5
5
5
4
4
4
4
4
4
4
4
4
4
4
4
4
4
4
3
3
3
3
3
2
2
2
2
2
6
6
6
6
6
3
3
3
3
3
Q u i c k S t a r t G u i d e
Q u i c k S t a r t G u i d e
Q u i c k S t a r t G u i d e
Q u i c k S t a r t G u i d e
Q u i c k S t a r t G u i d e
English
Connecting the cables
1.
Remove the rear cover.
2.
Connect the cables as the following instructions:
• To connect the audio cable:
To connect the audio cable:
To connect the audio cable:
To connect the audio cable:
To connect the audio cable: connect one end of the audio cable to
the monitor’s Audio-in port, and then connect the other end to the
computer multi-media (or audio) card’s audio output.
• To connect the power cord:
To connect the power cord:
To connect the power cord:
To connect the power cord:
To connect the power cord: connect one end of the power cord
securely to the monitor’s AC input port, the other end to a power outlet.
• To connect the VGA/DVI cable:
To connect the VGA/DVI cable:
To connect the VGA/DVI cable:
To connect the VGA/DVI cable:
To connect the VGA/DVI cable:
a.
Plug the VGA/DVI connector to the LCD monitor’s VGA/DVI port.
b. Connect the other end of the VGA/DVI cable to your computer’s
VGA/DVI port.
c.
Tighten the two screws to secure the VGA/DVI connector.
3.
Close the rear cover. Align the cover to the six slots near the ports,
then close the cover carefully. A click indicates that the cover has
been closed successfully.
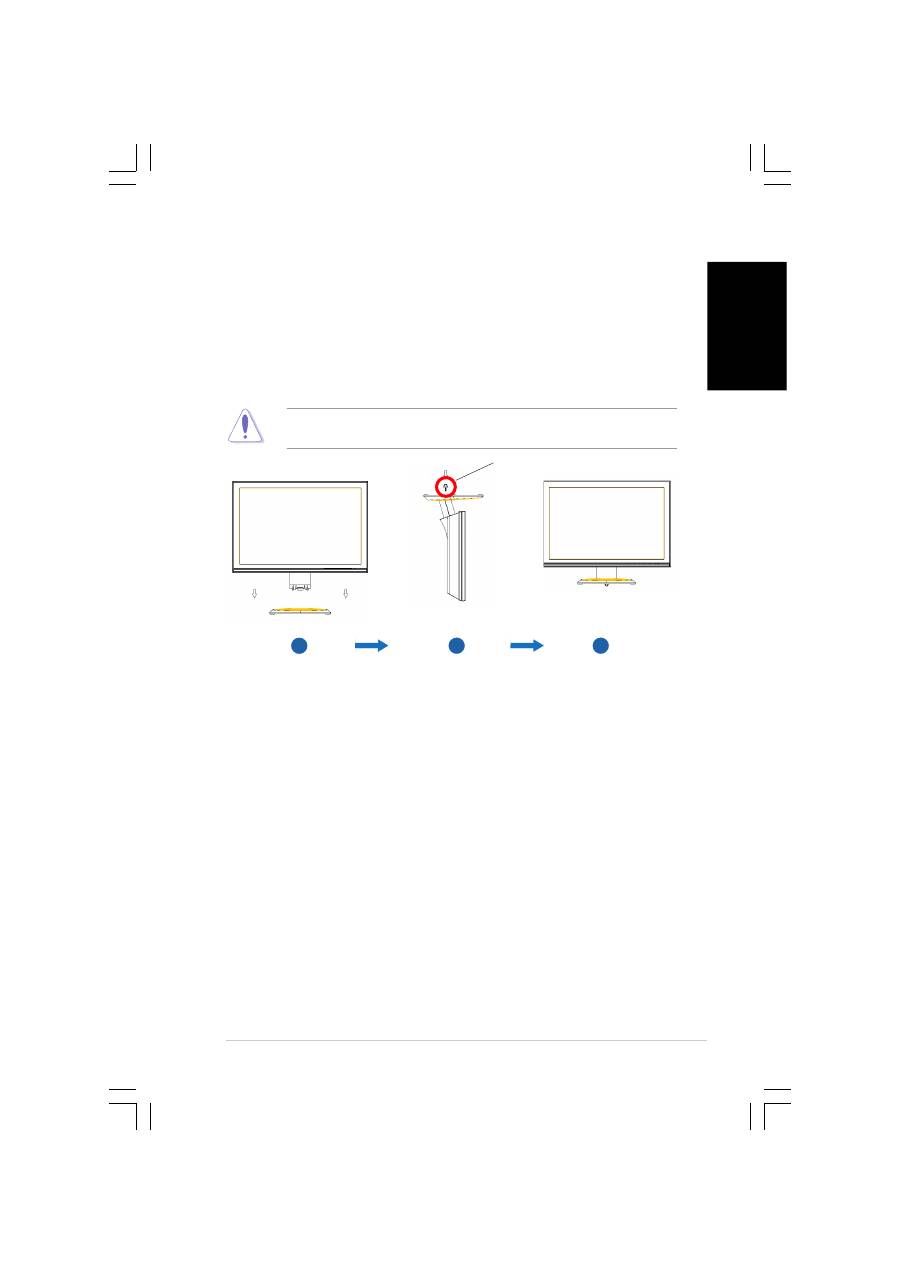
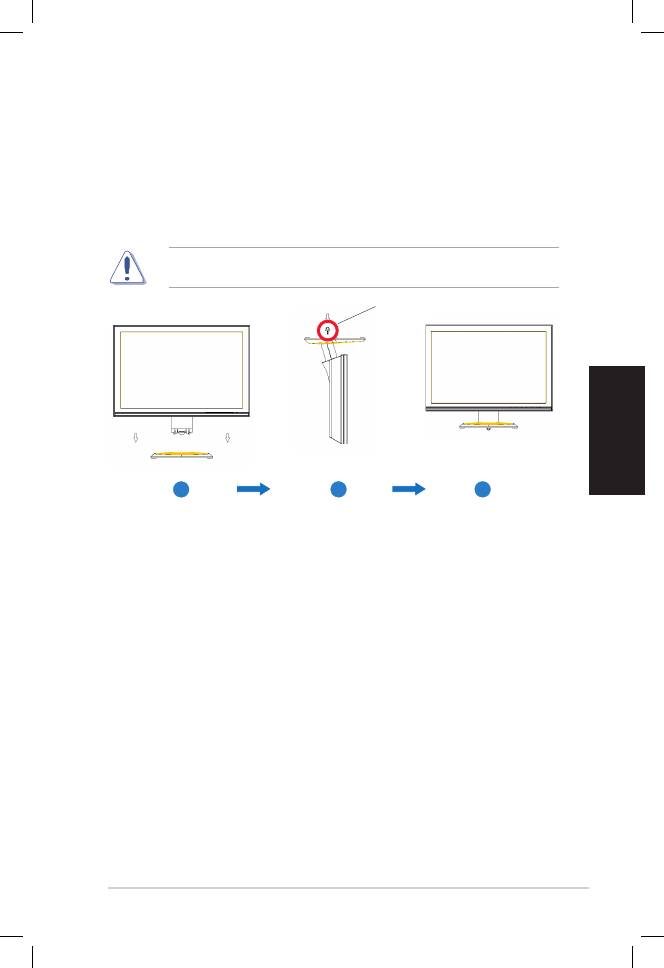
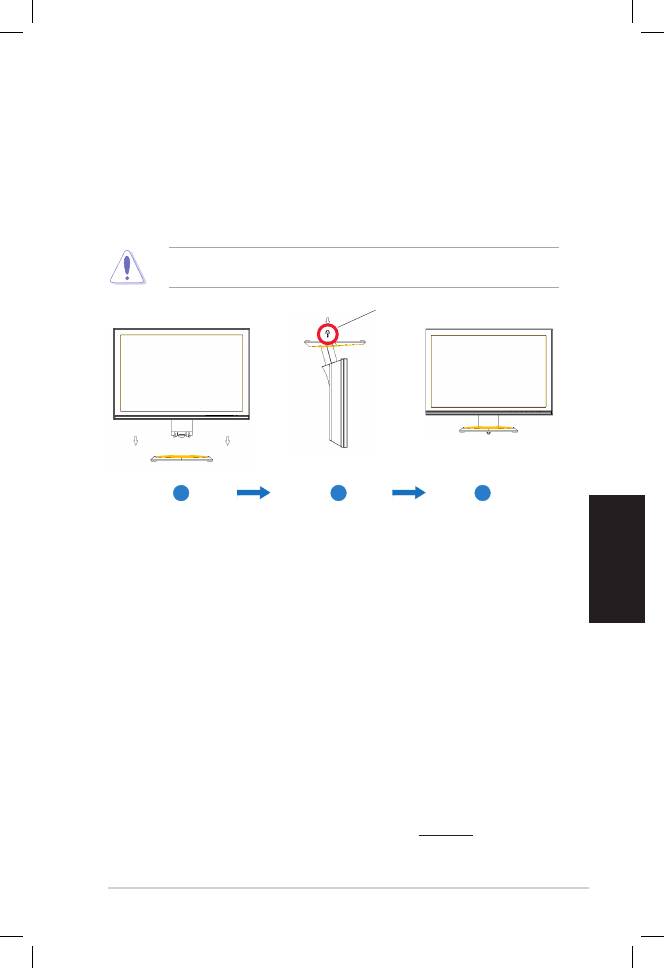
Assembling the monitor base
To assemble the monitor base:
1.
Connect the base with the monitor. A click shows that the base has
been connected successfully.
2.
Tighten the screw as the drawing shows to fix the base.
3.
Adjust the monitor to the angle that is most comfortable for you.
•
We recommend that you cover the table surface with soft cloth to
prevent damage to the monitor.
3
3
3
3
3
2
2
2
2
2
1
1
1
1
1
s c r e w
s c r e w
s c r e w
s c r e w
s c r e w
4
4
4
4
4
Q u i c k S t a r t G u i d e
Q u i c k S t a r t G u i d e
Q u i c k S t a r t G u i d e
Q u i c k S t a r t G u i d e
Q u i c k S t a r t G u i d e
English
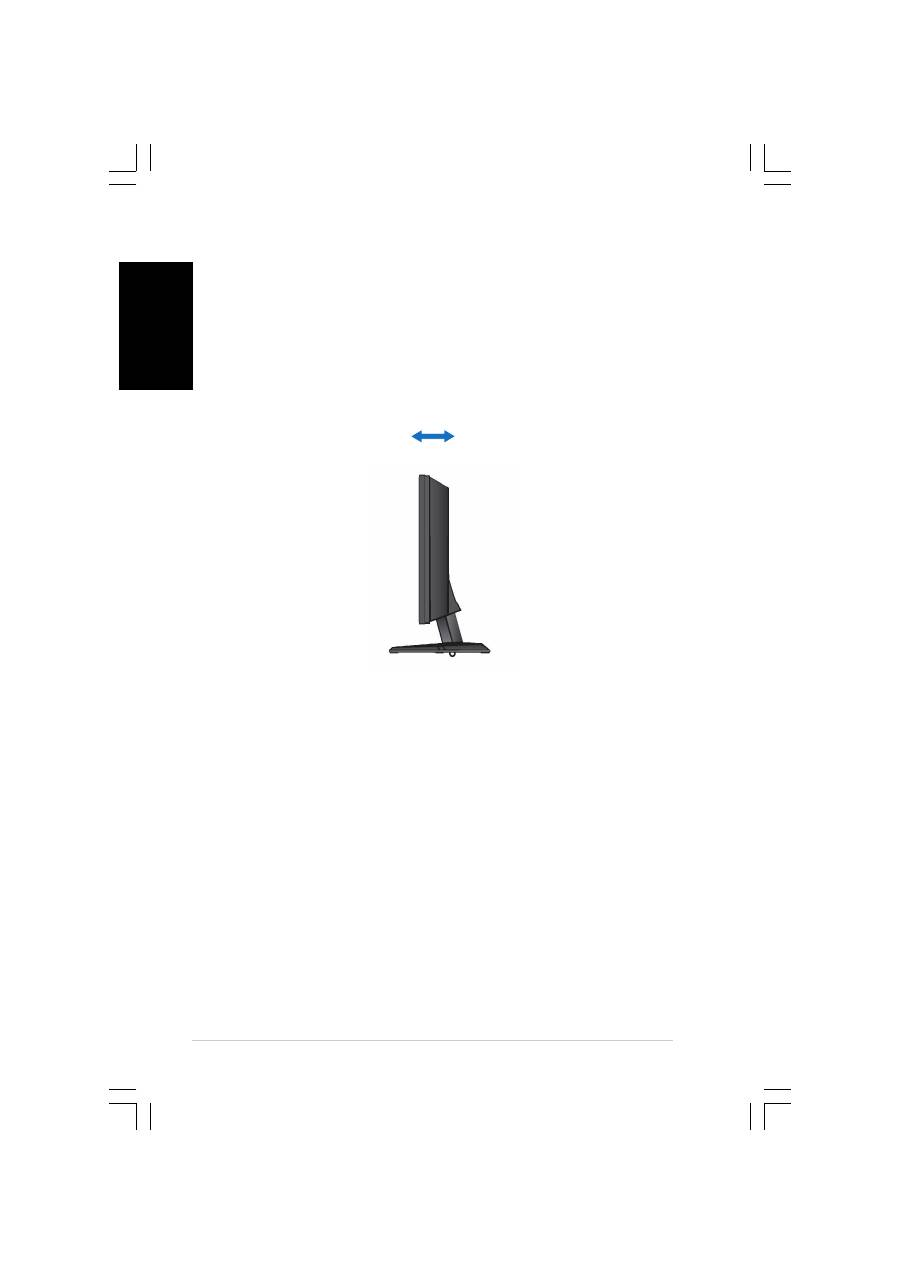
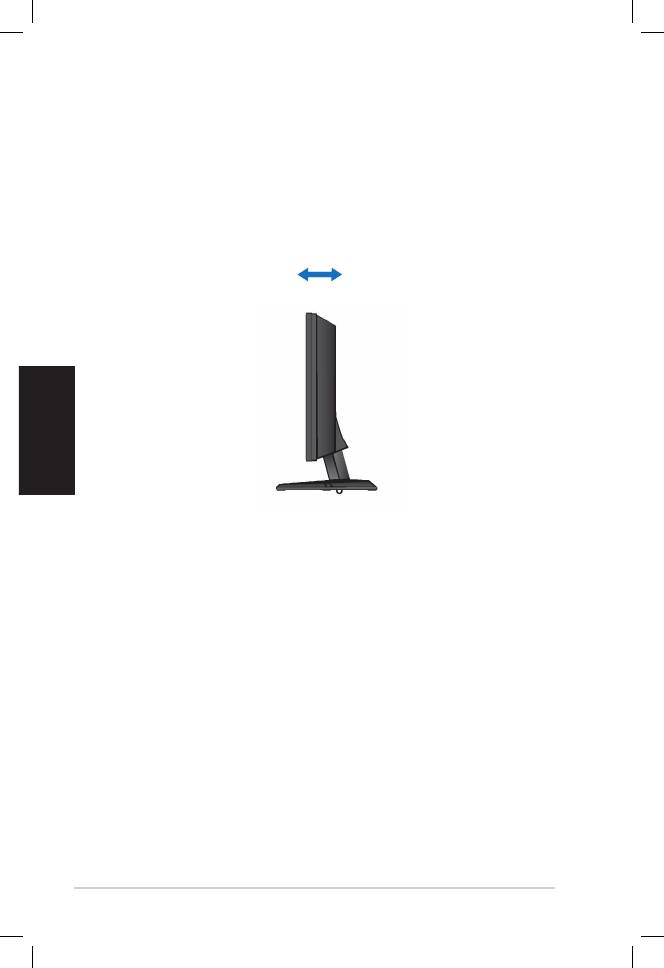
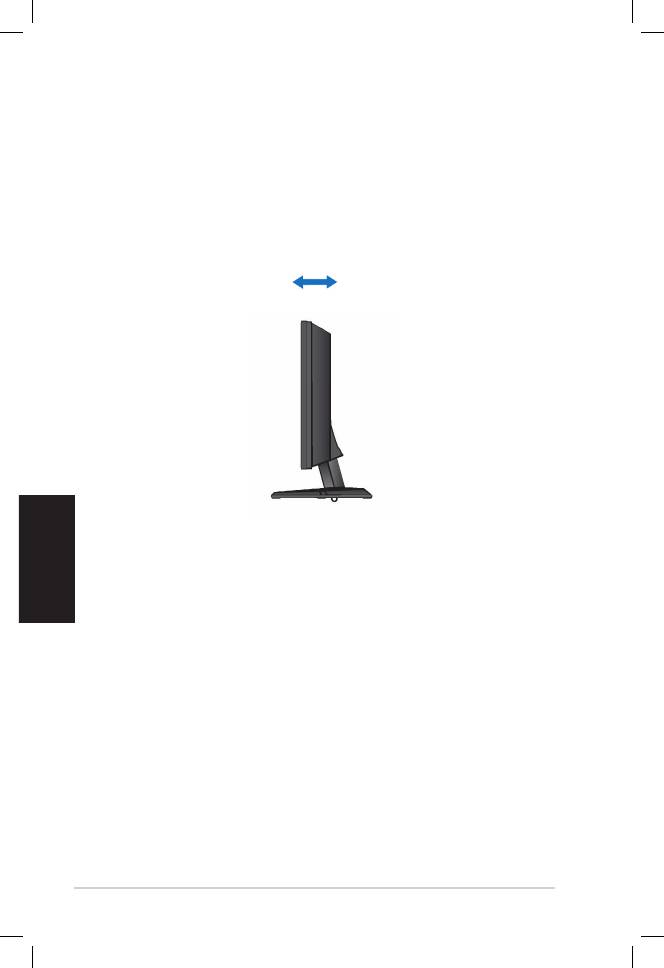
Adjusting the monitor
• For optimal viewing, we recommend that you look at the full face of the
monitor, then adjust the monitor to the angle that is most comfortable
for you.
• Hold the stand to prevent the monitor from falling when you change its
angle.
• You can adjust the monitor’s angle from -5º to 20º.
-5º~20º
Français
Séries VW192 Moniteur LCD
Guide de démarrage rapide
Guide de démarrage rapide
Français
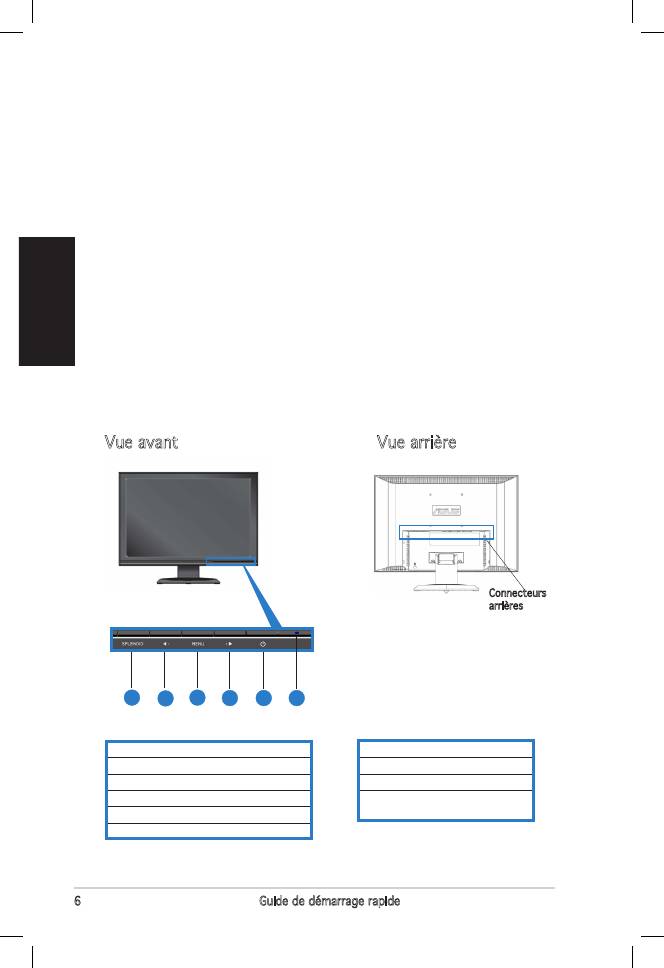
1. Port AC-in
2. Port DVI (VW192T uniquement)
3. Port VGA
4. Port Audio-in (VW192T�VW192���
(VW192T�VW192���
uniquement)
Informations sur la sécurité
• Avant de configurer le moniteur, assurez-vous d’avoir lu toute la
documentation incluse dans le paquet.
• Pour éviter les risques d’incendie et de choc électrique, n’exposez pas
le moniteur à la pluie ou à l’humidité.
• Le moniteur ne doit être utilisé qu’avec le type de source d’alimentation
indiqué sur l’étiquette à l’arrière. Si vous n’êtes pas sûr du type
d’alimentation électrique dont vous disposez, contactez votre
revendeur ou votre fournisseur en électricité local.
•
Utilisez la prise d’alimentation compatible avec les standars électriques
de votre région.
• Pour assurer un fonctionnement correct, n’utilisez le moniteur qu’avec
des ordinateurs certifiés UL, et fonctionnant entre 110-240V.
• Si vous rencontrez un problème technique avec votre moniteur,
contactez un technicien qualifié ou votre revendeur.
Introduction au moniteur
Vue avant
Vue arrière
1. Raccourci ���PLENDID™
2. Sélection/Raccourci volume
3. Bouton MENU
4. Sélection/Raccourci luminosité
5. �outon d’alimentation
�outon d’alimentation
6. �ndicateur d’alimentation
�ndicateur d’alimentation
11
Connecteurs
arrières
1
5
444
3
2
(De gauche à droite)
Guide de démarrage rapide
Français
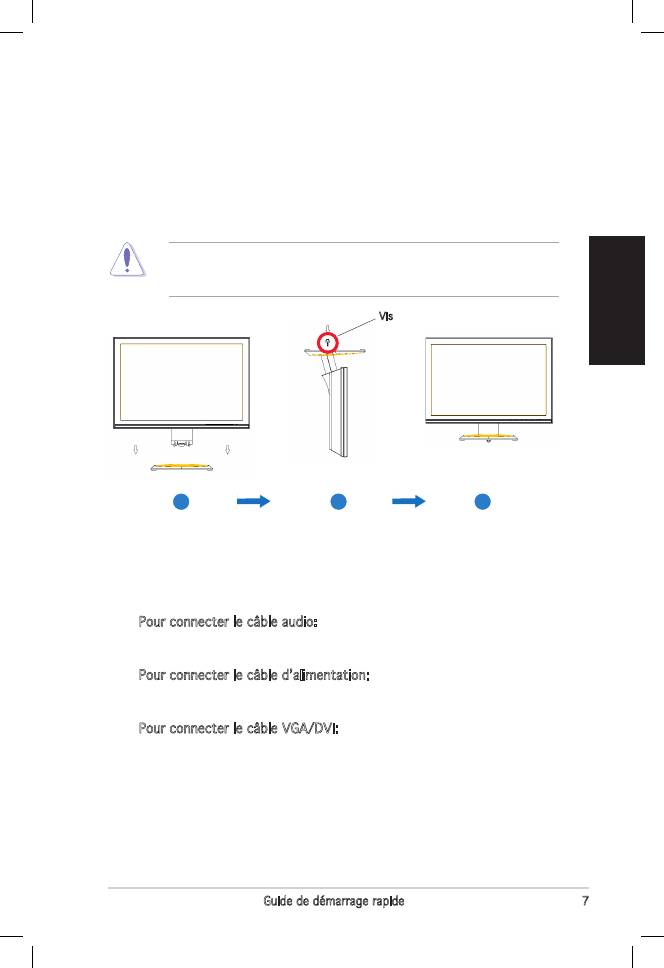
Assembler la base du moniteur
Pour assembler la base du moniteur:
1. Connectez la base au moniteur. Un léger cliquetis vous informe que la
base a été correctement connecteé.
2. Serrez les vis comme illustré sur l’image ci-dessous pour fixer la base.
3. Ajustez le moniteur dans l’angle vous paraissant le plus confortable.
• �l est recommandé de couvrir la surface du meuble supportant
le moniteur avec un chiffon doux pour éviter d’endommager le
moniteur.
•
Pour connecter le câble audio: connectez une extrémité du câble
audio au port Audio-in, puis connectez l’autre extrémité à la sortie
multimédia (ou audio) de l’ordinateur.
•
Pour connecter le câble d’alimentation: connectez une extrémité du
câble d’alimentation au port AC-�n, et l’autre extrémité à une source
d’alimentation électrique.
•
Pour connecter le câble VGA/DV�:
a. �ranchez le connecteur VGA/DV� au port VGA/DV� du moniteur.
b. Connectez l’autre extrémité du câble VGA/DV� au port VGA/DV�
de votre PC.
c. Sécurisez les câbles VGA/DV� à leur ports.
3. Fermez le couvercle arrière. Alignez le couvercle sur les six slots près
des ports, puis refermez délictatement le couvercle. Un léger cliquetis
indique que le couvercle a bien été fermé.
Connecter les câbles
1. Retirez le couvercle arrière.
2. Connectez les câbles en suivant les instructions suivantes:
3
2
1
Vis
Guide de démarrage rapide
Français
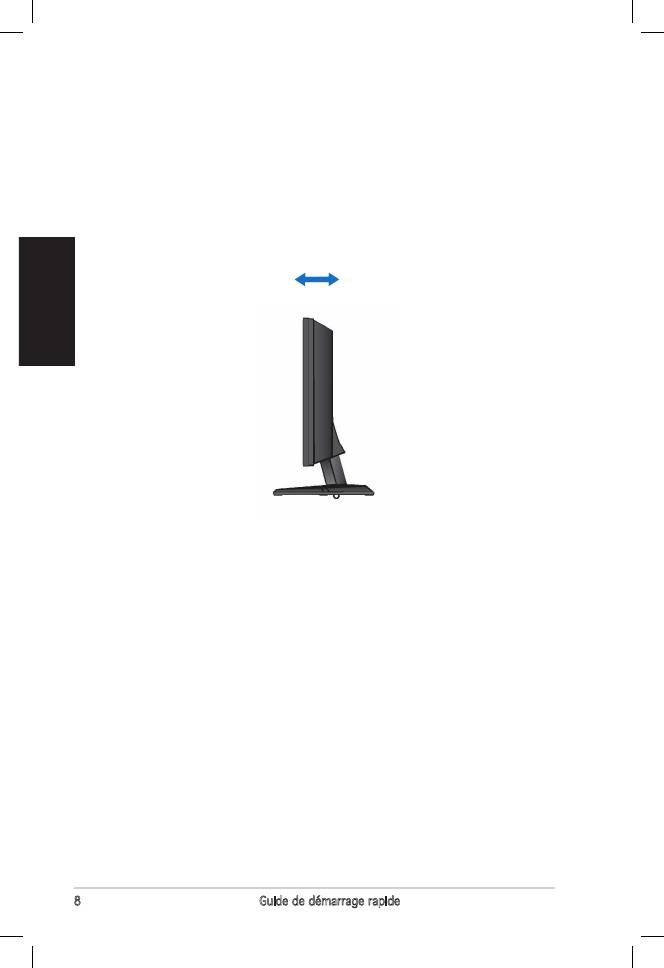
Ajuster l’inclinaison
• Pour une visualisation optimale, il est recommandé de visualiser l’écran
dans son intégralité, puis d’ajuster l’inclinaison du moniteur dans l’angle
qui vous paraît le plus confortable.
• Maintenez le haut du moniteur avec une main lors de l’ajustement de
l’inclinaison.
• Vous pouvez ajuster l’angle d’inclinaison du moniteur de -5º à 20º.
-5º~20º
Deutsch
VW192-Serie LCD-Monitor
Schnellstarthilfe
10
Schnellstarthilfe
Deutsch
1. SPLEND�D™-Modus-Hotkey
2. Kleiner-Schalter/Lautstärke
3. MENU-Schalter
4. Größer-Schalter/Helligkeit
5. Power-Schalter
6. Stromanzeige
1. AC-Eingang
2. DV�-Anschluss (nur VW192T)
3. VGA-Anschluss
4. Audio-Eingang (nur VW192T�
(nur VW192T�
VW192���)
Sicherheitsinformationen
• �evor Sie den Monitor installieren, lesen Sie sorgfältig alle mitgelieferten
Informationen.
• Um Feuer- und Stromschlagrisiken zu vermindern, setzen Sie den
Monitor niemals Regen oder Feuchtigkeit aus.
• Der Monitor sollte nur mit der auf dem Aufkleber bezeichneten
Spannung betrieben werden. Sind Sie sich über die Spannung der von
�hnen benutzten Steckdose nicht sicher, erkundigen Sie sich bei �hrem
Energieversorgungsunternehmen vor Ort.
• Verwenden Sie Stromstecker, die mit den Stromstandards �hrer Region
übereinstimmen.
• Um einen sicheren �etrieb zu gewährleisten, verwenden Sie den Monitor
nur in Verbindung mit Computern, die dem UL-Standard entsprechen
und über korrekt eingestellte Anschlüsse mit einer Spannung von 100-
240V~ verfügen.
• Sollten technische Probleme mit dem Produkt auftreten, kontaktieren
Sie den qualifizierten Kundendienst oder �hre Verkaufsstelle.
Monitoreinführung
Vorderansicht
Rückseitenansicht
11
Rückseitenanschlüsse
1
5
444
3
2
(Von links nach rechts)
11
Schnellstarthilfe
Deutsch
Anschließen der Kabel
1. Entfernen Sie die Rückseitenabdeckung.
2. Schließen Sie die Kabel wie im folgenden beschrieben an:
• So schließen Sie das Audiokabel an: verbinden Sie das eine Ende des
Audiokabels mit dem Audio-Eingang des Monitors und das andere mit
dem Audio-Ausgang der Multimedia (oder Audio)-Karte �hres Computers.
• So schließen Sie das Netzteil an: verbinden Sie zuerst das Netzteilkabel mit
dem Netzstromeingang des Monitors. Dann verbinden Sie den Stromstecker
mit dem Netzteil, und das andere Ende des Netzteils mit einer Stromquelle.
• So schließen Sie ein VGA/DV�-Kabel an:
a.
Stecken Sie den VGA/DV�-Stecker in den VGA/DV�-Eingang des Monitors.
b. Verbinden Sie das andere Ende des VGA/DV�-Kabels mit dem
VGA/DV�-Eingang �hres Computers.
c.
Ziehen Sie die zwei Schrauben fest, um den VGA/DV�-Anschluss abzusichern.
2. Schließen Sie die Abdeckung der Rückseitenanschlüsse, indem Sie die
Abdeckung in die drei Schlitze stecken und vorsichtig schließen. Ein
Klickgeräusch zeigt an, dass die Abdeckung korrekt geschlossen wurde.
3. Schließen Sie die Rückseitenabdeckung. Die Abdeckung muss auf
die sechs Schlitze in der Nähe der Anschlüsse ausgerichtet und
dann vorsichtig geschlossen werden. Ein Klicken zeigt an, dass die
Abdeckung korrekt eingerastet ist.
Zusammenbau des Monitors
So bauen Sie den Monitor zusammen:
1. Stecken Sie den Ständer an den Monitor. Ein Klicken zeigt an, dass der
Ständer richtig eingerastet ist.
2. Ziehen Sie die Schraube wie in der Abbildung gezeigt fest.
3. Richten Sie den Monitor nach �elieben aus.
• Es wird empfohlen, die Tischoberfläche mit einem weichen Tuch
abzudecken, um den Monitor nicht zu beschädigen.
3
2
1
Schraube
12
Schnellstarthilfe
Deutsch
Veränderung des Neigungswinkels
• Für eine optimale Anzeige wird empfohlen, dass Sie den Monitor gerade
ansehen und dann auf den gewünschten Neigungswinkel einstellen.
• Halten Sie den Monitor am Ständer fest, damit er beim Einstellen des
Neigungswinkels nicht umkippt.
• Der Monitor kann in einem Winkel von -5º bis 20º eingestellt werden.
-5º~20º
Italiano
Monitor LCD Serie VW192
Guida Rapida
Guida Rapida
Italiano
14
Informazioni di Sicurezza
• Prima di installare il monitor, leggere attentamente l’ intera
documentazione allegata alla confezione.
• Per evitare il rischio d’ incendio o di scosse elettriche, non esporre mai il
monitor a pioggia o umidità .
• �l monitor dovrebbe essere fatto funzionare soltanto con il tipo di
alimentazione indicato sull’ etichetta. �n caso di incertezza sul tipo di
alimentazione fornita alla propria abitazione, consultare il fornitore o la
società elettrica locale.
• Utilizzare la spina appropriata conforme agli standard elettrici locali.
• Per assicurare un corretto funzionamento, utilizzare il monitor soltanto
con computer marchiati UL, con ricettacoli configurati fra 100 e 240V
AC.
• Se si riscontrano problemi tecnici con il monitor, contattare un tecnico
abilitato per l’ assistenza o il rivenditore.
Presentazione del Monitor
Prospetto Frontale
Prospetto Posteriore
1. Tasto Rapido Modalità SPLEND�D™
Tasto Rapido Modalità SPLEND�D™
2. Pulsante di Riduzione /Tasto Rapido
Pulsante di Riduzione /Tasto Rapido
per la regolazione del Volume
3. Pulsante del MENU
Pulsante del MENU
4. Pulsante di Aumento /Tasto Rapido
per la regolazione della Luminosità
5. Pulsante di Accensione
Pulsante di Accensione
6. �ndicatore di Alimentazione
�ndicatore di Alimentazione
1. Porta AC-in
2. Porta DV� (solo su VW192T)
3. Porta VGA
4. Porta Audio-in (solo su
(solo su
VW192T�VW192���)
11
Connettori
Posteriori
1
5
444
3
2
(Da sinistra verso destra)
Guida Rapida
Italiano
15
Connessioni Cavi
1. Rimuovere la copertura posteriore.
2. Collegare i cavi come dalle istruzioni di seguito:
• Per collegare il cavo audio: collegare un’estremità del cavo audio alla
porta Audio-in del monitor e poi collegare l’altra estremità all’ uscita
audio della scheda multimediale (o audio) del computer.
• Per collegare il cavo di alimentazione: fissare l’ estremità del cavo AC di
alimentazione all’ apposita porta del monitor, mentre l’ altra estremità
va inserita nella presa di corrente.
• Per collegare il cavo VGA/DV� :
a. �nserire il connettore VGA/DV� alla porta VGA/DV� del monitor LCD
b. Collegare l’altra estremità del cavo VGA/DV� alla porta VGA/DV�
del computer.
c. Stringere le due viti per fissare il connettore VGA/DV�.
3. Chiudere la copertura posteriore. Allineare la copertura alle sei
scanalature vicino alle porte, quindi chiuderla con attenzione. A clic
indica che la coperura è stata chiusa correttamente.
Come Assemblare la base del monitor.
Per assemblare la base del monitor:
1. Collegare la base con il monitor. Un clic indica che la base è stata
collegata correttamente.
2. Per fissare la base, stringere la vite come da figura.
3. Regolare il monitor all’ angolazione più comoda.
• Per evitare danni al monitor, si consiglia di ricoprire la superficie del
tavolo con un panno morbido.
3
2
1
Vite
Guida Rapida
Italiano
16
Regolazione del Monitor
• Per una visione ottimale, si consiglia di guardare l’ intera superficie
del monitor, quindi di regolarne l’ angolazione, secondo la propria
discrezione
• �mpugnare il piedistallo per evitare la caduta del monitor durante la
regolazione dell’ inclinazione.
• L’ angolazione del monitor si può regolare fra i-5º e i 20º.
-5º~20º
Español
VW192 Series
Monitor LCD
Guía de Instalación
Rápida
18
Guía de Instalación Rápida
Español
Precauciones de Seguridad
• Lea atentamente toda la documentación incluida antes de realizar ajustes
en el monitor.
• Para prevenir riesgos de fuego y/o eléctricos, nunca exponga el monitor
a lluvia o humedad.
• El monitor debe ser operado sólo desde el tipo de fuente de energía indicado
en la etiqueta. Si no esta seguro del tipo de energía que será usada con
su equipo, consulte con su punto de venta o empresa suministradora de
energía en su localidad.
• Utilice enchufes con toma de tierra que se adapten a su estándar local.
• Para asegurar una operación satisfactoria, utilice el monitor sólo con PCs
listados en UL (agencia americana independiente para la seguridad de
productos) con receptáculos configurados apropiadamente con un voltaje
marcado de entre 100-240V de corriente alterna (AC).
• Si encuentra problemas técnicos con el monitor, contacte con su punto
de venta o servicio técnico cualificado.
Descripción del Monitor
Parte frontal
Parte trasera
11
Conectores de la
parte trasera
(De izquierda a derecha)
1
5
444
3
2
6
1. Botón de acceso directo SPLENDID™
2. Botón de decremento / Acceso directo
a volumen
3. Botón MENÚ
4. Botón de incremento / Acceso directo a brillo
5. Botón de encendido
6. Indicador de encendido
1. Puerto de entrada AC
2. Puerto DVI (sólo V�1�2�)
sólo V�1�2�)
V�1�2�)
3. Puerto VGA
4. Puerto de entrada de sonido (sólo
sólo
V�1�2�/V�1�2S)
