Asus GX1026: instruction
Class: Networks, communications, telecommunications, internet, security
Type:
Manual for Asus GX1026
Table of contents

Index
1. English ................................................................................1
English
2. Nederlands .........................................................................9
3. Français ............................................................................
17
4. Deutsch ............................................................................
25
5. Italiano ..............................................................................33
6. Português .........................................................................41
7.
Русский
.............................................................................49
8. Español .............................................................................57
9. Türkçe ...............................................................................
65

English
GX1026
Quick Start Guide
Copyright © 2008 ASUSTeK COMPUTER INC. All Rights Reserved.

Introduction
English
Thank you for purchasing the ASUS GX1026 rack mountable switch! The GX1026
provides non-blocking, wire-speed performance to meet your intensive network
needs. This switch comes with 24 Fast Ethernet ports and 2 Gigabit Ethernet ports
with auto-sensing and auto MDI/MDIX capabilities. With easy connectivity, ow
control, and QoS, the GX1026 is guaranteed to enhance your network performance
and productivity.
Features
• 24 x 10/100Mbps Fast Ethernet ports
• 2 x 10/100/1000Mbps Gigabit Ethernet ports
• Up to 200Mbps transmit speed for all ports in full-duplex mode
• Switch capacity: 8.8Gbps Forwarding rate: 3.6Mpps
• Plug and play–auto MDI/MDIX, and auto-sensing for speed and duplex mode
on all ports
• Flow control schemes (802.3x in full-duplex mode) to support zero loss under
temporary network congestion
• Head of Line (HOL) blocking preventions
• IEEE802.1p/TOS/DS supported to meet QoS requirements
• 4K MAC address learning and aging for concurrent connections to 4K nodes
• Easy-to-read LEDs provide quick indication of link status and speed
• Fanless design for quiet operation
• Desktop or rack mount placement options
2 Quick Start Guide
Package contents
Before installing the GX1026 switch, check your package for the following items.
• ASUS GX1026 switch x 1
• Power cable x 1
English
• User guide x 1
• Mounting kit x 1 (2 brackets and 6 screws)
Contact your retailer if any of the items is damaged or missing.
Technical specications
Physical dimensions
444mm (W) x 180mm (D) x 43.5mm (H)
Environmental
Operating temperature: 0ºC ~ 50ºC (32ºF to 122ºF)
specications
Storage temperature: -25ºC ~ 70ºC (-13ºF to 158ºF)
Operating humidity: 0 to 90%
Storage humidity: 0 to 90%
Operating altitude: up to 15,000 ft (4,500m)
Storage altitude: up to 40,000 ft (12,000m)
Power
Input: 100V ~ 240V AC/50-60Hz
Power Consumption:12 Watts
Certication
FCC Class A, CE
Quick Start Guide 3
Hardware
English
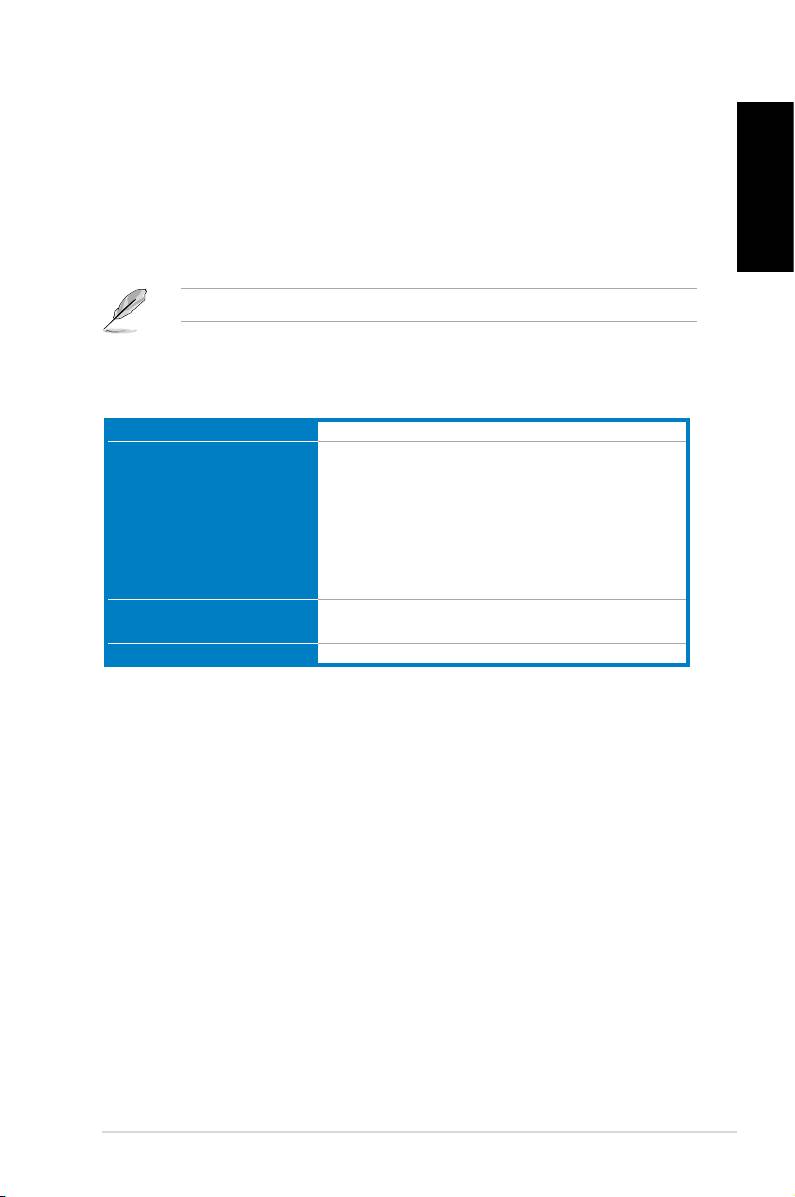
Front panel
The front panel of GX1026 includes 24 10/100Mbps Fast Ethernet ports, 2
10/100/1000Mbps Gigabit Ethernet ports, and LED indicators that show the
working conditions of the switch.
Figure 1. GX1026 front panel
Table 1. LED indicators
LED Color Status Description
SYSTEM
Green ON The power is ON
ON A device is connected to the port
STATUS
Green
Flashing Transmitting data
OFF No device connected
ON 100/1000Mbps
SPEED
Green
OFF 10Mbps
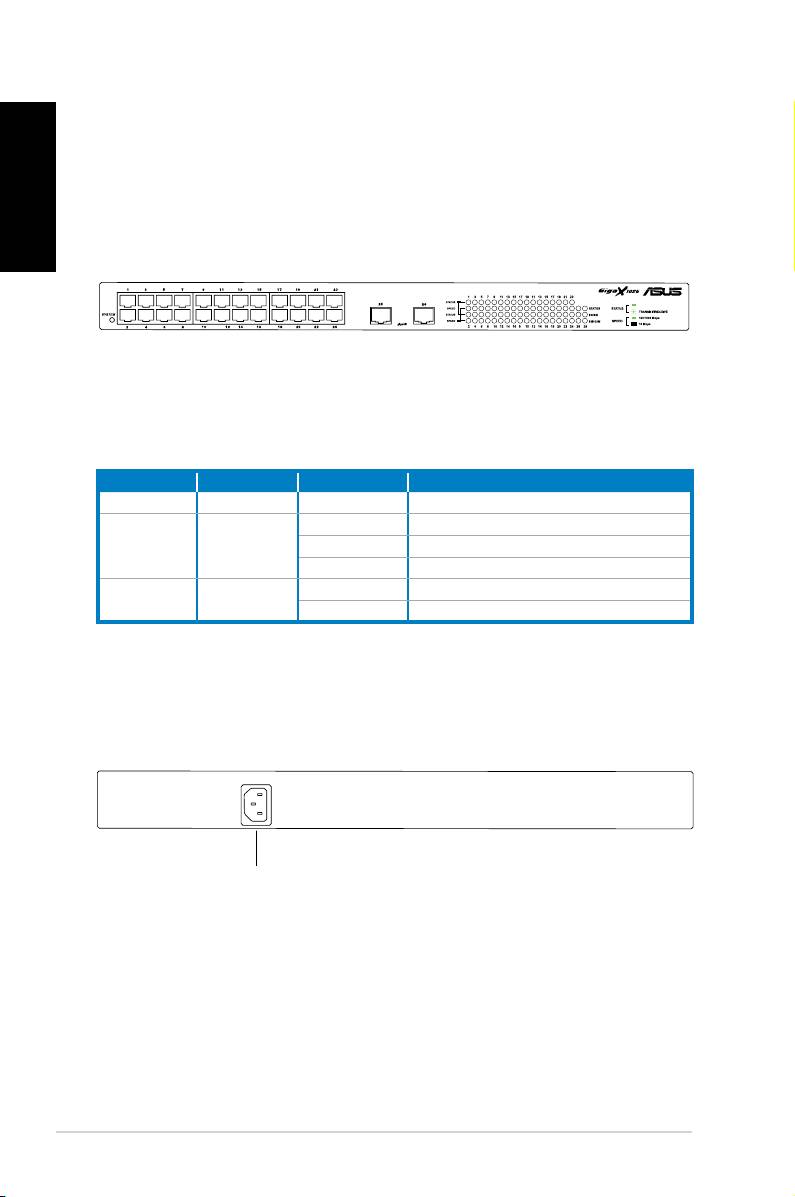
Rear panel
The rear panel of GX1026 contains the power connector.
Power connector
Figure2. GX1026 rear panel
4 Quick Start Guide
Placement options
Desktop placement
Place the GX1026 switch on a at and stable surface. Ensure that the location
English
meets the operating environmental specications. See page 3 for details.
The length of the UTP Category 5 cable length cannot exceed 100 meters (328
feet).
Mounting the switch on a 19-inch rack
You can mount the GX1026 switch on a rack with the supplied mounting brackets
and screws.
To mount the switch on a rack:
1. Locate three screw holes on both sides of the switch.
2. Align the mounting brackets with the switch screw holes.
3. Secure the mounting brackets with three screws supplied in the mounting kit
on both sides of the switch.
4. Place the switch in a 19-inch rack, then secure both sides with four rack
mount screws.
The rack mount screws are not supplied.
Quick Start Guide 5
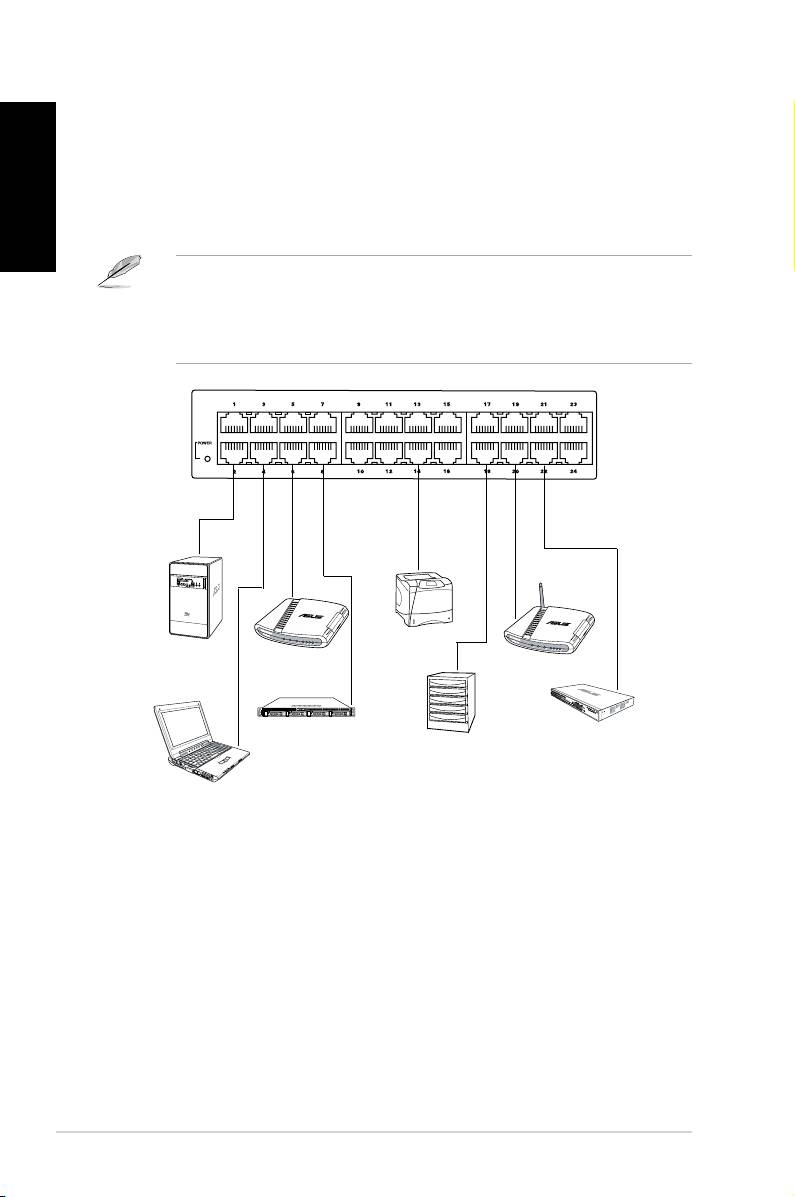
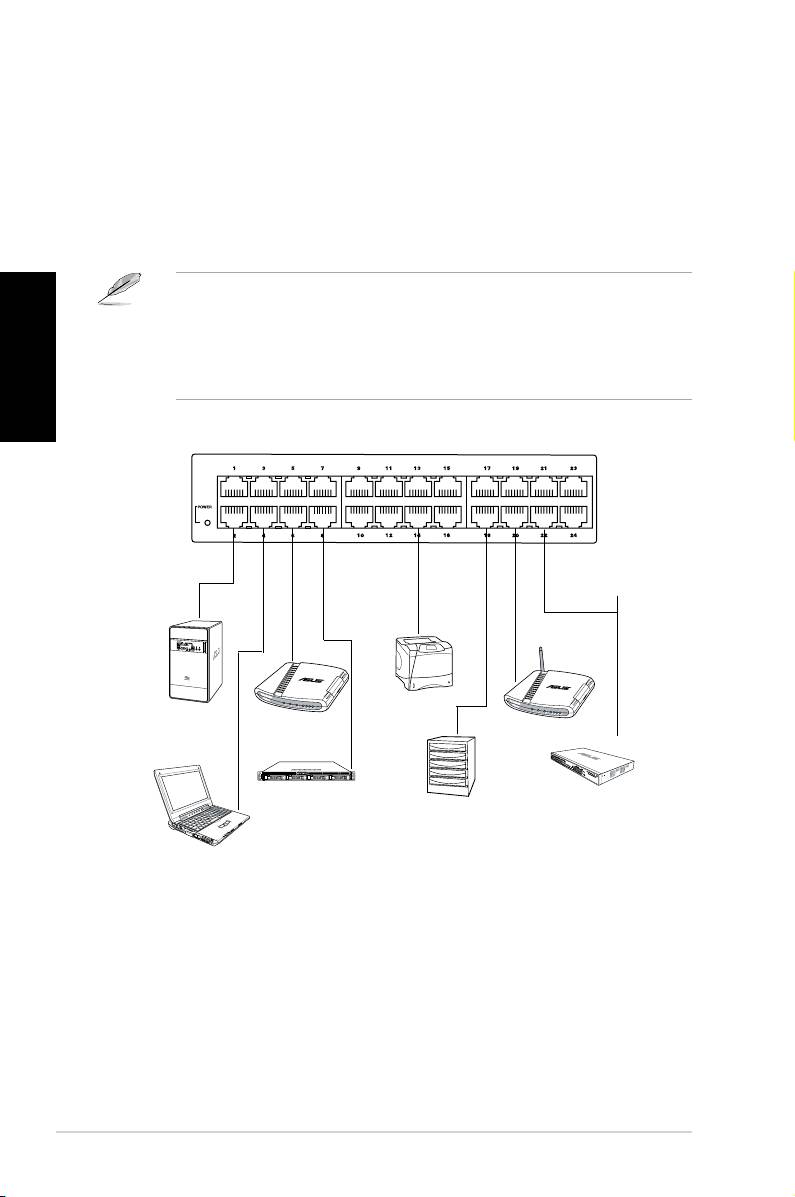
Connecting network devices
English
To connect network devices to the GX1026 switch:
1. Connect one end of the Ethernet cable to an Ethernet port on the switch
front panel. Connect the other end to the Ethernet port of the network device.
Repeat this step to connect additional network devices.
• We recommend the use of Category 5 Ethernet straight-through cables to
ensure proper connections between the switch and other network devices.
• You can use either cross-over or straight-through cables to connect other
network devices such as bridges, switches, hubs, and repeaters.
2. Plug one end of the power cable to the power connector on the switch rear
panel, then plug the other end to a power outlet.
3. The Power LED and LAN LED indicators for active Ethernet ports light up
when the switch is powered on and active nodes are connected to the LAN
ports. Refer to the front panel illustration and LED table in page 4 for details.
6 Quick Start Guide
1 2
Printer
Desktop
Router
Server
Wireless AP
Server
Switch / Hub
NAS
Notebook
Troubleshooting
This section provides solutions to some common problems which you may
encounter when installing or using the ASUS GX1026 switch. Contact the
ASUS technical support if the problem still exists after you have performed the
troubleshooting solutions.
English
Problem Solution
The POWER LED does not light up.
Check if the power cable is properly
connected to the switch and to a power
outlet with a correct voltage output.
The STATUS/SPEED LED
Check if the Ethernet cable is properly
does not light up even after a network
connected to the switch and to the network
device is connected to the port.
device.
Ensure that the switch and your network
device are powered on.
Check if the Ethernet cable meets your
network requirements. To connect a gigabit
switch port, you need a Category 5 cable to
get gigabit transfer speed.
Quick Start Guide 7

Glossary
English
10BASE-T
10 Mbps Ethernet over twisted pair cable (Category 3).
100BASE-T
100 Mbps Ethernet over twisted pair cable (Category 5)
1000BASE-T
1000 Mbps Ethernet over twisted pair cable (Category 5)
Auto MDI/MDIX
Allows network connections using either straight or cross
cables.
Ethernet
The most commonly installed computer network technology,
usually using twisted pair wiring. Ethernet data rates are
10Mbps, 100Mbps, and 1000Mbps.
Mbps
Abbreviation for Megabits per second, or one million bits per
second. Network data rates are often expressed in Mbps.
network
A group of computers that are connected together to
communicate with each other and share resources,
such as software, or les. A network can be small, such as a
LAN, or very large, such as the Internet.
8 Quick Start Guide

Nederlands
GX1026
Snelstartgids
Copyright © 2008 ASUSTeK COMPUTER INC. Alle rechten voorbehouden.

Inleiding
Hartelijk dank voor uw aankoop van de ASUS GX1026 op een rack monteerbare
switch! De GX1026 biedt niet-blokkerende prestaties met kabelsnelheid om aan uw
intensieve netwerkbehoeften te voldoen. Deze switch wordt geleverd met 24 snelle
ethernetpoorten en 2 Gigabit-poorten met capaciteiten voor automatische detectie
en auto MDI/MDIX. Met een eenvoudige connectiviteit, datatransportbesturing en
QoS, staat de GX1026 garant voor betere netwerkprestaties en productiviteit.
Nederlands
Eigenschappen
• 24 x 10/100Mbps Fast Ethernet-poorten
• 2 x 10/100/1000Mbps Gigabit Ethernet-poorten
• Tot 200 Mbps overdrachtsnelheid voor alle poorten in full-duplexmodus.
• Switchcapaciteit: 8,8Gbps Doorstuursnelheid: 3,6Mpps
• Plug & play automatische MDI/MDIX en automatische sensor voor snelheid en
duplexmodus op alle poorten
• Schema’s voor datatransportbesturing (802.3x in full-duplex-modus) om
nulverlies bij tijdelijke netwerkverzadiging te ondersteunen
• Preventie HOL-blokkering (head of line)
• IEEE802.1p/TOS/DS-ondersteuning om te voldoen aan de QoS-vereisten
• 8K MAC-adres aanleren en veroudering voor gelijktijdige verbindingen met
8K-knooppunten
• Gemakkelijk leesbare LED’s geven snel de status en snelheid van de
verbinding aan.
• Ontwerp zonder ventilator voor een stille werking
• Opties voor plaatsing op bureau of rackmontage
10 Snelstartgids

Inhoud verpakking
Voordat u de GX1026-switch installeert, moet u controleren of de volgende items in
de verpakking aanwezig zijn.
• ASUS GX1026 switch x 1
• Voedingskabel x 1
• Handleiding x 1
• Montageset x 1 (2 haken en 6 schroeven)
Neem contact op met uw verkoper als er items ontbreken of beschadigd zijn.
Nederlands
Technische specicaties
Fysische afmetingen
444mm (B) x 180mm (D) x 43.5mm (H)
Omgevingsspecicaties
Bedrijfstemperatuur: 0ºC ~ 50ºC (32ºF tot 122ºF)
Opslagtemperatuur: -25ºC ~ 70ºC (-13ºF tot 158ºF)
Bedrijfsvochtigheid: 0 tot 90%
Opslagvochtigheid: 0 tot 90%
Bedrijfshoogte: tot 4.500 m (15.000 voet)
Opslaghoogte: tot 12.000 m (40.000 voet)
Voeding
Ingang: 100V ~ 240V AC/50-60Hz
Energieverbruik: 12 watt
Certicering
FCC Klasse A, CE
Snelstartgids 11

Hardware
Voorpaneel
Het voorpaneel van de GX1026 bevat 24 10/100Mbps Fast Ethernet-poorten,
2 10/100/1000Mbps Gigabit Ethernet-poorten en LED-indicators die de
werkingsomstandigheden van de switch aangeven.
Nederlands
Figuur 1. Voorpaneel GX1026
Tabel 1. LED-indicators
LED Kleur Status Beschrijving
SYSTEM
Groen AAN De voeding is AAN
AAN Er is een apparaat aangesloten op de poort
STATUS
Groen
Knipperend Gegevens verzenden
UIT Geen apparaat aangesloten
AAN
100/1000Mbps
SPEED
Groen
(SNELHEID)
UIT
10Mbps
Achterpaneel
Het achterpaneel van de GX1026 bevat de voedingsaansluiting.
Voedingsaansluiting
Figuur 2. Achterpaneel GX1026
12 Snelstartgids
Plaatsingsopties
Bureaubladplaatsing
Plaats de GX1026 switch op een plat en stabiel oppervlak. Zorg dat de locatie
voldoet aan de specicaties voor de gebruiksomgeving. Zie pagina 3 voor details.
De UTP-kabel van Categorie 5 mag maximaal 100 meter lang zijn.
De switch in een 19-inch-rek monteren
Nederlands
U kunt de GX1026-switch in een rek monteren met de meegeleverde
montagebeugels en schroeven.
De switch in een rek monteren:
1 Zoek de drie schroefgaten aan beide zijden van de switch.
2 Lijn de montagehaken uit op de schroefgaten van de switch.
3 Bevestig de montagehaken aan beide zijden van de switch met de drie
schroeven die bij de montageset zijn geleverd.
4 Plaats de switch in een 19” rack en maak vervolgens beide zijden vast met
de vier rackmontageschroeven.
De rackmontageschroeven zijn niet bijgeleverd
Snelstartgids 13
Netwerkapparaten aansluiten
Netwerkapparaten aansluiten op de GX1026 switch:
1. Sluit het ene uiteinde van de ethernetkabel aan op een ethernetpoort op het
voorpaneel van de switch. Sluit het andere uiteinde aan op de ethernetpoort
van het netwerkapparaat. Herhaal deze stap om extra netwerkapparaten aan
te sluiten.
• Wij raden u aan rechte ethernetkabels van Categorie 5 te gebruiken om
Nederlands
een correcte aansluiting tussen de switch en andere netwerkapparaten te
garanderen.
• U kunt gekruiste of rechte kabels gebruiken om andere netwerkapparaten
zoals overbruggingen, switches, hubs en repeaters aan te sluiten.
2 Sluit het ene uiteinde van de voedingskabel aan op de voedingsaansluiting
op het achterpaneel van de switch en sluit vervolgens het andere uiteinde
aan op een stopcontact.
3 De voedings-LED- en de LAN-LED-indicators voor de actieve ethernetpoorten
lichten op wanneer de switch is ingeschakeld en de actieve knooppunten
worden verbonden met de LAN-poorten. Raadpleeg de afbeelding van het
voorpaneel en de LED-tabel op pagina 4 voor meer informatie.
14 Snelstartgids
1 2
Printerserver
Desktop
Router
Draadloos AP
Server
Switch/Hub
NAS
Notebook
Probleemoplossing
Dit gedeelte biedt oplossingen voor sommige gebruikelijke problemen die zich
kunnen voordoen tijdens de installatie of het gebruik van de ASUS GX1026 switch.
Neem contact op met de technische ondersteuning van ASUS als het probleem
zich blijft voordoen nadat u de oplossingen hebt geprobeerd.
Probleem Oplossing
De VOEDINGS-LED licht niet op.
Controleer of de voedingskabel correct
is aangesloten op de switch en op
een stopcontact met de correcte
Nederlands
spanningsuitgang.
De STATUS/SNELHEID-LED licht niet op,
Controleer of de ethernetkabel correct
zelfs niet nadat een netwerkapparaat op
is aangesloten op de switch en het
de poort is aangesloten
netwerkapparaat.
Controleer of de switch en uw
netwerkapparaat zijn ingeschakeld.
Controleer of de ethernetkabel voldoet
aan uw netwerkvereisten. Om een gigabit
switch-poort te verbinden, hebt u een
kabel van categorie 5 nodig om de gigabit-
overdrachtsnelheid te halen.
Snelstartgids 15

Woordenlijst
10BASE-T
10 Mbps ethernet via dubbel getwiste kabels (categorie 3).
100BASE-T
100 Mbps ethernet via dubbel getwiste kabels (categorie 5)
1000BASE-T
1000 Mbps ethernet via dubbel getwiste kabels (categorie 5)
Auto MDI/MDIX
Maakt het mogelijk netwerkverbindingen te maken met rechte
of gekruiste kabels.
Ethernet
De meest geïnstalleerde computernetwerktechnologie,
Nederlands
doorgaans met een dubbel getwiste kabel. Ethernetgegevenss
nelheden zijn 10Mbps, 100Mbps en 1000Mbps.
Mbps
Afkorting voor megabits per seconde, of 1 miljoen bits per
seconde. Netwerkgegevenssnelheden worden vaak uitgedrukt
in Mbps.
Netwerk
Een groep computer die onderling verbonden zijn om met
elkaar te communiceren en bronnen, zoals software
of bestanden, te delen. Een netwerk kan klein zijn, zoals een
LAN, maar kan ook zeer groot zijn, zoals het internet.
16 Snelstartgids

GX1026
Français
Guide de démarrage rapide
Copyright © 2008 ASUSTeK COMPUTER INC. Tous droits réservés.

Introduction
Merci pour votre achat d'un switch montable sur rack ASUS GX1026 ! Le GX1026
offre une commutation à pleine vitesse grâce à une architecture "Wire-speed"
non bloquante an de satisfaire à vos besoins réseau les plus intensifs. Ce
switch intègre 24 ports Fast Ethernet et 2 ports Gigabit Ethernet avec fonctions
auto-sensing et auto MDI/MDIX. Grâce à sa connectivité simpliée, son contôle
de ux et sa fonction QoS, le GX1026 est la solution idéale pour accroître vos
performances réseau et votre productivité.
Features
• 24 x ports Fast Ethernet 10/100Mbps
• 2 x ports Gigabit Ethernet 10/100/1000Mbps
• Vitesse de transmission atteignant jusqu"à 200Mbps pour tous les ports en
mode full-duplex
• Capacité de commutation : 8.8Gbps; Taux de retransmission : 3.6Mpps
Français
• Plug and play–auto MDI/MDIX, et auto-sensing pour vitesse et mode duplex
sur tous les ports
• Systèmes de contrôle de ux (802.3x en mode full-duplex) pour éviter les
pertes de paquets lors d'une congestion temporaire du réseau
• Préventions du blocage Head of Line (HOL)
• Normes IEEE802.1p/TOS/DS prises en charge pour satisfaire aux exigences
QoS
• Tableau d'adressage MAC 4K avec fonctions learning et aging pour des
connexions simultanées sur les noeuds 4K
• Système de voyants LED simple à lire pour une indication rapide du statut du
lien et de la vitesse
• Design sans ventilateur pour un fonctionnement silencieux
• Options de placement sur rack ou sur bureau
18 Guide de démarrage rapide

Contenu de la boîte
Avant d’installer le switch GX1026, vériez que la boîte contient bien les éléments
suivants :
• Switch ASUS GX1026 x 1
• Câble d'alimentation x 1
• Guide d'utilisation x 1
• Kit de montage x 1 (2 supports de montage et 6 vis)
Si l’un des éléments ci-dessus était manquant ou endommagé, contactez votre
revendeur.
Spécications techniques
Dimensions physiques
444mm (L) x 180mm (P) x 43.5mm (H)
Spécications
Température de fonctionnement : 0ºC ~ 50ºC (32ºF à
environnementales
122ºF)
Storage temperature: -25ºC ~ 70ºC (-13ºF to 158ºF)
Operating humidity: 0 to 90%
Français
Storage humidity: 0 to 90%
Operating altitude: up to 15,000 ft (4,500m)
Storage altitude: up to 40,000 ft (12,000m)
Alimentation
Input: 100V ~ 240V AC/50-60Hz
Power Consumption:12 Watts
Certications
FCC Classe A, CE
Guide de démarrage rapide 19
