Asus GigaX1105N: instruction
Class: Household, kitchen appliances, electronics and equipment
Type:
Manual for Asus GigaX1105N
Table of contents

Content
English ................................................................1
Français ..............................................................9
Deutsch ............................................................17
Italiano ..............................................................25
Español.............................................................33
Русский .............................................................41
Türkçe ...............................................................49

QE2402
English
GigaX1105N
GigaX1108N
Quick Start Guide
Copyright © 2005 ASUSTeK COMPUTER INC. All Rights Reserved.
1

Introduction
Thank you for purchasing the ASUS GigaX1105N or GigaX1108N gigabit
English
Switch! The GigaX1105N and GigaX1108N are desktop gigabit solutions
which provide seamless integration for your gigabit and Fast Ethernet devices.
The GigaX1105N and GigaX1108N also integrate an internal universal power
supply for easy cable connection.
Features
• 5 x 10/100/1000 Mbps RJ-45 ports (GigaX1105N)
• 8 x 10/100/1000 Mbps RJ-45 ports (GigaX1108N)
• Auto-negotiation for speed and duplex on all ports so as to support gigabit
devices and Fast Ethernet devices within the same network; under
1000Mbps connection, only full duplex flow control is supported
• Auto MDI/MDIX on all ports: both straight-through and crossover Ethernet
cable can be used to connect your network devices with GigaX1105N/
GigaX1108N switch
• Flow control in full duplex mode
• Supports jumbo frame up to 9.6K
• 8K entry MAC address table with auto-learning and aging function
• Fan-less design for quiet operation environment
• Desktop or wall mount placement options
Package contents
Before installing the GigaX1105N/ GigaX1108N switch, check your package for
the following items.
• ASUS GigaX1105N or GigaX1108N Switch x 1
• Power cord x 1
• User guide x 1
• Mounting screws x 2
NOTE
. Contact your retailer if any of the items is damaged or missing.
2 Quick Start Guide

Technical specifications
Physical Dimensions
195.6 mm (W) x 150.8mm (L) x 32mm (H)
Environmental Ranges
English
Operating temperature 0ºC ~ 40ºC (32ºF to 104ºF)
Storage temperature -25ºC ~ 70ºC (-13ºF to 158ºF)
Operating humidity 5 to 95%
Storage humidity 5 to 95%
Vibration IEC 68-3-36
Shock IEC 68-2-29
Drop IEC 68-2-32
Power
Input 100V ~ 240V AC/50-60Hz
Power Consumption 10 Watts Max.
Safety
UL1950, TUV
EMC
FCC Part 15, Class B, CE Mark, VCCI, MIC, C-tick
Quick Start Guide 3
Hardware
Front panel
English
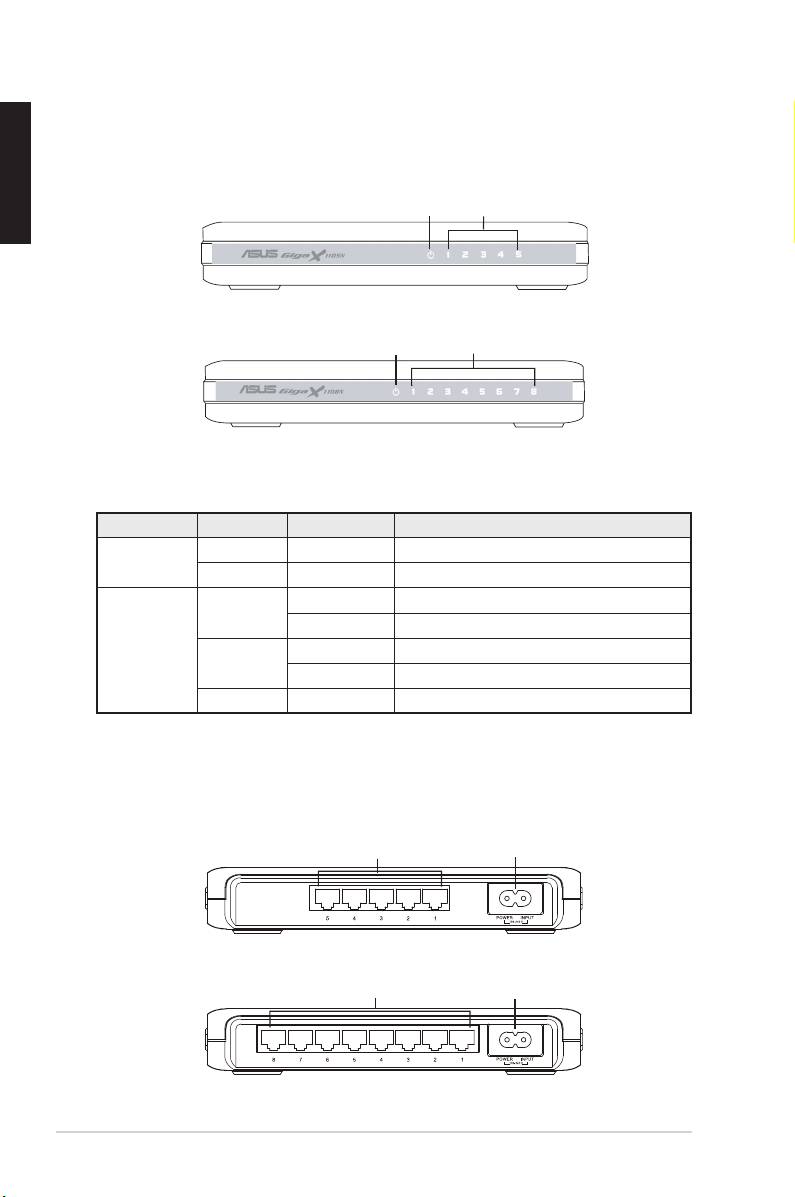
The front panels of GigaX1105N and GigaX1108N include LED indicators that
shows the working condition of the switch.
Power LAN
Figure 1. GigaX1105N front panel
Power LAN
Figure 2. GigaX1108N front panel
Table 1 LED indicators
LED Color Status Description
Power Green ON The switch is powered ON
OFF The switch is powered OFF
LAN Green ON Link established at 1000Mbps
Flashing Transmitting data at 1000Mbps
Amber ON Link established at 100Mbps
Flashing Transmitting data at 100Mbps
OFF No device connected
Rear panel
The rear panel of GigaX1105N and GigaX1108N contains five or eight RJ-45
Ethernet ports and a power connector.
Ethernet ports
Power connector
Figure 3. GigaX1105N rear panel
Ethernet ports
Power connector
Figure 4. GigaX1108N rear panel
4 Quick Start Guide
Placement options
Desktop placement
Place the GigaX1105N/ GigaX1108N switch on a flat and stable surface. Make
sure that the location meets the operating environment specification. See page
English
3 for details.
NOTE:
The length of the UTP Category 5 cable length cannot exceed 100
meters (328 feet).
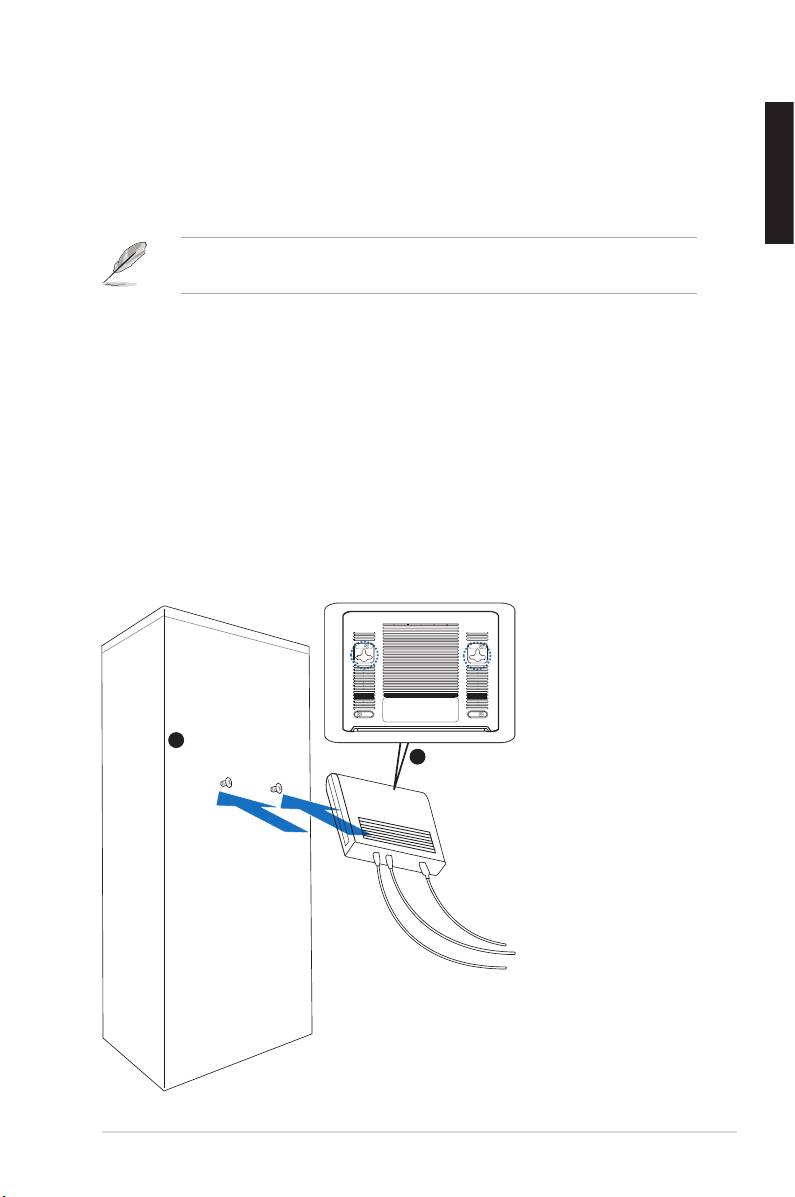
Wall mounting
You can mount the GigaX1105N/ GigaX1108N switch on a wall with the
supplied mounting screws.
To mount the switch on a wall:
1. Measure the distance between the two hooks on the bottom of the switch.
2. Mark the screw position on the wall with the same distance in between.
3. Secure the supplied screws on the wall until only 1/4 is showing.
4. Latch the hooks of the GigaX1105N/ GigaX1108N onto the screws.
Quick Start Guide 5
Bottom Side
1
Secure two screws on the wall
Latch the switch
2
onto the screws.
Figure 5. Wall-mount installation
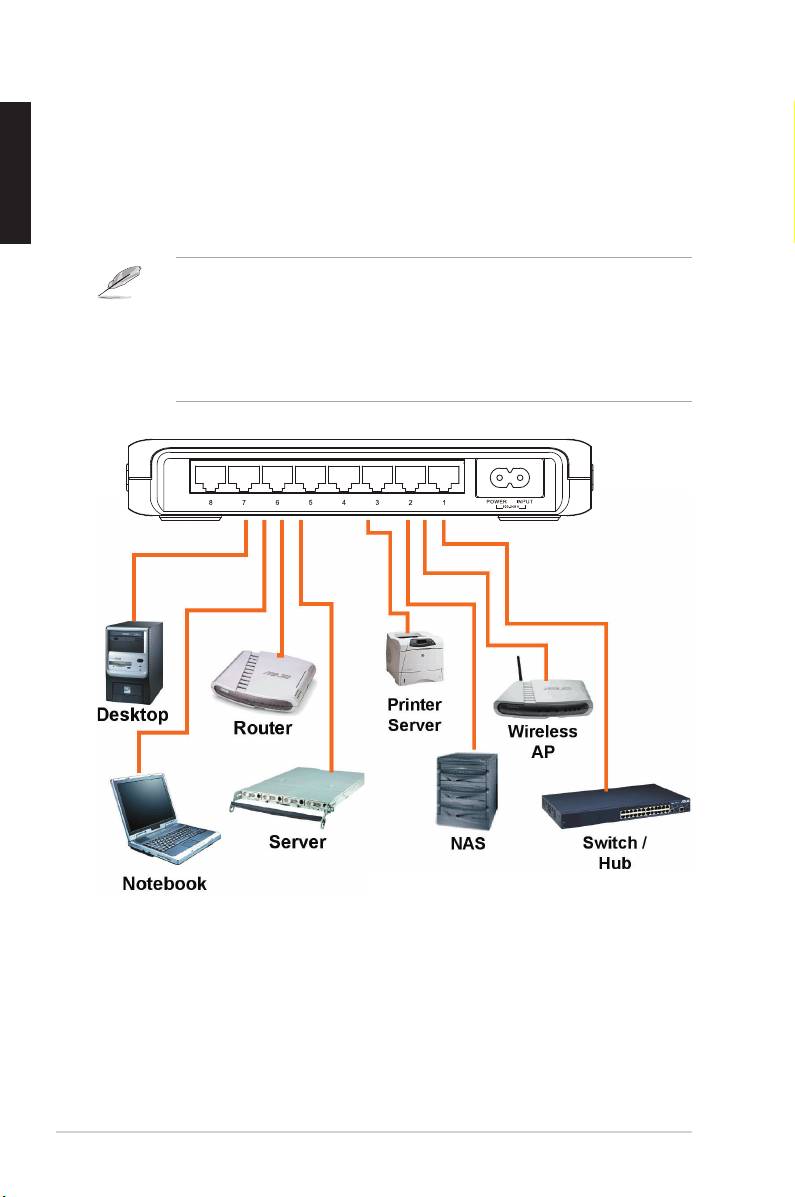
Connecting network devices
English
To connect network devices to the GigaX1105N or GigaX1108N switch:
1. Connect one end of the Ethernet cable to an Ethernet port on the switch
rear panel. Connect the other end to the Ethernet port of the network
device. Repeat this step to connect additional network devices.
NOTES
• Use Category 5 straight-through Ethernet cables for wiring so as to
ensure connection speed between the switch and the network devices.
• You can use either corssover or straight-through cable to connect other
network devices such as bridges, switches, hubs and PCs.
2. Plug one end of the power cable to the power connector on the switch rear
panel, then plug the other end to a power outlet.
3. The Power LED indicator and the LAN LED indicators of active Ethernet
ports light up when the switch is powered on and active nodes are
connected to the LAN ports. Refer to the front panel illustrations and LED
table in page 4 for the meaning of LED indicators.
6 Quick Start Guide

Troubleshooting
This section provides solutions to some common problems which you may
encounter when installing or using the ASUS GigaX1105N or GigaX1108N
switch. Contact the ASUS technical support if problem still exists after you have
English
performed the troubleshooting solutions.
Problem Solution
The POWER LED does not light
Check if the power cable is properly
up.
connected to the switch and to an
power outlet.
The LAN LED does not light up
• Check if the Ethernet cable is
even after a network device is
properly connected to the switch
connected to the port
and to the network device.
• Make sure the switch and your
network device are powered ON.
• Check if the Ethernet cable meet
your network requirements. To
connect gigabit switch port, you
need Category 5 cable to get
gigabit transfer speed.
Quick Start Guide 7

Glossary
English
10BASE-T
10 Mbps Ethernet over twisted pair cable (Category 3).
100BASE-T
100 Mbps Ethernet over twisted pair cable (Category 5)
1000BASE-T
1000 Mbps Ethernet over twisted pair cable (Category 5)
Ethernet
The most commonly installed computer network technology,
usually using twisted pair wiring. Ethernet data rates are 10
Mbps, 100 Mbps, and 1000 Mbps.
Mbps
Abbreviation for Megabits per second, or one million bits per
second. Network data rates are often expressed in Mbps.
network
A group of computers that are connected together to
communicate with each other and share resources, such as
software, files, etc. A network can be small, such as a LAN,
or very large, such as the Internet.
8 Quick Start Guide

QF2402
Français
GigaX1105N
GigaX1108N
Guide de démarrage rapide
Copyright © 2005 ASUSTeK COMPUTER INC. Tous droits réservés.
9

Introduction
Merci pour votre achat d'un switch GigaX1105N/GigaX1108N ASUS !
Le GigaX1105N et le GigaX1108N sont des solutions gigabit de bureau
permettant une intégration facile à vos périphériques gigabit et Fast
Ethernet. Le GigaX1105N et le GigaX1108N intègrent aussi un adaptateur
secteur universel interne pour une connexion électrique simplifiée.
Français
Fonctions
• 5 x ports 10/100/1000 Mbps RJ-45 (GigaX1105N)
• 8 x ports 10/100/1000 Mbps RJ-45 (GigaX1108N)
• Auto-négociation de vitesse et duplex sur tous les ports afin de supporter
les périphériques gigabit ainsi que les périphériques Fast Ethernet dans le
même réseau; sous une connexion 1000Mbps, seul le contrôle de flux full
duplex est supporté
• Auto MDI/MDIX sur tous les ports: un câble croisé ou droit peut être utilisé
pour connecter vos périphériques au switch GigaX1105N/GigaX1108N
• Contrôle de flux en mode full duplex
• Infrastructure Jumbo Frame jusqu’à 9.6K
• Tableau d'adressage MAC 8K avec fonctions auto-learning et aging
• Conception sans ventilateur pour un fonctionnement silencieux
• Option de placement sur bureau ou fixation murale
Contenu de la boîte
Avant d’installer le switch GigaX1105N/ GigaX1108N, vérifiez que la boîte
contient bien les éléments suivants:
• 1 x Switch ASUS GigaX1105N ou GigaX1108N
• 1 x Cordon d’alimentation
• 1 x Guide de démarrage rapide
• 2 x vis de montage
Note: Si l’un des éléments ci-dessus était manquant ou endommagé,
contactez votre revendeur.
10 Guide de démarrage rapide

Spécifications techniques
Dimensions physiques
195.6 mm (Pr) x 150.8mm (L) x 32mm (H)
Plages environmentales
Température de fonctionnement 0ºC ~ 40ºC (32ºF à 104ºF)
Température de stockage -25ºC ~ 70ºC (-13ºF à 158ºF)
Humidité de fonctionnement 5 à 95%
Humidité de stockage 5 à 95%
Français
Vibration IEC 68-3-36
Choc IEC 68-2-29
Chute IEC 68-2-32
Alimentation
Entrée 100V ~ 240V AC/50-60Hz
Consommation 10 Watts Max.
Sécurité
UL1950, TUV
EMC
FCC Partie 15, Classe B, CE Mark, VCCI, MIC, C-tick
Guide de démarrage rapide 11

Matériel
Panneau avant
Le panneau avant du GigaX1105N et du GigaX1108N intègre des indicateurs
LED affichant le statut de fonctionnement du switch.
Alimentation LAN
Français
Figure 1. Panneau avant du GigaX1105N
Alimentation
LAN
Figure 2. Panneau avant du GigaX1108N
Tableau 1 Indicateurs LED
LED Couleur Statut Description
Power Vert Allumé L'unité est alimentée
Eteint L'unité est éteinte
LAN Vert Allumé Lien à 1000Mbps
Clignotant Transmission de données à 1000Mbps
Ambré Allumé Lien à 100Mbps
Clignotant Transmission de données à 100Mbps
Eteint Pas de périphérique connecté
Panneau arrière
Le panneau arrière du GigaX1105N et du GigaX1108N intègre cinq à huit
(selon le modèle) ports Ethernet RJ-45 et un connecteur d'alimentation.
Ports Ethernet
Connecteur d'alimentation
Figure 3. Panneau arrière du GigaX1105N
Ports Ethernet
Connecteur d'alimentation
Figure 4. Panneau arrière du GigaX1108N
12 Guide de démarrage rapide
Options de placement
Sur bureau
Placez le GigaX1105N/ GigaX1108N sur une surface plane et stable.
Assurez-vous que l’emplacement correspond aux spécifications relatives à
l’environnement d’opération. Voir page 3 pour plus de détails.
NOTE.
La longueur maximum d’un câble UTP de catégorie 5 est de
100 mètres (328 pieds).
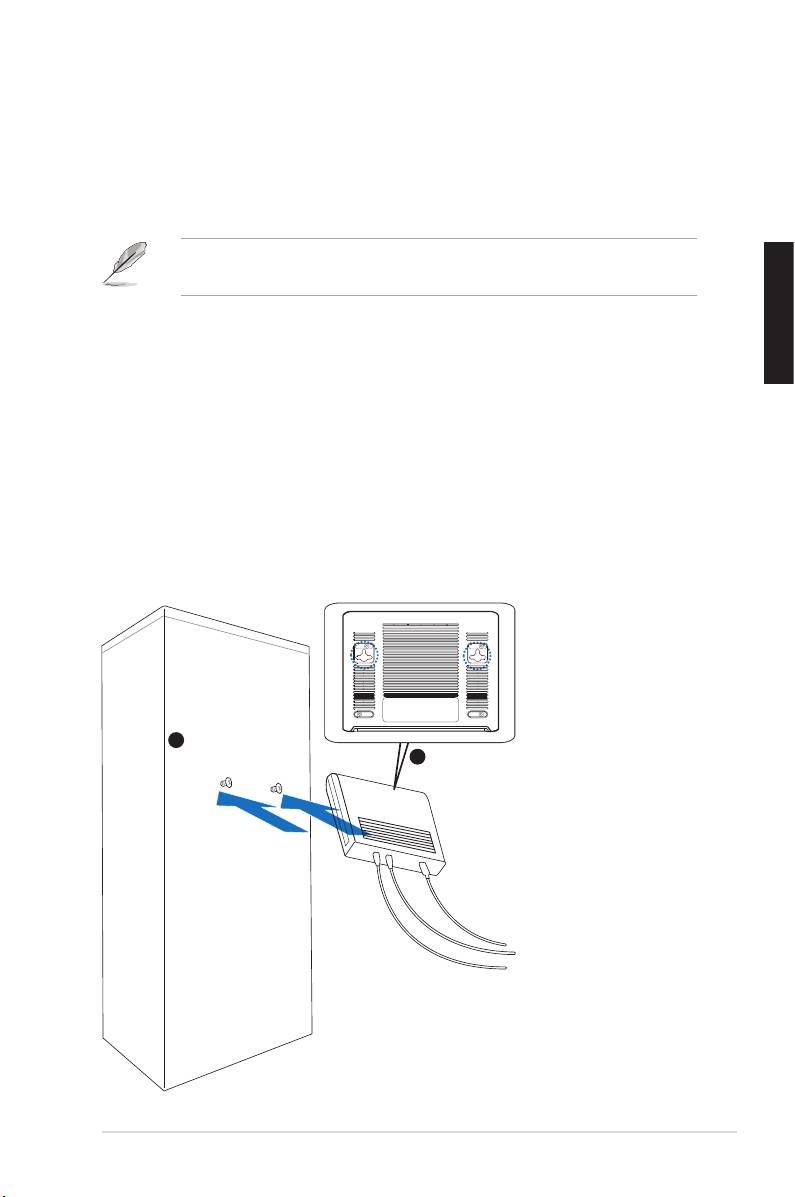
Fixation murale
Français
Vous pouvez aussi placer le GigaX1105N/ GigaX1108N sur un mur à l’aide des
vis fournies.
Pour fixer le switch sur un mur:
1. Mesurez la distance entre les deux ouvertures situées sous le switch.
2. Marquez la position des vis sur le mur avec la même distance.
3. Fixez les vis fournies sur le mur.
4. Positionnez les ouvertures du GigaX1105N/ GigaX1108N sur les vis.
Guide de démarrage rapide 13
Bottom Side
1
Secure two screws on the wall
Latch the switch
2
onto the screws.
Ouvertures du switch
Fixez les deux vis sur le mur
Positionnez les
ouvertures sur les vis
Figure 5. Fixation murale

Connecter des périphériques réseau
Pour connecter des périphériques réseau au switch GigaX1105N/GigaX1108N:
1. Connectez une extrémité du câble Ethernet à un port Ethernet du
panneau avant du switch. Connectez l’autre extrémité au port Ethernet
du périphérique réseau. Répetez cette étape pour connecter des
périphériques réseau additionnels..
NOTES
Français
• Il est recommandé d’utiliser des câbles Ethernet droits de catégorie
5 pour une meilleure qualité de connexion entre le switch et les
périphériques réseau.
• Vous pouvez utiliser les ports Ethernet du switch comme liaison
montante vers un autre switch, hub, bridge ou répetiteur. Le switch est
capable de détecter des câbles droits ou croisés.
Imprimante
PC
serveur
Routeur
Point d’accès
sans fil
Serveur
NAS Hub/switch
PC portable
2. Connectez une extrémité du cordon d’alimentation au jack d’alimentation
du switch, puis branchez l’autre extrémité à une prise électrique murale.
3. La LED d’alimentation et les LED pour les ports Ethernet actifs s’
allument pour indiquer que l’appareil est en état de fonctionnement et
que les noeuds actifs sont connectés aux ports LAN. Voir le tableau
des indicateurs LED page 4 pour plus d’informations.
14 Guide de démarrage rapide

Dépannage
Cette section fournit des réponses pour certains problèmes que vous pouvez
rencontrer lors de l’installation ou de l’utilisation du switch GigaX1105N/
GigaX1108N. Contactez le service de support technique ASUS si vous
rencontrez des problèmes non mentionnés dans cette section.
Problème Solution
La LED POWER ne s’allume
Vérifiez que le câble d’alimentation
pas.
est correctement connecté au switch
Français
et à une source d’alimentation avec
le voltage approprié.
La LED STATUS/SPEED ne
• Vérifiez si le câble Ethernet est
s’allume pas même lorsqu’
correctement connecté au switch
un périphérique réseau a été
et au périphérique réseau.
connecté.
• Assurez-vous que le switch et
votre périphérique réseau soient
bien alimentés.
• Vérifiez si le câble Ethernet
correspond à vos besoins réseau.
Assurez-vous que vous utilisez
bien des câbles de catégorie 5.
Guide de démarrage rapide 15

Glossaire
10BASE-T
Ethernet 10 Mbps via un câble à paires torsadées (Cat. 3).
100BASE-T
Ethernet 100 Mbps via un câble à paires torsadées (Cat. 5)
1000BASE-T
Ethernet 1000 Mbps via un câble à paires torsadées (Cat. 3)
Ethernet
Technologie réseau la plus répandue, utilisant généralement
des câbles à paires torsadées. Les taux de débit de
Français
données Ethernet sont 10 Mbps, 100 Mbps, et 1000 Mbps.
Mbps
Abréviation de Megabits per second, ou un million de bits
par secondes. Le taux de débit des données réseau est
souvent exprimé en Mbps.
Réseau
Groupe d’ordinateurs connectés ensemble, permettant de
communiquer entre eux et partager des ressources, comme
des logiciels, fichiers, etc. Un réseau peut être réduit,
comme un réseau local (LAN), ou très étendu, comme
Internet.
16 Guide de démarrage rapide

QG2402
GigaX1105N
GigaX1108N
Deutsch
Schnellstarthilfe
Copyright © 2005 ASUSTeK COMPUTER INC. Alle Rechte vorbehalten.
17

Einführung
Danke, dass Sie sich für den Kauf eines ASUS GigaX1105N oder GigaX1108N
Gigabit Switch entschieden haben! Der GigaX1105N und GigaX1108N sind
Desktop-Gigabit-Lösungen, die Ihnen nahtlose Integration Ihrer Gigabit- und
Fast Ethernet-Geräte bieten. Der GigaX1105N und GigaX1108N beinhalten
außerdem ein Universalnetzteil für einfache Kabelverbindung.
Funktionen
• 5 x 10/100/1000 Mbps RJ-45-Ports (GigaX1105N)
• 8 x 10/100/1000 Mbps RJ-45-Ports (GigaX1108N)
• Automatische Verhandlung für Geschwindigkeit und Duplex auf allen
Ports, um Gigabit- und Fast Ethernet-Geräte im gleichen Netzwerk zu
Deutsch
unterstützen. Unter einer 1000Mbps-Verbindung wird nur volle Duplex-
Flusskontrolle unterstützt.
• Automatische MDI/MDIX-Unterstützung für alle Ports: um Ihre
Netzwerkgeräte mit dem GigaX1105N/GigaX1108N Switch zu verbinden,
können sowohl Ethernetkabel als auch Crossoverkabel verwendet werden.
• Datenflusskontrolle im Vollduplexmodus
• Unterstützt Jumboframes von bis zu 9.6K
• 8KB-MAC-Adressentabelle mit automatischer Lese- und Alterungsfunktion
• Lüfterloses Design für einen geräuscharmen Betrieb
• Option zur Desktop- oder Wandmontage
Paketinhalt
Bevor Sie den GigaX1105N/ GigaX1108N Switch installieren, vergewissern Sie
sich, dass die folgenden Tile im Paket enthalten sind:
• ASUS GigaX1105N oder GigaX1108N Switch x 1
• Stromkabel x 1
• Schnellstarthilfe x 1
• Montageschrauben x 2
HINWEIS
. Falls einer dieser Gegenstände beschädigt oder nicht
vorhanden sein sollte, wenden Sie sich an Ihren Händler.
18 Schnellstarthilfe

Technische Spezifikationen
Abmessungen
195.6 mm (B) x 150.8mm (T) x 32mm (H)
Umgebungsbedingungen
Betriebstemperatur 0ºC ~ 40ºC (32ºF to 104ºF)
Lagerungstemperatur -25ºC ~ 70ºC (-13ºF to 158ºF)
Betriebsluftfeuchtigkeit 5 to 95%
Lagerungsluftfeuchtigkeit 5 to 95%
Vibration IEC 68-3-36
Schock IEC 68-2-29
Fall IEC 68-2-32
Stromversorgung
Eingang 100V ~ 240V~ /50-60Hz
Deutsch
Stromverbrauch max.10 Watt
Sicherheit
UL1950, TUV
EMC
FCC Teil 15, Klasse B, CE Markierung, VCCI, MIC, C-tick
Schnellstarthilfe 19
